Chapter 29. Application Development with SharePoint Designer 2013 and Visual Studio 2012
In This Chapter
![]() Deciding If Development Is Required to Meet Business Needs
Deciding If Development Is Required to Meet Business Needs
![]() Planning the Development Project
Planning the Development Project
![]() Evolution in the SharePoint Platform for Developers
Evolution in the SharePoint Platform for Developers
![]() Visual Studio 2012 Enhancements
Visual Studio 2012 Enhancements
![]() Considering SharePoint Designer 2013 for Development
Considering SharePoint Designer 2013 for Development
![]() Creating a Workflow-Based Application in SharePoint Designer 2013
Creating a Workflow-Based Application in SharePoint Designer 2013
![]() Using Visual Studio 2012 with SharePoint 2013
Using Visual Studio 2012 with SharePoint 2013
![]() Developing a SharePoint 2013 App
Developing a SharePoint 2013 App
![]() Packaging a SharePoint 2013 App
Packaging a SharePoint 2013 App
Application development is a weighty topic, and this chapter seeks to communicate to architects, administrators, and developers some of the new and exciting features in terms of developing for SharePoint 2013 using Designer 2013 or Visual Studio 2012. This chapter also includes exercises that provide users of varying levels of expertise experience with Designer 2013 application design and that create a Visual Studio 2012 Visual web part.
SharePoint Designer 2013 will be used to create a workflow that interacts with several SharePoint lists and is meant to serve as the foundation for an “application” that could be created by a power user within the organization. This workflow allows a user to convert a sales lead into a customer by executing a workflow that creates a new item in a different list, and leverages lookup columns to populate the new list.
The example using Visual Studio 2012 demonstrates the development of a Visual web part that utilizes many new development features that SharePoint 2013 supports, including the JavaScript Object Model (JSOM).
Deciding If Development Is Required to Meet Business Needs
When embarking on a development project in Microsoft SharePoint 2013, you want to consider several important criteria so that you have the proper tools to complete the task at hand. An initial question to ask is whether SharePoint 2013 offers tools out-of-the-box that might provide the functionality required. Some investigation in this area might save the developer many hours of needless labor.
For example, some of the lesser-known web parts (such as the Content Query web part, Content Editor web part, or Page Viewer web part) provide functionality that can be leveraged and extended to meet more-complex business needs. Many tips exist for pasting JavaScript into the Content Editor web part to perform a wide variety of tasks.
SharePoint web parts can be connected to each other, allowing one list to filter the contents of another list. Connected web parts allow a selection in one list to filter the contents of another list. Although the functionality is limited to single column joins, the relative ease of connecting web parts should not be overlooked as a possible solution and is leveraged in many “dashboard” configurations to allow a user to interact with the data displayed.
In SharePoint 2013, to support the connected web part features, the underlying lists and libraries continue to maintain enforced relationships between each other using the lookup column, as covered in Chapter 22, “Managing Metadata and Content Types in SharePoint 2013.” Lookup columns can spawn additional columns from the source list into the host list that contains the lookup column. Calculated columns allow SharePoint administrators and developers alike to complete many of the same calculations that Excel supports, including advanced string, date, and number operations. The functionality is fairly limited, but this just might satisfy the business owner’s requirements.
Content types are another overlooked and often misunderstood feature in SharePoint that, when used properly, can reduce the need for custom programming. Content types are in use throughout SharePoint from lists and libraries to article pages and are heavily used “under the hood” by InfoPath Forms Services. Creative use of content types is a very powerful way of providing enhanced behavior through the use of metadata and workflows, ultimately providing the user with a rich and intuitive experience.
There are also many development possibilities provided by features such as alerts, tasks, project tasks, or out-of-the-box workflows that push information to users of the SharePoint environment. SharePoint administrators can also solve business process needs by employing SharePoint 2013 alerts as simple workflows, because they push a limited amount of information to end users based on changes that take place in lists and libraries.
Tip
As well as out-of-the-box SharePoint tools, features, and capabilities, make sure to research whether third-party retail products might provide the required functionality. No developer wants to explain why they have spent weeks developing a web part that could be purchased for $500 from a reputable vendor and comes with updates, technical support, and other benefits.
Assuming this due diligence has been performed, and the desired functionality was not readily attainable, it is time to look into SharePoint Designer 2013 or Visual Studio 2012. This chapter demonstrates several different methods to harness the features provided by the two very different applications.
Planning the Development Project
A recommended best practice is always to document the goals for the application development project to ensure that the scope of work is clearly defined and there are clear milestones for the development process. Simply writing up a list of bullets of the reasons for the project, and the success criteria that will prove that the project has been successfully completed, can prove extremely valuable at a later date.
A simple development project (for example, a workflow for an expense report or the creation of a web part that displays data from a website on the Internet) might only require a few minutes to summarize, but a more complex project (for example, a purchase order application development project) can require several days and numerous meetings to thoroughly define.
SharePoint development projects usually involve out-of-the-box SharePoint components, as well as the creation of workflows in SharePoint Designer 2013, forms in InfoPath 2013, and solutions in Visual Studio 2012. Putting together a list of the components that are expected from the final project can help guide the development process. The following list provides a number of high-level tasks that should not be overlooked when planning a more complex development project:
![]() Define the statement of work (SOW).
Define the statement of work (SOW).
![]() Configure/update the development environment.
Configure/update the development environment.
![]() Configure the base SharePoint 2013 site/sites/site collection.
Configure the base SharePoint 2013 site/sites/site collection.
![]() Configure required lists and libraries to support the application.
Configure required lists and libraries to support the application.
![]() Create mock-ups of forms and visual components.
Create mock-ups of forms and visual components.
![]() Develop the required components and functionality in Designer 2013 / Visual Studio 2012.
Develop the required components and functionality in Designer 2013 / Visual Studio 2012.
![]() Ensure that auditing functionality is in place as needed.
Ensure that auditing functionality is in place as needed.
![]() Ensure that security for the objects involved in the application (lists, libraries, forms, and so on) is in place.
Ensure that security for the objects involved in the application (lists, libraries, forms, and so on) is in place.
![]() Ensure that the application is fault tolerant and scalable enough to meet the needs of the organization.
Ensure that the application is fault tolerant and scalable enough to meet the needs of the organization.
![]() Ensure that exception handling and logging is in place.
Ensure that exception handling and logging is in place.
![]() Document key steps in the development process.
Document key steps in the development process.
![]() Test functionality and “prove the concept” of the application.
Test functionality and “prove the concept” of the application.
![]() Make sure that the application is portable and can be moved from the development environment to the staging or production environments.
Make sure that the application is portable and can be moved from the development environment to the staging or production environments.
![]() Allow time for user acceptance testing (UAT) and pilot phases before a full rollout.
Allow time for user acceptance testing (UAT) and pilot phases before a full rollout.
![]() Allow time for end users and administrator training to use and support the application.
Allow time for end users and administrator training to use and support the application.
![]() Include signoffs along the way to ensure management approval of progress.
Include signoffs along the way to ensure management approval of progress.
![]() Establish change control practices for changes after the application is being used in production.
Establish change control practices for changes after the application is being used in production.
Following these steps for even simpler projects will enhance the success, and sometimes even more importantly, the perception of success, by managers and stakeholders who may not be technically savvy enough to appreciate the elegance of stable code.
Evolution in the SharePoint Platform for Developers
SharePoint 2010 grew in leaps and bounds over SharePoint 2003 and SharePoint 2007 and became recognized as a versatile and powerful development platform, but there were still limitations in the areas of security, portability, performance, reliability, and features. With SharePoint 2013, the bar has been raised yet again. The latest iteration of the SharePoint platform has too many enhancements to cover in a single chapter, but some of the highlights are covered in this section, as well as a summary of enhancements in Designer 2013 and Visual Studio 2012.
New in SharePoint 2013 are several client object models allowing interaction with SharePoint objects, methods, lists, libraries, and even service applications. The client object models come in two flavors, the first is the Client-Side Object Model (CSOM) dynamic link library (DLL)-based client library, which allows for the development of rich client applications using the familiar IntelliSense that developers have grown used to and the immediacy of synchronous calls. The second object model is the JSOM, which allows for browser-hosted, AJAX rich application development without the overhead of .NET.
From a list, library, and service application perspective, under the hood, SharePoint 2013 is very similar to SharePoint 2010. In fact, most solutions developed for SharePoint 2010 will continue to function, and upgraded code often only needs minor updates before successfully compiling for SharePoint 2013.
The largest change in SharePoint 2013 from a programmatic perspective other than the addition of the new object models is the addition of the SharePoint 2013 Workflow Manager. The Azure-based Workflow Manager is a cloud-enabled workflow engine that works side by side with the SharePoint 2010 Windows Workflow Foundation engine, which is still delivered with SharePoint 2013. Developers now have the choice to develop against the SharePoint 2010 Workflow Engine or SharePoint 2013 Workflow Manager.
In addition to the base features of the .NET Framework, SharePoint 2013 also leverages Windows Workflow Foundation, a powerful business process management engine that is seamlessly integrated into SharePoint for the development of advanced state applications. Visual Studio 2012 provides the project templates necessary to create sequential and state machine workflows and now supports their full development lifecycle from development, to testing, deployment, and packaging.
Note
A state machine workflow is a workflow associated with a SharePoint list item or document that can enter different states in any order. For example, a purchase order may have five states (such as Not Submitted, Submitted, Pending, Approved, and Completed). A state machine workflow, unlike a sequential workflow, allows the item to be routed and rerouted to each state as needed.
To make the development process more seamless and intuitive, Visual Studio 2012 contains a variety of templates available for SharePoint 2013. These templates are available after installing Microsoft Office Developer Tools for Visual Studio 2012 from http://msdn.microsoft.com/en-US/office/apps/fp123627. Some of the templates include site definitions, business data connectivity model, event receivers, and modules. Coupled with the new deployment features, developers are provided with the entire framework and are simply required to produce the code for the desired solution.
SharePoint 2013 continues to support a variety of deployment and debugging scenarios. Developers can develop sandboxed solutions, GAC-deployed assemblies that support fully integrated applications, and, now, a variety of application (app) programs. Unlike SharePoint 2007 and SharePoint 2013, these apps can be deployed and debugged directly from Visual Studio 2012 and even support deployment and debugging on Office 365.
Designer 2013 Enhancements
Designer 2013 has gone somewhat unchanged from Designer 2010. The notable enhancements include the Office 2013 look and feel, enhanced Visio 2013 integration, and better support for external content types. However, power users and nondevelopers will be surprised to find that the visual editor that they heavily relied on for visual layouts is no longer available. Some of the highlights of SharePoint Designer 2013 include the following:
![]() Support for SharePoint 2013 platform workflows: The 2013 workflows use the new Workflow Manager Azure-based workflow engine and come with a completely new set of actions.
Support for SharePoint 2013 platform workflows: The 2013 workflows use the new Workflow Manager Azure-based workflow engine and come with a completely new set of actions.
![]() Impersonation steps: These allow workflows to run under the context of another user other than that of the executing user. This allows a user with lesser privileges to start a workflow that can then perform actions that the author of the workflow has permissions to perform. This eliminates a major challenge in workflow design where the initiator’s privileges often limit the tasks that can be performed.
Impersonation steps: These allow workflows to run under the context of another user other than that of the executing user. This allows a user with lesser privileges to start a workflow that can then perform actions that the author of the workflow has permissions to perform. This eliminates a major challenge in workflow design where the initiator’s privileges often limit the tasks that can be performed.
![]() Reusable and exportable workflows: A workflow created at the top level of a site collection can be used by any subsite, and a workflow created in a specific subsite can be reused within that subsite. Workflows can also be exported from one site collection and then uploaded to and activated in another site collection.
Reusable and exportable workflows: A workflow created at the top level of a site collection can be used by any subsite, and a workflow created in a specific subsite can be reused within that subsite. Workflows can also be exported from one site collection and then uploaded to and activated in another site collection.
![]() Association columns: If the reusable workflow requires certain columns to exist in the list or library that it is associated with, those columns can be added as association columns and they will get added automatically to a list or library when a reusable workflow is associated with that list or library.
Association columns: If the reusable workflow requires certain columns to exist in the list or library that it is associated with, those columns can be added as association columns and they will get added automatically to a list or library when a reusable workflow is associated with that list or library.
![]() Associate workflows with content types: Reusable workflows can be filtered to a specific content type and be associated either with that specific content type or with any content type that inherits from that content type. If a workflow is associated with a site content type, that workflow becomes available for all items of that content type in every list and library to which that site content type has been added.
Associate workflows with content types: Reusable workflows can be filtered to a specific content type and be associated either with that specific content type or with any content type that inherits from that content type. If a workflow is associated with a site content type, that workflow becomes available for all items of that content type in every list and library to which that site content type has been added.
![]() Site workflows are associated to a site, rather than to a list, library, or content type: Clicking Site Workflows on the Site Actions menu will show the status of these types of workflows.
Site workflows are associated to a site, rather than to a list, library, or content type: Clicking Site Workflows on the Site Actions menu will show the status of these types of workflows.
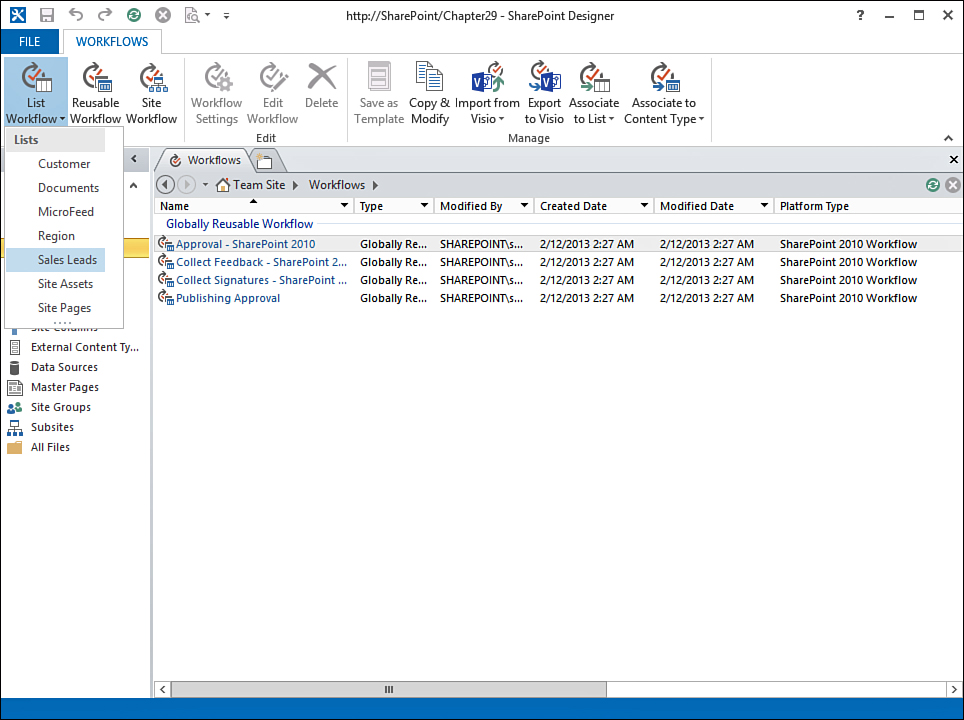
![]() Edit the workflows included with SharePoint Server: Approval, Collect Feedback, and Collect Signatures workflows are now “declarative workflows,” which means they are customizable in SharePoint Designer 2013.
Edit the workflows included with SharePoint Server: Approval, Collect Feedback, and Collect Signatures workflows are now “declarative workflows,” which means they are customizable in SharePoint Designer 2013.
Visual Studio 2012 Enhancements
Visual Studio offers many enhancements in Visual Basic, Visual C#, Visual C++ and Visual F#, Office system development, and it leverages improvements in .NET Framework 4.5 that are beyond the scope of this chapter. For developers familiar with Visual Studio 2012 or other integrated development environments that might access SharePoint, some highlights are as follows:
![]() A new app catalog allowing for developers to develop, package, and deploy apps that integrate with SharePoint, both directly and remotely. Apps can also directly access SharePoint hosted content through permission manifests that allow SharePoint administrators to enable communication between the app catalog’s domain and that of SharePoint 2013 itself.
A new app catalog allowing for developers to develop, package, and deploy apps that integrate with SharePoint, both directly and remotely. Apps can also directly access SharePoint hosted content through permission manifests that allow SharePoint administrators to enable communication between the app catalog’s domain and that of SharePoint 2013 itself.
![]() A new C# and JavaScript client object model allowing for code to be run on a client that was once relegated to only running on the SharePoint server itself.
A new C# and JavaScript client object model allowing for code to be run on a client that was once relegated to only running on the SharePoint server itself.
![]() REST application programming interfaces (APIs) allowing for standards-based Extensible Markup Language (XML) over HTTP communication with SharePoint.
REST application programming interfaces (APIs) allowing for standards-based Extensible Markup Language (XML) over HTTP communication with SharePoint.
![]() Enhanced client object models that allow for both C#-based and JavaScript-based applications and solutions.
Enhanced client object models that allow for both C#-based and JavaScript-based applications and solutions.
![]() LINQ support allowing for integrated, object-like access to SharePoint data from familiar .NET languages such as C# and VB.NET.
LINQ support allowing for integrated, object-like access to SharePoint data from familiar .NET languages such as C# and VB.NET.
![]() Sandboxed solutions are solutions that are safely deployed to a SharePoint site and are limited from doing harm to the farm through code access security (CAS).
Sandboxed solutions are solutions that are safely deployed to a SharePoint site and are limited from doing harm to the farm through code access security (CAS).
![]() Improved monitoring through timer jobs, which can be scheduled to run as often as every minute for a specified time span.
Improved monitoring through timer jobs, which can be scheduled to run as often as every minute for a specified time span.
![]() New service application framework designed to support applications that were once reserved only for the components of the shared service provider (SSP).
New service application framework designed to support applications that were once reserved only for the components of the shared service provider (SSP).
![]() Import, modify, and extend solution packages (.wsp).
Import, modify, and extend solution packages (.wsp).
![]() Develop SharePoint solutions with SharePoint project type templates and SharePoint project item templates.
Develop SharePoint solutions with SharePoint project type templates and SharePoint project item templates.
![]() Design association and initiation forms for sequential and state workflows.
Design association and initiation forms for sequential and state workflows.
![]() Aggregate and integrate back-end data by using Business Data Connectivity (BDC) models.
Aggregate and integrate back-end data by using Business Data Connectivity (BDC) models.
![]() Create web parts and application pages for a SharePoint site.
Create web parts and application pages for a SharePoint site.
Considering SharePoint Designer 2013 for Development
SharePoint Designer has evolved from SharePoint FrontPage 2003 to its latest manifestation as SharePoint Designer 2013, and Microsoft has continued to make it available free of charge to encourage its use by SharePoint power users and developers.
SharePoint Designer 2013 provides a wide range of tools for power users, site administrators, farm administrators, and developers, which become immediately obvious when opening a website, as shown in Figure 29.1. Similar to SharePoint Designer 2010, SharePoint Designer 2013 has a streamlined look and feel, a customizable ribbon, and broad access to functionality that was reserved to the browser in SharePoint 2007. The most notable change in functionality includes a larger repertoire of workflow actions and conditions, looping actions, and reduced page design capabilities.

Common Development Tasks
SharePoint Designer 2013 supports a variety of development tasks, including the following items:
![]() Extending upon the basic workflows provided out-of-the-box with SharePoint 2013. These were covered in more detail in Chapter 28, “Out-of-the-Box Workflows and Designer 2013 Workflows.”
Extending upon the basic workflows provided out-of-the-box with SharePoint 2013. These were covered in more detail in Chapter 28, “Out-of-the-Box Workflows and Designer 2013 Workflows.”
![]() While basic branding can be done with the standard browser interface in SharePoint 2013, more extensive branding in SharePoint 2013 requires SharePoint Designer 2013. In SharePoint 2013, the WYSIWYG editor is no longer available, and administrators are now limited to CSS- and HTML-based branding efforts.
While basic branding can be done with the standard browser interface in SharePoint 2013, more extensive branding in SharePoint 2013 requires SharePoint Designer 2013. In SharePoint 2013, the WYSIWYG editor is no longer available, and administrators are now limited to CSS- and HTML-based branding efforts.
![]() Custom ASPX and .NET pages extend the functionality of SharePoint and allow the development of custom .NET web pages within SharePoint that take advantage of powerful components such as the DataView.
Custom ASPX and .NET pages extend the functionality of SharePoint and allow the development of custom .NET web pages within SharePoint that take advantage of powerful components such as the DataView.
![]() Custom forms to extend the functionality of the built-in SharePoint 2013 forms.
Custom forms to extend the functionality of the built-in SharePoint 2013 forms.
![]() Basic web parts can be developed using SharePoint Designer 2013, but not all the features supported by Visual Studio 2012 are available.
Basic web parts can be developed using SharePoint Designer 2013, but not all the features supported by Visual Studio 2012 are available.
Creating a Workflow-Based Application in SharePoint Designer 2013
Chapter 28 provides an introduction to the basic types of workflows available in SharePoint 2013 and covers some of the capabilities of SharePoint Designer 2013 when working with workflows. This section now takes the process further and covers the creation of a basic application that involves multiple lists and a customized workflow that creates a new item in a new list and leverages lookup columns.
The following instructions describe how to create a workflow that interacts with multiple SharePoint lists when items are created and modified. The workflow is based on three lists: a Region list, a Sales Lead list, and a Customer list. When a user marks a Sales Lead as SaleClosed, a manager can trigger the workflow and create a customer based on the data in the Sales Lead list. This workflow also demonstrates how to work with SharePoint lookup columns by copying the Salesperson from the Region list and adding the value to the Customer list.
Although limited, this example demonstrates the steps necessary to develop a relatively simple application using SharePoint Designer. The functionality is limited because the processes are asynchronous, and the lists can be joined by only a single column, but the general concept could be reused for a variety of business purposes. Generally, a quickly developed application built in SharePoint is an easier sell to business owners than a standalone .NET application that requires everything from an Internet Information Services (IIS) site, security, documentation, and even its own database. Furthermore, the following example can be extended with list item security, custom views, custom forms, and email notifications to make the application more fully featured.
Follow these steps to create the application using SharePoint Designer 2013:
1. In a nonproduction site collection, create three SharePoint lists with a standard view (do not use datasheet view) using the Custom List template with the columns and data types as shown in Tables 29.1, 29.2, and 29.3. Unless specified in these tables, leave the other settings for the columns and the list on their defaults. Table 29.1 provides the columns needed for the Region list, Table 29.2 provides the columns needed for the Sales Leads list, and Table 29.3 provides the columns needed for the Customer list. Several of the columns are specified as Required to maintain data integrity within the application. If fields are allowed to be left blank, the application might not function properly.


Note
Leave the lists blank at this point. They will be populated after the workflow is created; full instructions are provided later.
2. Open SharePoint Designer 2013, select Open Site, and enter the URL for the site that houses these lists (such as http://SharePoint/Chapter29/). Provide credentials if asked.
3. Select the Workflows entry from the navigation pane, Site Objects section, on the left side of SharePoint Designer. Then select the drop-down menu under List Workflow in the Workflows tab, which should be active. Click the Sales Leads list, as shown in Figure 29.2.
4. Name the workflow Sales Leads – On Change and specify the platform type as SharePoint 2010 Workflow. Click OK.
Tip
When creating a workflow, it is good practice to provide a name that identifies the underlying list and whether the workflow is triggered on change, manually, or on create.
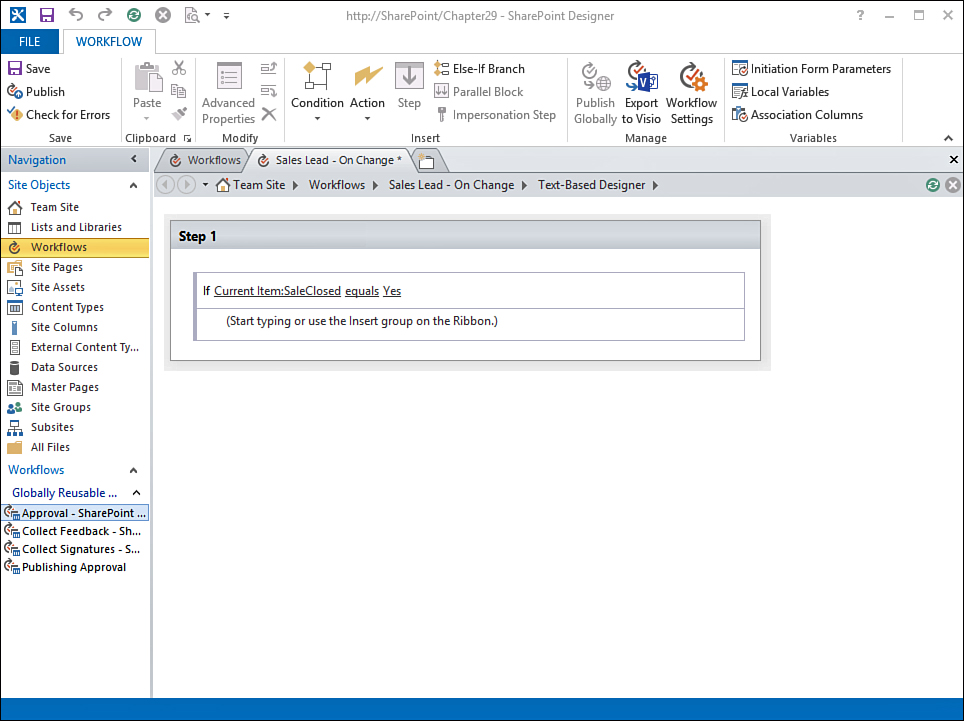
5. Upon creation of a new workflow, the workflow editor screen appears with a blank canvas containing a single step named Step 1. Click within the Step 1 editor box in the section under the title bar to ensure that it is active, and then click the Condition button on the Workflow ribbon and choose the condition If Current Item Field Equals Value. Step 1 will now reflect this change and display If Current Item Field Equals Value.
6. Click the field link that now appears in Step 1 and select SaleClosed from the drop-down list.
7. Then, click the value link and select Yes from the drop-down list. Figure 29.3 shows the contents of the step at this point.
8. Add an action just below the condition created. Click in the Step 1 box below the row where the condition was just defined. Type Create,press Enter, and choose Create List Item from the options.
9. Click the Create List Item link that will now be visible to open the Create New List Item window.
10. Choose Customer from the drop-down menu List field at the top of the window. Figure 29.4 shows the results.

11. In the Create New List Item window, double-click the Title field to open the Value Assignment window.
12. In the Value Assignment window, click the fx button; the Lookup for Single Line of Text window will open.
13. In the Lookup for Single Line of Text window, select Title in the Field from Source field, as shown in Figure 29.5.

14. Click OK to close the Lookup for Single Line of Text window, and click OK to close the Value Assignment window. The Create New List Item window should be active. The Title (*) entry in the Field column will now have a Value entry of Current Item:Title.
15. In the Create New List Item window, double-click the Region field to open the Value Assignment window.
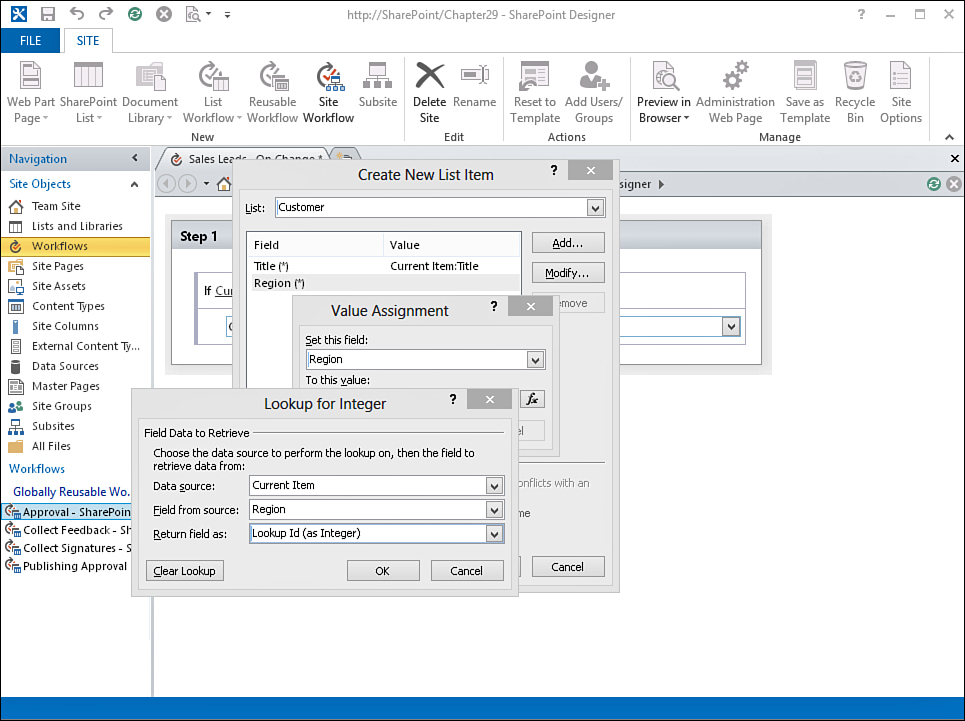
16. In the Value Assignment window, click the fx button to open the Lookup for Integer window. Verify that the Data Source field has Current Item in it.
17. Change the value for the field from Source to Region.
18. Choose Lookup Id (as Integer) for the Return Field As field. The completed Lookup for Integer window will look like Figure 29.6.
19. Click OK in the Lookup for Integer window and again in the Value Assignment window to return to the Create New List Item window. Now the Create New List Item window will have a value assigned to the Region (*) field of Current Item:Region.
20. In the Create New List Item window, click the Add button to open the Value Assignment window.
21. In the Value Assignment window, specify Salesperson for the Set This Field drop-down list.
22. Click the fx button to open the Lookup for Person or Group window.
23. Change the value in the Data Source field to Region, and additional fields will appear.
24. In the Field from Source field, select Salesperson from the drop-down menu.
25. In the Return Field As drop-down menu, verify that User ID Number String is selected.
26. In the Find the List Item section of the Lookup for Person or Group window, select Title in the Field drop-down list, as shown in Figure 29.7.
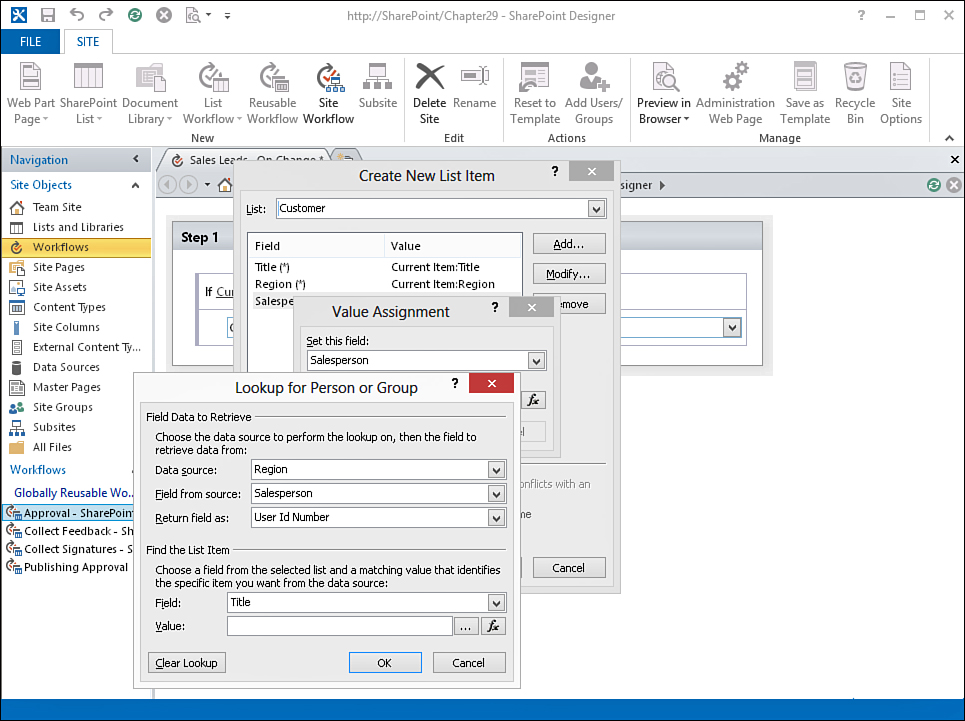
27. To complete the Lookup for Integer window, click the fx button for the Value field to open the Lookup for Person or Group window.
28. In the Data Source field, leave Region selected.
29. In the Field from Source field, choose Salesperson from the drop-down menu.
30. In the Return Field As drop-down, choose User ID Number from the drop-down menu. Click OK.
31. The Lookup for Person or Group window will now be complete and look like Figure 29.8.
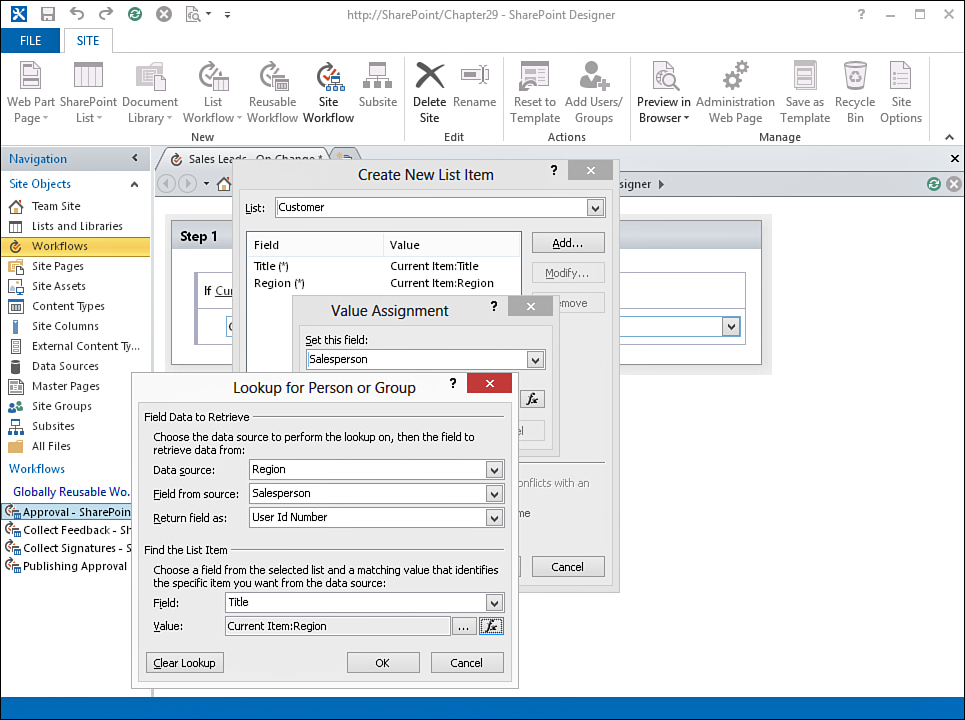
32. Click OK to close the Lookup for Person or Group window, and click Yes when the message “The lookup you defined is not guaranteed to return a single value” appears. Click OK to close the Value Assignment window.
33. The Create New List Item window should now look like Figure 29.9 and include a Salesperson field with a value of Region:Salesperson.

34. Click OK to close the Create New List Item window.
35. Save the workflow by clicking the Save button on the SharePoint Designer ribbon.
Unlike SharePoint 2007 workflows, which were immediately active upon save, SharePoint 2013 and 2010 workflows are available for use only after they are published. To publish a SharePoint Designer workflow, follow these steps:
1. Click the Workflow Settings tool on the ribbon. The display will change to show the workflow settings.
2. Verify that Allow This Workflow to be Manually Started is selected from the Start Options section on the lower-right side.
The workflow can be configured to start automatically, but the logic in this example is that the list item may be changed many times, and a user might accidentally set the item to closed, so a manager should be the only one starting the workflow, after the manager has confirmed that the lead is in fact closed.
3. Click the Publish button on the ribbon to deploy and activate the workflow on the list.
Tip
A form will be visible on the Workflow Settings page that should be titled Sales Leads – On Change.xsn. Clicking this link will open InfoPath 2013 if installed on the computer and allow customization of the initiation form.
Testing the Workflow
Immediately after you save and publish the workflow, it’s ready for testing. To test the Sales Lead workflow, follow these steps to populate the necessary lists and start a workflow:
1. Return to the SharePoint site where the workflow was published; the three custom lists are present. (In this example, the site is http://SharePoint/Chapter29/.)
2. Access the Region list and add two items. The first item should be titled Region A and have a Salesperson assigned who is a valid Active Directory (AD) user account (User1 in this example). The second item should be titled Region B and have a different Salesperson (User2 in this example).
3. Access the Sales Leads list on the SharePoint site. Click New Item and fill in the title with Customer ABC and select Region A. Click Save. This simulates the process of a field being created for a sales prospect in a specific region. In a production situation, additional fields could be added to track conversations with the client or upload proposals and other documents to the list item.
4. Edit the Sales Lead item created in the previous step and check the SaleClosed check box, and then click Save. This simulates the event where the sale is closed and the lead ready to be converted to a customer.
5. Access the ellipsis menu for the item and click Workflows.
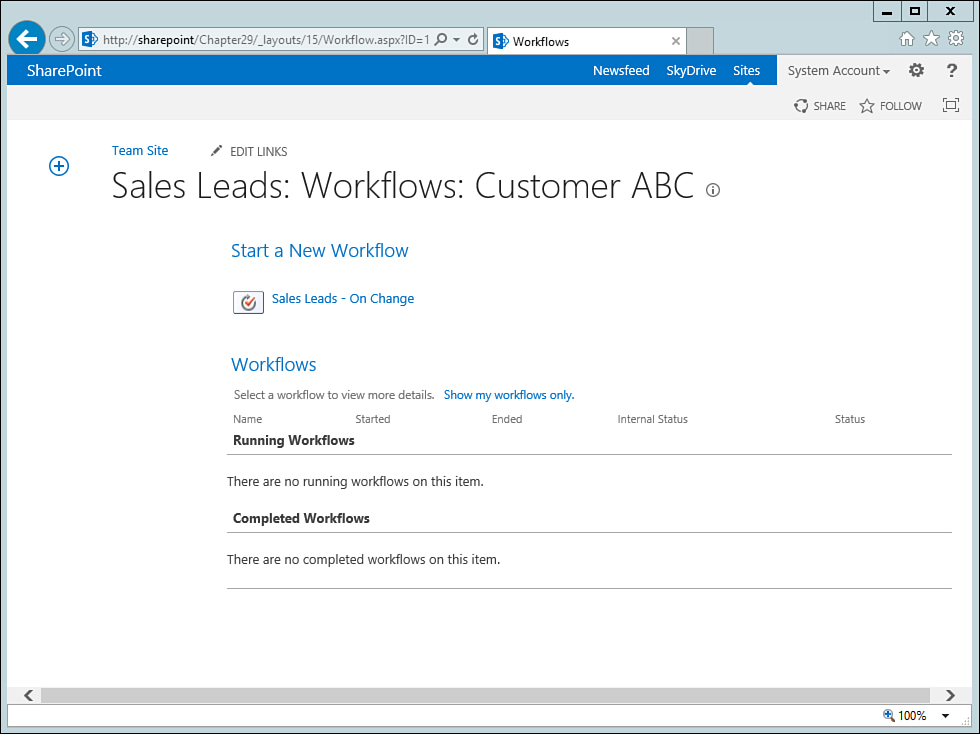
6. The Sales Leads – On Change workflow should appear next to the workflow icon as shown in Figure 29.10. Click the link next to the workflow icon to access the initiation page.
7. The IniWrkflIP.aspx page will load. Click the Start button.
Note
If State Service is not installed, the user will receive the following error: “The form cannot be rendered. This may be due to a misconfiguration of the Microsoft SharePoint Server State Service. For more information, contact your server administrator.”
A likely solution is to create the State Service Application through PowerShell (there is no UI option available in SharePoint 2013). And then associate the service application with the web application from Central Administration.
8. You will return to the Sales Leads list, and a Sales Leads – On Change column will appear and indicate that the workflow is In Process and then Completed.
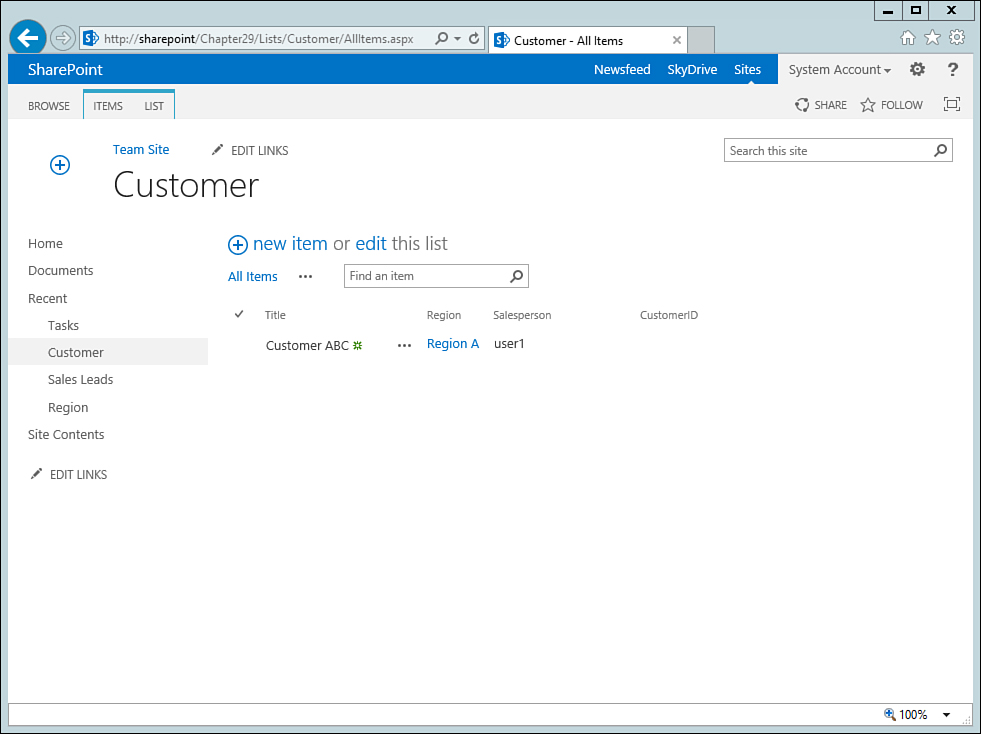
9. Navigate to the Customer list and verify that a new item has been created, as shown in Figure 29.11.
10. Return to the Sales Leads list and click the value that appears in the Sales Leads – On Change column to view the workflow history for that particular list item. The Workflow History window will open and display the status for the latest instance of the workflow.
Extending the Capabilities of the Application
While the workflow outlined previously will function properly, it is just a starting point and would not generally be considered to be “enterprise ready.” Here are some items to consider as ways of enhancing the functionality of the application:
![]() Create custom list views to show and hide the sales leads depending on whether the lead is actually closed.
Create custom list views to show and hide the sales leads depending on whether the lead is actually closed.
![]() Create an alert in the Sales Leads list that alerts a manager when an item is set to SaleClosed equals Yes.
Create an alert in the Sales Leads list that alerts a manager when an item is set to SaleClosed equals Yes.
![]() Create a new workflow that starts when an item is added to the Customer list and sends an email to the assigned Salesperson to alert him or her that they have a new client.
Create a new workflow that starts when an item is added to the Customer list and sends an email to the assigned Salesperson to alert him or her that they have a new client.
![]() For testing purposes, add the workflow action Log to History List to output debug or informational messages to the workflow history screen.
For testing purposes, add the workflow action Log to History List to output debug or informational messages to the workflow history screen.
![]() Logically, the application has flaws due to the fact that if a Sales Lead were reopened and then marked as Closed again, the workflow would trigger and create a duplicate customer. Therefore, a condition should be added to Step 1 that checks for the existence of the customer through the use of a lookup on the customer’s title column.
Logically, the application has flaws due to the fact that if a Sales Lead were reopened and then marked as Closed again, the workflow would trigger and create a duplicate customer. Therefore, a condition should be added to Step 1 that checks for the existence of the customer through the use of a lookup on the customer’s title column.
Using Visual Studio 2012 with SharePoint 2013
Development for SharePoint 2013 using Visual Studio 2012 requires the developer to take caution and adhere to more stringent standards for the project to be a success. Although an aggressive approach may allow the developer to make great strides in a short period of time, .NET and SharePoint 2013 development is both a science and an art. Code can still cause memory leaks, applications can enter near-endless loops, and simple mistakes may drastically affect SharePoint 2013’s performance. However, the resulting applications can meet a great range of business requirements, making Visual Studio 2012 the choice of many developers.
Visual Studio 2012 is the de facto standard for development on the Windows platforms and was first released in 1995. While developers can take advantage of Visual Studio 2012 to develop C++ applications and other applications that are compiled down to machine code, the typical developer creates applications on top of the .NET Framework, the same framework that SharePoint is built upon. SharePoint’s use of the .NET Framework is apparent in the ASP.NET controls, layout pages, master pages, .ascx controls, and .aspx pages that are visible throughout the system’s C:Program FilesCommon FilesMicrosoft SharedWeb Server Extensions15 directory.
When developing applications for SharePoint 2013, developers usually code using familiar languages such as VB.NET or C#. Although the syntax of these two languages differs, Visual Studio 2012 compiles the code down to an intermediate language called MSIL, where the code, regardless of the originating syntax, behaves roughly the same. Furthermore, code developed in different .NET projects using different languages can reference code developed in another .NET language. For more information about the .NET Framework, see http://www.microsoft.com/net/.
Visual Studio 2012 has standardized and streamlined packaging and deployment of solution packages and applications, an area where the preceding versions of Visual Studio fell short. A solution package and an application are cabinet files with a .wsp or .app extension, respectively, which contain the application code, a manifest, and one or more directories containing application specific files. Visual Studio 2012 can deploy, activate, deactivate, and retract solutions and applications without requiring the developer to open a command prompt or PowerShell. New in Visual Studio 2012 and SharePoint 2013 is the ability to publish and debug an Office 365 hosted application.
Note
Before starting development in SharePoint 2013 with Visual Studio 2012, a developer should understand the Microsoft.NET framework and VB or C# because most code samples available on the web are provided in one or both of these common languages.
Getting Started with Visual Studio 2012
This section introduces some basics in getting Visual Studio installed and the basics of creating a new project. Experienced users might want to skip this section and move on to the next section that covers creating a web part.
You can download Visual Studio Professional, Premium, or Ultimate from Microsoft at http://www.microsoft.com/visualstudio/ for a 90-day trial, if needed. The Professional, Premium, and Ultimate versions of Visual Studio 2012 can all be used to develop for SharePoint when the Microsoft Office Developer Tools are installed from http://msdn.microsoft.com/en-US/office/apps/fp123627. Visual Studio 2012 supports development and deployment of SharePoint components on a remote server, but most templates cannot be developed or deployed unless SharePoint is installed on the same system as Visual Studio 2012.
Downloading and Installing Visual Studio 2012
Follow these steps to download and install Visual Studio Professional. These steps may vary slightly on different system configurations. Note that the full installation requires at least 7.5GB of space.
1. Access the Microsoft Downloads site (http://www.microsoft.com/visualstudio/eng/downloads) (or search on “Microsoft Visual Studio 2012 Professional Trial” on Microsoft’s website) and click Install Now.
Note
You may need to install KB 2781514 which improves the stability of Visual Studio 2012 and KB 2799752 which is a Cumulative Update that defines new states for queue, topic, and subscription and contains a number of bug fixes for Service Bus 1.0.
2. Click Run to run the downloader application vs_professional.exe.
3. Click Run when this application downloads.
4. The Installation Wizard opens and starts. If desired, uncheck the box next to Yes, Send Information About My Setup Experiences to Microsoft Corporation. Click the box next to I Have Read and Accept the License Terms, and then click Next.
5. The wizard then informs that it will install: Blend for Visual Studio, LightSwitch, Microsoft Foundation Classes for C++, Microsoft Office Developer Tools, Microsoft SharePoint Developer Tools, Microsoft SQL Server Data Tools, Silverlight Development Kits, and Microsoft Web Developer Tools. For SharePoint development, ensure that the Microsoft Office Developer Tools and Microsoft SharePoint Developer Tools are checked. Click Install.
6. The items mentioned in step 5 will then download and install. This process will take a while, but the wizard lists which step it is on and the download speed, which is more helpful then the average progress bar.
7. Once the installation is complete, a reboot is required, so click Restart Now.
8. Upon reboot, the installation process will complete, which again takes a while.
9. After the setup completes, the option is provided to Install Documentation, which is recommended for less-experienced users of Visual Studio. Click Install Documentation to start the process.
10. Accept the default library location or enter a new one. Click OK.
11. The Help Library Manager window then provides a directory of content to choose from. For example, click Add next to SharePoint Development in the Visual Studio 2012 section and click Update.
12. Click Finish and then click Exit to exit the Help Library Manager.
13. Click Finish to close the Visual Studio installation wizard.
Developing a SharePoint 2013 App
The newest and most exciting feature of SharePoint 2013 is the ability to develop apps that support on premise and hosted SharePoint 2013, such as Office 365. Visual Studio 2012 contains project templates that contain all the functionality that supports the immediate deployment of a variety of objects, including apps, workflows, event receivers, web parts, BDC objects, and even list definitions. Developers will be pleased to note that the packaging of these components as a SharePoint solution (.wsp) is automatic and applications (.app) will automatically be created for solutions that utilize the application template.
Follow the steps listed here to create an app that renders a SharePoint announcements list in a custom format using the JavaScript Client Object Model (JCOM). To show some of the more recent advancements of both .NET and SharePoint 2013, this example uses the JavaScript Object Model and AJAX to dynamically render content in a web page.
Apps in SharePoint 2013 run in an independent application domain that is separated from the core SharePoint applications; this is furthered by the fact that apps reside in a different URL, such as apps.sharepoint.com rather than sharepoint.com/apps. By providing an independent application domain, apps run with a virtual separation of concerns between themselves and production SharePoint components. Because of this separation, app development is relatively easy unless the app needs to communicate directly with the host SharePoint sites. The example in this chapter demonstrates how to create an app using the cross-domain library, which allows the app to communicate from its host site.
To create an app for SharePoint, follow these steps on a system with SharePoint Server 2013 Standard or Enterprise installed, along with Visual Studio 2012 Professional or Ultimate:
1. Open Central Administration and click Application Management. Click the Create Site Collections link.
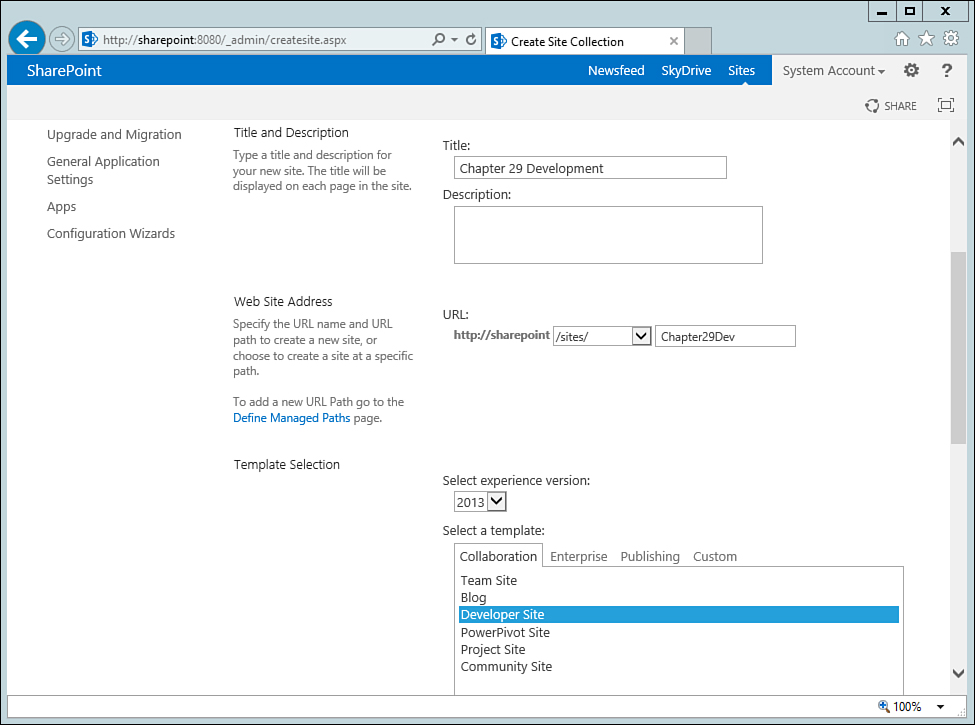
2. On the Create Site Collections screen, enter the title Chapter 29 Development and select /sites/ managed path in the URL drop-down. In the URL text box enter Chapter29Dev, as shown in Figure 29.12. In this example, the developer site collection’s URL will be http://SharePoint/Sites/Chapter29Dev/.
3. Once the developer site is created, access the site via the URL, such as http://SharePoint/Sites/Chapter29Dev/.
4. Click the Site Contents link and click Add an App. Create an Announcements app and a Picture Library app. If these do not exist, they will need to be created. The Announcements app will need to be named Announcements for the code included in this exercise to work. The Picture Library app can be named anything because it is not directly addressed in the code. For this exercise, the Picture Library app is named Pictures.
The Announcements list needs to have several columns added; otherwise, settings should be left at their default. Table 29.4 shows the columns that need to be added and relevant settings.

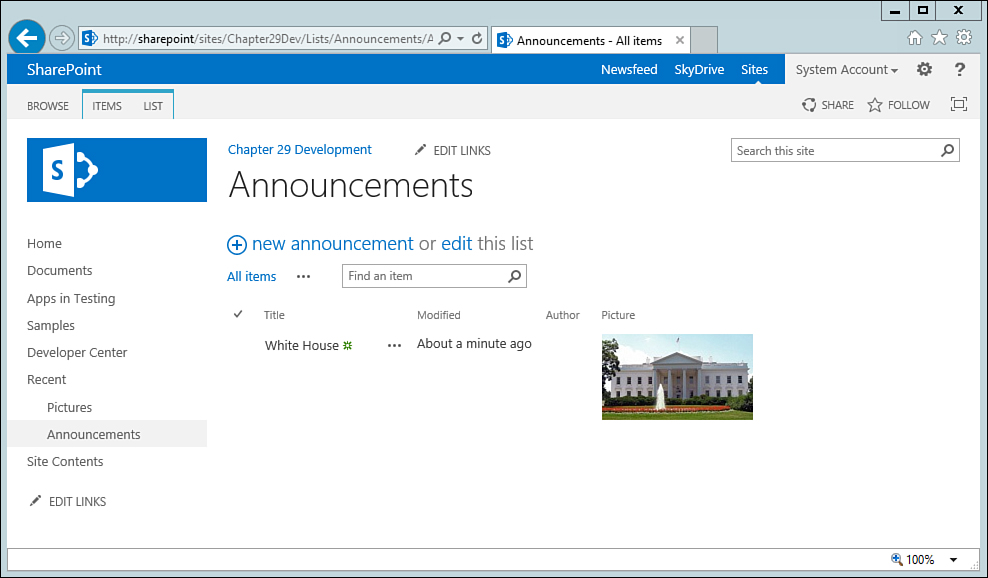
The Picture Library app should have an image uploaded to it. Once the image is uploaded, capture the URL for the image, and then create an announcement and paste the URL for the image in the Picture field. Figure 29.13 shows the Announcements list with an entry in it that references a picture.
The files that support the JavaScript object model (.js) are located in %ProgramFiles%Common FilesMicrosoft Sharedweb server extensions15TEMPLATELAYOUTS. These files are delivered to each server when SharePoint is installed, and it is recommended that they not be modified.
Before continuing with the web part development, verify that the account being used to run Visual Studio 2012 has the following rights:
![]() The account is not the SharePoint system account. In most cases, the application pool and system account are the same.
The account is not the SharePoint system account. In most cases, the application pool and system account are the same.
![]() Local administrator rights to the development machine.
Local administrator rights to the development machine.
![]() Farm administrator rights (not necessary if a sandboxed solution is being created, but always helpful to have if possible).
Farm administrator rights (not necessary if a sandboxed solution is being created, but always helpful to have if possible).
![]() Site collection administrator rights to the developer site collection where the solution will be deployed during debugging.
Site collection administrator rights to the developer site collection where the solution will be deployed during debugging.
Caution
SharePoint 2013 does not allow the system account to deploy apps or solutions.
To create a project in Visual Studio 2012, which will be used in the following exercise, follow these steps:
1. Open Visual Studio 2012 by clicking the Start button. Click All Programs, then click Microsoft Visual Studio 2012.
2. The first time it is opened, the default environment settings need to be set. Different developers will have their preferences, but for the exercises in this chapter, the first setting (General Development Settings) is sufficient.
3. Once Visual Studio is open, access the File menu and click New, Project.
4. In the New Project window, choose Visual C# and choose the Office/SharePoint node from the list of choices in the pane on the left. Expand the Office/SharePoint node and click the Apps node. Click the app for SharePoint 2013, as shown in Figure 29.14.

5. Then select the App for SharePoint 2013 template from the center pane. Name the app EventApp, and it will be auto-populated in the Solution Name field. Verify the location where Visual Studio 2012 will create the project folder structure is suitable. Click OK.
If the account being used does not have sufficient permissions, an error message appears. You might need to restart Visual Studio 2012 by right-clicking it from the Start menu and choosing Run as Administrator.
Note
Attempting to deploy an app to a SharePoint site collection that is not configured using the Developer Site template will receive the following error: “Error occurred in deployment step ‘Install app for SharePoint’: Sideloading of apps is not enabled on this site.”
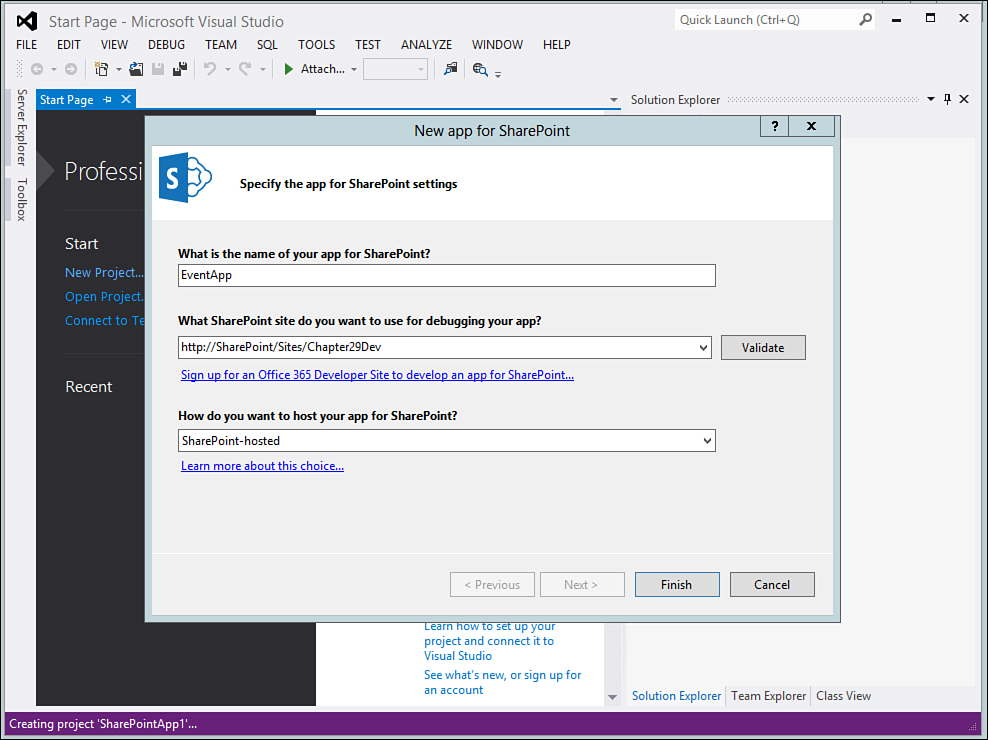
6. The Specify the App for SharePoint Settings window opens. Provide the name EventApp for the application, and then enter the URL for the target SharePoint site. Be sure to specify the site that contains the Announcements list. In this example, the URL is http://SharePoint/Sites/Chapter29Dev/. Click the Validate button, and Visual Studio 2012 will verify that the URL responds properly and is running the appropriate version of SharePoint 2013 and should display a Connection Successful message. Click OK to close the message. Select SharePoint-Hosted in the How Do You Want to Host Your App for SharePoint drop-down list, as shown in Figure 29.15, and click Finish. The resulting view should be similar to Figure 29.16.
Visual Studio 2012 supports development and deployment of apps targeted at Office 365. Developers can sign up for a trial developer site on Office 365 at http://msdn.microsoft.com/en-us/library/fp179924.aspx.
7. Before adding any code or display components to the EventApp, debug the app. Just click the Debug menu, and then click Start Debugging. Alternatively, click the green start arrow. Debugging the app before adding code or UI components allows the developer to verify that the project and development environment are working as expected.
Note
An error message may appear after Start Debugging is clicked. This message states “ErrorDetail: Apps are disabled on this site.” If this message appears, ensure that apps are enabled on the SharePoint 2013 environment by creating an app catalog site (http://technet.microsoft.com/en-us/library/fp161236.aspx).
8. A browser window will open to the SharePoint site as part of the debugging process. The current user’s name should replace the word Initializing when the page finishes loading, as shown in Figure 29.17.
9. Close Internet Explorer, and in Visual Studio the debug process will complete. Unlike development in SharePoint 2010, where the solutions were retracted after exiting debug mode, apps remain deployed to SharePoint until explicitly retracted by the developer by choosing Retract from the Build menu.
Note
For JavaScript and some .aspx or HTML pages, developers can now make changes in Visual Studio and see the changes in the app after refreshing the page. This time saver allows the developer to continue testing without having to restart the debugging process.
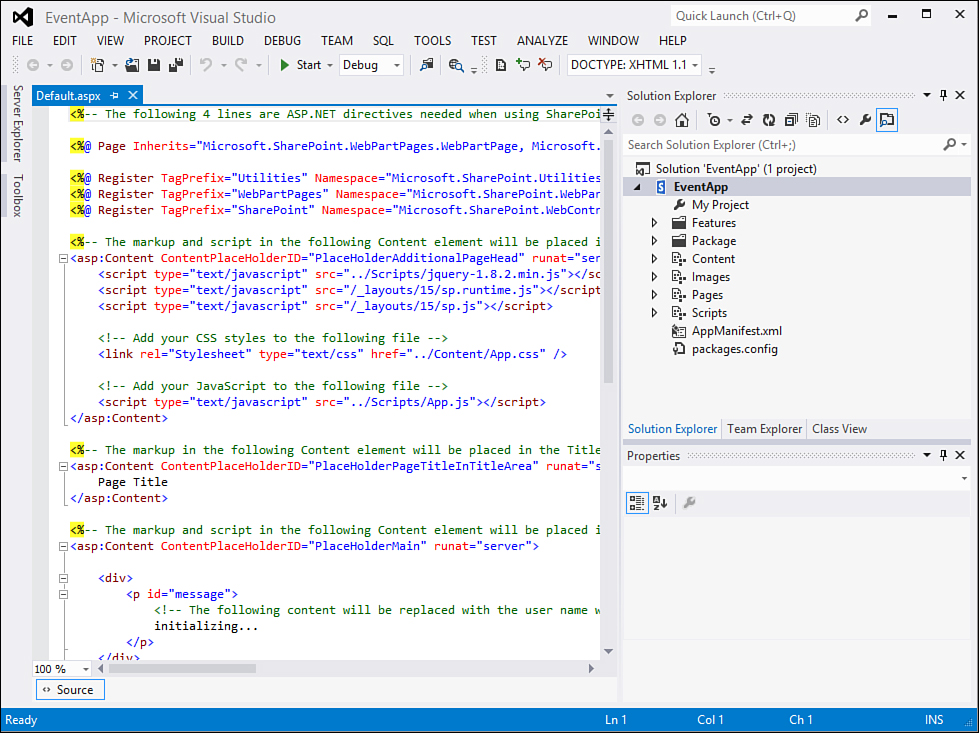
10. To create a page component to display the events, edit the Default.aspx page and add the following HTML within the body. When opened, the EventApp will replace the Loading Events text and replace it with the announcements dynamically pulled from the host site. Figure 29.18 shows the resulting contents of default.aspx:
<p id="events">Loading Events...</p>

11. Delete the portion of the default.aspx that was responsible for displaying the user’s name in Figure 29.17. This code is no longer necessary.
<p id="message">
<!-- The following content will be replaced with the user name when you
run the app - see App.js -->
initializing...
</p>
12. Save Default.aspx, and then from the tree view that appears in the Solution Explorer, click Scripts and open the file App.js.
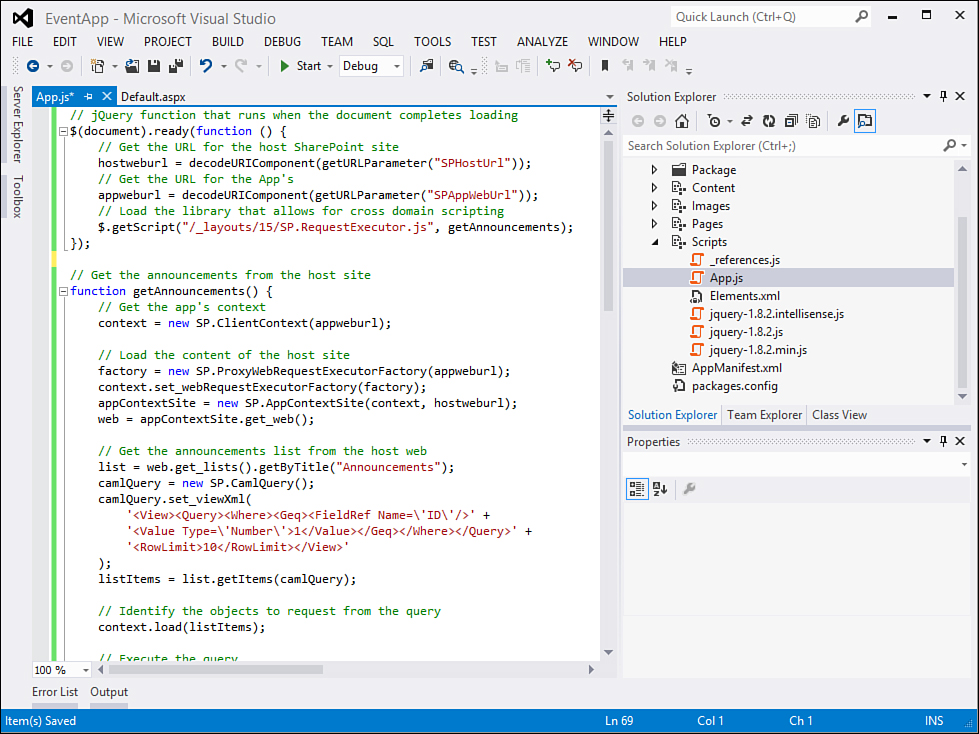
13. Replace the entire contents of the App.js file with the following code. This JavaScript code is the basis for the EventApp that pulls information from the host site and displays it on the app’s Default.aspx page. Save the App.js file when done editing the file. The resulting contents of App.js should appear similar to Figure 29.19:
// jQuery function that runs when the document completes loading
$(document).ready(function () {
// Get the URL for the host SharePoint site
hostweburl = decodeURIComponent(getURLParameter("SPHostUrl"));
// Get the URL for the app
appweburl = decodeURIComponent(getURLParameter("SPAppWebUrl"));
// Load the library that allows for cross-domain scripting
$.getScript("/_layouts/15/SP.RequestExecutor.js", getAnnouncements);
});
// Get the announcements from the host site
function getAnnouncements() {
// Get the app's context
context = new SP.ClientContext(appweburl);
// Load the content of the host site
factory = new SP.ProxyWebRequestExecutorFactory(appweburl);
context.set_webRequestExecutorFactory(factory);
appContextSite = new SP.AppContextSite(context, hostweburl);
web = appContextSite.get_web();
// Get the announcements list from the host web
list = web.get_lists().getByTitle("Announcements");
camlQuery = new SP.CamlQuery();
camlQuery.set_viewXml(
'<View><Query><Where><Geq><FieldRef Name='ID'/>' +
'<Value Type='Number'>1</Value></Geq></Where></Query>' +
'<RowLimit>10</RowLimit></View>'
);
listItems = list.getItems(camlQuery);
// Identify the objects to request from the query
context.load(listItems);
// Execute the query
context.executeQueryAsync(
Function.createDelegate(this, successHandler),
Function.createDelegate(this, errorHandler)
);
function successHandler() {
var eventHTML = "";
listEnum = listItems.getEnumerator();
while (listEnum.moveNext()) {
var listItem;
listItem = listEnum.get_current();
eventHTML += //"ID: " + listItem.get_id() + "<br/>" +
"<h1 style='margin-bottom:-15px'>" + listItem.get_
item("Title") + "</h1><br/>" +
"<h3>By " + listItem.get_item("Author") .get_
lookupValue() + ", " + listItem.get_item("Modified").toString().substring(0,
10) + "</h3><br/>" +
"<img style='float:left;padding-right:10px' src='" +
listItem.get_item("Picture").get_url() + "'>" +
listItem.get_item("Body") + "<br/>";
}
events.innerHTML = eventHTML;
}
// Prints the error message to the page.
function errorHandler(data, errorCode, errorMessage) {
events.innerHTML = "Unable to load announcements" + errorMessage;
}
}
// Function to get the URL parameters
function getURLParameter(name) {
return decodeURI(
(RegExp(name + '=' + '(.+?)(&|$)').exec(location.search) || [,
null])[1]
);
}
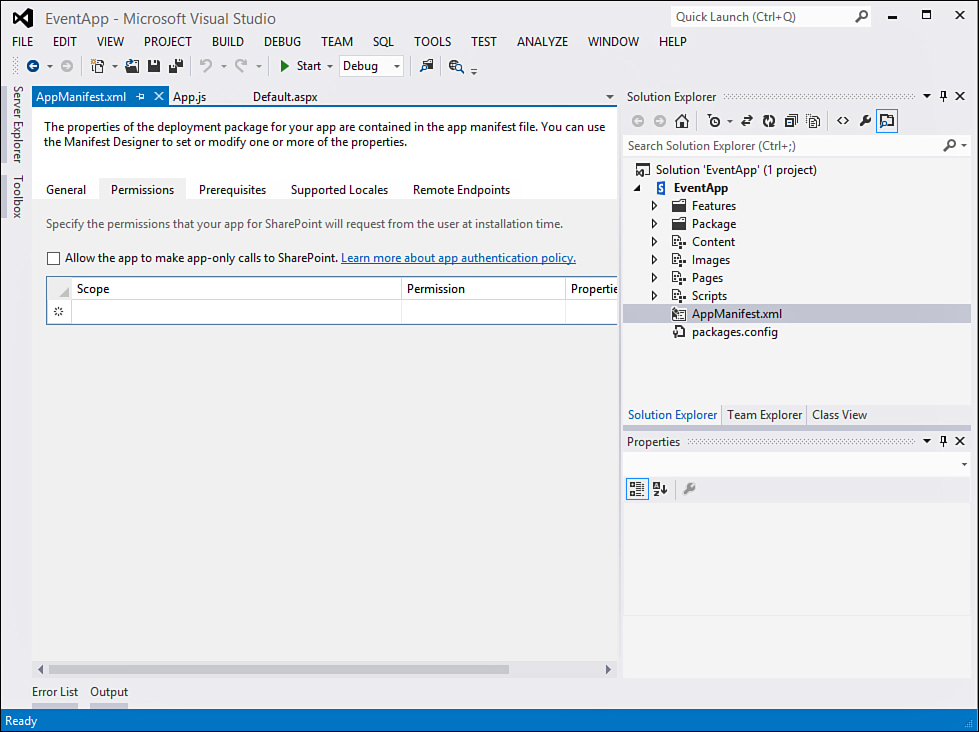
14. For a SharePoint 2013 app to function in a SharePoint farm, the person responsible for installing the app must grant the app permissions to the host SharePoint 2013 environment. These required permissions are defined by the application developer by identifying different scopes and associated permissions that are required for the app to function. To specify the EventApp’s required permissions, open the AppManifest.xml file from Solution Explorer.
15. Click the Permissions tab shown in Figure 29.20 to see the permissions the app will require to run.
Caution
For the purposes of this example, the JavaScript directive “use strict” has been omitted from the App.js. This allows for variables to be created and used without first declaring the variable, which makes code files much shorter and faster to write. However, it is not best practice for proper development. After becoming familiar with coding in JavaScript and Visual Studio 2012, be sure to take advantage of the “use strict” feature to ensure proper coding techniques are followed.
Note that Visual Studio 2012 will immediately attempt to compile and validate the code. Any code that Visual Studio 2012 flags as problematic will appear with a red underline. Before debugging or testing the app, these issues must first be addressed.
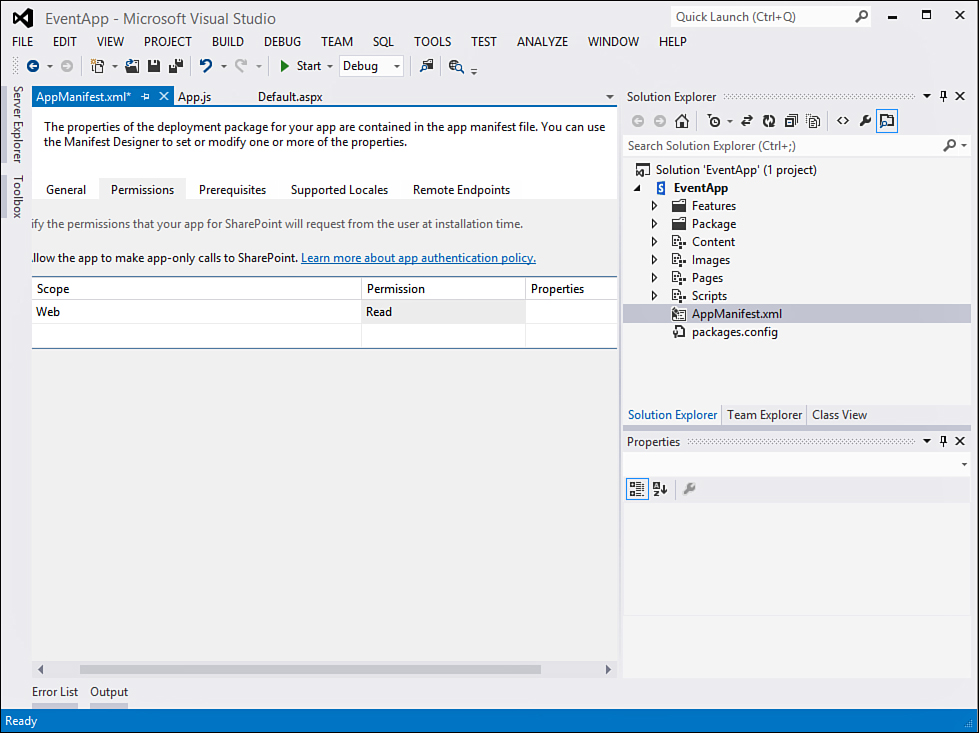
16. On the AppManifest.xml permissions page, click in the first row of the Scope column and choose Web from the drop-down list that appears. In the Permission column, choose Read, as shown in Figure 29.21.
17. Now test EventApp by clicking the Debug menu and choosing Start Debugging. If errors appear in the output window, attempt to address the errors, which usually specify the offending file and, in some cases, the line number where the error exists.
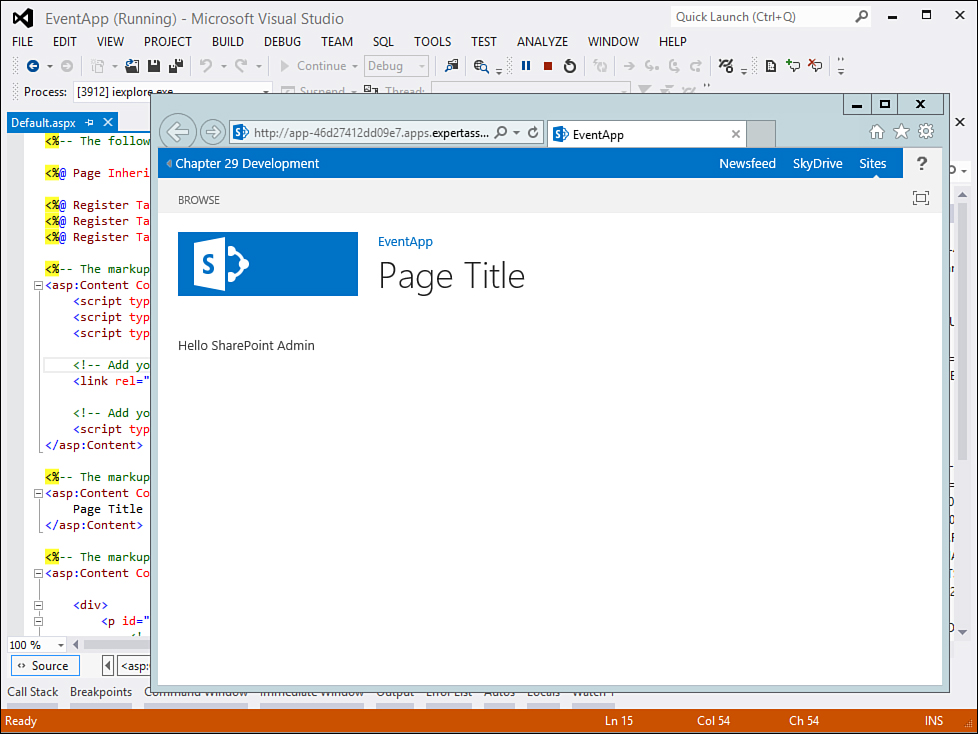
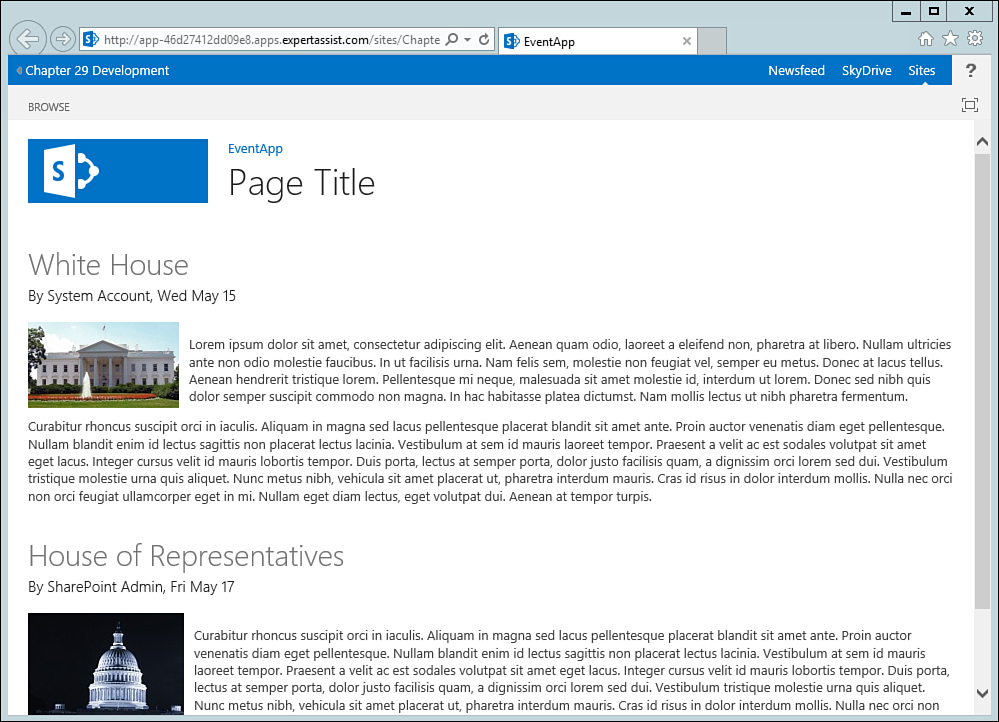
18. When debugging starts successfully and Internet Explorer opens, a screen appears, as shown in Figure 29.22, asking the user to trust the application. Click the Trust It button; the application will appear as shown in Figure 29.23.

Note
Note that an app only needs to be trusted one time when debugging. The screen that asks the user to trust the application will not reappear for subsequent debugging sessions. However, the trust page will appear if the application is deployed by clicking the Build menu and choosing Deploy.
19. Without closing the browser window, leave EventApp in debug mode and switch to Visual Studio 2012. Open the App.js from the Scripts node in Solution Explorer if it is not already open and scroll down to the line that starts with eventHTML+=. Modify the eventHTML code by changing float:left to float:right in the style property of the Img tag. Click Save, and then switch back to the EventApp in Internet Explorer and refresh the page. Figure 29.24 shows the EventApp with the image aligned to the right side of the content. This demonstrates how JavaScript code can be modified without requiring a redeployment of the application.

20. Switch back to Visual Studio 2012 and double-click the margin to the left of the line events.InnerHTML = eventHTML. A red dot will appear in the margin signifying a debug breakpoint. Switch back to Internet Explorer and refresh the page. The breakpoint will trigger, and when the cursor is positioned over eventHTML, the contents of the variable will be visible, as shown in Figure 29.25. Click the Continue button next to the green arrow in the ribbon to allow the page to continue loading. The Continue button may require multiple clicks before the page completes loading, because the breakpoint is in the middle of a while loop that iterates through each event stored in the list.

Note
Debugging is a useful method for quickly identifying issues with code. In Visual Studio 2012 and SharePoint 2013, the debugging process is steamlined, with faster deployment and automatic redeployment of client-side code.
21. To stop debugging, choose Stop Debugging from the Debug menu. The Internet Explorer window that displayed the EventApp will close when debugging is stopped. Likewise, if Internet Explorer is closed while debugging, Visual Studio will recognize the change in state and will automatically stop debugging.
The EventApp may not appear to be “earth shattering” in its complexity, but this app displays Announcements in a format that differs significantly from a normal list view web part, an example of which is shown in Figure 29.26. In this regular list view, the column headers cannot be removed, nor can the chrome font sizes be changed, all changes that were accomplished in the App.js code. Also note in Figure 29.23 that the column headers are not included, making the announcements appear more aesthetically pleasing. This is a common request and an example of making a page look “less SharePoint-y.”

FIGURE 29.26 The original Announcements list as displayed in SharePoint 2013, with additional columns for Author and Picture.
Packaging a SharePoint 2013 App
This section assumes that the previous section was completed successfully and that EventApp displayed as shown in Figure 29.23 (with the exception that most likely a different image was displayed). To deploy the solution to a staging or production machine, follow these steps:
1. With the EventApp solution open in Visual Studio 2012, access the Solution Configuration drop-down menu on the standard toolbar, as shown in Figure 29.27, visible just beneath the top menu bar. Change the configuration to Release. The next time the project is built, Visual Studio 2012 will generate each project’s binaries (DLLs) without the debug symbols, making them optimized for deployment to production environments.

2. Rebuild the solution by choosing Rebuild Solution from the Build menu.
3. In Solution Explorer, highlight the EventApp project, and then choose Publish from the Build menu, as shown in Figure 29.28. Publishing the app creates a SharePoint application file with the .app extension. The published app file is a compressed .cab file that contains the web part’s DLL, its visual components, and a manifest.

4. In the Publish apps for Office and SharePoint window, leave the Open Output Folder after Successful Packaging check box checked, as shown in Figure 29.29. Click Finish.

5. A Windows Explorer window will open upon successful publishing of the app, as shown in Figure 29.30. The file with the .app extension is similar to a SharePoint 2010 solution file that had the .wsp extension, but has a manifest and files that support deployment to the SharePoint 2013 app catalog.

Caution
The menus that appear on the top of Visual Studio are dynamic and change based on the node that is selected in Solution Explorer. The Publish menu item appears only if the project is highlighted in Solution Explorer and disappears if the Solution node is highlighted.
6. Return to Visual Studio 2012 and retract the debugged version of the EventApp from SharePoint by choosing Retract from the Build menu. This will allow for a clean install of the published app.
7. Open the Developer, which has the URL http://SharePoint/Sites/Chapter29Dev/, and click the Apps in Testing link that appears on the left side. If the EventApp appears in the Apps in Testing link, click the ellipsis and delete the app manually.
8. In the Apps in Testing list, click the New App to Deploy link. Click the Upload link that appears in the If the App Is Stored on the Local Machine, Then Upload it to the Developer Site. As shown in Figure 29.31, in the Upload App dialog, click the browse icon, locate the EventApp.app file and click OK.

9. The Deploy App dialog will again be active with the message “EventApp.app has been successfully uploaded.” Verify the site URL, and then click Deploy. Trust the app when the Trust this App window appears.
Caution
The SharePoint System account cannot deploy apps.
10. Refresh the Apps in Testing page; EventApp’s title will turn into a hyperlink after SharePoint 2013 has successfully installed the app (see Figure 29.32). Click the EventApp title to launch the app.

Summary
This chapter started with some cautionary information about taking time to understand what SharePoint 2013 can do out-of-the-box before deciding to use SharePoint Designer 2013 or Visual Studio 2012 to develop Windows SharePoint 2013 apps, web parts, event handlers, and workflows. In addition, developers should have experience with the .NET platform and preferably C# or VB.NET before delving into Visual Studio 2012 development.
An example of creating a workflow-based application in Designer 2013 was provided that showed how to create a workflow that interacts with several SharePoint lists. The workflow, while demonstrating basic functionality, shows how a power user can quickly develop SharePoint workflows supporting basic needs using a variety of predefined actions and conditions.
The example using Visual Studio 2012 demonstrated the development of the SharePoint 2013 app. The app utilizes many new development features that SharePoint 2013 supports, including the JavaScript Object Model and real-time debugging. The chapter also demonstrated the packaging and deployment of the app.
Best Practices
The following are best practices from this chapter:
![]() Before delving into Designer 2013 or Visual Studio 2012, confirm whether out-of-the-box SharePoint 2013 features provide capabilities that can meet end-user requests. This is no easy task, because SharePoint 2013, as shown throughout this book, has many new and powerful features such as calculated columns, lookup columns, external data, workflows, alerts, and other tools that might be “good enough” for end users to start with, rather than overbuilding a solution.
Before delving into Designer 2013 or Visual Studio 2012, confirm whether out-of-the-box SharePoint 2013 features provide capabilities that can meet end-user requests. This is no easy task, because SharePoint 2013, as shown throughout this book, has many new and powerful features such as calculated columns, lookup columns, external data, workflows, alerts, and other tools that might be “good enough” for end users to start with, rather than overbuilding a solution.
![]() When working with Designer 2013, you should not install Designer 2013 on production servers. Instead, install it on a workstation or on a development or test SharePoint 2013 server.
When working with Designer 2013, you should not install Designer 2013 on production servers. Instead, install it on a workstation or on a development or test SharePoint 2013 server.
![]() Always use a nonproduction server to develop and test code. When a development server is not available, use sandboxed solutions in a nonproduction web application or site collection.
Always use a nonproduction server to develop and test code. When a development server is not available, use sandboxed solutions in a nonproduction web application or site collection.
![]() When installing Visual Studio 2013, check the box that installs Microsoft SharePoint Developer Tools. If the Microsoft SharePoint Developer Tools are not installed, download and install them from http://msdn.microsoft.com/en-US/office/apps/fp123627.
When installing Visual Studio 2013, check the box that installs Microsoft SharePoint Developer Tools. If the Microsoft SharePoint Developer Tools are not installed, download and install them from http://msdn.microsoft.com/en-US/office/apps/fp123627.
![]() When possible, utilize a development, staging, and production deployment scenario to minimize the impact on the production environment.
When possible, utilize a development, staging, and production deployment scenario to minimize the impact on the production environment.
![]() When developing code for SharePoint 2013 solutions using Visual Studio 2012, you need both Visual Studio 2012 and SharePoint 2013 installed on the same machine.
When developing code for SharePoint 2013 solutions using Visual Studio 2012, you need both Visual Studio 2012 and SharePoint 2013 installed on the same machine.
![]() When developing code for SharePoint 2013 apps using Visual Studio 2012, you need both Visual Studio 2012 and SharePoint 2013 installed on the same machine or an Office 365 developer site for deploying and testing SharePoint 2013 apps.
When developing code for SharePoint 2013 apps using Visual Studio 2012, you need both Visual Studio 2012 and SharePoint 2013 installed on the same machine or an Office 365 developer site for deploying and testing SharePoint 2013 apps.
![]() JavaScript code developed using Visual Studio 2012 should begin with a “use strict” directive to ensure developers adhere to coding best practices.
JavaScript code developed using Visual Studio 2012 should begin with a “use strict” directive to ensure developers adhere to coding best practices.
![]() Many new features in SharePoint 2013 make it better suited to use as a development platform, including the sandboxed solution deployments, client object model, LINQ integration, and enhanced development environments. However, not all projects require direct integration with SharePoint. Take care to evaluate all contingencies, because SharePoint might not be the optimal platform to support the desired solution for many reasons, including licensing, storage requirements, throughput, record count, and security (to list a few).
Many new features in SharePoint 2013 make it better suited to use as a development platform, including the sandboxed solution deployments, client object model, LINQ integration, and enhanced development environments. However, not all projects require direct integration with SharePoint. Take care to evaluate all contingencies, because SharePoint might not be the optimal platform to support the desired solution for many reasons, including licensing, storage requirements, throughput, record count, and security (to list a few).