Chapter 23. Leveraging Social Networking Tools in SharePoint 2013
In This Chapter
![]() Creating and Exploring Personal Sites
Creating and Exploring Personal Sites
![]() Reviewing Relevant Central Administration Tools
Reviewing Relevant Central Administration Tools
![]() Reviewing Relevant User Profile Tools
Reviewing Relevant User Profile Tools
![]() Reviewing the My Site Settings Section
Reviewing the My Site Settings Section
![]() Managing Social Notes and Tags
Managing Social Notes and Tags
![]() Advantages of Using a Dedicated Web Application for My Sites
Advantages of Using a Dedicated Web Application for My Sites
![]() Restricting User Access to and Creation of My Site Sites
Restricting User Access to and Creation of My Site Sites
When discussing SharePoint 2013 designs (and earlier versions of SharePoint) with clients, the issue of My Site sites and social networking invariably involves discussions of whether they are “good” or “bad” for the organization, and IT decision makers tend to have strong opinions one way or the other. Those in favor of My Site sites (also referred to as personal sites) see them as having the potential to get users more involved with SharePoint 2013 implementations, and a way to not only make the implementation more successful from an adoption standpoint but to also provide social collaboration tools that can enhance the productivity of users. This stance has gotten more popular over the past handful of years due to the rampant success of sites such as Facebook and tools such as Twitter. Those against My Site sites tend to see the sites as potential time wasters, are afraid that the users are not sophisticated enough to understand how to use them, or are afraid that users will use them as “dumping grounds” for personal documents.
Both stances are valid, and after all, IT management tends to have good insight into the types of users who will be interacting with the SharePoint environment, and their concerns are most likely justified. That said, the SharePoint 2013 My Site tools and capabilities (available in SharePoint Server 2013 Standard or Enterprise) are dramatically improved and different from My Sites in SharePoint 2010. Therefore, it makes sense for IT to test and evaluate My Site capabilities to see the tools in action before a firm choice is made.
These tools also rely on the User Profile service application in Central Administration, so understanding how My Sites can be managed and the “moving parts” behind the capabilities of these sites is valuable. SharePoint 2013 also adds Communities to the social networking offerings (which can be created using the Community Site and Community Portal site templates) and these are also discussed in this chapter.
Because the personal sites are so intertwined with Central Administration tools such as the User Profile Service and web applications and site collections, a number of Central Administration tools are touched on to help administrators gain a full understanding of how My Sites can and should be managed.
Creating and Exploring Personal Sites
A good place to start when either taking over the management of an existing SharePoint Server 2013 Standard or Enterprise environment or putting the finishing touches on a new installation is to test My Site creation and the tools provided in a personal site, to gain a better understanding of the components and tools (and to see whether everything is working properly). The installation process of SharePoint 2013 Standard or Enterprise generally results in a functional User Profile Service in Central Administration, assuming the farm configuration wizard is used and the box to configure User Profile Service is checked during the configuration process. This allows for the creation of My Sites, but you want to verify that the process is functioning properly.
Note
There are many reasons why My Site creation may not work. A number of these are discussed throughout this chapter. These may include improper configuration of the environment or features that have been disabled on purpose by IT.
Assuming the User Profile Service has been properly configured, either through the wizard during configuration or manually if the wizard was not used, to create a personal site for a user, follow these steps in a SharePoint 2013 Standard or Enterprise environment:
1. Log in to the SharePoint 2013 Standard or Enterprise environment with a test account that hasn’t created a My Site yet but that has access to the SharePoint environment. In this example, the user TestUser1 is used.
2. From the site home page, click the Sites link at the top of the page. In a default installation, a Getting the Most Out of SharePoint window appears, with a Let’s Get Social check box with the description, “Use recommended settings to allow others to see certain activities in the newsfeed.” Click OK.
3. The page then displays the text, “We’re almost ready!” on it, as shown in Figure 23.1. In this example, the URL is http://sp20131/my/_layouts/15/start.aspx#/default.aspx. Note that the page only has the About Me and People links under the picture placeholder on the left. A note on the screen states, “It could take us a while, but once we’re done, here’s what you’ll get” and then mentions Newsfeed, SkyDrive Pro, and Sites. But these aren’t available yet. That is because the site collection for the individual needs to be created in the background.

4. However, in a few minutes, refresh the screen, and the look and feel changes, which shows that the site collection has been created for the user. As shown in Figure 23.2, additional links appear under the picture placeholder. A number of web parts appear on the screen, including a web part to start a conversation, links (Following, Everyone, Mentions), the I’m Following web part, and Trending #tags. Note that this is in fact the Newsfeed site for the user, as shown by the active tab at the top of the screen, but the URL remains http://sp20131/my/_layouts/15/start.aspx#/default.aspx.

Note
It is interesting to visit Central Administration after starting the personal site creation process. Immediately after clicking the Sites link for a user who doesn’t have a personal site, visit Central Administration, click Application Management, click View All Site Collections in the Site Collections section, and then look for the new site collection. In the current example, TestUser1 is the user, and there should be a corresponding site collection under the /my/personal path, as shown in Figure 23.3.

However, if the site does not appear, something is stopping the creation of the site. Most likely, self-service site creation is not turned on for the web application hosting the personal sites. Visit the Application Management page in Central Administration and click Manage Web Applications in the Web Applications section, highlight the web application that houses the personal sites, and click the Self-Service Site Creation icon on the ribbon. Make sure that the On option is selected for Allow Users to Create Site Collections in Defined URL Namespaces.
5. Click the different links to get a sense for the other tools available. These should include the following: About Me, Blog, Apps, and Tasks. Following sections look at these different tool sets in more detail.
Modifying Your Profile
One of the first tasks most users should do, to add value to their My Site, is to edit their profile. This information is critical to the foundation of a useful social networking solution in SharePoint. While some information comes over from Active Directory (AD), which varies based on the information that the AD account contains and the settings in the User Profile Service, there are a number of fields where the user can enter information that will help coworkers know his or her background, skills, projects worked on, and other information.
Follow these steps to modify the profile for the logged-in user. The assumption is that the user has already created the base My Site including the site collection:
1. Click the Newsfeed link at the top of the page to access the logged-in user’s Sites page. In this example, the user is TestUser1.
2. From the Newsfeed page, click the About Me link under the photo placeholder.
3. Click the Edit link to the right of the photo.
4. As shown in Figure 23.4, the Edit Details page opens. In this case, AD contained some information that was imported when the My Site was created. The Name, Work Phone, and Department fields were filled during the My Site creation process.

5. Note that the Name, Work Phone, and Department fields are read only and can’t be edited.
6. Click Upload Picture, click the Browse button, and upload a picture.
7. In the About Me field, enter in some sample descriptive text about the experience of the user. Note that the ribbon provides a number of text formatting tools to allow the user to personalize the description and have certain pieces of information stand out.
8. In the Ask Me About field, enter in a topic. In this example, the user started typing and was given some suggestions, also shown in Figure 23.4. In this example, the user typed s and was offered several managed metadata terms that start with the letter S. When a handful of entries have been entered, click Save All and close. You’ll receive this message: “Your changes have been saved, but they may take some time to take effect.” Click OK.
Note
In a new environment, there might not be any managed metadata term sets, but this illustrates how setting up term sets in advance can make it easier for users to choose terms to describe themselves and their abilities in their My Site profiles, as well as ensure consistency and reduce typos.
9. The Newsfeed My Site page now displays the uploaded photo and the text entered in the About Me field, and an activity shows up for each of the Ask Me About items that were entered, as shown in Figure 23.5. In this example, three terms were added in the Ask Me About field, so three activities are now listed.

In SharePoint Server 2013, a new feature known as the Distributed Cache (which uses AppFabric for Windows Server) maintains the newsfeed. This infrastructure better supports the read and write operations generated by users’ activities and participation in microblogging. The new microblogging functionality enables users to do the following:
![]() Participate in conversations by posting comments and replies
Participate in conversations by posting comments and replies
![]() Post pictures and links
Post pictures and links
![]() Use tags (starting with the # symbol) to define keywords that users can follow and search for
Use tags (starting with the # symbol) to define keywords that users can follow and search for
![]() Use mentions (starting with the @ symbol) to tag users in posts and replies
Use mentions (starting with the @ symbol) to tag users in posts and replies
![]() Indicate agreement with comments and replies by clicking Like
Indicate agreement with comments and replies by clicking Like
![]() Follow people, documents, sites, and tags to customize their feed
Follow people, documents, sites, and tags to customize their feed
Reviewing Relevant Central Administration Tools
Now that a new user My Site has been created, and some basic customizations have been made in the previous section, a visit to Central Administration is helpful to get a better understanding of the tools that the farm administrators have at their fingertips.
The following list provides a high-level overview of several key tools that farm administrators should be familiar with when managing My Sites:
![]() Application Management page, View All Site Collections tool: This tool allows the farm administrator to see all the My Site site collections that have been created. As shown in Figure 23.3, when a My Site is highlighted, information about that site is shown in the table on the right side of the page. It shows the database name that stores the My Site site collection and the primary administrator.
Application Management page, View All Site Collections tool: This tool allows the farm administrator to see all the My Site site collections that have been created. As shown in Figure 23.3, when a My Site is highlighted, information about that site is shown in the table on the right side of the page. It shows the database name that stores the My Site site collection and the primary administrator.
![]() Application Management page, Change Site Collections Administrators tool: Farm administrators are not by default site collection administrators to the site collections created as My Sites. Figure 23.6 shows the result of clicking Change Site Collection Administrators on the Application Management page and then selecting a My Site (for TestUser1 in this example). Note that the only default site administrator for this site collection is the user himself. The impact of this is that a farm administrator won’t be able to perform certain commands from the Manage Profile Service page for the User Profile service application.
Application Management page, Change Site Collections Administrators tool: Farm administrators are not by default site collection administrators to the site collections created as My Sites. Figure 23.6 shows the result of clicking Change Site Collection Administrators on the Application Management page and then selecting a My Site (for TestUser1 in this example). Note that the only default site administrator for this site collection is the user himself. The impact of this is that a farm administrator won’t be able to perform certain commands from the Manage Profile Service page for the User Profile service application.

![]() System Settings page, Manage Services on Server tool: Shows the status of the User Profile Service and User Profile Synchronization Service. If the User Profile Synchronization Service has not been configured in the User Profile service application, it will most likely show as Stopped.
System Settings page, Manage Services on Server tool: Shows the status of the User Profile Service and User Profile Synchronization Service. If the User Profile Synchronization Service has not been configured in the User Profile service application, it will most likely show as Stopped.
![]() Monitoring page, Review Job Definitions tool: This tool shows the different SharePoint jobs and when they are configured to run. The farm administrator may want to tune these settings based on which components of user profiles are going to be used. The relevant jobs for user profiles are as follows:
Monitoring page, Review Job Definitions tool: This tool shows the different SharePoint jobs and when they are configured to run. The farm administrator may want to tune these settings based on which components of user profiles are going to be used. The relevant jobs for user profiles are as follows:
User Profile Service Application—Activity Feed Cleanup Job (set to Daily by default)
User Profile Service Application—Activity Feed Job (set to Minutes by default)
User Profile Service Application—Audience Compilation Job (set to Weekly by default)
User Profile Service Application—Feed Cache Repopulation Job (set to Minutes by default)
User Profile Service Application—My Site Suggestions Email Job (set to Monthly by default)
User Profile Service Application—Social Data Maintenance Job (set to Hourly by default)
User Profile Service Application—Social Rating Synchronization Job (set to Hourly by default)
User Profile Service Application—System Job to Manage User Profile Synchronization (set to Minutes by default)
User Profile Service Application—User Profile Change Cleanup Job (set to Daily by default)
User Profile Service Application—User Profile Change Job (set to Hourly by default)
User Profile Service Application—User Profile Incremental Synchronization (set to Daily by default)
User Profile Service Application—User Profile Language Synchronization Job (set to Hourly by default)
User Profile Service Application—User Profile to SharePoint Full Synchronization (set to Hourly by default)
User Profile Service Application—User Profile to SharePoint Language and Region Synchronization (set to Minutes by default)
User Profile Service Application—User Profile to SharePoint Quick Synchronization (set to Minutes by default)
Reviewing Relevant User Profile Tools
This section focuses on demystifying the user profile tools and giving the farm administrator a better sense of the capabilities of the tools. A user profile is a collection of properties that describes a SharePoint user and is used in tools such as My Sites and People Search, and they can be created by importing data from directory services, such as AD. The User Profile Service Application page provides access for the farm administrator to a range of tools to manage user profiles, synchronize with AD or other directory services, and configure My Site settings.
Most organizations do not need to customize or modify these settings to any great degree, and leaving them as close to out-of-the-box as possible is recommended for smaller organizations and organizations new to SharePoint products. As discussed in this section, SharePoint 2013 should connect automatically to the AD domain the farm is attached to, which will be a welcome change from SharePoint 2010 synchronization issues.
It is important to understand that Microsoft Forefront Identity Manager (FIM), formerly known as Microsoft Identity Integration Server (MIIS), is used to facilitate the synchronization process. FIM is automatically installed as part of the SharePoint 2013 installation, but it won’t show up in Programs and Features in Windows Server 2012. It is not a full installation of FIM 2010 R2 either, and is a much more limited implementation, designed primarily for profile synchronization with AD.
Note
A new feature in SharePoint 2013 is called Direct Active Directory Import. This is designed to allow “basic” import of user information from AD without requiring the configuration and use of the Profile Synchronization Tools. The tool has limitations when compared with the profile synchronization tools, but in many cases is sufficient for basic synchronization with AD.
Note
SharePoint Server 2013 can create connections to the following directory services to synchronize users. Groups can only be synchronized with Active Directory Domain Services (AD DS):
![]() AD DS 2003 SP2 and AD DS 2008
AD DS 2003 SP2 and AD DS 2008
![]() Sun Java System Directory Server version 5.2
Sun Java System Directory Server version 5.2
![]() Novell eDirectory version 8.7.3
Novell eDirectory version 8.7.3
![]() IBM Tivoli version 5.2
IBM Tivoli version 5.2
Accessible by clicking the Manage Service Applications link on the Application Management page in Central Administration, and then clicking the appropriate service application (by default named User Profile), the Manage Profile Service: User Profile Service Application page provides access to a number of tools that a farm administrator should be familiar with when managing My Sites. An example of the Manage Profile Service: User Profile Service Application page is shown in Figure 23.7. Although it is not required that a farm administrator master all the settings on this page, a number of tools are important for day-to-day operations and management of user profiles and My Site Settings and so are covered in this section:
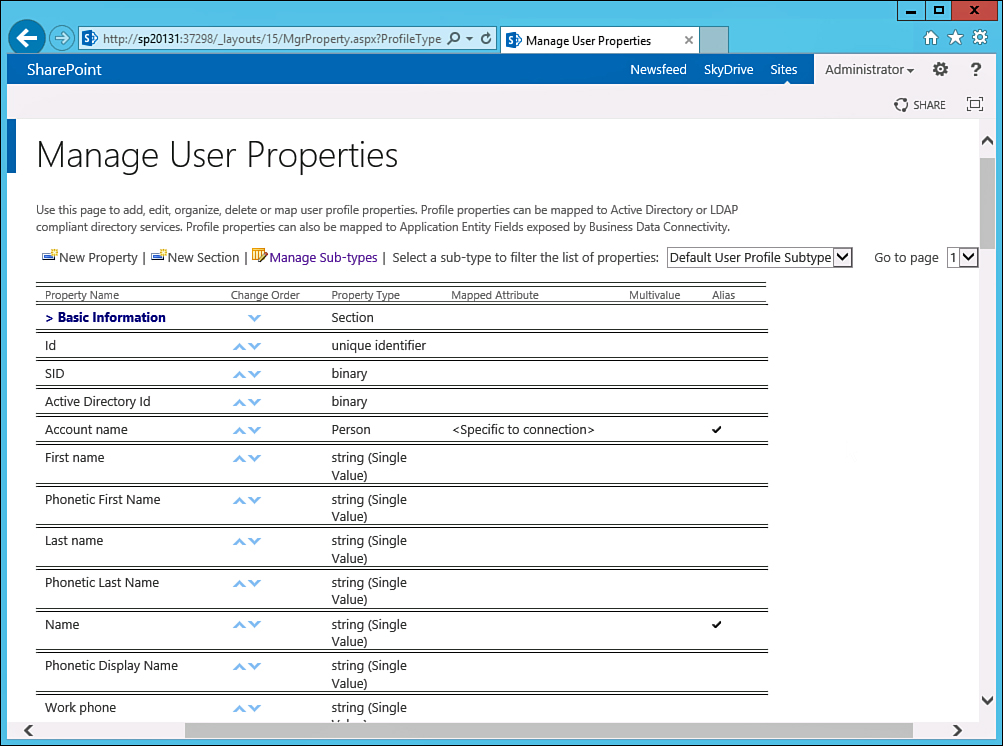
![]() People: Tools are provided to Manage User Properties as well as to Manage User Profiles, Manage User Sub-Types, Manage Audiences, Schedule Audience Compilation, Manage User Permissions, Compile Audiences, and Manage Policies. Of primary importance for an administrator in charge of managing My Sites is to understand user properties. Figure 23.8 shows a sample Manage User Properties page, which lists the Property Name, Property Type, Mapped Attribute, Multivalue, and Alias columns. Tools are provided to create a New Property, New Section, Manage Sub-Types, and to Select a Sub-Type to Filter the List of Properties. If a property name is clicked, a drop-down menu appears, and an Edit tool can be clicked. If the Edit tool is clicked, additional details of the settings for this property can be accessed. For example, settings such as default privacy settings, editing settings, display settings, and search settings can be configured here. By reviewing the properties and their individual settings, the administrator will gain a better understanding of how properties are used by SharePoint and how they can be customized if needed. This is important if the organization wants to modify the default settings, which isn’t generally recommended, or add new properties. The Manage User Profiles is also a very powerful and useful tool, and it is discussed later in the chapter in the “Restricting User Access to and Creation of My Site Sites” section.
People: Tools are provided to Manage User Properties as well as to Manage User Profiles, Manage User Sub-Types, Manage Audiences, Schedule Audience Compilation, Manage User Permissions, Compile Audiences, and Manage Policies. Of primary importance for an administrator in charge of managing My Sites is to understand user properties. Figure 23.8 shows a sample Manage User Properties page, which lists the Property Name, Property Type, Mapped Attribute, Multivalue, and Alias columns. Tools are provided to create a New Property, New Section, Manage Sub-Types, and to Select a Sub-Type to Filter the List of Properties. If a property name is clicked, a drop-down menu appears, and an Edit tool can be clicked. If the Edit tool is clicked, additional details of the settings for this property can be accessed. For example, settings such as default privacy settings, editing settings, display settings, and search settings can be configured here. By reviewing the properties and their individual settings, the administrator will gain a better understanding of how properties are used by SharePoint and how they can be customized if needed. This is important if the organization wants to modify the default settings, which isn’t generally recommended, or add new properties. The Manage User Profiles is also a very powerful and useful tool, and it is discussed later in the chapter in the “Restricting User Access to and Creation of My Site Sites” section.

Note
An alias property is treated as equivalent to the username and account name by SharePoint when searching for items authored by a user, targeting items to a user, or displaying items in the Documents web part of the personal site for a user. Aliased properties must be public. Default aliased properties are Account Name, Name, User Name, and Work Email.
![]() Synchronization: Tools provided include Configure Synchronization Connections, Configure Synchronization Timer Job, Configure Synchronization Settings, and Start Profile Synchronization. These tools may actually not be needed at all for many implementations, because the Direct Active Directory Import tool automatically (in most cases) ensures that “basic” AD synchronization occurs with the domain to which the SharePoint farm is connected. Note in Figure 23.7 a message in the lower-right corner: “User Profile Sync is not currently provisioned.” Yet the Direct Active Directory Import tool has imported a variety of AD field values, as demonstrated earlier in this chapter and shown in Figure 23.4, where work phone and department information was imported from AD.
Synchronization: Tools provided include Configure Synchronization Connections, Configure Synchronization Timer Job, Configure Synchronization Settings, and Start Profile Synchronization. These tools may actually not be needed at all for many implementations, because the Direct Active Directory Import tool automatically (in most cases) ensures that “basic” AD synchronization occurs with the domain to which the SharePoint farm is connected. Note in Figure 23.7 a message in the lower-right corner: “User Profile Sync is not currently provisioned.” Yet the Direct Active Directory Import tool has imported a variety of AD field values, as demonstrated earlier in this chapter and shown in Figure 23.4, where work phone and department information was imported from AD.
Note
If the full FIM-based profile synchronization process is to be used, a number of configuration changes might be needed before it will work properly (depending on how the farm was provisioned and configured). SharePoint users familiar with SharePoint 2010 may have experienced this “pain” previously in SharePoint 2010.
Some configuration requirements are as follows:
![]() You must have a full installation of SQL Server, not the Express Edition.
You must have a full installation of SQL Server, not the Express Edition.
![]() The synchronization account for a connection to AD DS must have the Replicate Directory Changes permissions on the domain being synchronized with.
The synchronization account for a connection to AD DS must have the Replicate Directory Changes permissions on the domain being synchronized with.
![]() Generally, the Farm Configuration Wizard should not be used, or if it was used, a new User Profile service application should be provisioned.
Generally, the Farm Configuration Wizard should not be used, or if it was used, a new User Profile service application should be provisioned.
Recommended steps to ensure proper functionality also include creating a dedicated web application to host the My Sites, a managed path for My Sites, a My Site Host site collection, a new User Profile service application, enabling NetBIOS domain names for user profile synchronization via PowerShell, and then starting the User Profile Service.
When the basic functionality is working, there are additional configuration steps required, including configuring the synchronization connections and thorough testing to ensure the tool is working properly.
Note
When troubleshooting synchronization issues, check the services running on the server housing the User Profile services application and verify that the following services are running when the synchronization process is running. These services may show as disabled until a profile synchronization is started:
![]() FIM Service
FIM Service
![]() FIM Synchronization Service
FIM Synchronization Service
![]() Organizations: Tools include Manage Organization Properties, Manage Organization Profiles, and Manage Organization Sub-Types. For large organizations that want to leverage My Sites to their fullest, organization profiles and subtypes can be defined and the properties and settings for those properties customized for different groups of users.
Organizations: Tools include Manage Organization Properties, Manage Organization Profiles, and Manage Organization Sub-Types. For large organizations that want to leverage My Sites to their fullest, organization profiles and subtypes can be defined and the properties and settings for those properties customized for different groups of users.
![]() My Site settings: Setup My Sites, Configure Trusted Host Locations, Manage Promoted Sites, Publish Links to Office Client Applications, Manage Social Tags and Notes, Manage Following—these tools are very important for all My Site administrators to understand and are addressed in more detail in the “Reviewing the My Site Settings Section” section.
My Site settings: Setup My Sites, Configure Trusted Host Locations, Manage Promoted Sites, Publish Links to Office Client Applications, Manage Social Tags and Notes, Manage Following—these tools are very important for all My Site administrators to understand and are addressed in more detail in the “Reviewing the My Site Settings Section” section.
Reviewing the My Site Settings Section
Available on the Manage Profile Service page for the User Profile service application, as shown in Figure 23.7, the Setup My Sites link in the My Site Settings section provides access to several tools that should be familiar to the farm administrator for effective My Site management. These include the following:
![]() Preferred Search Center: The farm administrator should decide whether to use the default search center when users execute a search from their My Site or to map to a different search center, and which scopes to configure as the people scope and the documents scope.
Preferred Search Center: The farm administrator should decide whether to use the default search center when users execute a search from their My Site or to map to a different search center, and which scopes to configure as the people scope and the documents scope.
![]() My Site Host: This can be changed if needed for the service application. However, any existing sites on the previous host will need to be manually transferred (that is, backed up and restored) to the new host, which can be a time-consuming process.
My Site Host: This can be changed if needed for the service application. However, any existing sites on the previous host will need to be manually transferred (that is, backed up and restored) to the new host, which can be a time-consuming process.
![]() My Site Host URL in Active Directory: This URL is returned through Exchange Auto Discovery.
My Site Host URL in Active Directory: This URL is returned through Exchange Auto Discovery.
![]() Personal Site Location: Usually set to my/personal; this can be changed if needed. A wildcard inclusion managed path matching this setting needs to exist on the web application hosting the My Site.
Personal Site Location: Usually set to my/personal; this can be changed if needed. A wildcard inclusion managed path matching this setting needs to exist on the web application hosting the My Site.
![]() Site Naming Format: Changing this setting will affect any future personal sites created, and will not affect existing personal sites. The farm administrator can choose between several options:
Site Naming Format: Changing this setting will affect any future personal sites created, and will not affect existing personal sites. The farm administrator can choose between several options:
User Name (Do Not Resolve Conflicts)
User Name (Resolve Conflicts by Using domain_username)
Domain and User Name (Will Not Have Conflicts)
![]() Language: Users can be allowed to set the language of their My Site.
Language: Users can be allowed to set the language of their My Site.
![]() Read Permission Levels: These accounts are given read permissions when new personal sites are created.
Read Permission Levels: These accounts are given read permissions when new personal sites are created.
![]() Security Trimming Options: Activity feeds, ratings, social tags, and notes may contain links. If the organization wants to hide links that the user doesn’t have access to, all links can be checked for permission. This is a general best practice because it can be seen as a security risk to show users links they shouldn’t have access to. However, the process of checking permissions does take time and therefore might slow down the rate at which the items appear on the user’s page. The options are as follows:
Security Trimming Options: Activity feeds, ratings, social tags, and notes may contain links. If the organization wants to hide links that the user doesn’t have access to, all links can be checked for permission. This is a general best practice because it can be seen as a security risk to show users links they shouldn’t have access to. However, the process of checking permissions does take time and therefore might slow down the rate at which the items appear on the user’s page. The options are as follows:
Check All Links for Permissions
Check Only Specified Links for Permissions (URL hierarchies can be entered to specify which links need to be checked, and URL hierarchies can be specified that should be displayed without checking.)
Show All Links Regardless of Permissions
![]() Newsfeed: Activities on My Site newsfeeds can be enabled or disabled here. Legacy SharePoint 2010 activity migration can be enabled or disabled here as well.
Newsfeed: Activities on My Site newsfeeds can be enabled or disabled here. Legacy SharePoint 2010 activity migration can be enabled or disabled here as well.
![]() Email Notifications: An email string should be entered here, and it is used when SharePoint sends out certain email notifications. Newsfeed email notifications can be enabled or disabled as well.
Email Notifications: An email string should be entered here, and it is used when SharePoint sends out certain email notifications. Newsfeed email notifications can be enabled or disabled as well.
![]() My Site Cleanup: If a user’s profile has been deleted, that user’s My Site is flagged for deletion after 14 days. Access can be granted to the user’s manager if Enable Access Delegation is enabled, or a secondary owner can be defined to manage all such activities.
My Site Cleanup: If a user’s profile has been deleted, that user’s My Site is flagged for deletion after 14 days. Access can be granted to the user’s manager if Enable Access Delegation is enabled, or a secondary owner can be defined to manage all such activities.
![]() Privacy Settings: My Sites are private by default, but the option to Make My Sites Public can be selected, which overrides policies set in People and Privacy in the Manage Policies page.
Privacy Settings: My Sites are private by default, but the option to Make My Sites Public can be selected, which overrides policies set in People and Privacy in the Manage Policies page.
Reviewing Other Configuration Tools in the My Sites Settings Section
Configure Trusted Host Locations, Manage Promoted Sites, Publish Links to Office Client Applications, Manage Social Tags and Notes, and Manage Following are other important tools for the My Site administrator to be familiar with:
![]() Configure Trusted Host Locations: Configuring trusted host locations can be of specific interest to larger organizations with thousands of users who want to leverage My Site sites, because the idea of putting all users in one “basket” (that is, managed by one service application and stored in one My Site Host site collection) may be unappealing. A large organization (for example, with 10,000 users) may want to create multiple User Profile service applications, each of which has a My Site Host site collection, and then split up where individuals’ My Site sites are created based on which branch office they are in. Several audiences would need to be created for this purpose, which look at the value of the Office field in AD, and if it matches a specific value, the user becomes a member of that audience when it is compiled. The audiences would then be used to determine where the users’ My Site personal sites are created.
Configure Trusted Host Locations: Configuring trusted host locations can be of specific interest to larger organizations with thousands of users who want to leverage My Site sites, because the idea of putting all users in one “basket” (that is, managed by one service application and stored in one My Site Host site collection) may be unappealing. A large organization (for example, with 10,000 users) may want to create multiple User Profile service applications, each of which has a My Site Host site collection, and then split up where individuals’ My Site sites are created based on which branch office they are in. Several audiences would need to be created for this purpose, which look at the value of the Office field in AD, and if it matches a specific value, the user becomes a member of that audience when it is compiled. The audiences would then be used to determine where the users’ My Site personal sites are created.
![]() Manage Promoted Sites: Promoted sites are sites that can be defined by a farm administrator and that appear on a user’s Sites page on their My Site.
Manage Promoted Sites: Promoted sites are sites that can be defined by a farm administrator and that appear on a user’s Sites page on their My Site.
![]() Publish Links to Office Client Applications: The Publish Links to Office Client Applications settings enable a farm administrator to define links and push them to the My SharePoints tab when opening or saving documents. Audiences can be used in both of these cases to determine which users receive these links.
Publish Links to Office Client Applications: The Publish Links to Office Client Applications settings enable a farm administrator to define links and push them to the My SharePoints tab when opening or saving documents. Audiences can be used in both of these cases to determine which users receive these links.
![]() Manage Social Tags and Notes: This is covered in the “Managing Social Notes and Tags” section.
Manage Social Tags and Notes: This is covered in the “Managing Social Notes and Tags” section.
![]() Manage Following: This tool enables farm administrators to set limits for maximum number of followed people (default value 1,000), maximum number of followed documents (default value 500), and maximum number of followed sites (default value 500).
Manage Following: This tool enables farm administrators to set limits for maximum number of followed people (default value 1,000), maximum number of followed documents (default value 500), and maximum number of followed sites (default value 500).
Following Sites
A user who has successfully created a new My Site site collection is able to click the Sites link at the top of the screen and go to his Sites.aspx page, as shown in Figure 23.9. This will be a common occurrence due to the location of the link at the top of the page.

The process for adding a site to the Sites page is quite simple. The user simply visits a site and clicks the Follow link in the upper-right part of the screen. A link to that site is then added to the Sites page. If the user tries to follow a list or library contained in that site, he receives a message: “You’re already following this site.”
Now if items are added to a Site Feed web part on the site that is now being followed, it then appears immediately in the newsfeed on the user’s My Site. An example is shown in Figure 23.10, where the administrator posted notes about the availability of free pizza.

Note
For this Follow tool to be enabled on a site, the Following Content site feature needs to be enabled, and the Site Feed site feature also needs to be enabled.
Managing Social Notes and Tags
You can find this tool on the Manage Profile Service: User Profile Service Application page, in the My Site Settings section, and it will assuage many of the fears of the farm administrator, who may well be concerned about allowing users to post “whatever they want” in a forum that other users can see. The nature of posting a note tends to encourage off-the-cuff comments, and the farm administrator may want to do periodic searches for certain words to make sure they aren’t appearing. Or an employee may leave the company, and IT decides that his tags should be removed.
This tool is not self-explanatory and can appear to “not work,” so a quick review of how to use it will be beneficial to administrators. In the following example, the user Test1 entered a comment that offended a user, who complained to a manager. The farm administrator now needs to do a general search and see whether he can locate and remove the comment. Follow these steps to learn more about the process of managing social tags and notes:
1. Click the User Profile service application from the Manage Services Applications page, and then click Manage Social Tags and Notes in the My Site Settings section.
2. From the Type drop-down menu, select Tags or Notes. In this example, the farm administrator was told it was an offensive note.
3. Either enter a username and click the Check Names button to resolve, or use the Browse tool to find the username required. Multiple names cannot be entered. In this example, Test1 is entered in the User field, and Check Names is clicked.
4. A URL can also be entered to narrow down the search. In this example, this field is left blank because the farm administrator doesn’t know which list or library the comment was made in.
Note
When searching from the Manage Social Tags and Notes page, either a valid username or a valid URL must be entered. Note that the URL needs to be the exact view where the tag or note was added. So in this example, the URL must be entered as follows: http://sp20131/sitecollectiondocuments/forms/allitems.aspx. This can be confusing and time-consuming, so it is generally better to search by username and see all of a user’s posts.
5. A date range can be entered. The farm administrator doesn’t know the date and so leaves these fields blank.
6. The Tag/Note Contains field can be filled out, and in this example, the farm administrator is looking for a specific word to search for and so he enters the term stupid.
7. The farm administrator clicks Find to see what Test1 has been posting over the past week. A number of results appear, as shown in Figure 23.11.

8. The farm administrator checks the box next to the one comment that returns, because he agrees it could be offensive, and clicks the Delete button. He clicks the OK button to confirm the deletion, and the note is deleted immediately.
Note
A site collection administrator can also delete notes directly from the document library or list by clicking Tags & Notes in the list or library and visiting the Note Board and clicking the Delete button. Other users can edit their own comments at a later date if needed.
Advantages of Using a Dedicated Web Application for My Sites
If the Farm Configuration Wizard was used during the configuration of the SharePoint 2013 Standard or Enterprise environment, the My Sites site collection is provisioned on the default web application. Although this may be acceptable to smaller organizations (for example, under 500 people), larger organizations may have more-complex requirements for the creation and management of My Sites. This section reviews some of these advantages that IT may want to consider before using the standard out-of-the-box configuration.
There can be advantages to using a dedicated web application for the creation of personal sites, especially if the full FIM Profile Synchronization capabilities are to be leveraged. One main advantage is that a web application is a “module” in the SharePoint environment that can be managed and configured in numerous ways. The Manage Web Applications page, as shown in Figure 23.12, provides numerous tools that can be used, including Authentication Providers, Blocked File Types, User Permissions, Web Part Security, User Policy, Anonymous Policy, and Permission Policy.

Note
Microsoft recommends limiting the total number of web applications in a farm to 20. This is a “supported” limit, which means that exceeding this number of web applications may cause unexpected results, decrease in performance, or other effects.
In addition, every time a user creates a My Site site, a site collection is created, so from a management standpoint, having these organized in a separate web application has its advantages, since a larger organization may have thousands of site collections to manage.
Another advantage is that the farm administrator can control a large number of basic settings for the web application that will house the My Sites, such as the following:
![]() Quota Template: A personal site quota template is provided by default that limits storage to 100MB for each site collection.
Quota Template: A personal site quota template is provided by default that limits storage to 100MB for each site collection.
![]() Recycle Bin: The amount of time after items are deleted can be reduced, or the second-stage Recycle Bin can be turned off if the organization wants to limit the amount of storage space that “personal” information is taking up.
Recycle Bin: The amount of time after items are deleted can be reduced, or the second-stage Recycle Bin can be turned off if the organization wants to limit the amount of storage space that “personal” information is taking up.
![]() Maximum Upload Size: This can be reduced, once again to control the total amount of data that needs to be backed up.
Maximum Upload Size: This can be reduced, once again to control the total amount of data that needs to be backed up.
![]() Blocked File Types: Blocked file types can be customized for the web application, which allows IT to be more (or less) restrictive over which file types can be uploaded.
Blocked File Types: Blocked file types can be customized for the web application, which allows IT to be more (or less) restrictive over which file types can be uploaded.
![]() Permission Policy: Policies can be created to limit users’ abilities to customize their sites (for example, such as Edit Personal Information or Create Subsites).
Permission Policy: Policies can be created to limit users’ abilities to customize their sites (for example, such as Edit Personal Information or Create Subsites).
The process can be quite complex because a new web application needs to be created, and then the My Site Host site collection template needs to be used, and settings in the User Profile service application then need to be modified. So, the full process is not covered in this chapter. Note that audiences can be defined in Central Administration (from the User Profile Service Application management page, Configure Trusted Host Locations) so that users in different audiences can have their personal sites created in different locations.
Restricting User Access to and Creation of My Site Sites
Some administrators want to restrict the use of My Site sites because they may want to pilot the use of these sites with a limited number of users, in the short term, or permanently exclude certain groups of users for a variety of business reasons. This section reviews several ways of controlling access to and creation of My Sites.
An initial requirement for My Sites is that Self-Service Site Creation needs to be activated for the site collection that houses the My Site host and also needs to be available for the web application that hosts the My Site host. If this isn’t configured, the full My Site deployment does not complete.
Assuming that My Sites are in use and are deploying successfully, the Manage User Profiles tool in the People section of the User Profile Service Application page provides a way to manage individual My Sites. So, for example, if IT wants to control access to TestUser1’s My Site, this is a good place to start. However, My Sites are “secure” by default, so even a farm administrator doesn’t have the privileges needed to manage this personal site! However, the farm administrator can gain access to the My Site site collection without having to ask the owner (TestUser1) by following these steps:
1. Access the Application Management page on the Central Administration site and click Change Site Collection Administrators.
2. Click the drop-down arrow next to the site collection indicated and choose Change Site Collection. Select the desired site. In this example, the site is my/personal/testuser1. Click OK.
3. As shown in Figure 23.13, only the user (TestUser1) is a site collection administrator by default. Click inside the Secondary Site Collection Administrator field, type in the domain and username of the desired secondary site collection administrator (company123administrator in this example), click the Check Names icon, and the name should resolve. Click OK to save.

4. Now that the administrator has site collection administrator rights on the user’s My Site, he can navigate to the Manage Service Applications page, click User Profile Service Application, and then click Manage User Profiles.
5. Here, enter the user’s name (TestUser1 in this example) in the Find Profiles field and click Find.
6. The user should show up in the results section of the page. Now click the drop-down arrow next to the user and select Manage Personal Site.
7. The familiar Site Settings page appears, and the farm administrator can now tweak permissions to the user’s My Site by accessing the Site Permissions page.
Another method is to create a user policy for the web application. This affects access to the entire web application, so this should not be used to restrict access to My Site sites if they are housed on the same web application that houses the intranet or portal site collection. The assumption here is that a separate web application was created for My Site and that the user policy will stop certain users from accessing that web application. Follow these steps to create a policy denying access to a My Site dedicated web application to the AD group External Partners:
1. Access the Central Administrator site, click Application Management, and then click Manage Web Applications.
2. Select the My Site web application (in this example, Personal) and click the User Policy button from the Web Applications tab on the ribbon.
3. Click Add Users.
4. Keep All Zones selected. Click Next.
5. From the Add Users window, add the username or AD group name to the Choose Users field (COMPANY123external partners in this example), and click the Check Names button, or use the Browse button to add the users or groups. Figure 23.14 shows the results when the group is validated.
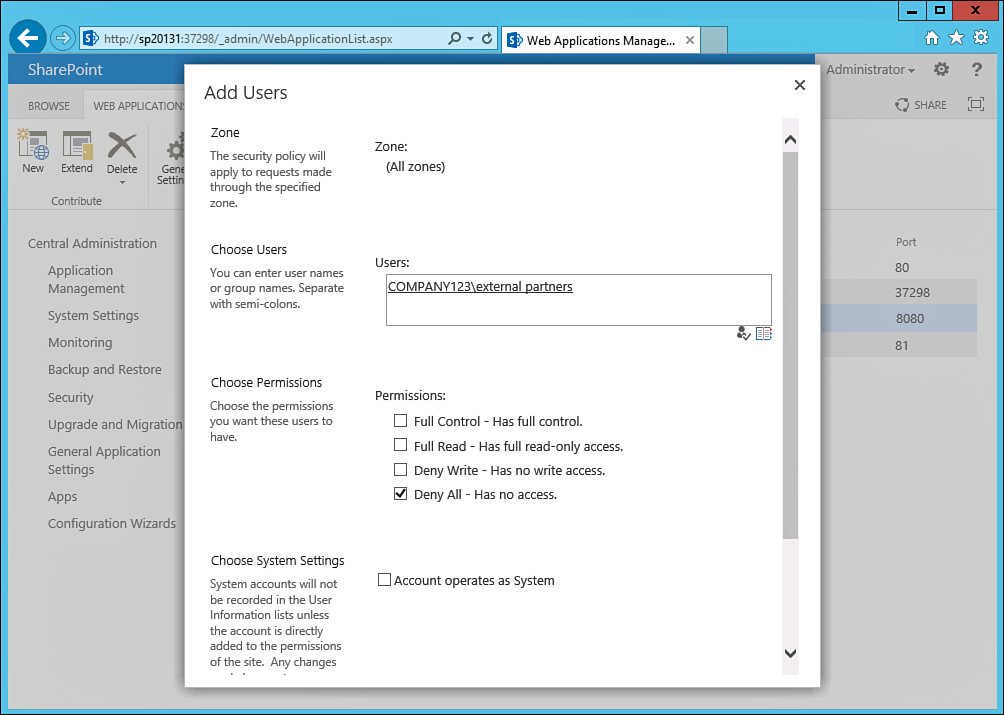
6. Check the box next to Deny All–Has No Access. Click Finish.
7. Then log in to SharePoint using the account that is a member of the AD group that the policy applies to and try to access My Site. In this example, the user Contractor1, who is a member of the Contractors group, gets a “Let us know why you need access to this site” message when trying to access her My Site.
Tip
Web application policies “win” over site collection policies, and web application deny policies win over web application allow policies. For example, in the previous exercise, a policy was created for the My Site Host web application that denies all access to members of the Contractors group. If a site collection administrator gives direct permissions to the Contractors group to the My Site Host site collection, any member of the group still gets an “Access Denied” error. This is useful to know when troubleshooting these types of errors.
Community Sites Explored
Community sites in SharePoint 2013 provide a number of tools and capabilities to create “forums” where users can post ideas and comment on other topics to generate content on one or multiple topics. Key components of a community are the topics that are defined as managing tools that can be used to categorize posts on the site. Moderators need to then manage posts and interactions on the site and define categories, set different levels of achievement that users can achieve by defining “badges” for the community, and perform other duties.
As with My Sites, community sites may not be for every organization and be relevant to every SharePoint 2013 implementation. To begin with, they should generally be used in conjunction with My Sites to fully leverage the capabilities of My Site newsfeeds and other My Site tools. In addition, community sites require time and effort from IT to set up, and then of moderators to monitor and manage the configuration of the communities, behavior, and posts of the members. Unregulated communities can easily get out of control and, if users report issues and no one responds, can lead to HR issues.
As with My Sites and many other SharePoint 2013 features, the general best practice recommendation is to test the capabilities of the community sites and make a decision from both a technology and governance standpoint on the value of the tools to the overall SharePoint project and act accordingly. Because community sites are usually rolled out as site collections or subsites, it is easy to control access to a test community during a pilot or prototype.
You can create communities within the SharePoint 2013 environment in several different ways:
![]() Create a community at the site collection level: This creates the community in a site collection “silo” and allows very granular management of the configuration of the environment and the storage of community data in a dedicated content database if needed. This is a good option if the community is used by many users and offers specific benefits to the SharePoint project. For example, a company that works in the entertainment space might benefit from a community that allows employees to share thoughts and ideas in a free-form forum type of environment.
Create a community at the site collection level: This creates the community in a site collection “silo” and allows very granular management of the configuration of the environment and the storage of community data in a dedicated content database if needed. This is a good option if the community is used by many users and offers specific benefits to the SharePoint project. For example, a company that works in the entertainment space might benefit from a community that allows employees to share thoughts and ideas in a free-form forum type of environment.
![]() Create a community at the site level (for example, as a subsite beneath an intranet or departmental root site): This is less of a commitment in terms of resources and administration and is a good option for SharePoint environments where there might be many communities with compartmentalized user bases. For example, a manufacturer might create a community with each departmental site to promote sharing of ideas within each department or group.
Create a community at the site level (for example, as a subsite beneath an intranet or departmental root site): This is less of a commitment in terms of resources and administration and is a good option for SharePoint environments where there might be many communities with compartmentalized user bases. For example, a manufacturer might create a community with each departmental site to promote sharing of ideas within each department or group.
![]() Community features can simply be activated on an existing site: Doing so provides the core community site pages, moderation, membership, and reputation functionality without creating a community itself. This is potentially less overhead than creating a dedicated site, but might confuse users about the true “purpose” of the site because many of the community site features might be seen as more “social” and less “business-like.”
Community features can simply be activated on an existing site: Doing so provides the core community site pages, moderation, membership, and reputation functionality without creating a community itself. This is potentially less overhead than creating a dedicated site, but might confuse users about the true “purpose” of the site because many of the community site features might be seen as more “social” and less “business-like.”
Note
A number of customized web parts are available on community site collections and sites with special capabilities designed for the community site. These include the following:
![]() What’s Happening: Displays how many members, discussions, and replies the community has
What’s Happening: Displays how many members, discussions, and replies the community has
![]() Top Contributors: Displays the members who contribute most to the community
Top Contributors: Displays the members who contribute most to the community
![]() My Membership: Displays information about a user’s membership in the community, such as the number of posts and replies
My Membership: Displays information about a user’s membership in the community, such as the number of posts and replies
![]() Manage: Provides site owners and community moderators tools to manage discussions, categories, members, reputation settings, and community settings
Manage: Provides site owners and community moderators tools to manage discussions, categories, members, reputation settings, and community settings
Follow these steps to create a unity site:
1. From Central Administration, click Create Site Collection from the Application Management page.
2. Select the web application that will house the Community Site, enter a title in the Title field (in this example, Having Fun Community), provide a URL in the URL field (in this example, http://sp20131/sites/Fun), choose Community Site from the Collaboration tab in the Select a Template section, identify primary and secondary site collection administrators, and click OK.
3. When the community site collection has been created, visit it by clicking the link provided. The results should look like Figure 23.15.

4. Click the Join This Community button. A welcome message should appear. Refresh the screen and the Member counter in the What’s Happening section should increment to 1.
5. From the home page, click the Community Settings link in the Community Tools section on the right side of the page.
6. Check the Enable Auto-Approval check box, and check Enable Reporting of Offensive Content check box. Click OK.
7. From the home page, click the Reputation settings link in the Community Tools section on the right side of the page.
8. Note that Allow Items in This List to Be Rated is set to Yes and that the Likes option is selected. Note the Member Achievements Point System, as shown in Figure 23.16. Leave these settings set to their defaults.

9. In the Achievement Level Representation section, select Display Achievement as Text. Note that the fields are populated with the text Level 1, Level 2, Level 3, Level 4, and Level 5. Click OK.
10. From the home page, click the Create categories link in the Community Tools section on the right side of the page.
11. Click New Item and enter a category name (for this example, Restaurants). In real-world situations, it is worth finding, editing, and uploading images that will be used for the category for a more visually rewarding end-user experience. In this example, leave the Category Picture fields empty. Click Save.
12. Return to the home page and click the New Discussion link; a form will load. Enter in a sample subject, sample body text, select Restaurants from the Category drop-down list, and click Save. The home page will look similar to Figure 23.17.

Summary
My Sites in SharePoint 2013 are dramatically improved and seem to hit the mark when it comes to providing a suite of tools that allows organizations to easily deploy My Sites, create Community template-based site collections, and allow users to start following sites and activities of other users. The Newsfeed page quickly becomes a Facebook-like page to check regularly and see what’s going on. As this chapter showed, there are many interesting and powerful features available in My Sites, and also many tools in Central Administration for the farm administrator to become familiar with to be able to thoroughly understand the “moving parts” of the My Site environment. For end users to have a positive experience, it is important to carefully test the tools that will be rolled out and to ensure that policies around the use of these tools be established and enforced.
Best Practices
The following are best practices from this chapter:
![]() Before actively enlisting users to create My Site sites, the farm administrator should verify that all the Central Administration components are properly configured and meet the needs of the organization and that AD synchronization is functional.
Before actively enlisting users to create My Site sites, the farm administrator should verify that all the Central Administration components are properly configured and meet the needs of the organization and that AD synchronization is functional.
![]() A new feature in SharePoint 2013 is called Direct Active Directory Import. It allows “basic” import of user information from AD without requiring the configuration and use of the FIM-based Profile Synchronization tools. The tool has limitations when compared with the Profile Synchronization tools, but in many cases is sufficient for basic synchronization with AD.
A new feature in SharePoint 2013 is called Direct Active Directory Import. It allows “basic” import of user information from AD without requiring the configuration and use of the FIM-based Profile Synchronization tools. The tool has limitations when compared with the Profile Synchronization tools, but in many cases is sufficient for basic synchronization with AD.
![]() For organizations with more-complex synchronization requirements, where the full Profile Synchronization features are required, a recommended best practice is to create a new web application and My Sites Host site collection and a User Profile service application. The full configuration process varies based on the details of the environment and isn’t covered in this chapter. Although it is generally quite involved, it is often required for larger organizations with more-complex needs.
For organizations with more-complex synchronization requirements, where the full Profile Synchronization features are required, a recommended best practice is to create a new web application and My Sites Host site collection and a User Profile service application. The full configuration process varies based on the details of the environment and isn’t covered in this chapter. Although it is generally quite involved, it is often required for larger organizations with more-complex needs.
![]() By default, only the creator of the My Site (such as TestUser1) is a site collection administrator of that site collection. Therefore, farm administrators should be familiar with how to add themselves as My Site administrators where necessary, as covered in this chapter.
By default, only the creator of the My Site (such as TestUser1) is a site collection administrator of that site collection. Therefore, farm administrators should be familiar with how to add themselves as My Site administrators where necessary, as covered in this chapter.
![]() Managed metadata, along with audiences, can be leveraged in many places in the My Site environment and should be considered as vital tools to the success of a well-thought-out My Site strategy.
Managed metadata, along with audiences, can be leveraged in many places in the My Site environment and should be considered as vital tools to the success of a well-thought-out My Site strategy.
![]() Numerous tools important to the successful management of My Sites are found in Central Administration on the Manage Profile Service: User Profile Service Application page. As reviewed in this chapter, the farm administrator should become thoroughly familiar with these tools to understand the fields in user profiles and how to manage user profiles, configure My Sites, and perform other management functions.
Numerous tools important to the successful management of My Sites are found in Central Administration on the Manage Profile Service: User Profile Service Application page. As reviewed in this chapter, the farm administrator should become thoroughly familiar with these tools to understand the fields in user profiles and how to manage user profiles, configure My Sites, and perform other management functions.
![]() Communities can be deployed as site collections, and subsites or community features can be enabled on existing sites. In general, it is recommended to create community sites as site collections or subsites rather than mixing community features with a departmental or collaboration site to keep more formal business documents and procedures separate from the less structured “forum-like” community environment where end users earn points and badges based on activities and contributions and are prone to off-the-cuff posts and comments.
Communities can be deployed as site collections, and subsites or community features can be enabled on existing sites. In general, it is recommended to create community sites as site collections or subsites rather than mixing community features with a departmental or collaboration site to keep more formal business documents and procedures separate from the less structured “forum-like” community environment where end users earn points and badges based on activities and contributions and are prone to off-the-cuff posts and comments.