
In This Chapter
10.5 Score Editing and Music Preparation
Walkthrough
Creating AC3 Files Using Apple Compressor
Knowledgebase
Logic and Multimedia Production
Writing music to picture for film and television often required a whole host of equipment from some form of video player synchronized to your computer sequencer and Digital Audio Workstation. However, Logic takes this task in its stride, and today, whole soundtracks can be written for picture from the one application. This has been made possible by the thorough integration of a visual player and high-level synchronization options from the ground up. This flexibility has meant that Logic has become one of the most popular products for film and television music production.
Additionally in the past few years, we have seen a sudden rise in other outlets for the music producer, such as gaming and Internet multimedia. Logic, with its integration of codecs to export audio as MP3, AAC, and many other formats, has positioned itself as a key production tool for many industries other than recording and production.
In this chapter, we take a movie file and begin integrating it into the Logic project and explore how to write effectively for film and television. We’ll look at working with surround sound, markers, scoring, and the delivery formats expected from the industry.
Logic has been at the forefront of music and audio composition for picture for sometime, and as such, there are many ways you can work with visuals. You can, of course, synchronize Logic to an external Visual Editor such as Avid or Final Cut, if you so wish, but you’re more likely to obtain a video file as an .avi or .mpg (Quicktime) ideally with embedded timecode so that you can work wholly within Logic itself.
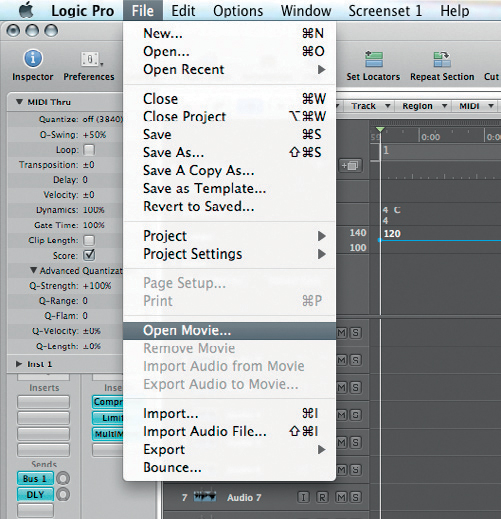
Figure 10.1 To get started on your composition, you’ll need to select Open Movie from the File menu.
Before starting work on the music and audio for your visuals, you will need to import the movie into Logic. To begin to integrate movies within your song, go to Open Movie (File > Open Movie…). A second method involves selecting your movie using the Open Movie button in the Video lane within the Global Tracks, which is covered later.
Once you have located your movie in the browser, it will appear as a floating window, which sits neatly on top of Logic. This can be moved around to fit the screen arrangement you have currently. This floating movie window can be resized to suit, and this is achieved by Ctrl + clicking the video window. This produces a new small selection box that reveals itself to offer you the choice of an alternative size for the window or the Video Project Settings.
The Video Project Settings allow you to control a number of things starting with where the movie presents itself. Within the Video Output menu, it is possible to select the preferred output. This will naturally remain as “Window,” which will open the movie in the standard floating window. For using a second monitor attached to the DVI output of your Mac, select Digital Cinema Desktop and then select the size of Video Format for that screen. This monitor cannot be used for any other function while Logic is in this mode. Other options include the professional DV output associated with the picture industry called DVCPRO HD and FireWire for sending to an external video interface.

Figure 10.2 Ctrl + clicking the movie window opens up many options such as the size of the movie window itself.

Figure 10.3 The small movie viewer in the Inspector can be a real space saver when working on a smaller screen.
The audio from the original movie can be piped through to the main output, although you may wish to control this by importing the audio into the Logic project, which we’ll cover later. Other flexibilities are available here, such as the movie start. For example, it is often unlikely that you’ll want the video to start running from 00:00:00:00, but may indeed need some preroll for any introductory credits that might not have come to you yet.
If you’re working on a small monitor or a laptop, Logic has a neat way of monitoring what is going on in your movie. At the top of the Inspector, there will now be a movie header. Simply click on the triangle on the left-hand side to open up a small movie viewer.
The Follow Tempo option fixes the speed of the video to the tempo of the Logic song. This link is set by something called the basis tempo. If the project tempo alters, then the speed of the video can relate to the difference between this and the basis tempo just like an Apple Loop would speed up to follow a new project tempo. To the bottom right of this Project Settings pane lies another button called Video Preferences.
Launching the Video Preferences pane reveals some more settings that can be adjusted for our work with video. The uppermost sliders, Video to Project and External Video to Project, allow for the video and timeline to be adjusted against each other, thus altering the start point of the movie if perhaps some lip synchronization is slightly out from a provided dialog track.
When working with video, Logic displays stills of your movie in Global Tracks (covered later). To allow Logic to do this, the computer needs to hold the movie in something called a Cache. A Cache is a form of buffer that holds some of the required data in memory for quick access. These settings allow you to specify both the Cache resolution of the video information and the maximum Cache size allowed. By altering these, you can manage how much video detail you can store in the Cache and thus the response speed when scrubbing.
Extracting the Movie Audio Content
Quite often, you might be given a visual that has integrated audio, perhaps a dialog track for the scene you are composing to. It will be prudent to extract this dialog track for you to be able to manage its level and mute throughout the writing process. In some circumstances, for example, you may wish to mute the dialog to ensure that you can hear your music properly before reintroducing it to see if it all fits together.
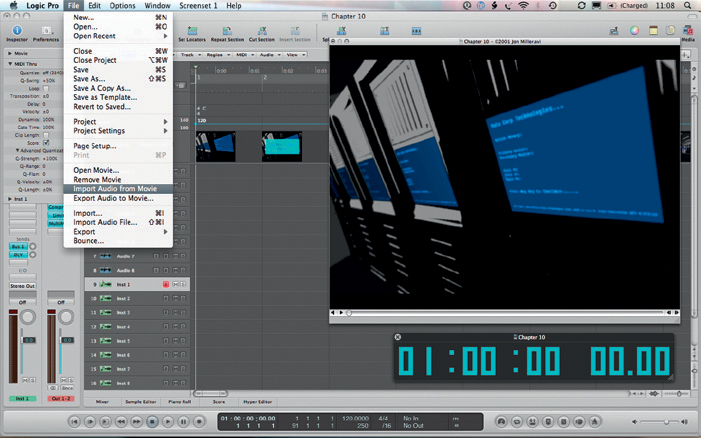
Figure 10.4 Importing guide audio from the movie can make embellishment a little easier.
The quickest way to extract audio for this purpose is to select Import Audio from Movie (File > Import Audio from Movie). By selecting this, Logic goes to work immediately taking the audio from within the movie and moving the subsequent audio file to a track on the Arrange window. The other option is to import audio from movie, which places the audio file in the audio bin. When the audio is extracted, its region will be timelocked to the position of the movie to ensure lip synchronization.
Global Tracks are an important feature of working to picture, not only for the viewing of video stills in the timeline but also for the ability to change the tempo, time signature, and keep track of important markers in the project. Changing the pace of the music can be crucial when composing to picture, and Global Tracks allow you to make these adjustments effectively as required.
Accessing Global Tracks is achieved by pressing “G” while on the Arrange window or clicking on the triangle to the left of the “Global Tracks” legend to the top left of the Arrange area. This should expand to show you any number of lanes that can typically include markers, signature, and tempo. To add to these, we need to choose to configure Global Tracks.
For example, a common way to view the visuals you’re working with is to use Global Tracks. Video stills can be added to this timeline by going to View > Configure Global Tracks or pressing Alt + G. A list will present itself in which you can select the lanes you wish to see in Global Tracks. By selecting video, a new lane appears which can show a set of stills of your video against the timeline.
Within this lane, there are some useful buttons. One of those is Open Movie, which offers you the opportunity to select the traditional, larger floating video window if you already have a movie loaded. However, if you’ve not yet loaded a movie to the project, then a Finder-like pane will appear to allow you to select a new movie. The other button is Detect Cuts, which we’ll discuss in a moment.
As with the locators found on traditional multitrack tape machines, Logic can also offer the ability to return to any marked position on the timeline. This can be useful to return to any point of a project which is visited frequently when recording, such as the beginning of the Middle 8 or a Chorus. Additionally this can have some excellent uses when working to picture.
Logic terms these location points as markers, and they can be seen in the time bar at the top of the Arrange area but are accessed in two main ways, through either the Global Tracks or the Markers Tab in the List Pane. As you expand the Global Tracks, you will notice that the Markers Lane come into view. It is likely that this lane also needs to be expanded by pressing the triangle to the left of the track header. This lane shows any markers you may have set against the timeline.
To get instantly working with markers, simply place the playhead at the required position and then click the Create button. A new marker is created that appears to run straight to the end of the project, although there is no length specified. This will be interrupted by the next marker you create or if you specify a marker length.
Markers can also be created on the fly while you are playing. This can be useful to note any aspect of a recording or a take you wish to revisit when you listen back. By pressing Cmd + Alt + Ctrl and clicking on the Lane, a new marker is created whose name awaits you to edit. Simply rename the marker and press return. This can be really flexible as you label sections going through a song, for example.
Editing a marker can take place directly on the Global Track Lane by selecting the appropriate tool from the Click Tools Menu (Escape) then editing the marker. Using the Text Tool to name makers is very flexible and can assist your workflow while you play through the takes.
All markers are also reflected on the Marker tab within the Lists Pane, which can be found by pressing Alt + M while on the Arrange window. Alternatively click on the Lists button to the top right of the Arrange window. Next, select the Marker tab that shows all markers within your project in a long editable list. Here, you’ll see the markers arranged in a table with their position to the left-hand side and their Length to the right. Naming may appear the same as in the Global Tracks lane here but can be added to create a separate line within the Markers Lane, which can reflect the part of the project. Simply double-click the name of the marker within the tab to reveal the marker naming area.
Each marker is tagged as “Marker ##” or “Scene ##,” where the “##” automatically numbers the markers in sequence. If you continue to write after this, then your text will be merged on the same line. But as in the example below, by pressing return, the Marker Lane can produce separate lane to show your description, which can be very useful when working to picture.
Scene markers are different to that of traditional markers in that they are locked to the movie file using Society of Motion Picture and Television Engineers (SMPTE) timecode. They will not alter depending on tempo changes or edits in the project. It is possible to convert these to normal markers and vice versa by selecting the Marker tab (Alt + M) and selecting the appropriate Convert … command from the Options menu.
Locating to the marker positions is simple and can be achieved first within the Marker tab by using the Finger Tool from the Click Tools Menu (usually the Cmd + Click Tool is set to this automatically) to click on any marker. The playhead will spring back to the marker point. To wrap the locators around the marker length, press Option + Cmd and Click. To access the start of a marker from the Global Tracks lane, simply press Option + Click a marker. Key commands can be programmed to respond to marker numbers if required, but are not part of the default key commands set.
Within the Global Tracks Marker Lane, an additional button called “From Regions” can be seen. This feature allows you to select pertinent regions from which markers are to be made. Perhaps you have different folder tracks already cut to the length of your verse and chorus. In this instance, the markers would automatically follow suit and allow you quick access to these elements of the song.
The “Alternative” feature within the Global Tracks Marker Lane offers the opportunity to have up to nine different sets of markers. This might be very useful when working to picture where markers are required which represent the dialog, others can be set in an alternative for working against the music and perhaps another for the visuals themselves.
It is important to get a feel for the structure of the visuals you are working with. A script or storyboard may not be provided and yet you will need to break the visuals down into useful, manageable chunks. The best way to get a handle on the visual material you are working with is to work scene by scene.
“Detect Cuts” is a button on the Video Global Track and stands for Detect Scene Cuts. Logic has a really useful feature in that it can detect scene changes in the video and produces markers for you to refer to or edit to suit. These take a little while to detect and will appear in the Marker Lane in Global Tracks and in the Markers List (Alt + M).
Scene markers are presented with a “film” icon within the list and are automatically labeled as Scene 1, Scene 2, Scene 3, etc. Obviously, this process may not be entirely 100% accurate, and it may be necessary to alter, add, or delete some of these Scene Markers. To create extra markers to denote scenes that the process may have missed, simply create a new marker by pressing the Create button on the marker Global Track. This marker may need to be converted to a Scene marker as described above by opening the Markers Tab in the Lists area, then opening Options > Convert to Scene marker.
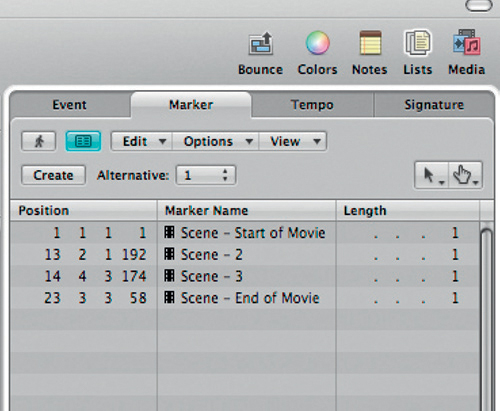
Figure 10.5 Scene markers are clearly seen within the Markers Tab and can be renamed and edited here.
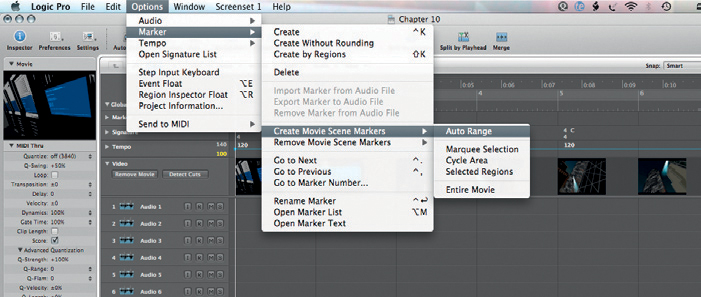
Figure 10.6 For more detailed extraction of scene changes for your markers, you might wish to use the menu at Options > Marker > Create Movie Scene Markers… where there are various selections to make scene cut detection more tailorable.
As you work through each of the Scene markers, you will need to move them to fit the movie more accurately. This can be easily achieved in the Global Track, where you are automatically given the resize tool. Alternatively visit the Marker tab and edit using the SMPTE timecode.
Working with Tempo and Signature Changes
Making changes to the pace of the music is often the key to writing effective music when writing to visuals. Whether it is to denote a new mood or some dramatic news that has been announced within the dialog, changing key and tempo, in conjunction with the accompanying visuals, could instantly move your audience to another emotional space.
Changing the tempo is very simple and can be achieved in the Global Tracks. Either select the pencil tool (Escape > 2) and click the tempo change at the desired place or choose the Tempo tab from the Lists pane, which can be accessed by the icon on the right-hand side of the Arrange window.
Using the Pencil tool can offer you a quick method to try ideas out in the project. Clicking the Global Track will reveal a new tempo, which can be glided up or down to instigate a tempo change. You’ll notice that the way in which these tempo changes are represented look very similar to that of the automation lanes and as such can be manipulated in similar ways.
For example, you might choose to introduce the piece at a slower tempo and increase it gently. To achieve this is easy, simply set the two different tempos at the ideal point. The jump will be instantaneous and will sound odd. There is a small point in blue at which the tempo changes from the original tempo to the new tempo. This first point can be moved backward in time to introduce a more subtle curve to the tempo change, thus making it gradual.
The menus within the Tempo tab offer some more options to tempo management. For example, you can view the subtle steps that Logic has placed in the project to increase the tempo. To do this, you need to click on the Additional Info button to the left of the Edit menu in the Tempo tab. Prior to selecting this feature, only the start and end point of the tempo change can be seen.
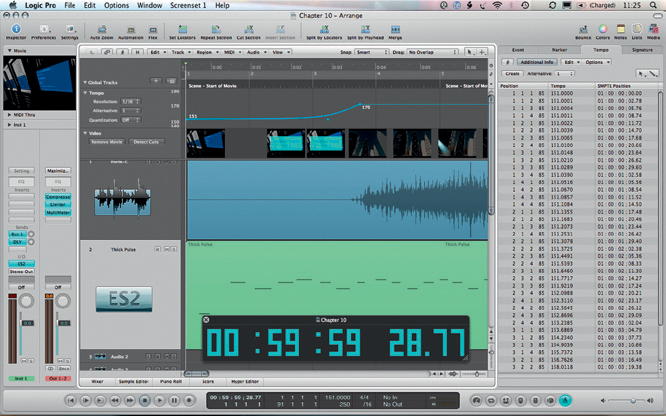
Figure 10.7 Tempo changes can be altered quickly and flexibly in the lists pane on the Arrange window or by editing the Tempo Lane within the Global Tracks.
With the steps expanded, it is possible to quickly edit any step to suit. As you edit the tempo of one of these discrete steps, the Global Track will reveal the steps graphically on screen. However, to create a more staggered, creative, or editable tempo change, simply choose Options > Tempo > Tempo Operations, which can offer some more options to the on-screen Global Track.
A new pane appears that allows you to edit more precise and in-depth tempo changes and alterations. There are many different editable features here, such as the types of curves and their resolution. Within the Operation menu, there are a number of really useful features that could save time, such as stretching the curve out or simply scaling it a little.

Figures 10.8 and 10.9 The Tempo Operations dialog gives some additional control over making tempo alterations.

Figure 10.10 Adding a key change in the Global Tracks is easy by double-clicking in the lane where a dialog box allows you to specify the change.
The signature lane in the Global Tracks is split into two; the top is for the time signature and the other for the key. As with the Tempo lane, there are again two main methods of changing the signatures. The first is through the lists on the right-hand side Lists window, which contain a tab dedicated to signatures. Within this tab, there are two buttons, one for Time Signatures (create signature) and the other to Create Key changes.
The second entry method is to click again on the lane itself with the Pencil tool (or simply double-click with the pointer). Whether it is for a signature or a key change, a slightly different dialog box greets you. The first of these is the time signature that not only allows you to simply select the signature you want but also gives you the opportunity to enable beat mapping, which we covered in Chapter 5.
Adding a key change is really useful for quick ideas and changes and will work with Apple Loops and any audio you have recorded in this Logic song. The key signature here will enable the Loops to alter in real time to your changes. Simply select the point at which the key change is supposed to occur and double-click (or click one using the Pencil tool), and a dialog box will emerge requesting the desired key and also whether you wish to disable double flats and sharps.
It is often difficult to be sure that the choices you make are definitely going to be right for the outcome of the visuals. Often, it is nice to make changes and try out ideas without losing the original version. Logic has an interesting solution that allows different experiments.
Each Global Track has something called Alternatives, which offer different perspectives on the same track. Similar in nature to alternative playlists when quick swipe comping which we covered in Chapter 5, the Alternatives menu in the Global Tracks allow you to make some different decisions without losing your original root idea. Simply click on the Alternatives menu and choose an alternative number. It is useful to remember that by pressing Alt as you click on your new choice, the data are copied from one alternative to the other.
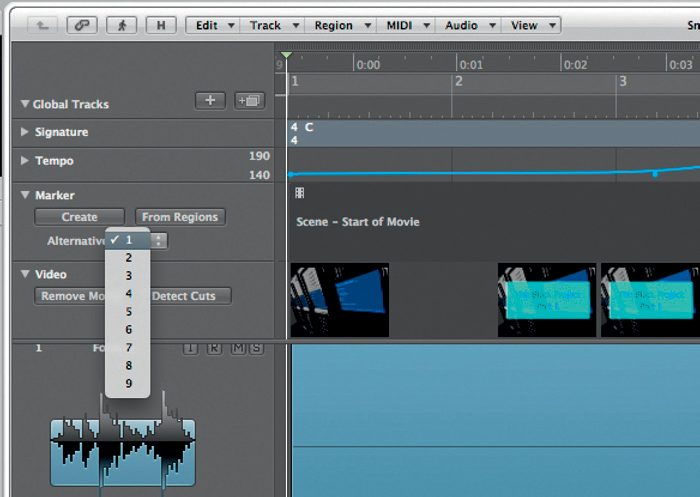
Figure 10.11 Alternatives are useful to try out different permutations of ideas in Global Tracks.
Working to picture is always dependent on timecode, which governs the synchronization between different cameras and audio recorders for editing purposes. Timecode typically comes in the form of SMPTE, which splits the time into divisions of Hours:Minutes:Seconds:Frames, and in some cases, subframes.
The transport bar always shows the SMPTE time of the playhead in the top left with the accompanying bars and beats below. When spotting sounds or effects to film, it will probably be necessary to see a larger timecode display. Ctrl-clicking the transport bar brings up a menu from which you can choose from the Big Bar Display or Big SMPTE Display. These are displays that remain within the darker section of the transport bar. There are also two options to show these as separate floating windows by selecting the Open Giant Bar Display and Open Giant SMPTE Display, respectively (shown on next page).
Working to picture will from time to time mean that you will be given a spotting sheet from your clients listing the sound effects. This will tell you where all the sounds need to occur to a particular timecode point and may also include an out time point. These points are given in SMPTE timecode, and in Logic, it is easy to edit to these points. It’s worth sometimes working to a snap value of “Frames” when working to picture to ensure that each frame is synchronized with the audio.

Figure 10.12 The Customize Transport Bar dialog box provides considerable flexibility in the information and control you have over your project.

Figure 10.13 The playhead’s SMPTE position can be specified by double-clicking the timecode readout in the transport bar.
Two main ways of spotting audio are offered. First is by using the Move to Playhead Position feature. Simply set the playhead to the point you wish for the audio to be placed. This can be best achieved by double-clicking on the SMPTE display in the transport bar and typing is straight in. Pointing toward the audio region, click with control pressed down to reveal the contextual menu and within this will be the Move to Playhead Position command.
The second and more likely method is to edit using the Event tab from the Lists window on the right-hand side of the Arrange area. Presuming you have called up all your audio regions onto the Arrange area, they should be listed here. To hone in on the parts you wish to spot, ensure that Link is on both the Events List and the Arrange window, and simply click on the region you wish to view. The Events List Tab is naturally set to show bars and beats and will need to be changed to view SMPTE through the View Menu (View > Event Position and Length in SMPTE Units).
To spot the audio, simply double-click on the position column to type in the desired timecode. The audio should in theory be spotted, although it might be likely that you will need to delve in further to more accurately ensure synchronization with the picture. Nudging the regions by frames can be a really quick way of making things fit. As we mentioned before, it is often wise to work to frames for the time being, although there will be times where you wish to work in finer resolutions. To change the Nudge Value, right-click on any region and select Set Nudge Value. Once set, simply select the region to be moved and select either the Nudge Left or the Nudge Right from the region’s contextual menu or press Alt + Cursor Left or Alt + Cursor Right.
A really fast way to spot audio is to position the playhead at the desired point and select the track you wish the audio to be placed. Next, open the separate Audio Bin Window using Cmd + 9 or Windows > Audio Bin. Select the audio file in question pressing Cmd as you click, and the audio file will be placed at the appropriate place. If you then select another audio file in this way, it will be butted up to the last audio file. There are a couple of useful key commands that can be brought in here called Pickup Clock (move Event to Playhead Position) and Pickup Clock and Select Next Event. These can be set in the key commands menu (Alt + K).
Working to picture or on larger projects might involve the need to link Logic to another player. For movie work in the past, it had been often the case that the video would be on another machine, perhaps tape-based, and Logic would need to synchronize to it. Similarly, there may be times when Logic needs to synchronize to another multitrack system, whether that be a legacy open reel 2-inch 24-track tape machine such as a Studer A800 and Otari MTR90 or simply another ProTools rig on another computer. Either way, Logic has a suite of features to cope with your synchronization needs.
Logic syncs in a number of different ways that are industry standard. The main system used for video is SMPTE, and it is an audible code that can also be translated into a digital equivalent used in MIDI called MIDI timecode (MTC). MTC is a popular system used between MIDI devices, and in the latter example above, it is likely that this would be the protocol used to connect a ProTools rig to your Mac with Logic on.
In either case, you will require a device that understands the timecode protocol. All MIDI interfacts should understand MTC, but only some devices are able to translate audible SMPTE timecode to MTC such as MOTU’s MIDI Time Piece.
To tell Logic that it will need to slave to another timecode signal requires you to select the Customize Transport Bar preferences by Ctrl + clicking the transport bar. Select the Sync check box that will generate a button on the transport bar, which looks like a clock with a large arrow facing into it.
In an ideal world, the synchronization should be as simple as selecting this button, and wait for an incoming sync signal to get the project moving. However, invariably you will need to edit the synchronization settings to suit the project you’re working on. To do this, either Ctrl + click the Sync button on the transport bar and select synchronization settings or vising File > Project Settings > Synchronization.
Within this pane, lie a number of key features for working with external synchronization sources. The frame rate of the synchronization is very important. Historically, frame rates differed depending on where in the world you worked; for example, 30 frames per second is used for television in the United States of America, whereas we worked with 25 frames per second in the United Kingdom. This was a simple division on the frequency of the electricity supplies in these regions at 60 and 50 Hz, respectively.

Figure 10.14 The Sync button seen here in blue can be selected from the Customize Transport Bar options. With this selected, Logic works in slave mode to incoming synchronization signal.

Figure 10.15 Right-clicking the Sync button on the transport bar gives you very quick access to the pertinent settings such as synchronization source and settings.

Figure 10.16 Use the synchronization settings to select frame rates and the usual offsets needed from time to time.
Strictly speaking, we’re no longer governed in quite the same way, and Logic can work at whatever frame rate is required. Within this menu are considerably more frame rates than we’ve hinted to above and it will all depend on the project you’re working on as to what frame rate you’ll need. Safe to say, Logic can handle them all!
Within the synchronization settings pane are some opportunities to offset the timecode to the arrangement. These offsets are very important when working with film. For example, you may wish to use a fresh Logic project for a Scene 1 hour into a film. It would be rather silly to start the Logic project at 1 hour also because things like Freeze tracks would take a considerable amount of time to process!
Setting the offset is easy. Simply select the SMPTE time at which your song should play. For example, Logic will open with Bar 1 playing at 01:00:00:00:00, which means 1 hour. SMPTE reads as Hours:Minutes:Seconds:Frames:Sub-Frames. However, there will come a time when you will need to alter this to suit. In the example above where we’d like to start the new Logic project at 1 hour into the movie, we’d need to set an offset of an extra hour. As such, we’d want the SMPTE reading here to read 02:00:00:00:00. Logic will then offset the incoming timecode to allow Logic to start playing at 2 hours.
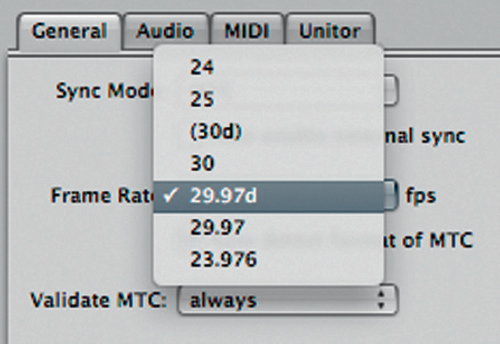
Figure 10.17 The frame rate will need to be matched to your synchronization source to keep up!
Below the main offset selection is an option to allow the bar positions to show the absolute timecode reference, which can be useful when working to external sources. It is important, for example, that the timeline you work to reads the same as the incoming timecode. Due to the offset in the example above, the Logic project will show a time of 00:00:00:00:00 despite being an hour into the film. This can be changed here, so the project starts Bar 1 at 1 hour, but also shows an accurate portrayal of the timecode it is receiving.
Logic also has the ability to be the master and to allow other devices to slave to its timecode. In this instance, it is necessary to return to the synchronization settings as outlined above and click on the MIDI tab. Here, we can see a checkbox titled Transmit MIDI Clock, which refers to the tempo settings of the project. This clock pulse can be outputted using the MIDI protocol to connect other devices such as effects units whose delay settings can respond in time with the project. Alternatively, in rare occasions, this can be used in part for synchronization.
Below this is the Transmit MTC checkbox and output menu. Here, it is possible to select a device (or “All”) to send the MTC to. This will enable any device connected using MTC will follow Logic. For example, if the ProTools rig was to sync as a slave to Logic, then simply connect a MIDI cable between the output of Logic’s interface to the other computer with ProTools’ MIDI In.
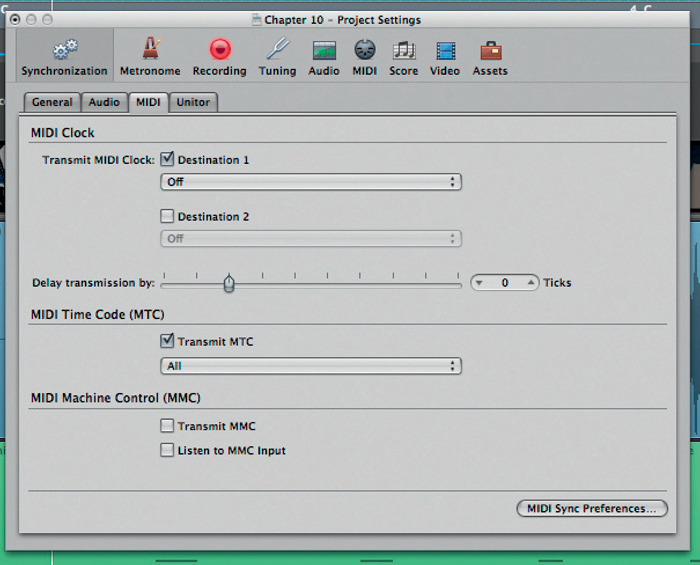
Figure 10.18 Transmitting MTC can be engaged by selecting an output from the Transmit MTC menu, or leave it to send out of all available MIDI outputs.
MIDI Machine Control is a remote control protocol that enables connected equipment to be controlled by another device. For example, Play on the master could be engaged by controls on a remote slaved device. This can still be a hugely beneficial option to employ across large studios.
10.5 Score Editing and Music Preparation
Although the Score editor can be used for MIDI editing activities in Logic, its most useful features lie in the “preparation” of music – in other words, taking the raw MIDI information that you’ve performed in the project and transcribing this as finished, musical notation. To be fair, though, Logic doesn’t compete with the publishing-standard output of dedicated industry-standard scoring programs like Finale or Sibelius, but its features are more than adequate either to produce parts for a small-scale overdub session, for example, or in the case of a full orchestral session, a sensible “intermediate” format to present to a proper orchestrator.
The process that we’re going to explore here, therefore, is the rudiments of taking an existing MIDI composition and turning that both into a full score for the conductor and parts for the musicians. Rather than being a complete exploration of the scoring features and the art of orchestration (which is a book in its own right!), we’re going to take a look at the essential processes and steps that guarantee readable, usable results in the shortest amount of time. If you want to produce even more effective scores, though, it’s well worth exploring further to see just how effective the Score editor can be in this task.
As the old adage goes – garbage in, garbage out – this is never more true than in the process of creating a score. Although it’s easy enough to open any region in the Score editor so as to see a notation-based view of the music, it doesn’t guarantee that the score is legible or playable. Arguably, the clearest example of this is strings. In your MIDI arrangement, it’s highly likely that the entirety of the violins, violas, and cellos, for example, will be amassed to one generic string patch. Although this polyphonic approach makes sense for MIDI production, it isn’t how players expect to read a score, as in reality, each instrumentalist will be expect to be presented with a single line, with the full score combining all the single lines onto a page.
The first step to prepare an effective score is to divide the music into a number of distinct lines (one for each player, or part) within your Logic arrangement. As we saw in the MIDI sequencing and instrument plug-ins chapter, there are a number of ways of doing this – from simply copying the part over and deleting notes in turn to features like Functions > Note Events > Voices to channels, followed by Split/Demix > Demix by Event Channel. Either way, you should end up with a series of regions for each part, each of which should be assigned to a unique named track for each instrument you want to appear in your score (like violin I, violin II, viola, and cello).

Figure 10.19 Here’s a typical “massed” string part, with all the violins, violas, and cellos being triggered from the same general MIDI track.

Figure 10.20 Creating a score from a series of split parts, each assigned to a different named track, will produce a more legible overall score, as well as facilitating the printing of individual parts.
With the parts split, you might also want to glance through and double check any timing issues, as well as the precise duration of notes. For example, in a MIDI arrangement, it’s easy to have notes finishing 1/16th before the end of a bar, but this can lead to some strange looking note durations in the score, alongside unwanted rests. For simplicity, it’s also worth merging each part into a single region lasting the full length of the score, unless you want parts dropping in and out of the finished notation.
With the MIDI data prepared, you can now go and open the required parts in the Score editor, by drag-enclosing the required instruments and opening the Score editor via the Window menu. Although, of course, you can also open the Score editor directly from the Arrange window, it probably makes most sense to have the complete screen dominated by the scoring features.
On opening the Score editor, you should have something on screen that approximates music, although as with the raw MIDI data, this will need to be tweaked to make the notation as legible as possible. For example, most of the instruments will probably default to a piano stave (with both a treble clef and bass clef on the same line!), and it’s probably the case that the music simply runs across the full width of the screen, rather than being displayed on a page-by-page basis.
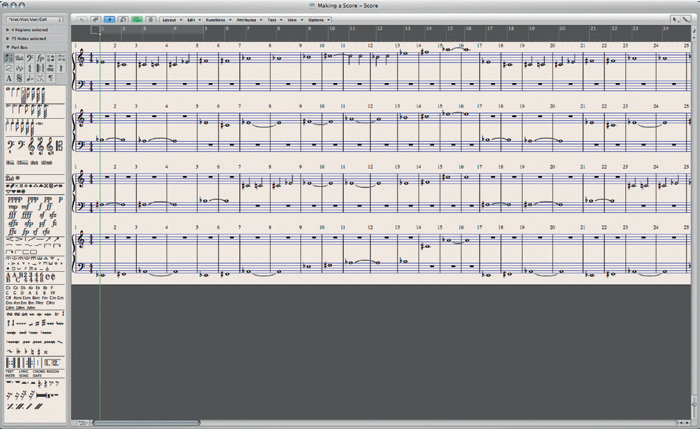
Figure 10.21 On opening the Score editor, you’ll be presented with a basic score, although this will need to be modified to make readable.
The first change, therefore, should be to turn the Score editor from its standard view into a page view, via View > Page View. Next comes the task of setting the staves. In keeping with the workflow on the Arrange window, you’ll find that each line of score has its own set of score parameters, available via the Inspector to the left-hand side of the Score editor window (note that this might be minimized at first or even with the Inspector itself hidden). By clicking on each line of the score, therefore, you should be able to select an appropriate style for each part – maybe selecting treble for the violins or the bass clef for a cello part. Note that for any transposing instruments (like Horns in F), Logic will automatically transpose the “scored” version of the instrument, although the “played” version remains untouched.
Adding Expression and Score Markings
To add interest to the score, it is vitally important to add expression markings; otherwise you end up with a sterile and lifeless recording. To help with this, the Score editor provides a part box, which allows you to place a series of expression markings onto your score. These could be as simple as pp, mf, or ff dynamic markings, right up to trills, or crescendos and diminuendos. What you should notice is that the score stylings are attached to a particular part or line in question (the corresponding part will be highlighted blue when you drop the object) so that even when we move back down to part level (rather than the full score) these markings will be carried with the part.

Figure 10.22 Adding expression markings, and so on, will make your score both clearer and more expressive.
Alongside expression marks, the part box also allows you to set the key of the piece (drag this to the first bar of the score and then any subsequent bar should a key change occur), as well as text-based objects like the song name.
Shrinking to Fit: Score Settings and Score Sets
Changing the broader qualities and appearance of the score can be done via the score tab of the project’s settings, also assessable via the Layout menu. Although most of these settings (margin spacing and so on) will be best left in their default state, there are a number of useful functions. For example, the Number and Names tab allows you to change how instrument names are displayed, using either their Full Names throughout the entire score, for example, or an abbreviated Short Name for pages after the first page.
Another part of the full score’s appearance is the percentage scaling of the staves on the page. For example, on a full score, it’s often important to see as much of the music as possible, so as to avoid excessive page turning, as well visualizing the entirety of the arrangement at any point in time. This is of particular relevance to a full orchestral score, where you might need 30–40 different staves on the page at any one time.
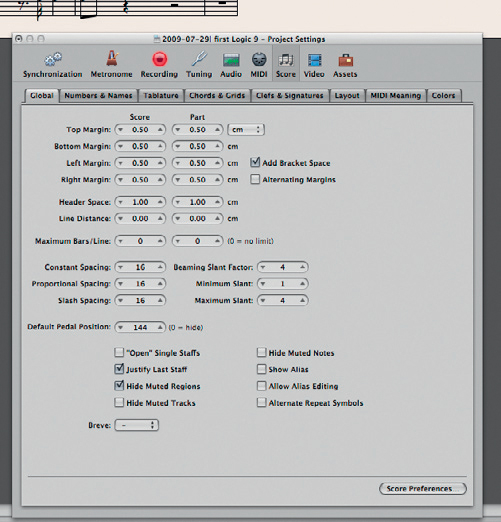
Figure 10.23 The Score tab under the project settings allows you to define some macro properties about how the score is laid out and printed.
Technically, when we selected our particular group of regions, we created what is known as a score set. As the name suggests, a score set assembles a group of instruments that will appear together on the score at the same time, theoretically letting you omit certain tracks on the Arrange pane from being displayed in the finished score. In addition to this, you can also define a percentage scale of a score set, allowing you to shrink or expand the score’s size accordingly. Go to Layout > Score Sets… to access the Score Sets Window, which you’ll need to ensure has its “local” Inspector open in the window so as to access the Scale [%] parameter.
To print off individual parts from the score, try double-clicking on the stave in question. This should drop you down one level (the equivalent of going into a folder in the Arrange pane), allowing you to see a single part with its associated score markings. So as to make the part clear and legible, you might want to consider raising the Scale [%] parameter as part of the Score Sets controls.Remember, though, that with both parts and the full score, you have the option to print to a PDF (via the OS) so as to create a saveable “hard” copy of the score for future reference, printing, or indeed, as an e-mail attachment for your music copyist.
Figure 10.24 Use the Score Sets Window to alter the overall percentage scaling of the score.
Surround sound, while synonymous with the film industry offering that extra dimension of realism, is now becoming popular in some circles for music production with many artists’ back catalogs being mixed for the medium. Whether working to picture or in music production, you’ll inevitably find yourself being expected to create a surround sound mix at some point. Fortunately, Logic has a great deal of expertise in offering surround sound with the inclusion of surround sound panners on each channel and a 5.1 Reverb plug-in amongst other features.
To work with surround sound, in this example 5.1, it is important to ensure that you have the speakers you require to monitor each output. You’ll need your main stereo pair of monitors, plus a center speaker, two surrounds (left and right) plus a subwoofer ideally. Connecting these up will usually mean a direct connection from your audio interface or desk to the amplifiers or powered monitors. The connections you make are governed by the Surround Preferences (Logic Pro > Preferences > Audio > I/O Assignments > Output). Within this pane are three tabs relating to the Output, Bounce Extensions, and Input.
The input arrangement should follow logically the output assignments and is used for making 5.1 recordings. The bounce extensions tab simply refers to the filename extension which is important when preparing for mastering. Concentrating on the Output tab, you can select how Logic shows its outputs. Typically, this will default to Logic’s own interpretation of 5.1. There are options for International Telecommunications Union’s (ITU) and WG-4’s output arrangements. The ITU’s is standard for 5.1 surround sound for most professionals. However, the WG-4 standard, which can be selected by the button below, is the choice of the DVD forum. At this stage, it is just important that the right outputs are connected to the correct speakers for accurate monitoring.
To get started with surround sound in Logic, you could either select a surround sound template from the chooser or alter your current stereo production to work in surround. Choosing Logic’s own template offers 24 surround-ready channel strips all bussed to groups including a 5.1 incarnation of Space Designer. This is excellent for that 5.1 project you’re about to start.
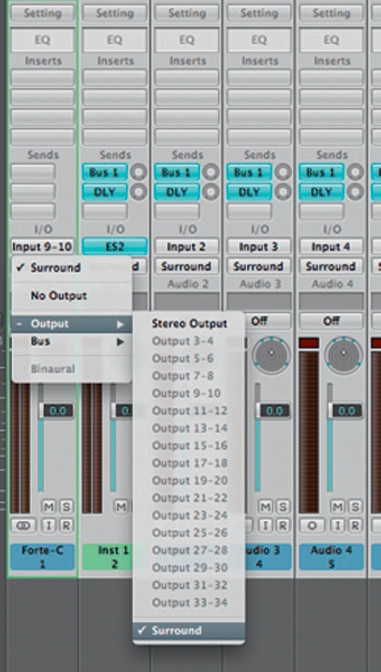
However, there will be times when you’ll need to alter your session to output in surround. To do this, simply choose the channel strips you wish to pan in surround and then visit the output assignment button. The drop-down menu should now show the possible output assignments, the last of which is Surround. Click this and notice the master channel strip alter from stereo containing two peak meters to a surround fader with 5 meters.
Working with Surround is very similar operationally to that of stereo except panning is different. You will have noticed a circular panner on each channel. When double-clicked, this opens up the Surround Balancer pane that shows a good-sized panner showing a visual representation of the space with the five speakers facing inward. To pan a mono signal, simply drag around the ball within the space to inform Logic where you’d like it to come from. Logic will calculate how much signal should come from each speaker.
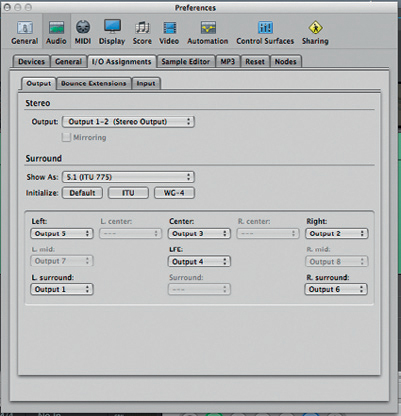
Figure 10.25 Selecting which audio outputs form your interface are sent to which speakers can be an important part of setting up your surround sound studio.
For stereo signals, Logic’s Surround Balancer shows three balls. The “L” and “R” balls represent the two discrete mono signals that go to make up the stereo signal. These balls are linked and allow for you to consider how wide you want the stereo signal to go within the surround space. The third ball is the overall pan that will alter the direction the stereo image comes from. In the larger surround panner on p. 361, the stereo signal is shown biased to the right.
Other controls on the Surround Balancer include the center level and the low-frequency effect (LFE) level. The center level refers to the image created by the center speaker. As surround sound is derived from the film industry, the center speaker has traditionally been placed behind or around the projection screen and due to its focal point it contained all the dialog. As such, the music was usually omitted out of this speaker, leaving it to create the phantom center image it currently creates with stereo reproduction. With a center level control in Logic, it is possible to decide whether to allow any signal to come through the center speaker at all.
Figures 10.26 The Output Assign menu on each channel offers you the ability to choose any available physical mono or stereo outputs, in addition to a surround mode.
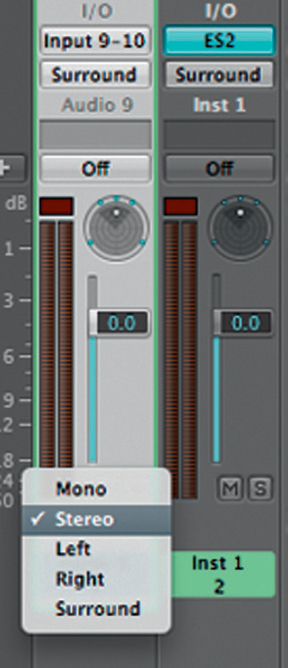
Figure 10.27 Clicking and holding on the button with a circle(s) in it will offer you the opportunity to quickly select the output mode of the selected strip.
Panning stereo signals in surround can make the process of mixing somewhat complicated. With two speakers, it is clear where the stereo signals go and how they might be managed as they can only come from within the space provided between the two speakers.
Surround sound in its popular incarnation means that there are five speakers through which the stereo signal can be routed. Does this stereo signal simply go to the left- and right-hand speakers and faithfully represent itself, or is it reinterpreted for surround and maneuvered around the sound space? In the past, a stereo pair on a guitar might have stayed centralized to the center, but with a multichannel set up, it is possible to say rotate this 90° so that the left-hand channel could be reproduced from the right monitor and the original right channel from the rear right monitor, hence keeping the stereo image but shifting it in the sound space as shown in the example below.

Figures 10.28 and 10.29 In this view, the panner can be seen managing a stereo signal. When panning stereo sources, there are extra controls to change the spread of the signals.
Three further controls are available from the bottom of the Surround Balancer. To obtain access to these, simply click on the small triangle to the bottom left of the pane. Three sliders appear that offer you the ability to alter the separation of the panner. In the diagram above, the orange square represents the bounds of the possible separation of the panners. However, in some examples, it might be necessary to reduce this to reproduce a less wide image of the original. The three sliders correspond to the front left and right image (Separation XF), rear left and right image (Separation XR), and separation between front and rear (Separation Y).
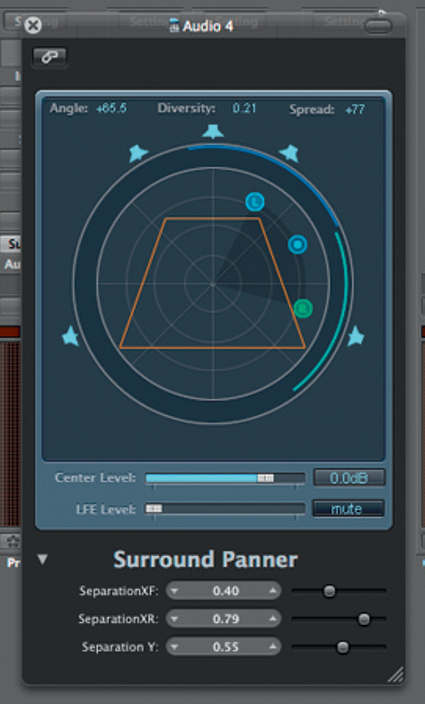
Figure 10.30 In this example, the separation has been reduced to limit the width of the image. Also, it is possible to spread circular lines around the circumference that indicate which speakers are receiving a signal from which channel.
The LFE level, sometimes also called the low-frequency effect, is the “0.1” of 5.1. This is what is commonly known in the industry as a subwoofer. The LFE level control is placed within each panner as it is often undesirable to send everything to the subwoofer, when the main monitors should handle most bass information perfectly well. This again has come from the film industry where the LFE is used to reproduce rumbles, explosions, and impacts. The 5.1 standard means that all the main five monitors should be full-frequency and should reproduce bass well for most applications. Hence, the LFE is included to add weight to the bass end. However, it is worth remembering when mixing that for many audio applications, including home cinema systems, the subwoofer is not included as an “effect” but as the only bass generating driver, leaving the satellites to consider only mid- to high-frequency ranges.
Knowledgebase ![]()
Working in surround sound requires that you think slightly differently when employing effects such as reverberations. You could employ a stereo plug-in or you could choose to use two in tandem for front and rear if need be. Logic has fortunately thought of this and produced an intuitive set of surround-ready plug-ins to get you instantly working.
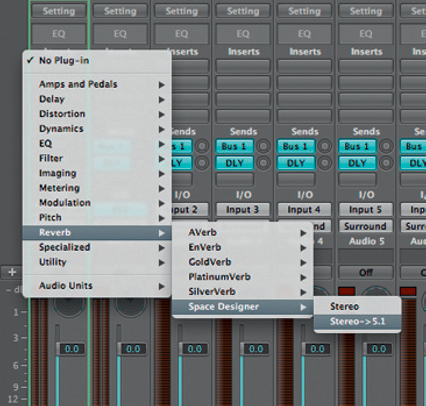
Figure 10.31 Choosing a surround plug-in can improve your 5.1 mix. Note how a mono track (or in this example a stereo track) will be processed with a surround sound plug-in thus changing its output to 5.1.

Figure 10.32 Space Designer comes with some impressive dedicated surround algorithms.
These dedicated plug-ins include the renowned Space Designer whose 5.1 algorithms are superb. Other 5.1 dedicated plug-ins include Delay Designer, Chorus, Tremelo, Flanger, Microphaser, and Modulation Delay.
The plug-in behaves in exactly the same way as the stereo version, but the response is returned in 5.1 as per the original impulse. To place a surround plug-in in your mix can be simply achieved by selecting it from the menu. Most 5.1 plug-ins can be applied to a mono track whose output will be converted to surround. However, these processes are best added to a 5.1 bus or output.
Other plug-ins do not require specific surround algorithms to operate with multichannel information. These will, therefore, work in “Multi Mono” mode for processing multichannel information. Plug-ins such as the compressor, which utilizes this mode, will show some banks using additional switches located above the main controls that are not found on its stereo or mono counterpart. The Configure switch allows you to configure which compressor bank is attached to which outputs. Therefore, it is possible to strap a compressor across the front speakers, another to the rears, and one dedicated to the LFE channel. Alternatively, you might wish to alter this so that the Center channel has a dedicated bank for use in film work where the dialog is of paramount importance.
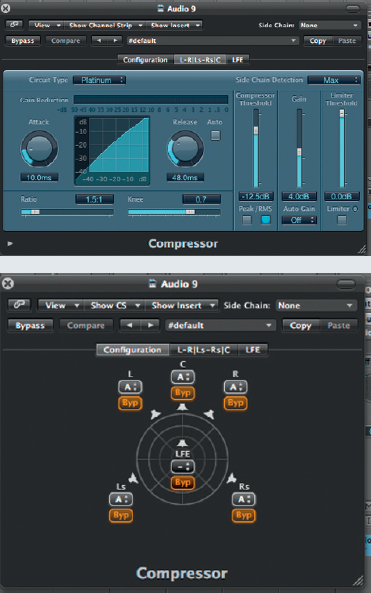
Figures 10.33 and 10.34 Plug-ins that do not require specific surround algorithms work in Multi Mono mode such as the compressor. Note the selector switches above the main plug-in to select which compressor bank operates which output.
Bouncing to Stereo and Surround
At some point, it will be necessary to present a mixed output of your production. If you are working within Logic, then it will be necessary to do a bounce, and depending on the application, different choices will need to be made. One of these choices will be of course whether to produce a stereo or a surround bounce. Bouncing surround mixes is achieved in the same way as traditional stereo mixes.
Once your surround sound mix is balanced and ready, simply select the “Bnce” button from the master channel strip in Logic’s Mixer. A new dialog button will emerge showing a number of options for editing. The first to note is the destination for the files once you have bounced them. Choosing the arrow to the top right will open up this dialog to show more of the file structure of the computer.
Moving on to the left-hand side, the Destination table can be seen, which allows you to configure the file type you wish to export to. For most applications, this is likely to be PCM, which means unaltered or data compressed information, unlike the MP3 and M4A options below it. The DVD-A option is an excellent option for surround sound as it will create a disc that can be played in most DVD players connected to a surround sound system.

Figure 10.35 Bouncing to surround is as simple as clicking the “Bnce” button on the master fader strip. It is important to select the surround bounce checkbox and choose whether you wish the file to be interleaved or separated out.
Below this are the range controls allowing you to specify the start and end points of your bounce. This might be useful in the instance that you might need to export each scene separately for a dubbing mixer. Additional features include whether you wish to monitor the bounce in real time or allow the computer to manage the event offline. You are also given the opportunity to automatically normalize your audio as it is bounced.
The right-hand side of the dialog box includes a number of drop-down menus that relate to the file destination type you wish to export. First up is the option to choose the file type. There are four choices here starting with Sound Designer II. The SDII format was created by Digidesign and has remained a standard for many years. Its benefit is that it is generally time-stamped meaning that it can be moved and can be recalled to its original position at any time. This can be extremely useful when working to film, for example, or when transferring session between DAWs which accept the SDII format. The second incarnation is the Audio Interchange File Format (AIFF), which is generally the common format used on the Apple Mac. This file format is not subject to any data compression and is generally an accepted file format for use between software and the industry. AIFF does not contain timestamp information. Next is the Wave format or .wav and is perhaps the most common of audio file formats for exporting to another computer for further mixing or mastering. Finally, in the menu is the Core Audio File, which is an all-encompassing format that contains a wide variety of different formats in one and is common for Apple Loops.
The next drop-down menu is labeled Resolution and relates to the bit depth you wish for your bounce. This can be set typically at 8, 16, or 24 bits. Following this is the sample rate selector where a wide variety can be chosen from for a wide variety of applications, which will be determined by your destination. The File Type box allows you to set whether you wish for the files to be interleaved together or split files for each channel.
Dithering is required in situations where a lower resolution bounce is required than the project’s set resolution – for example, when a 24-bit recording needs to be dithered down to produce a 16-bit CD ready file. Dither is a method by which the waveform is more accurately encoded for 16-bit reproduction and has been discussed previously.
The next, and perhaps most important feature for delivery of a multichannel export, is the Surround Bounce checkbox. This needs to be checked to enable that each channel of the surround field is exported as a separate file. The extensions for which are changed in the Audio Preferences as described before.
Logic now allows you to export a DVD-Audio ready disc directly from the bounce dialog. Within this window, select “Burn: DVD-A” and the right-hand pane should alter to show you the Mode. There are two choices here. DVD-A will produce a 5.1 mix for use in DVD-A players, while “CDDA” allows for a high-definition (HD) stereo bounce of 24 bits and a 192-kHz sample rate.
For working to DVD Video, surround sound files need to be compressed using Dolby Digital Professional (AC-3) format. To achieve this, we need to use Apple’s Compressor software which is part of Logic Studio or similar encoder software – see Knowledgebase.

Figure 10.36 Burning a DVD-A or CCDA can be achieved straight from Logic’s own Bounce window.
Walkthrough ![]()
Creating AC3 Files Using Apple Compressor
For your new 5.1 mix to be read on a DVD-V disc, it will need to be compressed to Dolby’s AC3 format. To achieve this using Logic Studio, you will need to export the six audio files (front left, center, front right, rear left, rear right, and LFE) using the “bnce” bounce feature. With six discreet audio files, it is now possible to compress for AC3.
To do this, make sure you’ve got your six audio files to hand. Quit Logic and search your applications folder for Compressor. Open this. You’ll note Compressor looks quite different, but is a fantastic batch processing tool for all kinds of conversions and so on.
In Compressor, go to Job > New Job with Surround Sound Group.
A new dialog box will appear giving you options to place individual, discreet audio files in each speaker. You can add 5.1 or indeed an additional rear center channel “S” making this 6.1.
Also note the ability to add a movie here to compress the whole thing together for a DVD-V ready file.

Figure 10.37

Figure 10.38
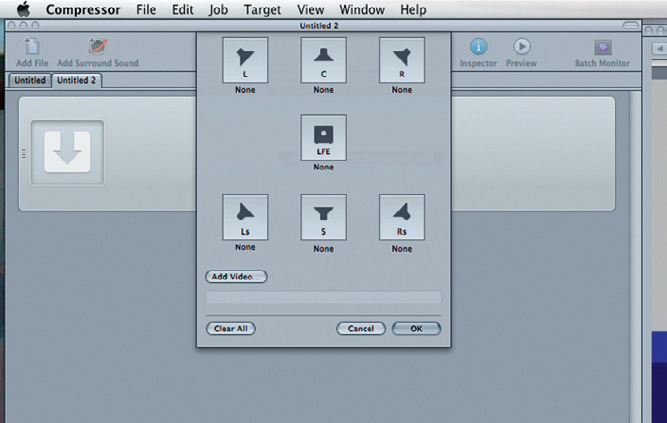
Figure 10.39
Once you’ve clicked OK, you’ll be back on the main Compressor screen and it is at this point you need to specify what the output file format will be. To do this go to Window > Settings or simply click Cmd+3.
A new Setting dialog box will open that has two tabs: one for the Destinations of compressed file and one for the Settings. We’re interested in the Settings at this point. There are a large number of file formats here to choose from, but seek out Formats > Audio > Dolby Digital Professional 5.1. Drag the Dolby Digital Professional 5.1 icon to the batch job in the main screen. Next press Submit on the bottom right to press your AC3 file.

Figure 10.40
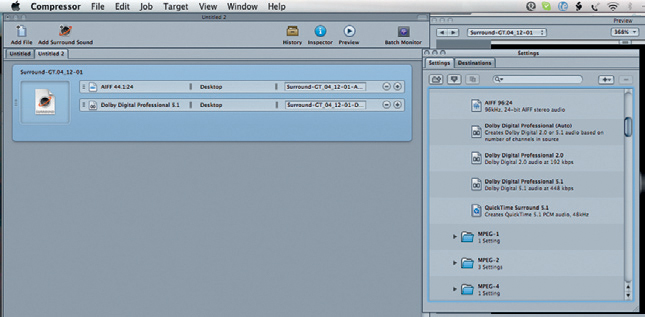
Figure 10.41

Figure 10.42 This pane allows for some choices for the nature of the exported audio.
First, we need to bounce the Surround Sound mix as split files, meaning that each stream (left, center, right, left surround, right surround, and LFE) is an audio file in its own right. This will then allow us to indicate in Compressor what files are for which output. Before bouncing, it might be worth checking the bounce extensions found in the audio preferences pane as discussed earlier.
Exporting Video with Audio (Dubbing)
Either during or at the end of the writing process for the film and television visual, you will be asked to send a copy with both the video and audio together into one file. This process is known in the industry as dubbing and is something that is normally handled by large postproduction houses, but for demo purposes, you can merge the two files together by selecting Export Audio to Movie from the movies menu (File > Export Audio to Movie…).
A new dialog box entitled Sound Setting will appear that allows you to choose the nature of the audio file. It is here that you decide upon the data compression format, sample rate, bit rate, and whether it should be stereo or mono. These settings are useful as a director or production company may wish to see your work in progress, and the best vehicle to deliver this to them is over the Internet via e-mail (if small) or File Transfer Protocol. It is, therefore, handy that the compression formats allow for a wide variety of standards to suit each and every client.
Once these settings are decided upon, click OK and choose the location for your final files. It is worth creating a folder at this point to ensure quick and tidy file management as there may be more than one file given the compression format you have chosen. Next click Save and wait while Logic compiles your video for you. Once completed, this file should be readable by Quicktime.