
5.2 The Big Picture – Forming Your Basic Arrangement
5.4 Working with Loops, Copies, and Aliases
5.6 Snapping – Understanding Your Editing Grid
5.7 Resizing and Cutting Regions
5.11 Expanding the Take Folder and Creating Basic Comps
5.12 Time Slipping a Quick Swipe Comp
5.13 Flattening or Merging a Comp
5.15 Flex Time View and Flex Time Modes
5.16 Transient Markers and Flex Markers
5.17 Quantizing Audio with Flex Time
5.18 Separating Regions Based on Transient Markers
5.19 Freezing a Flex Time Track to Save CPU
5.20 Editing Multiple Tracks Using Edit Groups
5.23 Sample Editor Applications
5.24 Inserting and Deleting Sections of Your Song
5.25 Working with Tempo and Loops
5.26 Managing Your Audio Files and Regions
5.27 Using Folders and Hiding Tracks
Audio Regions and Editing
Editing and arranging audio regions has become an integral part of the recording process – whether it’s simply tidying up a few misplaced notes, or creating the complex “glitch and stutter” edits that are common to many modern production styles. Therefore, in keeping with this increased importance of audio editing, Logic includes a wealth of different editing features – from Quick Swipe Comping to Flex Time editing – all of which unite to offer an almost unprecedented amount of control (and creative input!) in how your eventual production sounds to the listener.
In this chapter, therefore, we’re going to take a detailed look at all the editing features that Logic has to offer. Starting off from the basics, we’ll first explore how to use simple tools within the Arrange area to start forming the structure of our project – bringing parts in at different locations in the song, for example, or looping two to four bars of music to form a repetitive feature in the track. Exploring deeper, we’ll look at the various tools that can be used to improve an original performance – from the ability to “comp” a performance from a number of different takes through to ways of tightening a performance and making it lock more tightly to a predetermined groove.
Of course, there’s also plenty of creative potential to be explored using audio in Logic, discovering the intricacies of features like the Sample Editor, for example, or manipulating audio regions far beyond their original form. As you’ll soon see, Logic offers a vast array of creative possibility in audio editing, and effective use of its editing features forms the cornerstone of contemporary music making.
5.2 The Big Picture – Forming Your Basic Arrangement
In Chapter 4, we explored the basic principles of getting audio regions into your Logic project – as audio recordings, prerecorded audio files, Apple Loops, or REX2 files. However, having acquired these assets, we now need to start thinking about how we can organize and edit this raw material together to form our finished song. As you’d expect, the precise way you execute this will vary given the material you’re presented with, so you’ll need to be conversant with the various approaches and solutions for handling and editing audio regions in Logic.
Broadly speaking, your goals will be focused on two levels of interaction. First, you’ll need to pay attention to the overarching structure and arrangement of the project, using the various editing tools to bring instruments in and out of the song. Second, you’ll need to investigate the detailed qualities within each performance – like the choice of different takes at various points of the song, for example, through to the timing of each note that is played.
The first simple technique, therefore, is the ability to start moving regions within your arrangement – making copies of regions, looping regions, or muting them. You can move a region simply by selecting it and moving it to a different position in the Arrange area, either at a new point in the timeline or even onto a completely different track. Holding down Alt as you perform the drag allows you to create a copy of the region – maybe copying over a chorus vocal line, for example, or a repeated guitar motif, so that it appears at several different points in the track.

Figure 5.1 Forming the basic arrangement – either by dragging regions to new locations and copying them (by holding down the Alt key), or muting them.

Figure 5.2 The edit tools play an important part in the editing and arrangement process.
As you’d expect, the Tool menu (which can be quickly accessed by pressing Escape) plays a vital part in the editing process. The application of most tools should be apparent, although at this stage, you’ll probably want to principally work with the Pointer Tool (to move and copy regions), the Eraser Tool (for deleting regions), or the Mute Tool (to temporarily disable a region from playing back). We’ll be looking at the Scissors, Crossfade, and Marquee Tools later on in the chapter, although it’s worth noting their presence for now.
In conjunction with the graphical changes made in the Arrange area, it’s also worth noting another important feature in Logic’s approach to audio editing – the Inspector. As we first saw in Chapter 4, you can find the Inspector toward the left-hand side of the Arrange area, assuming that it has been toggled into view by selecting View > Inspector, or by using the keyboard shortcut I.
The Inspector’s Region Parameters display (seen at the top of the Inspector) shows the current text-based information that accompanies any selected region. The exact information displayed in the Inspector’s Region Parameters display will vary given the type of region selected, although given that we’re principally working with audio regions at this stage, you should see options that relate to the Delay, Gain, Looping, and Fade settings.
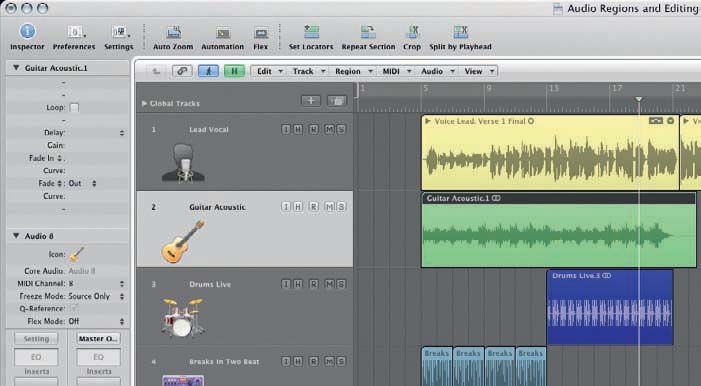
Figure 5.3 The Inspector’s Region Parameters display highlights the current settings for the selected regions.
The purpose of the Inspector’s Region Parameters box in editing is two fold. First, the Region Parameters box provides an extremely accurate way of interacting with a region’s current parameter settings – like increasing a region’s gain by +1 dB, for example, or applying a fade that lasts just a few milliseconds. Second, and arguably just as importantly, the Region Parameters box also proves itself useful as a way of applying the same edit across multiple regions – like fading-in all the regions at the start of a song, for example, or time-adjusting multiple percussion parts.
Rather than covering all the applications of the Inspector here, we’ll be dealing with various uses throughout the rest of this chapter.
5.4 Working with Loops, Copies, and Aliases
Many compositions feature a large number of repeated regions – like a two-bar drum loop, for example, or a repeated bassline – that occur throughout the duration of a song. In Logic, there’re a number of different ways you can deal with repeated musical phrases – from the ability to create multiple “hard” copies to the option of creating instantaneous region loops that last the full duration of the track.
As an extension of the existing region duplication feature (using the Alt key, in other words), consider using the menu option Region > Repeat Regions (cmd + R). This allows you to create multiple copies of the selected region/s along the duration of the timeline, specifying the number of duplicates you want to create.
One point worth noting though, is the ability to distinguish between the “hard” Copies option, and an Alias or Clone. In most cases, you’ll want to select the Copies options, so each newly created region is a discrete copy in its own right – separate from the original region. With an Alias or Clone, though, Logic will always reference the original region – so, if you make any subsequent physical edits to the region (like trimming off the last bar, for example), all the other cloned regions will follow this edit.
As an alternative to using Copies and/or Aliases, consider using the region looping feature. You can apply a loop in a number of different ways: including the Inspector’s Loop parameter, the keyboard short L, or by using the unique Loop Tool that should appear at the top right-hand edge of the region. A loop is indicated by a grayed-out version of the region extending to the right-hand side of the original part. By default, a loop will last for the full duration of the song, or until it hits another region on the timeline.
Looping is a great way of quickly extending a song and sketching out an arrangement without having to create multiple duplicate regions. As you’d expect, edits that you make to the original region will be reflected in the subsequent loops. This is much easier to keep track of than the region alias feature (thanks to the use of gray shading), and can even be put to use on some interesting creative treatments. One of the best examples of this is creating loops within your song that don’t fall on exact bars – like a three-beat phrase, for example, or a five-beat motif. The result creates constant movement in the song, especially when played against a rigid 4/4 loop.
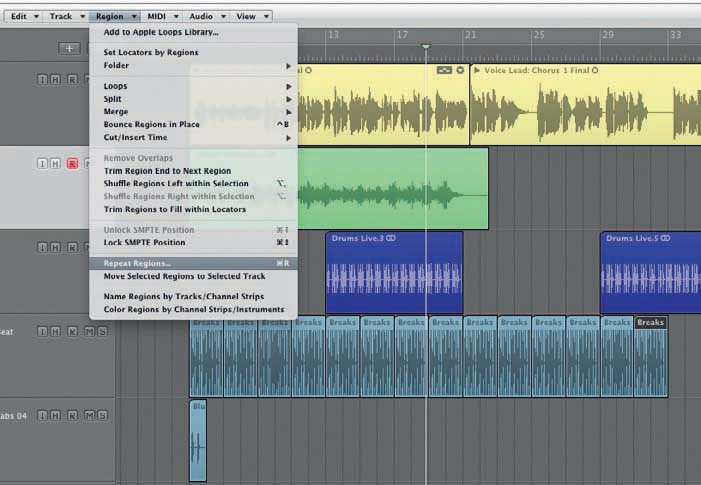
Figure 5.4 Use the menu option Region > Repeat Regions to quickly make a series of duplicate copies of a selected region.

Figure 5.5 Region looping – which is accessible from the Inspector – is a quick-and-easy way of repeating a region throughout the duration of the song (or until the region hits another object).
Having established the broad structure of your song, it’s now time to start to look at some of its finer details – from the precise placement of individual notes, for example, through to the task of “comping” between a number of different performances. Not surprisingly, this will start to push our use and understanding of Logic’s editing features much further, utilizing a greater range of editing tools (like Flex Time or Quick Swipe Comping), as well as our ability to handle audio regions at much finer division than just bars and beats. The result, however, will be a significant improvement in the tightness of our performance, and the musicality of the track in general.
5.6 Snapping – Understanding Your Editing Grid
So far, the edits that we’ve made have been largely based on bar divisions – for example, duplicating two bars of drums throughout the duration of a song, or offsetting a bass part so that it starts on bar five. More refined editing through, requires a finer grid to work from – moving from divisions based on bars and beats, right down to individual ticks, or even sample frames! By editing at such a detailed resolution, your edits will be that much more precise, allowing you to accurately position an edit to the most detailed timing resolution the human ear can perceive.
In Logic, the current editing resolution is defined by the Snap setting and can be found in the top right-hand side of the Arrange area. Options include various different timing divisions (like Bars, Ticks, Frames, and Samples) and an intriguing “Smart” mode that intelligently adjusts the editing grid based on your current zoom resolution.
At the start of a new project, the Snap value defaults to the Smart setting. This is an intuitive way of working with Snap, and to a large extent, provides you with the freedom not to worry about any current Snap settings as you perform your edits. Dependent on the zoom level, and the size of the region, the Smart mode interprets the division you require – if you’re working at a “macro” level, for example (moving regions around to form the structure of your track), Logic will stick to moving regions in bar increments. Zoom in closer, though (maybe to edit an individual note within a performance), and Logic will work at a correspondingly finer grid – whether it’s sub beats, for example, or individual frames.
Another important point to note in editing resolution is that Logic always attempts to keep the relative positions within bars, beats, and so on. Therefore, precise, nonstandard edits can remain relative to the “snapped” grid when moved or copied to other position in the project – a bass part, for example, that picks up 1/16th before the start of bar 17 retains this offset when moved a bar ahead in the track (even if the Snap value is set to Bar). Again, this allows you not to worry about Snap settings and region offsets as you go about making your arrangement, although it’s also worth remembering that just because a Snap setting is set to Bar, for example, doesn’t always mean that the region will always be precisely placed on a bar.
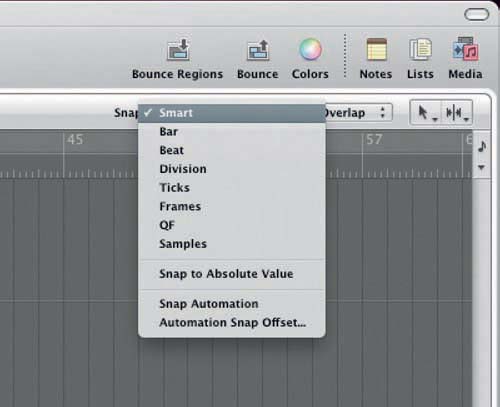
Figure 5.6 Logic features a variety of Snap settings, although the “intelligent” Smart option is best for day-today production activities.
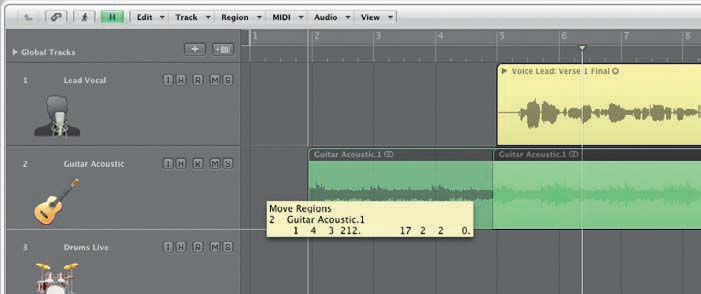
Figure 5.7 Logic tries to preserve any established “positional offsets” as you move a region around the Arrange area.

Figure 5.8 Using the Nudge feature is a great way of fine-tuning a region’s position. Change the current Nudge value by opening up the contextual menu.
Going Finer – Bypassing Snap and Nudging Regions
Of course, there are times when you may wish to bypass the snap constraints, even when it’s set to the intelligent Snap mode. This can be easily achieved by holding down Ctrl whenever you use a corresponding tool – like slicing a region, for example, or moving a region using the Pointer Tool. Another option is to use the Nudge option, which is specifically designed so that you can move audio region in small increments. A region can be nudged by selecting it, and then its position can be adjusted using either the left or right cursor keys combined with the Alt key.
As a quick way of adjusting the current Nudge value, try Ctrl-clicking on the region and selecting Move > Set Nudge Value to from the drop-down contextual menu. By using this feature, you can quickly set the Nudge value to the most appropriate setting – whether it’s as fine as a Sample, for example, or even Bar and Beat settings to maneuver regions about on the timeline using a keyboard rather than a mouse.
5.7 Resizing and Cutting Regions
Having understood how to work with various different snap resolutions, let’s start to explore some of the finer aspects of trimming, cutting, and resizing regions.
Remember that all the edits that you make on the Arrange area are nondestructive, and that once you cut a region, it’s always possible to resize the region and restore the original information. This makes it easy to audition possible edits, being confident that it’s always possible to return to the original recording at any point in the production process.
Cutting a Region with the Scissors Tool
One of the most immediate ways of editing is to use the Scissors Tool to divide one or more regions into two. An extra dimension to the Scissors Tool is that you can scrub across the timeline to hear where you are about to place an edit. Once you’ve clicked on the region/s to be edited using the Scissors Tool, simply hold the mouse button down, move the mouse back and forth to “scrub” the edit, and then release the mouse button when you’re confident of having found the correct location.
Another useful addition to working with the Scissors Tool is the ability to quickly slice a region into a number of equally sized slices – like 1/8th or 1/16th, for example. To cut a region in this way, simply place an edit at the start of the region that equals the same size as the subsequent slices (like 1/16th). However, before you release the mouse button, hold down the Alt key, noting the small “+” icon that should be added to the Scissors Tool. On release, the region should now be sliced into a series regions all of equal length. Try this technique as means of creating “glitch and stutter” type edits, especially using 1/16th and 1/32nd segments of a performance strategically rearranged and looped accordingly.
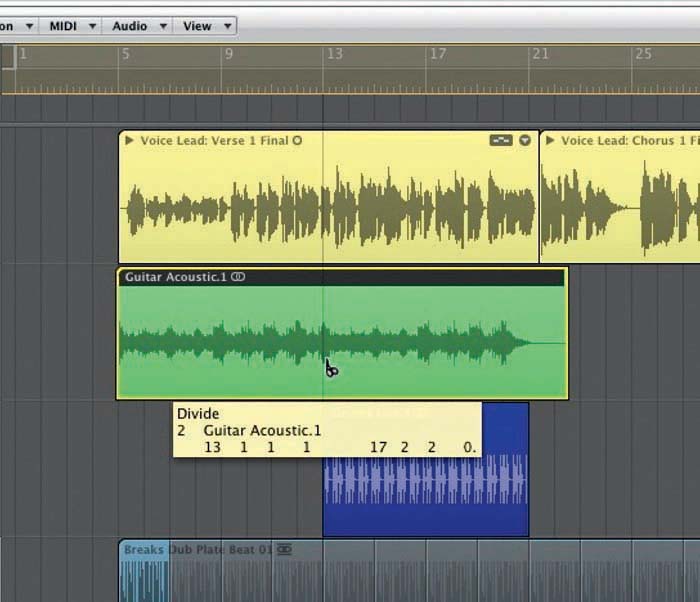
Figure 5.9 Use the Scissors Tool to divide a region in two. Remember, you can scrub the edit point to fine-tune the position of the cut.

Figure 5.10 Holding down Alt as you make a cut allows you to create a series of equally sized divisions. This is a useful technique for glitch and stutter editing.
Another important editing technique with audio regions is the so-called topping-and-tailing. This ensures that there are accurate and clean edits at the front and end of the audio passages, thus reducing any unnecessary noise and other unwanted artifacts. It also allows you to set a precise length for a region, which is vital in situations where you want it to loop effectively.
Regions can be manipulated easily and trimmed to fit by simply calling up the Resize Tool, which appears when you move the pointer to the bottom left- or right-hand extremes of any region. The pointer changes to an icon similar to that of a squared bracket with arrows on either side. With this tool enabled, simply drag the region to the desired length. As previously mentioned, this is as useful way of restoring an audio region to its original form if you’ve been slightly over zealous with your editing!
A useful alternative to the Scissors Tool is Logic’s Marquee Tool. Rather than cutting a region in two, the Marquee Tool allows you to select audio events within one or more regions, and then either delete the offending notes, or indeed, create a new region based on the Marquee’s boundaries. Overall, the Marquee Tool works best as a means of time-slipping notes, especially on a multitracked recording of drums – first, by selecting the offending hit in question using the Marquee Tool, separating the selection into a new region, and then moving the region/s accordingly.

Figure 5.11 Moving to the edge of a region will transform the Pointer Tool into the Resize tool, allowing you to adjust the respective size of the region.
Once you’ve selected the Marquee Tool, simply drag-enclose the area you want to select – whether it’s a few notes within a region, for example, or a portion of time across multiple regions. You can add to or remove from the selection at any point by Shift-clicking on your selection – adding in another track, for example, or increasing the size of the selection. Remember that any positional information will be set using the current Snap setting, so if you need your edits to be particularly precise, you’ll either need to zoom in on your edit, or use the control modifier to temporarily disable any snapping.
Once selected, you can simply hit the Delete key to remove the offending selection – leaving two regions (and an empty space) on either side of an edit. Alternatively, press Mute (M) to silence the selection but leave the region in place. To divide the selection into a separate region, simply Ctrl-click on the Marquee selection, and then Logic will divide the original region into three new regions.
A useful extension of the Marquee functionality is the ability to extend the selection to transient hits within the region. This is a particularly good way of editing drums, allowing you to accurately define a Marquee selection to hits within the region – this would allow you to neatly separate out a two-bar drum loop, for example, precisely slicing out an individual drum hit. Start by making the Marquee selection over the broad area you want to work with. Next, move the start or end points of the selection using either the left and right cursor keys to move the out-point of the enclosure, or the left and right cursor keys with the Shift key held down to reposition the in-point of the enclosure.

Figure 5.12 Use the Marquee Tool to enclose a selection across one or more regions – this can then be separated into a new region, deleted, or muted.
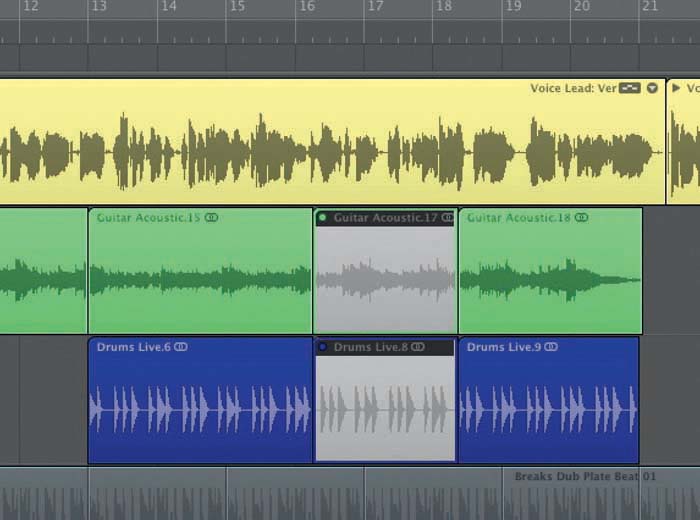
Figure 5.13 The Marquee Tool is a useful way of muting audio events within a region – simply enclose the area and press M.
Fades and crossfades are an important part of audio editing on many different levels – whether it’s just top-and-tailing an audio file, for example, or splicing together two adjacent audio files without creating any unnecessary clicks, or transitional discontinuities, between the two regions. In Logic, there’re three different ways to create fades and crossfades, each of which has its own strengths and weaknesses.
Using the Crossfade Tool to Create Fades
Probably the most immediate way of applying a fade is to use the dedicated Crossfade Tool, which can be used to create both fades and crossfades. The advantage here is that the tool works in a graphical way, with the length of the fade established by the proportion of the region you enclose using the Crossfade Tool. This makes it easy to establish the fade in relation to the waveform – maybe fading a region out, for example, as the sound decays away.
To create a fade at the start or end of an audio region, simply drag the Crossfade Tool over the appropriate segment you want to fade. Logic will then update the region, displaying a shaded area to indicate the length of the fade. To change the fade at this point, simply drag the small vertical white line accordingly, moving it backward or forward to lengthen or shorten the fade. Clicking on the fade itself allows you to adjust the relative curve of the fade – moving between a linear fade (the default) and the exponential and logarithmic curves.
Where two regions are “butt edited” up against one another, you might want to consider placing a crossfade. A crossfade is designed to smooth out potential discrepancies between the two regions, so that you’re left with a smooth transition between the two components. For example, even if the two regions are related in some way, the process of butting one up against the other will result in a small click as the waveform jumps from one position to another. In worse case scenarios, it might be that the two takes are radically different from one another, possibly necessitating a longer crossfade so that the edit isn’t noticeable.
You can create a crossfade by dragging the Crossfade Tool across two adjoining regions, with the respective length of the crossfade dictated by the size of the enclosure you make. Of course, in the case of a discrete butt edit, it might be that only a small crossfade is required, although this is usually best placed just ahead of a beat so as to not to damage any transient information. Where the discontinuities are greater, though (for example, maybe the adjoining notes have slightly different tuning), you’ll need to consider using a longer crossfade.

Figure 5.14 Use the Crossfade Tool as a simple, graphical way of fading a region in or out.
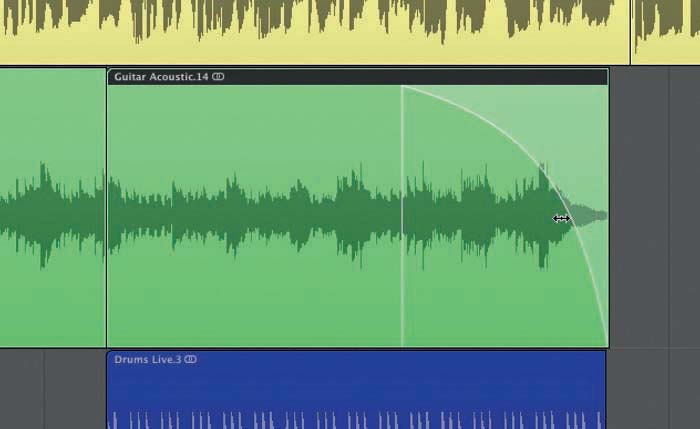
Figure 5.15 With the Crossfade Tool active, click on the white fade line to change its curvature or length accordingly.
Changing the Drag Mode to Create Fades
Along with the various Snap modes, Logic also includes several different Drag options, which can be found in the top right-hand corner of the Arrange area. The Drag mode defines how two regions interact when they are dragged over one another.
By default, regions are set to the Overlap drag mode, meaning that the regions can sit on top of one another, but the latter part will always take priority and mute the region that lies underneath it. This is a logical starting place for editing, especially when you might want to slip back and forth the crossover points between the two regions so that they fit appropriately. No Overlap, however, simply means that the first region will be edited in size to fit.
As an alterative to overlapping regions, Logic can also employ an automatic crossfade tool within the Drag menu, known as the X-fade. In X-Mode, the process of moving or resizing a part over another audio region will create a correspondingly sized crossfade. Therefore, by careful use of the region resize tool, you can quickly produce perfect crossfade edits between multiple regions – initially “butting” the edit to a bar, and then, resizing the inserted region/s back to create the crossfade.

Figure 5.16 The drag mode defines how Logic will behave when two regions are placed on top of one another.

Figure 5.17 With the X-fade mode engaged, regions that overlap (either by resizing, or being moved) will be crossfaded accordingly.
Using the Fade Parameter to Create Fades
The final method for applying fades is to use the Fade feature as part of the Inspector’s Region Parameters. Given the intuitive methods of applying fades that we’ve already seen, you’d be forgiven for wondering why you’d bother using the Inspector method. The first significant advantage with this approach, though, is the ability to create incredibly short fades without zooming in to the audio region/s in question. Second, it also provides a convenient solution where you need to apply fades to multiple regions at once – something that is impossible to achieve using the Crossfade Tool.

Figure 5.18 The Inspector offers a precise way of entering in fade information for a given region.
As an extension to the fade parameter found in the Inspector, it’s also possible to create a Speed Fade. Technically, a Speed Fade isn’t something you’d want to apply in conventional audio-editing activities, although as a creative effect, it’s a joy to behold! In theory, a Speed Fade approximates how a DJ might “spin in” a record, as well as slowing it down at the end to create a dramatic tail-off. Therefore, rather than modifying the amplitude of a region, a Speed Fade modifies its speed – pitching the region up across a “fade in,” while slowing it down over a “fade out.”
You can create a Speed Fade in much the same way as you create an existing fade. It probably makes most sense, therefore, to start by creating a traditional fade out – using the Crossfade Tool – over the area you want to Speed Fade. Once this has been established, turn to the Inspector and change the fade mode from Fade In or Fade Out, to Speed Up or Speed Down, respectively. Logic should now apply the fade, but in the form of a Speed Fade. Any subsequent changes to the length of the fade, therefore, will now change the duration of the speed-changing effect.
In Chapter 4, we introduced the notion of cycle recording and Logic’s ability to keep these multiple performances – or takes – as part of a Take Folder. This is certainly an effective way of managing multiple recordings of the same performance, reducing potential clutter on screen, and allowing you to group related recordings in a logical way. However, once you’ve recorded all these different takes, you then need to decide which takes you want to use, potentially switching between several different takes as part of the same finished “performance.”
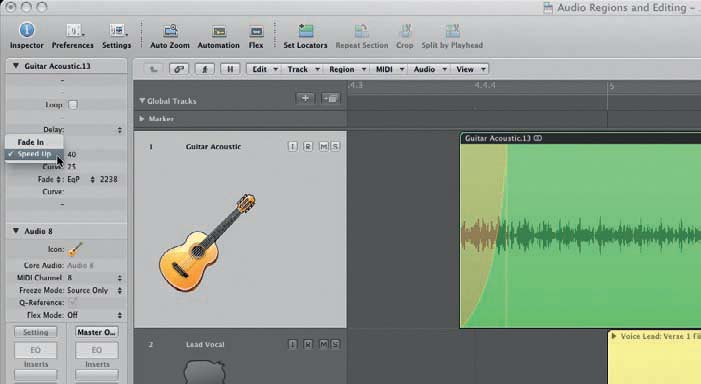
Figure 5.19 Use the Inspector to change the fade type – this allows you to create a distinctive Speed Up or Speed Down fade.
Technically speaking, the process of editing between different takes is known as comping, and Logic includes a dedicated feature specifically for this task – Quick Swipe Comping. Using this feature, you can quickly audition different takes, as well as dynamically switching between them without having to use complicated editing tools and crossfades. You also have the ability to create several different comps that allow you to experiment with different treatments of the same musical part without damaging any existing comp decision you might have already made.
5.11 Expanding the Take Folder and Creating Basic Comps
You can expand a Take Folder to see its contents by clicking on the small arrow in the top left-hand corner. You should now be able to see the various takes, alongside shading to illustrate which take is currently being used. At this stage, you could audition each take – either by using the small drop-down menu in the top right-hand corner of the Take Folder or by simply clicking on each respective take.
The idea of Quick Swipe Comping is that you can quickly move between the different takes – “swiping” the word, phase, or series of notes that you want to include. Adapting the quick swipe edit points between the different takes is as simple as dragging over the respective take to change the amount of highlighted audio. Note how changes on one take are reflected in another (only one take can play at any point in time), and how the top line displays the current edit in its complete state.
Comps that you have made can be named using the drop-down Quick Swipe Comping menu. Note that it’s also possible to Duplicate and Delete multiple different Comps, allowing you to try out several different editing strategies, and then audition the relative merits of each, by switching between the different completed Comps (which, again, are selectable from the Quick Swipe Comping drop-down menu).

Figure 5.20 Once you’ve opened your Take Folder, you can quickly start to piece together a preferred Comp between the various takes.

Figure 5.21 Comps can be named, duplicated, and deleted, allowing you to explore multiple different versions of the same line.
5.12 Time Slipping a Quick Swipe Comp
So far, we’ve seen how we can use the Quick Swipe Comping system as a means of switching between different takes of the same musical part. However, what we haven’t yet addressed is the need to slip potential edit decisions that you’ve made in time – of course, you can always move the whole Take Folder, but what if your concerns are with only one or two notes within one of the takes? If you attempt to move a region at this stage, you won’t get very far – either because of the inability to use the Scissors Tool, or that any attempt to move the region results in the Comp itself being changed.
The solution to this problem is the ability to switch the Take Folder’s Quick Swipe Comping functionality on or off accordingly. You can see whether Quick Swipe Comping is enabled by looking at the top right-hand corner of the Take Folder, just to the left of the Take Folder’s drop-down menu. By disabling the Quick Swipe Comping, you’ll find that Logic’s original toolset – namely, the Scissors Tool and Marquee Tool – now work as expected. Given that the broad comping is finalized (this time slipping is much easier to achieve after you’ve swiped the takes!), you can go about slicing out the offending notes and then repositioning them.
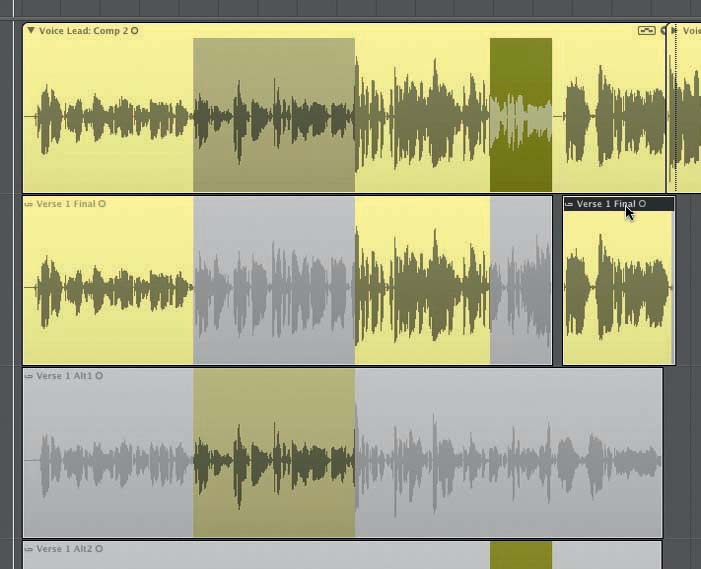
Figure 5.22 By disabling the Take Folder’s Quick Swipe functionality (by clicking on the small icon on the top right-hand corner of the Take Folder), you can use the standard editing tools, particularly with respect to time-slipping elements of the performance.
As we’ll see later on, though, this isn’t the only solution for time-slipping material within a comp.
5.13 Flattening or Merging a Comp
Finished, or even partly finished, comps can be handled in a number of different ways. First of these, is the option to flatten the edits you’ve made – “unpacking” the Take Folder, and creating a single track with all the edits in place. Flattening has its advantages and disadvantages – on the negative side, you can’t return to the edits in such an intuitive way as the Quick Swipe Comping feature, but on the positive side, you’ll gain a “clean” edit of your chosen comp, complete with editable crossfades within each edit point.
You can choose to flatten your edits through the Take Folder menu, with the resultant output displayed as a series of regions with crossfades between them. Flattened in this way, you can easily carry out any timing modifications (using an alternative approach to what we’ve seen previously), as well as adjusting the default crossfade times using the same processes that we’ve explored earlier on in the chapter.
A more destructive version of the Flatten function is the Flatten and Merge option. Using Flatten and Merge will create a new file, complete with the edit points and crossfades. If you’re completely happy with your edits, Flatten and Merge could be an appropriate choice, especially if you want a more transportable version of the track to import into another DAW. Unless you choose to specifically delete the original takes, you’ll always have the option of reimporting the files from the Audio Bin into the Arrange area should you decide to revisit what you’ve done at a later point.
Whether you’re carrying out a Quick Swipe Comp or Flattening a Comp Logic will work with the current default Crossfade Time and Curve settings established under the General tab of Logic Pro > Preferences > Audio. In most cases, the default setting of 20 ms is sufficient, although for particularly taxing comps, it might be the case that this has to be raised or lowered accordingly. Arguably, though, such fade adjustments are best applied to a flattened comp and this preference left as is.
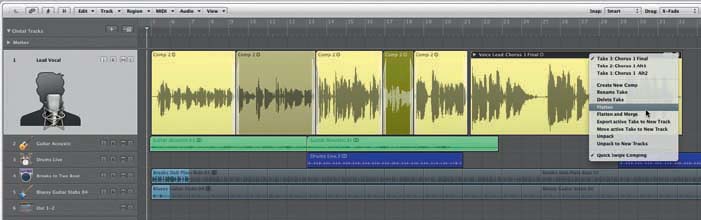
Figure 5.23 Flattening your comp will create a single track with all the various takes edited accordingly.
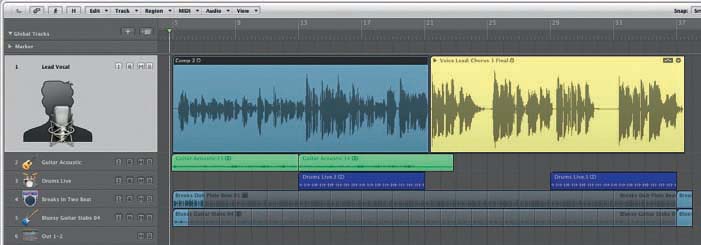
Figure 5.24 Flatten and Merge is a more destructive way of finalizing your comp – with a completely new audio file created from your editing decisions.
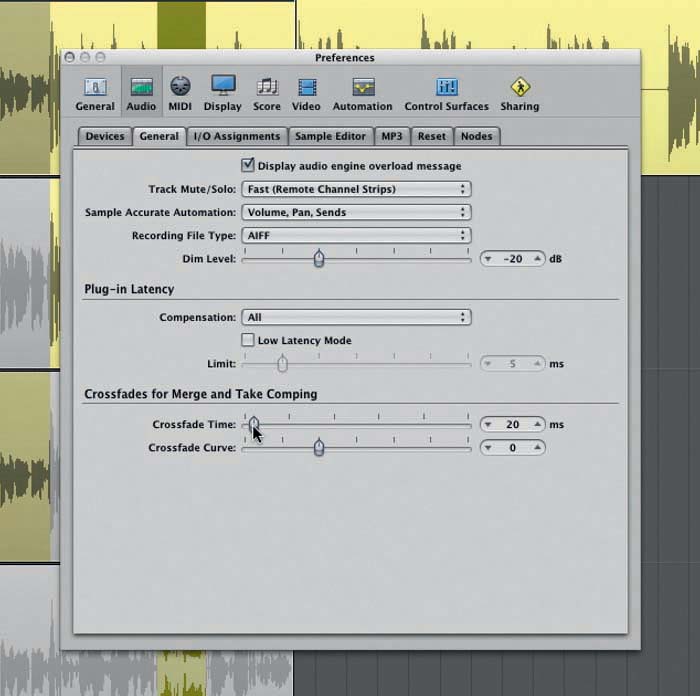
Figure 5.25 Use the General tab, found under Logic Pro > Preferences > Audio, to change the default crossfade time for Quick Swipe comping.
As an alternative to flattening your edits, it’s also possible to unpack the Take Folder, placing all the individual takes, as well as the various comps (complete with crossfades), onto separate tracks. Unpacking a Take Folder is a messy option in terms of the Arrange area and the amount of tracks it can potentially use up, but it does offer the best solution in terms of complete audio flexibility. For example, an unpacked take can be easily moved to new tracks – maybe using some outtakes from a main vocal as backing vocals. Alternatively, it might also be that the remit of editing goes above and beyond what can be achieved in Quick Swipe Comping alone – like a vocal requiring pitch correction in Melodyne, for example, or elements of time compression and expansion.
As the reverse of unpacking Take Folders, you can also use the menu function Region > Folder > pack Take Folders to combine several existing audio files into the same folder. The option to pack Take Folders potentially solves the previously suggested problem of adjusting timing issues – simply unpack the folder, move the required take, and then repack accordingly. The feature can also be an interesting way of creatively switching between a number of concurrent drum loops – packing them into a shared Take Folder and then using the Quick Swipe Comping to create complicated jumps between the loops.

Figure 5.26 Unpacking a Take Folder will explode all the original takes onto separate tracks, as well as flattening any comps you’ve made along the way.
So far in our exploration of production process in Logic, we’ve looked at the “conventional” tools and techniques of audio editing – namely, the ability to slice, resize, and reposition audio regions. However, in the past 5 years or so, musicians and producers have grown increasingly used to having a greater degree of “elasticity” with their audio – either using specific third-party applications like Melodyne, for example, or an increasing amount of tempo and time-adjustable functionality directly embedded into a DAW of choice. Therefore, having already seen some of the tempo-elastic possibilities of Apple Loops, Flex Time editing transforms the potential flexibility of audio regions within your project.
As the name suggests, the principle use of Flex Time is to modify the timing properties of an audio region and the “events” contained within it. Of course, using conventional editing techniques, we can always use region slicing to create such timing moves, but this can often be a laborious task necessitating multiple slices and complicated crossfading to make an edit sound transparent enough to the listener’s ear. What’s next to impossible to achieve using standard editing techniques, though, is the ability to change a note’s duration, whether it’s shortening or lengthening a note to optimize its phrasing.
The first application of Flex Time, therefore, is the ability to move notes backward and forward within a given region – achieving everything from the ability to “slip” a note so that it plays more in time with events in other audio regions, through to the ability to completely rephrase a melody line (including, as we’ve seen, the duration of the notes) so that each note falls in a different position in the bar. As the audio is “intelligently” time stretched (using the currently selected Flex Time mode) no additional editing is required, and the transition between the edited and unedited notes remains smooth and glitch-free.
Another important application of Flex Time editing is the ability to quantize audio events within a region – making a bass play exactly in time with a drum loop, for example, or changing its groove from a straight 16th feel to a bassline with a subtle “swing” feel. Again, this is something that’s possible to achieve with conventional editing but can be achieved in Flex Time in a matter of seconds.
5.15 Flex Time View and Flex Time Modes
To start working with Flex Time in Logic, you’ll need to engage the Flex View mode (View > Flex View). Once the Flex View mode has been engaged, you see some extra information in each of the track headers, allowing you to select a unique Flex mode for each track in your project. Ideally, you should try to match the Flex Time mode to the type of track being handled. The modes are largely self-explanatory, but let’s take a look at their principle application in music production.
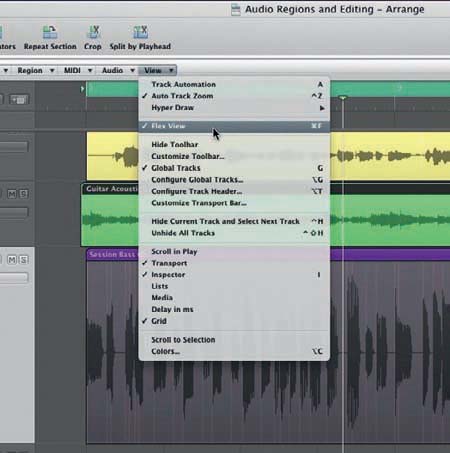
Figure 5.27 To begin working with Flex Time, you’ll need to engage the Flex View mode (View > Flex View).
The Slicing mode is the obvious choice to use with drums and percussion sounds, and makes a point of preserving transient details in the original recordings. Behind the scenes, the audio region is “flexed” using slices, using much the same process as we’ve seen with manual editing.
The Rhythmic mode is a good “catch all” solution for a range of audio files that contain both pitched and percussion elements – this might include a drum loop with some in-built bass parts, for example, or a rhythm guitar. Some “stretching” artifacts might be evident under closer scrutiny (or extreme settings), either as part of the body of the sound or the transient details.
If you working with a “melodic” instrument that doesn’t play chords – like bass, vocals, or lead guitar – then opt for the Monophonic Flex mode. This provides a good balance between transparency and CPU usage.
The Polyphonic mode is arguably the most CPU-intensive Flex mode, and should be reserved for polyphonic instruments, or indeed, complex submixes, that require high-quality time stretching with any unnecessary artifacts kept to a minimum. Remember that you can always bounce the finished Flex Time edit (for more information, see Section 5.19).
Definitely an inappropriate choice for smooth “flexing,” Tempophone is a Flex mode deliberately designed to sound obtrusive and noticeably modified. Use Tempophone when you want to use Flex Time almost like an effect, with the sound appearing increasing grainy and stretched as you move increasingly further away from its original duration.
As the name suggests, the Speed Flex mode modifies the speed of an audio event to account for changes in time. Compacting the placement of notes, for example, will speed up the playback, whereas stretching out notes will slow it down. This is much the same as modifying the pitch and tempo of track using a turntable’s varispeed control, or indeed, modifying the playback speed of tape. The Speed Flex mode, therefore, is best reserved as a creative effect, where you want audio to sound deliberately repitched accordingly.
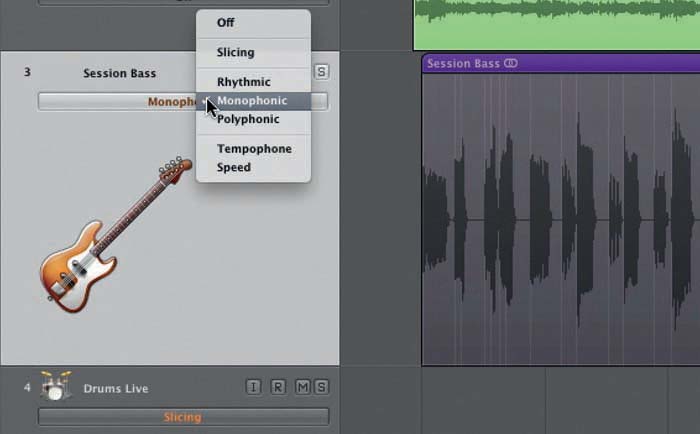
Figure 5.28 A variety of different Flex modes allow you to optimize the time-correction algorithms for the type of audio material you’re working with.
Besides engaging the Flex mode for the track, it’s also worth to check that the Flex functionality has been engaged as part Inspector’s Region Parameters box. In most cases, this will already be activated, but occasionally a region can have its Flex functionality removed.
5.16 Transient Markers and Flex Markers
Flex Time makes use of two types of makers – Transient Markers and Flex Markers – to carry out the “flexing” process. Transient Makers are first used to divide up the audio events within a region – creating markers for each word on a vocal take, or the individual hits within a drum performance. Flex Markers, however, identify the notes you wish to modify and how the notes are handled on either side of the Flex edit. Although this sounds complicated at first, their use and application soon becomes apparent once you start using Flex Time.
Whenever you engage a Flex Time mode, Logic will go through the regions on the selected track and assign a series of Transient Markers. This is a relatively quick process, and once finished, you’ll see a series of small gray hairlines to indicate their placement. Note that with Take Folders, though, the markers aren’t evident on the “top” level but can be viewed and modified once the Take Folder has been expanded.
With a series of Transient Markers placed, you can now start to explore various applications of the Flex Time technology. Probably the first and most immediate application is to resize a region and its contents accordingly. Previously, of course, the act of resizing a region would result in the “edit window” being resized, rather than modifying any of its contents. In Flex Time mode, though, the events will be expanded or contracted accordingly. This make it easy, for example, to conform a drum loop imported in at one tempo to your current project’s tempo, simply be resizing to the corresponding region end point.
Note that the expansion or contraction of any audio information within the region is always color-coded accordingly. Audio events that have been contracted will take on a green hue, whereas those that have been expanded will take on an orange shade. Where the stretch is too extreme, the shading changes to a red color, suggesting you try an alternative solution to the problem at hand!
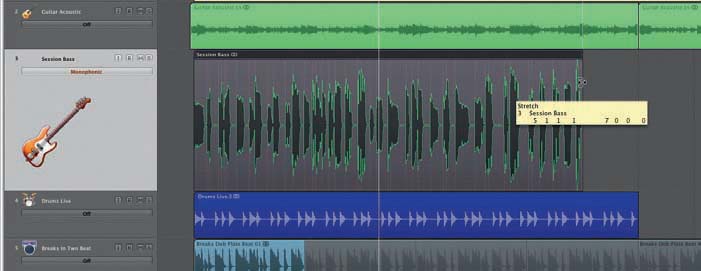
Figure 5.29 Once a region has been placed in Flex mode, any attempt to resize it will result in the audio being expanded or contracted accordingly.

Figure 5.30 A single Flex Marker will expand or contract the audio events on either side of it, as indicated by the green and orange shading.
Besides changing the region as a whole, Flex can also modify notes within it using a series of one or more Flex Markers. The art in understanding and using the Flex Marker system lies in the two contrasting ways Flex Markers can be placed, as indicated by the changing appearance of the Flex Marker Tool that appears as you float over the region in question.
By clicking in the upper half of our waveform display, we can create a single Flex Marker, which is set to the nearest Transient Marker and effectively acts as an “anchor” to the flexing process. By moving the Flex Marker in either direction, audio will be expanded or contracted on either side of the marker, again using green and orange color coding to indicate the qualities of expansion and contraction taking place.
A far more musical way of using Flex Time is to use three adjacent Flex Markers to move a single note backward or forward accordingly. Although the process of creating multiple Flex Markers might sound complicated, it’s easy enough to execute. With the Flex Time view active, move the pointer to the lower half of the region and note how the icon changes from one marker to three. Now, click on the note you want to move and note how three markers are created – one preceding your editing point, one on your edit point, and one succeeding your edit point. Moving the central Flex Marker moves the desired note position but preserves the timing on either side of the edit.
Another interesting way you can apply Flex Time is to tighten notes between adjacent regions – maybe aligning a note on a bass guitar, for example, to precisely play in time with a hit on the kick drum. First, you’ll need to ensure that both tracks have been assigned a Flex mode, and the track that you want to lock the note (or notes) to has been shuffled up or down the tracklist so that the two sit adjacent to one another. Again, we start to move our selected note using the “three marker” icon found in the lower half of the waveform display. This time, however, drag the mouse up or down to the adjacent track and note how the Flex Time marker snaps to transients on this track (the positioning line should also change to yellow to indicate this is happening).
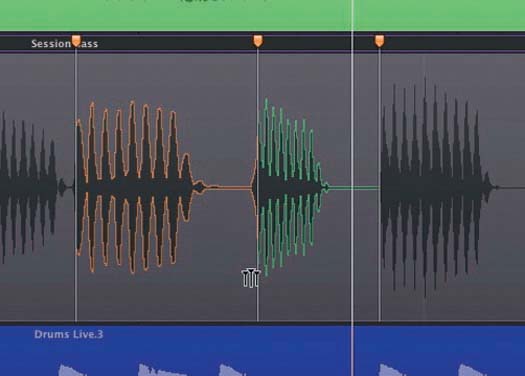
Figure 5.31 Placing three Flex Markers allows you to move a note’s position without affecting the timing of notes on either side of it.

Figure 5.32 By moving to an adjacent tracklane, you can snap a note so that it aligns with another part.
In keeping with the nondestructive ethos of editing audio in Logic, it’s also worth noting that Flex Time edits can be undone at any point in the production process, returning the audio region back to its original state. One gradual way of achieving this is to delete individual Flex Markers, thereby removing any unwanted Flex Time edits, but retaining elements that you are happy with. To delete an unwanted Flex Marker, therefore, Ctrl-click on the Marker and select Delete Flex Marker from the small drop-down menu.
When multiple Flex Markers have been assigned and you want them all to be removed, you can always Ctrl-click anywhere else on the region and select Delete All Flex Markers. This will restore the region to its original state, although subsequent regions on the track will retain any Flex Time edits that you have made. Therefore, to disable any Flex Time editing across the whole track, you can always switch the Flex mode back to its “off” setting to completely disable Flex Time editing.

Figure 5.33 Deleting a Flex Marker by Ctrl-clicking on it and selecting Delete Flex Marker.
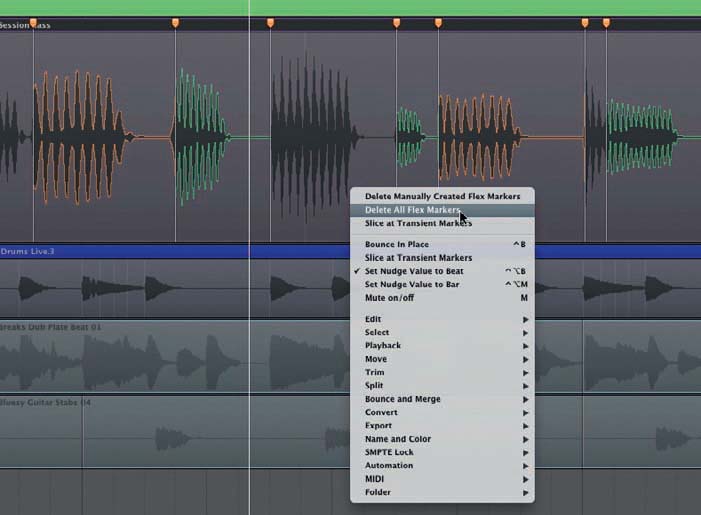
Figure 5.34 As well as deleting individual Flex Markers, you can also delete a series of Flex Markers assigned to a region.
5.17 Quantizing Audio with Flex Time
One of the standout features of Flex Time has to be the ability to quantize the events within an audio region. Quantizing is the process of “tightening” a performance so that notes within fall more closely to the divisions of a bar – something that up until the introduction of Flex Time had largely been the preserve of MIDI editing (covered in detail in Section 6.8).
To quantize the events in an audio region, you first need to select the region/s you want to quantize, and then pick an accompanying quantize setting from the Inspector’s Region Parameters box. There’re various settings to choose from, although in most situations you’ll want to select the 1/16 setting, which places each note to the closest 16th (or semiquaver) division of the bar. Once selected, you’ll notice that each note within the region has been moved slightly (unless the part was played exactly to the beat), as indicated by the orange and green shading.
From this basic quantize setting, we can then adjust various settings to change the feel and strength of the quantizing applied. For the sake of brevity, though, turn to Section 6.8 to understand fully what can be achieved here.
Groove Templates between Regions
A handy extension of the basic audio-quantizing facilities using Flex Time is the ability to copy the groove of one audio region to another. In many ways, this can be a more suitable way of improving the timing between different audio regions – allowing two different parts to play tightly against one another, but not losing the feel of the song to a rigid 1/16th grid.
The first part of the process is to extract a groove template from a suitable source region – in other words, the part you consider to be “in time.” To extract the groove, the track will need to be placed into an appropriate Flex mode (slicing is probably best) so as to create a series of Transient Markers. Once this has been done, highlight the region, and then select Make Groove Template from the region Inspector’s quantize menu. Once the groove has been created, you can choose to take the track out of its current Flex Time, assuming you have no need for it to be “flexed” in any way.
Applying the newly created Groove Template is much the same as the example of audio quantizing we’ve already explored earlier on in the Flex Time editing section. In this case, however, you’ll need to pick the particular Groove setting (rather than 1/16th, for example), which should appear at the bottom of the Quantize drop-down menu.

Figure 5.35 Flex Time allows you to quantize the performance of an audio region – shifting each respective note so that it precisely aligns to a rigid tempo grid.

Figure 5.36 Using the Region Parameter dropdown menu, you can add the “groove” of an existing region to your palette of quantize options.

Figure 5.37 Having created our new groove, we can then apply it to another region in our song. The two parts should now play together perfectly.
5.18 Separating Regions Based on Transient Markers
One final feature made possible by Flex Time is the ability to divide a single region into multiple regions based on Transient Markers within it. In the case of a recording of a drum kit, for example, this could allow you to create individual regions for each drum hit. Given the flexibility of Flex Time’s slicing mode (which achieves similar functionality in a more transparent way), the wisdom of applying this is somewhat dubious, although you might find some benefits in having regions separated in this way. One useful application, though, would be to divide a recording up into a series of “one shot” audio files ready to be imported into a software sampler like the EXS24.
You can slice a region that has been placed into a Flex Time mode by Ctrl-clicking on the region and selecting Slice at Transient Markers from the dropdown menu. Of course, once sliced, you can always take the track out of Flex Time mode to avoid any unwanted CPU activity. Should you want the regions to become individual sound files in their own right, then highlight them, and select Audio > Convert Region to New Audio Files.
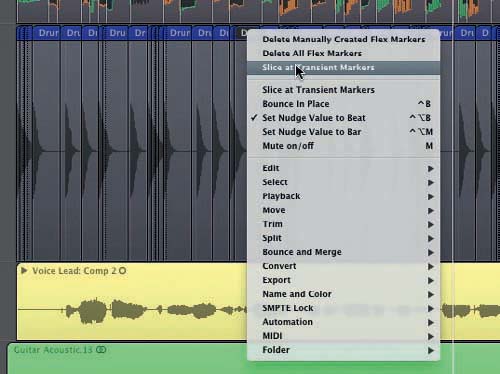
Figure 5.38 Once Transient Markers have been placed, you can separate a single region into a series of regions using the Slice at Transient Markers feature.
5.19 Freezing a Flex Time Track to Save CPU
Make no mistake about it – a heavy use of Flex Time editing can have a big hit on your CPU resources, especially if you use some of the more CPU-intensive Flex modes like the Polyphonic option. If you feel happy about the Flex Time edits you’ve made, therefore, you might want to consider “freezing” the track. Freezing is a common process in Logic (also covered in Chapter 8, Knowledgebase 3, Saving CPU: Freezing and More…) whereby an “off-line” rendered version of the track is created (complete with any plug-in settings or Flex Time adjustments), which is then streamed from disk in much the same way as an audio file. Although frozen, the track looks exactly the same – even retaining its Flex Markers – although any subsequent changes will result in the track needing to be rerendered, which can take a few seconds to complete.
To freeze a track, you’ll need to click on the Freeze icon as part of the track header. If you can’t see this, select View > Configure Track Header, and make sure the Freeze icon is checked accordingly. Before you initiate the freeze, another important point to check is the current Freeze mode, which can be established as part of the Track Parameters box, just below the Region Parameters box in the Inspector. Ideally, it should be set to Source Only, so that only the Flex Time edits are rendered in the form of an off-line file. By comparison, the Pre Fader option renders both the source information and plug-ins – which isn’t so appropriate as we haven’t got around to mixing our track yet!
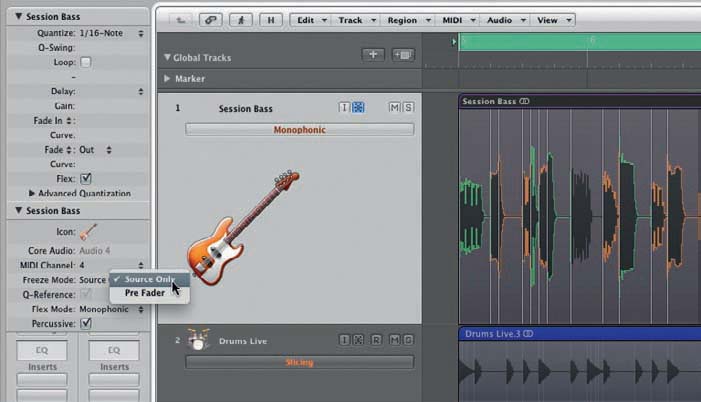
Figure 5.39 Using the Source Only and Freeze modes allows you to render your Flex Time edits as an off-line file, making a significant saving on your CPU resources!
5.20 Editing Multiple Tracks Using Edit Groups
Most of our edits so far have involved single-tracked instrumentation – that is to say, an instrument that’s recorded to a single track in either mono or stereo. However, there are plenty of examples where you might want to record more than one track on a single “pass”: for example, recording a drum kit; an orchestra using a combination of close microphones, room microphones, and a stereo pair; or a guitar amp using an array of different microphones placed around the cabinet. In all of these examples, your edits will want to be achieved en masse, rather than having to individually slice each accompanying region every time you make an edit.
Logic’s Grouping function allows you to link together tracks both in respect to editing and mixing. In Chapter 8, we’re going to be looking more closely at the applications of groups in mixing, but for now, we’ll concentrate solely on their use in editing.
You can assign one of more tracks into an edit group through the Mixer area, which also provides a current overview of the grouping status. Each channel strip on the Mixer page has its own Group Slot, which you should be able to see just below its “Audio 1” legend. Therefore, to assign a channel strip to group, simply click on this box and select a corresponding group from the drop-down menu. Note that you can also mass-enable several channels strips by Shift-clicking to augment your existing selection, and then selecting an appropriate group using one of the channels strip’s group slots.
Whenever you place a channel strip into a group, Logic will open the Group Settings window, which allows you to define how each group works. The principal option we’re interested in at this point is the Editing (Selection) and Phase-Locked Audio check boxes, as this will facilitate our edits being simultaneously carried out across all the regions.
Once the group has been established, you can go about performing your edits using any of the techniques we’ve described – using basic editing features like the Scissors and Marquee Tools to perform rudimentary edits, or stepping up to features like Flex Time, where your edits need to be more detailed. One point to remember, though, is the choice of “master” region you use to perform your primary edits. In the case of a drum kit, for example, the Overheads track makes most sense as this gives an accurate overview of all the notes played, rather than the individual notes that relate to just one part of the kit.

Figure 5.40 Create an edit group using the Mixer, ensuring you select the Editing (Selection) and Phase-Locked Audio check boxes.
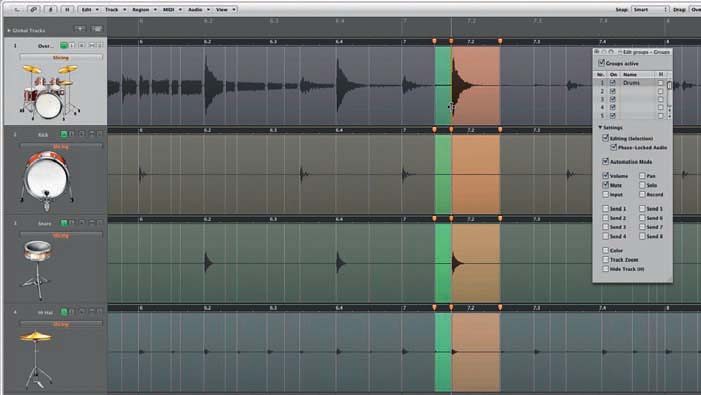
Figure 5.41 With the edit group active, all edits will be carried out across the associated regions. This is a powerful feature when used in combination with Flex Time editing.
Of course, once you’ve enabled a group, you’re not restricted to all subsequent edits being carried out across all the regions. By toggling the groups – using the so-called Group Clutch key, which is assigned to cmd + G – you can disable the group functionality across all the active groups. This then allows you to carry out edits on individual tracks as appropriate, returning the group functionality (using the Group Clutch key) once the edits have been made. You can see whether or not groups are active by viewing the small group slot on the Mixer page – when the legend is yellow, the group is active, and when it’s gray, the groups are currently disabled.
In addition to the use of edit groups and Flex Time to tighten a multitracked drum recording, you might want to turn to the Drum Replacement feature to either completely replace an individual drum sound within the kit recording, or to augment the existing sounds with a sample-based layer. Drum replacement is a common technique used in professional circles (although few actually admit it!), but has either previously required additional software – like Drumagog – or extensive use of the Audio to Score functionality (and plenty of laborious editing) to achieve in Logic.
Most drum replacement tends to focus on the kick and snare drum, as this contains the majority of the sound energy behind the kit, but equally because it’s relatively easy to achieve. By comparison – the overheads would be next to impossible to replace, mainly because of the number of different sounds (kick, snare, hi-hat, toms, and so on) occurring at the same time. In short, therefore, stick to tracks that have been spot microphoned to a single part of the kit, rather than tracks with more ambient microphone placements.
To start the replacement process, select the track that you want to replace or double, and choose the menu option Track > Drum Replacement/Doubling. A dialog box allows you to refine the drum-replacement process using a few easy-to-use parameters. First, of course, you need to set the instrument type from the drop-down menu, which includes options for Kick, Snare, Tom, and Other. As you’d expect, the threshold control establishes the amount of triggers generated – if there’s lots of background noise, for example, you might need to raise the threshold higher, otherwise pull it down to the point where all the drum hits have a yellow “trigger line” attached to them. You should be able to see all the triggers point on the accompanying regions.
The Drum Replacement feature works in conjunction with the EXS24 sampler, and as part of the replacement process, you should have noted that an instance of the EXS24 has been loaded, alongside MIDI trigger region, and a default sample setting. Therefore, once you’ve established the threshold, you might want to press the Prelisten button to hear the replacement in action (both the replacement part and the original audio track should play together solo’ed out from the mix), as well as stepping through the accompanying library settings to audition different EXS24 drum sounds. Once you’re happy with the result, hit the OK button to take you out of the Drum Replacement/Doubling dialog box, leaving the MIDI region and instance of the EXS24 in place.
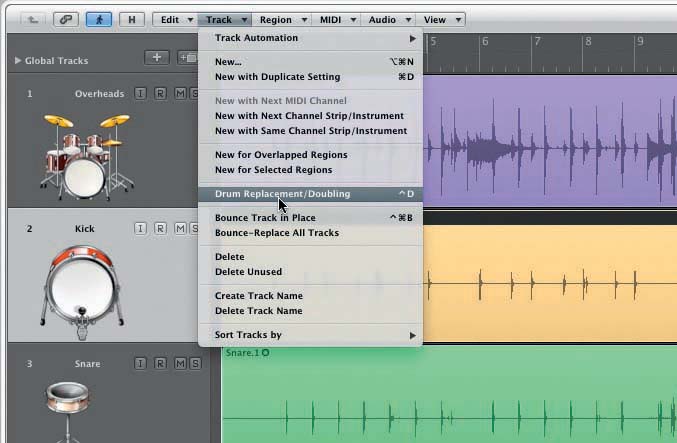
Figure 5.42 Once you’ve chosen a track to work with, select Track > Drum Replacement/Doubling to initiate the drum-replacement process.
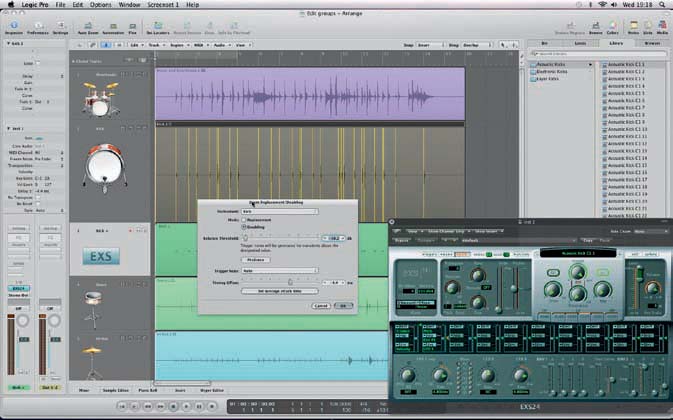
Figure 5.43 Using the Drum Replacement settings you can fine-tune the replacement process, adjusting the threshold and the type of sound you want to replace.
Once you’ve created the basic trigger part, you can then spend plenty of time refining the results as you see fit. Of course, at any point you can change the selected EXS24 sample, especially as you get closer to the final mix and have a better idea of how the part should sound. It might also be relevant to take a closer look at the MIDI data that has been created – possibly deleting unwanted notes, for example, or changing the velocities to achieve the level of dynamics you require (we’ll cover MIDI editing in more detail in Chapter 6). As the sample is devoid of any spill, there’s also plenty of potential to add reverb, compression, and EQ, without the fear of what might happen to the rest of the kit.
Given the exhaustive editing possibilities within the Arrange area, you could be forgiven for wondering why it was necessary to have another “layer” of audio editing within Logic. The Sample Editor, though, adds some important additional features to working with audio in Logic universe, some of which might be less useful to your day-to-day workflow, but still essential in getting the most from Logic.
The first important point to note about the Sample Editor Window is the fact that a large number of processes carried out within it are destructive. Rather than simply modifying playback information, therefore, many of the changes involve rewriting the data that is contained within an audio file – a gain change, for example, permanently modifies the amplitude of the data itself, rather than simply playing back the file slightly louder or quieter. Likewise, a timestretch will permanently render a longer or shorter version of the file accordingly. This technique of permanently changing an audio file is often referred to as an off-line edit.
Of course, actions taken in the Sample Editor have a degree of “undo” available to them, but it’s important to remember that decisions made in the Sample Editor might irrevocably damage the audio files used in your project, not to mention the potential havoc caused by projects that share audio files among them. However, there’re many examples of situations where you want to create a permanent change to the files, especially in situations where the audio file becomes the final “product” – like a sample ready to be imported into the EXS24 sampler, for example, or the final mix of a song ready to be burned onto an audio CD.
Therefore, as a good safety system, it’s worth making copies of any audio regions you wish to transform using the Sample Editor. This can be done by simply selecting the appropriate region and choosing Audio > Convert Regions to New Audio Files. A quick check in the Bin should indicate the creation of a new audio file, which you can modify, safe in the knowledge that the source files remains untouched. As an alternative, the Sample Editor also includes its own backup facility, found under the menu option Audio File > Create Backup.
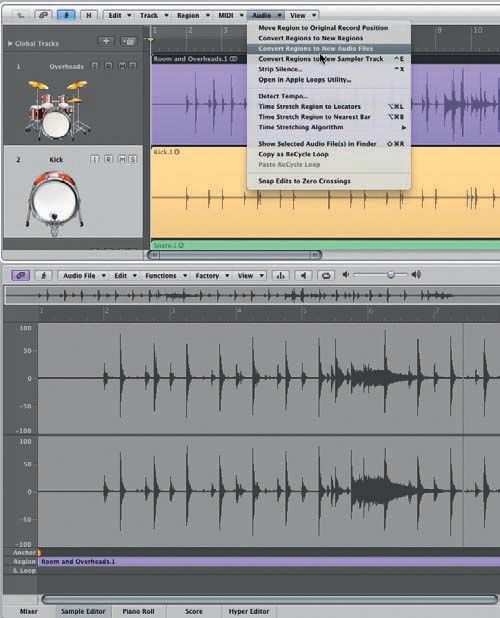
Figure 5.44 As the Sample Editor is a destructive process, you might want to consider creating a backup of your audio region before you perform any edits. One way of doing this is menu option Audio > Convert Regions to New Audio Files.
Although it is possible to edit to a high degree of accuracy in the Arrange area, the Sample Editor remains one of the best places to edit audio information down to individual sample frames. Generally speaking, this happens very rarely. One possible example, though, is the ability to use the Sample Editor’s pencil to tool to draw out small clicks that can appear in an audio file (especially when it has been poorly edited without any crossfades!). You can also use the Sample Editor to precisely align region start points so that they start precisely at the start of a note.
In addition to being able to perform off-line editing, there’s also some useful “functional” additions that are primarily addressed in the Sample Editor – from the ability to edit Transient Markers, for example, through to creating and positioning so-called Anchor points. Again, these might not be so important to your day-to-day workflow in Logic, but they add to the repertoire of techniques at your disposal!

Figure 5.45 The Sample Editor allows you to view audio data at its finest resolution – even down to the ability “draw out” sample clicks and other unwanted information using the pencil tool.
5.23 Sample Editor Applications
Although not exhaustive, we’ve compiled some of the best applications and uses of Sample Editor. There’s plenty more to be found in this intriguing section of Logic, so it’s worth exploring the Sample Editor furthermore as you grow more confident with your abilities.
This is one of my favorite applications of the Sample Editor, and it is one of the most rewarding ways of “twisting” a given sound – from reverse cymbals, through to backward guitar solos! Start by creating a duplicate audio file using the Audio > Convert Regions to New Audio Files command (otherwise, all occurrences will be reversed!). Once you’ve opened up the Sample Editor, highlight the area you want to reverse (usually the complete sound file) and then select Functions > Reverse.
To position a reversed region, take a look at the “Marking Anchor Points” feature outline below.
Use the Sample Editor to change the in and out point of your regions, potentially negating any unwanted sounds that might precede the first note, for example, or stray sounds that occur after the last note. The current size of the region is indicated by the two markers at the bottom of the Sample Editor, with an “in” and “out” point accordingly. Changing this won’t change any relative positional information, so even if you modify the start point (to remove some noise, for example), your region will still play perfectly in time.
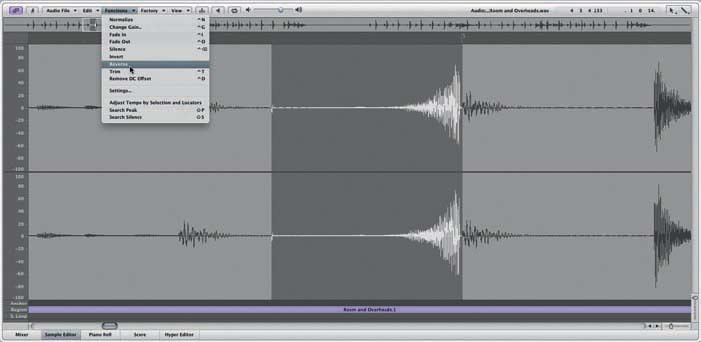
Figure 5.46 Use the Sample Editor’s Reverse function to reverse a given sound – although remember this is a destructive off-line edit, so it’s best to make a copy of the region first.
By default, all regions are positioned using their start points. However, it is possible to create an alternative anchor point positioned within the audio region. A good example of this in action is on reversed files, where the anchor point is probably best marked where the sound reaches its peak, rather than at the start of the region. You can place an anchor point by sliding the small orange marker at the bottom of the Sample Editor. Now, when you move the region in the Arrange area, you see the new anchor point being used to place the region, rather than the region’s start.

Figure 5.47 You can use the Sample Editor to accurately resize a region down to sample-level accuracy.
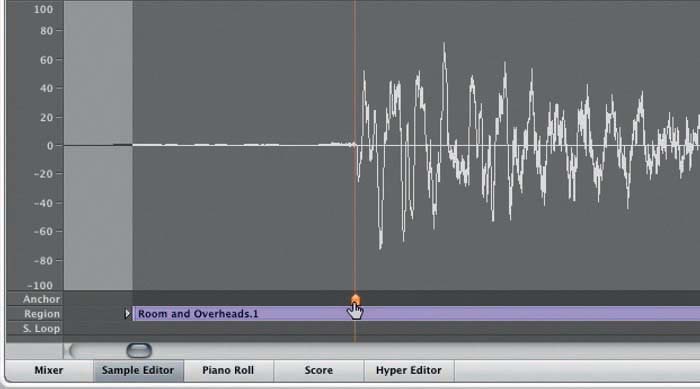
Figure 5.48 Anchor points are used as the “location reference point” for placing a region on the Arrange area.
Small unwanted noises in-between notes can be quickly removed using the Sample Editor. Simply drag-enclose the offending portion of audio and select either Silence or Change Gain from the Functions menu. So that there are no abrupt changes in the signal level, it might be prudent to opt for the Change Gain setting and pick a setting around –10 dB or so. This will attenuate the noise to the point that it is less noticeable but will not completely remove it. Again, remember these edits are destructive and will permanently change the source audio data!
It also worth noting the other “audio hygiene” options available under the Functions menu – from the ability to normalize an audio file (in others word, lifting its amplitude to hit 0 dBFS), through tools like the Invert function, which can be used to permanently change the phase of an audio file.
One interesting feature of the Factory menu is the ability to transform an audio region into MIDI data. As you’d expect, the results that can be achieved from the Audio to Score function can vary given the material Logic is presented to work with. If the source is a clean “monophonic” performance, then the output may well be useable, whereas a polyphonic source (with multiple notes, or several instruments, playing at the same time) with a large amount of background noise will stand little chance of being “transcribed” correctly.
Once edited, it’s highly likely that you can use this feature to a create usable “doubling” effect with virtual instruments, or even use it as an alternative way of transcribing played drum parts into MIDI triggers (other than the Drum Replacement/Doubling feature).

Figure 5.49 The Sample Editor’s Functions menu contains a number of tools to modify the source data – from the ability to change the gain, through to phase inversion.
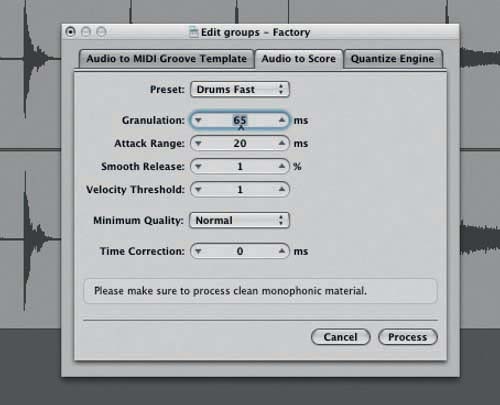
Figure 5.50 Given a clean enough source file, the Audio Score function can perform a passable attempt at transcribing an audio recording as MIDI data.
Although we’ve seen a large amount of “tempo elasticity” courtesy of Flex Time and Apple Loops, it’s also worth noting some of the “low-level” ways you can manipulate the pitch and timing of audio files using the Sample Editor. Of course, before the introduction of Apple Loops and Flex Time, the Sample Editor’s Time and Pitch Machine was the only way a Logic user could manipulate the speed and pitch of an audio file, although there’re still a number of applications that make this a valuable tool to have at your disposal.
As you’d expect, the biggest advantage of the Time and Pitch Machine is its relative accuracy – a timestretch, for example, can be as precise as a few samples, or in the example of a pitch transposition, as fine as a few cents. It’s also notable as one of the most flexible ways of adjusting both pitch and time, primarily because it can move between so-called free transposition, where the pitch and time are freely and independently adjustable, and “Classic” mode, which links together pitch and tempo/time changes, working in much the same way as a tape machine’s varispeed control.
The Time and Pitch Machine can work either with the region as a whole (selecting Edit > Select All from within the Sample Editor), or within a selected time period within the region. For example, this functionality allows you to individually repitch notes within a vocal line without having to separate each note of the performance into a series of individual regions.
Once you’ve selected the area to be processed and opened up the Time and Pitch Machine (Factory > Time and Pitch machine), you can then adjust the relevant parameters in the accompanying dialog box. First of all, you’ll need to set the mode – using Free mode to modify the pitch without modifying time (or the other way around), for example, or Classic mode when you want the feature to work much like varispeed (this can sound great on drums, for example). With tempo, you can either specify the change in tempo, a percentage, or the length of the file (either in samples, SMPTE, or Bars), while the amount of pitch change is measured in cents. You might also want to optimize the Algorithm for the material you’re working with, especially if the Universal setting isn’t delivering effective results.
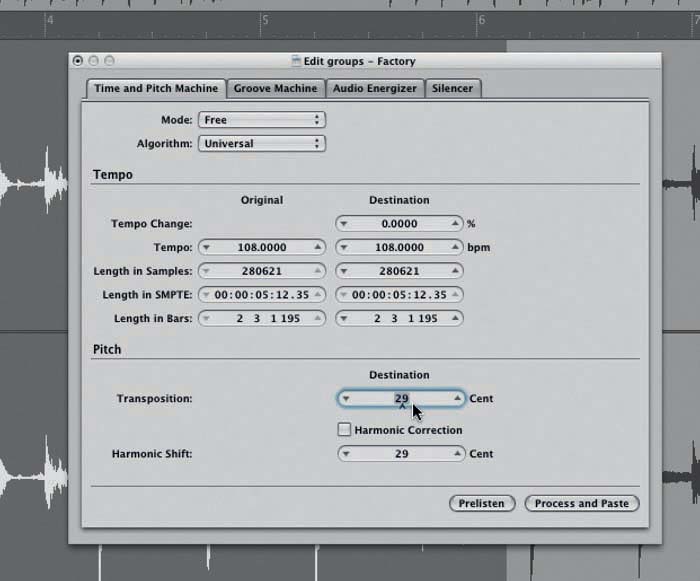
Figure 5.51 The Time and Pitch machine provides one of the most flexible and accurate ways of modifying the tempo, duration, speed, and pitch of an audio file.
5.24 Inserting and Deleting Sections of Your Song
One inevitable task of producing a song in Logic is the need to add or remove a segment of time at some point in the project’s arrangement – whether you need to remove an unwanted chorus, for example, or add several bars after the third chorus to form the middle eight. Of course, you could perform these tasks using some of the tools and technique we’ve discussed, or instead, you could turn to Logic’s specific “Cut/Insert Time” feature to perform this even more quickly and easily!

Figure 5.52 Use the Cut/Insert Time feature to extend or shorten your arrangement accordingly.
To take advantage of the Cut Insert Time feature, you’ll first need to draw the locators at the top of the Arrange area to indicate the part of the song you want to work with – either the area that needs time “inserted” into it, or the portion of the song you want to remove. Unless you only want the insertion/cut to work with a few selected regions, it’s then important that you select all the current regions in the full duration if the project using the Select All key command. Once this is done, use the menu option Region > Cut Insert Time, and choose an appropriate selection (Snip, Insert, Splice, or Repeat).
5.25 Working with Tempo and Loops
Throughout this chapter, we’ve seen a number of principal ways in which we can deal with the tempo-based material in Logic, especially in relation to the application of Flex Time. However, there are a variety of problems that arise when dealing with tempo-based material, all of which necessitate a unique solution to the problem in hand – whether it’s the ability to change your project’s tempo based on the tempo of an imported loop, or being able to Beat Map your timeline to a performance that wasn’t played to click.
Some, but not all audio files will have tempo information embedded within them – this includes Apple Loops files (as we’ve already seen), but also material you record into Logic, and file formats like ReCycle’s REX. In these situations, it’s usually as simple as clicking on the Follow Tempo as part of the Region Parameters box so as to have the loop conform to your current project tempo.
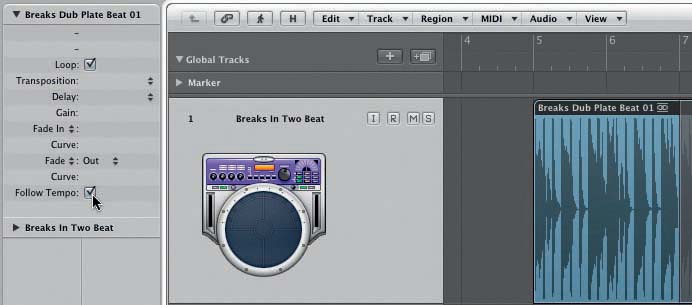
Figure 5.53 If your audio file has tempo information embedded within it, you can use the Inspector’ Follow Tempo option to have the region automatically conformed to the project’s tempo.
Timestretching a Region to Fit
If your audio file/loop doesn’t include tempo information, there’re a number of different ways to make it manually conform to your project tempo. First, of course, you can use the Flex Time functionality – engaging a Flex mode and then resizing the region so that it fits precisely to a number of bars. Another option is to use the Time Stretch option under Audio menu. Once you’ve selected the region in question, pick either Audio > Time Stretch to Nearest Bar, or Audio > Time Stretch to Locators, as appropriate. The option to stretch to Locators is useful if the amount of correction falls outside the “nearest bar.” In this case, use the Locators to set the size of the eventual time stretched region.
Working Out the Tempo of a Region/Loop
Another option to manually conform the loop is to use Logic’s Detect Tempo feature, which will then allow you to use the Follow Tempo functionality and have an imported loop follow your project tempo. With the region/s selected (in this example, Logic can work with multiple regions to extract a more accurate calculation) select the option Audio > Detect Tempo. In the accompanying dialog box, Logic will provide with a series of “best guesses,” which you can select as appropriate, and then check on the Enable “Follow Tempo” or “Flex” to have the resultant calculation used to lock the loop to your project’s tempo.
Matching Your Project’s Tempo to an Imported Loop
Now let’s look at the problem another way around – where you want to change the project’s tempo to match that of an imported loop. Once you’ve imported the region, select it, and then set the locators to match the required bar count – like two or four bars, for example. With this established, select Options > Tempo > Adjust Tempo using Region Length and Locators. Logic will now adjust the tempo so that it precisely fits the duration of the region, and assuming you’ve set the right bar count, everything should now play in time with the imported loop!
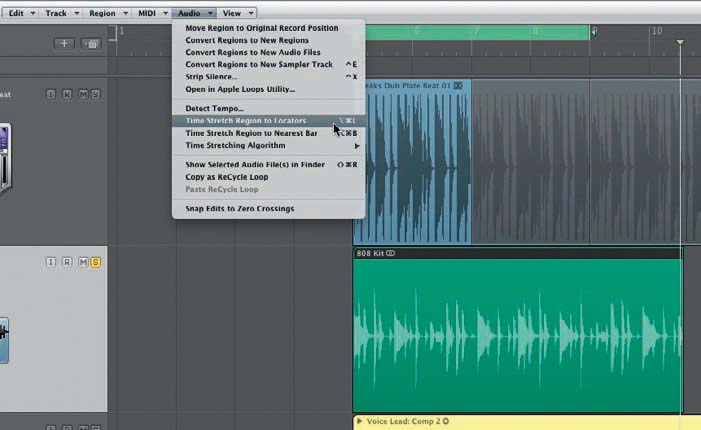
Figure 5.54 If you can’t use the Follow Tempo feature, you can turn to manually timestretching the region so that it hits the nearest bar or locator point.

Figure 5.55 Use the menu options Audio > Detect Tempo so that Logic can calculate a “best guess” for the region’s BPM. This can then be “flexed” accordingly.
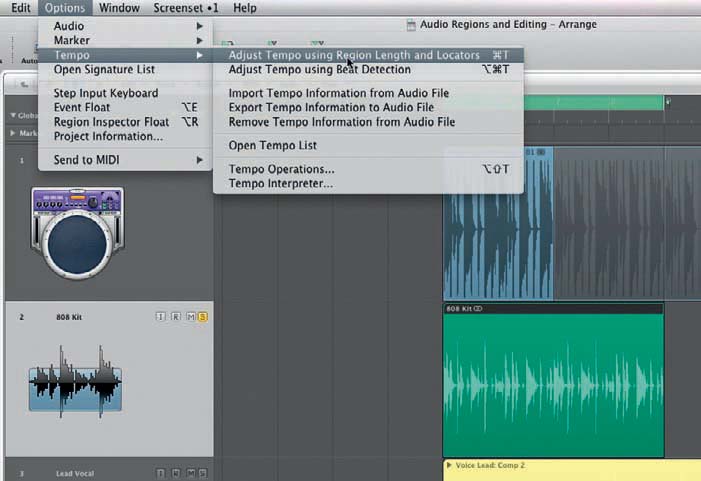
Figure 5.56 As well as getting a loop to play in time with your project, it’s also possible to adjust the tempo of your project to conform to the length of your imported region.
As well as working with loops, it’s also likely that you’ll need to deal with performances that have little or no relation to a rigid metronome or click. In this example, you might want to “beat map” your project’s timeline so that it follows the tempo fluctuations of the original performance, theoretically allowing you to synchronize additional loops, or even quantize MIDI parts, to the original recording.
Logic’s Beat Mapping feature can be found as part of the Global Tracks feature (which is covered in more detail in Section 10.3). You can view the Global Track by selecting View > Global Tracks. By default, though, the Beat Mapping track-lane isn’t displayed, so you’ll select View > Configure Global Tracks, and then ensure that the Beat Mapping option is enable.
As you’d expect with Logic, there’s a variety of ways you can use the Beat Mapping feature, although in this example, we’re going to explore the most common application – that of relocking a prerecorded performance and creating a new tempo grid that follows the fluctuations in the original track.
To get the process started, it helps if you find the average tempo of the performance, as well as editing the first “hit point” so that it falls at the start of your Logic project. Arguably, the best way of finding the average tempo is to use the BPM Counter plug-in, which can be found under the Metering plug-ins folder. Instantiate the BPM Counter plug-in either across your stereo bus, or across one of the rhythm tracks in question. Once you’ve established the tempo, use the transport to set this is as your project’s global tempo.
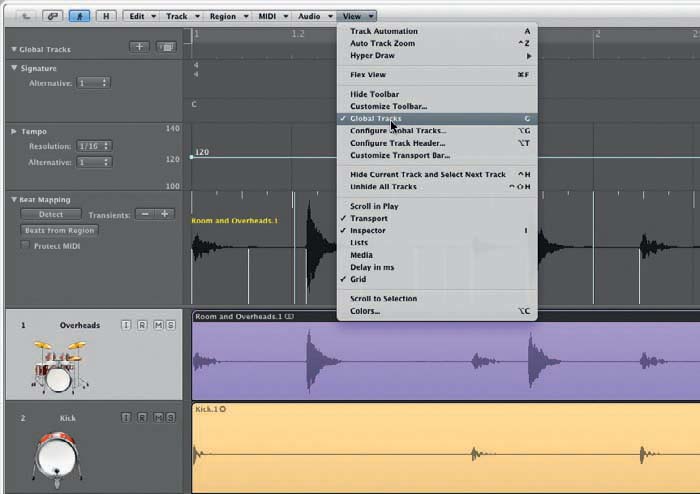
Figure 5.57 Logic’s Beat Mapping function is found as part of the Global Tracks feature. To view the Global Track, select View > Global Tracks.
Now we can turn our attention to the Beat Mapping process. Expand the Beat Mapping track and highlight the track you feel is most appropriate to work with – which will probably be something like the drum overheads. In the Beat Mapping track, you should now see the waveform of the region you’ve selected, and, if Logic had already created transient marker information, a series of white transient marker points. If Logic hasn’t got any transient marker information, press the Detect button as part of the Beat Mapping tracklane.
Zoom in on the first few bars of the performance – assuming our basic tempo is correct, most (but not all) of the hits should fall on the beat. However, some of the beats will be fractionally off, possibly leading to subsequent beats also falling “off the grid.” Using the Beat Mapping feature though, we can realign our tempo grid to that it aligns with the hit points that we feel are important (usually on the bar, for example, or the one of the principle off-beats).
To align the beat, simply click on the beat you want to align to (on the Beat Mapping timeline) and then align this to the accompanying transient point on the Beat Mapping display. As you’re aligning the beat and the transient, note how Logic draws a thin yellow line to indicate the alignment process that is taking place. Also, the Tempo track (which is part of the Global Track) should have additional tempo points inserted into it, indicating how Logic is varying its initial tempo to stay in time with the drum performance.
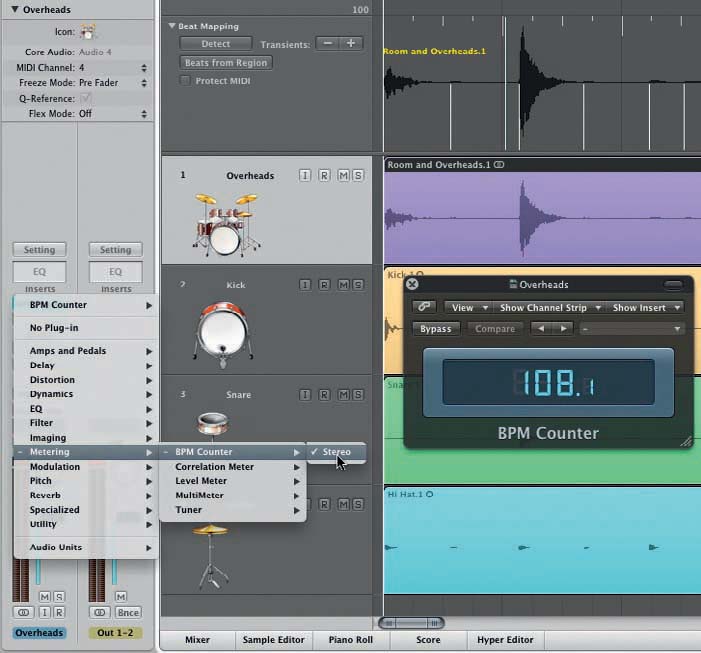
Figure 5.58 To start the Beat Mapping process, align the region/s to the start of the project and find the “average” tempo using the BPM Counter plug-in.
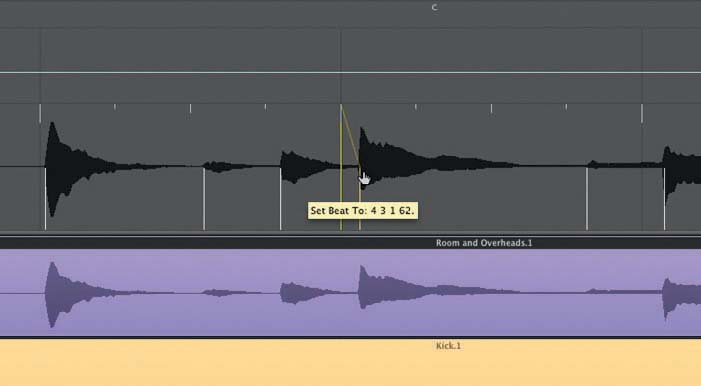
Figure 5.59 Step through the recording and adjust the tempo track to match the transients. First, click on the required beat in the timeline, and second, drag the yellow “beat mapping” line to meet the transient marker in the performance.
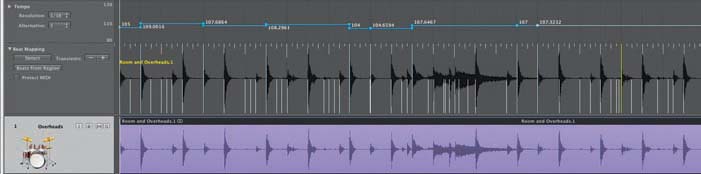
Figure 5.60 Here’s a finished example of Beat Mapping in action, with the associated tempo changes to keep Logic in time with the performance.
5.26 Managing Your Audio Files and Regions
In these last few sections of our audio editing chapter, we’re going to review the techniques that relate to the “management” of you editing workflow – whether it’s techniques to organize region data and tracks on-screen so as to make your editing process clearer and easier to negotiate, or techniques to manage the “raw” audio data that is included within your project.
The Audio Bin Tab versus the Audio Bin Window
As we’ve already seen in Chapter 4, the Audio Bin – found on the left-hand side of our Arrange window – provides a useful overview of the audio files included within our project, alongside basic information about the files in question: such as the sample rate, bit depth, mono/stereo information, and the total size. Clicking on any of the accompanying arrows next to the file opens up the list of regions associated with audio file in question.
However, in addition to the Audio Bin, Logic also includes a dedicated Audio Bin Window (Window > Audio Bin), which allows you to open up the bin separate from the main Arrangement window. Although many of the functions are shared between the two types of Audio Bin, it’s worth noting that the dedicated window includes several additional features that make it the ideal choice for more extensive file-based activates – including the ability to display full waveform views for each file/region, as well as an alternative means of setting a region’s anchor point (other than using the Sample Editor).
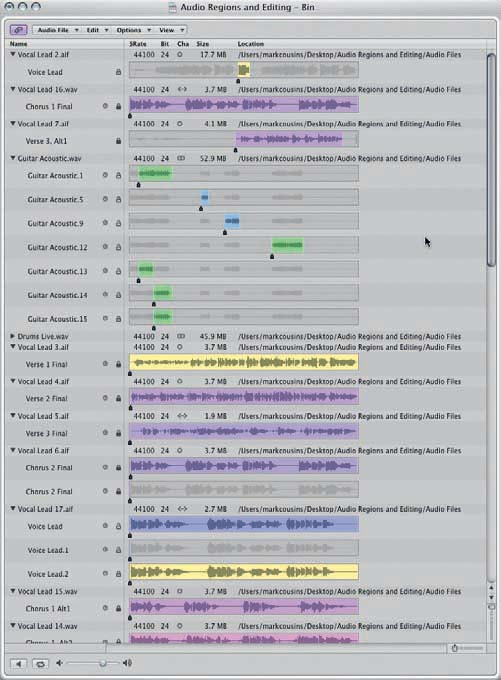
Figure 5.61 The dedicated Audio Bin window provides an expanded set of region and audio file management options, as well as an improved graphical overview that includes waveform data.
Using a combination of the Audio Bin’s Edit menu and the Audio File menu, you can perform a variety of file management activities – whether it’s something as simple as deleting an audio file from your hard drive, or moving a batch of audio files to a new location.
One of the most useful features of the Edit menu is the option to Select Unused files. This is a great way of giving your project a spring cleaning – selecting regions and audio files that are unused in the arrangement, which can then be potentially removed from your session using the Delete key. Of course, it goes without saying that you need to approach this function with some care, although its ability to tidy up a particularly messy collection of audio files and regions can be welcome, when used correctly.

Figure 5.62 Use the Select Unused option to give your Audio Bin a spring cleaning. Once selected, the unused regions and files can be deleted as appropriate.
Using the option Audio File > Move File(s) is a useful way of managing particularly large audio files folders. You can choose to use “nested” folders in a way you feel is most appropriate to a project – this could involve pulling all the vocal files into one folder, for example, or grouping all the files associated with a “take” of a song (assuming you’ve performed a simultaneous multitrack recording across multiple inputs). The location of audio files also comes in useful with some of the viewing options that we’ll see later.
One important task that the Audio Bin gets used for is the task of converting audio files between different file formats – like AIFF, WAV, or MP3 – as well as moving between different sample frequencies and bit rates. A good example of file conversion in action would be in the task converting an original 24-bit uncompressed mix into MP3 format for use on the Internet. When you choose the conversion option (Audio File > Copy/Convert Files), Logic will present a variety file conversion settings, as well as the option to re-reference the region in your project to the newly created files.
Viewing the Bin and Grouping Files
Using the View menu, you can configure how the Audio Bin displays its list of audio files and regions. One of the most useful features of this menu, though, is the ability to create a Group, allowing you to organize related regions/files so that they appear together in the Audio Bin. You can create a Group in a number of ways – either by selecting the files manually and then choosing View > Create Group, or by using one of the automatic group options. For example, you could group files by their location on your hard drive (assuming you’ve used the “nested” folder previously described), their file attributes, or the current selection in the Arrange area.
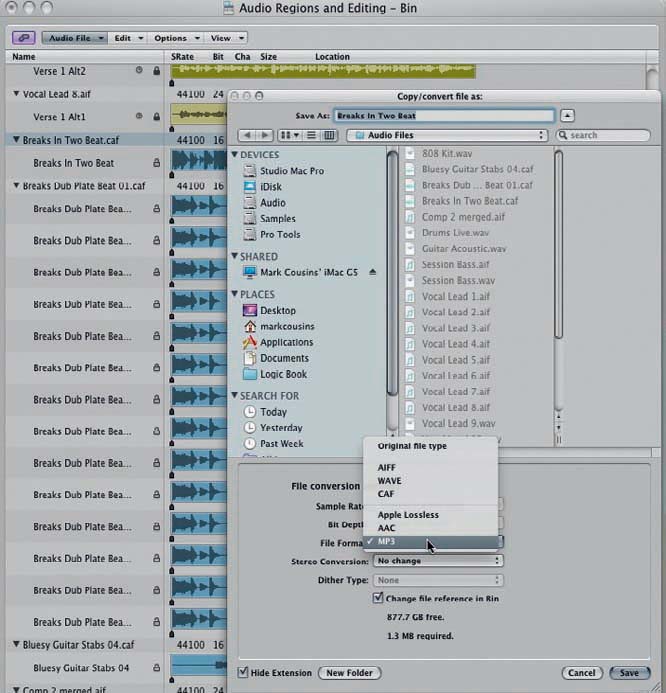
Figure 5.63 The Audio Bin allows you to convert audio files between different bit rates, sample frequencies, and file formats, including AIFF, WAVE, and MP3.

Figure 5.64 Use the Audio Bin’s Group Files feature to better organize how it displays your audio files and regions.
5.27 Using Folders and Hiding Tracks
In modern music production, it’s common to have a number of “related” tracks and regions – maybe the close and ambient microphones placed around a sing drum kit recording, for example, or the multiple performances that form a “chorus” of backing vocals. As these tracks and regions amass, it can get difficult to manage the amount of material on screen, especially if you’re working on a smaller-sized monitor.
Logic’s Folder feature, therefore, is an elegant solution to this problem – allowing you to group together related regions and tracks and pack them inside a folder. With the regions packed inside a folder, you can enjoy a more simplified arrangement area, with the mass of regions now represented as a single region/folder. At any point in the production, you can “peer inside” and see the contents of the folder – editing its contents accordingly, but only seeing the regions and tracks that relate to that folder. Move back out of the folder, and you’ll find yourself back on the “root level” of your arrangement.
Of course, the Folder feature bears some similarities to Take Folders used as part of the Quick Swipe Comping feature. Despite these apparent similarities, though, it should be noted that a Take Folder is principally used for the task of comping, whereas a Folder can be used to organize a number of discrete and separate regions working independently of one another. In short, use Take Folders for multiple takes, and Folders for groups of related instruments/regions.
To pack a folder, first select the regions you want to be include in the folder, and then choose Region > Folder > Pack Folder. Logic will now create a new folder (which looks and behaves much the same as a region) as well as a folder track to play this back. Both the folder and track can be named as you see fit.
To clear some space in the arrangement, you might also want to use the menu option Track > Delete Unused. This will remove the empty tracks from the Arrange area (left when the regions where placed in the folder), although of course, they’re still active “inside” the folder.
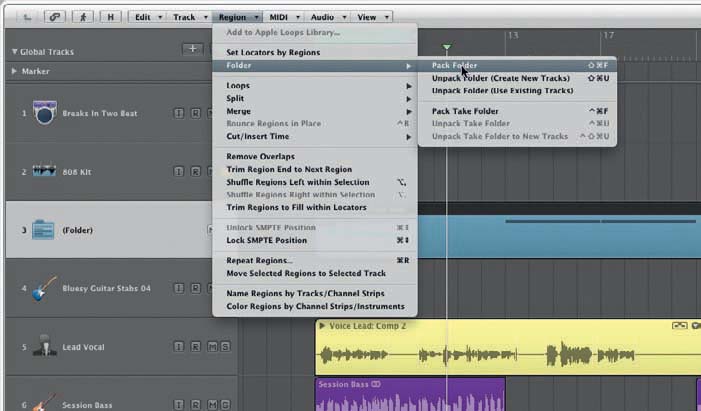
Figure 5.65 To organize complicated arrangements with multiple regions and tracks, use the menu option Region > Folder > Pack Folder.
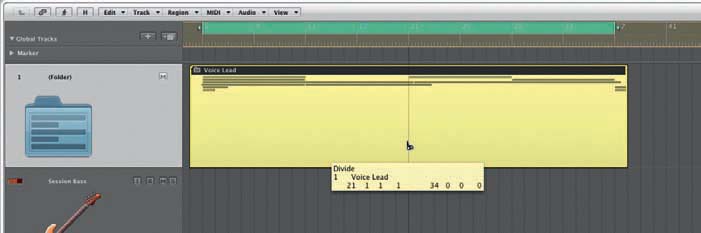
Figure 5.66 A folder works much the same as a region, allowing it to be resized, copied, and muted in much the same way as an ordinary region in the Arrange area.
Despite containing a number of regions, a folder can be edited and copied in much the same way as an ordinary region – resizing it, for example, to make it shorter, or duplicating the folder so that appears more than once in the song. As such, a folder is a very efficient way of handling multiple regions, especially where lots of edits have been made and there’s a risk of losing small region fragments as you move large selections of regions around your arrangement.
You can view the contents of a folder by double-clicking on it. Logic will then present an arrangement solely of the regions (and associated tracks) that are contained within it. This will also be reflected in the Mixer, which will also display a slimed-down set of tracks. To move back up to the “root level” of the arrangement, simply click on the back arrow in the top left-hand corner of the Arrange area.

Figure 5.67 Press the back arrow in the top left-hand corner of the Arrange area to move out of the folder and return back up to the root level of the Arrange area.
Of course, at any point in the production process, you can choose to unpack the contents of the folder, using either the menu option Region > Folder > Unpack Folder (Create New Tracks), or Region > Folder > Unpack Folder (Use Existing Tracks) accordingly.
As an alternative to packing folders, you can also choose to, temporarily, hide a number of tracks from the current view. The Global Hide View Button can be found in the top left-hand corner of the Arrange area, and when depressed a series of buttons also inscribed “H” appear on each track beside the record-enable button. Simply choose the tracks you wish to hide, and then click on the “H” button at the top of the Arrange area. The tracks you’ve selected to Hide will now be out of view (and the Global Hide View button illuminated orange to indicate this), allowing you to concentrate on a simplified arrangement. When you need the tracks returned back into view, simply press the Global Hide View button once more.