
In This Chapter
2.4 Editor Areas – Mixer, Sample Editor, Piano Roll, Score, and Hyper Editor
2.6 Inspector Area (Keyboard Shortcut – I)
2.8 Tools, Local Menus, and Contextual Menus
2.9 Adjusting How You View the Arrangement: Zooming In and Out
Knowledgebase
Logic’s Interface
Negotiating the interface of any audio application is vital to understanding how it works and the precise method involved in creating a finished audio recording. Logic’s interface is no exception, providing its own unique slant on the production process: with a number of editor windows, mixers, media browsers, and so on, all used to sculpt and refine your audio output. Navigate Logic’s interface in an informed way, therefore, and the application will become a seamless and enjoyable part of your audio production workflow, rather than a stumbling block to your creative exploits.
In this chapter, we’re going to take a look at both the overarching principles of using Logic, alongside the specific components of the Logic interface and how these integrate into the production process. From this important stepping-stone, we can then begin the process of creating our own projects and taking a more detailed look at Logic’s role and input in audio and music production.
Logic principally works with two types of data – audio and MIDI. Physical instruments and external sound sources are recorded directly into Logic as audio sound files. You might, for example, plug your guitar straight into a DI input on your audio interface or set up a number of microphones connected to your interface’s mic preamps – all of which will be recorded as audio files directly into Logic’s Arrange window. Once recorded, you can edit and mix these files to create your finished track, ready to be burned on to CD.
As an alternative to audio files, you can also record MIDI data directly into Logic using an attached MIDI keyboard, which, in turn, can be used to control Logic’s integral virtual instruments (or other third-party Audio Unit instruments), as well as external hardware MIDI synthesizers and samplers. Unlike audio recording, MIDI production provides an unprecedented amount of scope over both the performance and sound of the music, although it can sometimes lack the life and energy of music performed by real musicians.
Of course, it’s highly likely that most projects in Logic will use a combination of both audio and MIDI recordings together to create the optimal presentation of your track. In that respect, the combined power and functionality of the Arrange window in handling such projects makes Logic a superb production solution.
The Arrange window is the nerve center of your work in Logic, providing a range of different editing and arrangement features to piece your project together. Placed in the middle of the interface, and covering the majority of the screen, is the Arrange area, displaying a list of current tracks and instruments residing in the project (in the track list down the left-hand side of the Arrange area), alongside the various regions that form the structure and development of your song over time. By adding or deleting tracks or moving regions around the screen, we can visually build up the structure and arrangement of the song accordingly.
Springing up from the sides of the Arrange window are a number of other functional “areas.” These areas relate to activities involved in the production process and the tools of editing, arranging, and mixing audio and MIDI data. For example, in the initial stages of production, you might need to input the various signals to be recorded, checking their respective recording levels and making a suitable “monitor mix” – in this case, opening up the Mixer tab at the bottom of the Arrange window. Later on, you might want to import some additional audio files – using Logic’s Browser – or edit the timing of a MIDI performance using the Piano Roll.

Figure 2.1 The main arrangement area provides a visual overview of the tracks used in the project, as well as the arrangement of the song defined by the various regions.

Figure 2.2 Use the other areas of the Arrange window to access more detailed application-specific editing tools and features.
The idea with Logic’s Arrangement window, therefore, is that it can provide a dynamic working environment, optimized for the tasks you need to carry out at any point in time. Although it’s possible to open and shut many of these extra areas using on-screen tabs, or double-clicking on regions, it’s well worth memorizing some of the important keyboard shortcuts so that you open them “on the fly.” Importantly though, whatever additional area you decide to open up, you’ll still have some overview of the project’s arrangement, allowing you to keep a handle on how your edits affect the entirety of the track.
2.4 Editor Areas – Mixer, Sample Editor, Piano Roll, Score, and Hyper Editor
Opening from the bottom of the Arrangement window, the various editor areas within Logic allow you work with and edit your project in a number of different ways.
Knowledgebase ![]()
One of the principal concepts of a DAW system like Logic Pro is the notion of the nondestructive edit. Unlike the process of editing tape – which physically cuts the tape into two – an edit in Logic simply changes the proportion of data played. In that respect, we need to make an important distinction between the “source file” or recording and a “region.” In effect, a region is simply a window on the original data, playing back either a small or large part of file. You can also have a number of different regions focusing on different parts of the original file, but, ultimately, all sourced from the same material. Of course, all of these types of editing would be impossible to achieve with a physical, destructive editing medium like tape.
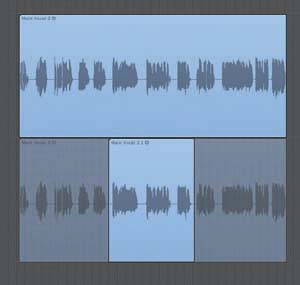
Figure 2.3 A region is simply a window on the original data, allowing you to resize the edit at any point, effectively bringing back audio or MIDI data after the original start or end point has been established.
The Mixer balances the respective levels of the tracks included in your project, as well as instantiating different signal processing plug-ins (like reverb, compression, or equalization) to process each mixer channel. In addition to audio mixing, the Mixer is also the primary port of call for using virtual instruments (like synthesizers, samplers, and vintage keyboards), allowing us to create music completely within the realms of Logic. Alongside the Arrange area, the Mixer is undoubtedly one of the most important day-to-day production tools used in Logic.
Sample Editor (Keyboard Shortcut – W)
The Sample Editor provides detailed, sample-accurate audio editing of a given region in the Arrange area. Although a large amount of audio editing can be achieved in the Arrange area alone, it is the Sample Editor that really allows us to comfortably work with low-level details of an audio recording – precisely setting edit points, for example, or applying unique “destructive” editing techniques such as reversing, silencing, or time compression/expansion.

Figure 2.4 The Mixer allows us to balance the mix, process tracks using audio effect plug-ins, and instantiate virtual instruments.
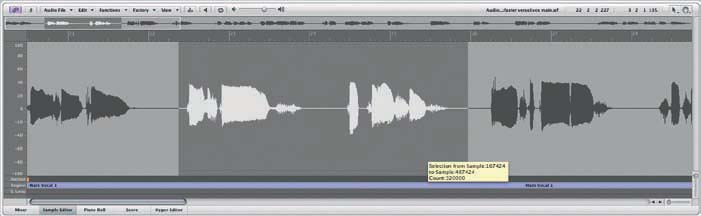
Figure 2.5 The Sample Editor allows you to edit and process your audio files in ways impossible to achieve in the Arrange area alone.
Piano Roll (Keyboard Shortcut – P)
The Piano Roll editor is the main MIDI editor in Logic, used to edit MIDI information that in turn controls virtual instruments or external hardware synthesizers and samplers. Using an intuitive display of note information based on the position on the piano keyboard (on the vertical axis) and the horizontal axis displaying both the note’s starting point and duration, Piano Roll offers both unparalleled precision and ease-of-use for MIDI editing. Using the extended editing functions of the Piano Roll, you can also transform and edit MIDI information in ways that would be extremely time-consuming (if not impossible) to perform by hand.
In addition to providing a useful way of visualizing and editing MIDI information for musically literate users, the Score editor is the vital conduit between your raw MIDI recordings and a finished printed score readable by real musicians! Although not everybody will want to use the Score editor, it does illustrate Logic’s intention to be a versatile and competent music production tool in the widest sense.

Figure 2.6 Piano Roll is Logic’s main MIDI editor, with a range of editing tools and features dedicated to the precise editing of performance data.

Figure 2.7 Although slightly less versatile as a MIDI editor, the Score area is still a useful tool for turning your MIDI performances into a finished score.
Hyper Editor (Keyboard Shortcut – Y)
This final form of MIDI editor offers a more specialized solution to working with controller data – like volume or pan – as well as offering an alternative means of programming and creating drum tracks. Information is presented within a unique series of vertical beams, allowing you to quickly draw in controller sweeps, for example, or complicated drum patterns full of sixteenth notes. As with the Score area, the Hyper Editor might not be to everyone’s tastes (there are alternative ways of achieving many of its main applications), but it does form an interesting alternative for working with several different lanes of controller data outside the Piano Roll editor.
To change the respective proportion of screen devoted to the main Arrange area and the various editors, click and drag on the thin gray line between the Arrange area and bottom editor area. This allows you to optimize the view based on your current priority – for example, expanding the Mixer when you need full access to its compression and equalization settings or using a minimized Mixer (with just the main fader positions viewable) when you want to quickly rebalance the mix in relation to the arrangement.

Figure 2.8 Hyper Editor displays its information as a series of unique vertical beams. As such, the Hyper Editor forms a useful solution for dealing with MIDI controller data.

Figure 2.9 Change the relative window size (using the thin gray line between the areas) to prioritize the view based on your current production activity.
Any project in Logic will be potentially composed of a number of different audio files, plug-in settings (for instruments and effects), and Apple Loops. The Media area, therefore, is an important tool for keeping on top of these various components and is permanently located toward the right-hand side of the Arrange window. Once open, the Media area can perform a vital role in a number of media-based activities: from the drag-and-drop importing of audio files directly into your project, to the navigation of plug-in settings and the creation of sampler instruments in the EXS24.
Alongside the Media view, Logic can also use the right-hand side of the Arrangement window to display a series of list-based information. Although not as glamorous or intuitive as some of the other editors, these list views are still vital to the success of the project and the flexibility and precision of working with Logic. In total, there are four types of list available. Event presents MIDI information in its “raw” form, allowing you to see precise parameter values and positional data. Marker displays a list of locational reference points (like verse, chorus, middle eight, and so on), which can be an effective way of navigating long projects. The Tempo list manages a project’s tempo changes, particularly vital when working to picture, while Signature offers a similar control in relation to time signature.

Figure 2.10 Using the Media area, you can work dynamically with the range of media files associated with a project.
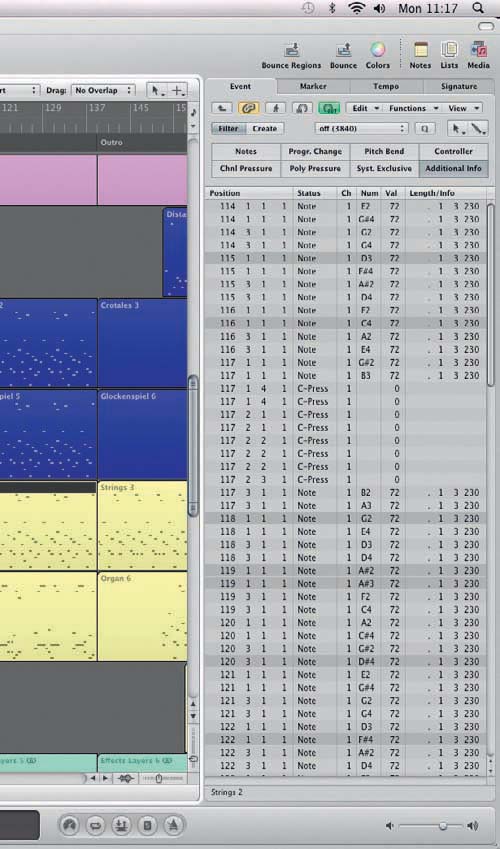
Figure 2.11 The Lists area manages the various list-based processes in Logic – from the detailed viewing and editing of MIDI information in the Event list through to the Tempo list’s set of tempo changes.
2.6 Inspector Area (Keyboard Shortcut – I)
The Inspector area – found toward the left-hand side of Logic’s Arrange window – provides a quick-and-easy access point to key parameters relating to the regions and tracks used within your project. The Inspector is a powerful tool for audio production work in Logic, performing many essential tasks like quantizing on MIDI regions or fades and crossfades with audio regions, as well as being an excellent way of viewing smaller parts of the audio mixer.
The Inspector is divided into three principal areas, which, looked at from top to bottom, are the region parameters, track parameters, and the arrange channel strip (see below for more information). It is possible for both the region and track parameters to be minimized, in which case you’ll need to open them (using the small arrow) to access the complete parameter set.

Figure 2.12 The Inspector provides a quick access point to parameters relating to audio regions and tracks, as well as a track-by-track display of the audio mixer.
Region parameters govern the playback data of a particular audio or MIDI region in the arrangement. For example, a MIDI region can be quantized, transposed, delayed, and looped, all directly from the region parameters box. An audio region, on the other hand, has its own unique set of parameters, largely in relation to the use of fades and crossfades. Besides being applied on a region-by-region basis, the region parameters box is also a powerful tool for modifying playback data across several regions at the same time – maybe applying a massed quantizing setting, for example, for all the MIDI regions in your arrangement.
Track parameters establish a number of parameters in relation to the track. Audio tracks tend to have slightly fewer parameters, whereas MIDI and virtual instrument tracks present slightly more control.
Not a full mixer as such, but the Inspector’s channel strip view at least provides some basic access to the audio mixer on a track-by-track basis. The second channel strip illustrates the “next step” in the channel’s signal path. For example, this could be the main outputs, or an aux fader, if the track was being fed to reverb or delay plug-in via a bus send.
Framing the extreme top and bottom of the Arrange window is the toolbar and transport bar, respectively. The toolbar offers quick access to important menu-based functions in Logic, from basic settings and preferences to various editing tools like region nudging, region splitting, automation, and strip silence.
The transport bar includes the all-important transport controls (play, rewind, fast forward, and so on), a display area (including SMPTE time, CPU usage, and so on), and finally, a number of Mode buttons to activate functions like the metronome and cycle playback.
To match your preferred way of working, it’s worth noting that both these bars can be redesigned as you see fit by Ctrl-clicking on part of their grayed-out surface. In both bars, you can add further functions, and in the case of the toolbar, change the relative positioning and arrangement of the buttons.
![]()
Figure 2.13 Use the toolbar to access features only usually available via keyboard shortcuts or the menu.
![]()
Figure 2.14 Navigate your project and invoke various Mode buttons via Logic’s transport bar.
2.8 Tools, Local Menus, and Contextual Menus
With many of Logic’s principal audio and MIDI editors, alongside the main arrangement area, you’ll find a series of tools dedicated to carrying out different activities or tasks. These tools can be configured for the left- and right-hand mouse button using the small drop-down menus in the top right-hand corner of the respective area. For example, the Arrange area includes tools that relate to the manipulation of regions, as well as automation data. When you’re editing automation data in the Arrange area, therefore, it might be beneficial to place the main pointer tool on one mouse button, with the Automation Curve tool on another.
Pressing the Escape key at any point will also bring up the particular toolbox menu for that area, allowing you to quickly switch tools without having to travel to the extremes of the area’s window.
Alongside Logic’s global menus, you’ll also find a set of local menus unique to each area, many of which contain powerful editing features and functions that go beyond what can be achieved by mouse alone. Although not essential, it’s worth familiarizing yourself with these menu features over time.
In many cases, it is also possible to access these features via the use of contextual menus, directly activated by Ctrl-clicking in the relevant area. As you’d expect, the precise role and content of the contextual menus changes between areas, but you’ll also find that the menu adapts given the precise part of the screen or objects you click on. For example, in the Arrange area, the contextual menu will differentiate between Ctrl-clicking in the main region area, regions themselves, the bar ruler, and the track list, with different functions appearing each time. Although bewildering at first, as you get more used to these features, you’ll find the contextual menus a powerful and immediate means of accessing the real depths of Logic’s editing prowess.
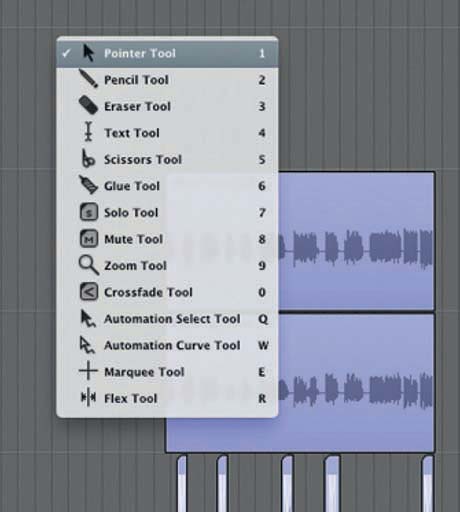
Figure 2.15 Each area has its own unique set of tools, which can be quickly accessed via the Escape key.
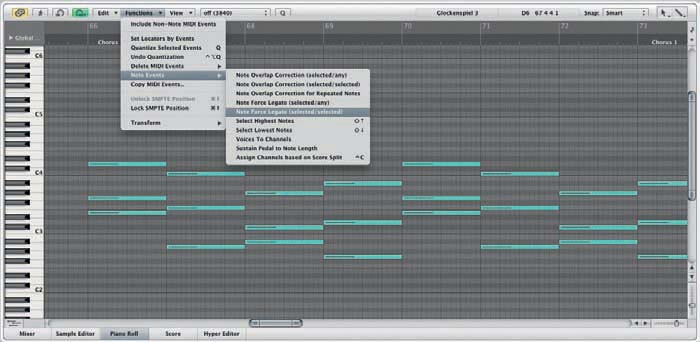
Figure 2.16 Each area will have its own local menu, with a range of functions that are unique to the activity taking place.
2.9 Adjusting How You View the Arrangement: Zooming In and Out
Varying the magnification of your project is essential both in terms of keeping an overview of the “macro” arrangement of your track and to be able to hone in on certain details, even down to sample-level accuracy. In the arrangement area, the two zoom controls (for the horizontal and vertical axes, respectively) can be found toward the bottom right-hand corner of the window – note that you can also use Ctrl+Alt+ any of the arrow keys to achieve the same movement in and out of magnification. You can also use the zoom tool to drag-enclose a specific portion of the screen you want to view, with a double-click taking you back to your original magnification level.
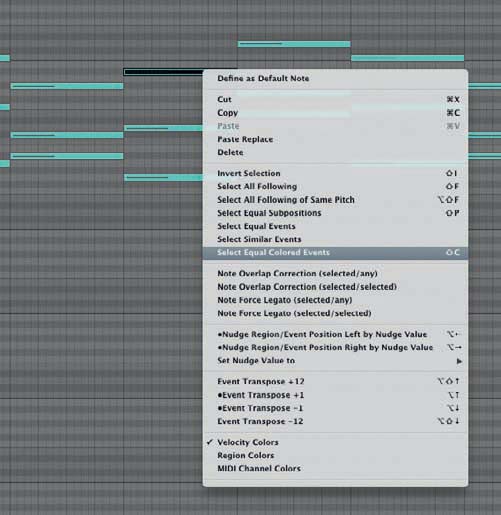
Figure 2.17 Contextual menus – by Ctrl-clicking on the screen – access many features that are unique to the area or object you click on.

Figure 2.18 Using the various zoom functions allows you to understand both the overall structure of your arrangement and the smallest details within it.
As an alternative to zooming in and out, you can also use the menu option View > Auto Track Zoom (keyboard shortcut Ctrl+Z) to enable a track-dependent horizontal zoom. This allows you to better view the track that you’re currently working on, although, of course, this is only in relation to the horizontal rather than vertical axis.

Figure 2.19 Changing the scaling of the waveform will allow you to improve your audio editing in relation to quieter parts of the signal.
Another type of magnification is the waveform intensity. This effectively changes the volume scaling of the waveform display, allowing you to better see quieter, more discrete parts of the waveform that you usually wouldn’t be able to see. To expand the waveform, simply click and hold on the waveform icon next to the horizontal/vertical zoom controls, and use the slider to scale accordingly. Although the waveform might end up looking distorted, the meters should, in fact, confirm that it isn’t.