
Shoot Sharp Images Consistently

This gorgeous Roseate Spoonbill was feeding in a ditch in South Florida. Monitor the histogram and highlight alert to avoid overexposing the light feathers.
Nature photography is an enormously fulfilling hobby. As your ability grows, you may decide you want to sell images to books, magazines, and calendars. Perhaps you want to enter images in the photo contest at the State Fair or the local camera club. To be successful, you’ll need beautiful images that are sharp! Producing critically sharp images is harder than most photographers realize, so it is necessary to develop excellent shooting habits to succeed.
USE A TRIPOD
Tripods are needed by everyone to produce the best possible images. Unfortunately, far too many people buy inexpensive tripods that are difficult to use and not very stable. A bad tripod is really worse than no tripod at all. On the other hand, a good tripod is a joy to use.
Tripods enable you to shoot sharp images at any shutter speed whether it is a 4 or 1/125 second exposure. Using a tripod gives you choices. You can shoot in any kind of light no matter how dim. You can use any aperture to control the depth of field. Suppose you are photographing a dragonfly on a dewy dawn morning; the exposure might be 2 seconds at f/16. With a tripod, it is easy to shoot a sharp image.
Tripods are beneficial because they support the camera and lens. This frees your hands to hold a reflector, diffuser, or a flash to take the photograph. This simplifies manipulating the light with these devices to make the best image. Tripods do slow you down, but that is wonderful news! The more time you spend with a worthwhile subject, the more likely you’ll discover the finest viewpoint or composition. Tripods give you time to study the composition in the viewfinder so you can be sure it’s what you want.
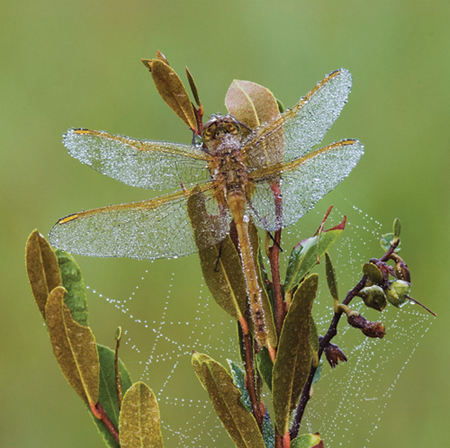
Dragonflies coated with dew are found only when the light is dim. A tripod must be used for sharp images and so the lens can be stopped down to f/11 or f/16 for adequate depth of field to cover the dragonfly.
TRIPOD CHOICES
Most nature photographers use Gitzo tripod legs or Manfrotto. Both of these companies are leaders in tripod technology and continue to improve their products. However, there are many companies making tripods so don’t limit yourself to only these two.
RECOMMENDED TRIPOD FEATURES
1 Sturdy enough to support the largest lens you own
2 The legs must spread straight out so the camera can be supported close to the ground
3 The centerpost should be short
4 The legs locks must be easy to use and work smoothly
5 Fresh water should not damage the legs
6 When the legs are fully extended, you should be able to peer through the cameras viewfinder without stooping over
Your tripod should be sturdy so it needs to have some weight to support heavy lenses and camera bodies. Many good tripods are made from aluminum. However, some that are lighter, but still solid are made from basalt and carbon fibers. These are a joy to use, but more expensive than similar sized aluminum tripods. We have used Gitzo 1340 tripod legs for many years. A few years ago, we began using the more expensive Gitzo 1325 carbon fiber tripod with excellent results. Both tripods easily support 500 mm lenses. If you don’t have a lens that big, then a similar model that is slightly smaller is fine for your needs.
Nature photography often involves photographing mushrooms, lichens, salamanders, frogs, insects, and tiny wildflowers. All of these subjects tend to live on or near the ground. A tripod that permits you to photograph easily near the ground is absolutely necessary. Some tripods like the two mentioned above are designed so the legs can be angled straight out making it possible to lay the tripod right on the ground with the three legs splayed out flat. This permits shooting near the ground. Nature photographers must have this feature!
The tripod should have a short center-post, rather than a long one, so it doesn’t interfere with its ability to go close to the ground. If the centerpost is long, even if the three legs can be positioned straight out, you can’t get near the ground because the long centerpost is in the way. A short centerpost or a long one that can be easily shortened (usually unscrewed) is the best way to proceed. The Gitzo 1325 and 1340 tripods work well because they come with a flat plate, so there is no centerpost at all.
However, due to the ease of stitching digital images together, many photographers now shoot panoramic images where they must be able to level the tripod first and then level the camera. It is tough to level the tripod on uneven ground. It can be done, but it takes a lot of fussing to do it. A quick way to level the tripod is to replace the flat plate with a Gitzo G1321 leveling base. This does have a short centerpost, but still works well for shooting near the ground and it is super for leveling the tripod.

This monarch butterfly spent the night sleeping on the gray-headed coneflower. All close-up subjects like this can benefit from the use of fill-flash or reflectors to lower contrast. Since the tripod is supporting your camera, you now have a free hand to hold a flash, reflector, or diffuser.
The tripod legs should be able to be positioned at all different angles. This makes setting up the tripod on uneven ground much easier. The Gitzo tripods already mentioned have three different positions where the legs can be locked in place. If you are careful, you can use intermediate positions too.
The legs locks must be smooth and easy to use. The Gitzo 1325 excels here and it is the main reason we prefer this model over the Gitzo 1340. Some tripods, such as those by Manfrotto have a lot of nuts and bolts in the leg-locking mechanisms that tend to loosen up after awhile. These aren’t quite as convenient to use since they need to be tightened from time to time.
It’s helpful if you can use your tripod in fresh water. In the past, some parts of the locking mechanism on some tripods were made with cork which swelled up as soon as they got wet. This made it difficult to adjust the length of the tripod legs. Now most washers are made with materials that don’t absorb water. Fresh water isn’t too hard on tripods. However, salt water can ruin a tripod in short order. If you must use a tripod in salt water, consider using a junk tripod that is just good enough to get the job done. Since it is in bad shape already, the salt water doesn’t do too much additional harm to it. Even then it is wise to rinse the tripod off in fresh water as soon as possible.
Tripods hate sand. Getting sand in the leg-locking mechanism is a sure way to damage your tripod. Always extend the lowest legs several inches first to get the leg locks out of the sand. Letting sand get into your tripod leg locks is going to cost you money! Please read that last line one more time and consider yourself warned.
Your tripod should have long enough legs so you can place the camera at eye level without having to use a center post. While you don’t want to take every shot at eye level while standing, it is convenient not to have to stoop over to see through the viewfinder because the tripod legs are too short. However, you might want to consider a smaller tripod to reduce the weight if you do a lot of long-distance hiking or use horses to photograph the backcountry.
CARRYING THE TRIPOD
Some photographers attach their tripod to the camera bag which is designed as a backpack. We have tried it this way, but found the tripod banged around too much. We prefer wrapping bicycle handlebar tape around the upper section of the tripod. This rubber barrier reduces heat loss in our hands when carrying the tripod on a cold day. The soft tape also cushions our shoulder from the metal where it rests as we hike along.
SPECIFIC TRIPOD CHOICES
When deciding what tripod to buy, always try to see it first at a camera store. If you can work the tripod controls before you buy it, you are more likely to get one that is perfect for your needs. Excellent tripods aren’t cheap, but they last a long time if you take care of them.
I have used Gitzo tripods my entire career with superb success. I currently use three tripods, but most photographers can get by with one. I have a beat up Gitzo 1340 model that I only use for salt water or other terrible situations. My favorite tripod and the one I use 90% of the time is the Gitzo 1325 carbon fiber model. When using horses to reach photo destinations in the mountains, weight is critical, so I take the much smaller Gitzo G1226 tripod. One tripod I don’t own, but would consider buying if I owned a 600 mm f/4 lens is the Gitzo 1548 carbon fiber. This tripod is huge, but it supports enormous 600 mm lenses well.
Manfrotto tripods work well too. Many nature photographers use the 3221 model successfully. Manfrotto offers numerous tripod choices and accessories. It would be worthwhile to contact both Bogen and Gitzo to get an overview of everything they offer.
No single tripod is right for everyone. The tripod that is right for you depends on how much you are willing to carry, what features you like, how heavy the camera gear is that you want it to support, and how much you want to spend.
TRIPOD HEADS
These are designed to support your equipment and make it easy to adjust the angle to get the perfect composition. Tripod heads come in a variety of shapes and sizes so you have many choices.
Tilt/Pan Tripod Heads
The two major styles of tripod heads include 3-way tilt/pan heads and ball heads. Tilt/pan heads are quite common. These heads are made so loosening one control allows the head to tilt front to back. Loosening a second control lets the camera tilt from side to side. A third control permits panning the tripod head right or left. These heads do work, but because they have three separate controls, they are a bit cumbersome to operate, though many photographers do like them well. Popular heads of this type include Manfrottos 3047 and Gitzos G1272M. If you do decide to get one of these heads, make sure it is made to accept quick-release plates. This is absolutely critical.
Ball Heads
These heads are by far the most popular style used by nature photographers. This simple head is made so a single control loosens a ball permitting the camera to tilt front to back, side to side, or panned left or right (when the camera is set for a horizontal shot). All good ball heads offer a second control so the camera can be panned when shooting vertical compositions.
Ball heads come in all sizes to handle everything from small cameras to heavy 600 mm lenses. Two companies that make wonderful ball heads are Kirk Enterprises and Really Right Stuff. We use Kirk Enterprises BH-1 and the slightly smaller BH-3 with excellent results. The BH-1 is necessary if you have a big lens to support, such as a 500 mm f/4 or 300 mm f/2.8. Since many digital nature photographers don’t own such big lenses and don’t need to with the digital crop factor they enjoy, the smaller and less expensive BH-3 works fine. Really Right Stuff builds a ball head that looks terrific, so check that out too. All of these ball heads are designed for quick-release plates which are made by Kirk Enterprises, Really Right Stuff, Wimberley, and others.
Gimbal Heads
The Wimberley gimbal style head is the best for making images of wildlife action. The Wimberley head or Kirk Enterprises Cobra head are unusual looking heads that are heavy and expensive. However, you can fasten a 600 mm f/4 lens with a camera body to it and balance it so the head doesn’t need to be locked. Once the lens/camera combination is in perfect balance, the head allows you to pan or tilt the camera easily, so flying geese are fairly easy to photograph well. If you let go of the camera, it maintains its position without locking the head!
However we seldom use these heads. Instead, we use the Wimberley Sidekick which converts the Kirk BH-1 ball head into a gimbal style head. This does the same thing as the bigger Wimberley Gimbal Head or Kirk Enterprises Cobra, but it is lighter and easier to carry. When photographing hummingbirds feeding on flowers, we always use the Wimberley Sidekick so we can easily move the camera left, right, up, or down to follow the hovering hummingbird as shown in the figure. The huge drawback in using the big gimbal style heads is they don’t work very well with short lenses. A small ball head is far more suitable for photographing wildflowers.
If you plan to photograph wildlife action and other subjects, you need to carry a small head in addition to the huge gimbal heads. It is too much to carry. Since we tend to photograph everything, we find it is best for us to use the Kirk ball head and carry the light Wimberley sidekick to use when we need it. If we only photographed wildlife, we would use the big gimbal heads.

The Wimberley Sidekick converts our Kirk BH-3 ball head to a gimbal style head. When the camera is balanced on this type of head, you can move the camera left, right, up, and down without locking it in place. This makes it simple to track moving subjects like this male rufous hummingbird.
Quick-Release Plates
You’ll enjoy using tripods more if the tripod head is made to accept quick-release plates. These plates fasten to the bottom of the camera body or to the lens collar that is found on some lenses. Once the plate is attached to your equipment, leave it there. Then it is a simple matter of sliding the quick-release plate into the locking jaws of the tripod head and tightening them so the equipment is solidly attached. Quick-release plates speed up the process of attaching or removing camera gear from the tripod.
However, a number of tripod heads and quick-release designs exist, so make sure the plates you get and the tripod heads are compatible. All of the plates we use are custom-made for a particular camera body or lens by Kirk Enterprises. Custom plates work better than generic plates that are designed to be used by everything. A custom plate is designed to let you access all of the nooks and crannies of the lens or camera body without having to remove the plate. That is important. Imagine using a plate that had to be removed every time you need to change the batteries in your camera. Many plates have edges on some sides to prevent the plate from loosening when you use it.

It is easier to shoot vertical images on top of the tripod head without flopping the head off to the side. The L-bracket works wonders for this purpose and greatly simplifies composing these autumn maples.
L-brackets
This wonderful bracket is designed to attach to the bottom of the camera. Of course, it looks like an “L”, but it really is a special quick-release plate that can be attached to the tripod with either side of the bracket. This makes it possible to mount the camera body vertically or horizontally on the tripod head, eliminating the need to flop the camera off to the side every time you shoot a vertical composition. This makes shooting vertical compositions much easier. Buy a custom L-bracket that is made specifically for your camera body so you have quick access to all of the controls on the camera. Kirk Enterprises makes many custom L-brackets for most of the popular camera bodies.
Tripod Problems
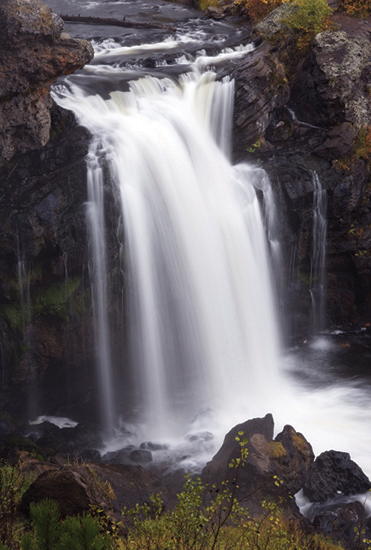
We have spent quite a bit of time exploring equipment that works well on your tripod. Although tripods help you shoot sharp images, you must use them properly in the field. Do not assume your tripod can’t move. Setting up a tripod in a stream where the water is splashing against the legs causes the tripod to vibrate making sharp images impossible. It is fun to shoot in the middle of a small stream as shown in the figure, but set the tripod legs so they are either in calm water or on top of stable rocks or logs.

When working around water such as Chapel Creek in northern Michigan, keep tripod legs on solid ground or rocks. Tripods are easily vibrated by flowing water causing unsharp images.
Wind makes tripods shake too. If you don’t believe it, just set up a 300 mm lens on a tripod in a 10 mph breeze. Without touching the tripod, peer through the viewfinder and you will certainly see the image shaking. This wind-induced vibration causes soft images. If you must shoot in the wind, it is best to turn on the image stabilization (if you have it), grab the camera and lens, and shoot with the highest shutter speed possible. The very act of grabbing the camera adds your body mass to the system which helps to minimize camera shake caused by the wind. By using fast shutter speeds such as 1/250 second, you have a real chance of getting sharp images.
Shooting Hand-Held
There are times when tripods are difficult or impossible to use. Shooting hand-held is necessary and can be effective. But, in no way do I want to convey the idea that tripods are really optional devices most of the time. They aren’t, but there certainly are times when you have to shoot without them.
Many wonderful images can only be made from a boat. Anytime you are photographing from a boat that is rocking in the waves, forget the tripod. It makes the images even more unsharp. From leopard seals resting on ice in Antarctica to photographing the gorgeous shoreline along Pictured Rocks National Lakeshore in northern Michigan, it is far more effective to shoot hand-held with fairly short lenses (if possible) while favoring high shutter speeds to minimize any negative effects from camera movement.
Tripods can often be omitted when shooting in deep snow too. Tripod legs don’t penetrate the snow easily and they are prone to slipping. Do use a tripod anyway if you are shooting big lenses like a 300 mm, but you can get away with shooting short lenses in the wide-angle range without a tripod if you favor fast shutter speeds. I did a test and could find no difference in sharpness between using a tripod or shooting hand-held when I use a 24 mm lens to photograph a forest of snow-encased trees with a shutter speed of 1/125 second. As a result of that test, I commonly shoot wide-angle lenses handheld if I have plenty of shutter speed. Due to the excellent results that digital cameras produce at ISO 200-400, it is easy to get enough shutter speed most of the time in bright light to shoot sharp images handheld with wide-angle lenses.
Another place where it is necessary to shoot hand-held is high-magnification macro photography in the field. When pursuing animated subjects like small insects or tiny frogs, often it is necessary to use flash and shoot hand-held. While the camera might be set to sync speed which is the fastest shutter speed you can use with flash, the short flash duration (usually around 1/1000 second) eliminates camera movement.
Image-Stabilized Lenses
Most camera systems offer ways to stabilize the lens while shooting hand-held. Canon builds some lenses that have IS (image-stabilized) technology. Nikon offers lenses with VR (vibration reduction) capability to help you shoot sharp images without a tripod. These lenses are made so some optics move to counteract any movement of the camera producing sharper images. Other companies are beginning to offer this capability too. Some systems build camera bodies where the stabilization feature is built in the body, not in the lens. All of these systems have merit and do work. Image stabilization helps all of us make sharp images hand-held at slower shutter speeds than would otherwise be expected. Normally, photographers consider it safe to shoot hand-held if the shutter speed is at least as fast as 1/focal length. To illustrate this concept, a 300 mm lens should have a minimum shutter speed of 1/300 second while you could get by with a shutter speed of only 1/20 second with a 20 mm lens. If you have this stabilizing technology, it is possible to achieve sharp results if you use a somewhat slower shutter speed. It is debatable, but some feel you can use shutter speeds three to 4 stops slower than you would normally use. For example, with a 300 mm lens, you could shoot at 1/75 second if the image stabilization feature is being used.
Image-Stabilizing Techniques
Image stabilization is terrific for those times when you can’t use a tripod. Since I often photograph from a rocking boat in Michigan, my Canon IS lenses are helpful for shooting on the choppy waters of Lake Superior. But, this wonderful technology should not be used as a crutch. Too many people use image-stabilized lenses and shoot hand-held when a tripod could easily be used. It doesn’t make any sense. The tripod not only helps you make sharp images, but it holds your equipment in place so you can compose thoughtfully too.
Generally, it is not advisable to have the image-stabilizing mechanism turned on when shooting on a tripod if the camera is perfectly still. Image stabilization is trying to minimize camera shake. If there is none, it may hunt looking for shake and cause some of its own. On the other hand, image stabilization works wonders on a tripod if wind is causing the camera to vibrate a bit. Be aware that image stabilization only helps to reduce camera movement, not subject movement. You’ll need more shutter speed or flash to solve subject movement.
Getting Sharper Results
Lenses write with light, so buy the best you can afford. Your camera manufacturer offers excellent lenses. But, you can save money by buying lenses made by some independent companies such as Tokina, Sigma, and Tamron. Since they make lenses that can be used on different systems such as Canon, Nikon, Pentax, Olympus, Sony, and Sigma, they sell to a larger market so they charge less for their fine products. Using these lenses is a good way to go if you wish to save money or your camera maker doesn’t build the lens you want.
Since lenses are designed with computers and lens makers have a lot of experience at making them, you can expect your camera manufacturer to offer quality lenses across the board. However, some lenses in your camera system may be more expensive because they are made with special glass that delivers exceptionally high quality. Canon designates their best glass with the letter “L” while other companies use different letters. Is it worth the extra money for these lenses? It is unlikely the vast majority of photographers could tell if an image was shot with a regular lens or the fancy lens with the finest glass. Unless your technique is flawless, you probably couldn’t tell. I tend to buy the best glass, though, because I hope it will help me. These lenses often have a larger maximum aperture, focus faster, and focus closer which are all appealing to me.
Keep Lenses Clean
To get the very best quality, your lenses should be as clean as possible. You’ll get better contrast and sharpness if your lenses are spotless. Make sure no smudges from your fingers or dried water drops are present on the glass surface too. Keep everything clean!
Avoid Using Protection Filters
Any glass filter inserted into the optical path is bound to slightly reduce image sharpness. Most serious photographers don’t use UV (protection) filters to keep the lens from getting damaged to avoid a small loss of sharpness which becomes more noticeable if you mount another glass filter, such as a polarizer on top of the “protection” filter. Unless it really gives you peace of mind, perhaps it is wise to eliminate protection filters. Just be careful and use a lens shade to protect the glass on the front of the lens.
Sharp Apertures
Not all apertures on the lens deliver the same quality. Most lenses are sharpest in the middle of the f/stop range around f/8. If you shoot at the widest apertures on the lens, such as f/2.8 or stop down to f/22 or f/32, you lose some sharpness due to optical limitations that all lenses have. This does not mean that you should not use these apertures, but you will get sharper images if you use intermediate apertures. If you don’t really need maximum depth of field to photograph a subject, then use the sharpest apertures on your lens which fall in the f/5.6 to f/11 range. From my tests, sharpness is most greatly compromised by stopping down the lens too far. I avoid f/22 with short lenses because diffraction is so bad that quality is noticeably reduced and I would never use f/32 if your lens can be stopped down that far. However, f/22 isn’t so bad with longer focal lengths because the physical size of the aperture is bigger which reduces the negative effects of diffraction.
Mirror Lockup
This is useful any time you are using a tripod to photograph a still object. Many cameras let you lockup the mirror prior to taking a photograph. You might be wondering why? When you want the sharpest possible image, even the action of the mirror when it moves out of the way so the light can pass to the sensor causes the camera to vibrate a tiny bit that does reduce sharpness at certain shutter speeds. Years ago, I ran a test to determine how bad the “mirror-slap” problem was as it was called back in 1980. By shooting a series of images at different shutter speeds from 2 to 1/60 second and using a stamp with fine detail for a subject, I found the worst shutter speed for mirror-induced vibration was 1/15 second. The 1/8 and 1/30 second shutter speeds weren’t too wonderful either. But, at higher shutter speeds like 1/60 second or slower speeds at 1/4 second and longer, the images got sharper. Can you explain why?
Let’s suppose the movement of the mirror causes the camera to vibrate slightly for 1/15 second. With a 1/15 second exposure, the camera is vibrating during the entire time (100%), the image is being recorded by the sensor. If you use a faster shutter speed such as 1/60 second, the shutter is so quick that it freezes the vibrating camera so the images are sharper. Surely, the image is less sharp during a 1-second exposure. If the camera vibrates for 1/15 second from mirror-slap, and then settles down to be perfectly still for the duration of the 1-second exposure, the image is sharper because the camera is only vibrating for a portion of the exposure. This means that during a 1-second exposure, the camera vibrates for about 7% of the exposure. Then the camera is perfectly still during the remainder of the exposure which represents 93% of the time, so the image is sharper.

This colorful hot spring in the backcountry of Yellowstone National Park is a joy to behold. Locking up the mirror prior to the exposure and using the two-second self-timer delay delivers sharp images.
If your camera doesn’t have mirror lockup, then your best bet is to avoid using shutter speeds in the 1/8 to 1/30 second shutter speed range or use flash as the primary light source. Shutter speeds that are faster or slower are fine to use. Do read your camera manual carefully to see if mirror lockup is possible. Often a custom function controls the mirror lockup function.
Firing the Camera
In most cases, when photographing subjects that are still such as a mushroom or landscape, it is worthwhile to use mirror lockup to eliminate camera vibration caused by the motion of the mirror. With the camera mounted on the tripod and mirror lockup enabled, it does you no good if you trip the shutter with your finger. Your quivering body will impart vibrations to the camera causing soft images again. Fortunately, there are a couple of easy ways to separate your body from the camera at the moment of exposure. One excellent way to do this is to use the self-timer. When the self-timer is activated, the camera counts a number of seconds such as 8 or 10 and then trips the shutter. The 10-second timer is fine if you want to be in the photo too. But, 10 seconds is a long time to wait if you want to photograph a landscape or mushroom and don’t wish to be in the image. Fortunately, many cameras offer a choice of self-timer delays such as 2, 4, or 8 seconds. We use the self-timer (set on 2-second delay) all the time to photograph anything that holds perfectly still. It is easy to do once you get used to it and sharper images are your reward for taking the time to do it.
Self-timer Problems
There are times when the self-timer isn’t so effective though. Anytime you photograph where you are waiting for lulls in a steady breeze so the wildflower or dewladen spider web you have selected is finally holding perfectly still, a self-timer becomes unworkable. Wind is the arch enemy of nature photographers. If you are waiting for a flower blossom to stop swaying in the breeze and it finally does, pressing the shutter to activate the self-timer won’t help you much because there is no way to know if the flower will still be holding still seconds later when the selftimer finally runs down and the camera fires. You need the shutter to trip as soon as the subject holds still.
Cable and Remote Releases
Most cameras have a remote way to trip the shutter. Usually it is an electronic cable release that connects to the camera. With the cable release, watch the subject carefully until it is perfectly still. Then press the trigger on the cable release and the image is taken instantly. Since the cable is flexible, any movement of your hand (within reason) when the release is tripped is not transmitted to the camera.

The slightest movement of wind makes this Indian Paintbrush wiggle. Watch the wildflower carefully and use a cable or remote release to instantly trip the shutter when it is perfectly still.
It is possible to get a remote release for some cameras where it isn’t attached to the camera. These work well too and permit you to fire the camera quickly to take advantage of still conditions. Remote releases that don’t connect to the camera are quite small and easily lost, so be careful with them.
As discussed earlier in Chapters 3 and 4, your digital camera offers a choice of RAW and JPEG image files. Your choice does affect image sharpness. Shooting your cameras RAW file format gives you the most detail in the image because it is unprocessed data that hasn’t been compressed. All JPEGs are compressed files that throw out some of the information collected by the sensor to make the files smaller. While image sharpness won’t be that different between RAW and the highest-quality JPEG setting for small prints, it does make a difference if you want to make huge prints.
We always shoot RAW images, but sometimes we set our cameras to keep a RAW and the largest quality JPEG at the same time. Then we have a choice of either file. You can’t go wrong in terms of image sharpness if you shoot RAW or both RAW and JPEG. If you decide to shoot JPEGs only, select the highest quality your camera offers. For instance, the Canon 20D camera offers seven different quality settings which include Raw, Large Fine JPEG, Large Normal JPEG, Medium Fine JPEG, Medium Normal JPEG, Small Fine JPEG, and Small Normal JPEG. Large Fine JPEG is the highest quality setting and Small Normal JPEG is the most compressed file so it is the lowest quality setting. Of the six JPEG settings, what do you choose? You could go with the lowest quality setting if you are desperately short of memory. But, if you have plenty of storage memory, does it make any sense? Perhaps it does if you know that all the images you take are going to be used where you don’t need the highest quality possible. Images that are used on a web site or emailed work with low-quality settings since you want the images to load fast and they still look good for these uses. However, high-quality image files are easy to convert to low-resolution files for use on the web so you have plenty of flexibility if you shoot high-quality (less compressed JPEGs) images to begin with. If you shoot the images with a low-quality JPEG setting, there is no way to accurately recreate detail that was discarded when the file was compressed. If you happen to get a terrific shot when shooting a low-quality JPEG, it is difficult to make a gorgeous large print because too much detail is missing. It’s better to get the details first to preserve your options for using the image later on.
FOCUS CAREFULLY
It seems obvious that focusing is critical to producing sharp images, but poor focusing is one of the leading factors for soft images. Digital single-lens reflex cameras (SLRs) offer numerous ways to achieve sharp focus and you must be thoroughly familiar with the autofocusing features offered by your camera to make the most of them.
With most camera systems, there are two ways to focus the lens. You can rely on autofocusing or go to manual focusing. Autofocus is effective in most situations (but not all) and is the preferred way to focus among the majority of photographers. While I hate to admit it, autofocusing is more accurate and faster than I am and probably you too. You’ll find auto-focusing is the best way to obtain sharp focus for the vast majority of your images.
MANUAL FOCUSING
Before getting into the details of autofocusing, let’s consider manual focusing. There are times when focusing the lens manually is the only way to effectively focus the subject. Some special lenses, such as the tilt/shift or perspective control lenses made by Nikon and Canon don’t offer autofocus because the lenses are made to “bend” in the middle making it difficult to build a lens that can autofocus. Many cameras lose their ability to autofocus when too little light passes through the lens. This could happen in dim light or if you use an accessory, such as a teleconverter or extension tube that makes the maximum aperture too small. Another place where autofocus fails miserably is shooting in low-contrast situations such as a foggy scene. The autofocus mechanism must see contrast so it can focus on the edges. If the contrast is too low, the camera isn’t able to autofocus. Shooting through vegetation is a huge problem for autofocus because it focuses on the first thing it detects such as the grass, rather than the face of a rabbit hiding in the grass.
Manual Focusing Techniques
Check the camera manual and look in the section under focusing to find out how to set the camera or lens to manual focus. Some systems have an autofocus on/off switch on the lens while others put the switch on the camera body. Once you have autofocusing turned off, you have to focus the lens manually.

Autofocus often focuses on objects in the foreground such as the grass in front of this marsh rabbit. Go to manual focus and carefully focus on the eyes of this bunny.
Here are some tips for manually hitting sharp focus. Many cameras have a diopter adjustment for the viewfinder so the image is sharpest for your vision just like glasses. Be sure to adjust this control, so the image in the viewfinder is as sharp as possible. Manually focus the lens by turning a ring on the lens. The most common mistake many make is focusing on the whole subject, instead of an important part of the subject. Rather than focus on the overall shape of a mushroom, bird, or wildflower for instance, it is far better to carefully focus on the most important part of the mushroom, or the eye of the bird, or perhaps the stamens of the wildflower. Manually focusing on the most important part that needs to be sharply focused forces you to consider what is important and improves precision. Developing this habit of carefully focusing greatly improves the chances of securing sharp images. Unfortunately, the older we get, the more difficult it becomes to focus manually since our eyes don’t work quite as well. This problem can be minimized somewhat by using faster lenses that have a maximum aperture of f/2.8 or more. The viewfinder is 2 stops brighter with a f/2.8 lens than a f/5.6 lens. Brighter viewfinders make manual focusing easier, plus the shallow depth of field you see in the viewfinder at f/2.8 makes the subject either pop into sharp focus or go instantly soft if you aren’t focused properly.
Autofocusing
Good autofocusing lenses today are extremely fast and accurate. It’s wonderful technology that makes some images, such as running cheetahs or flying birds fairly easy to photograph well. There is a lot more to autofocusing that you might think. I strongly recommend that you read the section about focusing in your camera instruction book carefully. It is full of information that is enormously useful.
Cameras generally have two ways to autofocus. They can focus on a subject and then stop focusing until you take the picture. Canon calls this one-shot AF while Nikon refers to it as Single Servo AF [S]. This works great for stationary subjects. Canons AI Servo AF or Nikons Continuous Servo AF [C] is terrific for sharply photographing moving subjects because the lens automatically tracks the subject keeping it in focus. This mode is by far the best for flying birds, running animals, and all other wildlife actions. Not only does it work well on moving subjects, but it is superb when you are moving too. If you are photographing from a drifting boat, continuous autofocus stays locked on the subject as the boat moves closer or further away from the subject.

I was photographing this Beisa Oryx standing under an acacia tree at Samburu using back-button focusing. Since my camera is always set on continuous autofocus, holding the back-button focusing control in gave me immediate continuous autofocusing so I could photograph this running oryx as it galloped to catch up to the rest of the herd.
Single Shot AF
Cameras that are set up in the default configuration which is what you get from the factory use the shutter button to initiate autofocusing. If the camera is set for single shot AF, all you need to do is point the active autofocus sensor that you see in the viewfinder (assuming you only have one selected) at the most important thing in the scene that should be in sharp focus and press the shutter button down half way. The lens instantly autofocuses on that spot. To take the photo, just press the shutter button all the way down. In most cases though, you will want to change the composition a bit. Continue to hold the button down half way, recompose the image to your liking, and then press the shutter button all the way to take the shot. This system works nicely if you are hand-holding the camera.
This method isn’t nearly as convenient or useful on a tripod because you need to focus first, recompose, and then lock the tripod head into position so it slows you down. A bigger problem occurs when you trip the shutter of the camera. With many cameras, if you focus on the spot where you demand sharp focus such as the eye of a deer, recompose, and trip the shutter with a cable release, the image won’t be sharp. The reason for this is recomposing may move the autofocus sensor off the face of the deer to a spot in the background. When you trip the shutter with the cable release, the autofocus is activated again and quickly focuses on the background sending the deer way out-offocus. Be aware of this possible problem and check your own equipment to see if using a cable release or remote device to fire the camera causes the camera to autofocus. If it does, the problem is easily solved by turning the autofocus switch off just prior to the exposure. It is easy to do, but turning the autofocus switch on and off all of the time is a nuisance. Your camera may (hopefully) have a better way to handle this which I will discuss shortly.
Continuous Autofocus
This mode is perfect for tracking moving subjects because the lens constantly changes focus as the subject moves closer or further away. Usually continuous autofocus is set someplace on the camera body. It could be a switch or selected by pushing a series of buttons. Continuous autofocus is also initiated by the shutter button. Let’s say we are photographing Ruppell’s Vulture descending on a lion kill in Kenya with a 300 mm telephoto lens. Set the camera to continuous autofocus, put the center autofocus spot on the bird as it approaches, and pan with it while keeping the autofocus spot on the bird. As the bird fills the viewfinder, hold the shutter down to take multiple images. Since the camera automatically adjusts the focusing distance as the subject distance changes, your chance of shooting a sharply focused image increases enormously. Just be sure to use a shutter speed such as 1/1000 second to freeze the action. Panning with a subject improves with practice. If the autofocus sensor “sees” the clouds behind the subject, it focuses on the new target sending the bird way out-of-focus.
This panning technique works fine with a big lens mounted on a tripod such as a 600 mm f/4. Super telephoto lenses are too bulky and heavy for most of us to hand-hold effectively so mounting them on a tripod is necessary. Suppose you are photographing snow geese and sandhill cranes at Bosque del Apache wildlife refuge in New Mexico during early January. By using a heavy tripod to support all of the weight of a monster lens and using a gimbal style head (Wimberley or Cobra), it is possible to perfectly balance the weight of the camera and lens on the tripod head so you can pan in all directions without locking up the head. As the sandhill cranes approach, keep the activated autofocus sensor on the birds and press the shutter button all the way down when you see the composition you want.
I enjoy photographing birds in flight. It isn’t that hard to do well if you practice a bit and use continuous autofocus to help you stay sharply focused. There is one common mistake that many people make when they try it though. Suppose Canada geese are flying out at dawn from a refuge right toward you. But, first they must cross a field that is off limits to human entry so they have 100 yards to go before they come within camera range. Most people start tracking the geese with autofocus lenses as soon as they begin to fly close which is an excellent idea. As the birds approach, pan with the birds until they are nicely composed and fire off several quick images with the camera set for the fastest possible shooting speed. So what is the mistake? It is human nature to assume a balanced stance when you first begin to pan with the birds. Unfortunately, by the time the geese are close enough to photograph well, you are off balance so it’s more difficult to maintain your panning speed and keep the autofocusing sensor on the bird. Since you know where you really want to photograph the birds, you are better off to perfectly balance your body while pointing the camera at the spot you want to photograph the birds, then pivot your legs and upper body toward the direction the birds are coming from. You are bit off balance at first, but as you follow the birds, you regain the balanced position when you actually shoot the images.
Many cameras offer a number of autofocus sensors in the camera to help you stay focused on erratically moving subjects which is often called dynamic focus. These do have merit, but I find I do better if I select only one sensor (usually the middle one) and keep it on the subject by panning.
Back-button focusing is perfect for Moose Falls. With only the middle autofocusing sensor activated in the viewfinder, point it at the upper right edge of the waterfall so the sensor “sees” some white water and some black rock, push the back-button to make the lens focus on the spot, let up on the button, recompose the scene, and take the image.

Autofocus works fine here if you point the activated sensor at the top of the trees so it can “see” the contrast between the top of the pine trees and the dawn sky.
Suppose your camera is set on one-shot AF to photograph a Canada goose resting quietly on a pond. Suddenly the goose begins to run across the water and take flight. This is a wonderful opportunity to photograph a Canada goose flying with water flying in all directions. But, if you are set on one-shot AF, the bird is out-of-focus because you didn’t have time to refocus or switch the camera over to continuous autofocus.
Back-button Focusing
The Canada goose situation is easily solved by using a little known technique called back-button focusing. Many cameras have a button on the back of the camera that can initiate autofocusing and removes it from the shutter release button. Now the shutter release only activates the metering system and trips the shutter. This function is typically controlled by a custom function which varies depending on the model of the camera. With many Canon cameras, custom function #4 controls it. With a Nikon D70, it is custom function #15. Study your custom functions carefully to find the one you need.
While it may sound inconvenient to use a button on the back of the camera to control autofocusing, it solves many autofocusing problems. I use back-button focusing on my Canon cameras nearly all the time and usually leave it on continuous autofocus. Barbara does the same thing with her Nikons. This gives us instant access to one-shot AF or continuous AF. Here is how it works. Suppose you are photographing a waterfall. Point the activated autofocus sensor at the most important part of the waterfall and press the back-button focusing control to focus the lens. Once you are in focus, let up on the button and the focus stays locked at that distance even with the camera set to continuous AF. Now you can recompose, squeeze the cable release or activate the self-timer, and take the image without any chance the camera will refocus.
In the previous example with the Canada goose, you could point the autofocus sensor at the head of the goose, press the back button to make the lens focus, let up on the button, recompose, and take the image. If the goose begins to fly, just hold the back-button focusing control in while panning with the goose. Since the camera is already set for continuous autofocus, there is a good chance you’ll get sharp images. Essentially, you can instantly switch from one-shot AF to continuous AF by using the back focus button to initiate autofocus. Another place where back-button focusing works well is low contrast scenes or shooting through foreground vegetation. If you have a low contrast scene, point the autofocus sensor at part of the scene that has the most contrast, perhaps a tree trunk in the fog, press the back button to autofocus and check the viewfinder to see if it looks like the lens focused properly. Now let up on the back button, recompose, and take the photo. With an animal peering though grass such as a lion, point the sensor at a part of the lions face that doesn’t have any grass in front of it, press the back button to hit focus, let up on the button, recompose, and take another sharp image. This focusing method works tremendously well once you get used to it. It is easily one of the best techniques we have adopted in the past 10 years.
The small drawback to this system occurs when you are photographing action. You have to hold the back button in while pressing the shutter button at the same time. It is easy to do with practice, but I admit it is still easier to set the camera to continuous AF and keep the control on the shutter button so one finger controls autofocusing and tripping the shutter. This is exactly what we do if we know we will be photographing only action.

Red Fox commonly hunt mice and ground squirrels around our barns. This one has become so accustomed to us that it comes when we call it. On page 180, you see John with the fox sitting in our plowed driveway which isn’t a good spot to photograph it. By tossing a small scrap of meat up on the bank, the fox quickly pounces on it which puts it in a much more photogenic spot. Now the fox is surrounded by untracked snow and it is slightly above Barbara so she could shoot up at it which is a viewpoint we both like.