
20. Media Playback and Background Execution
Many applications on a mobile device have a need for audio and video playback. The iPhone SDK offers a few options for audio and video playback routines, and, in this chapter, you will learn how to use the most common ones.
Creating the MediaPlayer Application
Create a Window-Based Application in Xcode. Name this project MediaPlayer.
This application will have a very simple interface so that you can concentrate on the guts of media playback. The application will display two buttons that will initiate different types of audio playback, and it will also display a movie. The object diagram for this application is shown in (Figure 20.1).
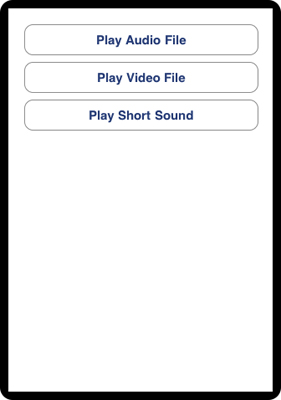
Figure 20.2. MediaPlayer object diagram
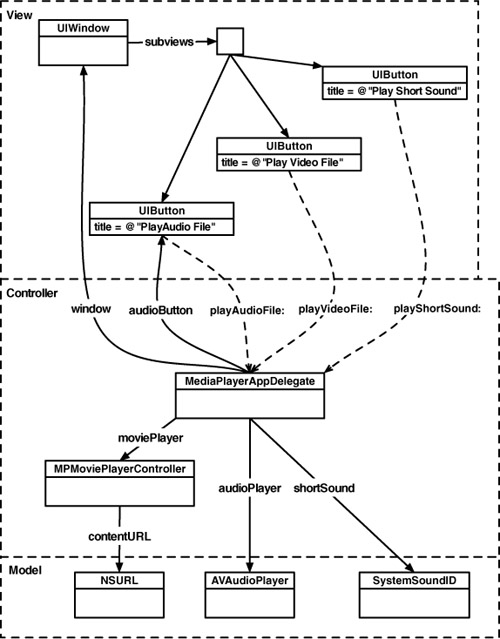
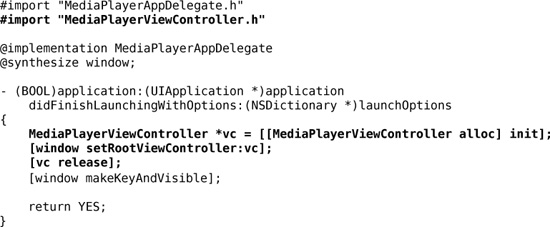
Create a new UlViewController subclass with a XIB file. Name this subclass MediaPlayerViewController.m. In MediaPlayerAppDelegate.m, import the header file for MediaPlayerViewController, create an instance of it and set it to be the window’s rootViewController.
The buttons for playing audio need action methods. Declare these methods (and an instance variable for one of the buttons whose title will change during runtime) in MediaPlayerViewController.h.

Save this file. Open the MediaPlayerViewController.xib file in Interface Builder to configure the interface. file in Interface Builder to configure the interface.
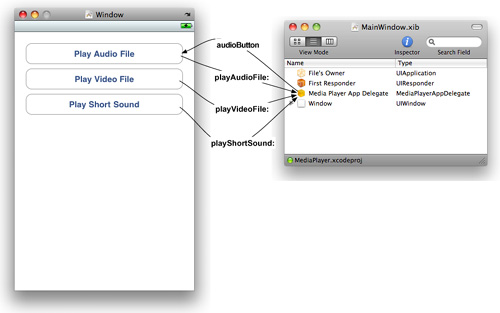
In Interface Builder, double-click the View object in the doc window to open it. Drag two UIButton object onto it and title them as shown in Figure 20.3. Then, make the action connections from each of the buttons back to the MediaPlayerViewController. Finally, connect the audioButton outlet to the button labeled Play Audio File.
Figure 20.3. Interface Builder connections
Save MediaPlayerViewController.xib and quit Interface Builder.
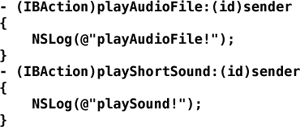
In order to build and run the application without warnings, you will need a stub method for each of the IBActions you declared. In MediaPlayerViewController.m, implement them as follows.
If you want to check your connections, you can build and run the application. The log messages should show up on the console.
Playing System Sounds
Audio files come in many different formats. The format describes the organization of the audio data within the file. Some files, like MP3 and M4A, have been compressed and require a decoder for playback. Compressed files are much smaller in size but require more work by the processor to play. For short sound effects, compression doesn’t save much disk space, and the extra work it takes to decode a compressed file may affect an application’s performance. (Short sound effects are typically used as an interface element. They are not critical to an application but add to the atmosphere you are trying to create.)
The AudioToolbox framework gives you the ability to register short sound effects on the system sound server. We call sounds registered with the system sound server system sounds. System sounds are short sound effects that must
• be a sound file less than 30 seconds in length
• have data in linear PCM or IMA4 format
• be packaged as one of the following three types: Core Audio Format (.caf), Waveform audio format (.wav), or Audio Interchange File Format (.aiff)
To start registering and playing system sounds, add the AudioToolbox framework to your project (Figure 20.4).
Figure 20.4. Adding the AudioToolbox framework

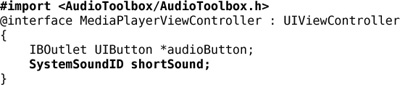
After a system sound is registered, you are given a new SystemSoundID that references that sound. A SystemSoundID is really just an integer that you can think of as a ticket. When you want to play a registered sound effect, you tell the sound server the number on your ticket. Declare a SystemSoundID instance variable in MediaPlayerViewController.h. Because this type is declared in AudioToolbox framework, you will also need to import AudioToolbox’s top-level header file.
The audio data for a system sound must be contained in a file located on the device. In this chapter, you will bundle a short audio clip file with the application. Locate the file Sound12.aif and add it to the Resources group of the project. (This file and other resources can be downloaded from http://www.bignerdranch.com/solutions/iPhoneProgramming.zip.)
You will grab the full path to the Sound12.aif file and register its contents with the system sound server when the application launches using NSBundle’s pathForResource:ofType: method. The object returned from this method is of type NSString, but, to register a system sound, you need to call the function AudioServicesCreateSystemSoundID and pass the path as a CFURLRef object.
You will use NSURL’s fileURLWithPath: to create an NSURL instance and cast that to its toll-free bridged counterpart: CFURLRef. In MediaPlayerViewController’s init method, get a path to the Sound12.aif file and register its contents as a system sound. Add the following code to MediaPlayerViewController.m.
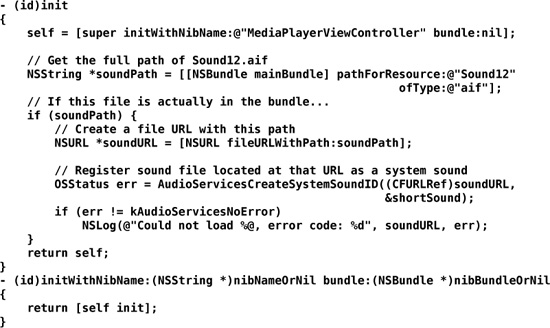
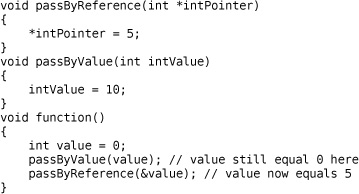
AudioServicesCreateSystemSoundID has a return value — an error code. Only one value can be returned from a function; therefore, the SystemSoundID cannot be returned to the caller. To get that value back from the function, you pass the address of a SystemSoundID variable to the function. This function then writes the value of the SystemSoundID to that location in memory. This is called passing by reference and allows the function to change the value of a variable.
You will now implement code to play this sound when the appropriate button is tapped. Back in the MediaPlayerViewController.m, implement the method playShortSound:.

Build and run your application. You should hear a pleasant noise every time you tap the Play Short Sound button. (Make sure your volume is turned up.) Most of the time, you will keep a system sound available the entire time an application is running. However, if you want to dispose of a short sound to free up memory while an application is running, you can call the C function AudioServicesDisposeSystemSoundID.
AudioServicesDisposeSystemSoundID(aSystemSound);
On the iPhone (but not the iPad or iPod touch), you can use system sounds to vibrate the device. Add the following line of code to MediaPlayerViewController.m to trigger vibration.

Build and run the application on an iPhone and tap the short sound button. It will play the sound and vibrate in your hand.
Playing Audio Files
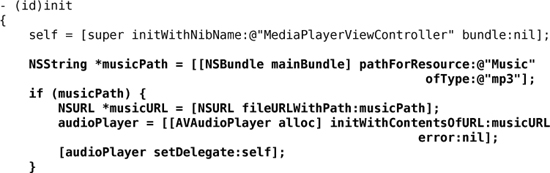
Playing a compressed audio file is as simple as playing a short sound. To play a compressed audio format or a file that is longer than 30 seconds, you will use the class AVAudioPlayer. In addition to playing longer, compressed audio, this class also gives you much more control over audio playback. You will use an instance of this class to play an MP3 file. Locate the file Music.mp3 and add it to your Resources group. (This file and other resources can be downloaded from http://www.bignerdranch.com/solutions/iPhoneProgramming.zip.)
This class is defined in the AVFoundation framework. Add the AVFoundation framework to your project and import its header file into MediaPlayerViewController.h. Declare an instance variable of type AVAudioPlayer.

Once again, you will implement the set up for this form of media playing in MediaPlayerViewController.m. Add the following code to the top of int.
And as before with the short sound, you will have the associated button begin playback of the audioPlayer. Replace the implementation of the following method in MediaPlayerViewController.m.

Build and run the application. Tap the Play Audio File and listen for the sound.
With AVAudioPlayer, you have more control over the audio playback, and you can halt its playback whenever you choose. You can also implement delegate methods for an AVAudioPlayer that will allow you to control what happens when the audio player finishes playing or when it gets interrupted.
When the audio player finishes, you will want to revert the title of the button that plays the audio file back to Play Audio File. Implement the delegate method for this in MediaPlayerViewController.m.

Build and run the application. Let the audio file finish on its own and watch the playback button return to its original state when the file ends.
Audio playback will be interrupted when a phone call occurs. When the iPhone interrupts an AVAudioPlayer instance from playing, it pauses the music for you. You can also perform additional tasks with the delegate method audioPlayerDidBeginInterruption:, such as updating your user interface. Another delegate method, audioPlayerEndInterruption:, is sent to the AVAudioPlayer’s delegate when the phone call ends. Implement this method in MediaPlayerViewController.m.

Playing Movie Files
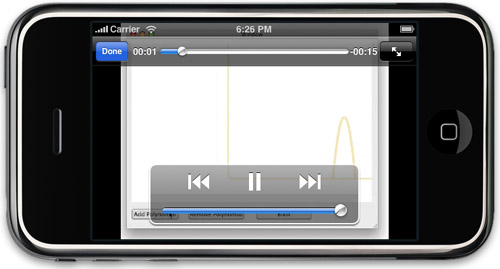
MPMoviePlayerController is responsible for playing movies on the iPhone. The YouTube application uses the same class to play its movies, so you’ve probably seen the interface before (Figure 20.5).
Figure 20.5. MPMoviePlayerController in action
Playing a movie file on the iPhone is fairly restricted. You are limited to two formats:
• H.264 Baseline Profile Level 3.0, up to 640 × 480 resolution at 30 frames per second
• MPEG-4 Part 2 video, Simple Profile
(Fortunately, iTunes has an option to convert video files into these formats. In iTunes, select a movie file and choose Create iPod or iPhone Version from the Advanced menu.)
Instances of MPMoviePlayerController can also play streaming video from a URL somewhere off in internet land. However, you should seriously consider the problems of this approach on a mobile device. If you have the choice, either bundle a movie file with the application or have your application download the video to the application sandbox after a user launches it. If you do not have the choice, be aware that Apple can reject your application if a video file is too large to be transported over the network in an appropriate amount of time. For example, your application can be rejected if it claims to support the original iPhone (using the Edge network) and streams video at more than 1MB per second.
In order to use MPMoviePlayerController, you must add yet another framework to your project. Add the MediaPlayer framework to your project and import the appropriate header file at the top of MediaPlayerViewController.h. Create an instance variable in MediaPlayerViewController for the movie player, as well.

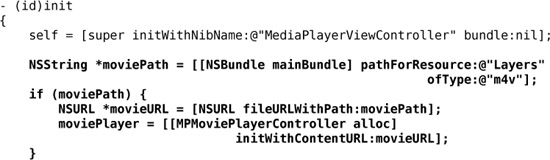
In this exercise, you will bundle the Layer.m4v movie with the application. Locate this file and add it to your project’s Resources group. (This file and other resources can be downloaded from http://www.bignerdranch.com/solutions/iPhoneProgramming.zip.)
To load the movie, add the following code to the top of init in MediaPlayerViewController.m.
A MPMoviePlayerController has a view property. This view contains the movie and controls for playing that movie. When MediaPlayerViewController’s view finishes loading, you will add the moviePlayer’s view to it. Override viewDidLoad in MediaPlayerViewController.m.

Build and run the application. The movie player will appear in the bottom half of the screen. You can tap the Play button within that view to begin playback. You can also tap the Fullscreen button to present that video in full-screen mode. Note that only one instance of MPMoviePlayerController can operate within an application. Therefore, you should not create multiple instances of MPMoviePlayerController. If your application intends to present a movie in multiple places, you should either reuse a single movie player controller or destroy movie player controllers that aren't being used and recreate them later.
If you wish to present a full-screen only video, you can use the class MPMoviePlayerViewController (notice the addition of View in the class name). This class inherits from UIViewController and manages a view that presents a movie. Instantiating a MPMoviePlayerViewController is just like instantiating a MPMoviePlayerController:
![]()
To present the full-screen video on top of an existing view controller, you send the message presentMoviePlayerViewControllerAnimated: to a view controller that is currently on the screen
![]()
Alternatively, you can add a MPMoviePlayerViewController to a tab bar or navigation controller.
Note that, internally, a MPMoviePlayerViewController uses a MPMoviePlayerController. Therefore, creating an instance of MPMoviePlayerViewController will invalidate any existing movie player controllers as you can only have one movie player at a time.
When you instantiate an MPMoviePlayerController, it immediately begins loading the video you ask it to. This loading happens on another thread so that your application does not halt while the video loads. A video loaded from disk will most likely be ready to play immediately, but one being streamed from the internet may take some time to load. You may not want to display an unloaded video right away. Therefore, you can register for a load state notifications to determine when you present a movie player's view on the screen. The loadState property of a movie player tells you whether or not the movie is playable, stalled or has enough data to not only play but the movie player can continue playing without interruption.

An instance of MPMoviePlayerController posts notifications for other events, too. Check out the documentation for the class to see all available notification names.
Now you can play any sort of media you like! Remember that audio and video files are relatively large compared to other resources you might have in an application.Gratuitous use of these types of resources may increase an application bundle's size and the amount of time it takes to download the application.
Background Processes
On iOS 4.0, applications can play audio even when they are not the active application. You will modify the MediaPlayer application so that it continues playing audio even when its interface is not on the screen.
By default, when the user presses the Home button, an application is put into the background state and then transitioned to the suspended state shortly thereafter. Audio playback cannot continue in the suspended state because no code can be executed. Your application can request to stay in the background state instead of transitioning to the suspended state by adding a key-value pair to the Info property list.
Open MediaPlayer-Info.plist. Add a new row to this file by selecting the last row and clicking the plus button (+) next to it. In the Key column of the new row, enter UIBackgroundModes. The Key column will automatically update to display Required background modes and its value will become an array that has a single item.
Figure 20.6. MPMoviePlayerController in action
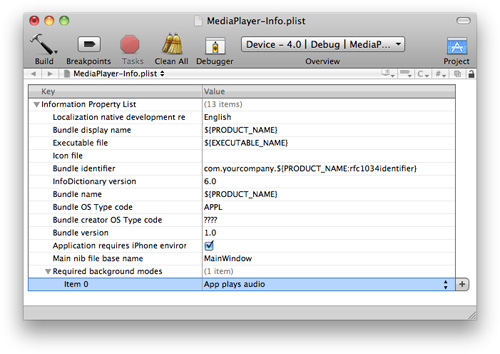
Click the disclosure tab next to the text Required background modes, and the items in the array will appear beneath it. There is currently one empty item. Enter the text audio in the value column and it will automatically update to display App plays audio.
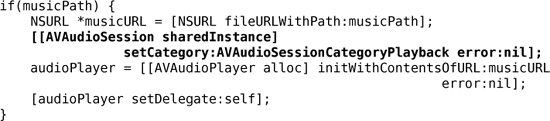
An application registered for background audio will only continue playing audio of a certain audio category. Every application has a single instance of AVAudioSession that manages the category of audio it plays. This category determines whether an application silences other sounds on the device so it can record audio without noise, or play and record audio at the same time or, in this case, an continue playing audio in the background.
To change the audio session's category, you send it the message setCategory:error: with one of the defined constants. The category that allows an application to continue playing audio in the background is AVAudioSessionCategoryPlayback. Update the code in the init method of MediaPlayerViewController.m.
Build and run the application. Tap the button titled Play Audio File and then press the Home button. Notice how the track keeps playing even while you are in other applications. When the track ends, the application will transition to the suspended state. Also notice that the system sound will not play while in the background — that’s just the way it is.
An application operating in the background is under more strict rules than an application in the foreground. Here are some general guidelines an application should follow when it is operating in the background:
• Do not use OpenGL ES or shared system resources (like the address book). The operating system will terminate your application if it notices you do either of these two things.
• Do not update your views, the user can’t see them anyway.
• Do release unneeded memory, similar to when responding to a low-memory warning.
• Do throttle back the application’s workload. For example, an application that plays audio in the background should perform just enough tasks to play the audio and nothing else.
• Do hide any personal information that is visible on the screen.
An application that runs in the background is still subject to termination by the operating system when memory gets low. The operating system will first issue a low memory warning to all applications in the active or background state. If there is still not enough memory available, the OS will start purging suspended applications. If a memory deficit still exists after suspended applications are purged, background applications are then terminated.
When an application that is running in the background is terminated, its delegate is gracefully sent the message applicationWillTerminate: and given a moment to perform any final tasks. However, you should still save any state information for a background application in the method applicationDidEnterBackground: to be sure.
Other forms of background execution
In addition to audio playback, there are two types of standard background execution: voice over internet protocol (VOIP) and location updates. You may add the location or voip to the setCategory:error: array in the info property list to configure your application to support these modes. VOIP is its own, very complicated process that is well outside the scope of this book. However, location updates (and the various possibilities for them) are worth discussion.
An application that is in the background (for any reason) will continue to receive location updates. As the location is updated, the delegate of the CLLocationManager is sent locationManager:didUpdateToLocation:fromLocation: as normal. You can specify that an application wants to remain in the background specifically for location updates by adding the location key to its UIBackgroundModes. An application that registers location as a background mode will remain in background mode as long as a CLLocationManager is actively updating its location.
However, continually updating the location while running in the background is a big drain on the battery. If your application doesn’t require precise updates at frequent intervals, you can instead monitor for signification location changes. A significant location happens when the device switches to a new cell phone tower. (Cell phone towers in metropolitan areas are typically a quarter- to half-mile apart and two miles apart in more rural areas.)
The added benefit of monitoring for significant location changes is that even if your application is suspended, the operating system will briefly wake your application up in the background. When it is woken up, the location manager’s delegate is sent the appropriate message so your application can handle the change in location. To enable significant location changes, send the message startMonitoringSignificantLocationChanges to an instance of CLLocationManager when it is instantiated.
![]()
While VOIP, audio playback and location updates are the standard fare for executing background tasks indefinitely, you may also have reason to temporarily stay in the background for longer. For example, an application downloading a file from the internet may want to finish downloading that file before it becomes suspended. You can ask the operating system for additional time to complete a background task with the UIApplication's method beginBackgroundTaskWithExpirationHandler:.
The operating system may or may not give you additional time to complete the task depending on system constraints. The amount of time is never guaranteed. You should also never use this method to attempt to keep your application in the background just for the sake of keeping it in the background. It is rare that an application would need to use this method of background execution, therefore, we won’t cover it extensively. If you are absolutely sure your application needs this functionality, consult the Executing Code in the Background section of the iPhone Application Programming Guide.
Low-level APIs
In this section, you have been exposed to the simplest, highest-level API for sound and video. If you plan to do a lot of audio work (either recording or playing), you should go deeper and learn about the audio queues, which are part of the AudioToolbox framework. You may also want to study CoreAudio, the framework upon which all of this is built.
Sadly, there is no low-level API for video at this time (iPhone OS 3.1).
Challenge: Audio Recording
You can also record audio with the iPhone SDK. Using the class AVAudioRecorder, record audio data and then play it back with a new button. (Remember, you can’t write data to the application bundle.)