
14. Saving, Loading and Multitasking
On iPhone OS, every application has its own application sandbox. An application sandbox is a directory on the filesystem that is barricaded from the rest of the filesystem. Your application must stay in its sandbox, and no other application can access its sandbox.
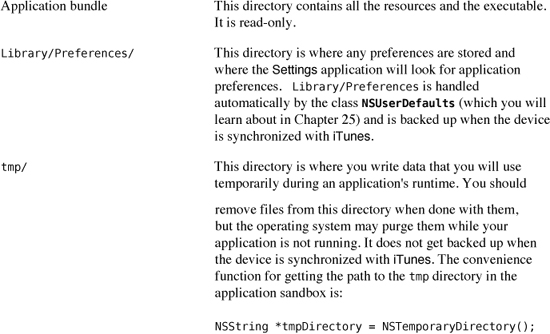
Application Sandbox
Figure 14.1. Application sandbox

The application sandbox has a number of directories, and each of them has a different use.
To get the full path for one of these directories in the sandbox, you use the C function NSSearchPathForDirectoriesInDomains. This function takes three parameters: the type of directory, the domain mask, and a boolean value that decides if it should expand a tilde (~) if one exists in the path. The last two parameters are always the same on the iPhone: NSUserDomainMask and YES. The first parameter is an NSSearchPathDirectory constant. For example, if you wanted to get the Documents directory for an application, you would call the function as follows:

The function returns an NSArray because this function comes from Mac OS X where there could be multiple directories for the parameters. On the iPhone, however, there is only one directory for the possible constants, and it is safe to grab the first NSString from the array.
You can also get the path for the sandbox itself and navigate within it using the function NSHomeDirectory.

However, you cannot write files or create directories at the root-level of the sandbox (the path returned by the NSHomeDirectory function). Any new directories or files must be created within one of the writable directories in the sandbox: Documents, Library, or tmp.
Armed with these functions, you can read and write to the appropriate directories within the application sandbox.
Archiving
There are many ways to write data to the disk on the iPhone, and one of the most important is called archiving. Archiving is handled by concrete subclasses of NSCoder and the NSCoding protocol and its two required methods: encodeWithCoder: and initWithCoder:. You can implement these two methods in any class, and instances of that class will know how to save and load themselves from disk. Therefore, when a class conforms to the NSCoding protocol, it can be archived and later reloaded into an application. (In fact, this is exactly what a XIB file is — a bunch of archived objects.)
In this chapter, you will make Possession instances in Homepwner conform to the NSCoding protocol. These possessions will then persist between runs of the application. Open Homepwner.xcodeproj.
Implementing the two NSCoding methods is easy. First, declare that Possession conforms to NSCoding. In Possession.h, declare the protocol in the interface declaration.
@interface Possession : NSObject <NSCoding>
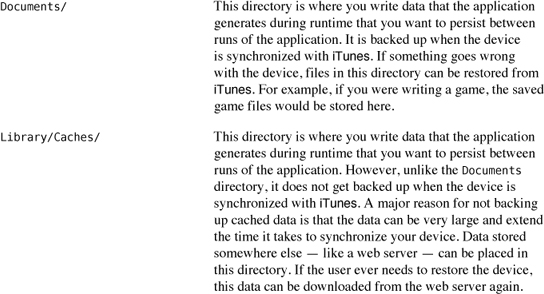
When an object needs to be archived, it is sent the message encodeWithCoder:. An NSCoder instance is passed to the object, and all of the instance variables are encoded into it. If any of those instance variables are objects, those objects are then told to encodeWithCoder:. (Figure 14.2). So archiving is a recursive process that starts at one object that encodes his friends, and they encode their friends, and so on. Thus, you can only encode objects and supported primitives like int that conform to the NSCoding protocol.
Figure 14.2. Encoding an object

Implement encodeWithCoder: in Possession.m.
So what exactly is this NSCoder instance? It is an abstract superclass for different types of data transfers. On the iPhone, NSCoder has only one available mode of data transfer: keyed archiving. (Desktop Cocoa has two more options.) There are two concrete subclasses of NSCoder for keyed archiving: an NSKeyedArchiver knows how transfer data to disk from RAM and an NSKeyedUnarchiver can read that data back into RAM from the disk. Keyed archives work a lot like an NSMutableDictionary; you add an object to it with a key. When you want that object back, you use the key to retrieve it. Typically, you use the name of the instance variable you are encoding as the key.
To unarchive an instance of Possession, you allocate a Possession instance and send it the message initWithCoder:. This method will use the keys to decode the same objects you encoded with encodeWithCoder:. Implement initWithCoder: in Possession.m.

Build your application to check for any syntax errors. Your application should run the same as before.
Note that initWithCoder: does not replace the other initialization methods. If you wish to create a Possession in code, you use the other initialization methods. If you want to create an instance from an archive, you use initWithCoder:.
Now, you actually don’t create an NSCoder instance explicitly; instead one of the NSCoder subclasses creates it for you and sends the appropriate messages to your Possession instances. In fact, you never invoke initWithCoder: or encodeWithCoder: on your own; NSKeyedUnarchiver and NSKeyedArchiver handle these processes.
You’ve implemented these two methods, and now the Possession class conforms to the NSCoding protocol. Not only can Possession instances be written to a file by themselves, but other NSCoding-compliant objects that contain Possession instances can also be written to a file.
What object in your code contains Possession instances? The possessions array in ItemsViewController. Its type, NSMutableArray, also conforms to NSCoding. Because the array and its contents conform to NSCoding, you can simply archive the entire array and unarchive it the next time the application launches. Brilliant!
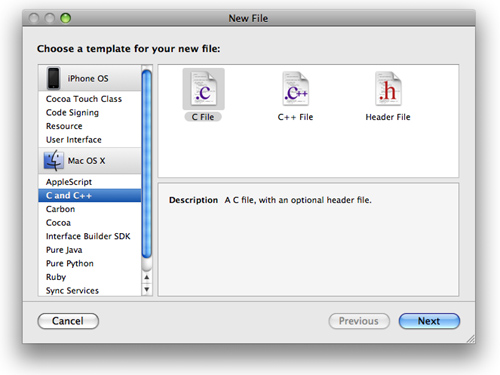
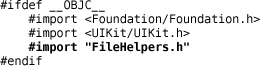
To archive this array, you need to have a path on the filesystem to write to. You will create a function that will return the full path of a file in the Documents directory. This function will not be part of an Objective-C class but a stand-alone C function. You are going to want to use this function many different places, so create a separate file for it. From the New File... window, select C and C++ from underneath the Mac OS X group. Choose C File from the template list as shown in Figure 14.3. Name this file FileHelpers.m. (Make sure to change the file suffix to .m!)
Figure 14.3. Creating a C file
Open FileHelpers.h, import the header file from UIKit, and declare this new function.
#import <UIKit/UIKit.h>
NSString *pathInDocumentDirectory(NSString *fileName);
In FileHelpers.m, define the following function. To use this function, you pass it a file name, and it will construct the full path for that file in the Documents directory.

When the application launches, you are going to unarchive an array of Possession instances from the disk and pass it to ItemsViewController. When the user quits using the application, you will archive that array to the disk. The object that receives messages for these two events (launching and quitting) is HomepwnerAppDelegate. Change the interface of HomepwnerAppDelegate to the following:

The method possessionArrayPath will return the full path to where you will save the possessions array. Implement that method in HomepwnerAppDelegate.m.

Because HomepwnerAppDelegate.m uses pathInDocumentDirectory, it must import the header file that this function was declared in. You could import FileHelpers.h at the top of HomepwnerAppDelegate.m, but you are going to use this function in other files, too. You would then have to import this file in every file that used pathInDocumentDirectory. Wouldn’t it be great if you could tell the compiler, “Import FileHelpers.h into ALL of my files.”? Well, you can.
Every project has a prefix file, and any declarations or compiler directives in this file are prefixed to all of your source code. Open the prefix file for this project, Homepwner_Prefix.pch (pch stands for precompiled header). In this file, import FileHelpers.h.
Now that you can construct the appropriate path on the file system and your Possession instances can be archived, you need to write code to kick off the processes of saving and loading. Because HomepwnerAppDelegate will be receiving messages when the application launches or terminates, it will be responsible for starting these processes. Currently, the array of Possession instances is pointed to by an instance variable in ItemsViewController. HomepwnerAppDelegate needs a way to get a reference to this array. Therefore, you will expose ItemsViewController’s possessions array as a property. Declare this property in ItemsViewController.h.
Synthesize it in ItemsViewController.
@implementation ItemsViewController
@synthesize possessions;
Archiving Objects
To write objects that conform to NSCoding to disk, you use the class method archiveRootObject:toFile: of NSKeyedArchiver. The root object, the first argument to this method, can be any object that conforms to NSCoding. This method creates an instance of NSKeyedArchiver and then encodes the root object into it.
When an object is encoded into an NSKeyedArchiver, it is sent the message encodeWithCoder:, just like the one you implemented for Possession. The argument passed to encodeWithCoder: is the instance of NSKeyedArchiver that will be responsible for writing all of the archived objects it contains to disk. When an array is encoded, all of the objects it contains are encoded with it (Figure 14.4).
Figure 14.4 Archiving an array

Therefore, passing an array full of Possession instances to the method archiveRootObject:toFile: kicks off a chain reaction of encoding. The root object is encoded, and thus sent encodeWithCoder:. Each object in the array is encoded and also sent encodeWithCoder:. Each of those objects then encodes their instance variables, triggering the encodeWithCoder: for each of those objects. This process continues until the entire subgraph of objects starting at the root object has been encoded. The data contained in the archive is then written to the disk at the path specified by the second argument of archiveRootObject:toFile:.
To kick off this chain reaction, you will write a new method named archivePossessions in HomepwnerAppDelegate.m. In this method, you will get a pointer to the possessions array from the ItemsViewController instance and archive it to possessionArrayPath (Figure 14.5).

Declare this method in HomepwnerAppDelegate.h.
![]()
Implement this method in HomepwnerAppDelegate.m.

Supporting Multitasking
When the user quits the application, you will archive all of the Possession instances to disk by invoking the method archivePossessions. In previous versions of iOS, when the user pressed the device's Home button, the active application would be terminated. The application delegate would get sent the message applicationWillTerminate:, and you would have invoked archivePossessions in its implementation. However, in iOS 4.0 and later, applications do not get terminated when the user presses the home button. Therefore, you must save data to the disk at another time.
To know when to save an application's data, you must understand the various states an application will transition to during its lifetime (Figure 14.6). When an application is not running, it is said to be in the not running state. In this state, the application does not execute any code nor does it have any memory reserved in RAM.
Figure 15.6. States of typical application

When the user launches an application, it enters the active state. When in the active state, the application is truly running; its interface is on the screen, it is accepting events and your code is handling those events. There is also a inactive state and it is similar to the active state, except that the application is not currently receiving events. An application is in the inactive state when it is first being launched (and the run loop hasn't been created yet) or when a phone call or other system-event (like a SMS message) occurs. (An application typically spends very little time in the inactive state.)
An application also briefly enters the inactive state before it enters the background state. When the user presses the Home button while an application is running, it goes from active, to inactive, to the background. While an application is in the background state, it can still execute code, but it is no longer visible. Its icon appears in the dock (accessible by double-clicking the Home button). By default, an application that enters the background state has five seconds before it enters the suspended state. (An application can stay in the background state for longer if requested. This will be covered later in the book.)
A suspended application cannot execute code, and any resources it doesn't need while in the suspended state are released. An application in the suspended state is essentially freeze-dried so it can be quickly thawed when the user launches it later. The resources that are released can be reloaded, and they include unreferenced cached images, system-managed caches, and other graphics data. You don't have to worry about these resources; your application will handle the destruction and renewal of them automatically.
Figure 14.7 Background and suspended applications in the dock
An application in the suspended state also appears in the dock and will remain in the dock as long as there is adequate system memory. When the operating system believes memory is getting low, it will immediately terminate suspended applications as needed. A suspended application that gets terminated gets no notification that it is terminated; it is simply removed from memory and the dock. (Note that a multitasking application never sends the message applicationWillTerminate: to its delegate. There is one exception to this that will be discussed later in the book.)
With all of these states, when should you save your data? Clearly, the not running and suspended states are out of the question; no code can be executed in these states. You could periodically "autosave" your data while still in the active state, but that will slow down the user experience if you are writing a lot of data at once. (In that case, you will be better served using SQLite or Core Data to do partial writes, and these tools handle writing data to the disk for you.) That leaves two options:
• The inactive state is entered when a phone call or system-event occurs, or when it is on its way to the background state, but your application is still running in the foreground. Saving data when transitioning to this state is a waste of time because the application will either become active again shortly, or it will enter the background. Therefore, the inactive state is not a likely candidate for saving data.
• When transitioning to the background state, the application is being removed from the screen. It is likely that it is on its way to being suspended, at which point, it is subject to being terminated by the operating system. Therefore, transitioning to the background state is the best time to save any application data.
For the majority of application state transitions, the application delegate is sent the appropriate message. (An application is not sent a message when it enters the suspended state, but it is sent one for the rest of the states.) The message sent to the application delegate when the application enters the background state is applicationDidEnterBackground:.
Implement this method in HomepwnerAppDelegate.m so that it calls the archivePossessions method.

This will properly archive all of the Possession instances to disk when the user presses the Home button. However, not all iOS devices support multitasking. For iOS devices that do not support multitasking, when you press the Home button, the active application will terminate and the application delegate is sent the message applicationWillTerminate:. Implement this method to perform the same task as its multitasking counterpart in HomepwnerAppDelegate.m.

Unarchiving Objects
In application:didFinishLaunchingWithOptions:, you will unarchive all of the possession instances from disk. To do this, you will use the class method unarchiveObjectWithFile: of NSKeyedUnarchiver. By passing this method a path, the contents at that path are unarchived by reading the data and sending the message initWithCoder: to the root object. Replace the code for application:didFinishLaunchingWithOptions: in HomepwnerAppDelegate.m. (Because there are subtle changes to the previous lines of code in this method, replace the whole thing — don't try and edit it!)
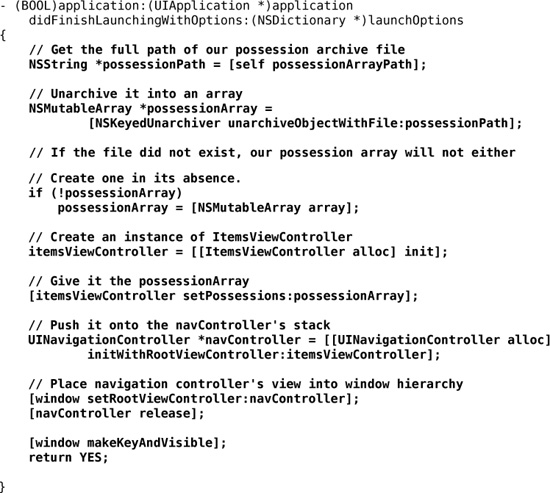
Notice that the object returned from unarchiveObjectWithFile: is of type NSMutableArray. That's because the root object that was archived to this path was an NSMutableArray. However, an archive's root object does not have to be an array in all cases, it just so happens to be in our application. Remember that the root object can be any object that conforms to NSCoding. When you unarchive data, you should know the type of the root object that was archived to that file to make your code work properly.
Also, notice that you create an empty NSMutableArray if nothing was returned from unarchiving the data at possessionPath. This is important because the first time the application launches, there won't be any data at that path, and nil will be returned from unarchiveObjectWithFile:. You must create an empty array if this happens so that you can add Possessions to it during execution.
Let’s review what you have done so far. When the application launches, it creates an NSMutableArray (either by unarchiving one from disk or by making a brand new one) and passes it to ItemsViewController. ItemsViewController uses the array as its possessions instance. When the application exits, you grab that array back from ItemsViewController and write it to disk. Simple enough, right?
Now that your data can persist between runs of the application, you will no longer fill the possessions array with random possessions. Remove the following code in the init method in ItemsViewController.m.

Build and run the application. There will be an empty table on the screen. Add some possessions using the Edit button. Play with some of the values of the Possessions and exit the application. (If you are using the simulator to run this application, you must click the Home button on the simulator window for the application to exit properly and archive the possessions. Quitting the simulator or stopping execution in Xcode will not properly exit the application.) Reopen the application, and your possessions will be there. So far, so good. However, because the image for each Possession is not archived, you still have to write out the images for the possessions to disk another way.
Application State Transitions
Before you move on to saving the image data, it might help to write some code to get a better understanding of application state transitions. As you know, there is an implicit variable named self that is available in every method body that points to the instance that is currently running that method. There is actually another implicit variable for every method. It is called _cmd and it is the selector for the method currently being run. You can get the NSString representation of a selector with the function NSStringFromSelector. In HomepwnerAppDelegate.m, implement all of the state transition delegate methods so that they print out the name of the method:
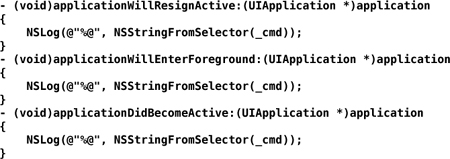
Also, add the following NSLog statements to the top of application:didFinishLaunchingWithOptions:, applicationWillTerminate: and applicationDidEnterBackground:.

Build and run the application. You will see that the application gets sent application:didFinishLaunchingWithOptions: and then applicationDidBecomeActive:. Click the home button, and the console will report that the application briefly inactivated and then went to the background state. Relaunch the application by tapping its icon on the Home screen or in the dock. The console will report that the application entered the foreground and then became active. Double-click the home button to launch the dock and then tap and hold the Homepwner icon until it begins to jiggle. Tap the red terminate button in the icon’s upper left corner and note that no message is sent to your application delegate, it is simply terminated immediately.
Writing to Disk with NSData
The images for Possession instances are created by user interaction and are only stored within the application. Therefore, the Documents directory is the best choice to store them. Let’s extend the image cache to save images as they are added and fetch them as they are needed. You can use the image key generated when the user takes a picture to name the image in the file system.
In this section, you are going to copy the JPEG representation of an image into a buffer in memory. Instead of just malloc’ing a buffer, Objective-C programmers have found it handy to have an object to create, maintain, and destroy these sorts of buffers. Thus, NSData instances hold some number of bytes of binary data, and you’ll use NSData in this exercise.
Open ImageCache.m and extend the setImage:forKey: method to write a JPEG of the image to the Documents directory.

When an image is deleted from the cache, make sure to delete it from the filesystem:
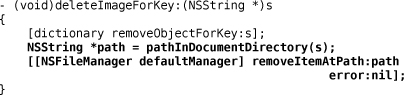
The function UIImageJPEGRepresentation takes two parameters; a UIImage and a compression quality. The compression quality is a float from 0 to 1, where 1 is the highest quality. The function returns an instance of NSData, a wrapper for a buffer of bytes. This NSData instance can be written to disk by sending it the message writeToFile:atomically:. The bytes held in this NSData instance are then written to the path of the first parameter. The second parameter, atomically, is a boolean value. If it is YES, the file is written to a temporary place on the disk, and, once the writing operation is complete, that file is renamed to the path of the first parameter, replacing any previously existing file. This prevents data corruption should your application crash during the write procedure.
It is worth noting that the way you are writing the image data to disk is not archiving. While NSData instances can be archived, using the method writeToFile:atomically: is a binary write to disk. Other classes, like NSString, have similar methods, and those are not archiving either. When an NSString is written to disk by sending it the message writeToFile:atomically:encoding:error:, the data written is a text file. These methods are useful when you are saving binary or text data to the disk.
Now when the user takes a picture, the image is stored to disk, and ImageCache will need to load that image when it is requested. The class method imageWithContentsOfFile: of UIImage will read in an image from a file, given a path. In ImageCache.m, replace the method imageForKey:.

Build and run the application again. Take a photo of one of the possessions and exit the application. Launch the application again. Selecting that same possession will reveal the photo you took.
Challenge: Archiving Wherewasi
Another application you wrote could benefit from archiving: Wherewasi. Go back to that application and archive the MapPoint objects so they can be reused.
For the More Curious: Reading and Writing to Disk
In addition to archiving and NSData’s binary read and write methods, there are a few more methods for transferring data to and from the disk. A few of them, like SQLite and Core Data, will be discussed in their own chapters later. The others are worth mentioning here.
You have access to the standard file I/O functions from the C library. These functions look like this:

You won’t see these functions used much because there are more convenient ways of reading and writing binary and text data. You already implemented code in this chapter that reads and writes binary data when you save and load the images for a Possession. For text data, NSString has two instance methods writeToFile:atomically:encoding:error: and initWithContentsOfFile:. They are used as follows:
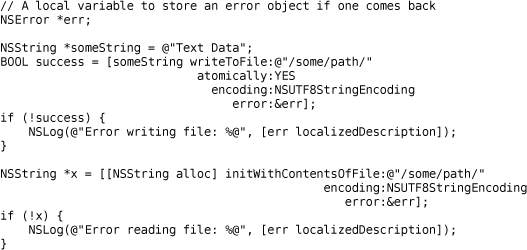
What’s that NSError object? Some methods might fail for a variety of reasons – for example, writing to disk might fail because the path is invalid or the user doesn’t have permission to write to the specified path. NSError objects contain the reason for failure. You can send the message localizedDescription to an instance of NSError for a human-readable description of the error. This is something you can show to the user or print out to a debug console.
Error objects also have code and domain properties. The code is an integer representing the error. The domain represents the error domain. For example, not having permission to write to a directory results in error code 513 in error domain NSCocoaErrorDomain. Each domain has its own set of error codes and those codes within different domains can have the same integer value; therefore, an error is uniquely specified by its code within an error domain. You can check out most of the error codes for the NSCocoaErrorDomain in the file Foundation/FoundationErrors.h.
The syntax for getting back an NSError instance is a little strange, An error object is only created if an error occurred; otherwise, there is no need for the object. When a method can return an error through one of its arguments, you create a local variable that is a pointer to an NSError object. Notice that you don’t instantiate the error object – that is the job of the method you are calling. You pass the address of the pointer variable you have to the method that might generate an error. If an error occurs in the implementation of that method, an NSError instance is created, and your pointer is set to point at that new object. (The error object is autoreleased.) If you don’t care about the error object, you can always pass nil.
In addition to NSString, two other objects have writeToFile: and initWithContentsOfFile: methods: NSDictionary and NSArray. In order to write objects of these types to disk in this fashion, they must contain only property list serializable objects. The only objects that are property list serializable are NSString, NSNumber, NSDate, NSData, NSArray, and NSDictionary. When an NSArray or NSDictionary is written to disk with these methods, an XML property list is created. (XML is a markup language, similar to HTML.) An XML property list is therefore a collection of values that are tagged.

XML property lists are a convenient way to store data because they can be read on nearly any system. Many web service applications use property lists as input and output. The code for writing and reading a property list looks like this:

For the More Curious: The Application Bundle
When you build an iPhone application project in Xcode, you create an application bundle. The application bundle contains the application executable and any resources you have bundled with your application. Resources are things like NIB files, images, audio files – any files that will be used at runtime. When you add a resource file to a project, Xcode is smart enough to realize that it should be bundled with your application and categorizes it accordingly.
How can you tell which files are being bundled with your application? In the Homepwner project window, open the Targets group by clicking the disclosure button next to it. The Homepwner target will appear. Click the disclosure button next to it. Three gray boxes will appear underneath it, as shown in Figure 14.8.

Each item in the Homepwner target group is one of the phases that occurs when you build a project. The Copy Bundle Resources phase is where all of the resources in your project get copied into the application bundle.
You can check out what an application bundle looks like on the filesystem after you install an application on the simulator. Navigate to ~/Library/Application Support/iPhone Simulator/(version number)/Applications. The directories within this directory are the application sandboxes for applications installed on your computer’s iPhone Simulator. Opening one of these directories will show you what you expect in an application sandbox: an application bundle and the Documents, tmp and Library directories. Right or Command-click the application bundle and choose Show Package Contents from the contextual menu.
Figure 14.9. Viewing an Application Bundle

A Finder window will appear showing you the contents of the application bundle. When a user downloads your application from the App Store, these files are copied to their device.
Figure 14.10. The Application Bundle

You can load files in the application’s bundle at runtime. To get the full path for files in the application bundle, you need to get a pointer to the application bundle and then ask it for the path of a resource.

If you ask for the path to a file that is not in the application’s bundle, this method will return nil. If the file does exist, then the full path is returned, and you can use this path to load the file with the appropriate class.
Also, files within the application bundle are read-only. You cannot modify them nor can you dynamically add files to the application bundle at runtime. Files in the application bundle are typically things like button images, interface sound effects, or the initial state of a database you ship with your application. You will use this method in later chapters to load these types of resources at runtime.