
13. Camera and UlPopoverController
In this chapter, you’re going to use UIImagePickerController, a subclass of UIViewController, to add photos to the Homepwner application. You will present a UIImagePickerController so that the user can take and save a picture of each possession. The image will then be associated with a Possession instance, stored in an image cache, and viewable in the possession’s detail view. Then, when the insurance company demands proof, the user has a visual record of owning that 70″ HDTV.
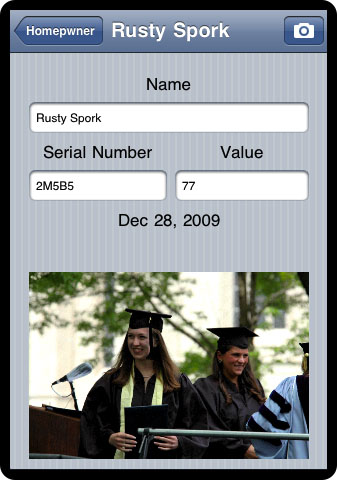
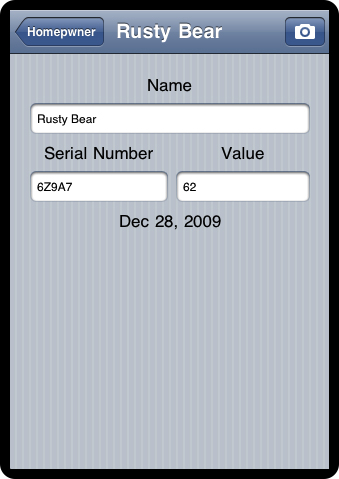
Figure 13.1. Homepwner with camera addition
ImageCache: a Singleton
First, you are going to create an image cache to hold all the pictures the user will take. In Chapter 14, you will have the Possession objects write out their instance variables to a file, which will then be read in when the application starts. However, images tend to be very large, so you’re going to keep them in the image cache and separate from the other possession data. The image cache will fetch the images as they are needed and flush the cache when the device runs low on free memory.
All of that nifty saving/fetching/loading stuff comes later; in this chapter, the image cache is little more than a dictionary of key-value pairs in which the keys are unique strings and the values are images. Open Homepwner.xcodeproj and, in Xcode, create a new subclass of NSObject (from the Cocoa Touch Class section) called ImageCache. Open ImageCache.h and create its interface:

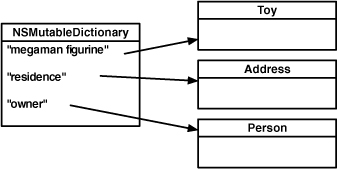
NSDictionary
The dictionary is an instance of NSMutableDictionary, the mutable subclass of NSDictionary. An NSDictionary is a collection object similar to an NSArray. However, an NSArray is an ordered list of pointers to objects that can be accessed by an index. When you have an array, you can ask it for the object at the nth index:

On the other hand, dictionary objects are not ordered within the collection. So instead of accessing entries with an index, you use a key. The key is usually an instance of NSString.

Here are some more important facts about NSDictionary:
• Whenever you add an object to a dictionary, the dictionary retains it. Whenever you remove an object from a dictionary, the dictionary releases it.
• There can only be one object for each key. Therefore, if you add an object to a dictionary and an object is already stored with that key, the new object is added to the dictionary and the previous one is removed.
• To associate multiple objects with one key, add them to the dictionary as an array.
• An NSDictionary is useful when you want to name the entries within a collection. In other development environments, this is called a hash map or hash table (Figure 13.2).
Figure 13.2. NSDictionary diagram
Open ImageCache.m and add the following methods to save and retrieve images from a dictionary:
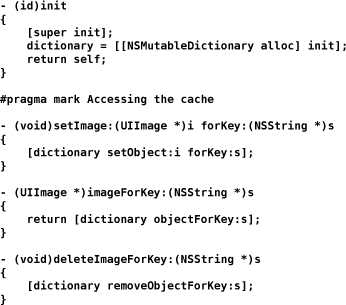
Note that there is no dealloc method because the cache itself will live for the entire life of the application.
Singletons
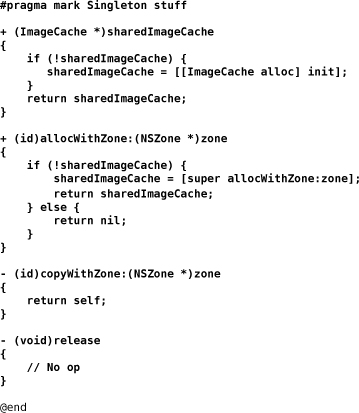
Note that there will be exactly one instance of ImageCache that will hold all the images and be accessible to all the controllers in the application. We call this a singleton. A singleton is a class that can only be instantiated once. (You’ve already used a singleton: UIAccelerometer.) The instance of a singleton class often represents a single resource that must be shared by many objects. Singletons also might contain instance variables that act as global variables without the possibility of a namespace collision.
Add a static variable in ImageCache.m that will hold on to the single instance:

(Some object-oriented languages have class variables. Static variables declared in the .m file serve the same purpose for Objective-C programmers.)
Now make it impossible to decrement the retain count of that instance or create another instance. Add the following methods to ImageCache.m:
Displaying Images and UIImageView
Once you have an image cache, you’ll want to get and display images from it using the ItemDetailViewController. An easy way to display an image is to put an instance of UIImageView on the window. Open ItemDetailViewController.h and add an outlet for an image view:
![]()
Save ItemDetailViewController.h or Interface Builder won’t recognize the changes.
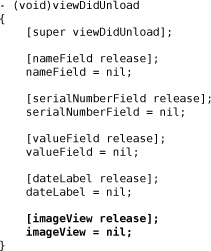
As a new subview of ItemDetailViewController’s view that is instantiated by loading a XIB file, imageView needs to be released and its pointer cleared in viewDidUnload. Make the following changes to ItemDetailViewController.m.
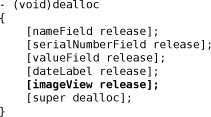
Also release the image view in dealloc:
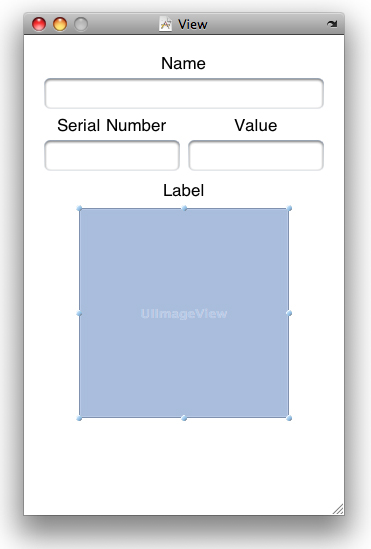
Open ItemDetailViewController.xib. Double-click on the View instance in the doc window and drag a UIImageView onto it. The interface of ItemDetailViewController should look like Figure 13.3.
Figure 13.3. ItemDetailViewController’s interface with a UIImageView
The UIImageView will display an image according to its contentMode property. This property determines where to position and how to resize the content of a view within its frame. The default value for contentMode is UIViewContentModeCenter, which centers but does not appropriately resize the content to fit within the bounds of the view. If you keep the default, the large image produced by the camera takes up most of the screen.
To change the contentMode of the image view so that it resizes the image, select the UIImageView and open the Inspector window to the first tab, Attributes. Change the pop-up button titled Mode to Aspect Fit as shown in Figure 13.4. This will resize the image to fit within the bounds of the UIImageView.
Figure 13.4. Image view attributes

Finally, make the connection from File’s Owner to the UIImageView, selecting imageView as the outlet. (Remember, anything you can do in Interface Builder can be done in code; to change the contentMode a UIImageView programmatically, you would send it the message setContentMode:.)
Before exiting Interface Builder, find the UITextFields that display Possession instance variables and hook up their delegate outlets to the File’s Owner object. This is necessary because you’re going to implement a method from the UITextFieldDelegate protocol in ItemDetailViewController.m later in this chapter. Save the XIB file and quit Interface Builder.
Taking pictures and UIImagePickerController
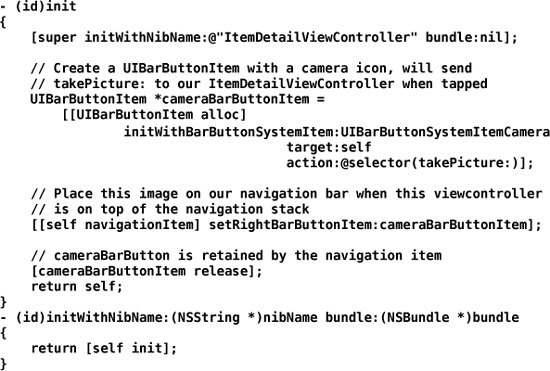
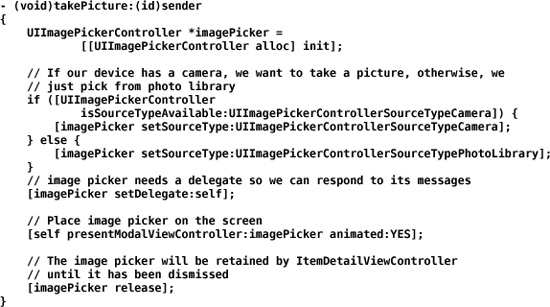
Now you need a button to initiate the photo-taking process. There is plenty of room on the UINavigationBar to add a UIBarButtonItem. UIBarButtonItems have a few stock icons they can display including a camera icon. Create a bar button item with a camera icon and add it to right slot of the ItemDetailViewController’s navigationItem. You also need to instantiate the imageCache instance variable. In ItemDetailViewController.m, override the method init:
When this button is tapped, it sends the message takePicture: to the instance of ItemDetailViewController. This method will create an instance of UIImagePickerController, if one has not yet been created, and then present it on the screen.
Figure 13.5. Interface with camera button
When creating an instance of UIImagePickerController, you must set its sourceType property. The sourceType is a constant that tells the image picker where to get the images. There are three possible values:
• UIImagePickerControllerSourceTypeCamera — The image picker will allow the user to take a new picture.
• — UIImagePickerControllerSourceTypePhotoLibrary The user will be prompted to select an album and then a photo from that album.
• — UIImagePickerControllerSourceTypeSavedPhotosAlbum The user picks from the most recently taken photos.
Figure 13.6 shows the results of using each constant.
Figure 13.6. UIImagePickerControllerTypes

The first source type, UIImagePickerControllerSourceTypeCamera, won’t work on a device that doesn’t have a camera. So you have to check for device support before using this type by sending the UIImagePickerController class method isSourceTypeAvailable:. When you send this message to the UIImagePickerController class with one of the image picking constants, you are returned a boolean value for whether the device supports that source type.
In addition to a source type, the UIImagePickerController also needs a delegate to handle requests from its view. When the user taps the Use button on the UIImagePickerController’s interface, the delegate is sent the message imagePickerController:didFinishPickingMediaWithInfo:. (The delegate receives another message — imagePickerControllerDidCancel: — if the process was cancelled.)
Once the UIImagePickerController has a source type and a delegate, it’s time to put its view on the screen. Unlike other UIViewController subclasses you’ve used before, UIImagePickerControllers are presented modally. When a view controller is modal, it takes over the entire screen until it has finished its work. (On the desktop, modal windows are windows that cannot be dismissed until a specific task is completed.) To present a view modally, presentModalViewController:animated: is sent to the UIViewController whose view is on the screen. The view controller to be presented is passed to it, and its view slides up from the bottom of the screen.
Implement the method takePicture: in ItemDetailViewController.m to create, configure, and present the UIImagePickerController.
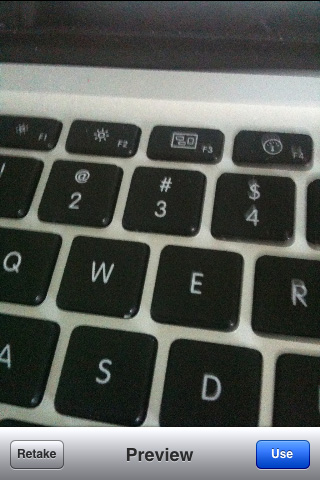
On the iPhone or iPod Touch, you can build and run the application on your device. (Hang on till the next section if you are interested in displaying the image picker on the iPad). Navigate to the ItemDetailViewController and tap the camera button on the UINavigationBar. UIImagePickerController’s interface will appear on the screen, and you can take a picture (or choose an existing image if you’re developing on a device that doesn’t have a camera). Tapping the Use Photo button will dismiss the UIImagePickerController. But, wait! — you don’t yet have a reference to the image anywhere in the code. You need to implement the delegate method imagePickerController:didFinishPickingMediaWithInfo: in ItemDetailViewController to hold on to the selected image.
Figure 13.7. UIImagePickerController preview interface
Before you implement this method, you have to address the two warnings that appeared when you last built the application: “ItemDetailViewController does not conform to the UIImagePickerControllerDelegate or UINavigationControllerDelegate protocol.” In ItemDetailViewController.h, add the protocols to the class declaration. (Why UINavigationControllerDelegate? UIImagePickerController is a subclass of UINavigationController.)
![]()
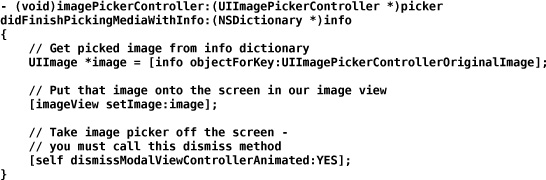
When the Use Photo button is tapped, the message imagePickerController:didFinishPickingMediaWithInfo: will be sent to its delegate. In this method, put the image into the UIImageView you created earlier. Implement this method in ItemDetailViewController.m.
Build and run the application again. Take a photo and tap the Use Photo button. After the image picker slides off the screen, you will see a scaled version of the image in the UIImageView. Note that if you choose another item from the table view, the same image will appear in the detail view controller until you take a new image. You will fix this shortly.
UIPopoverController
On the iPad, you cannot present a UIImagePickerController modally. Instead, an image picker must be presented by a UIPopoverController. A popover controller shows a view controller's view in an overlay on top of an existing interface. A popover controller is useful for giving the user a directed choice: select something from this popover controller or tap anywhere else to cancel. To use a UIPopoverController, you create an instance of it and give it a contentViewController. Then, you present the popover controller on the screen.
When the user taps the camera bar button item, you will present a popover controller that displays the image picker. In ItemDetailViewController.h, add an instance variable for the popover controller and declare that ItemDetailViewController conforms to the UIPopoverControllerDelegate protocol.

In ItemDetailViewController.m, add the following code to takePicture:.

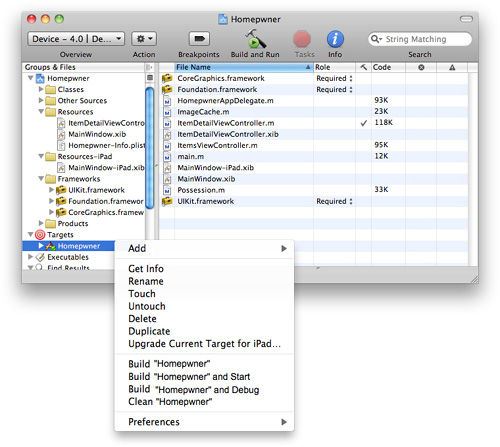
In order to run this code on an iPad, you will have to set up your project to run natively on the iPad. Select the Homepwner target from underneath the Targets group in the project window (Figure 13.8). Right-click and choose Upgrade Current Target for iPad.... Choose One Universal application from the sheet that appears and hit OK.
Figure 13.8 UIImagePickerControllerTypes
At the time of this writing, there is a little bug with the universalization process. Open MainWindow-iPad.xib. (It was created and added to your project in the previous step.) Select the Window object and open the Inspector window to the first tab. Check the box titled Full Screen at Launch and save the file. Build and run the application on an iPad and tap the camera button.
Right now, when you select an image from the popover controller, the popover remains on the screen. At the end of imagePickerController:didFinishPickingMediaWithInfo:, dismiss the popover when an image is selected.

Creating and using keys
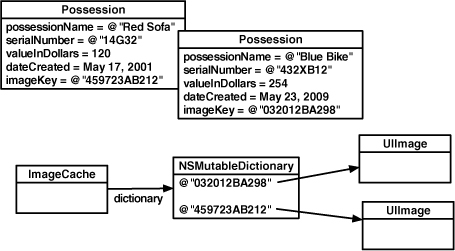
How can a Possession know which photo in the cache is its very own? Because you’re using a dictionary as the image cache, a Possession only needs to know the key for its image to find the right one in the cache. Add an instance variable to Possession.h to store the key.

Synthesize this new property in the implementation file.
@implementation Possession
@synthesize imageKey;
You also need to release this object when a Possession is deallocated. Add this code to Possession.m.
![]()
The image keys need to be unique in order for your dictionary to work. While there are many ways to hack together a unique string, Cocoa Touch has a mechanism for creating universally unique identifiers (UUIDs), also known as globally unique identifiers (GUIDs). Objects of type CFUUIDRef can represent a UUID and are generated using the time, a counter, and a hardware identifier, usually the MAC address of the ethernet card.
However, CFUUIDRef is not an Objective-C object; it is a C structure and part of the Core Foundation API. Core Foundation is a C API that is already included in the template projects and contains the building blocks for applications including strings, arrays, and dictionaries. Core Foundation “classes” are prefixed with CF and suffixed with Ref. Other examples include CFArrayRef and CFStringRef. Many objects in Core Foundation have an Objective-C counterpart, and NSString is the Objective-C counterpart of CFStringRef. However, CFUUIDRef does not have an Objective-C counterpart and knows nothing at all about Objective-C. Thus, when it produces a UUID as a string, that string cannot be an NSString — it must be a CFStringRef.
Recall that your instance variable for the image key is of type NSString. Do you have to change it to CFStringRef? Nope. Many Core Foundation objects can simply be typecast as their Objective-C counterparts. Here’s an example:

We call this toll-free bridging. (And it works because the structures in memory are equivalent. How smart is that?)
Now, in ItemDetailViewController.m, make changes to imagePickerController:didFinishPickingMediaWithInfo: to create and use a key for a possession image.
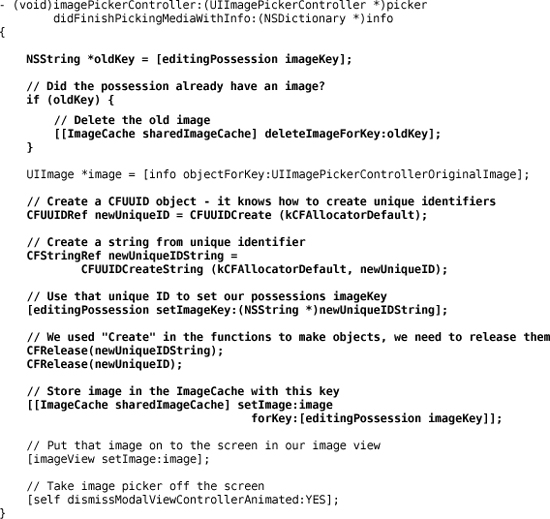
In this method, we call the C functions CFUUIDCreate and CFUUIDCreateString. When a C function name contains the word Create, you are responsible for releasing its memory just as if you had sent the message alloc to a class. To release a Core Foundation object, you call the function CFRelease with the object as a parameter.
Now, when ItemDetailViewController’s view appears on the screen, it should grab an image from the imageCache using the imageKey of the Possession to be displayed. Then, it should place the image in the UIImageView. Add the following code to viewWillAppear: in ItemDetailViewController.m.
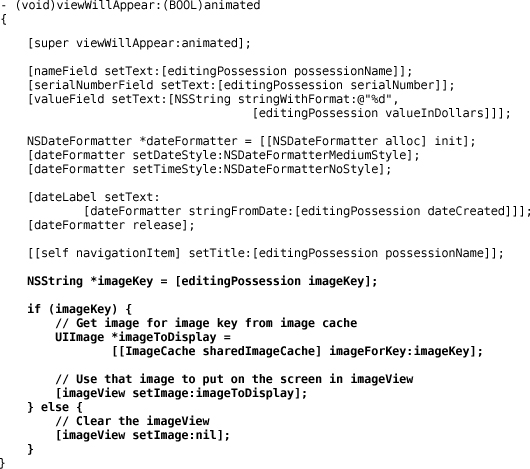
Notice that if no image exists in the cache for that key (or there is no key for that possession), the pointer to the image will be nil and that UIImageView just won’t display an image.
Make sure to import the header file that contains the ImageCache class declaration at the top of ItemDetailViewController.m.
#import "ImageCache.h"
@implementation ItemDetailViewController
Build and run the application. Select the first row of the UITableView and tap the camera button. After taking a picture, return to the list of possessions, tap a different row, and take another picture. Now verify that the appropriate image is displayed for each possession.
Dismissing the Keyboard
When the keyboard appears on the screen in the possession detail view, it obscures ItemDetailViewController’s imageView. Because this is annoying when you’re trying to see an image, the user may want to get rid of the keyboard. You’re going to allow the user to dismiss the keyboard by implementing the delegate method textFieldShouldReturn: in ItemDetailViewController.m. (This is why you hooked up the delegate outlets earlier in the chapter.)

However, it would also be stylish to dismiss the keyboard automatically when the user taps the camera button. In order to dismiss the keyboard, you must send the message resignFirstResponder to the first responder.
Unfortunately, when the camera button is tapped, you don’t know which UITextField in the detail view is currently the first responder. While you could send resignFirstResponder to every UITextField, it’s easier to let UIView do it. UIView implements an endEditing: method that will send resignFirstResponder to all of its subviews. In ItemDetailViewController.m, send this message to ItemDetailViewController’s view when the camera button is tapped.

You’ve done a lot in this chapter with Homepwner: accessed the camera, created an image cache, stored images in the cache, and tied them to possessions with unique identifiers. In the next chapter, you’ll learn more about the nuts and bolts of saving and loading data in an iPhone application and add that ability to Homepwner.
Challenge: Removing an Image
Add a button that clears the image for a possession.
For the More Curious: Recording Video
Once you understand how to use UIImagePickerController to take pictures, making the transition to recording video is trivial. Recall that an image picker controller has a sourceType property that determines whether an image comes from the camera, photo library, or saved photos album. Image picker controllers also have a mediaTypes property, an array of strings that contains identifiers for what types of media can be selected from the three source types.
There are two types of media a UIImagePickerController can select: still images and video. By default, the mediaTypes array only contains the constant string kUTTypeImage. Thus, if you do not change the mediaTypes property of an image picker controller, the camera will only allow the user to take still photos, and the photo library and saved photos album will only display images.
Adding the ability to record video or choose a video from the disk is as simple as adding the constant string kUTTypeMovie to the mediaTypes array. However, not all devices support video through the UIImagePickerController. Just like the class method isSourceTypeAvailable: allows you to determine if the device has a camera, the availableMediaTypesForSourceType: method is for checking if that camera can capture video. To set up an image picker controller that can record video or take still images, you would write the following code:

Now when this image picker controller interface is presented to the user, there will be a switch that allows them to choose between the still image camera or the video recorder. If the user chooses to record a video, you need to handle that in the UIImagePickerController delegate method imagePickerController:didFinishPickingMediaWithInfo:. When dealing with images, the info dictionary that is passed as an argument to this method contains the full image as a UIImage object.
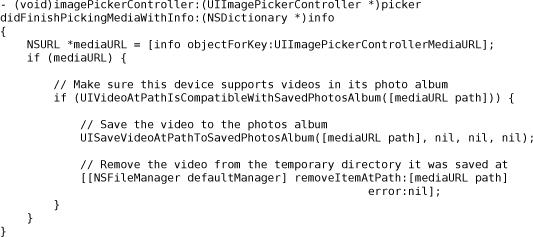
However, there is no “UIVideo” class (loading an entire video into memory at once would be tough to do with the iPhone’s memory constraints). Therefore, recorded video is written to disk in a temporary directory. When the user finalizes the video recording, imagePickerController:didFinishPickingMediaWithInfo: is sent to the image picker controller’s delegate, and the path of the video on the disk will be in the info dictionary. You can get the path in the delegate method like so:

While we will talk about the filesystem in the next chapter in depth, what you should know now is that the temporary directory is not a safe place to store the video. It needs to be moved to another location.
That is really all there is to it. There is just one situation that requires some additional information: suppose you want to restrict the user to choosing only videos. Restricting the user to images only is simple (leave mediaTypes as the default). Allowing the user to choose between images and videos is just as simple (pass the return value from availableMediaTypesForSourceType:). However, to allow video only, you have to jump through a few hoops. First, you must make sure the device supports video and then set the mediaTypes property to an array containing the identifier for video only.

If you build this code it will fail, and Xcode will complain about not knowing what kUTTypeMovie is. Oddly enough, both kUTTypeMovie and kUTTypeImage are declared and defined in another framework — MobileCoreServices. You will have to explicitly add this framework and import its header file into your project to use these two constants.
You might also wonder why kUTTypeMovie is cast to an NSString. This constant is declared as:
const CFStringRef kUTTypeVideo;
A CFStringRef is the standard string type in Core Foundation. Core Foundation is another API that is a bit lower-level than Cocoa Touch. Core Foundation technically doesn’t know anything about Objective-C — it is a C API. Some bits of the iPhone SDK, like this constant, use Core Foundation and C instead of Cocoa Touch and Objective-C.
The string pointed to by kUTTypeMovie is of type CFStringRef. Two methods in this code snippet (containsObject: and arrayWithObject:) want Objective-C objects as arguments — not a Core Foundation C object. To fix this problem, some Core Foundation objects are toll-free bridged with Cocoa Touch objects. A toll-free bridged object can be cast back and forth between its Core Foundation and Cocoa Touch counterpart. Underneath the hood, the objects are essentially the same and by casting them, the compiler won’t complain that an object is the wrong type. CFStringRef and NSString are toll-free bridged. Note that casting an object changes nothing about it — only the compiler cares about this detail.