
10. UITableView and UITableViewController
iPhone applications frequently show an interactive list of items that allows a user to select, delete, or reorder items on the list. Whether it’s a list of people in the user’s address book or a list of items on the App Store, a UITableView is doing the work. A UITableView displays a single column of data with a variable number of rows. Figure 10.1 shows some examples of UITableView.
Figure 10.1. Examples of UITableView

Beginning the Homepwner Application
Over the next six chapters, you’re going to develop an application called Homepwner that keeps an inventory of all your possessions. In the case of a fire or other catastrophe, you’ll have a record for your insurance company. So far, all of your iPhone projects have been small, but Homepwner will grow into a realistically complex application. This will give you a feeling for what it is like to work on a large iPhone application. (By the way, “Homepwner” is not a typo. If you need a definition for the word “pwn,” please visit http://www.urbandictionary.com.)
Select New Project from the File menu. In the New Project window, select Window-Based Application template (without Core Data). Click the Choose... button and name this project Homepwner. At that point, you will be taken to the familiar project window.
By the end of this chapter, Homepwner will present a list of Possession objects in a UITableView as shown in Figure 10.2.
Figure 10.2. Homepwner: phase 1

UITableViewController
UITableView is a view object, so, according to Model-View-Controller, it knows how to draw itself, but it doesn’t handle application logic or data. Thus, when using a UITableView, you must consider what helper objects are necessary. A UITableView usually occupies the entire screen, so it needs a UIViewController to handle placing it on the screen. A UITableView also typically needs a delegate so that other objects can be informed of events involving the UITableView. The delegate can be any object that (you guessed it!) conforms to the UITableViewDelegate protocol.
Additionally, a UITableView always needs a data source. A UITableView will ask its data source for the number of rows, the data to be shown in those rows, and many other tidbits that make a UITableView useful. Without a data source, a table view would be just an empty container. The dataSource for a UITableView can be any type of Objective-C object as long as it conforms to the UITableViewDataSource protocol.
Meet UITableViewController, a class that can fill all three roles: view controller, delegate, and data source. A UITableViewController is a subclass of UIViewController, and it handles most of the preparation and presentation of a UITableView. A UITableViewController’s view is always an instance of UITableView. The delegate and dataSource instance variables of the UITableView are automatically set to point at its UITableViewController (Figure 10.3).
Figure 10.3. UITableViewController-UITableView relationship

Subclassing UITableViewController
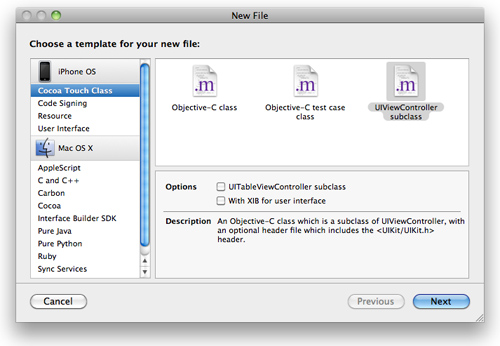
Now you’re going to write a subclass of UITableViewController for Homepwner. To create a UITableViewController subclass, select New File... from the File menu and select UIViewController subclass from iPhone OS’s Cocoa Touch Classes group. While there is a checkbox for a UITableViewController, do not check this. (The Xcode template for a UITableViewController subclass fills in too much code.) Also, uncheck the box for With XIB for user interface (Figure 10.4). Click the Next button, and you will be prompted for the name of this subclass. Call it ItemsViewController.m and click the Finish button.
Figure 10.4. Creating a UITableViewController subclass
Open ItemsViewController.h. Change the superclass of ItemsViewController from UIViewController to UITableViewController

Once you have a UITableViewController subclass, you need to add its UITableView to the window’s view hierarchy in order for the UITableView to appear on the screen.
Every UIViewController has a property named view. A UITableViewController’s view is always its UITableView. Every UITableViewController also has a property named tableView. This property will return the same object as view, but the compiler will see the object’s type as UITableView instead of the generic UIView. This is useful for sending messages to a UITableViewController’s table view that are specific to table views.
Once you have a UITableViewController instantiated and thus have a pointer to its UITableView, you can add the table view to the window. You have access to your application’s UIWindow in HomepwnerAppDelegate where the template connected it in Interface Builder. But first, HomepwnerAppDelegate needs to know about ItemsViewController. Open the file HomepwnerAppDelegate.m and import the header for ItemsViewController.
#import "HomepwnerAppDelegate.h"
#import "ItemsViewController.h"
When your application launches, you will create an instance of ItemsViewController and add its view to the window. Once this happens, user events will go to the UITableView and get handled by its controller, ItemsViewController. Add an instance variable to HomepwnerAppDelegate.h to hold on to the the instance of ItemsViewController.

In application:didFinishLaunchingWithOptions: in HomepwnerAppDelegate.m, create an instance of ItemsViewController ItemsViewController and set it as the rootViewController of the window.

(Note that the itemsViewController doesn’t leak or need to be released because it will be alive the entire time the application is running. If you did release it here, you would also release the data source and delegate for its UITableView. That would be bad.)
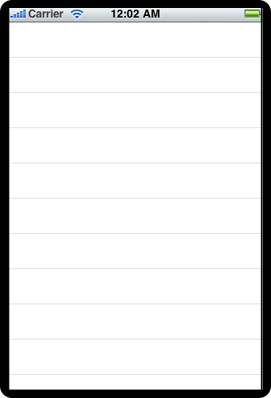
Build and run your application. You will see the default appearance of a plain UITableView with no content as shown in Figure 10.5.
Figure 10.5. Empty UITableView
Poor empty table view! You should give it some rows to display. In Chapter 2, you wrote a class that can describe a possession. Now you’re going to use that class again to have each row of your table view display an instance of Possession. Locate the interface and implementation files for Possession (Possession.h and Possession.m) and drag them onto Homepwner’s project window and into the Classes group on the Groups & Files table.
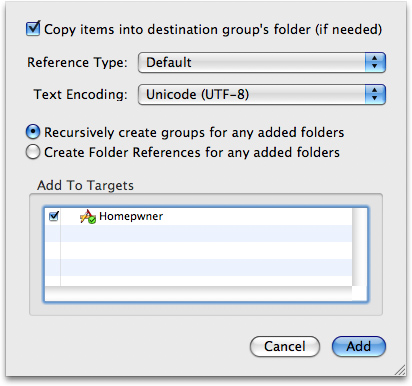
When dragging these files into your project window, make sure to select the checkbox labeled Copy items into destination group’s folder as shown in Figure 10.6.
Figure 10.6. Adding files to a project
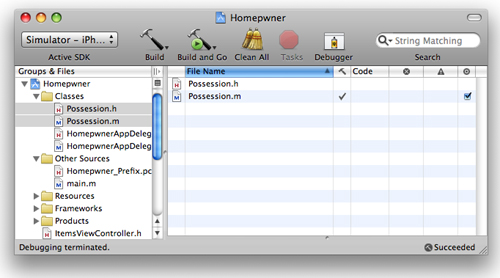
This will copy the files from their current directory to your project’s directory on the filesystem and add them to your project. The project window will now appear as shown in Figure 10.7.
Figure 10.7. Project window with possession files added
UITableView’s Data Source
The process of providing a UITableView with rows in Cocoa Touch is different from a procedural programming task. In a procedural design, you would tell the table view what it should display. In Cocoa Touch, the table view asks another object — its datasource — what it should display. Its data source is prepared to answer that question; it just needs to know for which row it should provide the content.
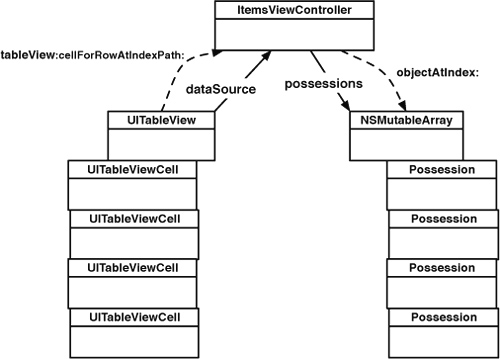
As a view object, a UITableView displays rows but doesn’t store the data used to populate those rows. That’s the job of the data source; therefore, ItemsViewController needs a way to store possession data. In Chapter 2, you used an NSMutableArray to store Possession instances and then print them out. You’ll do the same thing in this exercise, but instead of printing to the console, you’ll “print” to a UITableView (Figure 10.8).
Figure 10.8. Homepwner object diagram

First, add an instance variable to ItemsViewController.h.

The possessions array will be a list of Possession instances, and the UITableView will display these objects in its rows. Fortunately, you’ve already written a convenience method to create random Possession objects, and you already know how to populate an NSMutableArray. Implement the initialization methods in ItemsViewController.m.
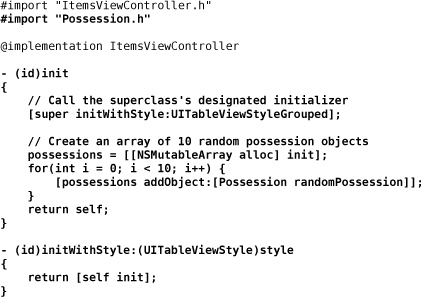
In the code above, initWithStyle: (the designated initializer of the superclass) is overridden to call the new designated initializer, init. One reason for this change is users of this class now only have to send it the message init; they don’t have to worry about passing it any arguments. It also forces ItemsViewController to appear in grouped table view style. (It looks prettier this way.)
UITableViewDataSource protocol
Now that ItemsViewController has some possessions, you need to teach it how to turn those possessions into rows that its UITableView can display. When a UITableView needs to know what to display, it has a set of messages it sends to its dataSource. These methods are declared in the UITableViewDataSource protocol.
Once again, you will peer into the iPhone SDK documentation to find these methods. In ItemsViewController.h, Command-Option-double click on the string UITableViewController to pull up the Developer Documentation window and the class reference for UITableViewController (Figure 10.9).
Figure 10.9. Documentation window
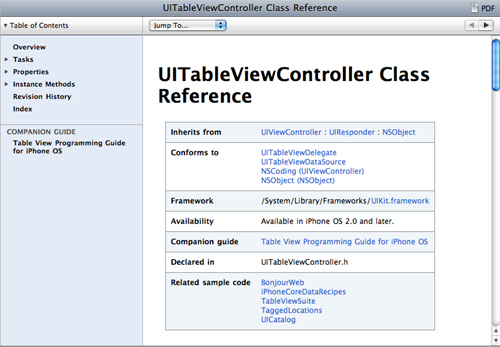
This reference will tell you everything you would ever want to know about UITableViewController. The basic information about the class is in a table at the top of the page. For instance, the Inherits from section tells you the class hierarchy of UITableViewController; ItemsViewController will also respond to any methods these classes implement. You can click on any of the items in this table to get to the reference for them.
Experienced iPhone developers spend a lot of time in the documentation. Many developers new to the Apple way of doing things don’t understand the importance of the documentation. Regardless of the amount of experience you have with the iPhone SDK, you will still spend a lot of time checking the documentation for the method or class you need. (The documentation browser is always open on any Big Nerd Ranch employee’s computer.) When starting or struggling with an implementation, browse the documentation to find the appropriate classes and methods to work with. Remember, if a common task is difficult in Cocoa Touch, you are probably doing it wrong. The documentation will usually show you the easy way.
Right now, you are looking for the methods from the UITableViewDataSource protocol that ItemsViewController could implement to turn Possession instances into rows for the table view. Click on UITableViewDataSource in the Conforms to section to get to the protocol reference. There you can scroll down and see all the messages that a UITableView can send to its dataSource.
There are many methods here, but the two that are marked required method must be implemented. For UITableViewController to properly conform to UITableViewDataSource, it must implement tableView:numberOfRowsInSection: and tableView:cellForRowAtIndexPath:. These methods tell the table view how many rows it should display and what content to display in each row.
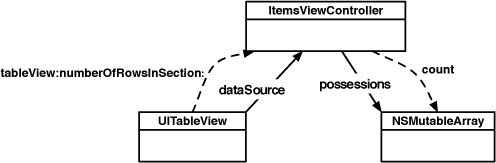
Whenever a UITableView needs to display itself, it sends a series of messages (the required methods plus any optional ones that have been implemented) to its dataSource. The required method tableView:numberOfRowsInSection: returns an integer value for the number of rows that the UITableView should display. Because there needs to be a row for each entry in the possessions array, the implementation of this method should return the number of entries in the array as shown in Figure 10.10.
Figure 10.10. Obtaining the number of rows
Now implement tableView:numberOfRowsInSection: in ItemsViewController.m.
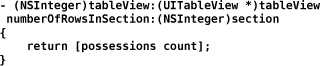
(You might be wondering what a “section” means in this method name. Table views can be broken up into sections, and each section can have its own set of rows. For example, in the address book, all the names beginning with “D” are grouped together in a section. By default, a table view has one section, and for this exercise, we will work with only one section. Once you understand how a table view works, it’s not hard to use multiple sections. In fact, using multiple sections is one of the challenges at the end of this chapter.)
UITableViewCells
A UITableViewCell is a subclass of UIView, and each row in a UITableView is represented by a UITableViewCell. (Recall that a table on the iPhone can only have one column, so a row will only have one cell.) UITableView is a container for UITableViewCells. A cell consists of a content view where the cell displays data and an accessory view (Figure 10.11). In the accessory view, the cell can display an action-oriented icon — like a checkbox, a disclosure button, or a fancy blue dot with a chevron inside. These icons are accessed through pre-defined constants for the appearance of the accessory view. (See the docs for UITableViewCell for details.)
Figure 10.11. UITableViewCell layout

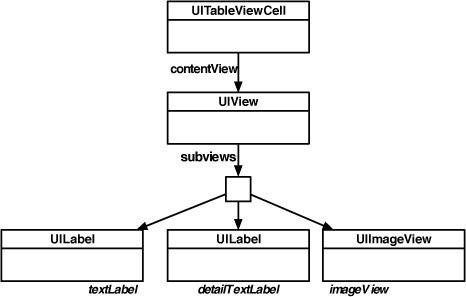
However, the real meat of a UITableViewCell is the content view. Each cell’s contentView has three subviews. Two of those subviews are UILabel instances, textLabel and detailTextLabel. The third is a UIImageView called imageView (Figure 10.12).
Figure 10.12. UITableViewCell hierarchy
Each cell also has a UITableViewCellStyle that determines which of these subviews are used and their position within the contentView. These styles are shown in Figure 10.13.
Figure 10.13. UITableViewCellStyles

In this chapter, each cell will display the description of a Possession. To make this happen, you will implement the tableView:cellForRowAtIndexPath: in the data source (ItemsViewController). This method will create a cell, set its textLabel to the description of the corresponding Possession, and return it to the UITableView that requested it (Figure 10.14).
Figure 10.14. UITableViewCell retrieval
How do you decide which cell a Possession corresponds to? One of the parameters sent to tableView:cellForRowAtIndexPath: is an NSIndexPath, which has two properties, section and row. When this message is sent to a data source, the table view is asking, “Can I have a cell to display in section X at row Y?” Because there is only one section in this exercise, the row is the only value of consequence. Therefore, implement this method in ItemsViewController.m so that the nth row displays the nth entry in the possessions array.

You can build and run the application now, and you’ll see a UITableView populated with a list of random Possessions. Yep, it was that easy! Thanks, Cocoa Touch! Also note that you didn’t have to change anything about Possession — you simply changed the controller object to interface with a different view. This is why Model-View-Controller is such a powerful concept. With a minimal amount of code, you were able to show the same data in an entirely different way.
Reusing UITableViewCells
The iPhone has a limited amount of memory. If we were displaying a list with thousands of entries in a UITableView, we would have thousands of instances of UITableViewCell. And the iPhone would sputter and die. In its dying breath, it would say “You only needed enough cells to fill the screen... arrrghhh!” It would be right.
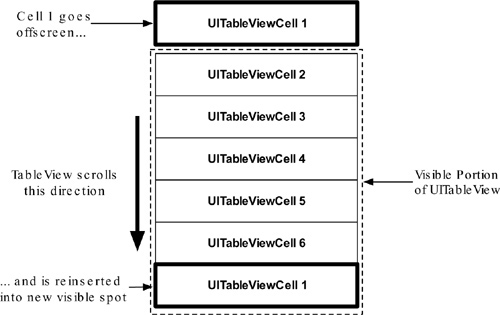
Reusing UITableViewCells prevents senseless iPhone death. A UITableView retains any UITableViewCell returned to it by the method tableView:cellForRowAtIndexPath: (which is why you can autorelease it in tableView:cellForRowAtIndexPath:). When the user scrolls the table, some cells are moved offscreen and put into a pool of cells available for reuse. Then, instead of creating a brand new cell for every request, the data source can check the pool. If there is an unused cell, the data source configures it with new data and returns it to the table view.
Figure 10.15. Reusable UITableViewCells
There is one problem: sometimes a UITableView has different types of cells. Occasionally, you have to subclass UITableViewCell to create a special look or behavior. However, subclasses floating around the pool of reusable cells create the possibility of getting back a cell of the wrong type. You must be sure of the type of the cell returned to you so that you can be sure of what properties and methods it has.
Note that you don’t care about getting any specific cell out of the pool because you’re going to change the cell data anyway. What you want is a cell of a specific type. The good news is every cell has a reuseIdentifier (an NSString) that the table view uses to distinguish it from other cells. If the reuse identifier is the name of the cell class, then it becomes easy to ask for a specific type of a cell. Update tableView:cellForRowAtIndexPath: to implement reusable cells:

Reusing cells means that you only have to create a handful of cells. When one needs to be reinserted in the table, you simply update its contents with new information. Your iPhone (and your application’s users) will thank you for it. Build and run the application. The behavior of the application should remain the same.
In the next chapter, you’re going to expand Homepwner and allow the user to reorder, delete, and insert new rows.
Challenge: Sections
Have the UITableView display two sections — one for possessions worth more than $50 and one for the rest. To make this process easier, use two separate possessions arrays. Before you start this challenge, copy the folder containing the project and all of its source files in Finder. Then tackle the challenge in the copied project; you’ll need the original to build on in the coming chapters.