
11. Editing UITableView
In the last chapter, you began an application that displayed a list of Possession instances in a UITableView. The next step in this application is allowing the user to interact with that table by moving, deleting, and inserting rows. Figure 11.1 shows what your Homepwner application will look like by the end of this chapter.
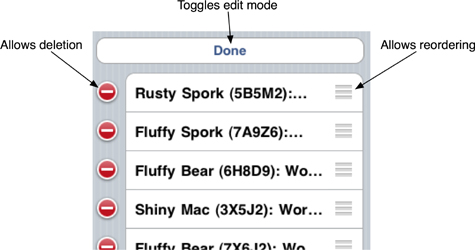
Figure 11.1. Homepwner in editing mode
Editing Mode
Every UITableView has an editing variable. When this boolean variable is set to YES, the UITableView enters editing mode, and the rows of the table can be manipulated by the user. The user can change the order of the rows, add rows, or remove rows. Editing mode, however, does not allow the user to edit the content of a row.
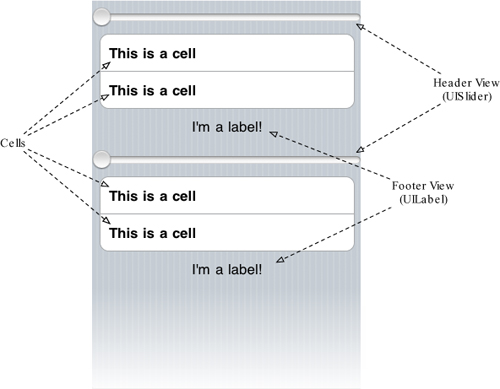
But before any of this can happen, the user needs a way to put the UITableView in editing mode. For now, you’re going to display a button that toggles editing mode in the header view of the table. A header view appears at the top of a section of a table and is useful for adding section-wide or table-wide titles or controls. It can be any UIView subclass. There’s also a footer view for the bottom of a section that works the same way. Figure 11.2 shows a table with two sections. Each section has a UISlider for a header view and a UILabel for a footer view.
Figure 11.2. UITableView header and footer views
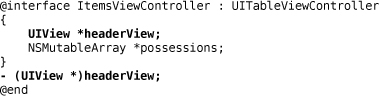
Open Homepwner.xcodeproj again. In ItemsViewController.h, declare an instance variable of type UIView for your header view. Also, declare a new method that will create this header view.
The standard UIView you’ve declared will be a container for a UIButton that toggles editing mode on and off. Now implement headerView in ItemsViewController.m.

In the method above, you added the target-action pair for the button in the code as opposed to previous chapters where you used Interface Builder. Remember when you Control-clicked a button and dragged back to the application delegate or view controller in the doc window? You were adding a target-action pair to that button so that whenever it received an event, it would send the action message to the target object. When you added this bit of code to headerView
![]()
you were doing the same thing as making the connection in Interface Builder. Now, whenever the editButton is tapped (UIControlEventTouchUpInside), it will send the message editingButtonPressed: to the instance of ItemsViewController as shown in Figure 11.3.
Figure 11.3. Target-Action pair

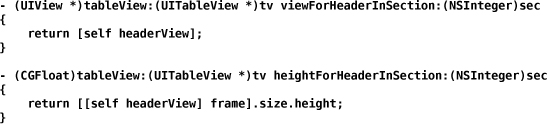
To get your header view to appear in a UITableView, you need to implement two UITableViewDelegate methods to check for a header view and obtain the view and its height. Implement these two methods in ItemsViewController.m.
Build and run the application. An Edit button will appear at the top of the table, but pressing it will generate an exception, of course, because you haven’t yet implemented its action — editingButtonPressed:.
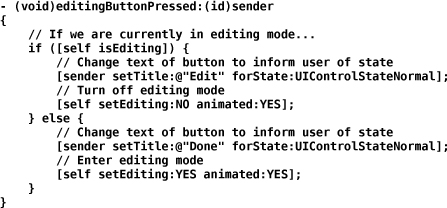
The implementation of editingButtonPressed: needs to toggle the editing mode of the table view. In this method, you could set the editing property of UITableView directly. However, a UITableViewController, like every UIViewController, also has an editing property. A UITableViewController instance automatically sets the editing property of its table view to the same value as its own editing property. To set the editing property for a view controller and toggle editing mode, you send it the message setEditing:animated:. Therefore, both the view controller and the table view will know whether editing is occurring, which will be important for implementing controller logic. Implement editingButtonPressed: in ItemsViewController.m.
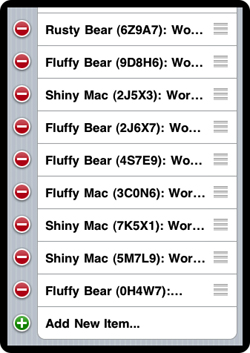
Build and run your application and touch the Edit button. The UITableView will enter editing mode (Figure 11.4).
Figure 11.4. UITableView in editing mode

Deleting Rows
The red circles with the dash (shown in Figure 11.4) are deletion controls, and touching one will delete that row. However, at this point, touching a deletion control deletes nothing. (Test it for yourself.) Before a row can be deleted, the table view needs to ask the data source how to delete that row. This includes choosing what type of animation to display and how the data being displayed is affected by the deletion of that row.
A UITableView asks its data source for the cells it should display when it is first added to the screen and at least three other times:
• when the user scrolls the table view
• when the table view is removed from the view hierarchy and then added back to the view hierarchy
• when your code sends the message reloadData to the UITableView
Now consider what would happen if deleting a row only removed the row from the table view and not the data source. The possessions array would still have the Possession instance displayed by that row, and the next time the UITableView reloaded its rows, the data source would create a cell for the supposedly deleted Possession. The unwanted row would rise from the dead and return to the table.
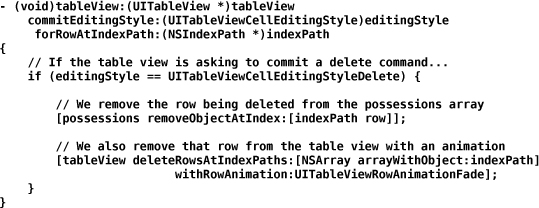
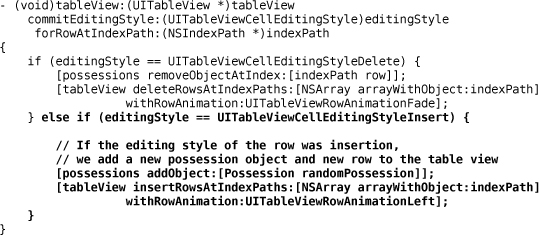
Therefore, when a row is deleted, you must remove the object that the row displayed from the data source. The method to implement is tableView:commitEditingStyle:forRowAtIndexPath:. When that message is sent to your data source, two extra arguments are passed along with it. The first is the UITableViewCellEditingStyle, which, in this case, will be UITableViewCellEditingStyleDelete. The other argument is the NSIndexPath of the row within the table. Implement this method in ItemsViewController.m.
Build and run your application and then delete a row. It will disappear. Now scroll the list, return to where the deleted row was, and check to see if your data source was updated. No zombie cells — hooray!
Moving Rows
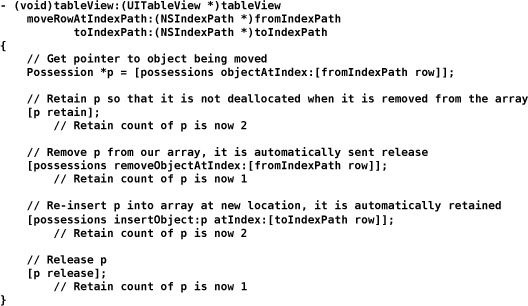
To change the order of rows in a UITableView, you will use another data source method — tableView:moveRowAtIndexPath:toIndexPath:. The implementation of this method needs to remove the object at fromIndexPath from the possessions array and re-insert it at toIndexPath. Implement this method in ItemsViewController.m.
When you were deleting a row, you had to explicitly send the message deleteRowsAtIndexPaths:withRowAnimation: to the UITableView. When moving rows, however, you don’t have to send a message to the table view that it’s okay to move a row; the table view will move it without further instruction. You just have to catch the message to update your data source. Build and run your application. Then touch and hold the reordering control (the three horizontal lines) on the side of a row and move it to a new position (Figure 11.5).

Note that before you implemented this method, the reordering controls did not appear on the table view. Simply implementing this method made them appear. This is because Objective-C is a very smart language. The UITableView can ask its data source whether it implements tableView:moveRowAtIndexPath:toIndexPath: at runtime. If it does, the table view says, “Good, you can handle moving rows. I’ll add the re-ordering controls.” If not, it says, “You bum. If you are too lazy to implement that method, I’m not putting the controls there.”
Inserting Rows
Deleting and moving rows is easy; inserting them is trickier. First, let’s discuss the one way of inserting a row that isn’t tricky at all: sending the message reloadData. You know that a UITableView displays rows based on what its dataSource tells it to display. If you wanted to add a row, you could simply insert an entry into possessions and send the message reloadData to the UITableView. The method reloadData restarts the process of asking the data source for the number of rows and getting the cells, and the new row would be added as part of that process. (You could do the same thing for deleting and moving rows, too, but the implementation would be more difficult — how would the user select which row to delete or move?)
The approach you’re going to implement is more difficult but totally worth it in terms of user experience. What you want is a row at the bottom of the table that has an insertion control (a green icon with a plus symbol) next to it (Figure 11.6). This row will only be visible during editing mode, and touching it will place a new random Possession at the bottom of the list along with an animation.
To begin, the table view needs to display an additional row when it is in editing mode. Override setEditing:animated: for ItemsViewController so that it either adds or removes a row at the bottom of the table depending on whether you are entering or leaving editing mode. (Recall that this is the method that is invoked when the editing button is tapped.)
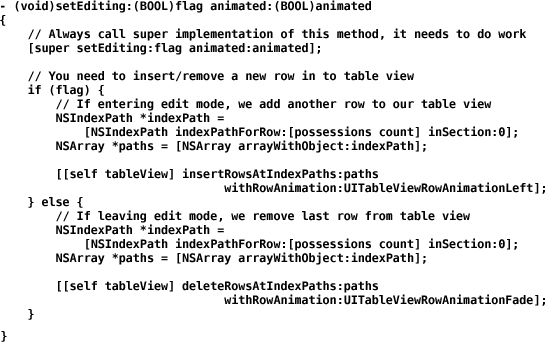
Notice that you send the same message to the superclass. This is to take advantage of UITableViewController’s special property that matches the UITableView’s editing property with its own.
When the user enters editing mode, another row is added to the bottom. However, now the view is out of sync with the data source: there are eleven rows visible, but the data source only has ten entries in possessions. Change the following method in ItemsViewController.m to resolve this conflict:
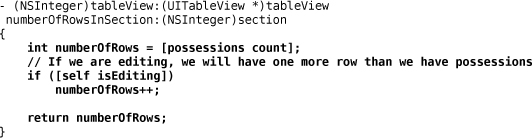
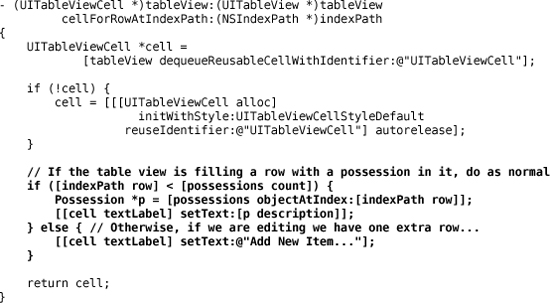
The UITableView will now have the correct number of rows while it is being edited. Now update tableView:cellForRowAtIndexPath: in ItemsViewController.m so that the last row in editing mode displays something useful like “Add New Item...”:
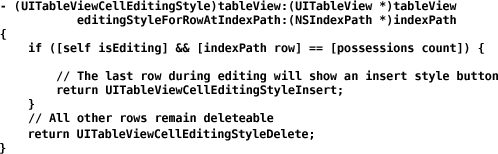
Build and run your application. Touch the Edit button and scroll down to the bottom of the table. There’s your new row... but it still has a deletion control next to it. To give this row an insertion control instead, you’ll need to change the row’s editing style. When a UITableView begins editing, it asks its delegate for the editing style at each row. Implement the following method in ItemsViewController.m so that the last row has a UITableViewCellEditingStyleInsert style.
Building and running now shows an insertion control next to the last row.
Now you have to implement code to handle what happens when this control is touched. You have already written the data source method for this; you just need to write some additional code to handle inserts. Add the following code to tableView:commitEditingStyle:forRowAtIndexPath: in ItemsViewController.m.
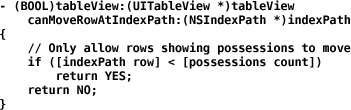
Adding the Add New Item... row introduces two potential bugs in Homepwner. First, the user could use the reordering control to move the Add New Item... row. This would blow up the entire application. (Try it — it’s fun!) The table view assumes that all rows can move in editing mode because its data source implemented the method to move rows. However, you can trim the set of moveable rows by implementing another data source method, tableView:canMoveRowAtIndexPath:, in ItemsViewController.m. This method will return NO for the last row, and that row will not show a reordering control.
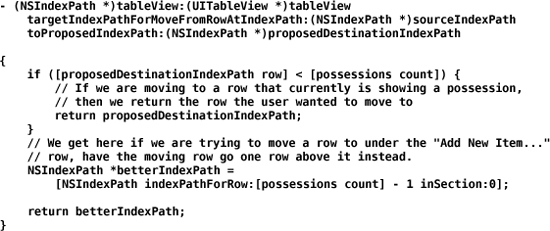
The second problem will occur if the user moves another row beneath the Add New Item... row. This will cause all sorts of havoc in the data source methods. Fixing this problem requires another delegate method, and yes, you may scream “I knew it!” This method gives you the NSIndexPath of the row that wants to move as well as the row it wants to occupy. If you don’t want to allow the proposed move to take place, you return the NSIndexPath of the row that it should move to instead. Add the following implementation to ItemsViewController.m.
Build and run the application. Try moving the last row. Now try moving another row beneath it. Ha! You can’t! Homepwner is so safe that even a child could use it. Now if we could just add real possessions instead of generating random ones....