
16. Subclassing UITableViewCell
UITableViews display a list of UITableViewCells. For many applications, the basic cell, with its textLabel, detailTextLabel, and imageView, is sufficient. However, when you need a cell with more detail or a different layout, you subclass UITableViewCell.
In this chapter, you are going to create a subclass of UITableViewCell to display Possession instances more eloquently. Each one of these cells will show a Possession’s name, its value in dollars, and a thumbnail of its image as shown in Figure 16.1.
Figure 16.1. Homepwner with subclassed UITableViewCells

Open Homepwner.xcodeproj. Select the New File... menu item from the File menu and create a new subclass of UITableViewCell (Figure 16.2). Name this subclass HomepwnerItemCell.m.
Figure 16.2. Creating a UITableViewCell subclass

Creating HomepwnerItemCell
A UITableViewCell is a UIView subclass. When subclassing UIView (or any of its subclasses), you typically override its drawRect: method to customize the view’s appearance. However, subclassing UITableViewCell requires a different approach. Each cell has a subview named contentView, which is a container for the various view objects that will make up the layout of a cell subclass (Figure 16.3). For instance, you could create instances of the classes UITextField, UILabel, and UIButton and add them to the contentView. (If you wanted something even more daring, you could create a UIView subclass, override its drawRect:, and add an instance of it to the contentView.)
Figure 16.3. HomepwnerItemCell hierarchy
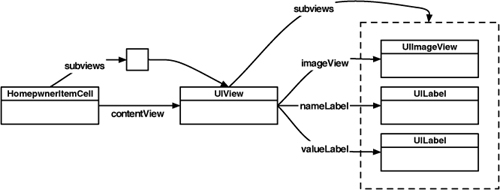
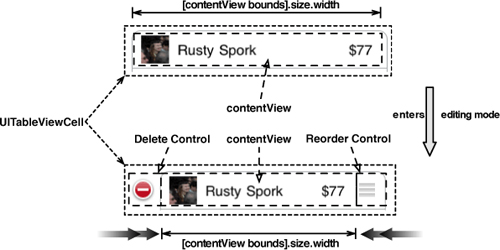
The contentView is important because it knows about the editing controls on either side of the row and automatically adjusts its subviews to allow for the presence of these controls when a cell enters editing mode (Figure 16.4). If you were to add subviews directly to the UITableViewCell, these editing controls would appear on top and obscure the cell’s content.
Figure 16.4. Table view cell layout in standard and editing mode
Create subviews
In your cell subclass, you need an instance variable for each subview so that you can set its content as it is displayed in a table view. In HomepwnerItemCell.h, create instance variables for the necessary subviews and declare a method to set their values with a Possession instance.

When an instance of HomepwnerItemCell is created, its valueLabel, nameLabel, and imageView are instantiated. Then, these subviews are added to the cell’s contentView. Override the designated initializer in HomepwnerItemCell.m to create each of the subviews. HomepwnerItemCell.m should now look like this:

Layout subviews
Note that you don’t set the size or position of the cell’s subviews here in the initialization method; you need to know the dimensions of the cell itself before you can set the subviews. Instead, the subviews should be sized and positioned in the method layoutSubviews. This message is sent to the cell right before it is displayed and, thus, after its size has been determined. (In fact, layoutSubviews is an instance method of UIView and is sent to any instance of UIView that is about to be displayed.)
Implement layoutSubviews in HomepwnerItemCell.m. (If you have a hard time picturing the sizes of frame rectangles in your head, draw them out on a piece of paper first.)

This method is fairly ugly, but let’s look at it more closely. First, you always invoke the superclass’s implementation of layoutSubviews. Invoking this method allows the UITableViewCell to layout its subview, its contentView. Then, you get the bounds of the contentView to find out how much area you have to work with when sizing and positioning all of the subviews. (If you don’t invoke the superclass’ implementation of layoutSubviews, the bounds of the contentView may not be correct.) Finally, you set the frame of each subview relative to the contentView’s bounds. This process ensures that instances of HomepwnerItemCell will have an appropriate layout regardless of the size of the UITableViewCell.
Using the custom cell
Now let’s look at the two options for setting the content of the subviews (imageView, nameLabel, and valueLabel). The first option is to create a property for each subview to use when you set the cell content in tableView:cellForRowAtIndexPath: (similar to the way you have been accessing the textLabel property of each cell). The second option is to pass the cell an instance of Possession and have it fill its own subviews. In this chapter, you will use the second option. Either way is perfectly reasonable; however, in the second option, the cell is made specifically to represent a Possession instance, so the code is written in a way that’s easier to follow. (The drawback is that HomepwnerItemCell will only be able to represent Possession instances.) Implement the method setPossession: in HomepwnerItemCell.m to extract values from a Possession instance and display them in the cell.

You can build the application to make sure there are no compile errors. Running it won’t show anything new because you aren’t yet returning HomepwnerItemCells from the UITableView data source method implemented by ItemsViewController. In ItemsViewController.m, import the header file for HomepwnerItemCell.
#import "HomepwnerItemCell.h"
@implementation ItemsViewController
Replace the method tableView:cellForRowAtIndexPath: to return instances of your new cell subclass. However, for the Add New Item..., you still need to return a standard cell. Check the incoming NSIndexPath before you decide what type of cell to return.
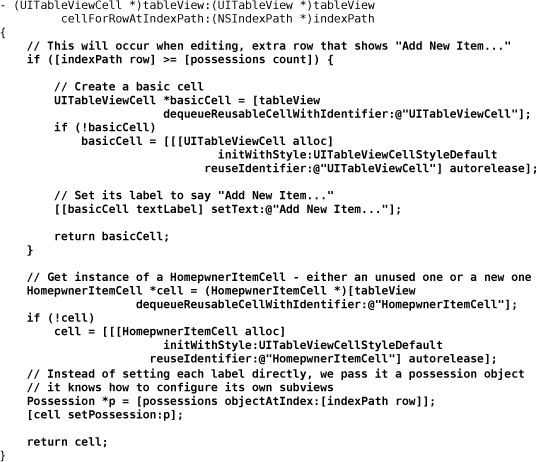
When creating a cell for a row that is intended to display Add New Item..., this method creates and returns a standard UITableViewCell. When creating a cell to display a Possession instance, this method creates and returns your new HomepwnerItemCell. Notice that you use different reuse identifiers for each type of cell; if you didn’t, you might get a UITableViewCell back for a cell intended to display a Possession. Then, the UITableViewCell’s lack of response to the message setPossession: would throw an exception and kill the application. (That’s bad.)
Build and run the application. Your new cells will display the name and value of a Possession. However, remember that you also want to display an image of the Possession within the cell.
Image Manipulation
To display an image within a cell, you could just resize the 1024×1024 image of the possession already in the image cache. However, it would be better to create and use a thumbnail of the image instead. Using the larger image would incur a performance penalty because a larger number of bytes would need to be read, filtered, and resized to fit within the cell whereas a thumbnail requires far fewer bytes. To create a thumbnail of an image, you are going to draw a scaled-down version of the full image to an offscreen context and keep a pointer to that new image inside a Possession instance.
However, this application will only create a thumbnail when an image is taken, and, if the user exits the application, the thumbnails will be lost. Therefore, you need a place to store this thumbnail image so that it can be reloaded when the application launches again – like the archive along with the rest of the Possession instance variables. (It’s okay to store thumbnails in the archive because they are so much smaller than the original images. Those images are still in the image cache where they can easily be flushed if there is a low memory warning.)
Big problem, though: UIImage doesn’t conform to the NSCoding protocol, so it can’t be encoded in an NSCoder. The thumbnail can, however, be encoded as data (JPEG format) and wrapped in an NSData object (which does conform to NSCoding). Open Possession.h. Declare two instance variables: a UIImage and an NSData. You will also want a method to turn a full-sized image into a thumbnail.

In Possession.m, create a getter method for thumbnail that will create it from the data if necessary:

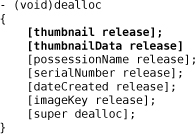
Both objects (the data and the image) will be retained. Therefore, you need to send a matching release message to them when a Possession instance is deallocated.
The setThumbnailDataFromImage: method will take a full size image, create a smaller representation of it in an offscreen context object, and set the thumbnail pointer to the image produced by the offscreen context. The iPhone SDK provides a convenient function suite to create offscreen contexts and produce images from them. To create an offscreen image context, you use the function UIGraphicsBeginImageContext. This function accepts a CGSize structure that specifies the width and height of the image context.
When this function is called, a new CGContextRef is created and becomes the current context. To draw to a CGContextRef, you use Core Graphics, just as though you were implementing a drawRect: method for a UIView subclass. To get a UIImage from this context after it has been drawn, you call the function UIGraphicsGetImageFromCurrentImageContext. Finally, once you have produced an image from an image context, you must clean up that context with the function UIGraphicsEndImageContext.
Implement the following method in Possession.m to create a thumbnail using an offscreen context.

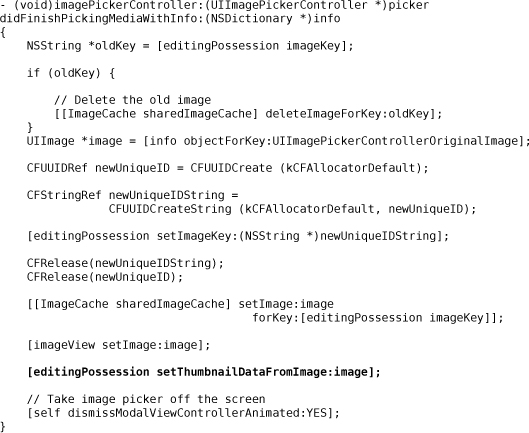
Because you create a thumbnail when the camera takes the original image, you need to add the following line of code to imagePickerController:didFinishPickingMediaWithInfo: in ItemDetailViewController.m.
Because you use this thumbnail to set the imageView of the cells when they are configured for the table view, add the following line of code to setPossession: in HomepwnerItemCell.m.

Build and run the application now. Take a picture for a Possession instance. That row will display a thumbnail image along with the name and value of the Possession.
Don’t forget to add the thumbnail data to your archive! Open Possession.m:

Build and run the application. Take some photos of possessions and then exit and relaunch the application. The thumbnails will now appear for saved possession objects.
Challenge: Accessory Views
HomepwnerItemCell only displays three properties of a Possession instance in the content. Allow HomepwnerItemCell to have an accessory view. When that accessory view is tapped, it will toggle between two different display modes: one that shows the serial number and date created of a Possession and another that shows the name and value in dollars.
Challenge: Make it Pretty
The thumbnail could be much prettier. Make it preserve the aspect ratio of the original image. Round the corners. You could even add a nice glossy gradient to make it look 3-dimensional.