
10. Inserting Tables
You will often use tables on Web pages to present tabular information—that is, data best presented in the form of rows and columns. You can also use tables for layout—that is, to align text and images on the page—but as you’ll see later in the chapter, in most cases you should be using CSS for layout instead.
In this chapter, you’ll learn how to create and format tables, ensure that tables and their content look the way you intend, work with Dreamweaver’s many table tools, and save time when you’re using tables.
Moving Away from Tables for Layout
In previous years, one of the most widespread uses for a table was as a layout device (sometimes called layout tables). You can create tables on your page, and then use the table cells to contain the text and images on the page. Because you have good control over the size of the cells and the position of their boundaries, you can line up and lay out elements on the page with precision, though it often requires some extremely complex tables. By hiding the borders of the table cells, the site visitor doesn’t notice the tables. This, up until the last several years, is how most nicely designed Web pages were created.
However, there are many problems with using tables for layout. First of all, the table has nothing to do with the content of the page (the information your visitor sees); all it does is affect the presentation of the content. One of the biggest benefits of CSS is that it separates content from presentation. As a result, you can completely redesign CSS-based sites largely by changing one file, the style sheet. If your presentation is mixed with your content, as it is with a table-based layout, it makes site redesigns difficult and expensive. Similarly, tables make it difficult to maintain visual consistency throughout a site (because the layout tables on different pages may not be the same).
So that’s what is wrong with tables from the standpoint of the Web designer, but there are problems for the site visitor, too. Tables make the size of an HTML page unnecessarily large (costing you extra bandwidth charges), and site visitors must download the layout tables on every page they visit in the site (ditto). Pages load more slowly than with a CSS-based layout, and slow page loads drive visitors away. Table-based pages are also much more difficult to read by users with disabilities and by visitors using cell phones and PDAs.
Tables were necessary for good-looking Web sites back in 1997, because the Web browsers of the day had many limitations, not the least of which was that none of them supported the then-emerging CSS standards for layout. But all modern browsers have reasonably good support for using CSS for layout (though ironically, a still-popular browser as of this writing, Microsoft Internet Explorer 6 for Windows, lags well behind other browsers such as Internet Explorer 7 and 8, Mozilla Firefox, Google Chrome, Apple Safari, and Opera). The vast majority of users of the Web now use Web browsers that can handle CSS-based layouts just fine.
As a result, you can (and should!) use Dreamweaver to build great-looking, CSS-based sites that are faster to load, accessible for everyone, and easier for you to redesign and maintain. To learn more about laying out your pages with CSS, see Chapter 8.
Because table-based layout has been so pervasive for most of a decade, Dreamweaver can still be used to create page layouts with tables. But Dreamweaver CS4 removed a set of tools, called Table Layout Mode, that made it easier to use tables for layout. Adobe is clearly pointing its users towards CSS for layout.
By the way, even with sites that use tables for layout, you can still use CSS to style the text inside the tables. Some CSS markup is devoted to styling text, and some is devoted to positioning elements on the page. You can use the styling kind of CSS to make your text look good, even inside a table. You just shouldn’t mix the positioning elements of CSS with tables; choose one method or the other for positioning elements on your pages.
By using CSS for layout, tables can go back to what they were originally intended to do, namely, to display tabular information that lines up in neat rows and columns. Think of a baseball box score or a timetable showing a bus schedule—both perfect candidates for tables.
Creating a Table
Tables typically consist of one or more rows and one or more columns. Each rectangular area at the intersection of a row and column is called a cell. Cells contain the page’s text or images, and items within a cell can’t extend past the cell’s boundaries.
You can insert a table anywhere on a page, even within another table (this is called nesting a table). By default, Dreamweaver creates tables with three rows and three columns, but you can easily change that format during the process of inserting the table. After you do make changes, Dreamweaver remembers them and uses them as the defaults for the next table you create.
To add a table to your page
1. Place the insertion point where you want the table to appear.
2. In the Layout category of the Insert panel, click the Table button ![]() .
.
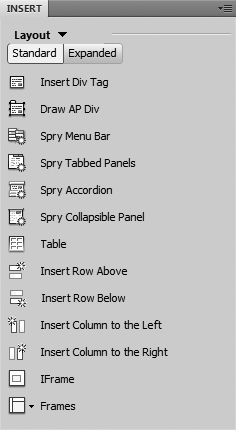
![]() You’ll use the Layout category of the Insert panel to add tables to your pages.
You’ll use the Layout category of the Insert panel to add tables to your pages.
or
Choose Insert > Table, or press Ctrl-Alt-T (Cmd-Opt-T).
The Table dialog appears ![]() .
.

![]() The Table dialog lets you get started building a table.
The Table dialog lets you get started building a table.
3. Enter the number of rows you want in the table, and press Tab.
4. Enter the number of columns you want in the table, and press Tab.
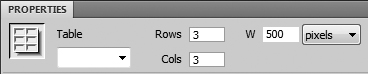
5. In the Table width text box, enter a number that will either be in pixels or a percentage of the page width, and then choose the units from the pop-up menu to the right of the text box ![]() .
.

![]() You can set the width of your table either in pixels or as a percentage of the browser page width.
You can set the width of your table either in pixels or as a percentage of the browser page width.
6. Set one or more (or none) of the following (see the “Anatomy of a Table” sidebar for explanations of the settings):
• Enter a figure in the Border thickness text box to set the size of the border, in pixels, that will be displayed between cells.
• Enter a figure in the Cell padding text box to set the amount of space, in pixels, between the content in the cells and the cell border.
• Enter a figure in the Cell spacing text box to set the number of pixels of space between cells.
7. In the Header section, choose the kind of header you want: None, Left, Top, or Both. The icons for the headers tell you what each choice looks like.
8. (Optional, but recommended.) In the Accessibility section, enter a caption for the table. Caption text appears in all browsers. If you enter text in the Summary text box, that text appears only in screen readers for the visually disabled.
9. Click OK.
The table appears in your page ![]() . When a table is selected, as in the figure, or when the insertion point is in a table cell, Dreamweaver shows green dimension lines above or below the table (if the table is at the top of the page, the dimension lines are below; otherwise, they appear above). The top dimension line shows the width of the table in pixels. Each column also has a dimension line, which shows the width of the column in pixels if you have set a fixed width for the column. Columns with widths relative to the table width show dimension lines (so you can easily see each column) without pixel values. These dimension lines appear only in Dreamweaver’s Design view, not in a Web browser.
. When a table is selected, as in the figure, or when the insertion point is in a table cell, Dreamweaver shows green dimension lines above or below the table (if the table is at the top of the page, the dimension lines are below; otherwise, they appear above). The top dimension line shows the width of the table in pixels. Each column also has a dimension line, which shows the width of the column in pixels if you have set a fixed width for the column. Columns with widths relative to the table width show dimension lines (so you can easily see each column) without pixel values. These dimension lines appear only in Dreamweaver’s Design view, not in a Web browser.

![]() The green dimension lines tell you the width of the table in pixels. The dimension lines above each column do not show pixel widths in this figure because the columns are set to be a percentage of the table width.
The green dimension lines tell you the width of the table in pixels. The dimension lines above each column do not show pixel widths in this figure because the columns are set to be a percentage of the table width.
Tip
To insert a table within a table, place the insertion point inside a cell of an existing table, and then choose either of the methods in step 2. The new table appears inside the first table ![]() .
.

![]() You can nest a second table inside any cell of an existing table.
You can nest a second table inside any cell of an existing table.
Tip
You don’t have to get the number of rows and columns right the first time; you can always add or subtract them later. See the sections “Adding Rows and Columns” and “Deleting Table Elements” later in this chapter.
Tip
If you don’t want to see the dimension lines above tables, you can turn them off by choosing View > Visual Aids > Table Widths, which removes the check mark from the menu item.
Tip
Captions are actually part of the table. When you move the table, the caption moves with it. Table captions appear above the table by default, but you can change that in the code. Switch to Code view, and then find the table’s <caption> tag. Click inside the tag to put the insertion point after the word, and then press the spacebar. A pop-up menu appears with the <caption> tag’s possible attributes. Choose align (which inserts align="" into the code and gives you another pop-up menu with the alignment values); then choose one of the five possible alignments (bottom, center, left, right, top) from the pop-up menu.
Tip
To edit a caption, select it and type over the existing text. To change the horizontal alignment of the caption in relation to the table, place the insertion point in the caption, and then right-click and pick one of the choices (left, center, right, or justify) from the Align submenu in the context menu.
Anatomy of a Table
Besides rows and columns, tables have several other attributes that affect how they look. You’ll find controls for these items in the Property Inspector when you select a table.
Border thickness is the width of the border around the table, in pixels ![]() . Dreamweaver sets it to one pixel by default, which results in a thin border. If the border thickness is set to a nonzero amount, you will also see a border between table cells. You’ll often see the border thickness set to zero on pages that are using tables for page layout and the designer doesn’t want you to see borders. Borders with zero thickness appear in Design view with dotted borders.
. Dreamweaver sets it to one pixel by default, which results in a thin border. If the border thickness is set to a nonzero amount, you will also see a border between table cells. You’ll often see the border thickness set to zero on pages that are using tables for page layout and the designer doesn’t want you to see borders. Borders with zero thickness appear in Design view with dotted borders.

![]() The same table with a border thickness of zero pixels (top), one pixel (middle), and 10 pixels (bottom). Cell padding and cell spacing are set to zero.
The same table with a border thickness of zero pixels (top), one pixel (middle), and 10 pixels (bottom). Cell padding and cell spacing are set to zero.
Cell padding is the amount of space, in pixels, between a cell’s borders and its content ![]() . Use this setting to give cell content more breathing room within cells. If you don’t specify a number here, most browsers use a default value of one pixel.
. Use this setting to give cell content more breathing room within cells. If you don’t specify a number here, most browsers use a default value of one pixel.
![]() Cell padding has been set to 5 pixels, which gives more whitespace around the table contents.
Cell padding has been set to 5 pixels, which gives more whitespace around the table contents.
Cell spacing is the amount of space between each table cell, also measured in pixels ![]() . If you don’t specify a number here, most browsers use a default value of two pixels. Wide cell spacing gives the table a look that is very 1996, so use this setting with care.
. If you don’t specify a number here, most browsers use a default value of two pixels. Wide cell spacing gives the table a look that is very 1996, so use this setting with care.

![]() Cell spacing of 5 pixels creates a wide border between cells—a dated look.
Cell spacing of 5 pixels creates a wide border between cells—a dated look.
The following table attributes can’t be set in the Property Inspector, but can be changed in Code view:
Table header tags part of the table as a header. The header is formatted as bold and centered, but more important, it has the <th> HTML tag, which allows screen readers used by visually disabled users to correctly read the table. It’s better to use a table header tag in Dreamweaver than to manually make cells bold and centered.
Border color is the color of the border around the table and between the table’s cells. This gives a dated look, so use with care.
Selecting Table Elements
To work effectively with a table, you’ll need to know how to select its elements. You can select an entire table; one or more rows and columns; an individual cell or multiple cells; and nonadjacent cells, rows, or columns.
To select the entire table
• Click the table’s upper-left corner.
or
Click the bottom or the right edge of the table.
or
Click in the table, and then choose Modify > Table > Select Table.
A border with resize handles appears around the table ![]() . Dimension lines also appear.
. Dimension lines also appear.

![]() You can tell this table is selected because it has a thick border around its edges with resize handles.
You can tell this table is selected because it has a thick border around its edges with resize handles.
Tip
Clicking any interior cell border also selects the entire table.
To select an entire row
1. Place the pointer at the left edge of a row.
The pointer becomes an arrow.
2. Click to select the entire row ![]() .
.

![]() When you move the cursor to the left edge of a table and the pointer changes to an arrow, you can click to select the whole row.
When you move the cursor to the left edge of a table and the pointer changes to an arrow, you can click to select the whole row.
You can click and drag to select multiple rows.
The cell borders for the selected row highlight.
To select an entire column
1. Place the pointer at the top edge of a column.
The pointer becomes an arrow.
2. Click to select the entire column ![]() .
.

![]() The pointer also changes to an arrow above columns. Click to select the column.
The pointer also changes to an arrow above columns. Click to select the column.
You can click and drag to select multiple columns.
or
Click the triangle in the dimension line above any column to display a pop-up menu, then choose Select Column ![]() .
.
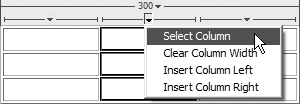
![]() If you prefer, you can use the pop-up column menu to select the column.
If you prefer, you can use the pop-up column menu to select the column.
The cell borders for the selected column highlight.
To select a single cell
• Click and drag in the cell.
or
Click in the cell, and then choose Edit > Select All, or press Ctrl-A (Cmd-A).
or
If the cell is empty, triple-click inside the cell.
The cell highlights to show it has been selected.
To select multiple adjacent cells
• Click in the first cell you want to select, and drag to the last cell.
or
Click in the first cell you want to select, hold down Shift, and then click in the last cell. All the cells in between will also be selected. You can also Shift-click in this manner to select rows or columns.
To select nonadjacent cells
• Ctrl-click (Cmd-click) in the first cell, hold down Ctrl (Cmd), and then click the other cells you want to select ![]() . You can also Ctrl-click (Cmd-click) to select nonadjacent rows or columns.
. You can also Ctrl-click (Cmd-click) to select nonadjacent rows or columns.

![]() By Ctrl-clicking (Cmd-clicking), you can select nonadjacent cells.
By Ctrl-clicking (Cmd-clicking), you can select nonadjacent cells.
Making Table Selections Easier
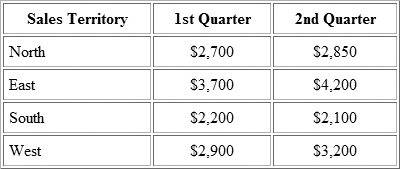
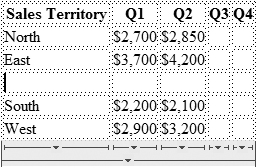
When you’re selecting tables and table elements, it can sometimes be difficult to select the particular part you’re after, especially if some of the table cells are narrow horizontally or vertically ![]() . To make things easier on you, Dreamweaver offers Expanded Tables mode, which temporarily adds a border (if there is none) and increases the cell padding and cell spacing. These changes aren’t permanent and don’t show up in a Web browser.
. To make things easier on you, Dreamweaver offers Expanded Tables mode, which temporarily adds a border (if there is none) and increases the cell padding and cell spacing. These changes aren’t permanent and don’t show up in a Web browser.

![]() If you wanted to select the cells under Q3 or Q4, it could be difficult to do so because they are so small.
If you wanted to select the cells under Q3 or Q4, it could be difficult to do so because they are so small.
To enter Expanded Tables mode
1. Choose View > Table Mode > Expanded Tables Mode.
or
In the Layout category of the Insert panel, click the Expanded button ![]() .
.

![]() Click the Expanded button in the Layout category of the Insert panel to enter Expanded Tables mode.
Click the Expanded button in the Layout category of the Insert panel to enter Expanded Tables mode.
or
Press Alt-F6 (Opt-F6).
The Design view switches to Expanded Tables mode ![]() , changing the appearance of all the tables in the document.
, changing the appearance of all the tables in the document.

![]() Expanded Tables mode makes all the tables in the document bigger, so you can select table elements easier. Note the indicator bar at the top of the document window that tells you that you’re in a special mode.
Expanded Tables mode makes all the tables in the document bigger, so you can select table elements easier. Note the indicator bar at the top of the document window that tells you that you’re in a special mode.
An indicator bar appears at the top of the document window to let you know you’re in the Expanded Tables mode.
2. Select and edit table elements as you like.
Tip
Remember that Expanded Tables mode is not a WYSIWYG (What You See Is What You Get) view, as is the standard Design view. Always switch out of Expanded Tables mode before you do any serious page layout or formatting.
To exit Expanded Tables mode
• Choose View > Table Mode > Expanded Tables Mode.
or
In the Layout category of the Insert panel, click the Standard button.
or
Click the [exit] link in the Expanded Tables mode indicator bar at the top of the document window.
or
Press Alt-F6 (Opt-F6).
Adding Rows and Columns
You may find you need to add additional content to your table. Dreamweaver allows you to add rows or columns to your table, either singly or in multiples.
To insert a single row in a table
1. Place the insertion point in a table cell.
2. In the Layout category of the Insert panel, click either the Insert Row Above or Insert Row Below button ![]() . A new row appears above or below the row where the insertion point is.
. A new row appears above or below the row where the insertion point is.

![]() You’ll use the Layout category of the Insert panel to make changes to tables.
You’ll use the Layout category of the Insert panel to make changes to tables.
or
Choose Insert > Table Objects > Insert Row Above or press Ctrl-M (Cmd-M).
or
Choose Insert > Table Objects > Insert Row Below.
or
Right-click in the cell, and choose Table > Insert Row from the context menu. This adds a row above the row where the insertion point is.
The row appears in your table ![]() .
.
![]() A new row has appeared in the middle of this table.
A new row has appeared in the middle of this table.
Tip
If the insertion point is in the last cell of the table, pressing Tab adds a row to the bottom of the table.
To insert a single column in a table
1. Place the insertion point in a table cell.
2. In the Layout category of the Insert panel, click either the Insert Column to the Left or Insert Column to the Right button. A new column appears to the left or right of the column where the insertion point is.
or
Choose Insert > Table Objects > Insert Column to the Left.
or
Choose Insert > Table Objects > Insert Column to the Right.
or
Right-click in the cell, and from the context menu choose Table > Insert Column. This adds a column to the left of the column where the insertion point is.
The column appears in your table.
To insert multiple rows or columns into a table
1. Place the insertion point in a table cell.
2. Right-click, and then choose Table > Insert Rows or Columns from the context menu.
or
Choose Modify > Table > Insert Rows or Columns.
The Insert Rows or Columns dialog appears ![]() .
.

![]() Use the Insert Rows or Columns dialog to add multiple rows or columns to a table in one operation.
Use the Insert Rows or Columns dialog to add multiple rows or columns to a table in one operation.
3. Select either the Rows or Columns radio button.
4. Enter the number of rows or columns you want to add. You can either type a number into the text box, or use the arrow buttons next to the text box to increase or decrease the number.
5. Next to Where, click the appropriate button to select the location of the new rows or columns.
6. Click OK.
The rows or columns appear in your table.
Merging and Splitting Cells
Dreamweaver lets you combine two or more adjacent cells into one larger cell (called merging) or split a single cell into two or more cells.
To merge cells
1. Select the cells you want to merge.
2. Choose Modify > Table > Merge Cells, or press Ctrl-Alt-M (Cmd-Opt-M).
or
Right-click, and then choose Table > Merge Cells from the context menu.
The cells merge ![]() .
.

![]() The four cells at the left edge of this table (top) have been merged into one cell (bottom).
The four cells at the left edge of this table (top) have been merged into one cell (bottom).
Tip
You can merge an entire row or column into one cell.
To split cells
1. Place the insertion point in the cell you want to split into two or more cells.
2. Choose Modify > Table > Split Cell, or press Ctrl-Alt-S (Cmd-Opt-S).
or
Right-click, and then choose Table > Split Cell from the context menu.
The Split Cell dialog appears ![]() .
.

![]() You can use the Split Cell dialog to divide cells into multiple rows or columns.
You can use the Split Cell dialog to divide cells into multiple rows or columns.
3. Choose whether to split the cell into rows or columns.
4. Enter the number of new rows or columns for the split.
5. Click OK.
The cell divides into two or more cells ![]() .
.

![]() In this example, the center cell has been split into four cells.
In this example, the center cell has been split into four cells.
Tip
Even if you select multiple cells, Dreamweaver can split only one cell at a time. If you try to split the cells, the Split Cell menu item will be unavailable.
Resizing Table Elements
You can resize tables horizontally or vertically, and also make columns wider and rows taller. You can specify the width of tables numerically, and numerically specify the width and height of rows and columns.
To resize an entire table
1. Click the bottom or the right edge of the table. The table will be selected, and a border with resize handles appears around it.
2. Drag one of the resize handles. To widen the table, drag the handle on the right edge of the table; to make the table taller, drag the handle on the bottom edge of the table; and to make the table grow in both directions simultaneously, drag the handle at the bottom-right corner of the table. Holding down the Shift key as you drag maintains the proportions of the table.
To resize a table numerically
1. Click the bottom or the right edge of the table to select it.
2. In the Property Inspector, enter a number in the W (for width) field ![]() . In the pop-up menu next to the field, choose either %, which makes the table width a percentage of the overall width of the page, or pixels, to set an absolute size for the table width.
. In the pop-up menu next to the field, choose either %, which makes the table width a percentage of the overall width of the page, or pixels, to set an absolute size for the table width.
![]() Use the Property Inspector to change the width of a table numerically.
Use the Property Inspector to change the width of a table numerically.
3. Press the Tab key or click in the document window to apply your changes.
To resize columns
1. Select the column you want to resize.
2. Drag the column’s right border to make the column wider.
or
In the Property Inspector, type a number in the W (for width) field ![]() . The width unit is in pixels. Alternatively, in the document window, click the triangle in the dimension line above the column and choose Clear Column Width from the pop-up menu; this makes the column resize to fit the contents.
. The width unit is in pixels. Alternatively, in the document window, click the triangle in the dimension line above the column and choose Clear Column Width from the pop-up menu; this makes the column resize to fit the contents.
![]() When you select a column, the Property Inspector changes and you can numerically set the column’s width.
When you select a column, the Property Inspector changes and you can numerically set the column’s width.
To resize rows
1. Select the row you want to resize.
2. Drag the bottom border of the row to make the row taller.
or
In the Property Inspector, type a number in the H (for height) field ![]() . The height unit is in pixels.
. The height unit is in pixels.
![]() Selecting a row allows you to numerically set the row’s height.
Selecting a row allows you to numerically set the row’s height.
Tip
If you set a width in percentage for a table, the table resizes based on the width of the user’s browser window. This may really change the look of your table. Be sure to preview the page in a Web browser and resize the browser window to see the effect.
Tip
Tables always stretch to fit the content inside the table.
Tip
Text inside cells usually wraps to fit the width of the cell. To force the cell to expand to the width of the text, you can turn off text wrapping on a cell-by-cell basis. Click in the cell, and then in the Property Inspector, select the “No wrap” check box.
Tip
Don’t be misled into thinking you have ultimate control over row height and column width, and therefore control over what your site visitor sees. Different browsers display content differently, and short of previewing your site with every browser ever made on every computer platform, there’s no way to be absolutely certain that your site visitor will see exactly what you intended.
Tip
Older versions of Dreamweaver had a H (Height) field in the Property Inspector for the entire table. That is an invalid property for current HTML, so the field was removed in Dreamweaver CS3.
Clearing and Converting Table Values
When you have a table selected, there are four buttons in the Property Inspector that can be very handy and save you a bunch of time ![]() . These buttons clear the width and height values for the table, or convert table units from percent to pixels or vice versa.
. These buttons clear the width and height values for the table, or convert table units from percent to pixels or vice versa.

![]() Use these four buttons in the Property Inspector to quickly clear width and height values, or convert tables to and from fixed widths.
Use these four buttons in the Property Inspector to quickly clear width and height values, or convert tables to and from fixed widths.
Clear Column Widths and Clear Row Heights are great for collapsing a table to fit its contents. Convert Table Widths to Pixels lets you change widths from relative to fixed measurements. Convert Table Widths to Percent does the opposite, converting a fixed size table to a relative one.
Deleting Table Elements
If you want to remove tables, rows, or columns, you can make short work of the task.
To delete a table
1. Select the table by clicking its right or bottom edge. A border with resize handles appears around the table.
2. Press Backspace (Delete).
To delete rows
1. Select one or more rows.
2. Press Backspace (Delete).
or
Choose Modify > Table > Delete Row, or press Ctrl-Shift-M (Cmd-Shift-M).
or
Right-click the row, and then choose Table > Delete Row from the context menu.
The row disappears from the table.
To delete columns
1. Select one or more columns.
2. Press Backspace (Delete).
or
Choose Modify > Table > Delete Column or press Ctrl-Shift-minus key (Cmd-Shift-minus key).
or
Right-click the row, and then choose Table > Delete Column from the context menu.
The columns disappear from the table.
Specifying Table Alignment
When you have a table and text together, you can set the alignment of the table, in some cases wrapping the text around the table ![]() . You can choose from four different alignments:
. You can choose from four different alignments:
• Default uses the browser default alignment for tables (usually it places the table to the left side of the page). This setting prevents text from wrapping around the table to the right.
• Left places the table to the left side of the page and allows text to wrap around the right side of the table.
• Center centers the table on the page with no text wrapping.
• Right places the table to the right side of the page and allows text to wrap around the left side of the table.
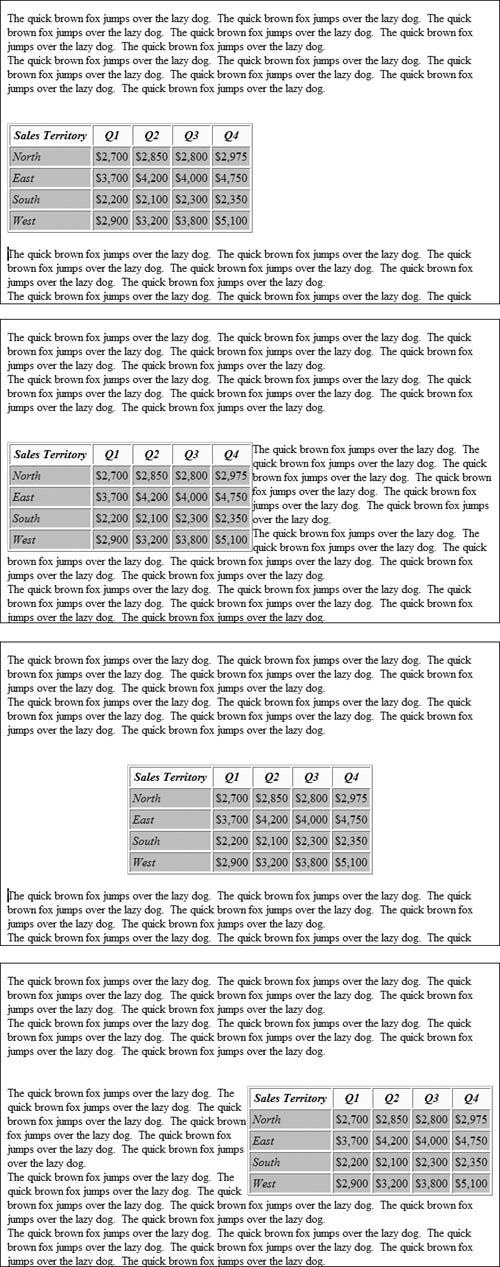
![]() The effects of different types of table alignment. From top to bottom: Default, Left, Center, and Right alignments.
The effects of different types of table alignment. From top to bottom: Default, Left, Center, and Right alignments.
You can use the Property Inspector to set table alignment. This applies HTML attributes to the <table> tag, which is acceptable but not really compliant with best practices. Instead, you should specify table alignment with a CSS style. See Chapter 7 for more information.
To set table alignment
1. Select the table you want to align.
2. In the Property Inspector, choose the alignment you want from the Align pop-up menu.
The table moves to the alignment you selected.
Setting Cell Properties
Alignment of the text or images inside a cell requires using the Property Inspector to set cell properties for each cell. You can use these alignment cell properties to set both the horizontal and vertical alignments. You can also set cell properties for the background color of the cell, and set the color of the cell border.
To set cell alignment
1. Place the insertion point in the cell you want to format.
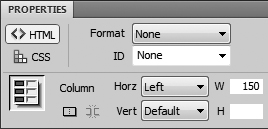
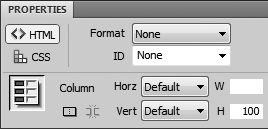
2. In the Property Inspector, from the Horz pop-up menu choose Default, Left, Center, or Right ![]() .
.

![]() Use the Property Inspector to set horizontal and vertical alignment for cell contents.
Use the Property Inspector to set horizontal and vertical alignment for cell contents.
The Default choice usually gives the same visual result as Left ![]() .
.

![]() Horizontal text alignment within a cell. From top to bottom: Left, Center, and Right text alignment.
Horizontal text alignment within a cell. From top to bottom: Left, Center, and Right text alignment.
3. From the Vert pop-up menu choose Default, Top, Middle, Bottom, or Baseline.
The Default choice usually gives the same visual result as Middle. Baseline sets the cell alignment to match the baseline of the text within the cell and is usually used to align images and text that are inside the same cell. Baseline usually gives the same visual result as Bottom ![]() .
.

![]() Vertical text alignment within a cell. From top to bottom: Top, Middle, and Bottom alignment.
Vertical text alignment within a cell. From top to bottom: Top, Middle, and Bottom alignment.
To set a cell background color
1. Place the insertion point in the cell you want to format.
2. In the Property Inspector, click the color well next to Bg to bring up the color picker and select the cell’s background color.
The cell’s background color changes.
Dreamweaver accomplishes this color change by adding an HTML attribute to the table cell, which is not considered a current best practice. Instead, you should apply table cell background color changes via CSS. See “Formatting Tables,” later in this chapter, for more information.
Sorting Table Content
It’s not uncommon to enter data into a table, then add more data, and then want to sort the whole thing. You asked for it, Dreamweaver can do it. The program sorts by the content of any column in your table, either numerically or alphabetically, in ascending or descending order, and it can sort on two successive criteria.
There are some limitations to Dreamweaver’s sorting abilities. You cannot sort merged cells, and Dreamweaver doesn’t have the ability to sort part of a table, so you can’t, for example, have the program ignore the merged cells you used for your table’s title (though you can have the program include or ignore header rows). Dreamweaver displays an error message if you try to sort a table containing merged cells.
Another problem is that the sorting algorithm Dreamweaver uses isn’t terribly smart. For example, you can sort numerically, but Dreamweaver doesn’t understand dates in tables, so you’re liable to get sorts like this:
3/19/99
3/25/77
3/3/02
Dreamweaver sorted the dates numerically, reading left to right, which resulted in an incorrect sort.
Despite these restrictions, table sorting in Dreamweaver is useful—you just have to be aware of the limitations.
To sort a table
1. Place the insertion point in any cell of the table you want to sort.
2. Choose Commands > Sort Table.
The Sort Table dialog appears ![]() .
.

![]() The Sort Table dialog lets you sort the contents of your table either alphabetically or numerically.
The Sort Table dialog lets you sort the contents of your table either alphabetically or numerically.
3. From the Sort by pop-up menu choose the column you want to use to sort the table.
4. In the Order pop-up menu on the left, choose whether to sort the column alphabetically or numerically.
5. In the Order pop-up menu on the right, choose whether to sort the column in ascending or descending order.
6. If you want to sort on a second set of criteria repeat steps 3 through 5 and use the Then by set of pop-up menus.
7. Make any selections from the Options list.
By default, the “Sort includes the first row” option is not selected because the first row of a table is frequently a header row. If your table doesn’t seem to be sorting properly, select this option.
8. Click OK.
Dreamweaver sorts your table according to the criteria you selected.
Tip
Dreamweaver can’t sort by rows, just columns.
Tip
If you want a merged row at the top of your table, do the sort first, and then merge the cells.
Tip
Be careful when you’re sorting numbers. If you accidentally leave the sort on Alphabetically, you’ll get an alphanumeric sort (1, 10, 2, 20, 3, 30) instead of a numeric sort (1, 2, 3, 10, 20, 30).
Formatting Tables
You can apply a CSS style to an entire table (which can change the look of the table), or you can apply a CSS style to selected table cells, which can change the look of the table contents.
When you use a CSS style to format a table, the table’s look is defined by instructions in a CSS style sheet. You can choose to have the table style apply to all tables in your document (if you use the style sheet to redefine the <table> tag), or you can create a custom CSS class for a particular kind of table you want to use, and apply the style to the table with the Property Inspector.
To apply a CSS style to a table
1. Select the table or table cells you want to format.
2. In the Property Inspector, choose the style you want from the Class pop-up menu ![]() .
.

![]() Apply a CSS style to a table in the Property Inspector.
Apply a CSS style to a table in the Property Inspector.
The selection takes on the formatting from the CSS style you chose.
Tip
You can create, format, and save an empty table for later use. Just create and format the table, select it, and then save it as a snippet. See Chapter 16 for more about creating snippets.
Importing and Exporting Tabular Data
Because tables are best used for tabular data, it stands to reason that Dreamweaver has an easy way to import such data (from database programs or Microsoft Excel, for example) and turn it into a table. This data needs to be in the form of a delimited text file, that is, a file that includes the data, separated by some character, such as a tab, a comma, or another delimiter.
To explain how a delimited file works, imagine that you have some data that would be displayed well in a table, such as baseball standings. Each row of the table with the standings contains information on a team, and the different columns of the table contain the team’s name, number of wins, number of losses, and winning percentage, as in the example (shown in Excel) in ![]() . To use this Excel data in Dreamweaver, you first need to export the data out of Excel as a delimited file, which is easy; you simply save a copy of the file in the “Text (Tab delimited)” format. This saves the data in the Excel worksheet as a plain text file. Each column of data is separated by a tab character, and each row of the data ends with a return character. Dreamweaver can then read in this delimited text file and convert it into a table.
. To use this Excel data in Dreamweaver, you first need to export the data out of Excel as a delimited file, which is easy; you simply save a copy of the file in the “Text (Tab delimited)” format. This saves the data in the Excel worksheet as a plain text file. Each column of data is separated by a tab character, and each row of the data ends with a return character. Dreamweaver can then read in this delimited text file and convert it into a table.

![]() Tabular data to be imported into Dreamweaver often starts out as a Microsoft Excel worksheet.
Tabular data to be imported into Dreamweaver often starts out as a Microsoft Excel worksheet.
Dreamweaver can also do the reverse trick of turning the data in a table into a delimited text file. This allows you to export table data to Excel or a database program for further processing, or you can take a table on a Web page and move it to a word processor or page layout program such as Adobe InDesign.
To import tabular data into a table
1. Place the insertion point where you want the table to appear.
2. Choose File > Import > Tabular Data.
or
Choose Insert > Table Objects > Import Tabular Data.
The Import Tabular Data dialog appears ![]() .
.

![]() Use the Import Tabular Data dialog to select the delimited text file and format the table you are about to create.
Use the Import Tabular Data dialog to select the delimited text file and format the table you are about to create.
3. Click the Browse button to select the delimited data file.
The Open dialog appears.
4. Navigate to the data file, select it in the Open dialog, and then click Open.
The name of the data file appears in the Import Tabular Data dialog’s Data file text box.
5. From the Delimiter pop-up menu, choose the delimiter character used in the data file.
Your choices in this pop-up menu are Tab, Comma, Semicolon, Colon, and Other. If the data file uses an unusual delimiter character, choose Other and type that character into the text box next to the Delimiter pop-up menu.
6. In the Table width section, choose Fit to data if you want the table width to be just as wide as the data, or Set to if you want the table to be a fixed width. If you choose the latter option, enter a number in the text box and choose the units from the pop-up menu (either percent or pixels).
7. You can enter values for cell padding, cell spacing, and the table border. You can also choose to format the text in the top row of the table (which is usually a header of some sort). Your choices are no formatting, bold, italic, or bold italic.
Dreamweaver reads the delimited text file and inserts it into your page as an unformatted table ![]() .
.

![]() The unformatted table, built from the imported data, appears in your document.
The unformatted table, built from the imported data, appears in your document.
Tip
If the table imports incorrectly, chances are that the data file uses a delimiter different from the one you chose in step 5. You have to delete the incorrect table and import it again with the correct setting.
Tip
If you are importing tabular data from Word or Excel, consider copying and pasting the data using Edit > Paste Special. Dreamweaver understands Office program formatting and you’ll save time, because you won’t have to reformat in Dreamweaver. See Chapter 4 for more about using Paste Special.
To export a Dreamweaver table’s data to a delimited file
1. Place the insertion point in any cell of the table.
2. Choose File > Export > Table.
The Export Table dialog appears ![]() .
.

![]() Use the Export Table dialog to save the data from a Dreamweaver table as a delimited text file.
Use the Export Table dialog to save the data from a Dreamweaver table as a delimited text file.
3. From the Delimiter pop-up menu, choose the delimiter character you want to use in the exported text file. Your choices are Tab, Space, Comma, Semicolon, or Colon.
4. From the Line breaks pop-up menu, choose the operating system that is the destination for the text file. Your choices are Windows, Mac, or UNIX.
The reason for this option is that each of the platforms has a different way of indicating the end of a line of text.
5. Click Export.
The Export Table As dialog appears.
6. Give the file a name, navigate to where you want to save it, and click Save.
Dreamweaver saves the table data as a delimited text file.
Tip
If you want to export only a portion of a table (for example, the top ten rows), select those rows, copy them, and then paste them into a different part of the document, where they will create a new table. Export the new table as a delimited text file, and then delete the new table.
Putting It All Together
1. Add a table to your page and fill in its contents.
2. Experiment with selecting rows, columns, and cells.
3. Add more rows and columns to your table, and fill in their contents.
4. Merge and split cells.
5. Resize the table elements.
6. Delete a few rows and columns.
7. Add text to your page outside of the table, and then wrap that text around the table’s left side.
8. Align the cells vertically and horizontally.
9. Set a cell background color.
10. Sort the columns of your table alphabetically or numerically (whichever is appropriate).
11. Format all or part of the table by applying a CSS style.
12. Export your table’s data to a delimited text file.
13. If you have access to a delimited text file, import data into another table.