Sounds, visual effects, even tactile feedback have all become standard parts of the Windows computing environment. Only gamers used to enjoy these elements, but today, you run into them constantly. Windows contains a wealth of multimedia—you find it on the Internet, some people use their computer DVDs to play movies, and of course, games have only gotten more multimedia oriented as time has passed. In short, the Windows user of today needs to know something about multimedia, and it helps to know a little about games, too.
We’ll begin our whirlwind tour of multimedia today by looking at the Windows offerings. We’ll look at old standby applications such as the CD Player and Sound Recorder. Of course, the versions Windows provides today bear only a passing resemblance to the first versions of these utilities. We’ll also discuss some new features such as the Windows Movie Maker and how to work with both cameras and scanners. One of the best new features is the ability to record CDs without using a third-party utility.
You’ll also see the games that Microsoft provides as part of Windows. The old standbys (Mine Sweeper, Pinball, Solitaire, and FreeCell) are present. You’ll also find a series of new Internet games that you can play with friends online. These new Internet games also provide a method for checking your Internet connection for problems. Also, look for a new and very addictive game called Spider Solitaire.
Finally, we’ll discuss some troubleshooting tips for your multimedia and games. Nothing is worse than spending leisure time diagnosing problems with your system instead of playing with it. We’ll look at both local and networking problems.
Windows XP comes equipped with many of the same multimedia add-ons found in other versions of Windows. You’ll find most of these utilities in the Start | Programs | Accessories | Entertainment menu. However, as with all those previous editions, Microsoft has made a few improvements to this version of the product. In this case, you’ll notice that some of the applications look nicer, while others provide enhanced features. For those of you who like neat looking gizmo applications, the Windows Media Player is the big news. The following sections tell you about the standard multimedia add-ons for Windows XP.
The Sound Recorder you see today is much the same as the one you saw yesterday. It looks the same and acts the same as the one that appeared in both Windows 9x and Windows 2000. Figure 7.1 shows what this utility looks like. The Sound Recorder still allows you to record a sound into memory, modify it a little, annotate it, and then save it to disk. The biggest change from Windows 9X is that you can make longer recordings.

To begin a recording, click Record. You’ll see the time position bar move across the front of the utility. The Sound Recorder makes recordings in 60-second increments. When the time position bar reaches the other side, the recording will stop. Click record again and you get another 60 seconds of recording time.
Sound Recorder allows you to modify the recording using entries on the Effects menu. This includes increasing/decreasing the recording speed and increasing/decreasing the recording volume. Unfortunately, changing the recording volume tends to introduce noise that most users find undesirable.
You can add echo to the recording, which gives it a fuller sound when used in moderation. You can also increase echo to the point where the recording sounds ridiculous. The Reverse option on the Effects menu allows you to play the recording backward.
The Sound Recorder enables you to perform some types of sound editing. For example, you can insert a sound clip into the current click by using the Edit | Paste Insert or Edit | Insert File commands. You can mix two files together using the Edit | Paste Mix or Edit | Mix with File commands. Finally, you can cut the current sound click using either the Edit | Delete Before Current Position or Edit | Delete After Current Position commands.
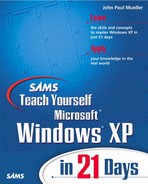
The final piece of this application appears under the File menu. Select Properties, and you’ll see a Properties for Sound dialog box. Click Convert Now, and you’ll see the Sound Selection dialog box shown in Figure 7.2. Notice that this dialog box lets you convert the sound into other formats.
The Name field contains a list of named formats. For example, if you choose the Telephone format, you’ll get a small sound file with mediocre quality at best. The Sound Recorder will set the Format field to PCM and the Attributes field to 11.025kHz, 8-bit, mono, and 10 kb/sec. The last attribute tells you how much file space this format requires for each second of recording time.
You can change the Format and Attributes fields by hand to achieve specific effects. The Format field supports 13 different formats. The content of the Attributes field will change to match the format you choose. The highest quality PCM format of 16-bit stereo at 48,000kHz requires a whopping 187 kb/sec of storage space. The “lossy” Motion Picture Experts Group (MPEG) layer 3 format of 48,000KfHz stereo only requires 15 kb/sec, but you also lose data. The recording isn’t as good as the PCM version, even though they’re both recorded at the same quality level.
You can access the Volume Control by using a number of techniques. The fastest method is to click, right-click, or double-click the speaker icon in the notification area of the Taskbar. If you simply click the icon, you’ll see a single slider dialog box that you can use to change the volume for the system as a whole.
Note
If you don’t see the Volume icon in the notification area of the Taskbar, open the Sounds and Audio Devices applet in the Control Panel. You’ll see a Place volume icon in the taskbar option on the Volume tab of this dialog box. Check this option, click OK, and the Volume icon will appear in the notification area.
Double-clicking or right-clicking and choosing Open Volume Control from the context menu displays multiple sliders as shown in Figure 7.3. Notice that each slider also has a Mute or Mute All checkbox. Clicking Mute will turn off sound for that feature no matter where you have the volume slider set. This is good for turning the sound off temporarily, so you don’t lose the volume setting.

Tip
Use the Mute button as a diagnostic tool. Sometimes a sound system will develop hiss or noise that’s hard to locate. Mute the features one at a time until you locate the culprit. You can look for the problem with this feature, which is normally a bad cable, but could be faulty circuitry as well. If you can’t locate the source of the noise within that feature and you don’t normally use the feature, you can simply keep it muted to keep the sound out of your system.
The Volume Control normally hides at least a few of the features that you can access. In addition, the view you see initially controls playback, not record. Use the Options Properties command to display the Properties dialog box. You’ll see three areas of control. The Mixer Device field selects the device you use for mixing purposes. Normally, you have just one sound card in your system, so there isn’t must to see in this area.
The Adjust Volume For group includes three options: Playback, Recording, and Other. The option you select determines the content of the Volume Control. It also controls the content of the Show the following volume controls list box.
You’ll use the Show the following volume controls list box to determine which features appear in the Volume Control. Select the features you plan to use and leave the other clear to reduce the complexity of the Volume Control.
If you select Recording and then click OK, the Volume Control will change to a Recording Control. The same sliders are present as before. However, the Mute check box changes to a Select check box. You can only select one device at a time for input. Windows XP normally selects the microphone, but you can also select from the CD-ROM, line-in, video, and other ports.
Tip
If you hear noise or hissing while recording, you already know the culprit. Because you can only select one recording device at a time, only that device could produce the noise you hear. However, to ensure that you try to fix the right device, select another input device to see if the hiss or noise goes away. In most cases, if the hiss goes away, the problem is with a cable or input device such as a microphone, and not with the circuitry. If you still hear the noise and hissing, then the problem is likely in the soundboard.
Microsoft added so many improvements to the Windows Media Player that you’ll hardly recognize it the first time you see it. Figure 7.4 shows a typical example of this utility with a CD loaded. Notice that the Windows Media Player automatically identifies the CD and provides track information. The following sections describe how to use the Windows Media Player. I’m describing the default Media Player configuration, except where noted. Each Windows Media Player “skin” places the controls in a different position. If you use something other than the default configuration, your screen and control positions will differ from the ones discussed in this section.

Note
For those of you who were looking for the venerable CD Player with its interesting quirks, this particular utility no longer appears in Windows XP. You’ll find that the Windows Media Player does a far better job than the CD Player could ever do. However, if you absolutely must have the CD Player to feel comfortable, the version from Windows 2000 works just fine under Windows XP.
You can adjust every aspect of your Windows Media Player experience. For example, you can adjust the graphic in the center of the display. Click Select visualization or album art (the button with the asterisk in the lower left corner of the display area). You’ll see a list of visualizations, plus an Album Art option. Interestingly enough, quite a few of my CDs were able to display the album art, even though I didn’t supply this information to the computer (nor did I supply anything else about the CD). Choose the visualization you want to see (or the album cover). If you choose a visualization, you’ll see two arrow buttons next to the visualization button. Click these arrows to see different versions of that visualization. If you want to see your visualization full screen, click View Full Screen in the lower right corner of the display area. This is the button with a window in the center and four arrows pointing outward from the edges of the window.
Tip
If you choose the album art visualization and then click on the album art, a copy of Internet Explorer will open. You’ll go to the http://windowsmedia.com/ site where you’ll see a list of all the albums available by the same group. The site will help you explore these other options. For example, you can play samples from many of the albums to determine if you’d like to hear more. You can buy the albums directly online if want with a few additional clicks. (The site links to CD-NOW.)
At the bottom of the screen, you’ll see a set of ten controls. These controls allow you to control the current position in the CD by using pause, stop, next song, previous song, a position-seeking pointer, a rewind function, and a fast forward function. You can also control the volume of the music and mute it when necessary. The final button, Switch to skin mode, changes the appearance of the Windows Media Player to the selected skin. Figure 7.5 shows just one of the many skins you can choose.

Yes, that’s a Picasso-like picture and all of the painted buttons do work. You’ll find quite a few skins for your Windows Media Player, and I anticipate that people will want to create their own.
Three of the four buttons at the top of the display control window will be displayed. The Show/Hide Menu Bar button controls the window surrounding the Windows Media Player. Normally, this window is invisible so you can see the effect of the skin. The Show/Hide Equalizer and Settings in Now Playing button displays a window immediately below the visualization window shown in Figure 7.4. This new window can display the SRS WOW effect, graphic equalizer, video settings, media information, captions, and lyrics. The Show/Hide Playlist in Now Playing button shows a list of the songs you plan to play. Double-clicking a song in this list automatically changes the player to that song. The fourth button at the top, Turn Shuffle On/Off, automatically selects tracks at random when set to on. This means that the CD won’t play end-to-end, but it will continuously play random selections.
The Lyrics option won’t work right out of the package. Because the lyrics are copyrighted, Microsoft can’t supply them for you. However, you can type them into the Windows Media Player yourself. Right-click the song you want to modify in the play list and choose Properties from the context menu. You’ll see a Properties dialog box. Select Lyrics, and you’ll see a field for the lyrics. Type the lyrics and click OK. Every time you play this song with the Lyrics option selected from this point on, the lyrics will be displayed.
The play list has a lot more to offer than allowing you to select the tracks on the CD and add lyrics. The context menu contains options to play the selected song, enable sections, and disable selections. Disabling a selection means Windows Media Player will skip it when playing the CD in either random or sequential order. The Edit option allows you to change the name of the song in the play list. You can also change the order of songs in the list using the Move Up and Move Down options. The context menu contains several other options that we’ll discuss as part of performing other tasks.
We haven’t discussed many of the buttons on the left side of the Windows Media Player yet. You’ll find several of them enable you to find media on the Internet. The main Internet button is Media Guide. Click this, and you’ll go to WindowsMedia.com. This is Microsoft’s main site for all things media.
The Radio Tuner feature also relies on the Internet. You click this option and after a few seconds, Windows Media Player displays the radio station page of WindowsMedia.com. Select a radio station and Windows Media Player will begin streaming content from it.
The Media Library helps you organize all your media. The first time you select it, you’ll see a dialog box that asks if you want to search your hard drive for media. Click Yes, and Windows Media Player will begin the search. Of course, you can always conduct the search later using the Tools | Search for Media Files option (you can also press F3). After you click Yes, Windows Media Player will ask where to search for media on your system. However, unless you click Advanced, you won’t see the additional options shown in Figure 7.6.

Select the search criteria you want to use for searching. The default settings may not work in all cases. For example, you may want to keep track of your sound bites in the library. The size options may prevent this by excluding files that are too small, yet fit within the sound bite category.
Notice that the default search criteria doesn’t include system folders. If you want to include Microsoft supplied media in your list, you’ll want to check the Include system folders option. In some cases, you might want to add files that you play to the media library even if they’re smaller than the limits you set. The Search for Media Files dialog box also includes an option to address this concern. Once you’re happy with the search settings, click Search, and Windows Media Player will begin searching your system for media. After the Windows Media Player finds all of your media, you’ll need to click Close to exit the Search for Media Files dialog box.
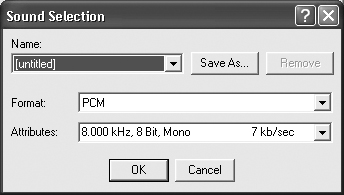
The Media Library will categorize your audio and video data with a hierarchical format like the one shown in Figure 7.7. Notice that this library shows the video clips by author. Other selections present the data in other ways.
Creating a database of your media selections makes it easier to see what you have and to work with the data. You can play everything in your library. The Windows Media Player also allows you to copy the data to an audio CD or work with it in other ways. For example, you can use this screen to create and manage play lists.
Note
Some of the elements on the left side of the hierarchical list don’t support a context menu. The choices for the selection normally appear at the top of the window, so you need to highlight the element before you can do anything with it. For example, if you want to create a new play list, you have to highlight My Playlists and click New Playlist at the top of the window.
The Windows Media Player makes it possible to create your own audio CDs. The CDs could contain anything you have recorded. You can also copy tracks from CDs that you own and make your own “best of” compilations. Of course, you’ll want to ensure that you observe all copyright laws when you work with copyrighted materials.
The first step in creating an audio CD is to compile the content. Make any required recordings as part of the first step. All WAV files must use the 44 KHz, 16-bit setting. If you’re making a CD compilation, you’ll need to copy the songs from your CD to your hard drive as a first step. All you need to do is place the CD into the drive. Windows Media Player will automatically load it. Select the Copy from CD option, and you’ll see a list of songs like the one shown in Figure 7.8.

Place check marks next to each song that you want to copy. Click Copy Music. Windows Media Player will display a message asking if you want to override the settings Microsoft has put in place for protecting copyrighted music. If you say no, you won’t be able to copy music from most CDs. After you change the copyright setting for Windows Media Player, it will copy the songs from the CD to the My Music folder on your hard drive. It will create two levels of folders. The first level is for the group, while the second is for the album. The songs will appear within the album folder.
Now you need to collect all of the data in one place. Click Media Library. Select My Playlists and then New Playlist. Type a name for the new Playlist; then click OK. You can use the same technique that you use for Explorer to drag recordings from other folders and place them in your new play list.
At this point, you’re ready to record. Click Copy to CD or Device. Select your play list from the drop-down list box. Make sure that all the entries say Ready to copy in the Status column. Click Copy Music. Windows Media Player will convert each of the files before it copies them. If it experiences any error, you’ll see an error message along with instructions for fixing the problem.
We already talked about the Windows Movie Maker to a limited extent in the “Windows Movie Maker” section of Chapter 1. The Windows Movie Maker allows you to create your own animations and movies. You can add sound to your movies by mixing a sound track with the pictures you capture. Given the capabilities of this product, you can use it for four purposes:
Animations. A series of hand drawn pictures that you use to create the effect of motion.
Movies. A succession of real life images captured with a device such as a camera.
Analysis Tool. If you have the equipment to capture live action video, you may not use Windows Movie Maker as an output device. You might use it to analyze the movie you captured.
Slide Shows. Still life or hand drawn pictures placed in a sequence. The slide show presents a progression or set of related images without motion.
The reason I presented these three typical applications is that many people will look at the term, Windows Movie Maker, and envision a studio in Hollywood. This isn’t a professional tool, but it does make a nice addition to the amateur’s arsenal.
For many people, the slide show is going to be the most common use of the Windows Movie Maker. You can create everything from self-running presentations to a picture show for loving grandparents of your children’s latest escapades. The point is that you can make Windows Movie Maker into your “soap box,” your way to present you to the world.
The Windows Movie Maker provides a reasonably easy set of controls to create your presentation. Figure 7.9 shows a typical display for a slide show.

Let’s begin with the toolbars. Windows Movie maker provides four toolbars. The Standard Buttons toolbar contains buttons you might find in any applications such as New Project, Open, Save Project, Cut, Copy, Paste, and Delete. The Project toolbar contains the Save Movie (creates the movie), Send (email or Web server), and Record (from live video source such as a camera or video capture board) buttons. The Collections toolbar contains the Up One Level, New Collection, Collections (shows or hides the collection tree view), and Views buttons. Finally, the Location toolbar contains the Collection drop-down list box that allows you to switch between collections.
The Collections tree view shows a hierarchical view of your collections area of the hard drive. A collection is a folder that holds all of the data for a movie. This definitely means still images and captured video. However, you can also add sound bites and other audio files that you have on hand. In short, the collection is your central location for storing everything for your presentation.
The center pane in Figure 7.9 contains the collection. The folder you highlight in the Collections tree view appears in detail in this pane. The left and right panes have the same relationship in Windows Explorer. Notice that the figure shows the thumbnails view of the data. You can also use a details or list view. The thumbnails view is extremely practical while putting your presentation together because there are fewer chances for making mistakes.
The right pane contains an enlarged view of the highlighted object or objects. It also contains controls for playing your presentation. They’re the same VCR-style controls you use with your home entertainment system. However, this control set also includes a Previous Frame and Next Frame button so that you can play the presentation one frame at a time. You’ll also find Full Screen and Split Clip buttons. The Full Screen button comes in handy for a realistic look at the output from your presentation.
You’ll find a combination of the storyboard and timeline on the bottom third of the screen in Figure 7.9. The storyboard and timeline are mutually exclusive. You can select between the two using the Timeline/Storyboard button. The Zoom In, Zoom Out, Record Narration, and Set Audio Levels buttons are only active when using timeline mode.
Part of the controls for the Windows Movie Maker are the options you can set for the application as a whole. Use the View | Options command to display the Options dialog box shown in Figure 7.10.

The Default Author field should contain the name of the person creating the movie. Windows Movie Maker defaults to the current username, but you can use any value you like.
Notice the Default imported photo duration (seconds) field. Adjusting this value before you import data for your collection can save time later when you need to create a timeline. If all the images will take the same amount of time, then setting this value now means that you won’t have to fiddle with the timeline later. Unfortunately, this setting only allows full seconds. It won’t help much when working with animation.
You’ll also want to check all of the file storage locations. Windows Movie Maker assumes that you want to use your personal directory for all storage needs. This works fine unless you’re sharing the data with someone else. You’ll want to change these settings to a common directory for collaboration purposes.
The E-mail Options button displays the E-mail Movie dialog box. This is the service that Windows Movie Maker will use if you create a movie and then use the File | Send Movie To | E-mail command to send it to someone on the Internet. Make sure that you select the correct service if you have more than one e-mail account. Windows Movie Maker will give you another opportunity to change this value when you actually send a movie to someone on the Internet.
How do you make a “movie” using Windows Movie Maker? First, you need to decide what kind of presentation you want to create. In Chapter 1, I showed you a series of images you could easily turn into animation. The clock hands would move around and simulate time moving too fast for words. The time interval between pictures would create the animation effect. In this case, we’re looking at a faster time interval of about a second or less. You have to give the viewer time to see the image, but not enough time for the animation to look jumpy. In fact, cartoons and other forms of professional animation use extremely small movements between pictures and present the images at 30 frames per section or higher.
If you decide to make a slideshow, the time between pictures is much longer. You need time to tell about the picture before the image changes. Of course, you don’t want to drone on about the same picture for hours, so it’s important to choose between speed and presentation content.
Finally, if you do have the equipment to capture live video, the camera decides the interval between pictures for you. The most you want to do is touch the pictures up, if necessary.
The second step is to create a collection and fill it with content. To create the new collection, click New Collection; then type the collection name and press Enter.
You can use several methods to collect data for your presentation. The easiest method is to import existing data. Use the File | Import command to display the Select the File to Import dialog box. You can use the Ctrl-Click method to select multiple files within this dialog box. If you plan to acquire still images from a scanner, you’ll need to scan the images first and then import them into the Windows Movie Maker (see the “Acquiring Images” section of this chapter for details).
The Windows Movie Maker also provides the means to collect live data from a camera or a video capture board. Click Record to start the process. You’ll see the Record dialog box shown in Figure 7.11.

You’ll need to select several options in this dialog box before you can begin a recording. First, make sure that you select an option in the Record field. Windows Movie Maker enables you to choose between video only, audio only, or both video and audio. It’s also important to configure the input devices. Click change to display the Change Device dialog box. Notice that you have to choose both a device and an input line for both video and audio. Some video devices provide video composite, video tuner, and video SVideo input (among others). The Record Time Limit field helps you keep track of disk usage by limiting the size of the file you can create. Make sure that you also set a quality setting. The Windows Movie Maker provides high, medium, and low, along with another setting that allows you to set your own parameters. Finally, you can click Record to collect live images. When you click Record, Windows Movie Maker will begin recording the live data. Click Stop to end the recording and save the file on disk.
Note
You can also use the Record dialog box to collect still images from a camera. Instead of clicking Record, click Take Photo next to it. This is the button with the little camera on it.
The third step is to tell a story. Good presentations interest an audience because they draw the audience into the presentation. The audience has to care about what they’re seeing. A storyboard allows you to set the sequence of events for your presentation. It doesn’t tell when the events will happen, just that they’ll happen and in what order. You want to create the storyboard first because it allows you to concentrate on the sequence of events for your movie.
To create a storyboard using Windows Movie Maker, drag objects from the collections area to the Storyboard. (Make sure that the bottom third of the screen is in storyboard mode.) You can change the order of the pictures by dragging them to a new location.
Tip
When creating the annotation for your presentation, place the audio for each graphic in a separate file. This enables you to synchronize audio and video better. The audio files provide clear end-of-file indicators that you can use with the pictures.
The fourth step is to create a timeline. This step can get tricky because you have to coordinate both video and audio elements. Click Timeline to display the timeline view of your presentation. Figure 7.12 shows a typical timeline example. If you can’t see the trim points, then use Zoom In to enlarge the picture. The trim points are the two triangles on the timeline. They control the start and end times for each picture.

You’ll need to play your presentation several times to get the timing correct. To play the presentation, select the first image on the timeline, press Shift, and select the last image on the timeline. The Windows Movie Maker will highlight all of the pictures in your presentation. Click Play to start the presentation. Adjust the trim points of your presentation as needed to synchronize the pictures with the audio.
The final step in creating the movie is to create a copy and watch it. Click Save Movie. You’ll see the Save Movie dialog box. Select a quality level in the Setting field. Type any information you want to appear with the movie. Finally, click OK. Windows Movie Maker will output the presentation at the quality level you requested. It will ask if you want to watch the presentation. Click OK and enjoy.
At one time, scanners were rare PC peripherals and cameras were unheard of, even on expensive setups. Today, both scanners and cameras are common devices. Users have found that the camera and scanner are money-saving devices in the long term. You can capture as many pictures of the family get-together as you want with a digital camera—and development is free. Likewise, scanning both images and text is a requirement for many home and business users today.
The following sections will help you install, configure, and use these new peripherals that have found their way onto many systems. Fortunately, Windows XP does a superior job of detecting these devices, so you may not even have to worry about device installation. I won’t tell you which devices to buy or about any quirks for a particular device. You’ll need to consult the vendor documentation for any oddities that come with your device.
Before you can scan the first article or capture your first picture, you’ll need to set your system up to recognize the device. Normally, Windows XP will perform this detection automatically. This is especially true if Windows XP provides built-in support for the device. You may have to configure the device by hand if your scanner or camera is so new that Windows XP shipped without support for them. The following steps tell you how to install a new camera or scanner.
Open the Scanners and Cameras folder in the Control Panel. Double-click the Add Device icon. You’ll see the Welcome screen of the Scanner and Camera Installation Wizard.
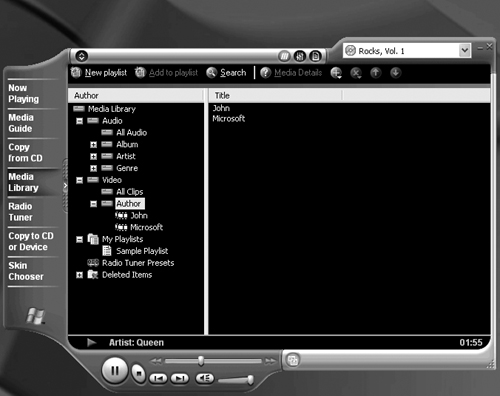
Click Next. Unlike other installation wizards for Windows XP, the Scanner and Camera Installation Wizard will normally display the “Which scanner or camera do you want to install?” dialog box shown in Figure 7.13 immediately.
Select a vendor and the scanner or camera model number. You can also click Have Disk and follow the prompts to read installation information from a floppy or CD-ROM if necessary. Click Next. The Scanner and Camera Installation Wizard will ask for connection information. You can choose the port if you know it, or ask the wizard to detect it for you automatically.
Select a connection option and then click Next. The Scanner and Camera Installation Wizard will ask for a name for the device.
Type a device name; then click Next. You’ll see a completion dialog box.
Click Finish.
At this point, you should see the new device in the Scanners and Cameras folder. It’s still not ready to use because you don’t know if the device will work. Right-click the device and select Properties from the context menu. You’ll see a Device Properties dialog box. The General tab of this dialog box normally contains a diagnostic section with a Test button. Click Test. Windows XP will test the unit and report success or failure. If the system reports success, you’re ready to go. Otherwise, make sure that you check cables, port settings, and the device itself for potential problems. You must turn the device on to test it.
Scanners and cameras are normally simple devices from a configuration standpoint. Most devices will provide a Color Management tab on their Device Properties dialog box. You can add or remove color schemes as needed to obtain good image captures from the devices. Generally, the default color settings will work just fine.
Some devices also include vendor specific tabs. You’ll need to consult the vendor documentation for usage instructions on these tabs. However, the custom tabs are often the source of problems with these devices. The vendor will provide a custom tab so the user can configure the device for optimal performance. The default settings may work, but normally you have to “tweak” the device to get it to work properly.
The purpose of installing a scanner or camera is to obtain images for your computer. Both devices require some type of image acquisition software. Fortunately, Microsoft built this software right into Windows XP. The following steps show you how to use the built-in software to scan an image. (Other image capture procedures are similar to this one.)
Double-click the device entry in the Scanners and Cameras folder found in the Control Panel. You’ll see a Scanner and Camera dialog box.
Click Next. You’ll see a Choose Scanning Preferences dialog box like the one shown in Figure 7.14. This dialog box looks deceptively simple, but it contains hidden settings that you need to adjust to get a good image capture. The first thing you need to do is select an image type.
Select an image type. Use the appropriate type for the image you want to capture. For example, while you must use the color setting for color images, the black-and-white setting actually produces images with higher definition. The second thing you need to do is to tweak the scan area and settings.
Click Preview. Windows XP will scan the entire bed the first time. This will allow you to grab just the part of the image that you need.
Use the sizing squares to adjust the size of the scanning area to match your image. Notice the two buttons on the right side of the dialog box. You can use these buttons to see the entire scanning area to adjust the sizing squares and then zoom into the capture area to see how it fits with the scanned image. After you size the image, you need to check image quality. If the image quality is less than perfect, you’ll need to set some custom settings.
Click Custom Settings, if necessary. You’ll see the Properties dialog box. Notice that you can adjust the resolution of the image, as well as the image type. It pays to adjust the image resolution to match the output resolution of your printer. For example, most laser printers offer 600 dpi resolution, compared to the 150 dpi default resolution of the Windows XP capture software. You can also adjust the image contrast and brightness—a must for color images.
Make any required custom setting changes. Click Preview after each change to verify image quality. Click Next. You’ll see a Picture Name and Destination dialog box. This dialog box allows you to choose an output file type. Make sure that you use an appropriate file type so you don’t lose information during an image conversion. The JPG and PNG file formats work well on the Internet. The PNG format may not work with older browsers, so use JPG for highest compatibility. You should use the TIF or BMP formats for local storage. The BMP format offers maximum compatibility with Windows applications, but TIF is more efficient.
Select the image storage options, type an image name, and click Next. You’ll see a Scanning Picture dialog box. After the scanning process completes, you’ll see an Other Options dialog box. You can use the options on this dialog box to send content to the Internet or order copies of the pictures from a photo Web site.
Choose one of the other options or tell Windows XP that you’re finished for right now. Click Next. You’ll see a completion dialog box.
Click Finish. You now have an electronic copy of the scanned image.

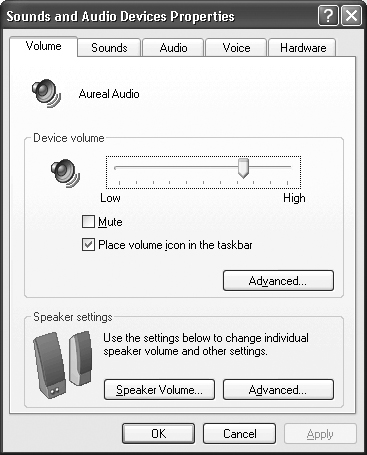
It’s important to know how to configure multimedia support on your system. For example, Windows XP assumes that you have standard desktop speakers. If you don’t change this setting, you’ll never receive the full value from your speaker purchase. Windows XP provides multimedia hardware support through the Sounds and Audio Devices applet in the Control Panel. The following sections describe the tabs in this dialog box and tell you how to use the controls they contain to configure your system.
The Volume tab appears in Figure 7.15. The Device Volume slider serves the same purpose as the single slider version of the Volume Control that you can access from the notifications area of the Taskbar. Click Advanced, and you’ll see the full Volume Control dialog box. Notice the Place volume icon in the taskbar option. Check this option if you want to see the speaker icon in the notification area.
Click Speaker Volume, and you’ll see a Speaker Volume dialog box. This dialog box allows you to adjust the output volume for the speaker, not the soundboard. Many speakers are unaffected by these settings. However, when the setting does affect your speaker, you can use it to balance out the sound for specific purposes. For example, one speaker may sit closer than the other and changing this setting will equalize the volume level.
One of the dialog boxes you’ll want to check is Advanced Audio Properties. Click Advanced to see this dialog box. The Speakers tab enables you to adjust the type of speaker that Windows XP optimized the output to handle. There are settings for everything—from no speaker at all to 7.1 surround-sound speakers. The laptop speaker settings are nice change from previous versions of Windows. This setting seems to help many laptops produce reasonable sound, although the small speakers found in most laptops will always sound tinny compared to full-sized, surround-sound speakers.
The Performance tab contains sliders that adjust the performance of your system. The first slider adjusts the level of hardware acceleration used for special features such as 3D sound. The higher you adjust this level, the more Windows XP relies on the soundboard to handle the sound processing requirements. The second slider adjusts the sample rate conversion quality. This setting, more than any other, can make a big difference in the sound you hear. Use the best setting your system will support to get high quality output.
The Sounds tab shown in Figure 7.16 contains the list of system events and corresponding sounds that you hear as you work with Windows. The number of events you see in the Program Events list depends on the operating system features and applications you have installed on your system. You’ll always see some event categories such as Windows in this list.

You can change sound settings by selecting an entry from the Sound Scheme list. Windows XP also allows you to store your favorite setups as sound schemes. Simply make adjustments to the entries in the Program Events list and click Save As. You’ll see a Save Scheme As dialog box. Type a name for the scheme and click OK.
To assign a new sound to a program event, highlight the event name in the Program Events list. Select a sound from the Sounds drop-down list box or click Browse to locate the sound you want to use. If you want to hear what the sound is like, click the arrow key. Windows XP will play the sound selected in the Sounds drop down list box.
The Audio tab allows you to assign a device to the playback, recording, and musical instrument device interface (MIDI). To change a device, select a new option from the appropriate drop-down list box. Windows XP normally selects the best device for a particular task if you have one soundboard. However, you’ll normally need to adjust these settings if you have multiple soundboards or a specialty device such as a MIDI board installed in your system.
You’ll also notice that the devices have a Volume and Advanced button. Click Volume to display the Volume Control or Recording Control dialog boxes. Click Advanced if you want to change the settings on the Advanced Audio Properties dialog box.
Like the Audio tab, you’ll use the entries on the Voice tab to adjust your hardware settings. However, in this case, the settings adjust voice recording and playback. The Volume and Advance buttons work the same as the Audio tab.
The one difference on this tab is the Test Hardware button. Click this button if you want to adjust the voice settings for your system. You’ll see the Sound Hardware Test Wizard. Click Next to get past the Welcome screen. The wizard will perform a diagnostic on your hardware and then display a Microphone Test dialog box. Speak into the microphone and adjust the volume; then click Next. You’ll see a Speaker Test dialog box. Talk into the microphone again, adjust the volume, and click Next. You’ll see a completion dialog box. Click Finish.
The Hardware tab provides a complete list of the multimedia hardware on your system. You’ll want to check this list to ensure that Windows XP recognizes all your devices. Click Troubleshoot if you see a non-functional device listed. Click Properties if you want to adjust the settings for a device or update its driver.
The Text to Speech support provided by Windows XP may sound like a separate feature at first, but it’s really Narrator (discussed in the “Narrator” section of Chapter 6) in disguise. You can access the Speech Properties dialog box shown in Figure 7.17 by using the Speech applet.
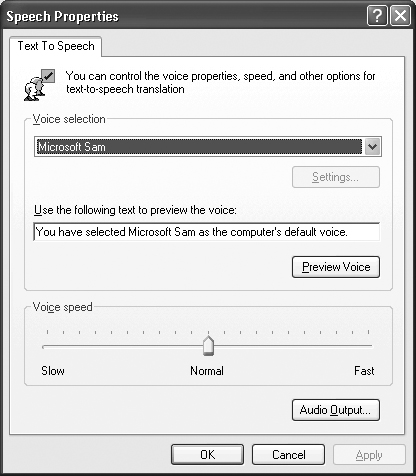
The Voice Selection field allows you to choose a new default voice from the drop-down list box. However, Windows XP only ships with one voice, Microsoft Sam. Eventually, third-party vendors will ship other voices. As you can see, Text To Speech disables the associated Settings button because Microsoft Sam doesn’t use it. A third-party voice could use this button to configure special voice features.
The voice preview feature includes a text field and the Preview Voice button. Microsoft supplies a default line of text, but you can type anything you’d like to hear. Click Preview Voice, and Microsoft Sam will talk to you.
Microsoft Sam doesn’t have the most pleasant voice in the world, but it’s definitely usable. You can adjust Microsoft Sam for your personal likes by adjusting the Voice Speed slider. You can also adjust the volume of the voice by clicking Audio and then clicking Volume in the Text To Speech Output Settings dialog box. Note that the Speech Properties dialog box doesn’t offer the pitch setting found in the Narrator setup, so you may prefer to set the voice settings that way.
Unlike previous versions of Windows, you no longer have to have a third-party application to burn CDs in Windows XP. Considering that many computers come with CD drives capable of burning CDs today, this is an especially useful feature. The CD burning capability is automatic. The moment you place a blank CD (one you can burn) into the CD drive, Windows XP will display a dialog CD Drive dialog box similar to the one shown in Figure 7.18. The following steps will show you how to record your own data CD.

Highlight Open writable CD folder using Windows Explorer and click Ok.
Place all of the files you want to write into the single pane view of Explorer. You can create folders to organize the data by right-clicking the folder area and selecting New | Folder from the context menu. Theoretically, you can also create new data files within the folder, but normally you’ll drag completed files into the folder for copying. The content for your CD should appear in finished format before you try to create the CD.
Use the File | Write these files to CD command to start the writing process. You’ll see the CD Writing Wizard. The first thing you need to decide on is a name for your CD. Use a descriptive name that will tell you the content of the CD. For example, Sams Data is less descriptive than Proj 101 Data. Use the most precise short name you can think of for the CD.
Click Next. The writing process will begin. Check your CD drive to ensure that it’s actually writing data (normally the light on the front of the CD drive is a different color for reading than writing). Be patient and don’t touch the CD drive until the CD Writing Wizard tells you to do so. The progress indicator tells you how long the writing process will take. When the CD Writing Wizard is complete, the drive will open. You’ll see an option to write the data files to another CD. If you check this option, you’ll need to add another CD to the drive.
Click Finish to complete the CD writing processing.
Verify the content of the CD by closing the drive door and viewing the contents using Windows Explorer. After you verify that the CD contains the data you want, you can get rid of the temporary files.
Close the initial Explorer single pane view. Windows XP will automatically remove the temporary files from your system.
Unlike most devices, Windows XP won’t normally detect your game controller because it won’t be able to detect it through the game port on your machine. This means that you have to install support for your game controller separately. The following steps tell you how to install a new game controller.
Open the Game Controllers applet found in the Control Panel. You’ll see the Game Controllers dialog box. Check this dialog box to ensure that the game controller doesn’t appear in the list. If it does, check the status column; you may find that the device is already recognized and functional. Adding a device twice can have undesirable results.
Click Add. You’ll see the Add Game Controller dialog box. Notice the Custom button in this dialog box. If you click this button, you’ll see the Custom Game Controller dialog box shown in Figure 7.19. As you can see, you’ll need to configure all of the specifics for the custom game controller.
Choose a standard game controller or configure a custom game controller. Click OK. Windows XP will add the new game controller to the Installed Game Controllers list on the Game Controllers dialog box. You need to test and adjust the game controller before you can use it.
Click Properties. You’ll see a Properties dialog box for your game controller. The Test tab will help you check the buttons and the positioning capability of the controller. The Settings tab will help you calibrate the controller. To calibrate the game controller, click Calibrate and follow the prompts provided by the Game Device Calibration Wizard.
Test and calibrate your device. Click OK. Click OK a second time to close the Game Controllers dialog box.

Windows has always had a love/hate relationship with games for a variety of reasons. With the advent of DirectX, gaming became better for Windows 9x users, but not for Windows 2000 users. You had to choose between a secure system and one that would run your games. Windows XP breaks this mold for the most part by providing some innovations that Windows 2000 users could only dream about.
Unfortunately, game users will experience one problem that defies an instant fix. Those of us who are lucky enough to have dual processor machines will also find that many games won’t work. You can play them for a while, but will eventually find yourself back in Windows. The problem is easy to fix once you know what it is. All you need to do is make the game think you have one processor by following these steps.
Start your application as normal. However, as soon as it gets to a menu or other stable location, use Shift+Tab to get back to Windows.
Right-click the Taskbar and choose Task Manager from the context menu. You’ll see the Windows Task Manager dialog box.
Select the Applications tab and locate the game within the list.
Right-click the game entry and choose Go to Process from the context menu. Task Manager will highlight the appropriate entry on the Processes tab.
Right-click the process and choose Set Affinity from the context menu. You’ll see a Processor Affinity dialog box. This dialog box tells Windows XP which processors to assign to an application. Remember, we want to fool the game into thinking we have only one processor.
Clear the CPU 1 checkbox. Click OK.
Close the Windows Task Manager. Enjoy your game.
Some games won’t run under Windows XP because they think it’s Windows NT/2000 or there’s something about Windows XP they don’t like. You can get around this problem in many situations by running the application in compatibility mode. Windows XP will fool the game into thinking it is some other version of Windows. The following steps show you how to set a game up for compatibility mode use.
Locate the game shortcut on the Start Menu. Right-click the entry and choose Properties from the context menu. Select the Compatibility tab, and you’ll see a dialog like the one shown in Figure 7.20.
Check the Run this program in compatibility mode for option. Select one of the operating system versions you think will run the application.
Check any required display settings. For example, many pieces of educational software require you to set the display to 256 colors. Unfortunately, Windows XP doesn’t support this mode, so you need to emulate it.
Click OK. Windows XP will apply the new settings to your game.
Test the game by selecting its entry in the Start Menu. If the game plays correctly, then the compatibility settings have helped. Otherwise, it’s unlikely that you’ll be able to run the game under Windows XP.

Always start the game using the shortcut you just set up. Otherwise, Windows XP won’t know how to run it using compatibility mode. Some games offer to start immediately when you place the CD in the drive and close it, but this won’t work with games that need to run in compatibility mode.
Most games rely on DirectX today, so if DirectX isn’t working on your system, then the games probably won’t work either. If Microsoft has a deep dark secret for gamers to discover, it’s that DirectX doesn’t have to be impossible to troubleshoot. All you really need to know is where to look and how to understand what to do with the information you find.
The first step is to start the DirectX diagnostic utility. You won’t find it on your Start Menu. Open the Run dialog box, type DXDIAG, and click OK. You’ll see a DirectX Diagnostic Tool dialog box like the one shown in Figure 7.21.

The first setting I always check is the DirectX Version entry near the bottom of the dialog box. You need to go to the DirectX Web site (http://www.microsoft.com/directx/default.asp) to verify this version number against the current version that Microsoft supports. If you see that the Web site contains a newer version, download it, install it, and restart your machine. Check the game again to see if it works. If the game still doesn’t work, you’ll need to perform some additional troubleshooting.
Notice the Next Page button at the bottom of the screen in Figure 7.21. You’ll find a button like that one on most of the DirectX tabs. What the button doesn’t tell you is that clicking it runs a test on your system. Try clicking it now, and you’ll advance to the DirectX Files tab. If you see No Problems Found in the Notes section, you know that the test passed.
Click Next Page again, and you’ll advance to the Display tab. The same success or failure message will appear in the Notes field again. However, this time you’ll also see some diagnostic buttons. For example, you can disable Direct3D Acceleration by clicking the associated Disable button. Before you cripple your system, however, you’ll want to test its compatibility with DirectX. Click Test DirectDraw, and the DirectX Diagnostic Tool will perform extended tests on your system. If everything goes well, click Test Direct3D. These tests will verify that your display adapter can work with DirectX and therefore work with the games on your system. If you do run into problems, the DirectX Diagnostic Tool normally provides enough information for you to fix the problem yourself or ask intelligent questions of a support person. In some cases, you have to disable a hardware acceleration feature to gain true compatibility.
Follow the Next Page and testing process until you get to the More Help tab. If everything passes at this point, your system is completely compatible with DirectX. The game you can’t run would likely have problems on any system.
Many gamers want the thrill of competing against another human being today. Generally, the artificial intelligence (AI) provided with a game can’t keep up with the mind of a skilled player, which makes the game somewhat boring. The only problem with multiplayer games is getting the network connection to work.
Let me say up front that you’ll experience situations on the Internet when no amount of screen banging will result in a good connection. Sometimes Internet connections fail, and you can’t do anything about it. The tips in the following sections skip over some of the impossible and esoteric problems I’ve heard about. We’ll discuss common problems that gamers experience.
You have full control over your LAN, but sometimes it seems to fight harder against playing a game than any Internet connection. The good news is that you can fix any non-performance or non-game related problem that you’ll experience with your LAN. If the problem is hardware or configuration related, you won’t have a problem fixing it.
The first thing to do is check the simple problems. For example, if the machines aren’t on the same network segment, you’ll find it difficult to play. Check your network addresses to make sure they’re in the same subnet. Right-click My Network Places and choose Properties from the context menu. You’ll see the Network Connections dialog box. Right-click Local Area Connection and choose Status from the context menu. Select the Support tab. Look at the IP Address and the Subnet Mask entries. The subnet entries must match. So, if your machine has an IP address of 192.168.0.5 and the other machine has an IP address of 192.168.0.25 and the subnet mask is 255.255.255.0, the two machines should be able to communicate. The subnet for both machines is 192.168.0. If the two machines aren’t on the same subnet, you’ll need to configure one of them by using the instructions in the “TCP/IP Configuration” section of Day 14.
After you establish that the two machines can talk, you should check to ensure that they actually do have a connection. Open a command prompt and type PING <Other Machine Name>; then press Enter. The other machine should respond. PING will test the connection four times for you. If the connection fails, you need to check problems such as a failed network interface card (NIC), a bad cable, a disconnection, or even a bad hub.
If the two machines can communicate by using PING, then there’s nothing wrong with your hardware or machine specific configuration. It’s time to recheck the game manual and see if there’s a problem with your game configuration. Generally, games will ask you to provide the address of the other machine. You could make a mistake entering the address. “Close” doesn’t work with TCP/IP, so you must configure it exactly right. If nothing else, type everything back in again and pay close attention to problems such as replacing a 0 (zero) with an O.
Sometimes, the game is broken, and there’s no doubt about it. Unfortunately, the game developer won’t call your house and tell you about the problem. In addition, game product support may not know about the problem or any existing fixes. You may find that a third party has released the fix and the game vendor doesn’t even know about it. That’s when you need to get online and check the game newsgroups online. Someone is almost certain to know about the problem. If there’s a fix, they can usually tell you where to find it.
Getting Internet games to talk is about the same as working with LAN games; only the players are different. You still need to check your local setups first. However, the IP address for your machine will vary from that of your friend. It’s important to get the right IP address. Make sure that you use the number from your dial-up or cable connection instead of the one for the local connection.
You also need to check with your Internet Service Provider (ISP). In some cases, a game will fail to run because the connection is extra slow. The ISP support staff can generally tell you if there’s a problem with the line. If there is, you’ll probably have to wait to play your game another day.
Don’t assume that because a game’s LAN connection works that the Internet connection also works. It would seem like the software used to make a direct connection would also make the remote connection, but this isn’t always true. So, if you have doubts about the vendor’s ability to deliver a solid product, you’ll want to check online again and see if there’s a patch that fixes the problem.
Windows XP comes packed with more games than any previous version of Windows. These aren’t long or complex games, they’re the type you play while the boss isn’t looking or during a break. You’ll find all the usual favorites: Solitaire, Mine Sweeper, Free Cell, and Pinball. All of these games play the same as they always did in the past. Microsoft has also included Hearts in the mix. You can play this game locally against three computer opponents.
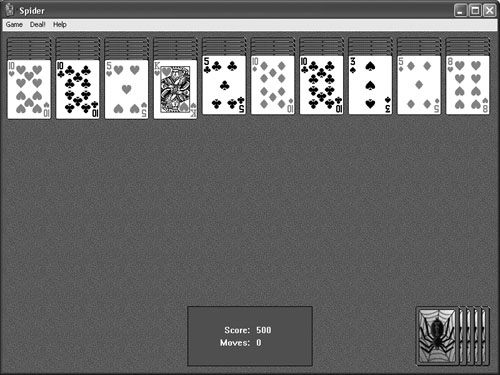
One of the most addictive new games is Spider Solitaire shown in Figure 7.22. This is another form of the popular game where you place like suits on top of each other instead of alternating red and black. When you have a complete set of 13 cards, the game automatically picks them up and puts them aside. The draw pile works differently than other versions of solitaire. You select an entire set of cards, one for each row of the game board. One of the features I like about Spider Solitaire is that you get to choose the level of difficulty. The hard game really is hard to play.
Microsoft also includes a series of Internet games with Windows XP. To play these games, you must have an MSN account. There isn’t any way to play them across a LAN or with other users who don’t have an MSN account. You’ll find old favorites such as backgammon, reversi, checkers, spades, and hearts.
Today you’ve learned about multimedia on your computer. I hope you agree that Windows XP includes a wealth of new multimedia features, some of which will affect everything form the way you tell people about your latest vacation to the way you run your business. The level of multimedia support you obtain with Windows XP is better than any previous version of Windows.
Why doesn’t the Windows Media Player list the statistics for my favorite album? | |
You may be running into one of several problems. The first problem is that Windows Media Player requires a connection to the Internet before it can supply your system with media data. The first place to check is your Internet connection to ensure that the Windows Media Player can grab the data it needs. The second problem is the level of content on the Microsoft Web site. It contains information for many CDs, but not every CD. If a CD is too old or too new, your chances of obtaining any information about it are slim. Finally, you won’t ever see some types of information from the Windows Media Player without a little work on your part. For example, you won’t see any lyrics unless you type them in yourself. | |
Why does the animation I created using the Windows Movie Maker look jerky? | |
I’m not a professional in this area. However, the animation books I’ve read show that animators use many pictures with evenly spaced amounts of movement. The interval between each picture must remain constant or the viewer’s eye will notice the discrepancy. Early animators were so concerned about the even movement and constant time problems that they would study live action video for hours to detect how the real world moves. Because I’m not a professional, I use graphics I can control easily, such as the clock example in Chapter 1, to create an animation with a somewhat smooth appearance. | |
Why doesn’t the live video capture seem to work on my system; the clip is always blank? | |
Make sure that you can see the live video in the window in the Record dialog box before you begin recording. If you can’t see the live video, check the cabling and ensure the device is on. It’s also important to install any device drivers you need. For example, the tuner on most video boards won’t work by using the default Windows XP drivers; you need a special driver from the vendor. | |
Why do sounds sometimes repeat on my system or disappear completely? | |
You’ll normally see odd sound system behavior when the hardware acceleration settings on the Performance tab of the Advanced Audio Properties dialog box are set too high. Make sure that you set these sliders as high as they can go without affecting system performance or sound quality. In some cases, this will mean accepting lower quality sound output to ensure you get any output at all. |
Welcome to the end of the first week! We’ve covered a lot of ground this week—everything from installing Windows XP, to using the product, and beyond. It’s time to test your knowledge of multimedia and games. You can find answers to the quiz and exercise questions in Appendix A at the back of the book.