More and more, users are finding that the appeal of Linux is becoming stronger. A good portion of you have already integrated Linux into your own networks. Businesses are still reluctant, though, to bring Linux fulltime into a network. Most of the reasons for this stem from a lack of knowledge of Linux and a hesitation on the behalf of network administrators to trust their networks and data to a “free” operating system.
Linux has been around for quite some time now and is no longer the domain of computing gurus. Some will say that Linux is a mainstream product now and deserves a place among the enterprise network operating systems. In light of this, you may find yourself needing to integrate Linux into your Windows networks or you may just want to integrate it for the sake of seeing how it performs.
Whatever your reasons for wanting to put Linux in your network, it’s a decision you won’t regret since it’s an excellent server in any network for file or printer sharing or as a Web or FTP server. You can even use it as a Primary Domain Controller (PDC) in a Windows NT network with some configuration, but we won’t delve into that here.
The discussion in this chapter will focus on using Linux as a file and print server in your Windows network and accessing the file and print shares provided by Linux from Windows XP Professional.
Tip
The Internet abounds with interesting sites containing Linux software. However, one of the best places to find great software and tips to go with it is Dave Central (http://linux.davecentral.com/). You’ll find a lot of great software here, including a version of Quicktime for Linux.
Samba started life as the brainchild of Andrew Tridgell back in 1991. Andrew was looking for a way to access files that resided on a Sun computer from his own PC, which was running Digital’s PATHWORKS for DOS.
Samba is a tool that allows for resource sharing from a Linux computer with a Windows computer. This sharing works both ways. You can use Samba to provide shares on a Linux server to Windows clients, and you can access shares on Windows computers from Linux by using the client portion of Samba.
Samba uses the server message block (SMB) protocol that’s found in Windows and other network environments. Samba isn’t just for Windows/Linux integration, however. It’s widely available as a free software package that allows file and printer sharing among many disparate computing platforms such as MacOS and Unix variants. Currently, Samba runs on the following operating systems:
AIX
AmigaOS
BSD (FreeBSD and OpenBSD)
BeOS
Coherent
HP-UX (Hewlett Packard)
Irix (SGI)
MVS
OpenVMS
OS/2
Tru64 UNIX (formerly Digital UNIX now Compaq)
ULTRIX (formerly Digital)
Many products and networks have used SMB over the years. The first implementation was in IBM’s PC Network Program—a broadband Ethernet network. Since that inception, IBM’s LAN Server, Microsoft LAN Manager, Windows NT, Windows for Workgroups and Windows 9x, as well as LAN Manager for UNIX and Advanced Server for UNIX, have all used SMB.
Most Linux distributions come with a version of Samba on the install CDs or downloads. Samba gets installed during the OS install if you choose it from the available packages. One of the first things you may want to do before continuing with this chapter is to acquire and install the latest version of Samba. This ensures that you have the latest bug fixes.
You can download the current version from http://www.samba.org. Look for your Linux distribution link and download the latest version there. As of this writing, version 2.2.0 is the latest version.
After you’ve acquired the latest version of Samba, you can install it. For some distributions of Linux such as RedHat and Mandrake, a software installation package, called RPM, is available. RPM stands for RedHat Package Manager and is perhaps one of the easiest ways to install software on a Linux computer. Check your distribution of Linux as many more are starting to use RPM.
Note
If you have a distribution that uses RPM, be sure to download the RPM version of Samba. In addition, after you install Samba, check the version number using the smbstatus command in a terminal session. It’s important to verify the version number before you proceed.
To use RPM to install Samba, locate the version of Samba that you downloaded; it normally resides in the user directory you were in when you logged into the Linux computer. For example, if I logged in as jmueller, then the file should be located in /home/jmueller.
RPM comes with many commands and options for software installation, removal, upgrading and verification; but we only need to look at the installation and upgrade options here. To see the available options, issue the RPM command in a terminal session by itself and press Enter. The options are displayed onscreen. Alternatively, you can read the manual pages by specifying man RPM. If you don’t have any version of Samba installed yet, issue this command to install the new package that you’ve just downloaded.
rpm –-install samba-2.2.0-200010417.i686.rpm
This command causes the RPM application to install the files in their required location to run Samba on your Linux computer. If you already have a version of Samba installed, you can either install the new version or upgrade the existing installation.
Caution
You may receive errors when trying to upgrade over an existing version of Samba. These errors usually indicate conflicting file versions. Use the—force option with RPM to force the installation of the newer files. The—force options is used immediately after the—upgrade or—install switches. Example;
rpm –-install –-force samba-2.2.0-200010417.i686.rpm
After you install Samba, you need to configure it before it will perform any useful functions on your network or even be visible to a Windows network. Samba is configured by using a text file called smb.conf. You’ll find this file located in the /etc directory. An example of a smb.conf file as shown in Listing 17.1.
Example 17.1. Main Samba Configuration File
#=======================GlobalSettings===============================
[global]
# workgroup = NT-Domain-Name or Workgroup-Name
 workgroup = MDKGROUP
# server string is the equivalent of the NT Description field
 server string = Samba Server %v
# This option is important for security. It allows you to restrict
# connections to machines which are on your local network. The
# following example restricts access to two C class networks and
# the "loopback" interface. For more examples of the syntax see
# the smb.conf man page
; hosts allow = 192.168.1. 192.168.2. 127.
; encrypt passwords = yes
; smb passwd file = /etc/smbpasswd
This isn’t the complete smb.conf file, since it’s considerably longer than this. Not that it has to be, but you’ll notice the comments throughout the file. The commented lines are prefixed with # and ; symbols. As the introductory text in the file mentions, the # symbol is used to indicate comments for information and the ; symbol is used to indicate lines that the user can edit or enable a certain feature by removing the ; symbol.
Most Linux and Unix users are familiar with a command line text editor called vi. vi has been around for quite some time in the Unix community and was included with Linux. As previously mentioned, it’s a command line text editor, and it’s very powerful. You can use vi to edit the smb.conf file by changing to the /etc directory and issuing the command:
vi smb.conf
Editing the smb.conf file manually certainly isn’t the easiest way to get Samba working for you. You need to know what each section is responsible for, what parameters are correct, and the settings for those parameters. This chapter can’t cover all the aspects of Samba, since it’s very complex. We’ll use vi to set a few options that will allow your Samba server to be visible to Windows. With the smb.conf file open in the vi editor, make the following changes to the file.
Using the arrow keys, scroll down to the line that contains the workgroup = MDKGROUP option and place the cursor on the M. Press the letter x to delete the entire MDKGROUP word.
After the entire word is deleted, press the “i” key to cause vi to go into “insert” mode. Press the spacebar once and then enter your workgroup or domain name. When you’re finished, press the ESC key to exit “insert” mode.
Once you’re out of “insert” mode, you can move around the document again. Using the arrow keys, scroll down to the section that contains the options:
<LINELENGTH>90</LINELENGTH>encrypt passwords = yes smb passwd file = /etc/smbpasswd
You’ll notice two semicolons (;) at the beginning of these lines. Using the “x” key, delete both semicolons. This ensures that Samba will use encrypted passwords, which is now the default in Windows.
Tip
Setting encrypt passwords to yes means that Linux and Samba will recognize the passwords transmitted across the network in encrypted format, rather than plain text. This is important because if your sent passwords are plain text, they can be intercepted in transmission by packet sniffers or network analyzers, which compromises security.
That’s all that’s required in terms of configuring Samba to be seen by a Windows computer on the network. All you have to do now is restart the Samba server or start if it isn’t already running. You do this by issuing the following command from the /etc/rc.d/init/d directory on the Linux computer.
./smb start
You should see a status message indicating that both the SMB and NMB services have started. This will be evident by the bracketed OK indicators after the name of each service as it starts.
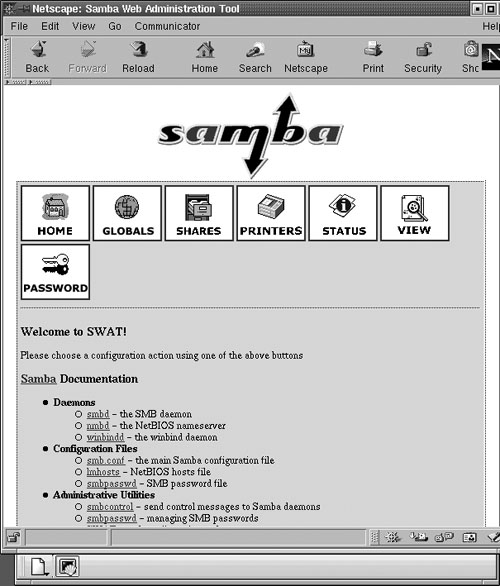
To verify that you can see the Samba server, open Network Neighborhood on your Windows computer. You should see the Samba server listed, as shown here in Figure 17.1, where you can see my server listed as Samba Server 2.2.0(Linux_One).

Before we can go any further into the configuration of Samba, we need to discuss the use of passwords. There have been some issues surrounding how passwords are used for Linux and Windows. Versions of Windows 95 prior to OSR2 used plain text passwords. This meant that your passwords were passed across the network to the Linux server as plain text, which obviously caused some security concerns. Later versions of Windows switched to using encrypted passwords. These two styles will be discussed in the following sections.
As mentioned before, Windows clients use encrypted passwords to satisfy login requests across the network. When a Windows client attempts to connect to a Samba share, the Samba server will first check the username and password that the requesting client used if he logged into a Windows domain, such as Windows NT or a Windows 2000 Active Directory domain. If you don’t have Encrypted passwords specified in the Samba configuration file, the login or access to the Samba share will fail.
When we talk about encrypted passwords, we mean that the password itself is hashed (identified using string that is generated by a mathematical formula). This prevents any network snoopers from getting the password when it’s sent across the network. All they’ll see is the hashed password; and without the correct hashing algorithm, they can’t decipher the password.
It’s a good idea to use encrypted passwords in your network unless you’re absolutely certain that nobody can tap into your network and monitor the transmissions. Also, by default, Windows uses encrypted passwords; so, you need to enable this option in the smb.conf file. You’ll see how to do this in the section in configuring Samba.
Samba can use clear text passwords if you have Windows clients earlier than Windows 95 OSR2, or if you decided you wanted to use clear text passwords. Samba comes configured by default to use clear text passwords so you only need to make changes to the smb.conf file if you don’t want to use clear text. That will be explained shortly in the section on configuring Samba.
There’s one caveat in using clear text passwords. If you have newer Windows clients, later than OSR2 or Windows 95, you’ll have to make a change in the registry to enable this on the Windows clients.
To change this parameter in Windows XP, go to this key in the registry:
HKEY_LOCAL_MACHINESYSTEMControlSet001Serviceslanmanworkstationparameters
You’ll see a value called enableplaintextpassword with a data type of REG_DWORD. Double-click this value to open it for editing. Change the HEX value to 1 to enable the use of plain text passwords, and set it to 0 to disable plain text passwords and use encrypted passwords instead.
From a security point of view, enabling clear text isn’t a good idea. I highly recommend, especially since you’re using Windows XP, that you enable encrypted passwords in your smb.conf file.
The methods that you used in the previous sections won’t allow you to browse any resources on the Samba server until the rest of the options are set. Editing the smb.conf by hand with a text editor isn’t the best method to get the job done. The easiest way to configure Samba is to use the Samba Web Administration Tool (SWAT) and Webmin.
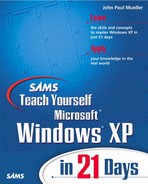
In order to use SWAT, open your favorite Web browser on the Linux computer and type http://localhost:901 in the address bar. This will cause Linux to load the SWAT tool into the browser and ask for a username and password to access it. You must have root access to use SWAT, so enter root as the username and then enter the root password. SWAT will present you with the screen shown in Figure 17.2 upon successful login.
As you can see in this figure, the SWAT tool is a graphical environment running in a Web browser. This allows you to easily configure settings for Samba by clicking graphics and hyperlinks.
The first section you need to be concerned with is the Globals section. Clicking on the Globals image at the top of the page opens the Globals page ready for editing.
Each of the options that are available on this page correspond to the Globals section in the smb.conf file. SWAT will write those values to the file when you click the Commit Changes button on this page. You’ll configure some of these options now.
The first set of options you see fall under the Base Options group and are listed and explained here:
workgroup. This setting is used to specify the Windows workgroup or domain that this Samba server will participate in. Enter your workgroup or domain name here.
netbios name. Using this setting gives the Samba server a netbios name that will be visible when users browse the network neighborhood applet of Windows. Provide a computer name that you want to use here.
server string. Use this setting to give the server a descriptive name that appears in the description field when browsing the network. You can check the manual pages for Samba to determine the available options for this setting but the default is fine. The &v option is used to indicate the version of Linux that’s running on the computer.
interfaces. Using this setting indicates which network interfaces the Samba connection will work over if you have multiple NICs installed in the computer. We won’t set this value here, since it’s not explicitly required.
The next section that you come across is the security section. This section deals with securing the Samba server from users and computers that aren’t allowed access. There are various ways to secure your server, and we’ll look at each in turn here.
The first option is the security and has USER specified next to it. This is the default, and we’ll leave it at USER. USER simply means that when a client attempts to connect to the Samba server, Samba will check to see if there’s a user account with a password for that user. If so, the user is allowed access and the home directory is displayed in the network neighborhood window, as shown in Figure 17.3.
We’ll look at specifying users a little later. For now, we’ll look at the remainder of the security settings. The next option after USER is the encrypt passwords option. You know about encrypted and clear text passwords from our discussion earlier in this chapter. Here’s where you enable that option. Ensure that you select Yes next to encrypt passwords.
Directly under this option is the update encrypted option. This option is used to specify whether a user logging on with a clear text password will have his encrypted password updated with the clear text password. This password resides in the /etc/smbpasswd file. Remember to set this option to Yes if you have encrypt passwords set to No.
Under the update encrypted option, you’ll notice the guest account option. You use this option to specify the guest account to use. Linux will use the guest account for users logging into the Samba server that have no valid user account on the server. The default is nobody, which tells Samba not to allow any guest logins.
You can set up a guest account on the server and limit the permissions that the account has and then assign that account here for guests to use. This is a security risk and not recommended, since it allows anonymous user access to your Samba server.
The next two options are the hosts allow and hosts deny options. You use these two options to specify which IP addresses or workstation netbios names to allow or deny access to the Samba server. The default is no entries in either of these options, which means that all workstations will have access to the Samba server, providing they have a valid login username and password.
One reason for using these two options is to limit access to clients that can connect to your Samba server by checking the IP address or range. You can use this feature if you connect your Samba server to the Internet through an internal network or make it available across the Internet. Using this technique allows remote sites within your organization to access your network across the Internet or a WAN.
You can specifically allow only certain clients by specifying an IP address or partial IP address to include a subnet, or you can also specify workstation names. For example, if you wanted to allow all workstations in the 192.168.0 subnet to access this Samba server, you can enter 192.168.0. in the hosts allow text box. This tells Samba to allow all IP address in the range 192.168.0.1 to 192.168.0.254.
You can specify more than one subnet or IP address by separating each entry with a space, as in the following example.
192.168.0. 192.168.1. 192.168.3.1
This example will allow all workstations that have an IP address in the 192.168.0 and 192.168.1 subnets plus the workstation with the IP address of 192.168.3.1.
The hosts deny works the same way. You can allow all workstations access and explicitly deny access to certain workstations by specifying the workstation name or IP address in the hosts deny text box. For our discussion, leave these options empty to allow all workstations access so as not to interfere with our examples.
The next section of the configuration deals with Logging Options. Samba can log all activity that takes place on the server when clients connect to and use the resources on the server. You can specify the location for the log file in the log file text box. Samba defaults to placing the log file in the /var/log/samba directory with a filename of log.%m where %m is used to specify the machine name that’s making the connection. If you don’t specify the %m variable in this text box, Samba will log all activity to the log.samba file.
If you look at the log file, you’ll notice a few things. First, there’s a time and date stamp placed on every activity that has taken place. You’ll also see status messages and error messages. The log files are a great Samba troubleshooting tool. You should enable them to help troubleshoot individual workstation connect issues.
The last option in the Logging Option section is the max log size. This setting allows you to specify how large, in Kilobytes, you want to allow the log file to be. The default is 50 Kilobytes.
The tuning options that are available in the section after logging deal with the communication over the network that Samba will use. Samba isn’t capable of automatically tuning itself for your network, so you may need to experiment with the available settings. Check the manual pages for Samba to get an understanding of all the available options for tuning.
One that I recommend that you add to the default is the SO_KEEPALIVE option by specifying it as:
SO_KEEPALIVE=1
This option will maintain your network connection to the client if left idle. If you don’t specify this option, a timeout will occur and cause your connection to be lost.
The default options that are shown in the Tuning section are designed to prevent any transmission delays on TCP/IP and set the size, in bytes, of the send and receive buffers.
Next, you’ll see the Printing options section. Here’s where you set the options relating to the display of printers in Samba. Most Linux systems are using the System V style of file and print systems. For this reason, the default entry in the printcap name option is lpstat. I recommend that you leave the default option of lpstat, unless you have reason to change it, since it will automatically provide a list of available printers on the server.
The next option in the Printing section is simply called printing. This option deals with the style of printing system used on the Samba server. Samba 2.0.6 uses CUPS (Common Unix Printing System) by default. There’s a list of available printing systems displayed when you click the arrow on the option drop-down. You can use these to select the printing system used by your Samba server if you’ve changed it to a different printing system. The available options are listed here for your convenience.
sysv
aix
hpux
bsd
qnx
pnp
lprng
softq
cups
nt
os2
After you’ve set the printing options, you can move on to the Browse options. These options deal with how Samba will behave in your Windows network in terms of announcing itself to browse masters and if it will behave as a browse master. Browse masters are used to contain lists of workstations, servers, and resources available on a Windows network.
The first option you’ll see is the OS-level option, which is used to set how aggressively Samba will announce itself to the Windows network in terms of browser elections. By default, Samba will win browser elections over Windows 9x workstations, but not over NT or Windows 2000 domain controllers. The higher the number, the more aggressive the announcement. The default is 20.
The next option is titled preferred. Setting this option to True will cause the Samba server to force an election and attempt to become the preferred master browser. The default is Auto, and it should be left at auto if you have domain controllers or other master browsers in your network. The reason is that Samba could force the election and cause a continuous round of browser elections with other master browsers. This will result in excess network traffic and network resources becoming unavailable or not visible at all. If you don’t want Samba to be a browser, set this option to False.
After the preferred option is the local master. This option is defaulted to Yes, which means that Samba will attempt to be the master browser for the local subnet. Once again, the same cautions apply as for the preferred option.
The last available setting in the Browsing section is the domain master. This option determines if Samba will be a domain wide master browser. Again, use this option with caution if you have Windows NT/2000 domain controllers on your network.
The last section to configure on this page is the WINS Options section. This section deals with name resolutions from NetBIOS names to IP addresses.
The first option specifies whether Samba will attempt to look up the NetBIOS name as a DNS name if it doesn’t find it listed in the WINS database. The default is No, and unless you have a DNS server running on the network, it’s recommended that you leave this at the default setting.
The next option, wins server, allows you to specify a WINS server on the network to perform the NetBIOS to IP name resolution. For Windows NT networks, WINS servers were a common occurrence; however, with Windows 2000 Active Directory reliant on TCP/IP and the fact that NetBEUI is no longer recommended or supported in Windows 2000, WINS support is slowly dwindling. The Samba server itself can act as a WINS server, which is discussed in the following paragraph. This option is normally specified as an IP address, but it can also be a DNS name. For the most part, you can use the LMHOSTS file on the Windows clients to specify the NetBIOS to IP address mappings.
The last option is the wins support option, and it is used to indicate if the server will act as a WINS server. Setting it to Yes will cause this server to act as a WINS server for the network. There are a couple of cautions to be aware of here. First, don’t enable more than one Samba server on the same network with WINS support. Second, this option shouldn’t be enabled unless you’re running multiple subnets on your network. The reason for this is the amount of network traffic that’s generated by WINS servers to maintain the mapping lists.
Once you’ve configured the necessary changes on this page, be sure to go back to the top of the page and click the Commit Changes button to make the options take effect. It may also be necessary to restart the Samba services to cause the changes to take effect.
Now that you have the network options configured, you can select the Share button at the top of the page to display the Share page as shown here in Figure 17.4.

In order to create a new share, simply type in a name for the new share in the box provided and click the Create Share button. The new share will be created. If you want to configure the new share or any other share, select the share name from the drop-down box and then click Choose Share. SWAT will display the share options for the selected share.
Since the options on this page are self-explanatory, I won’t cover them here. It’s important to note that the home directories are available by default for users as they log in.
There’s a page available on configuring printers, but we’ll discuss that a little later in this chapter when you’ll learn how to use Linux as a print server.
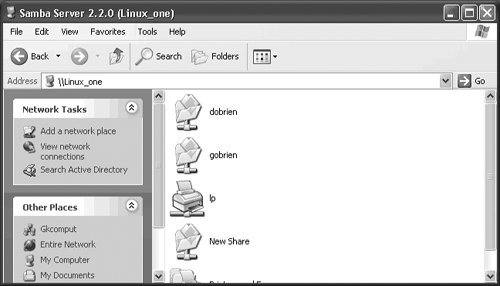
The button immediately to the right of Printers is the Status button. This brings up the status page for the Samba server, as shown here in Figure 17.5.
You’ll notice a few things from this page. First, the top button allows you to have the status page refresh automatically according to the interval specified in the interval box. This gets boring fast, since the entire page needs to reload for each refresh.
Next, you’ll see the version number of Samba that you’re running. Then you’ll see two sets of buttons each for the smbd and nmbd services. You can stop, start, or restart each service with these two buttons.
Note
The current screenshot shows that the smbd and nmbd services are running, which is why the first set of buttons state “stop smbd, stop nmbd”. If the services weren’t running, the buttons would say “start”.
You can use the Status page at any time to view the current status of your Samba server. Most times, simple connectivity issues are a direct result of the Samba service not running when you think it is.
Tip
You only need to issue the restart smbd command to cause an implicit restart of both the smbd and nmbd services when both are running.
The next item is the Active Connections section, which is where you can see what computers are connecting to your Samba server. The available information tells you what PID is (process ID) assigned to the client for the connection. The PID is necessary for Linux to be able to kill the connection, if need be.
Next, you’ll see the client name, which is the NetBIOS name of the client computer connected to the server. The client IP address follows; then the date and time the connection was made. The last column contains an X button titled Kill. This allows you to “kill” or disconnect the client from the server.
Under the Active Connections section, you see another table that lists the Active Shares. This shows you what shares the client computer has open and provides the share name, the user and group that the user belongs to, as well as the PID, client NetBIOS name and date and time stamp.
The last section shows you what files are open. It also provides information such as the PID again, sharing information along with the read and write aspects of the file, oplock information, the filename, and date it was opened.
You’ll access the next available page by clicking the View button at the top of the page. It’s a view of the smb.conf file as you’ve configured it to this point.
The last page that you can access using SWAT is the Passwords page. This page allows you to add, delete, and configure Samba users. Figure 17.6 shows an example of this page where the user account jmueller is about to be created.

After you click the Add New User button, the user is added to the /etc/smbpasswd file. The user can now access the Samba server.
What you’ve just stepped through is the basic requirements to set up and configure Samba for access by Windows XP. You can use advanced features that are available by choosing the Advanced View button on the Globals page in SWAT. The advanced features aren’t important for our discussion here, so I suggest that you experiment and read more in the advanced features on your own.
So far, you’ve seen how to configure Samba using the smb.conf file and a text editor, as well as using the SWAT utility. You can configure and manage your Samba server with another Web-based interface that allows even more security. That interface is the Webmin interface.
Webmin is a Web browser based interface that enables you to manage your Linux computer using SSL (secure sockets layer). In order to use Webmin, it must be installed on your Linux computer. Most Linux distributions come with Webmin, which you can install using the method utilized by your version of Linux. Mandrake 8.0, which the distribution used for this example, allows you to install Webmin when you set up the operating system. If your version of Linux doesn’t have Webmin, you can download it from http://www.webmin.com/webmin.
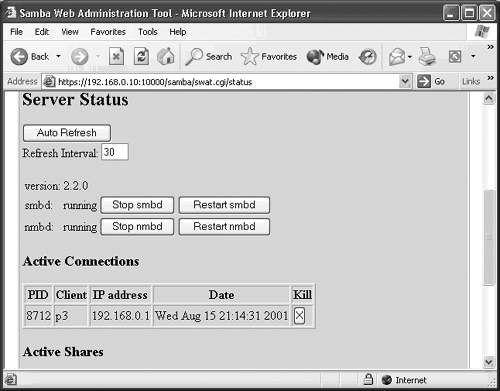
You can only gain access to Webmin by issuing a particular URL in your browser’s address bar. To access Webmin, you use the https protocol and specify the DNS name or IP address of the Webmin server along with the port number of 10000. For example, to access Webmin on my Linux computer, I enter this URL, https://192.168.0.10:10000. You’ll also need to enter a username and password, which appears as root until you create a new Webmin user.
You’ll notice that there are six tabs across the top of the page. These tabs allow you to configure certain aspects of your Linux computer. Since Samba is a server, you’ll find it under the Servers tab. If you click that tab, a list of servers appears that are installed on your Linux computer. Selecting the Samba Windows File Sharing server at the lower left corner will bring up the screen shown in Figure 17.7.
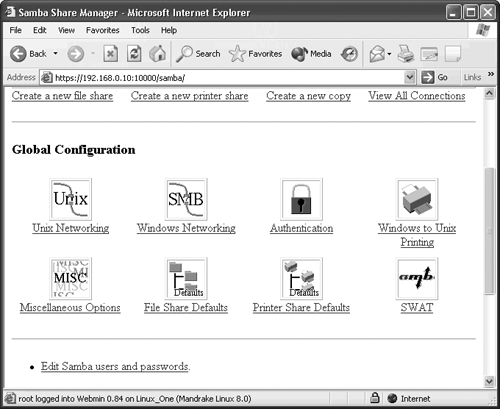
Selecting the various options on this page allow you to configure that aspect of Samba. Note that there’s also a SWAT entry at the bottom of the options. By using SWAT in this way, you have secure remote access to configure your Samba server.
Once you have the configurations set, as mentioned in the previous sections, you can begin to use Linux in your Windows XP network. Linux can exist as either a server or client in your network. It can serve as both at the same time also.
As a server, Linux can be used as a file and print server, as a Web server, or an FTP server. However, we’ll concentrate on using it as a file and print server, as well as a client for use in your network to access shares and resources on your Windows XP computers.
If you’re familiar with Windows networking in Windows 95 and later, you’re familiar with the Network Neighborhood applet that allows you to browse and access file and printer shares on other networked computers. Network neighborhood allows you to view shares on Linux Samba servers as well.
You’ve already seen the use of Network Neighborhood earlier in the chapter when you browsed the network to see the Samba server listed. After you set the necessary user accounts, as mentioned in the preceding sections, you can gain access to the home directory for the username you logged in as. Once you have access to your home directory or the share on the Samba server, you can gain access to the directories and files just as you would a Windows-based computer.
Take some time right now to browse the files and directories on your Samba server. You also have to remember that Linux and Windows store files differently. Samba allows a transparent interaction of the two computing platforms that will allow you to copy, move, and delete files on either machine without needing to worry about how they’re stored.
Note
Even though you can copy a Linux executable file to a Windows computer or vice versa, that doesn’t mean that the file will execute on the opposite computer. The executable files are compiled for different operating system platforms and aren’t compatible.
An ongoing software project called WINE is currently being developed. This Windows emulator project runs on Linux and allows you to execute Windows applications. You can get more information on WINE, including downloading working versions at http://www.winehq.com/.
Note
One thing you’ll notice with XP in comparison to other versions of Windows is that once you’ve accessed a share on the samba server for a username, that username becomes the default share. Network Neighborhood will display this each time you try to access the Samba server. You’ll need to log off the XP computer and back on again to clear the network mapping, allowing you to see the entire Samba server share list.
You can also gain access to your Samba server through the use of the NET utility at the command line. Some of you may be familiar with this utility and use it quite often. This section will discuss using NET to access the Samba server.
One of the first things that you might want to do with the NET command is to view what resources are available on the server you want to connect to. In our case, this would be the Linux_One server, so you’d issue the command net view \Linux_One. This will display the information shown in Figure 17.8.
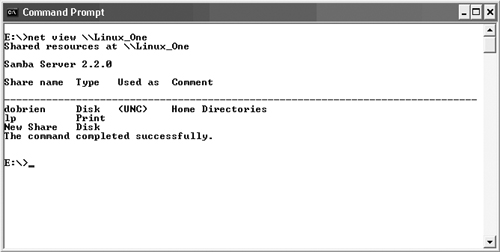
Net view is used to display the available resources or shares on a server. All of the shares may not be accessible to you since some require passwords for authentication or user accounts that may differ from your own.
Once you have a picture of what’s available on the remote server with the use of the net view command, you can connect to those directories and access the files that reside in them. To do this, you use the net use command and assign a drive letter to the directory that you want to access on the server. Issue the “Net use k: \Linux_Onefoldername” command to map a drive letter to the desired share folder.
Replace k: with an available drive letter on your computer. This will associate the drive letter k: with the share on the Samba server. You can now gain access to the files in that share by using the cd command to change to the directory as you would on the local computer.
The Net utility that comes with Windows has many more commands available. Some of them, such as net group, which deal with adding or modifying groups in a domain, don’t pertain to a Samba server and therefore aren’t usable. A list of the usable commands for XP and Samba interactivity is found here with brief explanations of each. The reader can view the online help to make the best use of these commands.
| Used to continue a service that has been paused by the pause command. |
| Displays the open file shares on the server and allows you to close files. |
| Used to add or delete messaging names used to accept messages (local computer). |
| Used to pause the specified service on the local computer. |
Used to view information about the specified print queue. | |
| Used to display the shares on the local computer. |
| Used to check or set the time on the remote or local computer. |
| Connects to or disconnects from a shared resource on a remote computer. |
| Allows you to view shared resources on a remote computer. |
As you can see, this list of commands comprises quite a few capabilities for the network with a command line utility. This list isn’t comprehensive, but it does include the commands that are useful in a Windows/Samba network.
Using Linux as a print server in a Windows network is made possible by the Samba software. There are a few issues that you need to be aware of in terms of using Linux as a server. The first is support for the printer hardware itself. If Linux doesn’t have a driver for your printer, you can’t use it on the Linux server. You may also find that the drivers available for certain printers don’t cover all models, but will still work with limited functionality. Contact your printer manufacturer or other sources such as drivers.com, for up-to-date drivers for Linux.
Another issue is the availability of drivers for the XP computer. Linux drivers aren’t compatible with Windows drivers and vice versa. Therefore, you must have a driver available for the Windows XP computer that you want to print from.
When you install a printer on the Linux computer, the drivers for XP computers aren’t made available on the Linux server as they are with Windows servers. You must install the drivers for the printer from a source other than the server.
To install a printer under Linux, ensure that you have the drivers and then run the printtool application. Printtool is a utility that’s available on Mandrake and RedHat systems that allows for easy installation of printers. If you have a distribution other than one of these, check the documentation for a printer installation utility.
When you issue the command printtool at a terminal on Mandrake 8.0, the screen shown in Figure 17.9 will appear.
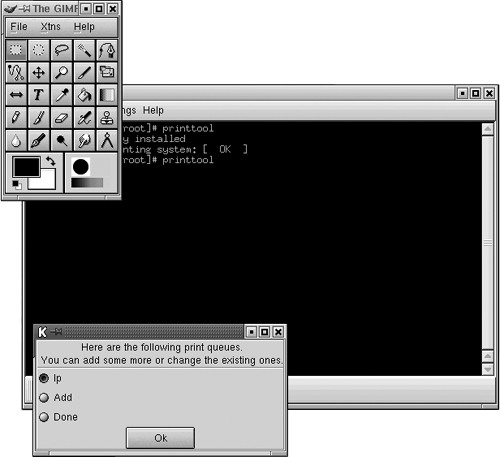
You can see here that the queue lp, which is the default printer queue in Linux, is already installed. You can add a new print queue here to attach to a printer by selecting the Add option and clicking the OK button. You’ll see a message that Linux is bringing up the CUPS system. CUPS is the Common Unix Printing System that’s used by Mandrake 8.0 and later versions of other distributions are starting to use it as well. Once CUPS has come up, you have the option to select a printer connection.
The local printer option is used to specify a printer that’s attached to the local printer port (LPT1 usually). Use the remote printer to select a printer that is located on another Unix or Linux server. The last option, SMB/Windows is used to install the drivers for a printer that resides on a Windows computer such as Win9x/NT/2000/XP. If you have a printer installed on the local LPT port, select local and click OK.
Next, a dialog box appears asking you to name the printer and give it a description and location. Each printer in Linux needs a name. The names default starting at lp and then increment such as lp1, lp2 and so on for each successive printer. Name your printer with a descriptive name such as OfficeJet or AcctLaser. Enter a description and location if desired and click OK.
CUPS will then try to detect the printer that you have installed. It may not detect it automatically, at which time you’ll see a list of printer manufacturers and models from which to choose. Find your printer in the list or a model number that closely matches the printer that you have. Click the OK button, and Linux will ask if you want to test printing. It’s a good idea to print the test page to ensure that the printer is functioning correctly locally first. If the test page prints satisfactorily, you have your printer installed and ready to use.
If not, try another model number or review the troubleshooting options for your specific distribution of Linux.
Now that you have the printer installed on the Linux computer, you can connect to and install the printer on your Windows computer from across the network. To do this, open Network Neighborhood. You should see the newly installed printer.
You can’t print to this printer without installing it onto the local Windows XP computer. Run the Install Printer wizard from Windows XP to install the printer and correct drivers on your XP computer.
The wizard will list the available printers on the network, including the printer shared on the Linux computer. You may also notice that it states that no drivers are available for this printer. This is because Linux doesn’t install the Windows drivers for the printer. You must install the drivers by using the installation media that accompanied the printer.
After the driver is installed, you can access and print to the driver from your Windows computer. All other operations, such as canceling documents and pausing document printing, are available on the printer.
It’s important to understand the difference between how Windows and Linux handle security. This comes in terms of user accounts and file and directory access.
For most users of Windows, security isn’t an issue until you step into a networked environment where you need to log onto servers and can only gain access to resources that are made available to your user account or group. Linux operates in a similar fashion, with the exception that you must log into a Linux system every time you want to use it. That differs from older versions of Windows, where anybody could use the computer if networking wasn’t installed. Even Windows 9x allows users to press the cancel button on the network login screen to bypass login and gain access to the computer. This is no longer the case with Windows XP.
Linux treats security seriously. You can’t gain access to the computer without first logging in. In order to log in, you must have a user account with a password. An administrator is responsible for setting up user accounts. Linux is similar to Windows NT/2000 in that it has an administrative account that has complete power over the user accounts and system. Windows calls this account the Administrator account. Linux refers to it as root. If you have root access, you have complete access to the Linux computer.
Caution
If you do have root access on a Linux system, don’t use that account for day-to-day operations of the system. You can cause some harm to the files or systems by inadvertently issuing an incorrect command and rendering the system unstable or unusable. Always create a user account for yourself and use that for day-to-day operations. You can issue the su command, (discussed shortly), to perform most administrative tasks from your own user account.
We’ve already discussed user accounts for XP in “Day 8, Working With Users,” so we won’t discuss it in detail here. Instead, I’ll introduce you to how Linux uses user accounts and determines access to files.
A user account in Linux is similar to one in Windows in that the user is assigned a username, a password, and a group to belong to. The user must sign in with the username and password to access the system. The user’s password is stored in a file in Linux that’s located in the /etc directory and is called passwd. An example password file is shown here.
root:x:0:0:root:/root:/bin/bash
bin:x:1:1:bin:/bin:
daemon:x:2:2:daemon:/sbin:
adm:x:3:4:adm:/var/adm:
lp:x:4:7:lp:/var/spool/lpd:
mysql:x:416:417:MySQL server:/var/lib/mysql:/bin/bash
gobrien:x:501:501:Gerry O'Brien:/home/gobrien:/bin/bash
jmueller:x:504:508::/home/jmueller:/bin/bash
One of the first things that you may notice is that there are no passwords listed in this file. The reason is that Linux hashes the password. For security reasons, they’re not visible. Let’s gain an understanding of this file by taking apart one entry in it, the entry for jmueller, which happens to be the last entry. You’ll notice that the first entry is the username. This is what the user logs into the system with. Following the username is the colon. You’ll also notice that the colon is used to separate fields of the entry.
Next you see a letter x. This is where the password would be if it were to be displayed in plain text. After the password field comes the user ID. Every user has a user ID. Normal user IDs start at 501 and increment by one for each new user added. Following the user ID is the group ID. This is the group that the user belongs to. If the user belongs to more than one group, each group will be listed in this field.
The next field is the user’s full name. The jmueller account doesn’t have the full name specified, in this case, but the gobrien account above it does. This demonstrates that any field not present will be blank, but the colon separator is still used.
After the full name field, the user’s home directory is listed. On most Linux systems, this directory can be found under /home and is labeled with the user’s login name.
The last field indicates what shell the user will use when logged into the system. Linux uses shells to provide the functionality to the user for interacting with the operating system. This isn’t the same as a DOS shell from Windows.
So, as you can see from this example, user accounts are treated differently than they are in Windows. NT/2000 make use of domain controllers and SAM (security accounts manager) databases to keep track of users. Linux uses the /etc/passwd file.
In terms of file security, Windows uses what is known as ACLs (access control lists) and ACEs(access control entries) to determine if users are allowed to access a file or resource. Each time you try to access a resource, Windows compares your ACE with the ACL of the resource to determine if you have access to it.
Linux treats file access a little differently. Linux uses the same method of securing files as those used by Unix. The file contains attributes that determine the access allowed. For example, list the files in a directory by using the ls –l command to display the files like those shown in Figure 17.10.
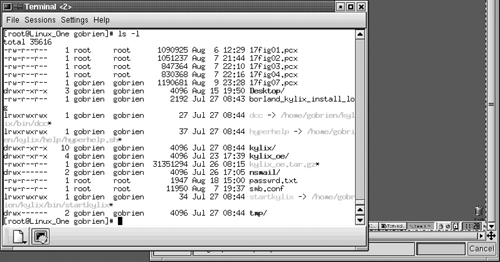
Look at the image shown. Note the beginning of each entry. You’ll see a group of letters and dashes. These are the attributes of the file, and they determine the file type and access allowed to the file.
The attribute section is broken down into four sections. These sections, from left to right, are File type, user access permissions, group access permissions, and everyone else’s access permissions. Let’s look at an example.
Looking at Figure 17.10, locate the file entry under the .pcx files that is titled Desktop, (the sixth file down). The file attributes are Drwxr-xr-x. The four sections are divided in this fashion. The first section is one letter wide and indicates the file type. The meanings of each letter that can be present are as follows:
| This indicates a normal file |
| This indicates a block-special file |
| This indicates a character specific file |
| This indicates a directory |
| This indicates a symbolic link |
Of these entries listed, you only need to be concerned with the dash (-) and the directory (d). The others are special types of files that we need not go into here. You can see from this list that our entry is a directory.
The next three sections each contain three characters. These three characters can only be r, w or x and they must appear in that order in the field. r Stands for read access, w is for write access, and x is for execute permission. The first group is used for the file’s owner, the second sets the permissions for the file’s group and the third sets the permissions for everyone else.
For our example directory file, we see that the owner of the directory, which, in this case, is the gobrien account, has read, write and execute permissions. The group and everyone else have read and execute permissions.
To set the permission on files, Linux users must understand a bit about the Octal numbering system. The reasons for this date back to when UNIX was originally create on DEC (Digital Equipment Corporation, now Compaq) minicomputers. These computers used the octal numbering system.
To set permissions, you use the chmod command and perform some simple addition of the octal numbers to achieve the permission. Table 17.1 shows how it works.
Table 17.1. Octal Numbers Used for Various Permissions
Octal Number | Permissions |
|---|---|
0001 | Execute permission for owner |
0002 | Write permission for owner |
0004 | Read permission for owner |
0010 | Execute permission for group |
0020 | Write permission for group |
0040 | Read permission for group |
0100 | Execute permission for everyone |
0200 | Write permission for everyone |
0400 | Read permission for everyone |
So, to set the appropriate permissions for a file, you simply add the columns as needed. For example, to assign execute, read and write for the owner, and read only for the group and everyone else, you’d take the columns for the owner which is 0001, 0002 and 0004 and add them to the columns for the group which is 0040 (read), and then the column for everyone else 0400 (read) and come up with the result of 0447. Lop of the leading zero to get 447. You would then issue the command, “chmod 447 filename.” That’s how you set or change the permissions for a file in Linux. Of course, you must have root access to do this or be the owner of the file.
So, in terms of the two most important aspects of security, user login and resource permissions, you now know how Linux treats these topics. and you can understand some of the differences in the Windows XP and Linux.
For the most part, Linux and Windows XP should co-exist perfectly fine without too much intervention after the necessary configurations have been made. Accessing shares on each platform should be seamless, and end users should have no idea of what takes place behind the scenes. Sometimes, that just isn’t enough.
If you’re a network administrator, or just concerned that your network is performing at its possible best, you may want to tweak a few things here and there to enhance the performance of the interaction between the two systems. The concepts discussed in this section will help you to increase the performance of your Linux and Windows XP network.
One of the areas that we touched on earlier in the chapter dealt with log files that Samba creates. These log files are a great source of information when it comes to troubleshooting Samba connectivity. However, having Samba log every activity that takes place will have an impact on your network performance. The reason is the Samba server is busy writing the log file events as they happen. For one or two clients, the impact may be negligible, but if you have many clients, you can understand how the impact can increase substantially.
The logging for Samba is specified as a level in the smb.conf. Located in the [global] section, it has an entry that reads:
log level = 3
Most distributions of Samba default to level three, which causes Samba to log every packet that is exchanged between the two computers. If your Samba server is installed and running with no issues, I recommend that you reduce the log level to 1. This level causes Samba to only log connect and disconnect packets, which will substantially reduce the logging activity, as well as the log file size.
Another area that can be tweaked for performance gains is in the TCP options used in network communication. Linux uses TCP/IP as its default network protocol and, as a result, has to endure the overhead that’s inherent in this protocol suite. TCP is a connection-oriented protocol, and it requires acknowledgement for each packet sent. This, of course, increases network traffic.
You can’t get away from this fact, so the best you can do is to tweak the TCP stack to gain the best performance you can. The way you specify the various options for TCP is to modify the socket options section in the smb.conf file, located in the [global] section. The various settings for the socket options are specified on the same line separated by spaces as shown in this example.
socket options = TCP_NODELAY SO_RCVBUF=8192 SO_SNDBUF=8192
You can see by this example that the no delay option has been specified and the buffers are set at 8192 bytes. Table 17.2 explains these options.
Table 17.2. Delay Options for the TCP Stack
Option | Parameters | Description |
|---|---|---|
TCP_NODELAY | None | Causes Samba to send network packet segments as soon as they’re sent by the application. This one option can cause Samba performance to increase substantially, and it is definitely a recommended option to enable. |
SO_KEEPALIVE | None | This option is used to send periodic packets to keep the connection alive. This option doesn’t have an impact on performance. |
SO_SNDBUF | # bytes | Specifies the size of the transmit buffer. The smaller you set this size, the more restrictive it is on throughput. Therefore, it will have a negative impact on performance. Newer builds of the Linux Kernel default to 32768, and you should never set it below 2048. |
SO_RCVBUF | # bytes | Specifies the size of the receive buffer. This has the same impact on performance as the send buffer and should be set accordingly as well. |
SO_SNDLOWAT | # bytes | Used to specify a minimum value for bytes free in the socket send buffer before allowing a select or poll call to return writable for the socket. This setting has no impact on performance. |
SO_RCVLOWAT | # bytes | Same as for the SO_SNDLOWAT buffer above, but used for the receive buffer instead. |
IPTOS_LOWDELAY | None | Used on LAN style connections to time the connection for low delays or network latency. Can have a minimal effect on performance. |
IPTOS_THROUGHPUT | None | Same as LOWDELAY above but used for WAN connections. |
Each of these options has some recommendations that are somewhat generic and offer only guidelines. You need to make the adjustments to suit your networks to achieve the best performance for your connections.
If you’re in the habit of transferring large files over your network between Linux and XP, you can gain a performance increase by using RAW reads and writes. Enabling these options provide the capability of Samba to transfer information in chunks of 65,535 bytes in size. This helps to speed up the transfer of the data because the files take less time to reassemble on the receiving end and less time to break up on the transmitting end. To enable this feature, set the following options in your smb.conf file [global] section:
write raw = yes
read raw = yes
Note that not all SMB clients support raw reads and writes. You have to experiment with this if you’re running other operating systems in your network besides Linux and Windows XP.
Although small in number, these areas of Linux/Windows interoperability can help you eke out some performance gains in your network and make the communication between the two operating systems just a little bit faster. After all, fast performance is a goal that’s sought after on a regular basis. The more you can do to reach that goal, the better.
So far in this chapter, we’ve talked about accessing Linux from Windows XP clients. This section will discuss the use of the smbclient utility for the purpose of accessing Windows XP computers from Linux.
The smbclient program is only one of many that Linux users can utilize to access resources or functionality from a Windows computer. The client utilities are listed here with a description of each.
| Command line program used to access windows clients. |
| This is a print filter used for printing from Linux clients to Windows systems printers on a Windows server. |
| Tar is a Unix/Linux archiving program. Smbtar is actually a shell script used for backing up Windows systems on a Linux computer. |
| Used to mount SMB file systems as native file systems. Mount is the Linux term used to describe making access available to a drive or device. |
| A program that’s used to emulate the mounting of file systems for computer systems that don’t support smbmount. |
| This is a command line program that you can use to invoke RPC (remote procedure call) services on computer supporting RPC. |
As you can see, there are quite a few applications that allow you to access Windows computers from Linux. This chapter and section will only be discussing the use of the smbclient program.
One of the first things you can do with the smbclient application is to simply issue smbclient at the command line to get a list of available options and some help on the command.
You may want to find out what resources are available on a Windows computer. If you know the NetBIOS name of that computer, this is an easy task. Simply issue the following command, “smbclient –L \computername -U username%password,” to get a listing of available resources on the computer as shown in Figure 17.11. Replace the computername, username, and password variables in the above command with that of your XP computer. The username and password must be a valid user account on the XP computer.

As you can see from this figure, there are 8 shared resources available. In actuality, the shares with a $ sign are, for all intents and purposes, hidden shares. These won’t show up on Windows computers. Therefore, you can gain access to the three driver letters C, D, and E from your Linux computer.
In order to access a specific share or drive on the Windows computer, you need to issue another smbclient command. To access the E drive from the previous listing in Figure 17.11, you can issue the command, “smbclient ‘\computernameD’ -U username%password.” This will produce an output similar to that shown in Figure 17.12. Note the use of the single quote surrounding the \computernameD entry. This is necessary because of the way some versions of Unix and Linux treat the backslash character. If you don’t include these, you’ll be given an error message indicating that there aren’t enough characters.

As you can see from Figure 17.12, you’re placed at the SMB: > prompt. This is an indication to you that you can now issue commands and gain access to the files on the remote XP computer. The available commands are listed here.
| Same as Windows and DOS dir command, gives a listing of the files in the directory. |
| Used to change directories on the remote computer. |
| With the smbclient program, you can’t use the copy or move commands on files. Instead, you use get to retrieve a file (works the same as an FTP get command). |
| Used to send a file from the Linux computer to the remote computer. |
| Used to delete a file on the remote computer. |
| Allows you to gain access to Linux commands on the local Linux computer. You may want to issue a command, such as ls, to get a listing of files in a local directory. |
| Used to change the local directory on the Linux computer. |
smbclient has more command options than what are used here. You’ve already seen the two most commom options, -L to list the available resources on a host and –U to specify a username and password for the connection. You can issue the smbclient command by itself, as mentioned earlier in this section, to obtain the list of options for the program. These will include a brief explanation of each. If you still need more information, you can use the manual pages on the Linux computer and issue the command man smbclient.
Even with Microsoft’s newest operating system offering the features and benefits it does, Linux is still a popular optional operating system and becoming more popular as time goes on. This chapter has presented you with the opportunity to learn how to connect to a Linux computer with Windows XP and allow the two to interact seamlessly.
Let’s see how well you’ve been paying attention to this chapter with a few questions and exercises for you to try. These will help reinforce what you’ve learned in day 17. The answers can be found in Appendix A at the end of the book.