Computers have become faster, more efficient, and more reliable over the years. A computer today will outlive its useful life by several years if you take a modicum of care of it. This means doing the little things like keeping it clean and checking the status of the various components regularly. You’ll also want to back your data up in case the nightmare of a hard drive failure occurs.
Of course, everything you do for the computer eventually pays dividends for you as well. Cleaning the mouse helps the mouse work longer, but it also makes the mouse less frustrating to use and more precise when you do use it. Cleaning (and optionally degaussing) the monitor reduces the potential for electric shock to both you and the monitor. (Only some monitors require manual degaussing, most modern monitors perform this task automatically as part of their power-on cycle.) A computer with clean fans tends to make less noise, allowing you to concentrate on your work.
Today, we’ll delve into the not so mysterious world of computer maintenance. Maintenance is actually the least understood part of a computer setup because most people see the computer as an appliance they use to do work and play games. However, even a refrigerator needs maintenance. You wouldn’t believe how much you can save by keeping it clean.
One of the nice features about Windows is that it does include a few maintenance programs to get you started. They might not be the best utilities, but you’ll find they do the job for a small business. You’ll still need to buy a few items, and I’ll let you know what they are as the day progresses. For now, put on your coveralls, and let’s get into some dusty places.
As previously mentioned, Windows XP provides several pieces of software you need to know about. Each piece of software helps you maintain your machine in some way. The following sections provide an overview of each utility and help you understand how to use them. I won’t be able to tell you how to use the utility on your specific system, but you’ll learn enough to adopt the procedures I show into something you can use.
Most people who’ve used Windows 9x know that it provides the ScanDisk utility for checking your drive. However, if you look at Windows XP, you won’t find a disk scanner, at least not on the Start Menu. You need to open a copy of Windows Explorer or My Computer. Right-click the drive icon and choose Properties from the context menu. You’ll see a Drive Properties dialog box. Select the Tools tab. Figure 21.1 shows a typical example of the entries on this page. One of the features I miss about this tab is that it no longer shows the time since your last check of the system.
Click Check Now, and you’ll see a Check Disk dialog box. The first option determines if Windows XP tells you about the errors it finds on your hard drive or attempts to fix them automatically. In most cases, you’ll want to know about the errors so you can record them in a maintenance log. This is one of the ways to track the health of your hard drives.
The second option on the Check Disk dialog box tells Windows XP to scan for bad sectors and attempt to fix them. Checking the option will increase the time required to error check the drive, but it’s time well spent. You don’t want a problem with bad sectors to begin killing your data. Bad sectors can sneak up on you, usually at the worst possible moment.
Select the options you want to use and then click Start. The indicator bar will show you the progress of the disk check. In most cases, you’ll see several error-checking phases. Each error-checking phase requires another time interval measured by the progress bar.
Creating a backup of your hard drive is one of the more important maintenance tasks you can perform. If your machine fails or a disaster occurs, the backup protects your data investment, which is often more than the cost of your machine and associated software. Let’s take a quick tour of the Backup utility that Microsoft has come up with for Windows XP.
Note
Make sure that you clean your tape drive regularly and inspect it before each backup. Open the tape drive door with a non-metallic screwdriver or other small non-metallic implement. Peak inside at the mechanism to ensure that everything is intact. One company I knew faithfully made backups of their system, only to discover that the tape head had detached from the tape transport. None of the tapes had any data on them.
The first time you start Backup, it will ask if you want to use the Backup Wizard (described in the “Creating a Backup with Backup Wizard” and “Restoring a Backup with Backup Wizard” sections). Advanced users will want to clear the Always Start in Wizard Mode option and then click the Advanced Mode link. Windows XP displays the Welcome tab of the Backup Utility dialog box. At this point, you can create a backup, restore and manage media, and schedule backup tasks. We’ll discuss these options in the sections that follow the Backup Wizard section.
Tip
Replace your tapes when they become too old or you’ve used them too often. Most tapes wear well through 20 uses, but you need to monitor signs of problems such as an uneven tape pack, which usually indicates stretching. The adhesive used to secure the magnetic media on tapes also fails after a while. Most tapes last about two years under perfect conditions. DAT tapes last about five years. Check your tape vendor specifications for tape storage requirements.
The Backup Wizard is a great choice if you have no experience at all creating backups. The Backup Wizard starts automatically when you start the Backup utility. You can also access it from the Welcome tab of the Backup Utility dialog box. The following steps tell you how to use the Backup Wizard to create a backup. I’ll assume that you can see the typical Welcome screen.
Click Next. Backup Wizard asks if you want to create a backup or restore previously backed up files.
Select Backup; then click Next. You’ll see a What to Back Up dialog box. Select one of the four options. If you select the Let me choose what to back up option, Backup Wizard displays an Explorer-like dialog box that lets you choose the backup files. Select the files you want to backup and then click Next. Backup Wizard asks which device you want to use for backup purposes. You can use a dedicated tape drive, a floppy drive, or an area on another hard drive.
Select a backup device; then click Next. You’ll see a completion dialog box. Notice the Advanced button at the bottom of the dialog box. This enables you to choose advanced backup features such as type of backup and the use of verification after the backup.
Choose advanced features if desired. Follow the prompts to make any changes to the standard setup. Click Finished. Backup will perform the backup you created.
Backups are like insurance. You know you need to have them, but you hope never have to use them. Unfortunately, you’ll eventually need the backup you created. That’s when you perform a restore by using the Backup Wizard. The following steps show how to do that. I’ll assume you can see the typical Welcome screen.
Click Next. Backup Wizard asks if you want to create a backup or restore previously backed up files.
Select Restore; then click Next. You’ll see a What to Restore dialog box that looks similar to a two-pane view of Windows Explorer.
Select an entire backup, or just a single file in a backup, using the same techniques you’ve used to choose files in Windows Explorer.
Click Next. You’ll see a completion dialog box. Notice the Advanced button at the bottom of the dialog box. This enables you to choose advanced restore features such as restore location and whether Restore should overwrite existing files.
Choose advanced features if desired. Follow the prompts to make any changes to the standard setup. Click Finished. Restore restores any required files on your system.
Advanced users will want to use the manual method for creating backups because it gives you better control over the backup settings. Always create backup jobs for your system. You’ll perform the same backup process more than once, so saving your settings is always a good idea. Even if you have to modify the default settings, making small changes usually requires less time than creating a new backup.
It’s important to create a backup strategy for your system. For example, many companies will store some tapes in a vault and others in an offsite location to ensure they always have a viable backup of their system. The following steps show how to create a backup job and start it. Begin the job creation process on the Backup tab of the Backup Utility.
Use the Explorer-like display to select the files you want to back up. Note that it’s better to use My Network Places entries than to use network shares when selecting network files. You never know when a network share will go away or change—making your settings obsolete.
Select a backup destination and a backup media or filename. The backup destination can include a backup device or a file. You can use any accessible location when working with a file. It’s best to use another machine for the purpose so you won’t have the data stored locally.
Use the View | Options command to display the Options dialog box. Select a backup type on the Backup tab.
Select the Backup Log tab and choose one of the three logging options. You’ll normally want to create a log to ensure that Backup can record any backup errors.
Select the Exclude Files tab and add or delete file specifications as need. Backup always includes files and directories that are active during backup. However, you’ll want to add file specifications such as *.BAK to reduce backup time.
Select the General tab and perform any required configuration. For example, Microsoft assumes that you don’t want to verify data after the backup completes; yet, this is an extremely important feature.
Click OK to close the Options dialog box.
Use the Job | Save Selections command to display the Save As dialog box. Give your job a name; then click Save.
Start the backup by clicking Start Backup. You’ll see a Backup Job Information dialog box.
Click Start Backup. You’ll see a Backup Progress dialog box. The Backup Progress dialog box will eventually tell you the backup is complete and allow you to view a report if desired.
Click Close to complete the backup process.
Disasters happen to the best of us, which means you’ll eventually need to restore a backup. Unlike backups, you’ll seldom perform a restore. For this reason, the Backup Utility doesn’t provide the means to create a job for restores. The following steps show you how to restore a backup.
Select the Restore and Manage Media tab of the Backup Utility dialog box.
Select the backup media you want to use from the Explorer-like display. Choose one or more files from within that media. The Backup Utility won’t restore files from more than one media at a time, so if you try to choose files from more than one media, it will ask if you want to clear the previous selections.
Select the files you want to restore. Make sure that you choose all of the required files so you restore everything needed on the first pass. Restores take longer than backups, so you’ll want to get this step right.
Select a restore location. If you choose anything but the Original Location option, you’ll also need to provide a directory name.
Use the Tools | Options command to display the Options dialog box. Select a restore option from the Restore tab. Microsoft recommends that you never replace an existing file with one from the backup. You do have the choice of replacing older files only, or replacing all files.
Click Start Restore. You’ll see a Confirm Restore dialog box. The Advanced button on this dialog box enables you to change additional restore options, such as the restoring security. Generally, you want to leave these options alone.
Click OK, and you’ll see a Restore Progress dialog box. This dialog box will tell you when the restore is complete and provide you with restore statistics. As with the backup, you can view a report containing any restore anomalies.
This section shows you how to optimize your hard drive. Just what is hard drive optimization? Your hard drive is a mechanical device that exacts a heavy toll on system performance. Anything you can do to make the hard drive run faster and work more efficiently nets large increases in system performance. The process of optimizing your hard drive includes moving data around so the hard drive can access it faster. You’ll also clean up old files and delete the older files that slow your system down to a crawl. An optimized hard drive also increases your productivity by making data easy to find.
Tip
Keeping your hard drive clean and defragmented yields other tangible results. A drive lasts longer when it doesn’t have to work as hard to find your data. Optimization can help where it counts most: in the cost operating your system. Keep your drive running faster by optimizing it regularly.
Now that you have some idea of what disk optimization is and why you’d want to do it, let’s look at the two utilities you’ll use to perform this task. The Disk Cleanup utility removes all of the old files from your system. It makes suggestions about the files you can remove safely. The Disk Defragmenter moves files around so the hard drive can access them faster. As you use your hard drive, the files become fragmented and the hard drive has to work harder to access them. The following sections show how to use both utilities.
One of the best things you can do for your system is clean up the wealth of useless files that accumulate. For example, many applications generate temporary files while you work on your data. Internet Explorer is one of the worst offenders, in this case, but word processors often come in a close second. In some situations, junk files continue to lurk on your hard drive until you delete them manually.
You’ll find the Disk Cleanup utility in the StartProgramsAccessoriesSystem Tools folder. The Disk Cleanup utility performs safe disk searches, in most cases, so the chances of error are low. However, you’re still deleting files from your data drives, so data loss can occur when using this utility. Always create a backup of your system before you perform any disk maintenance task, especially one that removes “unnecessary” files from the system as this one does. The data you save will be worth the time expended to create the backup. The following steps show you how to use the Disk Cleanup Utility.
Start the Disk Cleanup utility. You’ll see a Select Drive dialog box that contains a Drives list box.
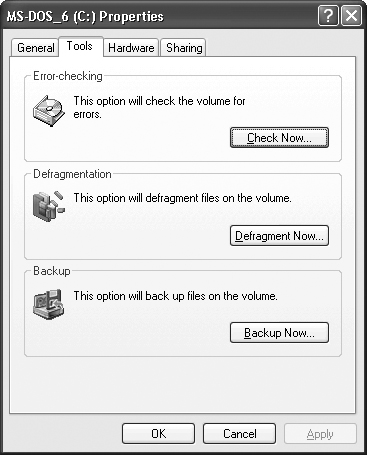
Select the drive you want to check from the list; then click OK. Disk Cleanup will display a Disk Cleanup dialog box while it performs maintenance tasks such as compressing old files on your drive. The progress indicator will show how much time Disk Cleanup will require. When Disk Cleanup completes the first part of the process, you’ll see a Disk Cleanup dialog box like the one shown in Figure 21.2.
The Files to Delete field contains options for removing unnecessary files from your system. Each entry contains a checkbox you use to select the item. It also tells you the location of the files and shows how much disk space you can save by using this feature.
Select one or more file groups to delete. Click OK. The Disk Cleanup Utility will remove the unneeded files.
Of course, this is a simple disk cleanup. You can perform a thorough cleanup by using special features provided by the Disk Cleanup utility. The More Options tab of the Disk Cleanup dialog box contains three areas that help perform additional disk cleanup. You can remove optional Windows components, installed programs, and restore points from System Restore. When working with System Restore, Disk Cleanup will save the last restore point, but remove all of the others.
You might still have reservations about deleting the files based on location alone. Click View Files on the Disk Cleanup tab, and you’ll see an Explorer view of the files in that location. The view you’ll see depends on the location. For example, when looking at the Downloaded Program Files folder, you’ll see the status of the file, along with the date of last access. If you decide that you don’t want to delete all of the files in a particular location, you can delete just those you think are outdated while in the Explorer view. Make sure that you clear the option in the Disk Cleanup dialog box when you’re finished.
The first question many of you will have is “What is disk fragmentation?” As you work with a disk drive, Windows XP has to find new places to put files. At some point, all of the spaces available for holding files will get too small for the file you want to save, and Windows XP will have to place the file in two sections of the hard drive. The act of placing the file in more than two places is fragmentation.
Fragmentation affects performance in a big way. Every time the system needs to access a fragmented file, it will have to move the drive read head to two (or more) locations, which is expensive in computer time. Of course, this problem will begin affecting more than just one file. After a while, many of the files on your drive will experience some level of fragmentation, and you’ll definitely see the performance drop.
Defragmenting your hard drive is one of the most important performance related maintenance actions you can do. The Disk Defragmenter utility reorders the content of your hard drive. It places the files back into one section of the hard drive and frees continuous space by moving all of the files to one end of the hard drive. A defragmented hard drive runs much faster. Unfortunately, this fix doesn’t last forever; you have to defragment your hard drive on a regular basis.
There are some problems with the Microsoft solution to disk defragmenting. The biggest one is convenience. Disk Defragmenter only works on local drives; you can’t start it on a local drive and hope to defragment remote drives. Disk Defragmenter is also Windows version specific. You need to use the version of Disk Defragmenter that comes with your system (or a compatible third party product).
Tip
The market for third-party disk defragmenter utilities is huge. This is an extremely important computer maintenance task, so administrators want to be sure they have the right tool for the job. Unfortunately, Microsoft changes the format of their drives every time they release a new product. This means that you need a new version of the third-party product if you want to run it on Windows XP. Unlike Microsoft, most third-party vendors make their product usable with all previous versions of Windows. They support features such as remote defragmenting, and they provide you with statistics that show the results of your activity. In short, while the Microsoft-provided utility is good, the third-party products tend to be better.
Now that you have a better idea of what Disk Defragmenter can do for you, let’s look at the procedure for using it. The following steps show who you how to perform a typical disk defragmentation.
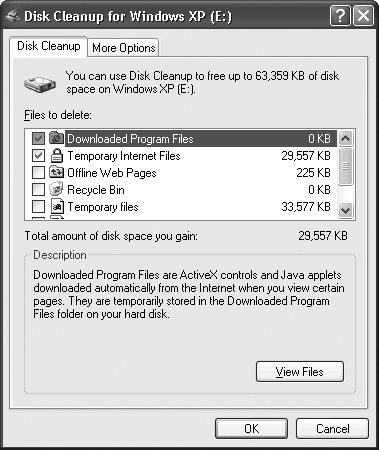
Start the Disk Defragmenter utility. You’ll see a list of the drives on your machine. The statistics include the formatting method, capacity, amount of free space, and the percentage of free space. The first phase of defragmenting the drive is to make sure that you actually need to defragment it.
Click Analyze. The Disk Defragmenter display will change as shown in Figure 21.3. Disk Defragmenter will check each file on the drive for fragmentation. When the analysis process is complete, you’ll see a dialog box that either recommends you defragment your drive or leave it alone for now.
Click View Report. You’ll see an Analysis Report dialog box. This dialog box provides information about the volume and lists the most fragmented files. Even if your drive doesn’t require defragmentation, you may want to defragment the drive if one or two files have an exceptional amount of fragmentation.
Click Defragment if you need to defragment a drive. Disk Defragmenter will perform a quick analysis and then begin the defragmenting process. You’ll see the areas of fragmentation disappear as the program moves files around on your system.
Everyone has problems with software from time-to-time, if for no other reason than buggy software. The problem is tracking the problem down so you can fix it. Some vendors make this nearly impossible by automatically starting parts of their application, hiding functionality in poorly named services, or using drivers that are incompatible with the rest of the software on the machine. However, using a logical troubleshooting process, knowing which tools Microsoft provides for analysis, and logging your installations all help to make the process a lot easier.
The following sections explore all three of these issues. You’ll learn about utilities such as the System Configuration utility that Microsoft provides for diagnosing problems. We’ll explore the drivers and how you figure out which ones Windows requires. Finally, we’ll look at some hardware-imposed issues that disguise themselves as a software issue.
You can look at system configuration from a number of perspectives. For the purposes of this section, we’ll look at system configuration as the setup that Windows XP uses to configure itself during the book process. In short, when you see an icon in the notification area immediately after startup, that’s a part of the system configuration process.
Unfortunately, the startup applications don’t always get along with every other piece of software on your system. For example, your disk detector utility might conflict with the CD burning software, making it impossible to create new CDs. While the disk detector is a great feature you’d love to keep around, it’s bothersome when you want to create a CD. If the disk detector doesn’t provide some convenient means for stopping, you might find yourself uninstalling the utility.
This is where the System Configuration (MSCONFIG) utility comes into play. It helps you modify the startup settings for your machine so you can start only want you need. To start the System Configuration utility, select Run from the Start Menu, type MSCONFIG in the Open field, and then click OK. You’ll see a System Configuration Utility dialog box shown in Figure 21.4.

Caution
This section of the chapter discusses the boot options for your system. Enabling or disabling boot options is always risky because you can cause your system to freeze during the boot process by disabling a needed driver, service, DLL, or other part of the operating system. Use the content of this section carefully. Disable or enable entries one at a time, so you can see what effect the single entry will have on the system. Using MSCONFIG does offer safety because you can always boot in safe mode and enable an option you need—the option isn’t gone forever.
As you can see, the System Configuration utility contains tabs that affect almost every part of the operating system boot process. You can use these entries to modify your setup. The following list provides an overview of each tab.
General. Controls the way Windows XP launches the next time you start it. You can choose a normal, diagnostic, or selective startup. The Normal Startup option is the one that you’ll use most often. It loads all the drivers and applications configured for your machine. You’ll use the Diagnostic Startup option starts Windows XP with only the essentials so you can check for problems with the operating system. The Selective Startup option is the one that you’ll use for performance and application compatibility purposes. However, you won’t normally change the boot options from this tab. You need to select files using the other tabs and the System Configuration Utility will set the options on this tab automatically.
SYSTEM.INI and WIN.INI. The SYSTEM.INI and WIN.INI tabs are leftovers from previous versions of Windows. Check these two tabs first for old 16-bit drivers and applications. Many of the entries on these tabs affect printer and font settings for old applications. You might find other surprises from antiquity here as well. Check the “Finding Unneeded Drivers” for additional ideas.
BOOT.INI. Controls the boot process from an operating system selection perspective. The BOOT.INI file contains entries for every operating system on your machine that the boot manager controls. Use Move Up and Move Down to change the position of the boot partition in the list displayed during system startup. The Set as Default button controls the default operating system. Finally, you can use Check All Boot Paths to verify the usability of the BOOT.INI entries.
The diagnostic functions go further than just validating the boot paths. You can use settings in this dialog box to change the boot type. For example, one option instructs boot manager to start the operating system in a non-GUI mode. Another option tells the system to create a boot log, while other settings change the default video or use the Safe Mode booting.
Services. Determines which services Windows XP loads during the boot process. A check box indicator shows whether the service is in an enabled or disabled state. Notice the Disable All button on this dialog. Disabling all services just about ensures your system will have difficulty restarting. The Essential column is supposed to tell you if the service is essential. However, many essential services aren’t marked, so exercise care when you make changes to this tab. The Status column shows the server state. For example, a service that’s marked Stopped is loaded into the system, but isn’t running at the time. A Hide All Microsoft Services option helps you see just the services installed by third party vendors.
Startup. Determines which applications Windows XP will start, including those in the notification area of the Taskbar. This is one of the safest choices for performance changes. You can disable all of the entries in this list and still expect the system to boot properly. Of course, you may notice the loss of some functionality, but the operating system will work as intended.
We previously discussed the SYSTEM.INI and WIN.INI tabs of the System Configuration utility. Both tabs have an entry marked “;for 16-bit app support.” If this entry contains anything at all, then you have 16-bit applications on your machine that you should retire.
It also pays to look at the [drivers] entry on the SYSTEM.INI tab because these are normally 16-bit drivers. Note that most machines will have a 16-bit wave and timer driver for compatibility purposes that you can theoretically eliminate unless you play DOS games on your system.
Entries in the [driver32] section of the SYSTEM.INI tab are safe, but suspect. Only older 32-bit drivers use this section, so you might want to look for updates. Likewise, take a close look at the [386enh] section for potential problems.
Not every unneeded driver on your system will wave a red flag and shout that it’s old and cranky. You can probably eliminate some of the entries on the Services tab of the System Configuration utility. The best way to know if you can disable a service is to research it first. Sometimes, you can tell a lot by just the service name. For example, if you see an entry marked NetMeeting Remote Desktop Sharing and you never use NetMeeting, you can probably save some memory by not loading that service. However, no matter what you think you know about the services listed in this dialog, always disable them one at a time, reboot, and test your theory before you make any other changes.
System glitches—they’re annoying, and we all hate them. In some cases, the problem is a fault in Windows XP, and you can’t repair it. In other cases, the problem is due to a number of causes that are under your control. You may not know how to fix the problem, but you could do something about it if you knew what to look for and how to get help fixing it.
The following sections look at the most common cause of system glitches. The solutions to many of these problems involve a system cleanup. You’ll get rid of old drivers, set up an application correctly, or find a new way to access a device. In short, it’s cleaning of the configuration portion of your machine.
Many glitches occur during startup—the very worst moment to have them happen because the system doesn’t have enough software installed to track the problem correctly. Startup problems can involve everything from a corrupted driver to a piece of hardware that decided it was time to call it quits. Sometimes, the startup problem occurs because you installed something yesterday, which is why logs are helpful in diagnosing problems.
We’ve already discussed some of the solutions to this problem. For example, you can use the System Configuration utility to disable a suspected problem. In many cases, you can find the errant program, reinstall it, and have the problem fixed (at least until the nest time corruption sets in).
It also helps to look at Device Manager. Non-functional devices appear in the list with a yellow exclamation point next to them. If you can get your machine running at all, the Device Manager entry will at least cue you to the problem. Of course, sometimes you can’t get the machine running, so you’ll need a diagnostic program to find the problem. We’ll discuss this solution in the “Running Specialty Diagnostics” section.
You’ll also find your share of subtle problems. Your machine might start one time and not another. Perhaps the problem is due to heat or other environmental stress conditions. Diagnostic programs can help find these problems. However, don’t overlook the help that Microsoft provides in the form of the Event Viewer. Look for repetitive entries or those that happen when you experience the problem. Sometimes, a startup problem is the result of an odd combination of software. You might need to start some applications automatically and others manually to obtain a stable system.
The hardware configuration problem is one of the tougher problems to figure out. You install the hardware just like the vendor says, but it fails to work. If you install the same hardware on another machine, it works without a hitch. Of course, the vendors all engage in a major finger pointing session at this point, and you don’t receive any help with your problem.
One of the more interesting problems that you’ll see is one where a piece of hardware keeps another piece from working. For example, one brand of hardware decoder for a DVD installed fine as long as you didn’t have a certain brand of soundboard. If you tried to install the DVD after the soundboard, Windows XP never found the hardware decoder. It recognized the DVD, but that didn’t help you play movies on your system.
In this case, the solution to the problem was to remove every non-essential board from the system, which included soundboards and extra SCSI boards (you could have one specifically for your tape drive). If Windows XP suddenly saw the hardware decoder or other device, you could install support for it and then add the other boards back in. Generally, you’ll find the device works fine from that point on.
Some software won’t exercise the full range of hardware settings. This problem used to be common, but you’ll rarely see it now. For example, a communications program might place an artificial limit on the serial port settings that it’ll recognize. The device works, you can use it with other applications, but it won’t work with the one application you need to use. The solution is to attempt to reconfigure the device. Unfortunately, that doesn’t always work, so you might have to buy a new application that does provide the required support.
Memory, or the lack of it, is the number one problem you’ll run into when working with large applications. Creating a larger swap file (or allowing Windows to create it for you) will only go so far in helping a memory problem. Windows XP requires real memory to function. The swap file is a means to offload parts of memory that an application has requested, but isn’t using now. In short, the swap file can’t fill in for a lack of system memory.
Both main memory and the swap file do have one thing in common. A machine that’s running for long periods will experience fragmentation in both main memory and the swap file. The fragmentation causes a drop in performance. It could, in rare cases, cause Windows to deny an application request for additional memory. The fix for the memory problem is to reboot Windows occasionally in order to clear memory.
Fixing the swap file problem requires that you recreate the PAGEFILE.SYS file located in the drive’s root directory. You can do this by changing the partition that the swap file uses, changing the size, selecting the No Paging File option, or setting the minimum size to 0. (You’ll find the swap file options on the Virtual Memory dialog box accessed through the Advanced tab of the System Properties dialog box.) If you defragment the drive before you create a new swap file, you’ll notice an incremental increase in speed.
Drivers have been the bane of users everywhere for as long as Windows has existed (and before). The problems they cause range from a lack of support for hardware features to interference with other drivers and applications. Sometimes, the problems stem from using an old driver that doesn’t follow the rules correctly or is no longer current with existing technology. In other cases, the design of the hardware is incompatible with the system as a whole or the application doesn’t access the driver correctly.
Microsoft is trying to fix this problem by using signed drivers. Whenever you see a signed driver, it means that it has gone through extensive testing. Signing is akin to a certification process. Unfortunately, vendors are usually unwilling to go through the effort of signing for an older device, so you might be stuck with an unsigned driver.
Using the newest driver possible ensures that you have the benefit of any bug fixes the vendor may have provided. In many cases, the newer driver will also perform better than an older drive in the same circumstances.
In a very few cases, you might have to get online, check into the Microsoft newsgroups, and see if anyone knows of an alternative driver. For example, using a third-party driver fixed a problem with my DVD drive and hardware decoder. The original vendor didn’t want to provide a fix, so a third party provided a solution. It doesn’t always happen, but looking for solutions of this sort does work.
Sometimes, you’ll run into odd problems associated with multiple CPU machines. For example, we looked at a common problem with games in the “Configuring Windows Games” section of Day 7. The solution in that situation was to turn one of the processors off for that application. You simply tell Windows XP to execute the application using only one processor. Of course, this problem can affect more than games, so you should always check for multiple CPU problems with problem applications.
The problems can become more severe than an application that refuses to work. For example, you may have a special utility program that refuses to work. Sometimes, programs such as Microsoft ActiveSync will refuse to recognize parts of your hardware (the USB port in this case). If you find that these special programs won’t work, you should look for a newer version of the product. Sometimes, these vendors will find the problem and fix it. You can also try the solution from Day 7, but that’s problematic, in this case, because you have to make the change after every reboot for every affected application. In some cases, finding a third-party alternative application will work. Finally, you might simply have to move the problem application to another machine to get it to work.
Having multiple CPUs can cause other problems. An incorrect implementation of multiple CPU support can cause a motherboard to malfunction. For example, some Asus motherboards have a problem where you can’t use Advanced Configuration and Power Interface (ACPI) support. These motherboards actually require a physical change you can’t make at home (see http://www.asus.com.tw/Products/Techref/Acpi/solution.html for details). The only way to know about this problem is to spend time on the vendor Web site searching for the required answer, the vendor will almost certainly fail to contact you regarding the situation.
I’m often amazed at how reliable hardware is today. There was a time when I replaced my hard drive annually, rather than face the problems of a crash. Today, hard drives run longer than the machine is viable. The machine and its hard drive are often in great shape a year or two after I turn it over to someone else. The point is that hardware reliability isn’t as much of a concern as it once was (although hard drives will fail).
The problem with hardware today is that it interacts with the system in so many ways and has become so complex, that you often run into compatibility problems. The problems are so severe that the hardware may not work at all. For that matter, the system may not even see the hardware.
Standards are also a problem. By the time standards organizations produce standards that hardware vendors can follow, the technology is already out-of-date. It’s as if we’re in a constant state of using beta hardware for missing critical needs.
No matter what your hardware problem is, you can usually find a solution for it. The following sections discuss the methods for locating hardware problems on your system. In fact, the first section that follows will tell you one way to prevent the problems from occurring at all. We’ll discuss cleaning your machine as a means to keep your hardware healthy and happy.
One of the best things you can do for your hardware is to clean it. Dust is the mortal enemy of electronics and removing it can only extend your computer’s life. Even if you plan to make a yearly computer upgrade, cleaning helps the machine run better and make less noise.
Unfortunately, most people don’t know how to clean their machines properly. One person that I talked with had used a vacuum with a metallic nozzle no less to clean their machine. The resulting disaster sent them to the computer store in search of a new machine.
You should invest in a few cleaning essentials for your machine. A can of computer-quality compressed air is a requirement. It’s also helpful to have static free wipes, a bottle of methyl (best) or isopropyl alcohol, some electronics grade cotton swabs, a floppy disk cleaner, CD cleaner, and a cleaning tape (if you have a tape drive). A small computer toolkit will help you with the screws that still permeate computer construction and an inspection mirror (think dentist) will help you look in tight corners. Now that you have your cleaning kit assembled, the following tips will help you use it.
Carefully remove your computer from its hiding spot. If necessary, mark and then remove the cables. Marking the cables is important if you want the machine to work later. Moving your machine to an open area helps you do a better job of cleaning it and makes it easier to clean the resulting dust.
Open the computer case. Use the compressed air to get rid of dust. Spray in the hidden areas too. Disk drives are notorious for hiding dirt in crevices. If some dirt is especially hard to get rid of, use a cotton swap soaked in alcohol to help remove it. For example, you’ll find the blades of the various fans attract and retain dirt.
Look for any damage such as frayed wiring or burned components. Sometimes, a computer component will show damage before it stops working. Use the inspection mirror to check places you can’t normally see. Put your computer back together, but don’t put it back into place just yet.
Blow as much dust as you can from your monitor without removing the cover.
Blow as much dust as you can from the printer. Make sure that you open the user accessible areas of the printer, but don’t open the areas where you need a screwdriver for access. Look for areas of ink buildup. Clean them with fresh alcohol-soaked cotton swabs.
Clean your mouse. If you have an optical sensor, clean the sensor opening with an alcohol soaked cotton swab. If you have a standard mouse, carefully remove the cover holding the ball in place. Blow dust from the inside of the mouse. Wash the mouse ball carefully in plain water (no soap). Dry the mouse ball with a lint free cloth. Don’t let the contaminants from the water supply stay in place, remove them with the cloth. Put the mouse back together.
Clean your keyboard. Use the compressed air to get bits of dust and other material from between the keys. Clean the keys with a screen wipe or other slightly damp cloth. Don’t use alcohol on the keyboard because you might rub the letters and numbers right off. In addition, use a soft cloth, rather than a paper towel, to remove dirt from the keys.
Vacuum the dust you’ve dislodged from the computer and any surrounding areas. Don’t use a vacuum on any piece of computer equipment or get the vacuum around recordable media such as floppy disks. After you clean the area up, put the computer back in place and reconnect any cables using your connection diagram or other documentation.
Turn your machine back on. Use the vendor instructions for the floppy disk cleaner, CD cleaner, and tape cleaner to clean these devices. You now have a clean machine worthy of your use.
You’ll eventually run into a situation when you need to perform diagnostics on your system. A piece of hardware might fail, the system will refuse to recognize a new piece of hardware, or you might run into a compatibility problem. The point is that you need some means for identifying the cause of the problem and fixing it. With hardware, this could mean everything from getting a new driver to replacing the old hardware with something new.
The following sections discuss diagnostics at several levels. You’ll learn about the Microsoft provisions for gaining access to system information. We’ll also discuss third-party products that you can use to augment your hardware diagnostic toolkit.
System Information has been around in one form or another for many years. Originally, Microsoft called the product Microsoft Diagnostics (MSD). It was then renamed WinMSD to reflect a change to a graphical information. Today, we call an updated form of the same utility System Information. The System Information moniker is actually more accurate than calling this utility a diagnostic. It tells you details about your system, but doesn’t tell you that anything is wrong with it.
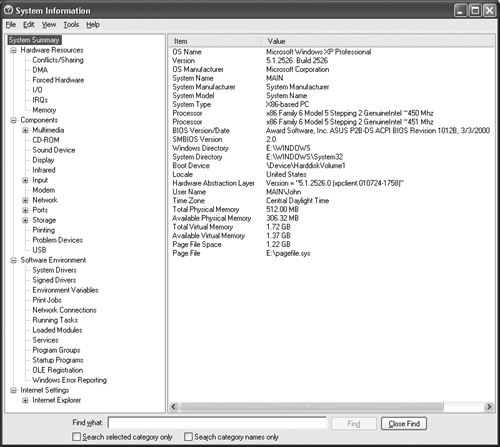
You’ll find System Information in the StartProgramsAccessoriesSystem Tools folder. Figure 21.5 shows the initial display for this application. Notice that you receive detailed information about your system from the very beginning. However, the utility can provide details at an even greater level. All you need to do is select one of the four categories of information that System Information can provide.
Generally, you’ll use System Information to view the status of your machine. However, you an also export this information to a file on disk. This is one way to take a snapshot of your system state and save it for later use in diagnosing problems. In fact, this is the way that Microsoft originally used this program. It allows them to collect information about your system to aid in problem resolution.
You can export system data in two ways. First, you can use the File | Export command to create a text version of your system information. This is the most convenient way to transfer the information to a database for later analysis. Second, you can use the File | Save command to create a file on disk. This file has an NFO extension that permits you to view it within System Information later. This is the best way to store data if you simply want a snapshot of your system for later use.
Tip
The NFO files that System Information creates use XML. In some cases, this might be a better format for importing the data into your database. Of course, the database will have to know how to interpret the XML file. Many new database managers and associated languages use XML as a common form of data exchange, so you’ll find that this method works better that straight text.
Like many other Windows XP utilities, System Information has a command line interface. Type MSINFO /? to display a complete list of the current switches. The switches that you’ll commonly want to use within a script include those that output system data to disk in silent mode. You can save a text file by using the /Report <Filename> switch. Likewise, you can produce an NFO file using the /Info <Filename> switch. You can even switch to a remote computer using the /Computer <Computer Name> switch.
Now that you have a better idea of what System Information can do, let’s discuss a few details. System Information uses a hierarchical format similar to Windows Explorer. The following list tells you about each of the entries in the display shown in Figure 21.5.
Hardware Resources. Contains a complete list of hardware resources for your machine. You can use these lists to look for missing or misconfigured hardware. This list also tells you about hardware conflicts (two devices using the same resource) and shows free resources that aren’t used by any hardware. The Forced Hardware entry is especially important because it shows hardware someone has forced to non-standard settings on the system. This could point to a problem that wasn’t resolved, just sidestepped.
Components. Describes the individual components of your system. For example, if you select the CD-ROM option, System Information will query your CD and DVD drives for vendor specifics. It will also test the drives and tell you about device characteristics such as data transfer rates. Some of the entries shown in Figure 21.5 had additional subentries. For example, you’ll generally find two selections under the Input entry: Keyboard and Mouse.
Software Environment. Describes every running application on your machine. You’ll find entries for applications, services, and drivers. Notice from Figure 21.5 that System Information differentiates between signed and system drivers. The System Driver entry lists all drivers on your machine, signed or not. The information you receive will vary. For example, if you select Services, System Information will tell you if the service is stopped, the start mode, and the kind of service that you’re viewing.
Internet Settings. Contains a list of the Internet settings for your machine. More specifically, you’ll find information about Internet Explorer under this entry, unless you have another browser installed. The Internet Explorer information includes facts such as driver version numbers and a few of the settings. System Information seems most interested in security levels, not in the kind of rules you set for discarding junk mail or the last place you visited online.
DOS was once the only way you could start a diagnostic program and expect it to find out anything about your hardware. In some cases, having a DOS partition on your machine today is one of the best ways to ensure you can at least boot the system and find out what’s wrong with it.
The DOS partition contains a simple operating system and works with a variety of low-level utilities, many of which come from the vendors that created your system. For example, DOS is the only environment in which many flash read-only memory (ROM) tools will run. You need a flash ROM tool to upgrade your machine basic input/output system (BIOS) if your machine has a supported configuration. You’ll also find that some vendors still provide DOS-based diagnostic tools with this hardware.
At one time, I would have said that you needed a DOS partition no matter what operating system you used normally. Windows tends to hide the hardware so well that a diagnostic is nearly useless in that environment. Other operating systems such as NetWare have few diagnostic programs available for them. DOS was the one operating system where you could find a tool that would tell you about the problems with your system.
Today, many high-end diagnostic programs are self-booting, which means that you don’t need DOS to run them. If your only concern is the ability to test your system for faults, then you might be able to rid yourself of that ancient DOS partition. However, until you know that you’ll never need to run anything from the DOS prompt again, you might want to keep it around.
Windows XP provides many useful tools for diagnosing problems with your system. For example, you can check your modem with relative ease by using the Query Modem button on the Diagnostics tab of the Modem Properties dialog box. The problem is that these utilities are scattered throughout Windows, they don’t provide low-level analysis of problems, and they often fail to locate the real problems in your system. This last point is especially important because few people realize that Windows maintains an iron grip on the hardware that will block the efforts of any serious diagnostic.
The only way to test your hardware fully is to get outside of Windows. That means using a third-party product that loads in DOS or provides a self-booting feature. The following sections provide a brief overview of three such utilities. All three of these utilities are self-booting, so you don’t need to maintain a DOS partition to use them. Some of these utilities are quite expensive, but you definitely get what you pay for. Anyone who has more than a few machines to care for will realize the value of having an application that can pinpoint even significant hardware problems quickly.
#1-TuffTest Pro (http://tufftest.pcdiag.com/tufftest.htm) is the least expensive diagnostic program you’ll find on the market today (unless the diagnostic is free). This is the no frills solution for someone who wants to test just the basics and absolutely nothing else.
You’ll want to avoid TuffTest when working with certain types of hardware. For example, it doesn’t include anything for working with SCSI drives. You’ll also find that the port support is minimal and that you can’t test any of your buses. TuffTest doesn’t provide any configuration utilities or any of the other add-ons that other diagnostic tools provide. In short, this is the Spartan configuration.
You’ll also find some benefits when using this program. The diagnostic is extremely small and fast. The menu system is easy to understand, and the vendor didn’t clutter it with many features you’ll never use. Unlike many large diagnostic programs, you can test all of your memory using this product.
One of the features that doesn’t stick out at first is the product support that you get with TuffTest. The author maintains a newsletter where you can find out more about the product. In addition, there’s a mailing list where you can exchange information with other users. Overall, this is one of the better product support packages.
PC-Technician (http://www.windsortech.com/pctech.html) is a basic diagnostic program at a reasonable cost. It emphasizes the essentials of your system. You can use it to test main components such as memory, the hard drive, and your ports. One of the advantages of using this product is portability. PC-Technician is small and executes within about 200 KB of RAM. This enables PC-Technician to test all of main memory and perform a few other tricks that larger diagnostic programs can’t perform.
What you won’t find with PC-Technician is the capability to test some of the newer hardware on the market. For example, this program won’t test the expansion bus on your machine. If you have a problem with your PCI or AGP setup, PC-Technician won’t find it. Generally, PC-Technician won’t work with newer ports. For example, you can’t use it to test your USB port.
This program does have similarities to other offerings on the market, but the simple interface makes the features easy-to-use. For example, you can use PC-Technician to perform burn-in and certification testing. You can also perform certain types of performance tests.
Finally, PC-Technician helps you perform system configuration, as long as the configuration is within the range of PC-Technician capabilities. You can perform all of the essentials including CMOS configuration. However, PC-Technician lacks a flash ROM utility, so you can’t use it to upgrade the BIOS on your machine. Fortunately, most motherboard vendors provide this utility for you.
CheckIt Professional Edition (http://www.smithmicro.com/checkit/) is the Cadillac of diagnostic programs. Of the three diagnostic programs, this is the most expensive and complex. It does everything the other products will do, only better. (Complete memory testing could be problematic due to the size of this diagnostic program.)
You’ll also find that CheckIt tests all of the current bus technologies including PCI, PCMCIA, and AGP. CheckIt analyzes the PCI cards in your system and provides complete information about them. It includes many burn-in and certification tests that the other products don’t support. For example, you can run a power cycling test on your system.
Space doesn’t allow me to describe the entire feature set of this product, but CheckIt is an example of getting what you pay for. Of course, the price is the major negative of this product. Only those who need the ultimate in diagnostic utilities will need to consider this one.
Sometimes, a problem with a serial or parallel port is outside the confines of the chips you can test, and yet not within the cable. The problem might exist in the plug or in other connection-related areas of the port. Using a loopback plug enables you to test a serial or parallel port completely.
Loopback plugs pass the signal from the port output back to its input. To create a loopback plug, you use a blank connector without wires and then connect wires between specific pins. Most of the high-end diagnostic programs you buy (such as PC-Technician, AMI Diags, or the Norton Utilities) provide these plugs. Others, such as CheckIt, don’t provide them (some packages from Touchstone do include loopback plugs now, but you need to purchase their high-end products to get them).
Loopback plugs eventually break. In addition, many systems today have multiple output ports that you might want to test without switching the port around. This means building loopback plugs of your own. It’s not hard; all you need to do is buy the blank connector and add some wires to it. The following tables contain the connections you need to create loopback plugs of various types.
Table 21.2. 9-pin serial port (DB9S) loopback plug connections.
First Pin | Connected to Second Pin |
|---|---|
02 (RD: Received Data) | 03 (TD: Transmitted Data) |
07 (RTS: Request to Send) | 08 (CTS: Clear to Send) |
06 (DSR: Data Set Ready) | 01 (CD: Carrier Direct) |
01 (CD: Carrier Detect) | 04 (DTR: Data Terminal Ready) |
04 (DTR: Data Terminal Ready) | 09 (RI: Ring Indicator) |
Table 21.3. 25-pin serial port (DB25S) loopback plug connections.
First Pin | Connected to Second Pin |
|---|---|
03 (RD: Received Data) | 02 (TD: Transmitted Data) |
04 (RTS: Request to Send) | 05 (CTS: Clear to Send) |
06 (DSR: Data Set Ready) | 08 (CD: Carrier Direct) |
08 (CD: Carrier Detect) | 20 (DTR: Data Terminal Ready) |
20 (DTR: Data Terminal Ready) | 22 (RI: Ring Indicator) |
As you can see, the pin connections are relatively easy to make. Whether you buy pre-made loopback plugs or make your own, this is an essential tool for your toolkit. Without loopback plugs, you’ll never know whether the serial or parallel port you tested really works.
Networks are one of the most difficult areas of your system to fix because you have multiple machines, lots of cable, and devices such as routers and hubs to consider. The fact that most vendors make their networking equipment extremely reliable doesn’t help much when you’re tracking a cable at two in the morning, rather than sleeping.
Some problems occur more often than others do. For example, you’d think that a cable would be extremely reliable since it never has to move. However, cables are one of the nightmares that network administrators face regularly because users always manage to find a way to crush or damage them.
The following sections describe some of the common problems that you’ll run into when working with networks. This list isn’t complete; some authors use entire books to describe what they consider common problems. This list represents the problems you’ll run into most often.
One of the utilities that you’ll use more often than you think is the PING utility. This command line tool helps you test TCP/IP connections with another computer. You can actually use it for a number of purposes, but we’ll only look at the diagnostic function today. The two command lines you’ll commonly use for PING in a diagnostic mode are:
PING <Host Name>
PING <IP Address>
So, if you wanted to contact a machine named AUX, you’d type PING AUX and press Enter. PING will output four messages of 32 bytes and tell you about the response to each one. You can modify the size of the packet sent to the remote computer using the -l <Size> switch. If you wanted to test the computer at 192.168.0.1 with 1024 byte packets, you’d type PING -l 1024 192.168.0.1. Using a different packet size often reveals problems that the standard packet size won’t show. The maximum packet size is 65,500 bytes.
You can also use the -n <Count> switch to change the number of packets sent to the other computer. You might suspect that an error won’t occur until you send the fifth or sixth packet, so you can adjust the count to 5 or 6. If you use a value of -1, PING will continue sending packets until you press Ctrl+C (using Ctrl+Break won’t work).
Finding flaws in the cables that connect your network is a major problem even on smaller networks without the proper tools. Network administrators, especially those managing large networks, can spend a lot of time tracing cables. Standing on a ladder while you trace cables in the ceiling is a lot less fun than it sounds. Tracing cables in other places is even less exciting.
Cable scanners help find cable flaws by sending a signal on the cable and waiting for it to return. The time required for a return signal tells the location of a break or other flaw. Fixing the cable is a matter of tracing the specified distance from the source. This is a lot easier than trying to guess where a cable has a break.
Many people use the term time domain reflectometer (TDR) to refer to a cable scanner, but a cable scanner works just fine for most people. Theoretically, a TDR is a special, high-end version of a cable scanner. An average cable scanner costs about $1,000, although you can find them a little cheaper. Less expensive cable scanners provide fewer features and may not provide much accuracy in finding a cable flaw.
Tip
You can build your own cable scanner for about $200 by using plans in some electronics magazines. For example, Circuit Cellar INK’s October/November 1992 issue contains a set of plans on page 22. You can find this resource online. You can order a reprint of the article at http://www.circuitcellar.com/backissues.html. The source code for the cable scanner appears at http://www.dtweed.com/circuitcellar/caj00029.htm.
Most cable scanners provide both text and graphic output. This is a handy feature for maintaining records on your system. In some cases, the cable scanner also offers the option to send output to a printer through a serial, parallel, or wireless connection. All you need to do is print the results of the cable check and add it to the network documentation.
You should also look for a cable scanner that can detect the noise level of the cable on your system. Using this feature helps you to reduce the number of packet errors by reducing the noise that the packet signal must overcome. Just about everyone can benefit from reducing noise on his network.
Some cable scanners provide an oscilloscope interface. This enables you to monitor the signal that flows across the network. An experienced network administrator can use this information to troubleshoot problem installations. However, this is a feature that most small businesses will never use because their cable setup isn’t complex enough.
Today you’ve learned about different types of maintenance you should perform on your machine. It may seem like a lot to do at first, but once you’ve done it a few times and set up a schedule, it won’t seem like much time at all. The important consideration is to perform the work regularly. A little bit of maintenance here and there won’t do much for your system or for you.
We’ve also looked at the types of maintenance you should perform. You’ve learned how to care for your disk and keep your system clean. In addition, you’ve learned how to run diagnostics so you can find problems when they occur. While we haven’t covered every potential problem you’ll run into, you should have a better idea of what the technician is talking about the next time you do run into a problem you can’t handle alone.
It’s the end of the twenty-first day. You’ve learned all kinds of troubleshooting information that will hopefully make your PC experience more enjoyable. Now it’s time to see how much of this troubleshooting information you learned. You can find answers to the quiz and exercise questions in Appendix A at the back of the book.