Today we’re going to look at user management. The entire purpose of creating a network is to make users more efficient, in order to enable them to do more than they could in the past. The network has to answer the needs of users, yet protect them from themselves. Many network administrators consider users the toughest part of the networking picture because users are unpredictable, and you can’t lock them in a closet like you can a server.
It’s important to have good tools when managing a network and the users it serves. Good management tools help you see the big picture. They also help you monitor the network for problem areas and perform configuration tasks quickly. The Microsoft Management Console (MMC) is an application that can help you do all this and more. You’ll learn how MMC works today. We’ll begin by looking at the issue of computer management. One tool allows you to manage both local and remote computers, so the process is essentially the same for either task.
Security is one of the tools that network administrators use to ensure that users obtain what they need from the network. The security policies you set determine how a user interacts with the system as a whole. It also affects a user’s attitude toward the network. If you set a security policy that’s too strict, the user will constantly fight with the system to gain access to the most basic of resources. Users on a restrictive network are often unhappy and don’t mind telling everyone why. On the other hand, networks that have lenient security policies set themselves up for failure. I’ll show you how to create network policies today and help you understand the ramifications of certain configuration choices you’ll need to make.
Finally, users require access to resources. Most network resources are difficult to abuse because you maintain a security policy that controls access. However, users always find a way to abuse the hard drives on a network. Every byte of space will disappear in short order if you’re not careful. We’ll look at some management policies that help users understand the cost of the network resources they use, so they can manage them with greater care.
Windows XP relies mainly on the MMC for computer management tasks. You’ll find the MMC in one form or another in most of the management tools provided with Windows XP. However, Windows XP also relies on other tools. For example, the backup application is still stand-alone; it isn’t part of the MMC. The point is that you don’t have to use an MMC console to perform every type of maintenance, but most people find that MMC consoles are easy to use and understand.
The following sections discuss a special “one size fits all” MMC console named Computer Management. It allows you to perform many types of computer maintenance and this one console may be all you need to perform most of the maintenance tasks on a small network. (You’ll always need other tools, but probably not every day.)
As previously mentioned, the MMC is the central tool in the Windows XP management arsenal. However, it’s important to understand that MMC is really a container application. You place snap-ins inside the container. The combination of snap-ins and the container is a console. The MMC console is the actual tool you use to maintain some part of the network.
You can create your own MMC consoles; just run the MMC command at the Run dialog box (use Start | Run to access it). You’ll see a blank container that you fill with snap-ins using the File | Add/Remove Snap-in command. Click Add in the Add/Remove Snap-in dialog box, and you’ll see an impressive list of snap-ins from which to choose. (Not every snap-in has a home in a console right now.) This command generally isn’t available when using predefined consoles, especially those created by Microsoft. Begin with a blank console if you want to create something special for your administrator toolbox. You can see a list of the predefined consoles in the Administrative Tools folder (found in the Control Panel or the Start | Programs menu).
Fortunately, many of you will never have to worry about creating an MMC console because Windows XP ships with so many of them. The emphasis of the Microsoft console creating effort is the corporate workstation or home system. Consequently, you’ll find an MMC console to manage local security policies, but not a group policy manager. These “world view” consoles will arrive with the next version of Windows server.
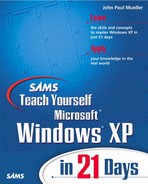
In the meantime, you do have direct access to a wealth of consoles for your local needs. The Computer Management MMC console is the Swiss knife of the console world. As you can see from Figure 8.1, this console contains a little bit of everything needed to maintain your system.
As you can see, this truly is a central repository of tools for the small network. You can manage the three computer system areas: System Tools, Storage, and Services and Applications. In addition, you can manage more than your own system by right clicking Computer Management and choosing All Tasks | Connect to Another Computer from the context menu. The Select Computer dialog box contains the Another Computer field you use to select another machine on the network. Use the Browse button if you don’t know the other computer name. Click OK, and you’ll see the same information for the other machine. The location information (seen as “Local” in parenthesis beside the Computer Management entry in Figure 8.1) will change to show the new computer name.
The main entries you see in Figure 8.1 will remain the same when you switch to another computer. However, you may see a difference in subentries. For example, if you connect to a server, Event Viewer will contain several new logs including Directory Service, DNS Server, and File Replication Service. The entries you see depend on the capabilities of the machine you monitor.
Some entries will stay intact, but you won’t be able to use them. For example, you can’t use the Disk Defragmenter on a remote drive. The entry stays in place, but you’ll see an error message instead of the local display. Fortunately, the situations where you can’t perform a task on a remote system are rare.
The System Tools folder of Computer Management helps you configure and maintain your system. This folder doesn’t contain every snap-in you’ll ever need, but you’ll find that you can spend most of your time using this folder for system specific needs. For example, while the System Monitor snap-in doesn’t appear in this folder, the Performance Logs and Alerts snap-in does. You only need System Monitor when tuning your system for optimal performance, but you might use Performance Logs and Alerts daily to ensure that your system stays in shape. The differentiation in purpose is important.
Now that you know why particular tools appear in the System Tools folder, let’s talk about their purpose. The following list provides an overview of each tool and tells why you might use it on a regular basis. Some of these tools receive a complete description section today; we’ll discuss others on other days.
Event Viewer. The Event Viewer helps you keep track of special occurrences on your system. The three folders this snap-in contains track application, security, and system events. Event Viewer provides three levels of tracking: information, warning, and error. Depending on which machine you’re monitoring, you might see more logs. It’s also possible (but unlikely) that a vendor will use special message types. You should check Event Viewer each day because it normally provides the first indication that something is wrong with your system. In fact, a well-written application can alert you to conditions long before they become problems. We’ll discuss this snap-in in more detail in the “Using Event Viewer” section during Day 9.
Shared Folders. Networking involves sharing resources with other people. For example, you might have a project folder on your system that requires the efforts of several people to complete. It’s important to share the data, but you also want to monitor access to ensure that people don’t abuse their privileges. The three folders provided by this snap-in (Shares, Sessions, and Open Files) help you track which resources are available, who’s using them, and for how long. We’ll discuss this snap-in more in the “Shared Drive and Folder Monitoring” section today.
Local Users and Groups. This snap-in contains two folders. The Groups folder contains a list of all the groups that can access your machine. The Users folder contains a list of all the users who can access your machine. You’ll use the groups to define the same level of access for more than one person. In both cases, you want to provide access to other users, but limit that access to ensure your data remains safe. We’ll discuss this snap-in in more detail in the “Managing Local Users and Groups” section today.
Performance Logs and Alerts. Some people view performance tuning as a one-time task that they’ll begrudgingly do someday. Performance tuning begins when you monitor system performance, select a course of corrective action for problem areas, and implement the changes as needed. However, this is just the beginning. If you don’t continue to monitor your system, performance will eventually decline as the system state changes. This snap-in helps you track system performance on a continuous basis. You can create alerts to tell you when specific events occur, such as a significant drop in disk space or performance. In short, System Monitor is the tuning tool you use occasionally, while Performance Logs and Alerts is your helper for daily performance tuning. We’ll discuss this snap-in in more detail in the “Performance Logs and Alerts” section during Day 9.
Device Manager. The Device Manager contains a complete list of the devices on your system. It displays the devices by type, making them easier to find. You can tell if a device has failed because Windows XP will mark it for you. This snap-in also allows you to check how Windows XP uses system resources, update device drivers, and perform some device configuration tasks. We’ll discuss this snap-in in more detail in the “Using Device Manager” section of Day 10.
Your system has three essential resources you must control in order to get good performance: memory, processing cycles, and hard drive space. A lack of any of these three items will result in a system that performs poorly. You can control memory by configuring applications to use only the features you need and by opening only the applications that will fit within memory. Of course, you can always take the “add more memory” route because it does work. You can control processing cycles by keeping processor intensive applications to a minimum. We’ll also explore a more interesting technique in the “Processes” section during Day 9.
The Storage folder contains utilities you need to maintain the hard drive space requirement for good performance. You’ll find that it provides access to three snap-ins that are specifically designed to make managing storage easier. The following list discusses these options and tells you where you can learn more about them.
Removable Storage. Computers have many removable storage options today. For example, you can use permanent removable media such as CD-ROMs and DVDs. Some removable media is semi-permanent. The CD-RW and DVD-RAM drive both fall into this category. Still other devices, such as ZIP drives, look just like hard drives. This snap-in helps you keep track of your removable drives by checking the media they contain and their status. We’ll discuss this snap-in in more detail in the “Working with Removable Storage” section of Day 10.
Disk Defragmenter. The Disk Defragmenter snap-in reorganizes the data on your hard drive so your system can find it faster. Defragmenting your hard drive removes some of the costs of working with physical devices such as head movement. We’ll discuss this snap-in in more detail in the “Disk Defragmenter” section of Day 21.
Disk Management. Use this snap-in to create new partitions, format a drive, change the drive letter, and determine the drive status. You’ll also use this utility to create special drive setups, such as using a redundant array of inexpensive disks (RAID) to increase system reliability. We’ll discuss this snap-in in more detail in the “Using Disk Management” section of Day 10.
The Services and Applications folder contains a minimum of one folder, Services. The Services folder contains a list of services on your system, plus a status for each service. It also provides two views: standard and extended. The standard view contains the list of services in a details type view. The columns include name, description, status, startup type, and logon as. The extended view contains the same information, along with a secondary pane that extends the description so you can see it. Unfortunately, you can’t adjust the size of the secondary pane, which means you need to move items around to see all of the column entries properly. Figure 8.2 shows a typical example of the extended view. We’ll discuss services in more detail during Day 11, “Configuring Services.”

Figure 8.2 shows three applications in addition to the Services folder. Sometimes these applications will show up in the folder even if you haven’t activated them. In this case, only the Indexing Service is active. The WMI Control and Internet Information Services entries will produce error messages when you click on them.
You should also notice that the applications aren’t applications in the standard sense of the word. These are background, service-related applications. For example, the Indexing Service keeps track of your hard drive content in the background. It comes into play when you need to find data on your hard drive. The Indexing Service can provide answers to the search engine much faster than a real time search.
Windows XP provides several interfaces for managing users and groups on your machine. The first method is the simplified interface provided by the User Accounts applet. This interface has the advantage of using a task-based approach to user management. You don’t need to worry about which menu has the option you need. The disadvantage is one of flexibility and access. This interface is somewhat rigid and doesn’t provide full access to user information. In addition, using this technique doesn’t allow you to manage groups.
The second method is the Local Users and Groups MMC snap-in. You saw this snap-in loaded in the Computer Management console in Figure 8.1. This method does allow you to manage both users and groups, but at the expense of a more complex interface and increased management time. Problems aside, this is the method that you’ll want to use to create users, in most cases, because it allows you to assign a password and group permissions. The following sections discuss both interfaces.
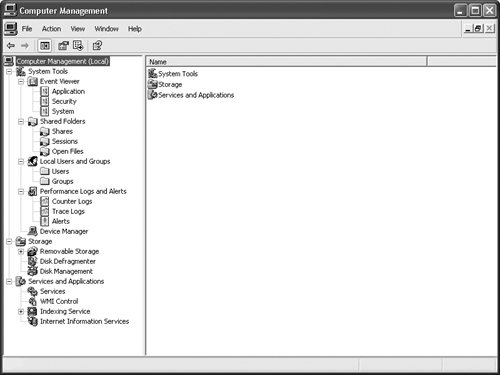
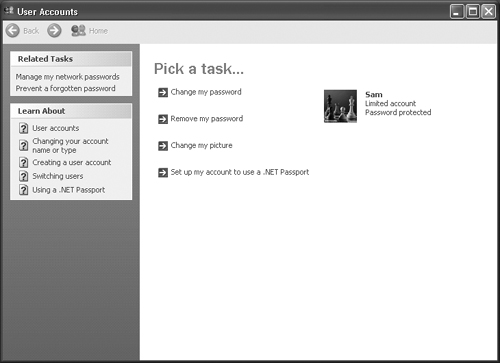
The User Accounts applet helps you manage user accounts without the complexity of an MMC snap-in. In addition, it consolidates several functions, such as changing the way users log into the system, and uses a task-oriented management approach. Figure 8.3 shows a typical view of the User Accounts dialog box from the network administrator perspective. You’ll see in a few moments that the average user sees something different.
Tip
The User Accounts dialog box doesn’t provide access to the Local Users and Groups MMC snap-in. It also limits the tasks you can perform on a user account. Making this applet accessible to users allows them to change some of the characteristics of their account, such as the picture displayed on the Welcome screen, without leaving any security holes. This is a good solution for network administrators who want to give users freedom without leaving the network open for attack. With this applet in place, there’s no reason to expose the Local Users and Groups MMC snap-in to anyone but network administrators.
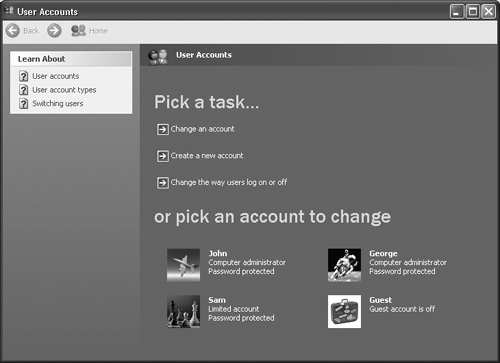
Click Change Account, and you’ll see a Pick an Account to Change dialog box that lists the accounts the user can access. Select an account, and you’ll see the What you do want to change about your account? dialog box shown in Figure 8.4. You can also reach this dialog box by clicking the account you want to modify on the Users Accounts dialog box shown in Figure 8.3. You can also choose other people’s accounts. Again, this is the network administrator view of the User Accounts applet. The average user won’t see any accounts but the one that he or she normally uses.
As you can see, you can change or remove your password, change your picture, and set your system up to use a .NET Passport. The User Account applet will always enable these options. The availability of the other options depends on the rights of the user and the local security policy settings. For example, average users can’t change their network names assigned to them or their account types.
How does the average user’s view differ from the one seen by the network administrator? Figure 8.5 shows what the user will see when he first opens the User Accounts dialog box. As you can see, the user’s choices are limited, and he can’t access anyone else’s account. This simplified interface makes it easy for any user to change his password and Welcome screen picture as needed or desired.
Using the various links is easy. If you change your name, the User Account applet will present your current name and ask for a new one. Changing your password involves typing the old password, the new password twice, and a phrase or a word used to provide a password hint. Generally, you’re better off enforcing a policy that prohibits the use of hints. Removing your password is almost too easy. All you need to do is type the old password and click Remove Password. Windows XP won’t complain unless you set the Minimum password length policy to something other than 0 (the default). The Change my account type setting is also simplistic. You choose between a computer administrator or a limited account.
Caution
The password hint is visible to anyone on the network. Some users will almost certainly try to use their password as a hint. Unfortunately, Windows XP doesn’t check for this potential problem. It accepts the user’s password as a perfectly acceptable hint. This means that you could have passwords that are completely visible to anyone on the network. The problem is more serious than you might think. No local security policy bans this practice, so you can’t enforce the user’s password and hint choice. A written policy might help, but it’s difficult to enforce considering the network administrator doesn’t know the user’s password.
When you click Change my picture, Windows XP will display a list of new pictures for your account. Many of the pictures are generic, and you may want something special. Click Browse for more pictures if you want to use your own picture for an icon. The important thing to remember is that the picture is going to be small, so you have to choose a picture that looks good in a small size. Windows XP allows you to use any picture in a BMP, RLE, DIB, JPG, GIF, or PNG format.
The Local Users and Groups MMC snap-in provides you with the greatest flexibility in changing the accounts for a specific machine. In addition, you can use this MMC snap-in on more than one machine by connecting to it. You won’t find these features in the User Accounts applet.
You can use the Local Users and Groups snap-in in two essential areas: users and groups. The Users folder contains individuals in your company, while the Groups folder contains settings for groups of individuals who perform similar tasks. The following sections will help you learn to work with both users and groups, and better define the differences between them.
When you open the Users folder of the Local Users and Groups snap-in, you’ll see a list of users currently set up for the local machine. This doesn’t represent the users for a domain unless you connect to a server. In addition, Active Directory provides another set of snap-ins to perform work with it. The list includes the name (login), full name, and description for each user.
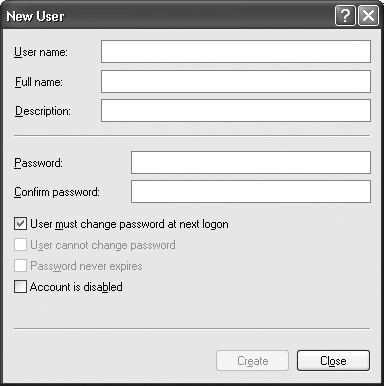
To create a new user, right click an open area in the details window and choose New User from the context menu. You can also use the Action | New User command to perform this task. Figure 8.6 shows the New User dialog box that you’ll see. It allows you to enter the user’s login name, full name, description, and preliminary password. A network administrator should force the user to change his password during the login so that the user can never say the administrator used the account for illegal purposes.
The New User dialog box only contains the essentials for defining a user. If you right-click the new user entry and choose Properties from the context menu, you’ll see a User Properties dialog box with several tabs of information. The General tab contains the information we just defined for the user.
Click the Member Of tab, and you’ll see a list of groups. Click Add if you want to add a new group to the list. You’ll see a blank Select Groups list, which is something that confuses many people. Microsoft listed the groups in previous versions of Windows, but doesn’t for Windows XP. Click Advanced, and you’ll see a Select Groups dialog box like the one shown in Figure 8.7. Click Find Now, and Windows XP will provide a list of groups on your local machine. Notice that I’ve already conducted a search using the entries in this dialog box.

The Profile tab contains login settings for the user. The Profile Path field enables you to assign a profile located on a server to the user, which allows the user to roam from machine to machine and still use the same setup. Windows XP supports two types of profiles: roaming and mandatory. In both cases, the user downloads a profile from the server when he or she logs in. In the case of a roaming profile, Windows XP will update the profile settings on the server when the user logs out. The mandatory profile doesn’t allow any changes, so Windows XP won’t update it when the user logs out.
The Dial-in tab shown in Figure 8.8 is only active for server-based accounts. These settings determine if a user can call into the server. They also determine how the user can call into the server. Generally, Windows XP relies on whatever remote access policy you set for dial-up connections. Fortunately, you can override those settings to always deny or allow access.
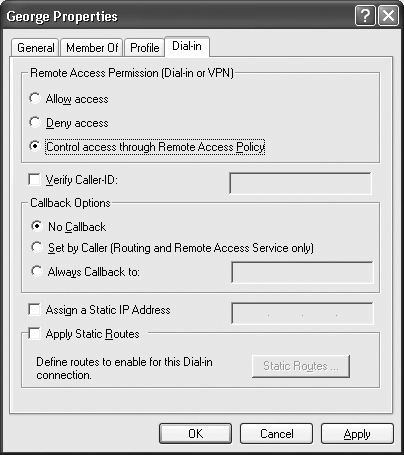
If you check the Verify Caller-ID option, the user must call in from the same number every time he or she uses the dial-in connection. This setting also sets limits on the features the user can add to his or her remote connection because some telephone services will hide the number.
A more traditional method of checking the remote caller’s identity is to use the callback system. In a callback system, the user calls the server and provides identification. The server hangs up the telephone, validates the user’s identity, and then calls the user back to establish a connection.
The least secure callback method is to allow the user to set the callback number. Using this technique allows you to track the receiving number and allows the user to call in from more than one location. The most secure method is to call back to a specific number. In this scenario, the user must call in from the same number every time. Unless the user changes numbers, the callback ensures the user’s identity by calling the same number every time.
You’ll use the Assign a Static IP Address and Apply Static Routes options to remote networks that call into a main network number. For example, a satellite office might need to call into the office to establish a connection each morning. Assigning the caller a static IP address enables communication between the two networks and users of the two networks. Using static routes also allows communication between two individual machines by allocating a static route for all machines on the remote network.
Groups are an organizational tool, and you’ll find they’re simpler to understand than the use settings. Click the Groups folder in the Local Users and Groups snap-in, and you’ll see a list of groups for the system. The groups don’t contain much in the way of settings. Figure 8.9 shows a typical setup.

As you can see, the Group Properties dialog box contains the group name, a description, a list of users and objects, and buttons for adding and removing members. The New Group dialog box looks similar to the one shown in Figure 8.9. The main difference is that the New Group dialog box allows you to change the group name.
Sharing hard drives and folders is an essential part of networking. It’s the basis for every network in existence. In fact, early network operating systems (NOSs) built their reputation on file and print sharing.
Windows XP provides file and drive sharing, just like almost every version of Windows before it. The model used for file and drive sharing is similar to the one used in Windows 2000, rather than the less secure model used in Windows 9x. This means that you set specific levels of security at an individual or group basis. We’ll discuss security in detail during Day 16, “Configuring Security.”
Today we’ll discuss the Shared Files MMC snap-in. This snap-in helps you keep track of user connections and other information about your drives. We’ll also talk about auditing and quotas—two methods to tracking drive resource usage. Auditing creates a record for disk accesses, while quotas limit the drive space each user can access.
The Shared Files snap-in contains three folders: Shares, Sessions, and Open Files. You’ll use each of these folders to monitor drive usage on your system.
The Shares folder, shown in Figure 8.10, shows which drives you’ve shared and the number of connections people have made to them. Don’t assume that this means one person for each connection. The same user can connection to more than one drive, and Windows XP counts each drive connection separately. Notice that this list includes both standard shares and default or administrative shares (those with a “$” in their name). This allows you to monitor all system activity.
Tip
You can use the Shared folder display to perform a number of not-so-obvious tasks. For example, a Stop Sharing entry on the context menu will remove the share from the system. Click Properties, and you’ll see a Drive Properties dialog box containing tabs that allow you to adjust caching, share permissions, and security. The Security tab has an Advanced button that provides access to the auditing features of the drive. Unfortunately, you can’t adjust the quota from this drive.
The Sessions folder appears in Figure 8.11. Notice that it contains the name of each person using your system. The entries also include the number of files the person has open, the time they connected, and the amount of idle time since their last activity. The Guest column tells you if the user logged in using the guest account.
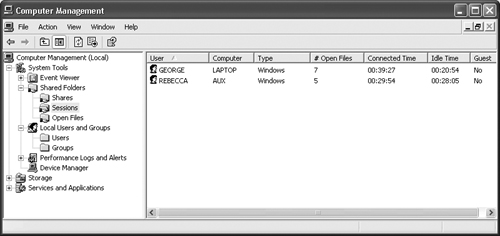
The only task you can perform in this folder is to end the user’s session by using the Close Session option found on the context menu. Using this feature can have undesirable results. For example, users could lose data because their session ended with a file in an uncertain state. Normally, you’ll want to contact the users first and ask them to disconnect from your system. You do this by right-clicking Computer Management and Selecting All Tasks | Send Console Message from the context menu.
You’ll use the Open Files folder shown in Figure 8.12 to monitor the files opened by other people on your system. Notice that the columns list the user’s name, the type of file access, the number of locks on the file, and the type of access requested. A file lock indicates some type of shared access. For example, two people can share a database file. It’s important to use locks in such a case to ensure that one user doesn’t infringe on the edits make by another user.
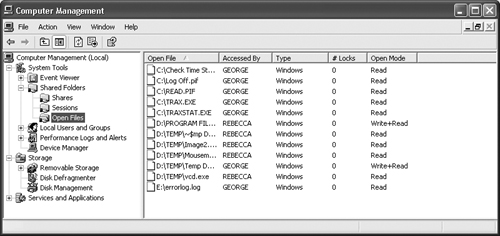
As with the Sessions folder, you can only perform one action on files in the Open Files folder, Close Open File. Closing a file opened for Read access is usually safe. The action might inconvenience the other user, but is unlikely to harm the file. However, closing a file opened for either Write or Write+Read access could damage the file, cause data loss, and will definitely do more than irritate the other user. Again, it’s always better to send a console message to ask the other party to close the file, rather than close the file yourself.
You can enable drive quotas under Windows XP in a number of ways, but one way is easier than all the rest. Open a copy of Windows Explorer, right-click the drive you want to modify and select Properties, and select the Quota tab. You’ll see a display similar to the one shown in Figure 8.13. The first step in using drive quotas is to check the Enable Quota Management option as shown in the figure.

You’ll want to decide if new users should have an automatic quota set on their accounts, or if you want to set the limit as necessary. You can also choose to log any excessive use of disk space. The log can contain just the users that exceed their limit, or you can include those that reach the warning level as well.
Enabling quotas and setting a default limit isn’t enough to ensure good resource management. You also need to review the users who have a quota. To do that, click Quota Entries. You’ll see a Quota Entries dialog box like the one in Figure 8.14 that contains a list of users who have a quota for this drive. The list indicates their warning level and quota limit. You’ll also see how much space these users have already used and learn if they’ve exceeded their limit.
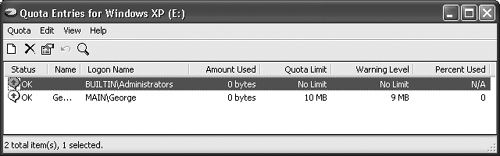
To add a new user to the list, click New Quota Entry. You’ll see a Select Users dialog box. Type a user’s name or locate it by using the Advanced button. Click OK, and you’ll see a New Quote Entry dialog box. Select a quote limit and warning level for the new user and click OK. Their name will appear in the Quota Entries list.
Auditing, for the purpose of this discussion, is the act of creating a log of user activity on your system. You can audit all kinds of user activity. For example, if you want to know every time a user successfully deletes a file, you can create an audit entry for it. These logs are useful if you want to monitor user activity or check for illegal actions.
You can enable auditing in a number of ways, but the easiest method is to right-click a drive in Windows Explorer and choose Properties from the context menu. Select the Security tab in the Drive Properties dialog box and then click Advanced. You’ll see an Advanced Security Settings dialog box. Select Auditing, and you’ll see a dialog box similar to the one shown in Figure 8.15.
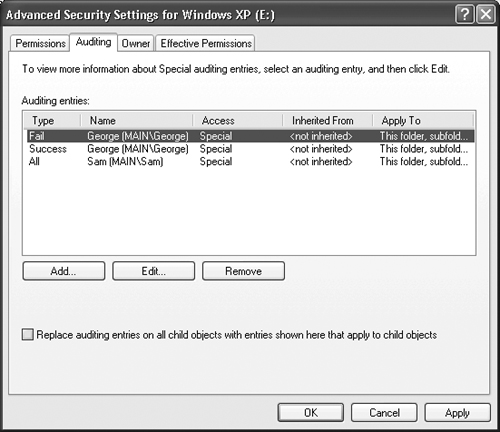
As you can see from the dialog box, you can monitor users for success, failure, or both success and failure in performing certain tasks. Windows XP helps you monitor everything from taking full control of the drive to deleting files to simply changing the file attributes.
To Add a new entry, click Add. You’ll see a Select User or Group dialog box. Click Advanced and then Find, to display a list of local user and group names. Select a user or group from the list and click OK. You’ll see an Auditing Entry dialog box. Select the tasks you want to monitor and click OK. Windows XP will add the new auditing entry to the drive. The audit will remain in place until you remove it.
Many of the offices I’ve set up in the past use multi-user workstation setups. One user has possession of the computer during the day; another by night. Several users might share the same computer because one user won’t use it all day. A manager might need access to an employee computer because the one in his or her office is too far away. The reasons could go on forever, but multi-user workstations are common. The following tips help you set up a multi-user workstation up in the most convenient way.
Create a default user setup. The Documents and SettingsDefault User directory contains a complete set of empty folders. Every user you create for a local machine will use this set of folders as a starting point. The user will only receive input from this folder during the creation phase. Don’t confuse this set of folders with the All Users folder.
Use the all users folder (Documents and SettingsAll Users) to hold all common elements. For example, if everyone needs access to the word process, you’ll want to place the icons for it in this folder, rather than duplicate those icons for every user. However, if you have a situation where most, but not all users, require access to an application, you can place it in the default user setup. This allows you to remove the icons from those users who don’t need it.
Implement Start Menu security. You might have a machine where all employees need access to some icons, but guest users shouldn’t have access. Assigning security to those icons allows you to place them in the all users folder, but still restrict access. Icons normally inherit rights from their parent, so you need to click Advanced on the Security tab of the Object Properties dialog box. Clear the Inherit option and then click OK before you begin setting a new security policy. Note that everyone can still see the icon, but only those with the required permissions can use it.
Create common desktop elements as needed. For example, everyone might work on the same project together, so placing the folder for that project in the Documents and SettingsAll UsersDesktop folder makes sense. This way you can ensure that everyone will use the same folder, and that all of the data is changed at the same time.
Set security to assume that the user will always fail to log out when leaving the area. For example, you can set the screen saver to log the user out automatically and return to the login screen. This forces the user to log back into the system and protects it from prying eyes.
Today you’ve learned about some of the MMC snap-ins provided with Windows XP. You also learned about the User Accounts applet in the Control panel. Each of these management tools affects the user environment in some way. In some cases, the user receives access to resources. In other cases, you restrict the user from entering sensitive areas of the computer. These management tools allow you to monitor user activity in a way that maintains both user privacy and system security. Finally, you can look at these tools as a performance aid. By managing the user’s access to resources, you also optimize the use of those resources and enhance overall system performance.
It’s the end of the eighth day. By now, you should consider yourself a network guru, or at least a guru in training. It’s time to see how much you know about working with users on a network. You can find answers to the quiz and exercise questions in Appendix A at the back of the book.