Security is front-page news today because of break-ins at various Internet sites. People also suffer at the hands of crackers in their e-mail. Computer systems suffer death due to lax security, or, at least, the user suffers loss of data. Let’s just say that security is a passionate subject for some, but a requirement for all.
The press often maligns Microsoft as being too slow in their security efforts. In addition, many members of the press point to every flaw and failed attempt to fix problems to indicate that Microsoft is incompetent. It’s true that Microsoft’s track record isn’t the best in the industry and their solutions for problems are often dubious at best. However, you’ll also find plenty to say about the negligence of network administrators and users alike. For example, Microsoft released a fix for the Code Red worm weeks before it appeared on the scene, yet the worm infected many computer systems because the network administrator failed to apply the patch. The fact that Microsoft makes such a large target for crackers to attack doesn’t help either. Most people use Microsoft products, and crackers want to affect the largest number of people they can.
We’re going to discuss security issues today. The information you obtain will help you organize your security efforts. You’ll also learn how to make the best use of the security features that Microsoft provides. In addition, I’ll tell you about a few techniques that you can use to sway the security war in your favor. Crackers use well-known techniques because they work. You can use that to your advantage by ensuring that you don’t fall into traps.
However, the two things we can’t do today are predicting the future and making your system completely airtight. You don’t know what new viruses and worms crackers will create tomorrow. In fact, even if you did know, it would be hard to prevent an attack on an unmonitored system. This is the second part of your security responsibility. Not only do you need to be aware of security threats and fixes for your software, but you also need to monitor your system for security problems. Only monitored systems have a chance to survive in a world filled with security threats.
Every network should have a security plan. Even if you put two computers together to play games with your friends on the weekend, you need a security plan. Some security plans are quite formal, while others appear on a single sheet of paper in a maintenance log. The important thing is that you know what security measures are in place on your system and what to do in case someone breaks in. Think of it this way—it doesn’t matter what data you lost as the result of a cracker attack. The only thing that matters is that you did lose data.
The following sections will discuss the requirements for a security plan. They help you design a security plan that really maintains a system security. While the security plan won’t lock your system up, it does help with security because it helps you understand the security process in place in your organization.
Breaking the company into securable groups seems like one of those things that every network administrator should know about, and yet I’ve seen more than a few networks that assign security on an individual basis. Always break your company into groups that you can manage easily. The group mentality will save you time and effort because groups take less time to configure. Groups also reduce the chance that you’ll forget to change someone’s account when you need to make a change to network security. All you need to consider is the needs of the group and change the group settings.
Of course, the big question is how you break the company into nicely packaged groups. You might look at your company and see a multitude of people who all do different tasks. It might not be easy to break them into groups. You can use the following list of grouping suggestions as a guide, but sometimes you’ll just have to become creative in your approach to the problem.
Department. This is the easy grouping choice. Everyone in the same department should have similar security needs at some level. Some users will have other requirements, but you can consider their department security needs as essential. For example, everyone working in accounting will require access to some level of accounting files. All you need to do is find out what that level is and create a group that will answer that need.
Rank. Another easy grouping choice is rank. Even if you have the smallest company in the world, some users will fit into the worker category, while others fit into the manager category. Managers often have network needs greater than those assigned to a department because of their position within the company. The larger your company, the larger the number of rank-based groups you’ll need to consider.
Team. Many companies have a team mentality. Users from different departments join together to create a product or perform some other task. The members of the team often require access to special files. In addition, you normally want to keep people outside the team from knowing what the team is doing. The team approach keeps files in the hands of those that need them. This particular grouping is rank independent. A manager may not have access to some of the files used by a subordinate if he or she isn’t part of that team.
Skill Level. If your company is large enough, you’ll have a constant influx of new people. You don’t want to give these people access to everything the network has to offer until they’ve completed a training period. Of course, skill levels can go well beyond the trainee. You need to consider other skill levels in the organization. For example, a new manager may not know enough to work with all of the management files. You may want to train them first or give them time to adjust to their new position.
Sensitivity Level. Companies have secrets, and you only want those you can trust to know them. You might need a special grouping for the company’s inner circle. It might seem at first that this group would include only managers, but politics often play a role in the sensitivity setting. It pays to keep your options open on the groups so that it’s easy to make changes. Don’t assume that all managers will have access to every company secret.
Temporary Groups. This group could contain just about anything that you don’t plan to keep around for very long. It could even include temporary employees hired on for a specific purpose and let go after the job is complete. A temporary group works well when you have company training that requires user interaction with the network.
Tip
Everyone outside of IT is going to complain about any security plan you create if you don’t involve them in the decision process. Part of the group creation process is to present the list of groups to those involved. You might be surprised at the ideas that users come up with when you ask them to brainstorm your security plan. In addition, you can be a little more certain that you’re not forgetting a major security need.
What happens if you can’t fit every user need within a group? In some cases, you’ll have to assign an individual user a unique set of network privileges. The unique settings you make can come back later to haunt you, however, so it’s important to take some precautions when you need to go outside the group mentality. It pays to maintain a log of individual user settings so you can find them quickly when needed. Otherwise, you don’t know where those little “security bombs” will show up.
Part of the group creation process should involve diagramming the groups to show how they relate to each other. If you don’t want to diagram the security on your network, at least make a list of the groups and provide a reason for the existence of each group on the list. Eventually, the user and group entries on your network will create clutter that you’ll want to clean up, and you may find yourself wondering why you created a particular group. Good notes now prevent head scratching later.
Once you have a list of groups and a structure for your security plan, you need to begin work on the security plan itself. A good security plan considers some basic needs. The following list shows what I normally include in a security plan. Depending on the size of your company, you may need to add other provisions to the security plan.
Responsibilities. Many companies today stress the team concept toward managing projects. The concept works well on projects because the entire team can pull together to complete the task. However, the team concept in security is a mistake and a disaster waiting to happen. One person has to have responsibility for each security area. In addition, the plan should assign a second person to check the first person’s work. However, the first person is ultimately responsible for a particular well-defined area of security and only that person will “fry” when something happens.
Responsibility extends to the user realm. Every user is responsible for maintaining his or her password. They’re responsible for keeping their part of the information puzzle confidential. Finally, each user is responsible for reporting anomalies to the network administrator. A good security plan begins with personal responsibility.
Policies. Every security plan should consider how the company manages resources. The plan needs to spell out the policies the network administrator implements within the network setup in the form of local or group policies. For example, the plan should consider the frequency of password change within the organization. See the “Setting Local Security Policy” section for additional policy settings that Windows XP supports.
Normal Event Handling. One of the biggest problems with security plans that I’ve seen is that they don’t spell out normal procedures. Simple questions, such as how a user requests additional access to system resources, remain unanswered. Without a list of standard procedures, users are apt to conceive their own unique solutions to problems. Unfortunately, the solutions often put user needs first, the needs of the company second, and security requirements dead last.
Emergency Event Handling. Quick! Someone has spotted a virus on the network! Do you know what to do? If you have a good security plan, you do. On the other hand, if you’re like most companies, your system is now dead in the water, and your data is at risk. Everyone has a headache, and no one wants to face the extreme task of fixing the system. In short, most companies manage by crisis. A little forethought in the form of emergency procedures can keep the situation calm and damage to a minimum.
Penalties. This is one area where most security plans do have an entry. However, the penalties are often weak or extreme. They don’t reflect the idea of, “Let the punishment fit the crime.” Firing someone who forgot his password is akin to capital punishment for jay walking. Likewise, a slap on the wrist for someone who brought a virus to work on that floppy from home isn’t strong enough. Make penalties for minor infractions a teaching experience. For example, you could ask the person to write a paper on the topic and present it before their workgroup. The process of researching and presenting the paper is a lesson the person is unlikely to forget. Of course, infractions that damage the company in a major way require a major response—up to and including firing the person for cause.
Review Process. The world is changing and so is your company. A security plan that fulfilled every need six months ago is unlikely to work today. You need to spell out a review process. The parties responsible for security should meet regularly to review changes in technology, external and internal threats, and company needs.
The preceding list tells you about the mechanics of a security plan and what this plan should contain. However, you need to consider other needs as part of the security plan. For one thing, you need the full support of management for a security plan, which means involving management in the creation process. Make sure that management reviews and approves your security plan. In addition, you need to get approval to add “teeth” to the penalties of your security plan.
Another axiom for security plans is that it won’t work without user cooperation. Some users will fight tooth and nail about every provision in a security plan because they don’t want their “freedoms” taken from them. That’s the reason you need a penalties section. However, the vast majority of users, the proverbial 95% of them, will want to cooperate. All they need is training on the new security plan. After you create a security plan, make sure that you schedule training time and show the users how Windows XP will help them implement the tenants of the plan. It’s important to stress that the security plan will actually give the user more freedoms, not less. For example, users won’t constantly worry about virus attacks if they follow the requirements of the plans.
We began discussing user management issues, including user security, during Day 8, “Working with Users.” Today we’ll explore the security aspect of user management in detail. The discussion begins with the Local Users and Groups snap-in of the Computer Management console.
Figure 16.1 shows the Groups folder, which contains a list of the default groups for Windows XP along with an explanation of each group. You’ll want to check this list out when creating your own group list because the default groups will serve some of the generic requirements. In addition, looking at the default groups will present you with some ideas for your own.

To create a new group, right-click anywhere in the Details pane and select New Group from the context menu. You’ll see a New Group dialog box. Type a group name in the Group Name field and a description for the group in the Description field. Click Add to display a Select Users dialog box. Type or find the names of the users you want to add to the group and then click OK. Click Create to create the group. From this point on, every time you assign a right to the group, you also assign it to the users of that group.
Tip
Always provide detailed descriptions for groups. The default groups will provide you with ideas on what type of information to include in a group description. The description should always tell precisely what purpose the group serves and indicate why you created it. Temporary group descriptions should begin with the word “Temporary” to make them easier to find. Documentation is extremely important when security is involved.
If you need to rename or delete a group, right-click the group name within the Details pane. Select the appropriate action. If you’re deleting a group, Windows XP will warn you of the consequences of deleting it. Group deletions are permanent, and you can’t restore them later. If you select the Rename option, then the group name will change into an edit box where you can change the name. Changing the name doesn’t affect the users assigned to the group or the resources the group can access.
Sometimes, you’ll need to change the group description or add or remove users. You’ll do this in the Group Properties dialog box. Right-click the group entry in the details pane; then choose Properties from the context menu. Note that the Group Properties dialog box won’t allow you to change the name of the group; you must do this with the Rename option on the context menu. You’ll use the Add and Remove buttons in the Group Properties dialog box to add and remove users as needed.
Figure 16.2 shows the Users folder. The list contains a few default users such as Administrator and Guest. You’ll also find the initial user that Windows XP requested you create as part of the installation process. Microsoft also includes a SUPPORT_<Some Number> and a HelpAssistant account with Windows XP for the newer features it supports. Either you or an application created the remaining accounts in this list.

Notice that many of the users in this list have a red circle with an X on them. This indicates that the account is disabled. You don’t want to delete default accounts you’ll need later. In fact, you can’t delete them in some cases, because Windows XP will prevent you from doing so. You can disable any account, including the Administrator account. Disabling the account makes it unavailable and a less likely target for compromise.
Crackers always look for defaults. You can rename any of the accounts including the Administrator account. It pays to rename any default account that you can in order to protect the account from prying eyes. Although I haven’t renamed the accounts in Figure 16.2 for clarity, I normally rename all of the default accounts in a manner consistent with my security plan. For example, one good naming scheme that I saw on a system was to combine the name of the machine with a shorter version of the default account name. For example, Administrator might become MyMachineAdmin. The name is easy to remember, yet doesn’t use the default name.
Note
Always check the documentation for applications that create default accounts on your system. For example, a UPS may create a default account that only has privileges for UPS information. You can’t rename these accounts, in some cases, because they’re “hard wired” into the application. If you can’t change the account name in the application, you can’t change it in the Users folder either.
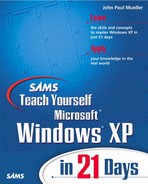
We already discussed adding and removing users in the Users folder in the “Working with Users” section of Day 8. Let’s look directly at the security issues for users. The General tab of the User Properties dialog box shown in Figure 16.3 contains account and password settings. The option that you should never check is Password never expires. This is like saying that you don’t care how long a cracker uses the account to create havoc on your system. Forcing users to change their password regularly increases security in a big way. Likewise, I’ve never come up with a good reason for network administrators to disallow user password changes; a good administrator wants users to change their passwords regularly.
Use the User must change password at next logon option whenever you make a change to the account. Generally, you want users to be responsible and in control of their accounts. Security begins when someone takes responsibility for his or her actions. If users know you can’t access their accounts, then they begin to build a sense of ownership over the account.
The Member Of tab contains a list of the groups to which the user belongs. Use Add to add new groups to the list and Remove to remove the accounts. The user always has access to anything the group can access.
The most difficult resource on your network to manage is the disk drive. Anything the user can use to store data becomes the target of abuse on every network. Users don’t even know they’re using the resource incorrectly in most cases. All they know is that they want to keep that report from five years ago, even if they’ll never use it again.
We’ve already discussed some disk-related issues in the “Disk” section during Day 10. The following sections focus on the security elements of disk management. You’ll learn how to protect your disk resources and make them a less tempting target for abuse by everyone on the network.
One of the bigger security concerns you’ll have is how much of a resource to share. We discussed quotas during Day 10, but quotas only protect the use of the resource, they don’t protect the data the resource contains. To do that and still allow users access to the data they need, you need to create one or more shares on a host drive.
Every host drive already has one share defined at the root level. This is an administrative share designed to provide access for backups and other administrative tasks. No one else should have access to this share and even the administrator should never use it directly. Administrative shares commonly have the device name and a dollar sign ($). For example, the C drive will have an administrative share name of C$.
Many shares will occur at the folder, not the drive level. You want to share the minimum level of drive resources that will satisfy a user’s needs. The smaller you make the share, the better from a security perspective.
To manage a share, right-click the drive or folder icon and then choose Properties from the context menu. Select the Sharing tab, and you’ll see a Drive Properties dialog box similar to the one shown in Figure 16.4. Notice that the dialog box contains sections that determine the sharing status of the resource, the user limits, and caching status. The areas we’re interested in for this section are the Permissions, the Remove Share, and the New Share buttons.

You can create a new share by clicking New Share. Windows XP will display a New Share dialog box. Type an easy-to-remember single word share name. You can use underscores to connect words if desired such as My_Drive. Add a comment that describes the share. I normally include the drive type, location, and reason for the share. For example, the comment might look like this: “Windows XP hard drive on John’s machine for general data storage.” If the share appears on a user machine, then you’ll also want to select Allow this number of users and set a reasonable number that will reduce the burden of data sharing on the user. Click OK to make the new share permanent.
Removing a share is as easy as selecting the share in the Share Name drop-down list box and clicking Remove. However, Windows XP doesn’t provide any warning when you take this action. Removing the share is permanent and Windows XP doesn’t save any of the settings for you. In short, use the Remove option with care.
In the previous section, we discussed the mechanics of creating a share. However, the share isn’t complete until you assign permissions to it. Windows XP always assumes that you want the Everyone group to access the share with full permissions. Always remove this permission unless you really need it because it’s too broad for most purposes. Of course, you’ll also find that you need to reassign permissions to a share from time-to-time. In most cases, you want to add specific group permissions and only give them the level of access they require.
To change the permissions for a share, click Permissions, and you’ll see a Permissions for Share Name dialog box. Windows displays this same dialog box when you click Permissions in the New Share dialog box. The Group or User Names field contains a list of the users and groups that can access the share. Click Add to add new entries and Remove to remove existing entries.
When you click Add, you’ll see a Select Users or Groups dialog box. Type or find the name of the user or group you want to add to the permissions list. Click OK. Check boxes in the Permissions for field for the new entry that determines the level of access the user or group will have.
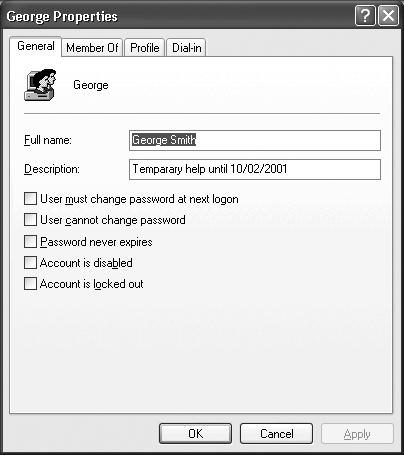
Creating a share for your drive makes it accessible by others on the network. You can determine which groups have access to the drive, but creating the share doesn’t mean they’ll actually enjoy all of the access you provide in the share. The Security tab shown in Figure 16.5 determines the precise level of access every group and user has to use the drive. It overrides the settings in the share.
You’ll still see a list of groups or users that can access the drive in the Group or User Names field. However, notice that the list of rights in the Permissions for field is more extensive and offers finer control over drive access. When working with a folder, you’ll notice that Windows XP automatically checks the permissions at the folder level that you checked at a higher level unless you disable permission inheritance.
Notice the Advanced button at the bottom of the dialog box. Click this button, and you’ll see the Advanced Security Settings dialog box shown in Figure 16.6. We’ve already discussed the Auditing tab of this dialog box in the “Auditing Drive Access” section of Day 8. Today, we’ll discuss the uses for the other tabs in the dialog box.

Note
The Advanced Security Settings dialog box shown in Figure 16.6 is for a folder. The inheritance option at the bottom of the dialog box forces the folder to use the settings of the parent resource when checked. Clear this option to set the permissions for the folder individually. The drive version of this dialog box lacks the inheritance check box because drives are at the top of the resource hierarchy.
The Permissions tab contains a list of every group and user that has permission to access the resource. To add a new user or group to the list, click Add. You’ll see a Select User or Group dialog box where you can type or find the name of the user or group that you want to add.
After you add the user or group, click OK, and you’ll see a Permission Entry dialog box similar to the one shown in Figure 16.7. Note that this is the same Permission Entry dialog box you’ll see when you click Edit in the Permissions tab. As you can see, the list of permissions is very detailed and allows you to set security for a wide range of needs.

Notice the Change button next to the Name field. This button enables you to change the name of the user or group that the settings will affect. Use the entries in the Apply Onto list box to control what effect the changes you make have on the directory structure. For example, you can choose just this folder, just the subfolders, or just the files in the folder, or any of a number of other combinations. After you make the required changes, click OK.
The Owner tab displays the current owner of the objects within the drive or folder. You can take ownership of the objects by checking the Replace owner on subcontainers and objects option and then clicking Apply. If you have the required permissions, Windows XP will change the owner on every object at the current level and below in the hierarchy.
The Effective Permissions tab is an essential security diagnostic tool. So far, we’ve looked at a number of ways to set security, and it would be easy to get confused, especially if more than one administrator makes changes to the same drive. To use this tab, click Select. Type or find the name of the user or group whose security you want to test. Click OK. You’ll see the effective permissions (the combination of all permissions) checked in the Effective Permissions field. Using this feature can help you locate users and groups with too many permissions for a given area of the resource.
The Local Security Policy console shown in Figure 16.8 helps you set the security policies for your system. A policy is a general rule that Windows XP applies to everyone who uses the computer. In addition, some policies apply to objects and not just users. For example, you can specify how much access the UPS account has to the system as a whole.

Windows XP includes an impressive list of policies for you to use in securing your system. One of the biggest problems with the initial Windows XP setup is that most of these policies are either undefined or have a default setting that leaves the system open to attack. In short, one of the first security tasks you need to perform is changing the security policies so they work in your favor.
If Windows XP simply presented you with a list of policies, you’d spend a lot of time trying to find the one you need, so Microsoft grouped the policies into functional areas. The following sections tell you how to use the four standard policy folders: Account Policies, Local Policies, Public Key Policies, and IP Security Policies on Local Computer. I won’t discuss the Software Restriction Policies because these policies are application specific. The application designer has to create and document them for you.
Note
This section doesn’t discuss every policy in detail because you can find a detailed description of every policy in the Windows Help and Support Center. The purpose of this section is to show you how to use the policies to your benefit. In short, we’ll focus on the practical aspects of using the policies, rather than determining what they do.
The Account Policies folder affects everyone’s ability to log into the system. It consists of the Password Policy folder shown in Figure 16.8 and the Account Lockout Policy folder.
The Password Policy folder contains entries that affect the way that users log into the system. Figure 16.8 shows the default settings for this folder. As you can see, the settings aren’t very challenging. To make these settings a little tougher for a cracker to break, you’d want to enforce the Password History option to ensure that users have to change their password. In addition, I recommend a maximum of 30 days between password changes. However, even a weekly change isn’t too much if you’re working with secure data. (Daily changes might become annoying after a while.)
Notice the Password must meet the complexity requirements option. Select this option, and users will need to select unique passwords that contain three categories of characters that include numbers, uppercase letters, lowercase letters, and special symbols. When you add this requirement to a minimum password length of at least six characters, the passwords are much harder to break.
Tip
Some people’s idea of a hard to break password is something long and difficult to remember such as xyz@2aBC$928. I’m sure that most users are just going to roll their eyes at such a password and write it down somewhere—I know that I would. Of course, the problem is creating a difficult to guess password that’s also easy to remember. How about using two words and a special symbol? For example, My$Password uses all of the criteria for a complex password, is relatively hard to figure out, and yet easy to remember. If you don’t want users to write their password down, then give them something they can remember. Of course, it also helps if you add some thing to your security plan that details penalties for writing their password down.
Windows XP provides three account lockout policies for your system. The Account lockout threshold policy is the key to these settings. The default setting of 0 means users can enter the wrong password all day long, and you’d never know about it. A policy of 3 or 4 incorrect logins usually assures that the system can handle typos, but leaves crackers with little room for invading your system. The other two policies set the lockout duration and the amount of time that must pass between incorrect logins before the lockout counter resets. The default of 30 minutes really isn’t long enough to discourage crackers. In addition, it might tempt employees to wait before reporting problems. I normally set both counters to 1,440 minutes or 24 hours as a minimum.
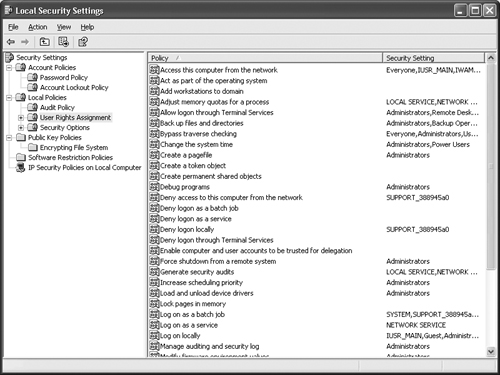
An account lockout occurs when a user types his password incorrectly a given number of times. When this occurs, Windows XP will display a message telling the user that the system has locked him out, and he needs to contact the network administrator. Figure 16.9 shows the results of a lockout. You enable the account by removing the check next to the Account is locked out option. Whether you clear the User must change password at next login will depend on the reason for the lockout. In most cases, you’ll want the user to create a new password for his account.

The Account lockout threshold setting also shows another part of the Local Security Settings console. Whenever you change a policy that affects other policies, you’ll see a Suggested Value Changes dialog box like the one shown in Figure 16.10. This dialog box tells you what Microsoft suggests as minimum policy settings to go with the change you want to make. You can always set the policy settings higher than suggested.

The Local Policies folder contains three major folders: Audit Policy, User Rights Assignment, and Security Options. This is the heart of the local security policy for your system because it contains the settings that the user will rely upon while working with Windows XP.
The Audit Policy folder contains the main audit settings for your system. Windows XP doesn’t cover the entries in this list in other areas. For example, you’ll see options to audit account logon events. Double-clicking these entries displays a dialog box that contains a Success and Failure option. You can audit none, either, or both of the options.
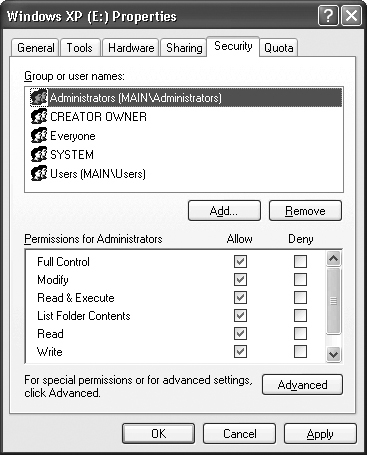
The User Rights Assignment folder is misnamed. It actually contains settings that control the access provided to every object in the system. Figure 16.11 shows an example of the entries in this window. Notice that you can change settings such as the user’s right to change the priority of applications. When you double-click any of these settings, you’ll see a dialog box containing a list of the users that have the right in question. It contains the usual Add and Remove buttons for management purposes.
You’ll want to observe the user additions in this folder carefully, because changes could indicate cracker activity. For example, if the Everyone group suddenly has the power to deny local logins, you can bet that someone has tampered with the settings. You’ll also want to modify a few of the standard settings. For example, even if you disable the Guest account, the Log on locally policy will still contain Guest as one of the people that can log on. Removing Guest from the list adds a little more security to your system.
The Security Options folder shown in Figure 16.12 contains policies that affect system processes. For example, you can restrict access of the CD-ROM drive on your machine to users who log on locally. No matter how you change Windows Explorer, this policy won’t change (unless you change it with a global policy).
Some of the more important security settings reside in this folder. For example, you’ll find the Interactive Logon settings in this folder. Use the Do Not Require CTRL-ALT-DEL setting to determine if users go directly to the logon screen when they start the machine. Other settings change the logon message and title. You can also delete the name of the last user who logged in with an Interactive Logon setting.
You’ll also find some convenience items in the list. Look at the Shutdown group, and you’ll find the Allow system to be shut down without having to log on policy. This policy adds a convenience factor if you enable it for regular workstations. Of course, you’ll want to keep it disabled for public machines such as those used for kiosks. Otherwise, you’ll find users who will shut your system down and annoy the person running the kiosk.
Notice that this folder contains yet more audit options. It’s important to realize just how much auditing you can perform on a Windows XP system. Windows XP provides the means to monitor just about every form of system activity.
The Public Key folder normally contains just one folder, Encrypting File System. The Encrypting File System folder contains all of the certificates for your system. A certificate is a form of identification that you can present to someone else to validate your identity. This listing tells you who owns the certificate, who issued it, the date the certificate expires, how the system uses the certificate, the certificate’s friendly name, the certificate status, and the template used to create the certificate. Generally, you won’t need to do anything with the certificates on this tab.
You can delete, export, and open certificates. Because Windows XP generally keeps certificates even when they’re out-of-date, your major housekeeping task is to delete the certificate. Opening a certificate enables you to view its contents. Sometimes, you’ll find useful information about the issuer within the Details tab of the Certificate Properties dialog box.
The only time you need to export a certificate is to send it to someone else or to move the user to another machine. Right-click the certificate and choose All Tasks | Export from the context menu. You’ll see a Certificate Export Wizard Welcome screen. The following steps show how to export a certificate.
Click Next. You’ll see the Export Private Key dialog box. Always export the private key if you’re moving the certificate to another machine or creating a backup. Never export the private key if you’re going to share the certificate with someone else.
Choose a private key option; then click Next. You’ll see an Export File Format dialog box. The options you see in this dialog box will vary by your machine setup, the network configuration, and whether you chose to export the private key. If you’re exporting the certificate to share with someone else, choose a file format that’s compatible with their machine setup.
Choose an export file format and then click Next. You’ll see a File to Export dialog box.
Type or choose a filename; then click Next. You’ll see a Completion dialog box. Notice that the dialog box contains all of the settings for the file export.
Verify the certificate output settings; then click Next. The Certificate Export Wizard will create the file for you.
Windows XP provides the means for creating a secure IP computing environment. The IP Security Policies on Local Computer folder contains the following three entries.
Client. Describes how the client will react to requests from the server and what type of information the client supplies to the server. The standard settings allow the client to communicate if unsecured (plain text) mode. If the server requests a secure connection, the client will negotiate the type of security used.
Secure Server. Defines the settings for a secure server environment. The default setting requires secure communication with the client, preferably using Kerberos. The server won’t allow any form of unsecured communication.
Server. Defines the settings for a normal server environment. The standard settings ask the client to use Kerberos for a secure environment. If the client doesn’t respond, then Windows XP will use clear text communication.
If you double-click on any of these entries, you’ll see a Policy Properties dialog box. The General tab contains the name and description of the policy. It also contains a setting that determines how often Windows XP checks for new security policies. You can also click Advanced if you want to change the key exchange settings.
The Rules tab contains the rules used to administer the policy. If you want to add a new rule, click Add. You can also edit and remove rules by using the associated buttons. Whenever you add a new rule, you have a choice of creating the rule using the New Rule Properties dialog box or using the Security Rule Wizard. Both methods produce the same results and most people find the Security Rule Wizard (the default setting) easier to use. The following steps tell you how to create a new security rule using the Security Rule Wizard.
Click Next. You’ll see a Tunnel Endpoint dialog box. This dialog box contains the address of an endpoint (the remote machine) for a communication. If this is a general rule, you won’t want to provide an endpoint value.
Enter an endpoint value, if necessary, and then click Next. You’ll see a Network Type dialog box. Windows XP divides the rules into three types: those that affect all networks, those that affect the local network, and those that affect remote communications of any type.
Select a network type option; then click Next. You’ll see an Authentication Method dialog box. Windows XP doesn’t support Kerberos without domain controller (Windows Server) that has Active Directory installed. If you have a smaller network without the required support, you’ll need to choose one of the other authentication methods.
Choose an authentication method. Type any required information. Click Next. You’ll see an IP Filter List dialog box. Unless you want to install a new file, Windows XP provides you with a choice of standard IP or Internet Control Message Protocol (ICMP) filtering. Even if you choose one of the standard filtering choices, you can highlight the option and then click Edit to change the settings. Never remove a default filtering option.
Select or create an IP filtering option; then click Next. You’ll see a Filter Action dialog box. The filter normally allows three actions. The first is to allow unsecured transactions. The second requests a secure transaction, but will allow an unsecured transaction if the client or server doesn’t provide the required support. The third requires secured transactions. You can add other actions as necessary using the Add button.
Select or create an IP filtering action and click Next. You’ll see a Completion dialog box.
Click Finish. The Security Rule Wizard creates the rule for you.
Encryption is one of the easiest ways to secure data on your system if you’re using the NFTS file system. If you want to secure a file or folder, right-click the file or folder and choose Properties from the context menu. On the General tab, you’ll see an Advanced button. Click Advanced, and you’ll see an Advanced Attributes dialog box. Check the Encrypt contents to secure data option. Note that encrypting the file and compressing it is mutually exclusive, so Windows XP will automatically clear the compressed attribute if you select encryption. Click OK twice to make the change. Windows XP will encrypt the file for you.
Microsoft has spent considerable time and money trying to convince everyone that Windows XP is secure. Likewise, many other vendors have spent an equal amount of time and money pointing out the flaws in Microsoft’s operating system in the hopes that you’ll buy their product. The fact of the matter is that Microsoft is unlikely to make Windows XP secure in our lifetime, and it’s equally improbable that anyone else will introduce a completely secure operating system. The reason that Windows appears in the news so often is that they’re such a large target that no cracker can resist.
The biggest Windows security deficiency is one of perception. If you buy into the Microsoft hype, you’ll eventually get hurt. It’s safer to assume from the outset that anyone who really wants to is going to break into any operating system out there. Once you assume this mind-set, many Windows security deficiencies won’t only become apparent, but you’ll be able to stop them by using third-party tools, patches, and intense system monitoring as well.
Anyone who’s observed Microsoft recently will admit that they’ve gotten better about reporting bugs in their system. The problem is that they often hide the information so no one knows about it. This is the two-edged sword of being a marketing-driven company with a large target product. The best way around this problem is to take a proactive approach and search the Microsoft Knowledge Base (http://search.support.microsoft.com/kb/c.asp) for new articles on a weekly basis.
A final way to overcome Windows security deficiencies is to use third-party products. Many of the major trade presses include product reviews you can use to determine the relative merit of third-party offerings. What most people don’t realize is that these reviews often alert you to security problems you didn’t know about. In short, not only can the third-party product solve security problems you do know about, but it can help you better understand security requirements based on the current security environment as well.
Some people are under the assumption that all crackers are brilliant computer specialists in disguise. It’s true that many crackers are smart computer users. However, the one thing that a cracker needs in abundance is time. Crackers are patient, and they’ll wait for an opening in your network before they attack, unless they have a good reason to force their way in. An opening created by someone in your company requires less work on the part of the cracker and definitely hides their activity.
Crackers are also opportunistic. If you fail to apply a patch to your system or fail to remove a default account that everyone knows about, it’s like hanging a sign on your network saying, “Attack here, I really don’t care!” However, we’ve already discussed these issues as part of the chapter. You already know that you need to close the holes in your network. What can you do to keep crackers at bay once you fix the major problems?
Tip
Privacy is a major concern for most users of the Internet. Several recent surveys by large consulting companies show that about 86% of users consider privacy a major concern and one of the reasons they don’t trust Internet commerce. A few companies such as Anonymizer.com (http://www.anonymizer.com) have set up secure servers you can use to surf the Web in privacy. You must click a button on your Internet Explorer toolbar to enable the service and can disable it at any time. The way the service works is you send the URL you want to surf to Anonymizer, who then obtains the data for you and sends it back to your machine. Therefore, it’s impossible for anyone to track you, your personal information, your IP address, or send cookies to your machine. This means that you can’t use Anonimizer to access a financial institution or to shop online. Anonymizer (and sites like it) is currently grappling with the issue of keeping its site safe from use by crackers to hide their activities. In addition, these privacy services plan to provide secure service to financial institutions.
The first mistake that every network administrator makes is assuming that you can seal your network up tight so that no crackers can get through. Many people have tested this theory and none of them has succeeded. If a cracker wants to access your system, he’ll find a way to do it. Therefore, your best friends as a network administrator are the monitoring tools you use to check your system for leaks. After you have your system fixed and your monitoring tools in place, you might want to try some of the following suggestions. Just remember, there isn’t a network made that someone else can’t break into.
Kill the Default Setting. The default setting is your worst enemy. Crackers spend a great deal of time learning all of the default settings for a network they want to invade. They look for anything that might help them, including the small things like log files. It always pays to change the default settings if possible. Move your log files to another directory to make them harder to find. Use something other than the default name for your administrator account. Keep the number of default configuration settings to a minimum.
Limit Resource Access. If a cracker does break into your system, make sure that he gains a minimum level of access. The user does require enough resource access to accomplish his tasks, but you don’t want to give him anything more than the minimum. This also makes it easier to ascertain the level of risk after a cracker breaks into your system.
Never Work with the Administrator Account. You have to use an account with administrator privileges to manage your system. However, always use a standard user account when performing other tasks. Crackers often try to steal the administrator account information, so the less you use it, the less exposure the account has to compromise.
Read the Trade Press Alerts. Electronic newsletters often provide valuable information long before you see it anywhere else.
Take Threats Seriously. I don’t know of a more effective cracker than a disgruntled employee with a modicum of knowledge. Some of the worst damage you’ll ever see comes from within. However, it’s a mistake to consider any threat so much hot air. Every threat is serious, and you need to deal with it.
Don’t Make Brash Statements. At least one person has made the mistake of saying his site was cracker-proof to a member of the press. The crackers proved this person wrong by launching a major DoS attack. Several days later, the person in question begged the crackers to leave the Web site alone and admitted that it was wrong to make such a brash statement. If you want crackers to leave you alone, keep a low profile and don’t make yourself a target.
Use the Latest Tools. Some network administrators install a firewall on their system and never look at it again. They just assume that the firewall will continue to work as anticipated. Sometimes, you need to do more than just patch your security software. In many cases, it gets outdated, and you need to replace it.
Today is only the beginning of an education in security. A knowledgeable network administrator keeps track of new threats and knows how to recognize them. Education isn’t an option today; you must continually look for the threats that will affect your system.
You did learn about the security features that Windows XP can provide. Crackers often attack because they find the door to your network wide open. Closing the door will at least discourage the cracker. Some will still sneak in through the windows, but you’ll keep many crackers at bay.
Finally, there’s no such thing as a secure system. The best you can hope to achieve is a system that has all of the required patches installed and security barriers in place. You must maintain vigilance over your network if you want to ensure that you detect the first appearance of crackers on your system.
I’m confused about the role of local and group policies on the network. Where does one begin and the other end? | |
Windows XP actually provides four policy levels. Windows XP won’t implement some policies until you specifically set them. Other policies have a default value that defines their effect on the system. Local policies that you specifically set come next. Setting a local policy means that you’ve taken a stance on a particular security measure. However, local policies affect only one machine—the one on which you define them. Finally, group policies affect the system as a whole. You set a group policy when the entire organization observes a rule. Group policies override all other policy settings. | |
Why doesn’t Microsoft make all of the permissions for a resource available at one level, rather than using so many levels? | |
The main reason for all of the levels of security settings is simplicity. If someone doesn’t understand the detailed security settings, or a network administrator only wants to set a basic level of permissions, the upper-level dialog boxes work just fine. Only when you want to perform a detailed setup do you need to access the lower-level dialog box as we did today. | |
There are so many security alerts, at times, that turn out to be hoaxes. How can I tell the difference? | |
Reliable news sources generally check their facts before they pass a virus alert along to their readers. In addition, you’ll find several places online that specialize in presenting virus information. One of the better sources of information is to subscribe to an online newsletter such as InfoWorld (http://www.iwsubscribe.com/newsletters/) and eWeek (http://enewsletters.ziffdavis.com/pc_subscribe.asp). You can also check several Web sites devoted to revealing hoaxes for what they are. Some of the more popular sites include:
|
It’s the end of the sixteenth day. You should have a better understanding of how security works now. Of course, it will take time for you to understand security fully, and I doubt that anyone can ever say that he is completely ready for a cracker attack. Now it’s time to see how well you understand security-related tasks. You can find answers to the quiz and exercise questions in Appendix A at the back of the book.