Windows XP provides several automation features that help you perform tasks quickly, easily, and best of all, with little effort. The Task Scheduler is a great example of a tool that tells the system to perform a task for you automatically. All you need to do is perform a little task configuration, and the system will get it done.
However, what happens if you can’t package the task neatly into something that Task Scheduler will understand? For that matter, what happens if the task isn’t one that you perform on a regular basis? That’s where scripting can come in handy. It allows you to execute tasks when you need to perform them.
Scripting is more flexible than using Windows automation. It allows you to perform tasks that Microsoft might not have thought essential. You can create your own utilities that help you work faster and more efficiently.
Today, we’ll discuss both scripting and automation, with an emphasis on scripting because it’s more flexible. You’ll learn enough about scripting to create some basic utilities. These utilities won’t astound the world, but they’ll make your life easier.
Scripting, as people currently view it, is relatively old. A script is simply some human words that an interpreter changes into data that the computer can understand. An interpreter is a special type of application that performs conversions; it comes in many different forms. If you use this definition for scripting, it’s been around since the beginning of computers, for all practical purposes.
Windows XP includes the Windows Scripting Host (WSH). The combination of WSH and a scripting engine form an interpreter that accepts a script file as input and outputs application data from the computer. Of course, WSH and its associated scripting engines are more complex than any previous interpreter. You can read about Microsoft’s original vision for WSH at http://www.microsoft.com/mind/0698/cutting0698.htm.
Before you can do much with scripts, you need to understand how to work with them. This means at least learning to run the scripts. The following sections show you how to run scripts.
Note
The Internet includes many useful WSH resource sites. One of the more interesting sites is LabMice.net (http://www.labmice.net/WSH.htm). If you want to learn about books about WSH, check http://ourworld.compuserve.com/homepages/Guenter_Born/WSHBazaar/USBook.htm. You’ll find quite a few other resource sites throughout the following sections. Make sure that you check them out to get the most out of the material presented today.
You can start scripts from a variety of places. Scripts permeate every part of Windows XP. For example, you’ll find scripts in your browser and most likely your word processor as well. A script can make the difference between an application that works well and one that only performs simple tasks.
Scripts use something known as the Windows Scripting Host (WSH) to run. WSH is an interpreter, something that reads human words and converts them into machine language that the computer can understand. WSH is extremely flexible. It can run a number of languages if you install the required support. Windows XP comes with support for both JavaScript (JS files) and VBScript (VBS) built in. The VBS files normally have a Visual Basic Editor (VBE) extension in Windows XP.
Note
You’ll see several different names for JavaScript. The most popular alternative name right now is JScript. It also appears under the name of ECMAScript (http://www.ecma.ch/ecma1/stand/ecma-262.htm) because this organization is producing a standardized form of the language. The big thing is not to confuse JavaScript with Java. The two are completely different. You’ll find JScript in Windows XP, but Java support has gone by the wayside due to Microsoft’s legal loss to Sun. For the purposes of clarity, I’ll always use JavaScript in the book.
All of the scripts we’ll use in this section will run at the command prompt. However, it’s important to realize that the scripting skills you develop now will also work in other areas of Windows. As long as you have an interpreter that understands your script, it will run in any environment. You’ll find Command Prompt in the StartProgramsAccessories folder. Here are the two command lines you can use to start a WSH script:
CScript <Script Name> [<WSH Command Line Switches>] [<Script Arguments>]
WScript <Script Name> [<WSH Command Line Switches>] [<Script Arguments>]
As you can see, there are actually two different commands you can use to start WSH. CScript is the character mode version of WSH, and WScript provides a dialog interface. Both forms of WSH accomplish the same tasks. The only difference between the two commands is the interface.
CScript and WScript use the same command line. You must provide a script name as the first command line argument. Most scripts have a VBE or a JS file extension, but any extension is acceptable. For example, you can still use VBS files with WSH, but the icon won’t look right and you can’t double-click it to start the execution. Figure 19.1 shows the standard script icon. The icon is yellow for VBE files and blue for JS files. Other languages will potentially use other icons or other colors.

WSH provides a wealth of command line switches that you can use to modify its behavior. Table 19.1 shows a list of the command line switches that WSH provides. Notice that all of these command line switches start with two slashes like this: //. The slashes differentiate them from switches you may need for your script. WSH passes script arguments to your script for processing. Script arguments can be anything including command line switches of your own or values needed to calculate a result.
Table 19.1. WSH Command Line Switches
Switch | Description |
|---|---|
//? | Displays the currently documented command line switches. The newest versions of WSH tend to reject older switches, even those of the undocumented variety. |
//B | Use this mode when you don’t want the user to interact with the script. Batch mode suppresses all non-command line console user interface requests from script. It also suppresses error message display (a change from previous versions). |
//D | Activates debugging mode so that you can fix errors in a script. |
//H:CScript | Makes CSCRIPT.EXE the default application for running scripts. (WScript is the default engine.) |
//H:WScript | Makes WSCRIPT.EXE the default application for running scripts. |
//I | Allows full interaction with the user. Any pop-up dialog boxes will wait for user input before the script continues. |
//Job:<Job Name> | Executes a WSH job. A WSH job has a WSF extension. This file enables you to perform tasks using multiple scripting engines and multiple files. Essentially, this allows you to perform a “super batch” process. We’ll discuss WSH jobs in more detail in the “Creating Script Job Files” section. |
//Logo and //NoLogo | WHS normally prints out a logo message. You’d use the //NoLogo switch to prevent WSH from displaying this message. |
//S | This command line switch allows you to save current command line options for a user. WSH will save the following options: //B, //I, //Logo, //Nologo, and //T:n. |
//T:nn | Limits the maximum time the script can run to nn seconds. Normally, there isn’t any timeout value. You’d use this switch in situations where a script might end up in a continuous loop or unable to obtain the requested information for other reasons. For example, you might use this switch when requesting information on a network drive. |
//X | Starts the script in the debugger. This allows you to trace the execution of the script from beginning to end. |
//U | Outputs any console information using Unicode instead of pure ASCII. This is a CScript-only option. |
Note
Users of older versions of CScript and WScript may remember the //C and the //W switches used to switch the default scripting engines. Newer versions of CScript and WScript replace these switches with the //H switch. You’ll also find the //R (reregister) and //Entrypoint switches missing because with WSH the functionality is no longer needed by script developers.
Some of the switches in Table 19.1 may not make a lot of sense right this second, but I’ll explain them as the day progresses. Let’s look at a couple of the switches right away, though, so that you’ll have some idea of how they work.
As shown in Table 19.1, you can work with WSH in either interactive or batch mode. You use batch mode when you need to perform tasks that don’t require user input. For example, you might want to run Scan Disk every evening but use different command line switches for it based on the day. You could use Task Scheduler to accomplish this task, but using it in conjunction with a WSH script will improve the flexibility you gain when running the task.
Another kind of batch processing might be to send log files to your supervisor or perhaps set up a specific set of environment variables for a character-mode application based on the current user. On the other hand, interactive mode requires user interaction. You’d use it for tasks such as creating a form letter script. Such a script could ask the user a set of general questions and then create a form letter based on the user’s input. The form letter would follow company guidelines and save the user time. All the user would need to do is tweak a few of the lines to make the letter complete.
Tip
Because batch processing doesn’t require any form of user input, I normally include the //T:nn switch with the //B switch. This allows me to stop the script automatically if it runs too long. In most cases, this allows me to stop an errant script before it corrupts the Windows environment or freezes the machine. However, you can’t time some tasks with ease. For example, any Web-based task is difficult to time because you can’t account for problems with a slow connection. In this case, you’ll need to refrain from using the //T:nn switch or provide a worst-case scenario time interval.
The next set of command line switches that I’d like to talk about are //Logo and //NoLogo. There aren’t any right or wrong times to use these switches, but I usually use the //Logo switch when testing a script and the //NoLogo switch afterward. The reason is simple. During the testing process, I want to know about every potential source of problems in my script environment, including an old script engine that might cause problems. On the other hand, I don’t want to clutter my screen with useless text after I debug the script. Using the //NoLogo switch keeps screen clutter to a minimum.
You don’t have to rely exclusively on command line switches to configure WSH; you can configure two WSH options from the Windows Script Host Settings dialog box. Run WScript by itself, and you’ll see the dialog box shown in Figure 19.2.

The first check box allows you to set WSH to stop executing a script after a certain time interval has elapsed. The edit box below it contains the number of seconds to wait. Setting this option is like adding the //T:nn command line switch to every script that you run.
The second check box determines whether WSH displays WSH logo when running scripts from the DOS prompt. Normally, this option is checked, which is the same as adding the //Logo command line switch to every script that you run. Clearing this option tells WSH that you don’t want to display the logo, which is the same as using the //NoLogo command line switch.
You can get the same dialog as shown in Figure 19.2 for individual scripts. All you need to do is right-click the script file and select Properties from the context menu. Select the Script tab to see the options. Changing the WSH options when looking at a script file Properties dialog changes the options for that script, but the options for WSH in general remain the same.
Use Reset to Defaults to change all of the settings back to their Microsoft defaults. The default settings include no time out period and will always display the WSH logo.
Job files can help you create a modular script environment and yet automate tasks. Modular scripts perform a single task. You can use them alone or with other scripts to produce certain effects. Using a modular approach saves time because you only have to create and debug a script to perform a specific task one time. After that, you just add it to your application. Think of modular scripting as a way of creating applications with script Lego’s.
The script job file is a form of eXtensible Markup Language (XML), which looks similar to the code in HTML pages. The job files have a specific format. The following WSF file executes a single script named TEST1.JS:
<Job ID=MyJob>
    <Script Language="JScript" Src="TEST1.JS" />
</Job>
Every job begins with the <Job> tag. You have to assign an ID to your job to make it easy to identify. Notice that the <Script> tag includes an ending slash (/). XML requires that you include the slash so that all of the entries are symmetrical.
You can use a mix of languages within a job. Every entry identifies the language it uses so that WSH doesn’t have to guess how to run it. If the code is in a file, you add an Src attribute to the <Script> tag.
WSH also provides support for code within a job file. You can mix languages if desired. Anything you can do with a script file, you can also do with a job file. For example, the following job runs a JavaScript script and then executes some internal script (don’t worry too much about understanding the code for now):
<Job ID=MyJob>
    <Script Language="JScript" Src="TEST1.JS" />
    <Script Language="VBScript">
        WScript.Echo("Hello World")
    </Script>
</Job>
In this case, the job file outputs the results of the TEST1.JS file first and then outputs “Hello World.” If the user started the script with WScript, there would be dialog boxes for each output. CScript places all of the output on separate lines of the command window.
Let’s say you wanted to create a single file containing all your jobs. That way, all you really need to know is the name of your file and the name of your job. Everything is located in one place on the hard drive, so there’s nothing to lose. The following example shows how to create a file with multiple jobs:
<Package>
    <Job ID="MyJob1">
        <Script Language="JScript" Src="TEST1.JS" />
    </Job>

    <Job ID="MyJob2">
        <Script Language="JScript" Src="TEST1.JS" />
        <Script Language="VBScript">
            WScript.Echo("Hello World")
        </Script>
    </Job>
</Package>
Notice that we’ve added a <Package> tag to the mix. The <Package> tag serves to bundle all of the jobs together. Each job still requires an ID, but you don’t assign an ID to the package. You’ll use the //Job:<Job Name> switch as shown below to access a specific job in the package:
CSCRIPT MyJob3.WSF //Job:MyJob1
That’s all there is to job files. You’ll use a combination of XML and script to combine script files together. Using this approach enables you to create some interesting scripts for your system.
I can’t provide you with a complete tutorial on scripting in one day. Some developers require months to learn everything there is to know about the scripting language and the objects the language controls. Today you’ll learn a little about the scripting language as you work with various objects that WSH supports. By reading through the examples, you’ll learn the basics of scripting. You won’t become a guru overnight, but you could create some simple scripts. As you learn more, you’ll be able to create scripts of increasing complexity. Scripting isn’t hard to learn, but you need to take your time and learn it a bit at a time.
Note
Earlier versions of Windows used to include a samples directory for scripts. Windows XP doesn’t include this directory. However, you can still download the script samples from Microsoft’s site at http://msdn.microsoft.com/scripting/. Select Windows Script Host and then Overview from the menu on the left side of the page. Click Download the Samples to obtain a variety of scripting examples.
WSH depends on objects that Microsoft supplies as part of Windows XP to perform tasks such as outputting text to the display. An object consists of two elements: properties and methods. A property describes the object and determines its functionality. For example, you can say an apple is red. In this case, red is a property of the apple. However, you can also paint the apple blue. In this case, you changed the color property of the apple to another value.
Methods are actions you can perform with an object. For example, looking at an apple again, you can say that it has a grow method. As the tree applies the grow method, the apple becomes larger.
Writing scripts in Windows XP means knowing the object you want to work with, the properties that object provides, and the methods you can use with that object. You don’t have to learn about every object. In fact, you’ll find it easier to learn about one object at a time. The following sections will tell you about the main scripting object, WScript, and some of the supporting objects it contains. We’ll also look at some scripting examples in both VBScript and JavaScript.
The WScript object is the main object for WSH. You’ll access every other object through this one. The following list tells you about the properties that the WScript object supports:
Application. Provides you with access to a low-level interface for WScript. An interface is a pointer to a list of functions that you can call for a particular object. Only advanced programmers will need this property because WSH exposes all of the basic functions for you.
Arguments. Provides a complete list of the arguments for this script. Applications pass arguments on the command line. WSH passes the argument list as an array. You create a variable to hold the argument list and then access the individual arguments as you would any array. The Arguments.Count property contains the total number of array elements.
FullName. Contains the full name of the scripting engine along with the fully qualified path to it. For example, if you were using CScript, you might get C:WINDOWSSYSTEM32CSCRIPT.EXE as a return value.
Interactive. Returns true if the script is in interactive mode.
Name. Returns the friendly name for WScript. In most cases, this is Windows Scripting Host.
Path. Provides just the path information for the host executable. For example, if you were using CScript, you may get a return value of: C:WINDOWSSYSTEM32.
ScriptFullName. Contains the full name and path of the script that’s running.
ScriptName. Provides just the script name.
Version. Returns the WSH Version number.
Remember that all of these properties tell you about the WScript object. You can also use methods to perform tasks with the WScript object. The following list provides a brief overview of the more important methods you’ll use with the WScript object. Note that most of these methods require that you pass one or more parameters as input.
CreateObject(strProgID). Create the object specified by strProgID. This object could be WSH specific, such as “WScript.Network” or application specific, such as “Excel.Application”.
GetObject(strPathname [, strProgID]). Retrieves the requested object. The filename for the object you want to retrieve is contained in strPathname. In most cases, this is going to be a data file, but you can retrieve other kinds of objects as well. As soon as you execute this command, WSH will start the application associated with that object. For example, if you specified “C:MyText.TXT” as the strPathname, WSH may open Notepad to display it. The optional strProgID argument allows you to override the default processing of the object. For example, you may want to open the text file with Word instead of Notepad.
Echo(AnyArg). Displays text in a window (WScript) or to the console screen (CScript). AnyArg can contain any type of valid output value. This can include both strings and numbers. Using Echo without any arguments displays a blank line.
GetScriptEngine(strEngineID). Registers an alternative script engine, such as the PERL script engine we talked about earlier. The identifier for the script engine that you want to retrieve is contained in strEngineID. You’ll need to register the engine using the GetScriptEngine.Register method before you can actually use it. A script engine also requires you to provide a default extension.
Quit(intErrorCode). Exits the script prematurely. The optional intErrorCode argument returns an error code if necessary.
Whenever you start a script, you have the option of passing one or more arguments to it on the command line. That’s where the WshArguments object comes into play. It helps you determine the number of arguments and retrieve them as needed. You’ll always use the WScript.Arguments property to access this object; it’s not directly accessible. The following list describes the properties for this object:
Item(intIndex). Retrieves a specific command line argument. The index of the argument that you want to retrieve is contained in intIndex. The array used to hold the arguments is 0 based, so the first argument number is 0.
Count(). Returns the number of command line arguments.
Length(). Returns the number of command line arguments. This property is provided for JScript compatibility purposes.
You’ll use this object to access the Windows shell (the part of Windows that interacts with applications and creates the user interface) in a variety of ways. For example, you can use this object to read the registry or to create a new shortcut on the desktop. This is an exposed WSH object, which means you can access it directly. However, you need to access it through the WScript object like this: WScript.WshShell. The following list describes the WshShell methods:
CreateShortcut(strPathname). Creates a WSH shortcut object. The location of the shortcut, which will be the desktop in most cases, is contained in strPathname.
DeleteEnvironmentVariable(strName [, strType]). Deletes the environment variable specified by strName. The optional strType argument defines the type of environment variable to delete. Typical values for strType include System, User, Volatile, and Process. The default environment variable type is System.
GetEnvironmentVariable(strName [, strType]). Retrieves the environment variable specified by strName. Default environment variables include NUMBER_OF_PROCESSORS, OS, COMSPEC, HOMEDRIVE, HOMEPATH, PATH, PATHEXT, PROMPT, SYSTEMDRIVE, SYSTEMROOT, WINDIR, TEMP, and TMP. The optional strType argument defines the type of environment variable to delete. Typical values for strType include System, User, Volatile, and Process. The default environment variable type is System.
Popup(strText [,intSeconds] [,strTitle] [,intType]). Displays a message dialog box. The return value is an integer defining which button the user selected. It includes the following values: OK (1), Cancel (2), Abort (3), Retry (4), Ignore (5), Yes (6), No (7), Close (8), and Help (9). The text that you want to display in the dialog box is contained in strText. How long WSH displays the dialog box before it closes the dialog box and returns a value of –1 is determined by intSeconds. The title bar text is contained in strTitle. The intType argument can contain values that determine the type of dialog box that you’ll create. The first intType argument determines button type. You have a choice of the following: OK (0), OK and Cancel (1), Abort, Retry, and Ignore (2), Yes, No, and Cancel (3), Yes and No (4), and Retry and Cancel (5). The second intType argument determines which icon Windows XP displays in the dialog box. You have a choice of the following values: Stop (16), Question (32), Exclamation (48), and Information (64). Combine the intType argument values to obtain different dialog box effects.
RegDelete(strName). Removes the value or key specified by strName from the registry. If strName ends in a backslash, RegDelete removes a key. You must provide a fully qualified path to the key or value that you want to delete. In addition, strName must begin with one of these values: HKEY_CURRENT_USER, HKEY_LOCAL_MACHINE, HKEY_CLASSES_ROOT, KEY_USER, HKEY_CURRENT_CONFIG, or HKEY_DYN_DATA.
RegRead(strName). Reads the value or key specified by strName from the registry. If strName ends in a backslash, RegDelete reads a key. You must provide a fully qualified path to the key or value that you want to read. In addition, strName must begin with one of these values: HKEY_CURRENT_USER, HKEY_LOCAL_MACHINE, HKEY_CLASSES_ROOT, KEY_USER, HKEY_CURRENT_CONFIG, or HKEY_DYN_DATA. RegRead can only read specific data types including REG_SZ, REG_EXPAND_SZ, REG_DWORD, REG_BINARY, and REG_MULTI_SZ. Any other data types will return an error.
RegWrite(strName, anyValue [, strType]). Writes the data specified by anyValue to a value or key specified by strName to the registry. If strName ends in a backslash, RegDelete writes a key. You must provide a fully qualified path to the key or value that you want to write. In addition, strName must begin with one of these values: HKEY_CURRENT_USER, HKEY_LOCAL_MACHINE, HKEY_CLASSES_ROOT, KEY_USER, HKEY_CURRENT_CONFIG, or HKEY_DYN_DATA. RegRead can only write specific data types including REG_SZ, REG_EXPAND_SZ, REG_DWORD, and REG_BINARY. Any other data types will return an error.
Run(strCommand [, intWinType] [lWait]). Runs the command or application specified by strCommand. You can include command line arguments and switches with the command string. The type of window that the application starts in is determined by intWinType. You can force the script to wait for the application to complete by setting lWait to True; otherwise, the script begins the next line of execution immediately.
SetEnvironmentVariable(strName, strValue [, strType]). Sets the environment variable named strName to the value specified by strValue. The optional strType argument defines the type of environment variable to delete. Typical values for strType include System, User, Volatile, and Process. The default environment variable type is System.
The WshNetwork object works with network objects such as drives and printers that the client machine can access. This is an exposed WSH object, which means you can access it directly using the WScript.WshNetwork object. The following list describes properties associated with this object:
ComputerName. Returns a string containing the client computer name.
UserDomain. Returns a string containing the user’s domain name.
UserName. Returns a string containing the previous name that the user used to log on to the network.
As with any other WSH object, the WshNetwork object uses methods to work with network resources. The following list describes the methods associated with this object:
AddPrinterConnection(strLocal, strRemote [, lUpdate] [, strUser] [, strPassword]). Creates a new printer connection for the local machine. The local name for the printer specified by strRemote is contained in strLocal. The strRemote value must contain a locatable resource and usually uses a UNC format, such as \RemotePrinter. Setting lUpdate to true adds the new connection to the user profile, which means Windows XP will make the connection available each time the user boots the machine. Optional user name and password values required to log onto the remote machine and create the connection are contained in strUser and strPassword.
EnumNetworkDrives(). Returns a WshCollection object containing the list of local and remote drives currently mapped from the client machine. A WshCollection object is essentially a 0-based array of strings.
EnumPrinterConnections(). Returns a WshCollection object containing the list of local and remote printers currently mapped from the client machine. A WshCollection object is essentially a 0-based array of strings.
MapNetworkDrive(strLocal, strRemote [, lUpdate] [, strUser] [, strPassword]). Creates a new drive connection for the local machine. The local name for the drive specified by strRemote is contained in strLocal. The strRemote value must contain a locatable resource and usually uses a UNC format, such as “\RemoteDrive_C.” Setting lUpdate to True adds the new connection to the user profile, which means Windows XP will make the connection available each time the user boots the machine. Optional user name and password values required to log onto the remote machine and create the connection are contained in strUser and strPassword.
RemoveNetworkDrive(strName [, lForce] [, lUpdate]). Deletes a previous network drive mapping. If strName contains a local name, Windows XP only cancels that connection. If strName contains a remote name, Windows XP cancels all resources associated with that remote name. Set lForce to True if you want to disconnect from a resource whether that resource is in use or not. Setting lUpdate to true will remove the connection from the user profile so that it doesn’t appear the next time that the user logs on to the machine.
RemovePrinterConnection(strName [, lForce] [, lUpdate]). Deletes a previous network printer connection. If strName contains a local name, Windows XP only cancels that connection. If strName contains a remote name, Windows XP cancels all resources associated with that remote name. Set lForce to True if you want to disconnect from a resource whether that resource is in use or not. Setting lUpdate to true will remove the connection from the user profile so that it doesn’t appear the next time that the user logs on to the machine.
Now that you have some idea of how Windows XP supports scripting, let’s look at a simple script. I’m presenting these examples in both VBScript and JavaScript so that you can see the differences between the two languages. In addition, some people prefer one scripting language to another, so this is your chance to see both in action. The following code shows a basic example in VBScript:
' Test1.VBS shows how to use functions and subprocedures
' within a WSH script.

WScript.Echo("The value returned was: " + CStr(MyFunction(1)))

function MyFunction(nSomeValue)
    WScript.Echo("Function received value of: " + CStr(nSomeValue))
    Call MySubprocedure(nSomeValue + 1)
    MyFunction = nSomeValue + 1
end function

sub MySubprocedure(nSomeValue)
    WScript.Echo("Subprocedure received value of: " + CStr(nSomeValue))
end sub
As you can see, the sample code uses the WScript object to send some information to the screen. I thought it important to introduce you to the idea of functions and subs, the two building blocks of VBScript. The following code shows a similar example for JavaScript:
// Test1.JS shows how to use functions within a WSH script.
WScript.Echo("The value returned was: " + MyFunction(1));

function MyFunction(nSomeValue)
{
   WScript.Echo("The value received was: " + nSomeValue);
   return nSomeValue + 1;
}
JavaScript only provides functions, so that’s all this example demonstrates. It’s also important to notice that VBScript requires you to convert numeric values to a string, while JavaScript performs the conversion automatically.
At this point, you know a little about scripting and a little about the WScript.Echo() method. Let’s look at some other methods that the WScript object provides. The following JavaScript code retrieves information from the command line. It also retrieves information about the application environment.
// ProgInfo.JS determines the specifics about your program and then
// displays this information on screen.

// Create some constants for display purposes (buttons and icons).
var intOK = 0;
var intOKCancel = 1;
var intAbortRetryIgnore = 2;
var intYesNoCancel = 3;
var intYesNo = 4;
var IntRetryCancel = 5;
var intStop = 16;
var intQuestion = 32;
var intExclamation = 48;
var intInformation = 64;

// Create some popup return values.
var intOK = 1;
var intCancel = 2;
var intAbort = 3;
var intRetry = 4;
var intIgnore = 5;
var intYes = 6;
var intNo = 7;
var intClose = 8;
var intHelp = 9;

// Create a popup display object.
var WshShell = WScript.CreateObject("WScript.Shell");

// Create a variable for holding a popup return value.
var intReturn;

// Get the program information and display it.
WshShell.Popup("Full Name:	" + WScript.Fullname +
        "
Interactive:	" + WScript.Interactive +
        "
Name:		" + WScript.Name +
        "
Path:		" + WScript.Path +
        "
Script Full Name:	" + WScript.ScriptFullName +
        "
Script Name:	" + WScript.ScriptName +
        "
Version:		" + WScript.Version,
        0,
        "Program Information Demonstration",
        intOK + intInformation);

// Ask if the user wants to display the argument list.
intReturn = WshShell.Popup("Do you want to display the argument list?",
            0,
            "Argument List Display",
            intYesNo + intQuestion);

// Determine if the user wants to display the argument list and
// display and appropriate message.
if (intReturn == intYes)

    // See if there are any arguments to display.
    DisplayArguments();
else
    WScript.Echo("Goodbye");

function DisplayArguments()
{
    // Create some variables.
    var strArguments = "Arguments:
	";    // Argument list.
    var intCount = 0;            // Loop counter.

    // See if there are any arguments, if not, display an
    // appropriate message.
    if (WScript.Arguments.Length == 0)
        WshShell.Popup("There are no arguments to display.",
            0,
            "Argument List Display",
            intOK + intInformation);

    // If there are arguments to display, then create a list
    // first and display them all at once.
    else
    {
        for (intCount = 0; intCount < WScript.Arguments.Length; intCount++)
            strArguments =
              strArguments + WScript.Arguments.Item(intCount) + "
	";
        WshShell.Popup(strArguments,
        0,
        "Argument List Display",
        intOK + intInformation);
}
When you run this script, you’ll see a dialog box containing all of the information about the script engine. When you click OK, the program will ask if you want to display the command line arguments. If you say yes, you’ll see anything you typed at the command line. Otherwise, the script displays a Goodbye message.
You should notice a few things about this example. First, I create an object in this code. You need access to the WshShell object for many of the tasks you’ll perform with scripts. The code also shows how to use the Popup() method to obtain information from the user. Finally, the code uses the Arguments object to access the command line information. Notice the object hierarchy used in this example.
The final example shows how to use VBScript to access information in the registry. You don’t want to change information unless you have to, but seeing what’s available in the registry is a good way to build your knowledge of both scripting and the registry. Note that this example uses the command line argument to determine which file extension to look for in the registry.
' RegRead.VBE will display the application extension information
' contained in the registry.

' Create an icon and button variable for Popup().
intOK = 0
intInformation = 64

' Create a popup display object.
set WshShell = WScript.CreateObject("WScript.Shell")

' Create variables to hold the information.
strExtension = ""    ' File extension that we're looking for.
strFileType = ""     ' Holds the main file type.
strFileOpen = ""     ' File open command.
strFilePrint = ""    ' File print command.
strDefaultIcon = ""  ' Default icon for file type.

' See if the user provided a file extension to look for.
' If not, assign strExtension a default file extension.
if (WScript.Arguments.Length > 0) then
    strExtension = WScript.Arguments.Item(0)
else
    strExtension = ".txt"
end if

' Get the file type.
strFileType = WshShell.RegRead("HKEY_CLASSES_ROOT\" +_
                strExtension + "\")

' Use the file type to get the file open and file print
' commands, along with the default icon.
strFileOpen = WshShell.RegRead("HKEY_CLASSES_ROOT\" +_
                strFileType +_
                "\shell\open\command\")
strFilePrint = WshShell.RegRead("HKEY_CLASSES_ROOT\" +_
                strFileType +_
                "\shell\print\command\")
strDefaultIcon = WshShell.RegRead("HKEY_CLASSES_ROOT\" +_
                strFileType +_
                "\DefaultIcon\")

' Display the results.
WshShell.Popup "File Type:" + vbTab + vbTab + vbTab + strFileType +_
        vbCrLf + "File Open Command:" + vbTab + strFileOpen +_
        vbCrLf + "File Print Command:" + vbTab + vbTab + strFilePrint +_
        vbCrLf + "Default Icon:" + vbTab + vbTab + strDefaultIcon,_
        0,_
        "RegRead Results",_
        intOK + intInformation
When you run this script, it reads the command line. If you haven’t supplied a value, the script will assign a default extension of .TXT. The script uses the extension to locate information in the registry such as the file open and print commands. Finally, the script uses the Popup() method to display the output.
You should notice several differences between this example and the JavaScript example we looked at previously. First, the method for creating an object requires the use of a “set”—you can’t simply assign the object to a variable. You’ll also notice that VBScript has access to all of the standard Visual Basic constants, such as vbTab and vbCrLf. Finally, VBScript handles many of the method calls as subs, not as functions. You need to exercise care when working in a mixed environment.
The main purpose of the Files and Settings Transfer Wizard is to move your Windows settings from one machine to another. Microsoft developed this tool to make it easier to upgrade to a new machine. You could also use the Files and Settings Transfer Wizard for a number of other tasks. For example, some people have used it to move their settings from one partition on a machine to another. This allows you to create a Windows 2000 setup, for example, and transfer those settings to a Windows XP partition on the same machine
Tip
A few people have mentioned that they use this wizard to create a backup of their system. All you need to do is select the network file save option found in the “Working with the Old Computer” section. Of course, the best option is to create a backup of your system using a standard backup application, but this serves as an interesting alternative for those on a budget.
You’ll find the Files and Settings Transfer Wizard in the StartProgramsAccessoriesSystem Tools menu. When you first open the program, you’ll see a Welcome Screen. Data transfers using media such as a hard drive or floppy disk occur in two steps. You move the data from the old machine to the media and then from the media to the new machine. Serial cable transfers occur in real time on both machines. The following sections show how to use this utility to move data from an old machine to a new one.
You’ll always transfer files from the old computer first. In many cases, you’ll create what amounts to a backup of your old computer on a floppy or removable media and then transfer it to the new computer. The wizard also provides an option for moving the settings using a serial cable between the old and new machines. The following steps show you how to use the wizard to save the old computer settings:
Click Next. You’ll see a Which computer is this? dialog box.
Select Old Computer. Click Next. You’ll see a Select a Transfer Method dialog box. Notice that you have a choice of using a serial cable, floppy or other removable media, or a network drive.
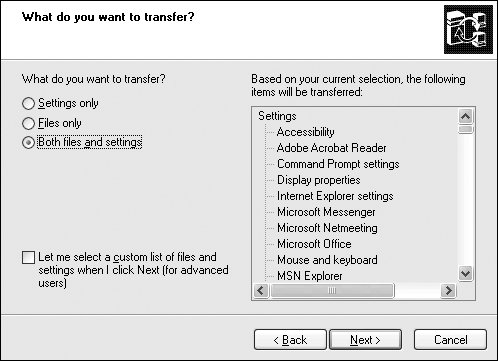
Select a transfer method. Make sure that you select an empty folder if you select a location on a network. You’ll see the What do you want to transfer? dialog box shown in Figure 19.3. Notice that you have three default settings: settings only, files only, and files and settings. The defaults assume that you want to transfer everything. If you check the option at the bottom of the dialog box, you can perform a custom selection of files and settings. Note that this is the best way to use this wizard to backup your system if you don’t plan to restore everything.
Select the information that you want to transfer. If you select the custom option, click Next and you’ll see a Select Custom Files and Settings dialog box. Choose the files and settings that you want to transfer and click Next. In all cases, you’ll see an Install programs on your new computer dialog box.
Make note of the programs that Microsoft recommends you install on the new machine (for that matter, you may want to install them at this point). Click Next. The Files and Settings Transfer Wizard will collect information about your machine. At some point, you’ll see a completion dialog box. Make note of any files or settings that the wizard couldn’t move and move them manually if possible.
Click Finish. The files and settings are now ready to move to the new computer.
After you backup the settings from the old computer, you can transfer them to the new computer. The following steps show you how to transfer the old computer settings to the new computer:
Click Next. You’ll see a Which computer is this? dialog box.
Select New Computer. Click Next. You’ll see a Do you have a Windows XP CD? dialog box. Use the options in this dialog box to create a wizard disk that you can place in the new machine. The wizard disk creation method depends on the options you choose. Follow the instructions that the Files and Settings Transfer Wizard provides.
Select a wizard disk creation option and then click next. If you choose the last option, the wizard won’t create a wizard disk. Click Next. You’ll see a Where are the files and settings? dialog box. This dialog box contains options that help you choose a transfer method. You can use options such as transferring data from a floppy.
Select a file and setting transfer option and then click Next. You’ll see a Transfer in Progress dialog box. Eventually, the Files and Settings Transfer Wizard will display a completion dialog box.
Review the list for any files or settings that the wizard couldn’t complete. Click Finish. The Files and Settings Transfer Wizard will ask you to log off so that the settings can take effect.
Log off and then back on. Try to restore the missing files or settings manually.
The Task Scheduler is one of the handier utilities provided with Windows XP. It helps you create automated jobs that will run on a predefined schedule. This means that you can schedule work for your computer and not worry about it afterward.
You can use the Task Scheduler for a number of tasks. In fact, some people end up overusing this utility in an attempt to reduce their work. The Task Scheduler works well for repetitive tasks that rely on a single application. In addition, the application must perform the same steps every time you use it because the Task Scheduler can’t think. In other words, the Task Scheduler is quite useful, but it can’t replace the human on the other side of the monitor.
One of the best uses for Task Scheduler is machine maintenance because this task uses the same precise set of steps every time you do it. I normally schedule a disk defragmentation every morning before I start work. Once a week, the Backup program runs automatically to preserve my local settings. (My system also uses a network backup on a daily basis.)
In some cases, Task Scheduler is actually redundant and can’t perform as well as the application. For example, Outlook Express will faithfully check your e-mail every half hour (or other selectable interval) using settings on the General tab of the Options dialog box (accessible using the Outlook Express Tools | Options command).
Task Scheduler provides two distinct interfaces. Actually, they’re separate commands, but the effect is the same. The graphical user interface (GUI) is the easiest way to use Task Scheduler for manual entries. Use the AT command line (character mode) utility for scripts and batch files.
Now that you have a better idea of what Task Scheduler is like, it’s time to learn how to use it. The following sections discuss both the GUI and command line interfaces for Task Scheduler. You learn how to use both so that you gain the extra flexibility that both interfaces provide. We’ll also discuss using scripting and the Task Scheduler together.
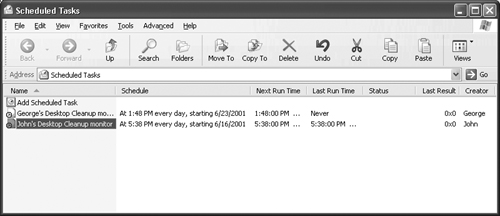
The easiest way to learn about Task Scheduler is to start the program found in StartProgramsAccessoriesSystem Tools. You’ll see the Scheduled Tasks entry. Figure 19.4 shows what this program looks like when you first start it. As you can see, the Task Scheduler includes entries for each scheduled task. The entries include the task name, run interval, the next run time, the time the Task Scheduler last ran the task, the last result, and the task creator. Note that the Task Scheduler (using the Scheduled Tasks window) shows all of the scheduled tasks—even those of other users.
The Task Scheduler interface is relatively easy to learn. All you need to know is how to work with the tasks and modify the behavior of Task Scheduler. The following sections tell you about both activities. We’ll start with the simple part of the interface, changing the Task Scheduler behavior.
Figure 19.4 shows many menu options. However, the only menu you’re interested in for Task Scheduler is the Advanced menu. The following list describes the menu entries:
Stop Using Task Scheduler. Select this option and Windows XP will stop the Task Scheduler service on your machine. It will also prevent the Task Scheduler service from running automatically. The menu entry will change to Start Using Task Scheduler and you’ll notice that several other options are grayed out. Normally, you’ll use this option only if you decide not to use Task Scheduler at all.
Pause Task Scheduler. Select this option if you want to temporarily stop the Task Scheduler. Windows XP will simply pause the Task Scheduler service. The menu entry will change to Continue Task Scheduler, and you can continue where you started. All of the other menu options remain enabled and Windows XP will automatically restart Task Scheduler the next time you boot the machine. You can use this feature if Task Scheduler wants to run a task at an inconvenient time. For example, Task Scheduler might decide to perform a disk defragmentation in the middle of a file download.
Notify Me of Missed Tasks. Use this option if you want Task Scheduler to remind you of missed tasks. The notice you receive lets you run the missed task. Of course, this feature can become a nuisance if you already know that you missed the task and don’t want Task Scheduler to remind you.
AT Service Account. The AT command line utility can add entries to the Task Scheduler. You’ll find the entries aren’t the same as those created using the GUI. We’ll discuss these differences in the “Using the AT Command Line Utility” section. The account runs separately from the user account, a necessity if you want the AT utility to add tasks to everyone’s account.
View Log. To use this entry, you have to stop the Task Scheduler service. Otherwise, you’ll receive a message that the file is in use by another application. Use View Log to see the log entries for the Task Scheduler.
As previously mentioned, the AT service account defaults to the system account. If you select the AT Service Account option, you’ll see the AT Service Account Configuration dialog box. The dialog box contains two options: System Account and This Account. If you choose This Account, you’ll also need to enter the name and password of the account you’d like to use. Generally, you’ll never need to use this option unless you want to allow regular users access to the AT command.
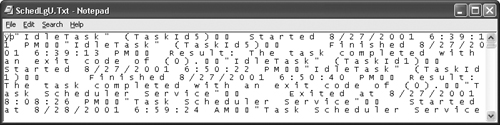
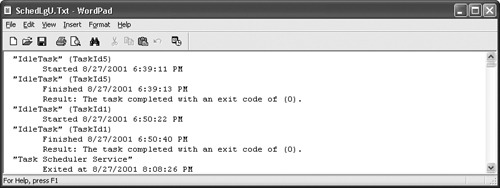
The View Log option is a bit of a disappointment. This option actually opens the SCHEDLGU.TXT file found in the WINDOWS folder. The only problem is that Windows associates the TXT extension with Notepad, so you see the messy display shown in Figure 19.5. If you looked at the SCHEDLGU.TXT file with a hex editor, you’d notice that it uses Unicode characters, a format that Notepad can’t handle. While Notepad does a marvelous job with plain text, you won’t want to use it for the Task Scheduler log file.
The alternative, in this case, is to open the file with WordPad. Of course, you’ll still need to stop the Task Scheduler service before you can read the log entries. Figure 19.6 shows the readable display provided by WordPad. Notice that each task entry contains a TaskId value used to identify the task within the log. Unfortunately, unless you started the task with AT, there isn’t any way to match the TaskId with an entry in the Scheduled Tasks window (at least, not without a lot of research). The best way to use this log is to match the starting times and dates with the entries in the Scheduled Tasks window.
Tip
You can fix the View Log problem with Task Scheduler using a simple registry change. Locate the HKEY_LOCAL_MACHINESOFTWAREMicrosoftSchedulingAgent key. This key contains a LogPath value that you can change to another extension. Instead of using SCHEDLGU.TXT, try using SCHEDLGU.DOC. You’ll find that the View Log option now works as intended. If you have Word installed on your system, you’ll find this fix even negates the need to shut down the service. Word will simply tell you that the file is in use by someone else and will ask if you want to make a copy. Click Yes and you’ll see the existing logon screen. Because you won’t make any changes to the log, this method of access is completely safe and won’t interfere with normal Task Scheduler operation. Note that the key also contains values that enable you to change the default log size, the number of minutes before the Task Scheduler goes into idle mode, and the location of the scheduled tasks folder.
One of the first tasks you need to perform with Task Scheduler is creating some tasks to perform. Creating a task is easy. Right-click the Scheduled Tasks window and choose the New | Scheduled Task option from the context menu. Type a name for your task, and you’re ready to go, except you haven’t configured anything.
If you want to create a new task the easy way, double-click the Add Scheduled Task icon in the Scheduled Tasks window. You’ll see the Welcome screen for the Scheduled Task Wizard. The following steps show you how to use the wizard:
Click Next. You’ll see a list of applications on your machine. In some cases, the applications will also include version numbers so that you can choose a particular version.
Note
The interesting thing about the application list is that it contains all of the registered applications. If you have a script, an older Windows application, or even an old DOS application you want to run, you’ll need to click Browse to find it. The list also contains some choices you’ll want to ignore. For example, no one would want to schedule Minesweeper to run at a given time (except as a means to remind yourself to take a break). Finally, some obvious choices are missing. For example, if you want to defragment your disk, you’ll need to locate the DFRG.MSC file in the WINDOWSSYSTEM32 folder.
Highlight the application you want to run and click Next. You could also click Browse and use the Select Program to Schedule dialog box to choose an application. In both cases, the Scheduled Task Wizard will display a dialog box that asks for a task name and scheduling time. You can choose intervals that include weekly, one time only, or when you log on to the system.
Type a name for the task and select a task interval. Click Next. You’ll see the Start Time dialog box. The content of this dialog box varies according to the schedule you select. Figure 19.7 shows a typical example of a weekly interval. In most cases, you’ll need to select a time to run the application. However, the other start time information will vary. For example, you might have to provide a list of months in which to run the application or the day of the week. Some options, such as When I Log On, don’t ask for a starting time. In this case, you’ll skip to step 5.
Select the start time information for your application. The Scheduled Task Wizard will ask for your name and password.
Type your name and password. Click Next. You’ll see a completion dialog box. Notice the option for opening the Advanced Properties dialog box. The Advanced Properties dialog box helps you further refine your task options. In most cases, you won’t need to do anything more at this point.
Determine if you need to modify any advanced properties (we’ll see what they are in the “Modifying Tasks” section). Click Finish. The Scheduled Task Wizard will create your task.

What happens if you change your mind about a scheduled task or want to refine the schedule you create for it? That’s where modifying the task comes into play. Double-click the task, and you’ll see a task properties dialog box.
The General tab of the task properties dialog box contains application specifics. You’ll note that the Scheduled Task Wizard didn’t allow you to add any command line parameters. This is where you add the parameters. Just type them into the Run field along with the application path. This dialog box also contains fields for changing the starting directory, adding some comments, and changing the username and password. Notice the Enabled option at the bottom of the dialog box. Clear this option if you want to disable the task but want to retain it for future use.
The Schedule tab shown in Figure 19.8 determines when the application will run. The figure doesn’t show the default state of the dialog box. Notice the Show Multiple Schedules option at the bottom of the dialog box. Check this option if you want to run the application on more than one scheduled time. For example, you might want to run it once a week and once a month at given times. To add a new scheduled run time, click New. You can remove scheduled run times by selecting the entry and clicking Delete.

Figure 19.8 shows the setup for a monthly task. However, you can change the interval using entries in the Schedule Task field. In addition to the normal entries provided by the Scheduled Task Wizard, this list also includes a When Idle option. The When Idle option is a great choice for tasks that you can perform a little at a time when the user isn’t doing anything else with the system. For example, the user might be reading a Web page. You set the time interval that Windows will wait before it begins the tasks. As soon as the user starts a new activity, the task will pause and wait for another idle period.
You’ll find some differences on the Schedule tab when compared to the Scheduled Task Wizard. For example, the Schedule tab hides more items. In Figure 19.8, you’d need to click Select Months to change the month in which the application will run. You’ll also see an Advanced button that displays the Advanced Schedule Options dialog box. Fields in this dialog box select the start date and end date. The Advanced Options dialog box also includes an option to repeat the task over a given interval.
Figure 19.9 shows the Settings tab. The options on this tab control task execution, rather than the application. Notice that you can set the task to delete itself automatically if you haven’t scheduled it to run again. This keeps your Scheduled Tasks window from filling with old information.

This tab also contains a idle time setting. However, this time the setting affects the task, not the application. When the application begins running, it will continue to run until it runs out of time or it completes its task. Use this option to ensure that the machine isn’t in a high state of activity when you start the application.
Finally, this tab contains power management options. You’ll use these options with laptop machines. For example, you wouldn’t want to defragment the disk while the laptop is on battery power because excessive disk use drains the battery quickly. Task Scheduler will simply wait until you connect the laptop to AC power to start the task.
You rename and delete tasks much the same as you do anything in Windows Explorer. Right-click the task you want to delete or rename and select the appropriate option on the context menu. Deleted tasks remain in the Recycle Bin until you empty it. Unlike Windows Explorer, using Shift+Delete doesn’t remove the task permanently; it still ends up in the Recycle Bin.
As previously mentioned, the AT command line utility uses a character mode interface. You interact with it using the command prompt. The AT command use the following formats:
AT [\Computer] [[<Id>] [/DELETE] | /DELETE [/YES]]
AT [\Computer] <Time> [/INTERACTIVE] [/EVERY:<Dates> | /NEXT:<Dates>] <Command>
As you can see, the first format removes tasks, while the second adds them. Table 19.2 tells you about the switches and parameters the AT command accepts.
Table 19.2. AT Command Switches and Parameters
Switch or Parameter | Description |
|---|---|
/DELETE | Removes a job from the list. If you omit the Id parameter, AT will remove all jobs that it created from the list. This command doesn’t affect other jobs created using the GUI. However, AT will request confirmation for each deleted job unless you specify the /YES switch. |
/EVERY:<Dates> | Runs the job during the specified day of the week or month. Adding more than one entry will run the job on multiple days of the week or month. If you omit the date parameter, AT assumes that you want to run the job monthly during the current day of the month. |
/INTERACTIVE | Determines if the user can interact with the job (and vice versa). The default setting runs the job in the background without any interaction. |
/NEXT:<Dates> | Runs the job during the next occurrence of the day of the week or month. Adding multiple dates runs the job during each of the specified dates. If you omit the date parameter, AT assumes that you want to run the job during the current day. |
/YES | Prevents AT from asking whether it should delete each job in the list. |
\Computer | The name of a remote computer used to run the AT command. |
Command | The path of the command you want to run including any command line switches. You must enclose the command in double quotes. |
Id | The identifying number of the job. The AT command begins at 1 and moves up from there. |
Time | Determines the starting time of the job. |
Creating a job with AT is relatively easy. Earlier, we used the Scheduled Task Wizard to create a defragmenter job that runs at 6 p.m. every Friday. You can create a similar job using the following command line:
AT 6pm /Every:Friday "E:WINDOWSSYSTEM32DFRG.MSC"
You don’t obtain the same level of configuration features using AT that you would using the GUI method. Many of the special configuration features we discussed in the “Modifying Tasks” section are unavailable. If you modify an AT task using the Scheduled Tasks window, AT won’t track it any longer. The second you apply the changes, AT removes the task from its list.
The Scheduled Tasks window tracks jobs created using both the GUI and the command line method. AT only tracks jobs that it creates. If you type AT at the command prompt and press Enter, all you’ll see are the AT jobs. Figure 19.10 shows a typical example of the same jobs created using the GUI and AT. Notice that the AT job name has “at” and the number of the job.

As you can see, from a Scheduled Tasks window perspective, both jobs are the same. The only two differences are the job name and the creator name. Unless you change the default setting, the system creates all AT jobs. Any job created using the Scheduled Tasks window will appear under the user’s name.
Today you’ve looked at scripting, and you’ve learned about automation. Some people never think to combine the two, but they’re a natural fit. When you create scripts that perform a common task, adding the script to the Task Scheduler is a natural way to save time. Of course, you’ll want to ensure that you debug the script fully. Otherwise, you can’t be sure what the system will end up doing in your absence.
The powerful aspect of scripts and the Task Scheduler for the average user is that you’re the one in control. You create the script and determine when it will run on your system. The combination of scripts and the Task Scheduler frees you from performing some of the mundane tasks you might otherwise perform.
Creating a task to run a script is precisely the same as creating a task for any other application. You have access to most of the settings as normal. For the most part, Task Scheduler looks at your script as an application to run and nothing else. However, Task Scheduler does appear to have a problem working with scripts that require switches or parameters. Sometimes, the job won’t run as anticipated without a lot of fiddling.
It’s also important to avoid user interaction within a script. The task will simply stop at the point of user input and wait for the user to do something. If the user is away from his desk at the time, the task could time out, and Task Scheduler will terminate it. The only thing you’ll know when you look at the script entry is that it failed. This is one of those surprise errors that occur when you mix scripting and automatic execution.
Throughout the book, we’ve discussed synchronization. For example, you can set up a Favorites entry for offline viewing. Windows XP downloads a copy of the page to your hard drive so that you can view it as needed, even if you don’t have an Internet connection to use. Offline viewing extends to other resources, such as network drives (if you enable the feature). No matter what the source of synchronized data, Windows XP provides the means to update it.
The Synchronize utility shows you the current synchronization settings for your system. You can access this utility using the Tools | Synchronize command of any Explorer-like utility provided with Windows XP including the Scheduled Tasks window. Windows XP will display the Items to Synchronize dialog box, which contains a list of items to synchronize. Click Synchronize, and Windows XP will begin the synchronization task.
Click Setup and you’ll see a Synchronization Settings dialog box similar to the one shown in Figure 19.11. Each of these tabs tells Synchronize when to perform its work. You can synchronize data during the login or logout process. Windows XP will also update Web content during system idle time or at a time that you schedule using the Task Scheduler. (Use the entries on the Schedule tab to perform this task.)
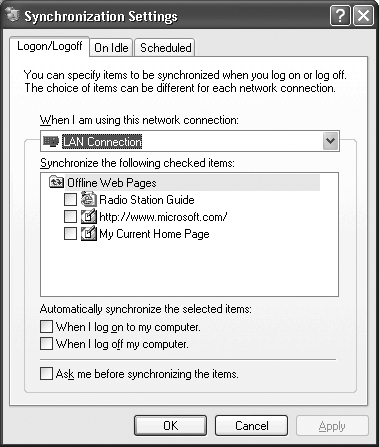
The Logon/Logoff and On Idle tabs work about the same. You select the connection you want to use for synchronization purposes and a list of offline content to synchronize. The options at the bottom of the dialog box tell when to perform the synchronization. If you choose to perform synchronization during the logon or logoff process, you can also tell Windows XP to ask before it performs the task.
The individual entries in the Synchronization utility also have settings. Highlight any entry and click Properties. You’ll see a Content Properties dialog box. This dialog box contains the individual offline content settings for that site. We’ve already discussed these settings as part of Internet Explorer. See the “Browsing Offline” section of Day 4 for details.
As you saw today, scripting and automation are two sides of the same coin. You use both of them to make your life simpler. Scripting has the advantage of providing great flexibility, while automation is something you can configure and forget. Both scripting and automation are essential tools for the power user. If you use them together, you can create an impressive list of productivity aids that will help you stand above the crowd.
Where can I find a complete reference for WSH? | |
Microsoft provides a number of places that contain a WSH reference, but many of them aren’t complete. The best place to find a complete reference is http://msdn.microsoft.com/scripting/windowshost/doc/wshTOC.htm. Not only is this online reference complete, but the reference is relatively easy to use as well. | |
How many languages will actually run on WSH? | |
The number of languages is undefined. As long as you can find a script engine for WSH, you can use the associated language. From a practical standpoint, VBScript and JavaScript have the greatest support. Perl also garners support from Microsoft and third-party vendors (see http://www.xav.com/perl/Windows/windows_script_host.html or http://pages.infinit.net/che/perlwsh/perlwsh0.html for details). A REXX scripting engine is also available (http://www-4.ibm.com/software/ad/obj-rexx/orx_sys.html), but you may not find good support for it. Rumors talk of TCL and Python scripting engines, but you won’t find much information about either of them. (See http://aspn.activestate.com/ASPN/Cookbook/Python/Recipe/65108 for an example of a WSH script in Python.) Note that you can use WSH alternatives, such as PrimalScript (http://www.sapien.com/Primalscript21.htm), if you have specific language needs. | |
What’s the most practical use of synchronization? | |
Many people go crazy when they discover the Synchronize utility. However, this tool can quickly eat valuable computing time as it goes about updating every Web page that you tell it to update. Eventually, you can slow system access and use so many resources that Synchronize becomes a detriment, rather than a productivity aid. The best solution to this problem is to synchronize data you use every day. In addition, you should target data that you use offline and that’s small enough to fit comfortably on your hard drive. Synchronize is a valuable tool, but like any other tool, you can misuse it. |
It’s the end of the nineteenth day. By now you should have a better idea of what scripts can do for you and some idea of how to create and test them. Now it’s time to see how well you can create, debug, and use scripts of your own. Of course, part of scripting is to automate tasks, so you’ll see a few automation items in the list. You can find answers to the quiz and exercise questions in Appendix A at the back of the book.