The Web is an open environment for sharing information that attracts both novices and professionals. Every year, statistics show that more people have connected to the Internet to share information in some way. The fact that the Internet is slowly running out of addresses for Web sites only serves to tell you how quickly the Internet has caught on.
When some people think of the Internet, they think of businesses. It’s true that you can find just about every business that exists in the real world on the Internet. In addition, the Internet supports some businesses you won’t find out in the real world. For example, you can’t buy electronic books at your local bookstore, yet.
For those who were with the Internet at the beginning, it represents an information store for scientists. In fact, that’s the original purpose behind the Internet (if you haven’t heard the story a dozen times before). The Internet still serves a purpose for academia. You’ll find a myriad of standards groups and scientists sharing information in the same way they always have. In fact, the Internet probably contains more science today than it ever has.
The Internet is also about home users and communities. Many people that I know of create Web pages now. Most of them wouldn’t consider themselves programmers. All they want to do is present a few pictures of the kids online or tell about their latest project.
Windows XP provides features that allow anyone to create and test Web pages. Theoretically, you could run an extremely small Web site with your Windows XP machine as well (although Microsoft doesn’t recommend you do so). Windows XP could also serve the needs of a small intranet, making it easier to create paths of communication in a small company.
Today we’ll learn about everything Windows XP has to offer with regard to Web page development and Web site setup. Mind you, Windows Server has a lot more to offer than Windows XP does, so you may not see everything you’ve seen in that environment.
Windows XP Professional Edition includes a limited version of Internet Information Server (IIS). Generally speaking, you won’t be able to run a Web site using this product, or, at least, not a very busy Web site. Microsoft places strict limits on the number of Web servers you can create with the version of IIS found in Windows XP Professional Edition. You’ll also find there are limits on the number of connections you can create. In short, this version of IIS works fine for Web page testing and small intranets, but most people won’t want to use it for anything on the Internet.
Note
Many ISPs offer Web site hosting for a reasonable charge, but make it up by charging exorbitant rates for services such as domain name registration. You can register your domain name for free at http://www.yournamefree.com/ and rid yourself of one more cost for starting a small Web site.
The copy of IIS found in Windows XP Professional Edition is complete in almost every other respect. Any practice you perform using this version of the product will transfer to the full version found in Microsoft’s Windows Server products. This means you can practice on a workstation, before you move onto a real Web site on your server, reducing the usual risks in learning something new.
You do need to be aware of a few missing features from the version of IIS that comes with Windows XP Professional Edition. One of the most critical elements is a lack of bandwidth throttling. The lack of this feature means that a remote site could consume all the local processing cycles and network bandwidth with Web requests. You’ll also notice a lack of support for operator entries (Windows XP assumes the local user) and server extensions. However, the property page tabs you do see under Windows XP are precisely the same as those on Windows Server.
The following sections will help you understand some of the basics of using IIS. By the time you complete this section, you’ll know enough to set up a Web site for an intranet or test your personal Web paged hosted by someone else. This section won’t make you an IIS guru. There are many issues that we won’t cover such as creating an enterprise grade Web site with full security.
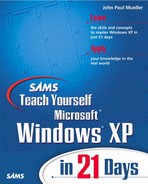
Microsoft rightfully assumes that most people won’t use IIS their first day with Windows XP. In fact, most people won’t use IIS on their workstation at any time, so Windows XP doesn’t install this feature by default. You’ll find all of the IIS setup features in the Internet Information Services folder of the Windows Component Wizard dialog box. As you can see from Figure 20.1, the IIS installation requires a little more thought than setting up the games that Windows XP provides.
Caution
The moment you install IIS on your workstation, it becomes vulnerable to the same viruses that a server can get. For example, a workstation that has IIS installed can get the Code Red virus. Make sure that you use safety features that include a firewall and virus scanner. Keep both products updated. You’ll also want to patch IIS as needed to keep your network safe. For example, the Microsoft security bulletin at http://www.microsoft.com/technet/security/bulletin/MS01-044.asp makes you aware of fixes for the Code Red virus. Check the Windows Knowledge Base (http://search.support.microsoft.com/kb/c.asp) and Windows Update (accessible on the Start Menu) for patches on a regular basis.
With so many features to consider, you might find it hard to figure out just what to install. The one thing you don’t want to do is install everything at one time. Taking it slow with IIS is a good idea because it’s a complex product. Most people start by installing the World Wide Web Service and the Documentation. Make sure that you only install the level of World Wide Web Service you need. The folder has three virtual directories: Printers, Scripts, and Remote Desktop Web Connection. If you’re using this setup for testing purposes, it’s unlikely you’ll need any of these features.
Some features that Windows XP provides are developer related. The only time you need to install the Visual InterDev RAD Remote Deployment Support is when you have Visual Studio installed on your system. Otherwise, this feature will waste drive space and opens your system to attack by crackers. Likewise, the FrontPage 2000 Server Extensions feature is only useful if you own the full copy of FrontPage.
A few of the features are growth items that you might want to consider sometime down the road. For example, many intranet Web sites also feature an FTP site where users can download files (or you can set scripts to download them for the users).
You might also need the Simple Mail Transfer Protocol (SMTP) Service. The mistake many people make is thinking this service provides full electronic mail support. The SMTP Service only provides the base electronic mail support; it doesn’t include an e-mail server. To get full e-mail services, you need a server such as Exchange (http://www.microsoft.com/exchange/default.asp). In most cases, Microsoft provides a 120 day trial version of Exchange you can download and test with your Web Server. Considering the size of the download, you might want to take Microsoft up on its offer of obtaining Exchange through a CD shipped in the mail.
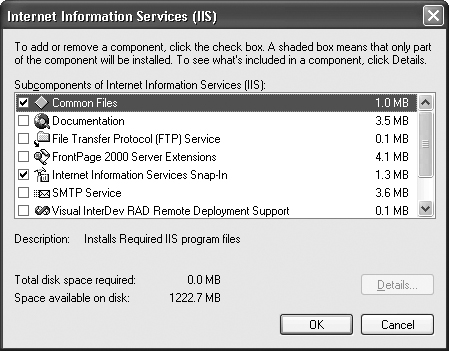
IIS installation is the same as any other Windows XP feature you’ve worked with in the past. Select the options you want; then click OK. Click Next and follow the prompts in the Windows Component Wizard dialog box. To verify that Windows XP installed IIS properly, open a copy of Internet Explorer. Type http://localhost/ in the Address field and press Enter. You’ll see a Web page similar to the one shown in Figure 20.2. Internet Explorer should also open a second window and display the IIS documentation.
Before you can use IIS, you need to configure it. Microsoft makes some assumptions about the setup that you’d like, but they normally won’t meet all of your needs. At a minimum, you’ll want to perform the setups in the Global and Web Site sections that follow. These setups help you gain the most out of your intranet or test Web site.
Note
Windows XP Professional Edition doesn’t support a news server (NNTP). However, in some cases you’ll see an NNTP entry in the Internet Information Services MMC snap-in. You can right-click on the computer entry and choose the New | NNTP Virtual Server option. The New NNTP Virtual Server Wizard will even start. However, when you try to finish the setup, the wizard will fail with an ambiguous message. The only time you can use NNTP is if you see a Network News Transport Protocol (NNTP) entry in the Services MMC snap-in.
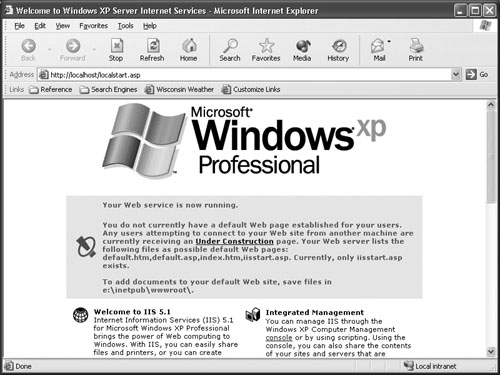
Unlike the full version of IIS that comes with Windows Server, you’ll find that this version lacks an administration Web site. This means you can’t use a remote Web interface to configure this setup, as you could with the server version. We’ll use the Internet Information Services MMC snap-in shown in Figure 20.3 for configuration purposes throughout the day. The following sections address the basics of all IIS configuration requirements.

Tip
IIS tends to cache site settings. This means you can make changes to a Web or FTP site configuration and not see the changes immediately. Stopping and then Starting the service usually makes the changes visible. Make sure that you also refresh browser and FTP utility displaces because these products also cache information. You might be looking at an old copy of the data on your own drive.
The global setup affects all of the Web sites you create. You can override some settings at a lower level, but these settings will affect the starting setup for every Web site. To change the global settings, right-click Web Site and then choose Properties from the context menu. You’ll see a Web Sites Properties dialog box similar to the one shown in Figure 20.4.

The ISAPI Filters tab contains a list of special applications for IIS. Figure 20.4 shows the default list of filters’ simple IIS installation. Internet Server Application Programming Interface (ISAPI) Filters do just what their name says—they filter the information arriving at your server. Unless you buy a third-party package that includes ISAPI Filters, or you create an ISAPI Filter of your own, you’ll never need to look at this tab except to ensure that the filters are all running. You can tell a filter is running because it has a green arrow that points up. If you see a red down arrow icon, you know the filter isn’t running, and you need to find out why. Filters often cause IIS to act erratically, or you’ll see a loss of functionality.
When you select the Home Directory tab, you’ll notice that IIS grays out many of the features. Most of the features on this tab won’t apply until you get to the Web site level. However, you can still assign global permissions such as read and write. It also pays to select the Log Visits option, at this level, so that you record all user visits to the site. Finally, make sure that you select the Index this resource option so the Indexing Service will create search entries for it.
Tip
The Indexing Service handles Web sites separately from local hard drives or other indexing setups you might create. This allows search pages to report only the data that appears on your site and reduces the risk of inadvertent disclosure of critical information. In addition, this separation enables you to set the indexing features separately from the rest of your system.
The Default Document tab contains a list of default documents. IIS chooses a default document based on the capabilities of the requesting browser and the order in which the documents appear in the list. IIS uses a default document when you check the Enable Default Document option. If you don’t enable this feature, then users will need to enter the name of a Web page precisely, or they’ll receive an error message. You can add and remove default documents by using the Add and Remove buttons.
IIS also provides a feature for adding a default footer to every Web page. Default footers commonly contain contact information or other links on the Web site. To use this feature, check Enable Document Footer. You’ll also need to supply the name of a footer file. A footer file is a standard HTML page that IIS adds to the bottom of the document.
The Directory Security tab contains the security settings for your site. The only setting you can change at the global level is authentication control. Click Edit, and you’ll see an Authentication Methods dialog box. Windows XP provides three levels of access: anonymous, basic authentication, and integrated Windows authentication. You’ll use anonymous access for a site that everyone can visit. Basic authentication works fine for local sites, but presents a security problem for remote sites because the user passes their name and password in clear text. The Integrated Windows Authentication method is secure because it uses encryption for both the username and password. However, the problem with this method is that it limits access to Windows clients. This last limitation will have a greater impact on server setups than a workstation setup.
The HTTP Headers tab shown in Figure 20.5 controls content handling for your Web site. The Enable Content Expiration is especially important if your site handles time critical information. The browser will compare the cached copy on the user’s local hard drive with the expiration date to determine if it needs to download a new copy of the page from the Web server. Using this feature effectively means reducing Web server demands, while ensuring the user always has fresh content.
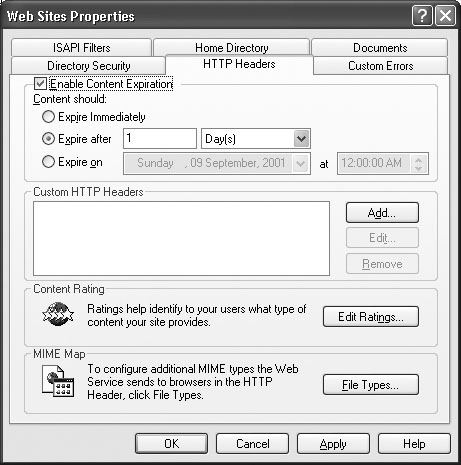
The Custom HTTP Headers section contains a list of specialized headers for your Web server. An HTTP header contains information about the content that follows. For example, it can tell the client to use a particular helper application to display the content. The headers that IIS sends out are standard as of the time of release. However, as standards groups define new HTTP headers, you might want to add them to your server. This feature allows you to make the extension without much effort.
You’ll use the Content Rating feature on sites that contain objectionable material that younger viewers might see. Click Edit Ratings, and you’ll see a Content Ratings dialog box. The Rating Service tab tells you about the ratings service. It provides a link you can visit that provides additional information and has a questionnaire you can answer about your site. The Ratings tab has settings that you can use to set the content rating for your site. There are entries for violence, sex, nudity, and language. You’ll rate the level of each of the entries by using a slider. The tab also contains fields for a contact address (the e-mail address of the person who rated the site) and an expiration date for the content rating.
The final setting on the HTTP Headers tab is the MIME Map. The Multipurpose Internet Mail Extensions (MIME) setting determines the types of files your site supports. IIS sends this information to the client, so the client knows what to expect concerning content types. Unless you use some unusual file types, you’ll never need to touch this setting. However, if you do find that you need to change something, ensure that you add the standardized MIME entries for the file type available from RFC3161 (http://www.faqs.org/rfcs/rfc3161.html).
The Custom Errors tab contains a list of every error that the Web server can generate, along with an associated error message. In most cases, the generic error message is pretty generic and less than helpful. However, most users find them useful enough—at least they know there’s a problem. You can use the entries on this tab to define custom responses for error messages. For example, users of your Web site might run into one error more often than any other error message. Defining a custom error message can provide useful help to users who need it and reduce the number of support calls you receive.
FTP sites require fewer configuration settings than Web sites do, so I’ll discuss both global and local FTP settings in one section. Figure 20.6 shows the Default FTP Site Properties dialog box. You’ll use this dialog box for local FTP settings. The FTP Sites Properties dialog box (the one used for global settings) doesn’t include the FTP Site tab. In addition, you’ll find a few features missing on the Home Directory tab.
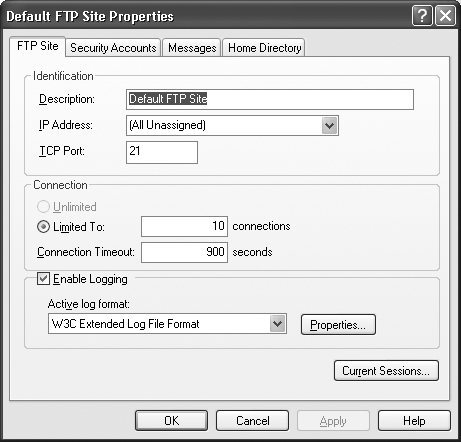
As you can see from Figure 20.6, the FTP Site tab contains the FTP site, address, and port. The default setting is port 21. If this is a private FTP site, using a different port can reduce the chance of cracker attack (or at least slow it down a little). The Connection properties are a little optimistic for Windows XP. In most cases, you’ll want to set the number of connections to 2 or 3. The Connection Timeout value will probably work, but you may want to set it lower in order to avoid holding resources for failed connections.
The FTP Site tab also contains an option for logging all user access. The standard format is a World Wide Web Consortium (W3C) standard format. You can also use a custom IIS format. Click Properties, and you’ll see an Extended Logging Properties dialog box like the one shown in Figure 20.7. The General Properties tab has settings that determine the interval that IIS uses the same log and the location of that log. The default settings change the log daily and place it in the WINDOWSSystem32LogFiles folder. You can increase security by changing the default log location to another secure area of your system. The Extended Properties tab shown in Figure 20.7 contains a list of standard log entries. The standard settings don’t tell you much about the person using your site. If this were a public site, you’d want to save log space by using the Spartan entries shown in the figure. However, given that this is a private site and log size won’t be a problem, you should log as much information about the individual as possible.

Click Current Sessions at the bottom of the FTP Site tab, and you’ll see a FTP User Sessions dialog box. This dialog box lists the name of the person(s) using the FTP site, the IP address of the remote connection, and the amount of time they have connected to the FTP site. You can use the Disconnect and Disconnect All buttons to remove users from the site as needed.
The Security Accounts tab controls access to your FTP site. Clear the Allows Anonymous Accounts option if you want to restrict someone from logging into the site anonymously. Unfortunately, this also causes problems because FTP passes the username and password in clear text. This means that someone with a network sniffer could gain access to the user’s connection information. This tab also contains options that force IIS to use anonymous connections alone. Finally, you’ll find a list of the FTP site operators.
FTP sites normally require the use of four messages for connecting users. The Messages tab contains Banner, Welcome, Exit, and Maximum Connections fields to handle all four messages. IIS doesn’t include any default messages, so visitors to your site will see a blank screen until you define a message.
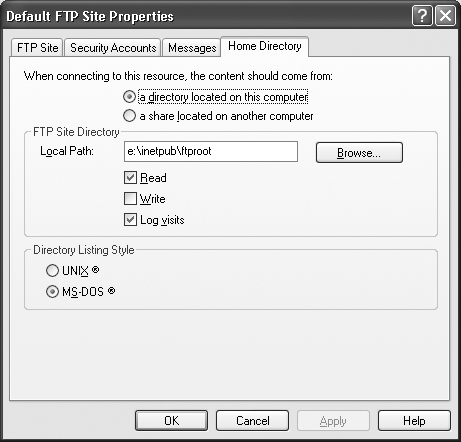
The Home Directory tab, shown in Figure 20.8, controls the location and security settings for the home directory. Notice that you can use a local directory or a share (directory or drive) on another machine. The FTP Site Directory information includes the path to the directory and the rights the user has to the directory. Notice that you only have a choice of read, write, and log visits. The Directory Listing Style is especially important. Many FTP utilities require the UNIX style of directory listing and won’t show any subdirectories until you use it. If users have problems seeing the folders or files on your FTP site, you may need to make this change.
Web Sites use settings that are similar to the Global settings we discussed earlier. However, as shown in Figure 20.9, you’ll see at least one additional tab. The Web Site tab begins by defining the Web site identification. This includes a Web site name, IP address, and port number.
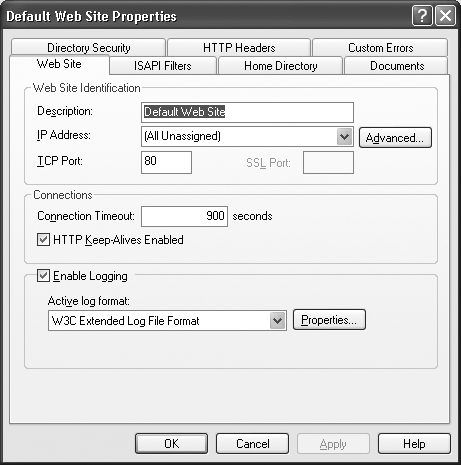
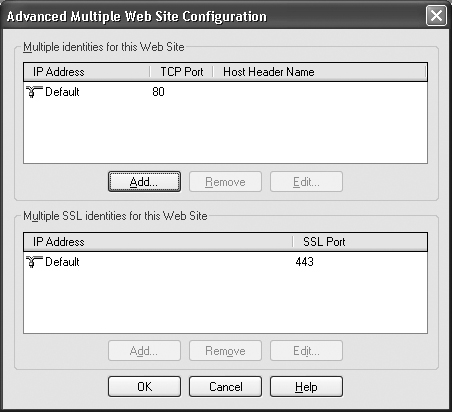
The problem is that the TCP Port field is misleading. While this number does define the default port number, it doesn’t tell you about other port numbers that IIS supports natively. Click Advanced, and you’ll see an Advanced Multiple Web Site Configuration dialog box like the one shown in Figure 20.10. As you can see, IIS defines two ports for all Web sites: standard and secure. If you allow outside access to your Web site, you’ll need to configure your firewall to accommodate both the standard port of 80 and the secure port of 443.
Note
You can create multiple standard host ports for your system. In fact, you can even remove the default setting of port 80 and use something else. However, the secure port setting of 443 is cast in stone, and you can’t change it. In addition, you can’t create additional secure port entries.
The Connections section of the Web Site tab determines the connection settings. The first point of interest is the HTTP Keep-Alives Enabled option. This setting tells IIS to maintain a connection with the client during the entire client session. The advantage of this setting is that the client won’t need to reestablish contact for each request. The client and server both save time and server performance improves. The disadvantage of this setting is that IIS maintains the connection if the client inadvertently loses contact with the server. The server must wait the entire interval specified by the Connection Timeout setting before it releases the connection. The default setting of 900 seconds (15 minutes) is too long for a local connection. A setting of 400 seconds (or less) works better.
As with the FTP site settings, you can log all access to your Web site. You have the same logging choices of a W3C standard format or an IIS specific format. However, in this case, you also have a choice of a National Center for Supercomputing Applications (NCSA) common log file format. This format is compatible with servers running the Apache Web server, so it’s a good choice in a mixed server environment. The remaining log file choices and options are the same as they are for FTP sites.
Tip
You might be tempted to think that once you select a log format you have to live with it forever. Fortunately, Microsoft provides the CONVLOG utility to convert IIS logs from any supported format to NCSA common log file format. The utility will convert IP address to DNS names. You can even convent logs from local time to GMT in order to synchronize entries from various parts of the world. Several Web sites have a description of this log file format including http://ulysses.uchicago.edu/docs/LOGS.doc2.html.
We discussed some of the other tabs found in the Default Web Site Properties dialog box in the “Global” section. The ISAPI Filters, Documents, HTTP Headers, and Custom Errors tab work the same as before. However, you’ll notice some implementation differences. For example, the ISAPI Filters tab is unlikely to have any filters installed or active. You’ll also find additional Web pages on the Documents tab for the default Web site.
The Home Directory tab shown in Figure 20.11 contains all of the information for the root location of the Web site. As with an FTP site, you can place the Web site on a local or remote drive. Unlike an FTP site, you can also redirect a Web site to another URL. Notice that Web sites provide a few more directory access options. You can tell IIS to index the Web site. Notice, also, that there’s an option to protect your script source and to allow directory browsing. Directory Browsing is a nice feature to have if you want to make the Web site completely open. It enables users to search through all of the available files. However, this option is harmful if you want to hide anything on your site and probably isn’t a good choice for public sites.

The Directory Security tab for the Default Web Site Properties dialog box differs from the Web Site Properties (global) version. It contains an option for creating a server certificate. When you click Server Certificate, you’ll see the Welcome screen for the Web Server Certificate Wizard. The following steps show you how to use this wizard.
Click Next. You’ll see a Server Certificate dialog box. This dialog box gives you three options for installing a server certificate. The first is to create a new certificate, which is the option that you’ll use when you first start working with IIS. The second is to assign an existing certificate to the server. You’ll use this option after you receive a certificate from a third party such as Verisign. Finally, you can import a certificate from the Key Manager backup file.
Select Create a New Certificate; then click Next. You’ll see a Delayed or Immediate Request dialog box. If you choose the delayed option, IIS will generate a request on disk that you upload to the third party. The immediate option sends the request directly to the certificate authority.
Select a request option; then click Next. You’ll see a Name and Security Settings dialog box. This dialog box contains settings that determine the certificate name, encryption key length, and cryptography options. It also contains an option for choosing a cryptographic service provider (CSP)—the vendor that supports your server cryptography mechanism.
Type a name for your certificate. Select security settings as needed. If you decide to choose the CSP for the certificate, you’ll see an Available Providers dialog box where you’ll choose a CSP. Click Next. You’ll see an Organization Information dialog box. Type the name of your organization and the name of your organizational unit. The organizational unit can reflect the organization of your company in any way, but normally contains a department or other workgroup name.
Type an organization and organizational unit name. Click Next. You’ll see the Your Site’s Common Name dialog box.
Type the name of your site. Windows XP normally uses your machine name, but you can choose any appropriate name. Click Next. You’ll see a Geographical Information dialog box that contains fields for your country, state, and city.
Type the name of your country, state, and city. Click Next. You’ll see a Certificate Request File Name dialog box.
Type a name for the request file. Click Next. You’ll see a summary dialog box.
Read the summary and verify all of the information is correct. Click Next. You’ll see a completion dialog box that provides additional information about your certificate.
Read the instructions; then Click Finish.
When you receive the certificate from the CSP, place it in an easy-to-find directory on your machine. Start the Web Server Certificate Wizard. You’ll see an option to process the pending request and install the certificate. You’ll need that option in this case. When asked for the certificate, provide the location on disk. After another question or two, IIS will install the certificate for you.
IIS provides the means for you to create individual settings for your Web site directories. Generally, the Directory Properties dialog box contains a subset of those found for the Default Web Site Properties dialog box. The Documents, Directory Security, HTTP Headers, and Custom Errors tab entries work the same in both cases. The Virtual Directory tab is actually a renamed form of the Home Directory tab. In short, working with a Directory is easy once you understand how to work with a Web site.
The Web Page Properties dialog box is an even smaller version of the Default Web Site Properties dialog box. It contains the same HTTP Headers and Custom Errors tab. The File Security tab is a renamed version of the Directory Security tab with the same options. Finally, the File tab is a shortened version of the Home Directory tab. You’ll see fewer options than before. For example, you can’t use a share from another computer for obvious reasons. In addition, the security options only include read and write protection. The File tab also contains options for protecting your source code and logging user visits.
It isn’t always convenient to place data you want to see on your Web site on the local drive or even within the Inetpubwwwroot folder hierarchy. A virtual directory is essentially a pointer to the data, wherever it exists. The virtual directory makes it appear that the data is local to the Web server, although the data might exist on a network drive. Think of a virtual directory as a sort of shortcut for IIS.
Creating a virtual directory is relatively easy. Right-click the location you want to place the virtual directory. You can place the virtual directory at any level below the Default Web Site in the IIS hierarchy. Choose New | Virtual Directory from the context menu, and you’ll see the Welcome screen of the Virtual Directory Creation Wizard. The following steps will show you how to complete the virtual directory setup.
Click Next. You’ll see a Virtual Directory Alias dialog box. The name you assign here is the name that IIS will use to reference the directory. It’s also the name the user will need to access the directory. Using single word directory names is usually best because using spaces causes problems for some browsers. In addition, you’ll find single word directory names easier to work with when you create Web pages.
Type an alias for the virtual directory and click Next. You’ll see a Web Site Content Directory dialog box. The Directory field contains the path to the physical directory location. Click Browse if you want to search for the directory.
Provide a content directory name and then click Next. You’ll see an Access Permissions dialog box as shown in Figure 20.12. Notice that the access permissions don’t directly correspond with the settings from any of the tabs that we discussed earlier. The security settings are easy to understand, but you’ll always want to check the settings later.
Choose security settings for your virtual directory and click Next. You’ll see a completion dialog box.
Click Finish. IIS will create the virtual directory for you.
Right-click the new virtual directory; then choose Properties from the context menu. You’ll see a Directory Properties dialog box.
Verify the settings for your virtual directory.

As previously mentioned, you can’t use the SMTP service in place of a standard e-mail program. However, you can use it to send and receive messages in some situations. For example, a developer can use the SMTP service to enable communication between applications. Some applications use SMTP as a means to deliver data to the company.
The SMTP service creates two folders: Domains and Current Sessions, as shown in Figure 20.3. The Domains folder contains a list of domains participating in SMTP. Generally, you’ll see a single domain consisting of your machine when working with Windows XP. If you double-click this entry, you’ll see a Domain Properties dialog box. The Drop Directory field of this dialog box specifies where IIS places incoming mail. The Enable Drop Directory Quote option determines if IIS automatically stops accepting incoming mail after the folder reaches the size specified by the directory quota.
The Current Sessions folder contains a list of users or applications connected to the SMTP server. Like the FTP server, you’ll see a username, remote connection IP address, and the connection time. You can also disconnect one or all of the users as needed.
The only configuration for the SMTP server is the Default SMTP Virtual Server. Right-click this entry, choose Properties from the context menu, and you’ll see the Default SMTP Virtual Server Properties dialog box. The General tab of this dialog box contains the IP address for the service, the number of connections, connection timeout, and logging options. If you click Advanced, you’ll see an Advanced dialog box that contains the IP address and port numbers associated with the SMTP server (the default port number is 25).
The Access tab contains security options for the SMTP server. Click Authentication, and you’ll see an Authentication dialog box that contains the three same authentication options you can use for a Web site (anonymous, basic, and integrated Windows). You can secure communication by using a certification. Click Certificate, and you’ll see the Web Server Certificate Wizard we discussed in the “Web Site” section. The Connection and Relay buttons both open dialog boxes that restrict access to SMTP by IP address. You can restrict computers singly, in groups, or at the domain level.
The Messages tab shown in Figure 20.13 determines acceptable incoming message parameters. As you can see, you can limit content per message and per session. You can also limit the number of messages sent by any one client and the number of recipients per message. The last two options on this tab determine how SMTP handles undeliverable mail. The default settings place the bad mail in the Badmail folder. Considering the size of a Windows XP setup you should supply an e-mail address for the bad message reports. Otherwise, the directory can fill up without any advance notice.

The Delivery tab shown in Figure 20.14 contains all of the settings that determine a delivery schedule for messages. Notice that SMTP will try to deliver each message four times. If the message is undeliverable after four attempts, it goes into the Badmail folder. The settings shown in Figure 20.14 are more appropriate for an Internet connection, than a LAN setup.

Notice the Outbound Security and Outbound Connections buttons on this tab. Click Outbound Security, and you’ll see an Outbound Security dialog box that contains the three levels of authentication we discussed earlier. This dialog box also contains entries for the name and password to use for authentication. You need these settings because SMTP uses these security settings to send messages to another location. You can also choose to use encryption to protect message content.
Click Outbound Connections, and you’ll see an Outbound Connections dialog box. The settings in the dialog box determine the connection and timeout values for outbound connections. A special setting determines the number of connections per domain so you don’t use all of the outbound connections on a single domain. The TCP Port field contains the port number of the outbound connection.
The LDAP Routing tab of the Default SMTP Virtual Server Properties dialog box contains settings for a lightweight directory access protocol (LDAP) connection. The only time you’ll need this connection is if you decide to use Active Directory or another server database setup (such as Site Server or Exchange). The settings on this tab include the name of the server, the schema type of the database (Active Directory is the default), and the type of binding (security setup). If you choose a secure binding protocol, you’ll also need to supply a domain name, username, and password. The final field on this tab is Base. In essence, the Base field contains a description of the location you want to access in the directory service database with SMTP.
The Security tab contains a list of qualified SMTP operators. SMTP will use this list of names for notification purposes. In addition, the list contains the only people allowed to modify SMTP settings or perform other kinds of maintenance.
Now that you have a functional server, you’ll want it to do something for you, which means creating Web pages. A Web page contains a combination of tags and content. All the end user should see is the content. The browser reads the tags and uses them to perform tasks such as formatting the output so it looks nicer. Of course, learning all the tags is akin to learning a new language and a new way of thinking, which is why many people see Web page creation as a difficult task. If you obtain a good Web page editor, you can work with the content more than the tags.
Note
This discussion looks at the simpler aspects of Web page design. Web pages can contain a lot more than just tags and content. For example, many people add scripts so that the Web page can do more than provide a static interface to the user. However, it’s important to take small steps before you take large ones. Creating successful Web pages means knowing how to use tags and how to present content in an aesthetically pleasing way before you move onto the harder topic of scripts.
Internet Explorer versions before Version 6 (the one in Windows XP) provided FrontPage Express as a Web page editor. FrontPage Express isn’t the best editor in the world, but it works and it’s free. Most important of all, FrontPage Express is a good tool to learn simple Web page development because it doesn’t overwhelm you with features you don’t care about immediately.
Web page design is a popular topic, so you’ll also find a wealth of third-party editors on the Internet. We’ll also talk about a few of the editors. You’ll definitely want to try them before you buy one because Web page editors tend to provide unique interfaces. One Web page editor might seem intuitive, while another with the same features seems cumbersome.
Finally, Web pages aren’t about tags or scripts. If you design a Web page around the fancy gizmos you can include, you’re missing the point. The whole point of Web pages is content. It’s important to design Web pages in such a way that the user sees an immediate need for the content you have to provide. The content has to be easy to read and understand.
FrontPage Express is the first Web page editor that many people use because it comes with Internet Explorer. You can hardly beat a deal where the editor is free and delivered to you. In addition, FrontPage Express has the advantage of being simple to use and learn. You’ll find that you’re productive with it in just a few hours.
Tip
For those of you who’ve wondered where FrontPage Express went, you won’t find it by searching Microsoft’s Web site. For the obvious reasons, they want you to buy the full-fledged version of FrontPage. However, you can still download the required FrontPage Express CAB file from http://mssjus.www.conxion.com/download/ie501sp1/install/5.01_sp1/win98/en-us/fpesetup.cab. This is part of Microsoft’s download for Internet Explorer 5.01. You can view the contents of the CAB file after you download it from the Internet site. Create a folder where you’d like to extract the FrontPage Express files. Open the CAB folder, select all of the files in the CAB folder, and then drag them to the location you created. Windows XP will automatically extract the files for your and place them in the new folder. Open a command prompt in the folder where you placed the extracted files. Type rundll32 advpack.dll, LaunchINFSection fpxpress.inf, defaultinstall. Windows XP will install FrontPage Express for you and create a shortcut to it. You’ll be able to uninstall this product by using the normal procedure.
Of course, FrontPage Express has problems, too. It lacks many of the features of modern editors, and Microsoft shows little interest in upgrading the product. Yes, you can do all of the basics, but you’ll find a complete lack of support for advanced features, such as graphic mapping (associating areas on an image with links to other parts of the Web site). In addition, FrontPage Express lacks any kind of support for scripting. Because of these limitations, many people learn with FrontPage Express, and then they move on to something a little more functional.
Figure 20.15 shows what FrontPage Express looks like when you first start it. As you can see, it looks like a simple word processor or other editor. The three toolbars have very different purposes.

The long toolbar on the top controls text features. You can perform all of the basics you find in any editor including adding bold, italics, and underlined text. The text can appear left, right, or center justified—it can read from left to right, or right to left (left to right is the default). You can vary the font size and select a font face. The Increase Indent and Decrease Indent buttons help you position the text on the page. The Change Style drop-down list box leaves the formatting details to the editor—you simply select the paragraph style you want to create. This first toolbar also has buttons for creating numbered and bulleted lists.
The second toolbar contains many functional buttons. This is where you’ll save existing files and create new ones. You’ll find the usual Cut, Copy, and Paste buttons, along with icons for printing and previewing your document. The four interesting buttons on this toolbar include Insert WebBot Component, Insert Table, Insert Image, and Create or Edit Hyperlink. The WebBot components consist of Include, Search, and Timestamp.
The third toolbar contains the size components you’ll use to create Web pages. They include a single line edit box, scrolling edit box, check box, radio button, drop-down menu, and a push button. Out of all these components, the drop-down menu is the only one that does something extraordinary.
In some respects, FrontPage Express uses Microsoft Word as a model for the user interface. For example, FrontPage Express provides a special Table menu that contains a wealth of entries for manipulating the tables you create. You can set individual cell properties, merge cells, insert cells, and change the overall table properties.
You’ll also want to spend time looking at the Insert menu. It includes a few features that you might not see otherwise. For example, this menu includes an option for inserting a marquee on your Web page. The Insert menu also contains options for inserting ActiveX controls, Java applets, special plug-ins, a PowerPoint animation, video, and background sounds. The Insert menu also contains an option for inserting scripts, but you’ll find it simplistic at best.
Every project begins with a new file. However, you don’t have to start with the empty page shown in Figure 20.15. Use the File | New command to display the New Page dialog box, and you’ll see a list of standard forms. FrontPage Express provides a few basics, such as a survey, confirmation, and a form page. You can modify these pages and add more of your own by working in the Program FilesMicrosoft FrontPage ExpressPages folder. However, these forms are a good place to start working with Web pages.
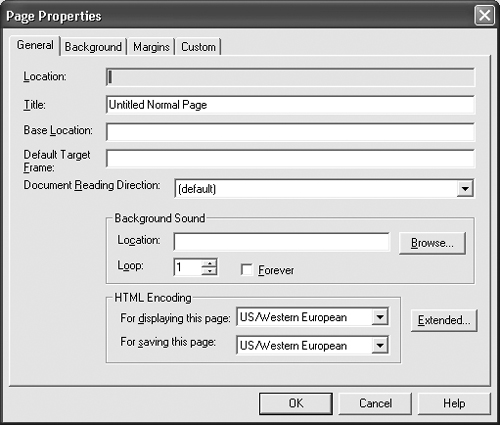
Before you begin adding anything to the Web page, you should define the page properties. Use the File | Page Properties command to display the Page Properties dialog box shown in Figure 20.16. The Base Location field is especially important because it helps define the format of any links you create. This is one of the reasons you need to define the page properties early. FrontPage Express has a tendency to modify links incorrectly if you don’t supply this value at the outset. You’ll also use this tab to change values such as the background sound and the encoding used for fonts.
The Background tab contains entries for all the colors your Web page will use. You can change the background, text, hyperlink, visited hyperlink, and active hyperlink colors. If you want, you can also add a background image and make it into a watermark (a repeating image).
Normally, you won’t specify margins for your Web page. Using margins limits the size of the page and causes problems with some browsers. If you do decide to add margins to your Web page, the Margins tab contains options for modifying both the width and the height.
The Custom tab enables you to add both user and system variables. In most cases, you won’t need to worry about changing these values until you know a lot more about Web page design. For now, all you need to know is that these values appear at the top of the file. They’re essentially comments that some search engines use for finding your Web page faster.
After you define a page, it’s time to add some content. After all this effort, it’s time for the main event. Unfortunately, some people damage their Web page design at this point. Start simply by outlining your ideas. Use the predefined Header styles to create an outline for your page.
The headers add structure to your Web page, but they don’t really do much for the reader, except tell them what to expect. The second phase is to add any basic structures. For example, if you plan to use a table to hold some information, try setting it in place under the heading that will hold the information. You’ll also want to insert any graphics and position them on the page.
It’s time to add some text. You have all of the structural elements in place, so now it’s time to tell the viewer what these elements mean. Make sure that you use short, descriptive paragraphs. Don’t waste words, but at the same time, use enough text to describe your topic fully.
After you get to this point, you’ll want to save the page to your test Web site and check it out in Internet Explorer. One of the problems that Web page designers run into is that they make their page too large. Many of your viewers will see the page in 800[ts]600 resolution. Shrinking your browser down to these dimensions helps you see your page from their viewpoint.
You’ll find a wealth of shareware editors on the Internet. In fact, there are so many of these editors that you might invest considerable time figuring out which one you want to use. The problem isn’t so much one of features (although feature set is important), it’s one of interface. Web site design is essentially an artistic process. The tools you use have to reflect your style of working with content. This means that you might reject a perfectly acceptable editor because the interface doesn’t work the way you’d like.
The following sections present some shareware products that seem to do a good job. Each product has a different slant on creating Web pages. If you don’t find a product you like in this list, at least you’ll have a better idea of what’s out there so you know where to look.
The feature that most intrigues me about this product is that it contains an interesting list of features. For example, the author includes graphic conversion tools and an image mapper, two tools you don’t see in every shareware product. First Page III supports dynamic HTML (DHTML), so you can perform some interesting tricks with it. For example, you can create drop-down list boxes without resorting to script. You can obtain a copy of First Page III at http://www.evrsoft.com/.
WebExpress is another basic Web page editor. It emphasizes simplicity above anything else. You won’t find some of the gizmos offered by other products in this package, but you won’t drown in excessive functionality either. One of the more interesting features of this product is that it supports so many graphic file formats. I checked the list and did not find anything that I’d need beyond the list WebExpress provides. This product also includes an excellent form wizard. Designing forms can be challenging, but this product makes them easy. You can find out more about WebExpress at http://www.mvd.com/webexpress/index.htm.
HomeSite is a little more complex than the previous two tools, but not quite in the professional category. It’s a good, middle-level tool for those who have a little Web development experience and want to build on it. You’ll find some interesting features in this product. For example, HomeSite is the only product in the section that provides both wireless and handheld support right out of the box. You’ll also find support for productivity features such as cascading style sheets. HomeSite also supports a variety of scripting languages including JavaScript, VBScript, and Perl. You can find out more about HomeSite at http://www.allaire.com/products/homesite/index.cfm.
This is a moderately complex Web page editor. It includes all of the standard tools that you’d expect from a middle-level tool. For example, the editor provides color coding, and you’ll find the project organizer is a snap to use. One of the more interesting features of this product is that it includes scripting wizards. The wizards won’t make you a great programmer, but they do get you started. Think of the wizards as a way to get the mundane development tasks out of the way so you can concentrate on what you’d like the code to do. Hippie uses a side-by-side editor, which means you can see the code and the final Web page at the same time. Changes in either window automatically appear in both. You can find out more about this product at http://www.hippie98.com/.
This is a tool for professionals. HTMLtool has features that make many commercial products look like bumbling attempts by comparison. A pick bar helps you choose key words and tags to use in your Web page. All of the source code is color coded to make it easy to read. You’ll even find a spelling checker that keeps track of problems as you type. The editor will underline incorrect spellings with a wavy red line. You’ll also find tabs that lay your project out in hierarchical format. In fact, the display looks similar to the one used by many development products such as Visual Studio today. In short, this is the product to consider when you’ve gotten well past the basics and into advanced design. You can find out more about HTMLtool at http://members.nbci.com/htmltool/index.html.
Web pages can be a lot of fun to design if you look at them as a means of expressing your inner thoughts. The content you deliver to the people who see your Web site should grab their imagination and leave them wanting more. Unfortunately, many Web sites go for the glitz and leave out the content. While this section won’t replace the years of experience that many Web site developers have, it will help you avoid some of the pitfalls of poorly designed sites.
Tip
You’ve probably seen Web sites that include their own icon as part of their link. When you save the URL in Favorites, the icon goes along with it, giving the Web site entry a distinctive look. It’s reasonably easy to add an icon to any Web page. Find out more about this process at http://hotwired.lycos.com/webmonkey/01/18/index1a.html?tw=design.
One of the most basic principles of good Web site design is readability. If the person visiting your Web site has to squint to read the text, you’ve probably lost someone who might be interested in what you have to say. Likewise, you need to avoid using terms that the reader might not understand unless you also define them. Finally, it’s important to use a spelling and grammar checker on your Web site. The text on some Web sites is so terrible that no one can understand it.
Tip
Sometimes, you can read your text a hundred times and never see the problems with it. That’s when the Narrator comes in handy. Set up the Narrator, display your Web page, and listen. In many cases, you can hear a problem with the text on your site long before you spot it by reading. Using the Narrator will also point out potential problems in your setup. Narrator will have problems reading poorly formatted Web pages. Because many visitors with special needs will use a product like Narrator to interact with your site, you’ll want to be sure to remove any flaws that might cause problems for these applications.
Organization is another problem you need to solve. I find that organizing my thoughts using an outline helps. Major topics go on separate pages. Any topics that belong together, but cover different aspects of the topic belong in separate sections on the same page. Use links as needed to put the pages together. Make sure that you include a link back to the home page so users don’t have to back out of several levels of your Web page to find another topic. If a Web page is particularly difficult to construct, it helps to work on the outline down to the paragraph level. If you don’t understand the organization of your Web site, neither will anyone else.
Use graphics sparingly or not at all on your Web page. Small graphics can dress up a Web page and make it look appealing, but lots of large graphics tend to clutter the Web page and increase the download time dramatically. The users of your site will click Stop long before they see the lovely images you’ve included. A better choice is to provide a small version of the image that the user can click to see a larger version on separate page.
Include a little white space on your Web page. The term “white space” refers to areas around the content. If you don’t provide enough white space, the Web page looks cluttered and is hard to read. Try to make paragraphs small, use bulleted and numbered lists whenever possible, and present some information using tables as a visual organization aid.
If you follow these basic tips, you’ll find that people get a lot more out of your Web site. More importantly, you’ll find that your site is a lot easier to maintain. Good design pays many dividends.
The Internet has grabbed the attention of everyone. Many people are experimenting with ways to make the Internet personal. They use it as a means of communication. Not only do Web pages convey information to others, but your Web page also says a lot about who you are. It helps other people understand some facet of you and what you want to present to the world.
The Internet isn’t only about Web pages; you need a Web server to display those Web pages. One of the things to consider about creating your own Web site is that it helps you gain a better understanding of how the Internet as a whole works. We’ve looked at some of the basics of creating a Web site today. You aren’t ready to create a mega-site like Microsoft’s, but you could create something small and experiment with it.
Why does Microsoft provide such a confusing array of IIS features when most home and small business users won’t use them? | |
Microsoft assumes that network administrators and developers will use this product, too. It’s easier to learn the basics on a local machine than it is to create a two-machine setup for working with the full product. Consequently, you’ll find that Microsoft has packed IIS with features that you might not use, but others will. | |
How does the content rating system work? Why would I want to use them? | |
The browser compares the content rating of a Web site with the content rating of the browser. If the rating is such that the user can view the site, then the browser loads the Web page. Otherwise, the user will receive an error message telling why the Web site is unacceptable. You can find out more about the ratings at http://www.rsac.org/ (scripting enabled) or http://www.rsac.org/lr_about.html (plain text). The reason you want to use the rating system is to ensure that no one can enter your site if it contains material they don’t want to see. This avoids problems with those who don’t want to see or hear an abundance of sex, violence, nudity, or inappropriate language. | |
What’s the best way to determine if people with color blindness can view my site? | |
The easiest say to make your Web site color friendly is to use colors that everyone can see well, yet use colors that make the site look aesthetically pleasing. Of course, that’s a difficult combination for anyone. A color selection that looks fine to you may make the site incomprehensible to someone else. Fortunately, you can find precise guidelines for this problem at http://www.firelily.com/opinions/color.html and http://msdn.microsoft.com/voices/hess10092000.asp. |
It’s the end of the twentieth day. You’ve learned some of the basis of creating a Web page and maintaining an IIS Web server. Now it’s time to see how well you can create Web pages of your own and maintain your Web server. You can find answers to the quiz and exercise questions in Appendix A at the back of the book.