Part 4 Advanced Photo Fixing
Are you ready to kick it up a notch? Here’s where your photo-editing skills become a bit more extensive. In this part, you’ll learn how to brighten up dark photos, clarify blurry ones, make skin tones look more natural, and even change the color of Grandma’s shirt if you like. Want to delete Cousin Steve’s ex from the family portrait? No problem—just keep reading and you’ll learn how to do that, too.
The first thing to learn, however, is how to isolate just the part of the image you want to work on to make sure you don’t alter the rest of the picture unintentionally. The first three tasks in this part show you different ways to select part of an image so that you can work with it. Even if you skip the rest of the tasks in this part, don’t skip these—creating selections is a skill you’ll need over and over again.
As you learn these editing techniques, you’ll realize why photographs are no longer considered proof of much of anything. Digital images are so easy to change that it’s hard to know when you should stop. Try to use a light touch so that your photos still say the same things they did when you picked up your camera to shoot; the idea is just to make that message a bit clearer.

A dark, boring photo before...
...and a striking, colorful landscape after. You’ll be amazed at what a few lighting and color adjustments and a bit of sharpening can accomplish.
If you believe you’ve moved beyond Quick Fix mode and are ready to try a few of the more advanced tools in Photoshop Elements, you might want to start with Guided Edit mode. In this mode, you use the same tools and controls as in Full Edit mode, but Photoshop Elements places them in the Palette Bin and walks you through their use step by step.
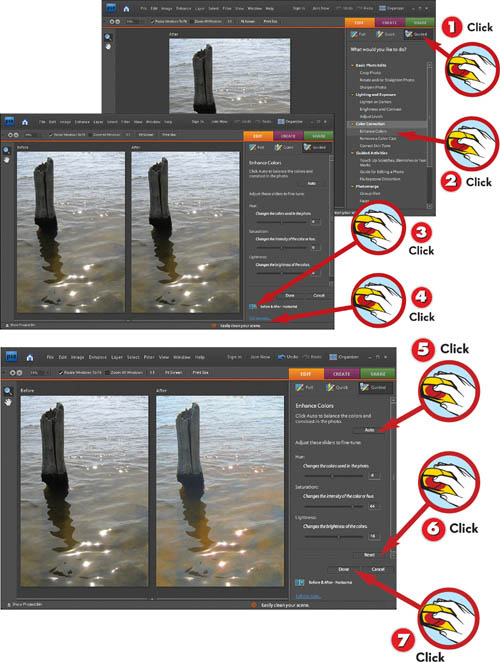
![]() With an image open in the Editor, click the Guided button to switch to Guided Edit mode.
With an image open in the Editor, click the Guided button to switch to Guided Edit mode.
![]() In the list in the Palette Bin, click the task you want to complete.
In the list in the Palette Bin, click the task you want to complete.
![]() Click the View button at the bottom of the Palette Bin to switch to the view mode you prefer.
Click the View button at the bottom of the Palette Bin to switch to the view mode you prefer.
![]() Click Tell Me More to learn more about the task you’re working on.
Click Tell Me More to learn more about the task you’re working on.
NOTE
Tools, More or Less
In Guided Edit mode, the toolbox contains even fewer tools than it does in Quick Fix mode. That’s because Photoshop Elements puts the tools you need for each task right in the Palette Bin. If you want to use tools that aren’t available, switch to Full Edit mode.
TIP
A View to an Edit
You’ll best be able to gauge the effects of your settings if you switch to one of the Before & After modes in step 3. Use Before & After - Horizontal for vertically oriented pictures and Before & After - Vertical for horizontally oriented pictures.
![]() Starting at the beginning, read and follow the instructions in the Palette Bin.
Starting at the beginning, read and follow the instructions in the Palette Bin.
![]() To undo the changes you’ve made and start over, click Reset.
To undo the changes you’ve made and start over, click Reset.
![]() When you’ve finished making edits, click Done.
When you’ve finished making edits, click Done.
TIP
Wait, There’s More!
Some Guided Edit tasks have multiple steps and different options. Be sure you drag the scrollbar at the right side of the Palette Bin to display all the text in each Guided Edit task. And if you want to know more about the tools and techniques you’re using in Guided Edit mode, click Tell Me More to see a Help page that explains everything.
When you’re painting the trim in your house, you use tape to mask off the parts of the wall where you don’t want to get paint. That’s what selections are all about in the Editor’s Full Edit mode—with part of the image selected, any changes you make are applied to just that area, leaving the rest of the image untouched.
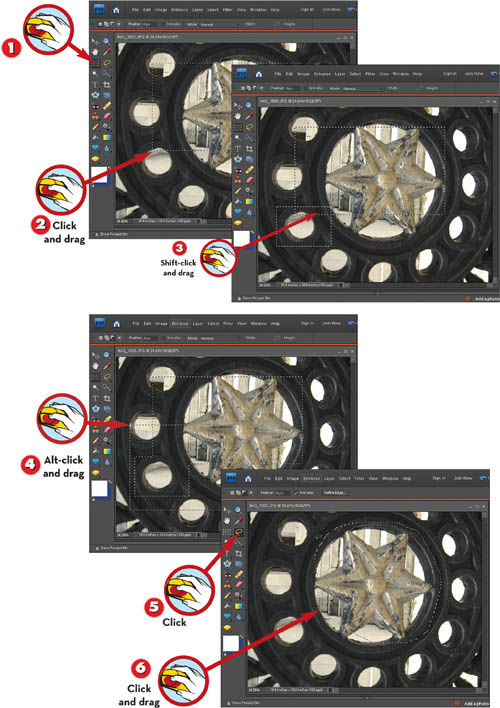
![]() With the Editor in Full Edit mode and an image open, click the Rectangular Marquee tool.
With the Editor in Full Edit mode and an image open, click the Rectangular Marquee tool.
![]() Click and drag to select a rectangular portion of the image.
Click and drag to select a rectangular portion of the image.
![]() Shift-click and drag to add to the selection marquee.
Shift-click and drag to add to the selection marquee.
TIP
Circles and Squares
When drawing selections using one of the marquee tools—the Rectangular Marquee or the Elliptical Marquee—you can create squares or circles, respectively, by pressing Shift as you drag out the selection.
NOTE
Shift This, Shift That
When you want to add to an existing selection, be sure to press Shift before you click in the image to draw the next part of the selection. If you click outside the selection without Shift or Alt held down, the existing selection disappears.
![]() Alt-click and drag to remove part of the selection marquee.
Alt-click and drag to remove part of the selection marquee.
![]() Click the Lasso tool.
Click the Lasso tool.
![]() Click and drag around any part of the image to select an irregular area.
Click and drag around any part of the image to select an irregular area.
NOTE
Mix It Up
You can use any combination of selection tools to create a selection that’s just the shape you’re looking for. For example, you might start out with a rectangular or circular selection, then use the Lasso tool to add and subtract smaller areas.
You might have thought the Magic Wand was enough magic for one program—but you haven’t seen the Quick Selection Brush yet! With this funky tool, you scribble across the area you want to select, and Elements figures out what you want selected.
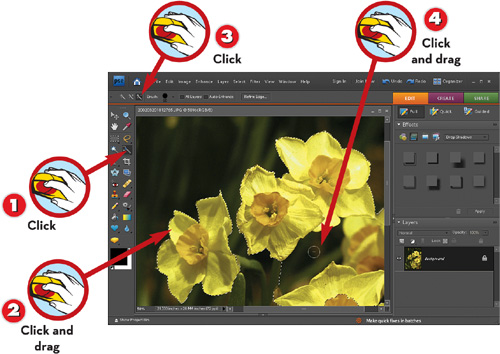
![]() With the Editor in Full Edit mode and an image open, click the Quick Selection Brush tool.
With the Editor in Full Edit mode and an image open, click the Quick Selection Brush tool.
![]() With the Quick Selection Brush tool, click and drag to roughly cover the area you want to select.
With the Quick Selection Brush tool, click and drag to roughly cover the area you want to select.
![]() Click the Subtract from Selection button on the options bar.
Click the Subtract from Selection button on the options bar.
![]() Click and drag to remove areas from your selection.
Click and drag to remove areas from your selection.
TIP
The Magic Modes
Three buttons on the options bar control the behavior of the Quick Selection Brush. You always start in New Selection mode, and you can click this button at any time to start your selection over. Click Add to Selection when you want to paint over more colors that should be included in the selection—Elements automatically switches to this mode after you make your initial strokes with the tool. Finally, click Subtract from Selection when you want to paint over areas that should not be included in the selection.
With the Magic Wand tool, you can quickly select an irregular area that’s all the same color, such as a flower, a T-shirt, or even the sky. By changing the Tolerance value, you can make the Magic Wand more or less picky about how closely a color must match your target color to be selected.
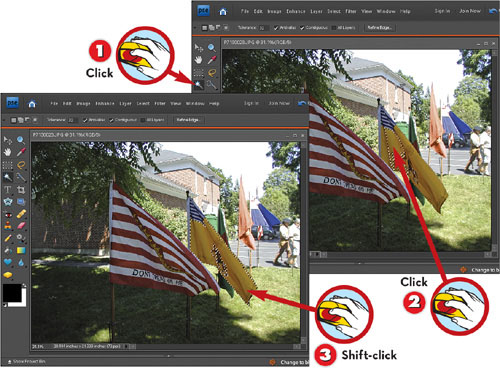
![]() With the Editor in Full Edit mode and an image open, click the Magic Wand tool.
With the Editor in Full Edit mode and an image open, click the Magic Wand tool.
![]() Click a solid-colored area of the photo to select it.
Click a solid-colored area of the photo to select it.
![]() Shift-click another spot to add another area to the selection.
Shift-click another spot to add another area to the selection.
TIP
All About Tolerance
Tolerance can range from 0 to 255, and it determines how close a pixel’s color must be to the pixel you click to be included in the selection. At 0, only pixels that match the original pixel exactly will be selected; at 255, the entire picture will be selected.
Often, a selection made with the Magic Wand or the Quick Selection tool has ragged edges or includes a “halo” around the object you were trying to select. Fixing these problems is simple, using the Refine Edge dialog.
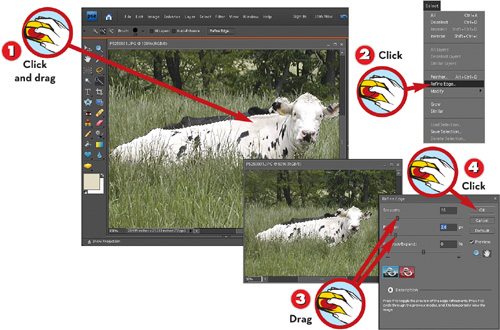
![]() With the Editor in Full Edit mode and an image open, make a selection using any selection tool.
With the Editor in Full Edit mode and an image open, make a selection using any selection tool.
![]() Choose Select, Refine Edge.
Choose Select, Refine Edge.
![]() Drag the sliders to smooth, blur, or resize the selection.
Drag the sliders to smooth, blur, or resize the selection.
![]() Click OK.
Click OK.
NOTE
In the Mode
The Refine Edge dialog can use two different preview modes: Standard Selection mode, which shows you “marching ants” around the selection’s edges, or Overlay mode, which gives you a better idea of the selection’s shape, particularly if you’re feathering it.
If you’re like many users of Photoshop Elements, the Shadows/Highlights command may turn out to be the one that you use on nearly every photo. It’s not considered a Quick Fix—yet its results are amazing and you’ll love its ease of use.
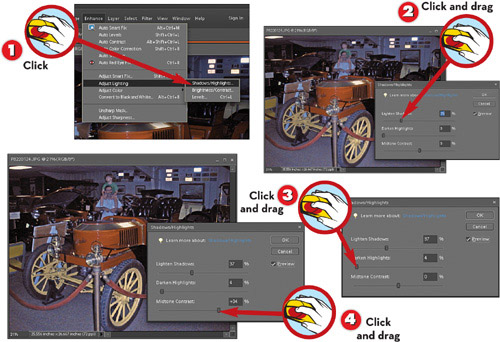
![]() With the Editor in Full Edit mode and an image open, choose Enhance, Adjust Lighting, Shadows/Highlights.
With the Editor in Full Edit mode and an image open, choose Enhance, Adjust Lighting, Shadows/Highlights.
![]() Click and drag the Lighten Shadows slider to the right to bring out shadow detail.
Click and drag the Lighten Shadows slider to the right to bring out shadow detail.
![]() Click and drag the Darken Highlights slider to the right to tone down the image’s bright areas.
Click and drag the Darken Highlights slider to the right to tone down the image’s bright areas.
![]() Click and drag the Midtone Contrast slider to the right to make the image’s colors stand out more against a dark background.
Click and drag the Midtone Contrast slider to the right to make the image’s colors stand out more against a dark background.
CAUTION
Easy Does It
Be careful not to increase shadow lightness too much—it’s fun to bring out the shadow details that you didn’t even realize were there, but shadows that are too light don’t contrast enough with the brighter areas of an image.
If a photo has an undesirable overall tint, it’s because the image’s white balance is off. Daylight has a blue cast, light bulbs indoors make everything orange, and fluorescents can make faces a sickly green. This command compensates by rebalancing all the colors in the picture in relation to pure white.
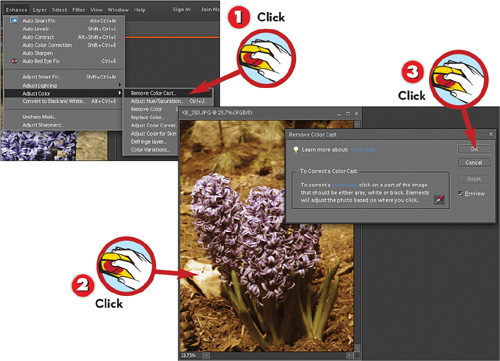
![]() With the Editor in Full Edit mode and an image open, choose Enhance, Adjust Color, Remove Color Cast.
With the Editor in Full Edit mode and an image open, choose Enhance, Adjust Color, Remove Color Cast.
![]() Click an area of the image that should be white.
Click an area of the image that should be white.
![]() Click OK.
Click OK.
This is a handy command designed specifically to fix “off” skin tones in photos of people. You can compensate for poor lighting by lightening or darkening skin tones and changing the picture’s yellow/pink balance. You can also adjust overall lighting of the scene.
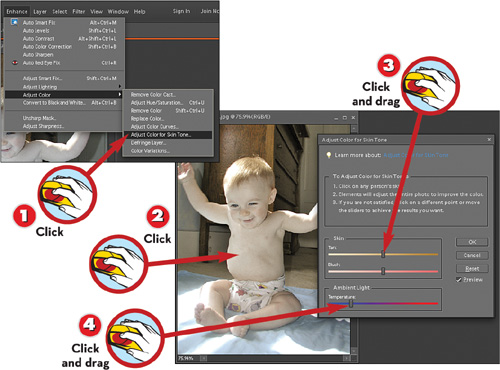
![]() With the Editor in Full Edit mode and an image open, choose Enhance, Adjust Color, Adjust Color for Skin Tone.
With the Editor in Full Edit mode and an image open, choose Enhance, Adjust Color, Adjust Color for Skin Tone.
![]() Click a patch of skin in the image. Elements adjusts all the skin tones in that range within the picture.
Click a patch of skin in the image. Elements adjusts all the skin tones in that range within the picture.
![]() To refine the skin tones, click and drag the Tan and Blush sliders.
To refine the skin tones, click and drag the Tan and Blush sliders.
![]() Click and drag the Temperature slider to make the entire image look warmer or cooler.
Click and drag the Temperature slider to make the entire image look warmer or cooler.
NOTE
Tone Deaf
Elements looks at the color of the area you click to determine which colors in a photo qualify as skin tones. If people in your photo have widely varying skin colors, you might not find this command as useful as it is when the subjects’ skin colors are similar.
Perhaps it’s not that the colors in the picture are wrong, you just want them to be different. For example, an interior decorator might want to view a room in a different light or with the decor a different shade. Experiment with color variations, which can be more dramatic than just correcting the picture’s overall cast.

![]() With the Editor in Full Edit mode and an image open, choose Enhance, Adjust Color, Color Variations.
With the Editor in Full Edit mode and an image open, choose Enhance, Adjust Color, Color Variations.
![]() Click a radio button to choose what part of the image you want to adjust.
Click a radio button to choose what part of the image you want to adjust.
![]() Click and drag the Amount slider to make the differences between the Variation thumbnails greater or less.
Click and drag the Amount slider to make the differences between the Variation thumbnails greater or less.
TIP
Adjust Midtones First
Adjusting midtones (values ranging between shadows and highlights) usually give you more noticeable results than working with shadows, highlights, or saturation. To change the magnitude of an effect, drag the Adjust Color Intensity slider before you apply it.
![]() Click a thumbnail, such as Decrease Green, to change color or brightness in the shot.
Click a thumbnail, such as Decrease Green, to change color or brightness in the shot.
![]() Click the same thumbnail again to increase its effect, or click another thumbnail to adjust a different color, or the image’s brightness.
Click the same thumbnail again to increase its effect, or click another thumbnail to adjust a different color, or the image’s brightness.
![]() When the After image looks right, click OK.
When the After image looks right, click OK.
TIP
Take Baby Steps
The default setting for Adjust Color Intensity is usually a bit too powerful, meaning that it changes the image too much with each click. It’s better to drag the slider to the left and then click multiple times on a thumbnail, building up an effect gradually, than to click once with a higher intensity setting and end up changing the image too much.
Don’t like the color of that dress? Does the sofa clash with the drapes? Want to make the sky pink or the river run green? You can make it so at no extra charge—with your choices limited only by your design sense.
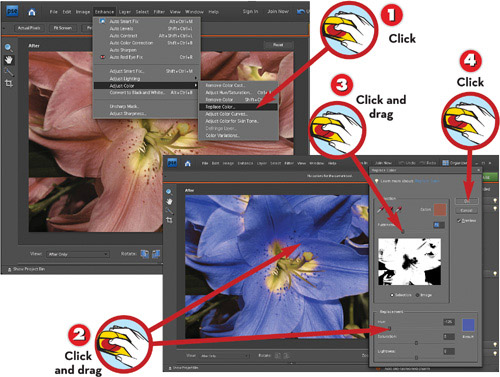
![]() With the Editor in Full Edit mode and an image open, choose Enhance, Adjust Color, Replace Color.
With the Editor in Full Edit mode and an image open, choose Enhance, Adjust Color, Replace Color.
![]() Click within an area in the picture; then click and drag the Replacement sliders until you see the color you want in the Sample box.
Click within an area in the picture; then click and drag the Replacement sliders until you see the color you want in the Sample box.
![]() Click and drag the Fuzziness slider to adjust the selection by changing the number of related shades that it includes.
Click and drag the Fuzziness slider to adjust the selection by changing the number of related shades that it includes.
![]() Click OK.
Click OK.
TIP
Add or Subtract
Click the Add to Sample or Subtract from Sample eyedroppers (marked with + and −) and click the area in the picture to add or remove it. Then, dragging the Replacement sliders applies the color change to the entire selection.
Sometimes a Quick Fix like Auto Contrast just doesn’t do the trick—especially if the image has bright highlights, deep shadows, or both. These steps give you more control so that you can make continuous adjustments while previewing the result.
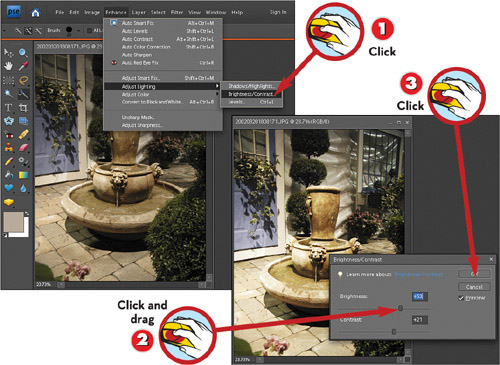
![]() With the Editor in Full Edit mode and an image open, choose Enhance, Adjust Lighting, Brightness/Contrast.
With the Editor in Full Edit mode and an image open, choose Enhance, Adjust Lighting, Brightness/Contrast.
![]() Click and drag one or both sliders, Brightness or Contrast, until the picture looks right.
Click and drag one or both sliders, Brightness or Contrast, until the picture looks right.
![]() Click OK.
Click OK.
NOTE
Overall Change
Changing brightness and contrast affects the entire image unless you select a particular area first. Some of the available selection tools are Rectangular Marquee (for rectangular areas), Lasso (for irregular areas), and Magic Wand (for intricate shapes).
You’ll occasionally need black-and-white pictures for newsletters that will be printed in one color—or perhaps when you’re in a vintage-movie kind of mood. You can easily convert your color shots to black and white, but don’t forget to adjust the contrast before clicking OK, to make them suitably snappy.
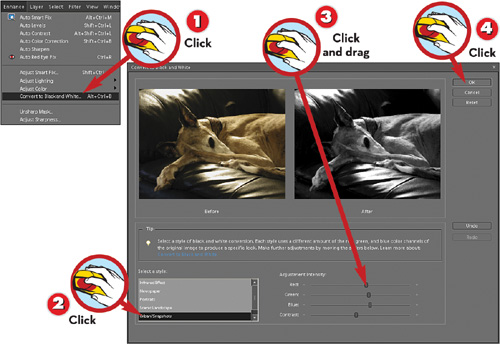
![]() With the Editor in Full Edit mode and an image open, choose Enhance, Convert to Black and White or press Ctrl+Alt+B.
With the Editor in Full Edit mode and an image open, choose Enhance, Convert to Black and White or press Ctrl+Alt+B.
![]() Choose an appropriate style for the image.
Choose an appropriate style for the image.
![]() Click and drag the Adjustment Intensity sliders to refine the conversion.
Click and drag the Adjustment Intensity sliders to refine the conversion.
![]() Click OK.
Click OK.
TIP
Brown Study
Sepia (a brownish monochrome) is actually a color effect. After converting to black and white and adjusting contrast, choose Image, Mode, RGB Color; then apply one or more Color Variations to colorize the image.

To take a great photo, you have to catch both the subject and the setting at just the right time. In case another object intrudes into the scene at the crucial second, Photoshop Elements makes it easy to remove that little “extra” at a later date.
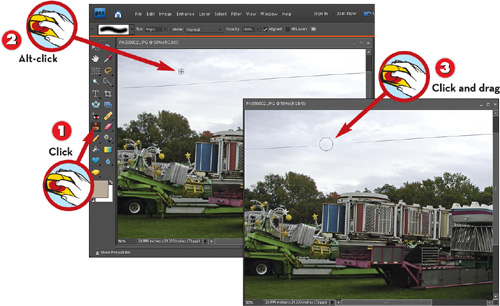
![]() With the Editor in Full Edit mode and an image open, click the Clone Stamp tool or press S.
With the Editor in Full Edit mode and an image open, click the Clone Stamp tool or press S.
![]() Press Alt as you click a clear area that matches the background.
Press Alt as you click a clear area that matches the background.
![]() Click and drag over the object you want to remove from the image.
Click and drag over the object you want to remove from the image.
NOTE
Take Your Time
You might need to apply the Clone Stamp multiple times, using short strokes, to blend the new pixels in with the existing background.
NOTE
Object Removal Magic
The Clone Stamp tool is a good choice for removing objects on irregular backgrounds and for larger objects. For small objects, Elements includes special “healing” tools. Turn to “Removing Blemishes,” p. 143, to learn more.
Does this ever happen to you? You think you’ve got the perfect shot, but then you get home, offload the pictures on your camera, and find that your perfect shot actually has an obnoxious pigeon in the foreground that you didn’t notice at the time. Well, as long as you have a backup shot or two of the same scene, Photoshop Elements can get rid of that pigeon in about two seconds flat.
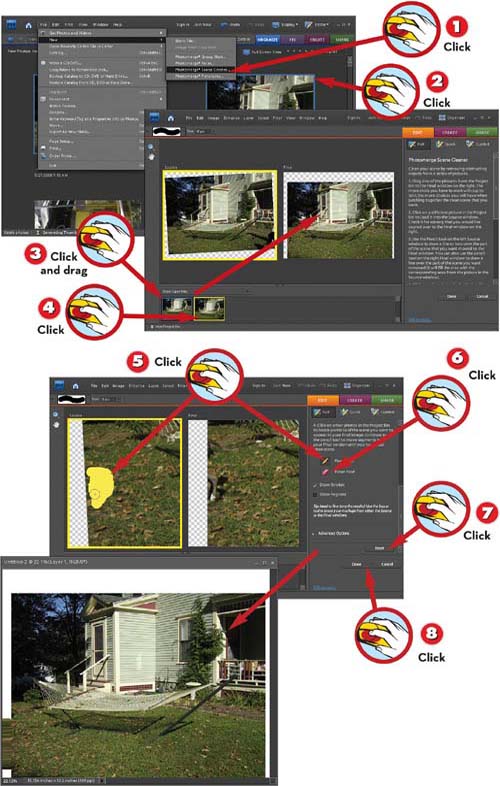
![]() In the Organizer, select all the shots of the scene that you want to clean up.
In the Organizer, select all the shots of the scene that you want to clean up.
![]() Choose File, New, Photomerge Scene Cleaner. The images open in the Editor, with instructions in the Palette Bin.
Choose File, New, Photomerge Scene Cleaner. The images open in the Editor, with instructions in the Palette Bin.
![]() In the Project Bin, choose the best shot and drag it to the Final preview.
In the Project Bin, choose the best shot and drag it to the Final preview.
![]() Click another photo in the Project Bin to display it as the Source image.
Click another photo in the Project Bin to display it as the Source image.
NOTE
Final Step: Crop
After you’ve created the final composite image, you’ll usually need to crop it to remove white areas around the edges. These exist because Photoshop Elements makes room for everything shown in all the selected images.
TIP
Matching Up
Scene Cleaner works only with photos that are very similar. So when you’re shooting a scene, try to keep your camera at the same distance from it and pointed in the same direction.
![]() Click the Pencil tool and draw over areas in the Source image that you want to merge into the Final photo. (I’m replacing my dog’s hind leg with grass.)
Click the Pencil tool and draw over areas in the Source image that you want to merge into the Final photo. (I’m replacing my dog’s hind leg with grass.)
![]() To remove areas from the Final photo, click the Eraser tool and erase the Pencil marks.
To remove areas from the Final photo, click the Eraser tool and erase the Pencil marks.
![]() Click Reset if you want to start over.
Click Reset if you want to start over.
![]() Click Done when the Final preview looks the way you want it to.
Click Done when the Final preview looks the way you want it to.
NOTE
Facing the Truth?
When you chose Photomerge Scene Cleaner from the New submenu, you may have noticed another command called Photomerge Faces. Photoshop Elements can do a fun party trick: Combine facial features from different pictures to produce an “if A and B had a kid” picture that shares elements of both pictures. Give it a try!
It never fails—no matter how many shots you take of everyone at a gathering, someone’s always looking the wrong way, or blinking, or scratching an itch. Fortunately, if you save all those funky shots, Photoshop Elements can help you merge them into one perfect picture.
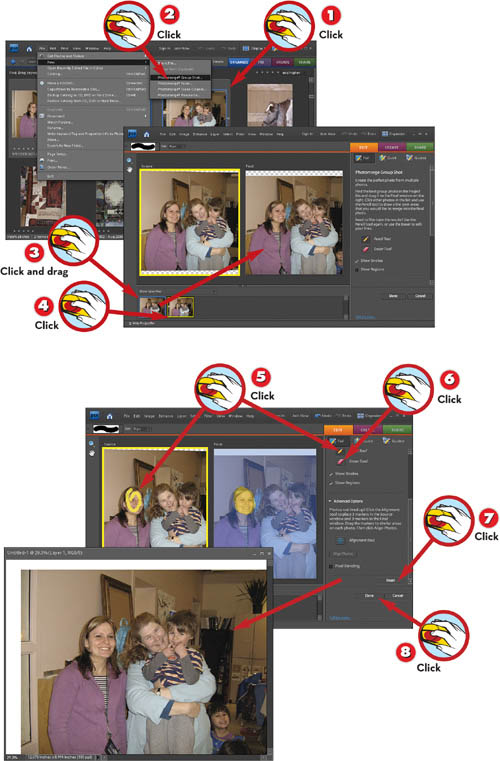
![]() In the Organizer, select all the pictures that you want to combine.
In the Organizer, select all the pictures that you want to combine.
![]() Choose File, New, Photomerge Group Shot. The images open in the Editor, with instructions in the Palette Bin.
Choose File, New, Photomerge Group Shot. The images open in the Editor, with instructions in the Palette Bin.
![]() In the Project Bin, choose the best group shot and drag it to the Final preview.
In the Project Bin, choose the best group shot and drag it to the Final preview.
![]() Click another photo in the Project Bin to display it as the Source image.
Click another photo in the Project Bin to display it as the Source image.
NOTE
Show Me
You can control how Photoshop Elements indicates the areas that are being copied from the Source image to the Final image. Click Show Strokes to show your Pencil strokes in the source image (this setting is on by default), and click Show Regions to reveal the copied areas in the Final image. Turn off these settings to see how the Final image will appear after you have finished.
![]() Click the Pencil tool and draw over areas in the Source image that you want to merge into the Final photo.
Click the Pencil tool and draw over areas in the Source image that you want to merge into the Final photo.
![]() To remove areas from the final photo, click the Eraser tool and erase the Pencil marks.
To remove areas from the final photo, click the Eraser tool and erase the Pencil marks.
![]() Click Reset if you want to start over.
Click Reset if you want to start over.
![]() Click Done when the Final preview looks the way you want it to.
Click Done when the Final preview looks the way you want it to.
TIP
Toeing the Line
If the photos aren’t lined up correctly in the Final image preview, click the Alignment tool, click to place three markers in the Source image and three markers at the corresponding points in the Final image, and then click Align Photos.
Digital cameras have an auto-focus feature, which attempts to make the edges of the subject in the center of the frame as sharp as possible. It doesn’t always work. For more consistent results, learn how to focus manually. But, you can always try this simple technique to sharpen slightly blurred shots.
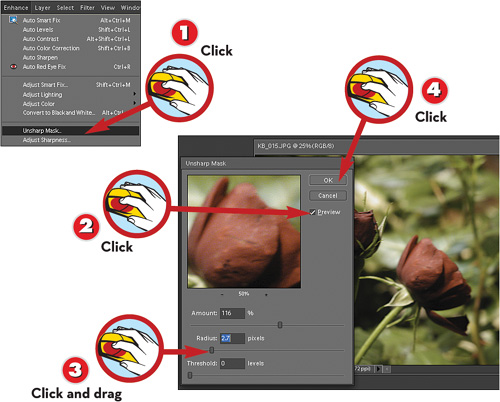
![]() With the Editor in Full Edit mode and an image open, choose Enhance, Unsharp Mask.
With the Editor in Full Edit mode and an image open, choose Enhance, Unsharp Mask.
![]() Click the Preview check box to see your changes in the image window.
Click the Preview check box to see your changes in the image window.
![]() Click and drag the sliders to sharpen the image.
Click and drag the sliders to sharpen the image.
![]() Click OK when you’re happy with the picture.
Click OK when you’re happy with the picture.
NOTE
Focus Manually
Sharpening an image can improve the look of a blurred shot somewhat, but it’s no substitute for proper manual focusing. That’s particularly true when you’re doing close-ups—with the subject fewer than four feet away.
There are at least two good reasons to soften focus: It can make a portrait look more flattering, blending out lines, pores, and small blemishes; and it can save a shot that’s only slightly out of focus—making the softness look more deliberate.
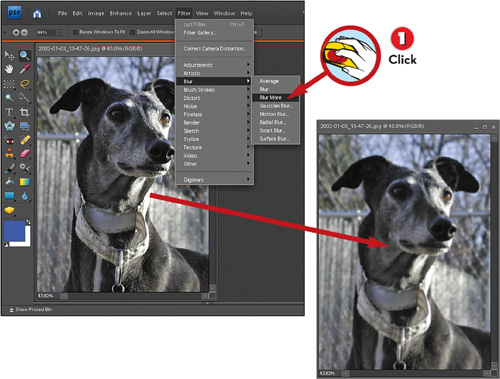
![]() With the Editor in Full Edit mode and an image open, choose Filter, Blur, Blur More.
With the Editor in Full Edit mode and an image open, choose Filter, Blur, Blur More.
TIP
An Artful Blur
This task uses Blur More because the result of the Blur command can be hard to see. The other Blur commands in the Blur submenu are for when you’re feeling arty.