Part 3 Basic Photo Fixing
Think of this Part of the book as a comfy family restaurant where you can go for your daily bread and never be bored with the same meal twice. It’s just not slick, or complicated, or arty. (Oh, we’ll go there, too, eventually.) You’d be well served to return here again and again—but these steps are so quick and easy that to do them once is to know them cold.
Up to this point, you’ve opened files and printed them out, but you haven’t changed how they look very much. If you need to fix a photo, come here first. Your quest will probably end here, and you’ll be more than satisfied. The shot that looked too dark will perk right up, crooked will become straight, and that unflattering pallor on your subject’s face will become a rosy glow.
A particularly handy feature of Photoshop Elements is the Quick Fix workspace, which gives you single-click access to a variety of commonly needed repairs—with automatic corrections. The first several tasks in this part demonstrate its use.
So, if you have time to do only a few of the tasks in this book, choose some of these. You’ll be hooked, and you’ll recover a lot of shots you thought were duds.

You can use Photoshop Elements Quick Fix mode as one-stop-shopping for all the commands in the Enhance menu. You can get there by clicking the Edit button on the Welcome screen or by choosing Editor, Quick Fix button at the top right of the Organizer window.
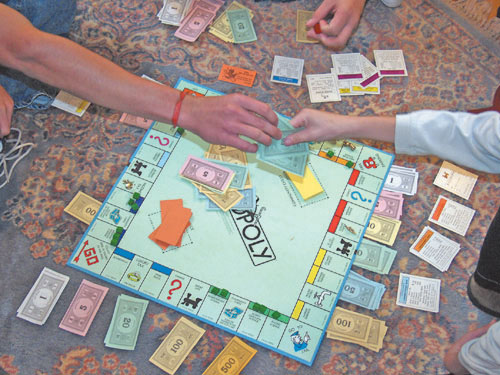
![]() With the picture you want to fix open in the Editor, click the Quick button at the top of the Palette Bin.
With the picture you want to fix open in the Editor, click the Quick button at the top of the Palette Bin.
![]() Click the disclosure triangle for the section you want to use (such as Lighting).
Click the disclosure triangle for the section you want to use (such as Lighting).
![]() Click an Auto button (such as the one for Levels) to adjust the image; Levels adjusts the picture’s balance of dark and light areas.
Click an Auto button (such as the one for Levels) to adjust the image; Levels adjusts the picture’s balance of dark and light areas.
![]() If you don’t like the changes Elements makes, click Reset to restore the image to its original state.
If you don’t like the changes Elements makes, click Reset to restore the image to its original state.
NOTE
Auto and Semi-Auto Fixes
Any of the Auto adjustments require just a single click of the button. If you want more control over the changes being made to your image, you can use the sliders to determine the amount of modification made to lighting and color and the amount of sharpening (see the next task).
Don’t think of any photo-fixing decisions you make as mistakes, for two good reasons: You can always undo them, and experimenting is the only way to learn what works and what doesn’t. So, click away—you have nothing to lose but playtime!
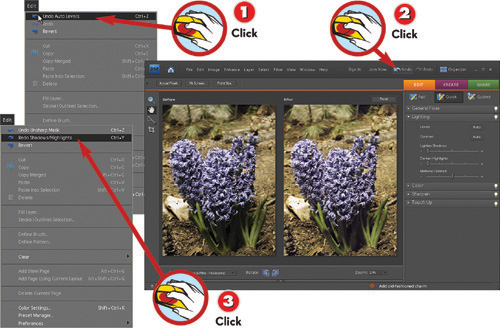
![]() Immediately after making any change to the picture in the Editor, choose Edit, Undo, or press Ctrl+Z.
Immediately after making any change to the picture in the Editor, choose Edit, Undo, or press Ctrl+Z.
![]() To undo the next-most-recent change, click the Undo button (or press Ctrl+Z) again.
To undo the next-most-recent change, click the Undo button (or press Ctrl+Z) again.
![]() To reapply the last change you undid, choose Edit, Redo (or press Ctrl+Y) before you do anything else.
To reapply the last change you undid, choose Edit, Redo (or press Ctrl+Y) before you do anything else.
TIP
Other Ways to Undo
If you want to see everything you’ve done to an image before you start undoing, you can use the Undo and Redo buttons, or open the Undo History palette (choose Window, Undo History). Right-click the step you want to undo, and choose Delete (subsequent steps are deleted, too).
TIP
Canceling All Changes
To undo all your changes during a session—before you save—choose Edit, Revert. The last saved version of the file appears in the active image area.
Photoshop Elements Lighting Quick Fixes are designed to fix images that are too light, too dark, or too grayish. You can bring out shadow detail, tone down harsh highlights, and improve a picture’s overall contrast.
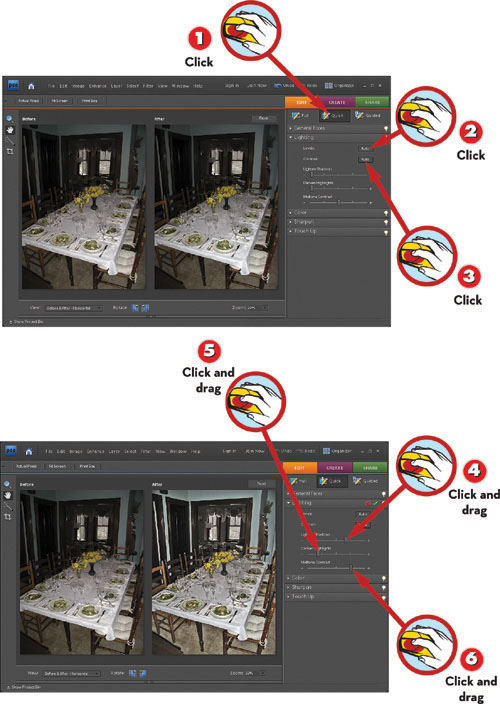
![]() With the picture you want to fix open in the Editor, click the Quick button at the top of the Palette Bin.
With the picture you want to fix open in the Editor, click the Quick button at the top of the Palette Bin.
![]() To have Photoshop Elements even out the dark and light areas in the image, click the Auto Levels button in the Lighting area.
To have Photoshop Elements even out the dark and light areas in the image, click the Auto Levels button in the Lighting area.
![]() To have Photoshop Elements adjust the image’s contrast, click the Auto Contrast button.
To have Photoshop Elements adjust the image’s contrast, click the Auto Contrast button.
NOTE
Fully Automatic
The Quick Fix Auto buttons for lighting duplicate the function of the Enhance menu commands Auto Levels and Auto Contrast. You can also use keyboard shortcuts for these functions; press Shift+Ctrl+L for Auto Levels or Alt+Shift+Ctrl+L for Auto Contrast.
TIP
What’s in Your Toolbox?
When you’re in Quick Fix mode, your toolbox is limited to just a few tools: the Zoom tool, the Hand tool, the Magic Selection tool, and the Crop tool. If you need to use tools that aren’t available, switch to Full Edit mode by clicking the Full button at the top of the Palette Bin.
![]() To lighten the darkest areas of the picture, click and drag the Lighten Shadows slider.
To lighten the darkest areas of the picture, click and drag the Lighten Shadows slider.
![]() To darken the brightest areas of the picture, click and drag the Darken Highlights slider.
To darken the brightest areas of the picture, click and drag the Darken Highlights slider.
![]() To adjust the image’s overall contrast yourself, click and drag the Midtone Contrast slider left or right.
To adjust the image’s overall contrast yourself, click and drag the Midtone Contrast slider left or right.
NOTE
Just the Highlights
To adjust an image’s shadows and highlights in Full Edit mode, choose Enhance, Lighting, Shadows/Highlights. The sliders in this dialog are the same as the ones in the Lighting area of the Palette Bin when you’re in Quick Fix mode.
In the Color section of the Quick Fix mode’s Palette Bin, you’ll find tools to repair images whose colors are off and even ones that are too colorful or not colorful enough. Try the Auto buttons first. If you don’t get the result you’re looking for, undo and see what you can do with the four different sliders.
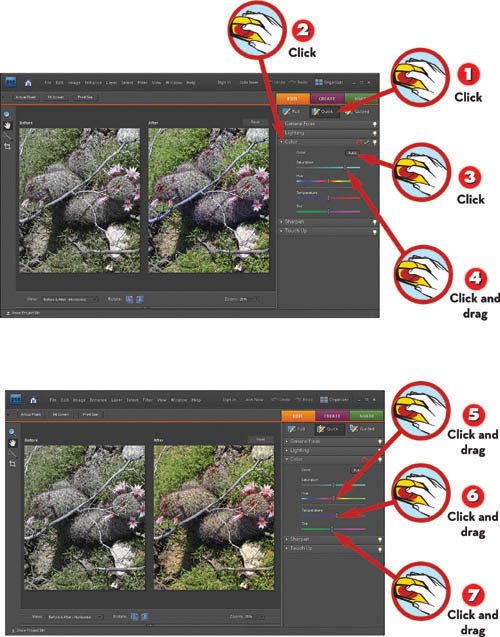
![]() With the picture you want to fix open in the Editor, click the Quick button at the top of the Palette Bin.
With the picture you want to fix open in the Editor, click the Quick button at the top of the Palette Bin.
![]() Click the triangle to reveal the contents of the Color palette.
Click the triangle to reveal the contents of the Color palette.
![]() To have Photoshop Elements fix the picture’s color, click the Auto Color button in the Color area.
To have Photoshop Elements fix the picture’s color, click the Auto Color button in the Color area.
![]() To make the colors more or less vivid, click and drag the Saturation slider.
To make the colors more or less vivid, click and drag the Saturation slider.
NOTE
Polyunsaturated Colors
The term saturation refers to the intensity of a color. A completely desaturated color is gray, white, or black.
TIP
The Two T’s
You’ll find the Tint and Temperature sliders in the Lighting area especially useful for adjusting older photos that have color-shifted over the years, as well as photos taken under artificial lighting.
![]() To modify the hues in the picture, click and drag the Hue slider left or right.
To modify the hues in the picture, click and drag the Hue slider left or right.
![]() To make the image appear cooler (more blue) or warmer (more red), click and drag the Temperature slider.
To make the image appear cooler (more blue) or warmer (more red), click and drag the Temperature slider.
![]() To compensate for a green cast or a pink cast, click and drag the Tint slider right or left, respectively.
To compensate for a green cast or a pink cast, click and drag the Tint slider right or left, respectively.
NOTE
It’s All About Skin
When you’re adjusting color, don’t forget to look at the whole image, and concentrate particularly on skin tones. People notice oddities in these parts of a picture more than anywhere else. If you find that you need to adjust color differently in different parts of the picture, switch to Full Edit mode and select each part of the image to work on in turn.
Most Quick Fixes are applied to the entire image. The tools in the Touch Up area, however, make it possible for you to apply a fix to a specific area. You can remove red eye, whiten teeth, make the gray sky blue, or even turn part of an image grayscale to give the color areas greater punch.
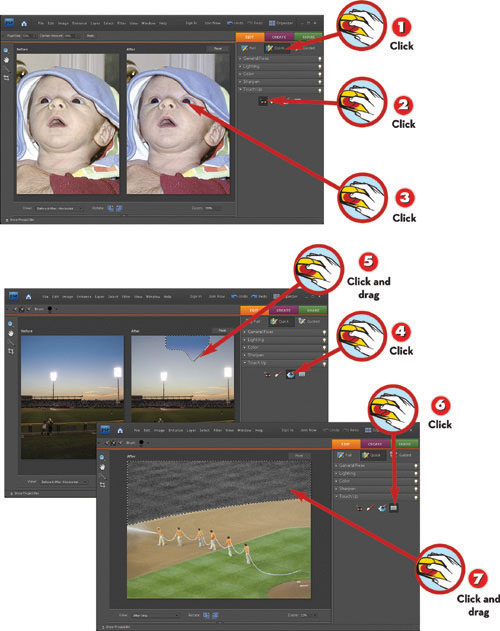
![]() With the picture you want to fix open in the Editor, click the Quick button at the top of the Palette Bin.
With the picture you want to fix open in the Editor, click the Quick button at the top of the Palette Bin.
![]() Click the Red Eye Removal tool in the Touch Up area.
Click the Red Eye Removal tool in the Touch Up area.
![]() Click the eyes in the After view of the image to remove the red eye effect.
Click the eyes in the After view of the image to remove the red eye effect.
NOTE
What You Want to See
When you’re working in Quick Fix mode, you can choose which versions of the picture display onscreen. From the View menu at the bottom of the Palette Bin, choose one of the following: After Only, Before Only, Before & After - Horizontal, Before & After - Vertical.
![]() Click the Whiten Teeth tool or the Blue Skies tool.
Click the Whiten Teeth tool or the Blue Skies tool.
![]() Click and drag over teeth to make them whiter or the sky to make it more intensely blue.
Click and drag over teeth to make them whiter or the sky to make it more intensely blue.
![]() Click the Black and White tool.
Click the Black and White tool.
![]() Click and drag over any part of the image to convert that area to grayscale with high contrast.
Click and drag over any part of the image to convert that area to grayscale with high contrast.
NOTE
Available 24/7
Several useful functions are always available at the bottom of the Quick Fix window, no matter which tool is active. Along with the View menu options, you’ll also find the Rotate Left and Rotate Right buttons and a Zoom percentage field—enter a number to zoom in or out to that view.
TIP
Booming and Zooming
To zoom in and out, switch to the Zoom tool and click in the image on the object on which you want to focus. To switch from zooming in to zooming out, click the Minus button in the options bar, then click the Plus button to switch back.
When an image is just a bit out of focus, sometimes you can save it with a judicious application of sharpening. First, try the Sharpen Quick Fix’s Auto button, which enables Photoshop Elements to determine automatically how much sharpening to apply. If you don’t like the results, undo or click the Cancel button and try dragging the Sharpen Amount slider.
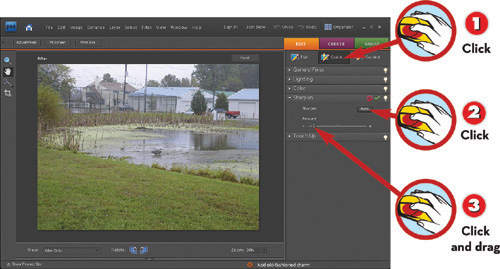
![]() With the picture you want to fix open in the Editor, click the Quick button at the top of the Palette Bin.
With the picture you want to fix open in the Editor, click the Quick button at the top of the Palette Bin.
![]() To have Photoshop Elements sharpen the image, click the Auto Sharpen button.
To have Photoshop Elements sharpen the image, click the Auto Sharpen button.
![]() To adjust the amount of sharpening yourself, click and drag the Amount slider until the picture looks clear but not grainy.
To adjust the amount of sharpening yourself, click and drag the Amount slider until the picture looks clear but not grainy.
TIP
Look Sharp
If you want more control over the sharpening procedure, choose Enhance, Adjust Sharpness. This command enables you to control the amount and intensity of sharpening very precisely.
One hallmark of a skilled photographer is pleasing composition, or arrangement of the things you’re shooting within the picture frame. You can’t always take the time to get the composition just right. Cropping used to be one of the most common fixes made in the darkroom—now you can do it with the lights on.
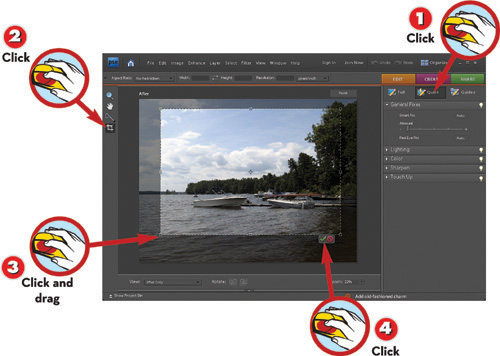
![]() With the picture you want to fix open in the Editor, click the Quick button at the top of the Palette Bin.
With the picture you want to fix open in the Editor, click the Quick button at the top of the Palette Bin.
![]() Choose the Crop tool from the toolbox, or press C.
Choose the Crop tool from the toolbox, or press C.
![]() With your picture open in the Editor, drag a corner of the cropping box to indicate the new framing.
With your picture open in the Editor, drag a corner of the cropping box to indicate the new framing.
![]() Click the Commit button near the cropping marquee (or press Enter on the keyboard) to accept the change.
Click the Commit button near the cropping marquee (or press Enter on the keyboard) to accept the change.
TIP
Adjusting Width and Height
After step 1, type a width and height in the options bar to match the proportions (type 5 for width and 7 for height for a 5 × 7 print). Or, press Shift while you drag to force a perfectly square selection.
Automatic straightening works best when the subject is just slightly out of alignment—a flagpole that appears to be leaning, for example. Photoshop Elements finds a strong vertical or horizontal line in the image and aligns the image by matching that line with the nearest 90° angle.
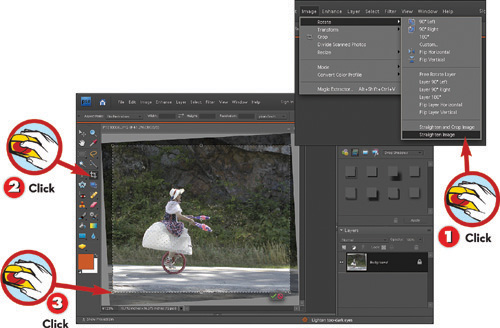
![]() With the picture open in the Editor, choose Image, Rotate, Straighten Image. Photoshop Elements aligns the image.
With the picture open in the Editor, choose Image, Rotate, Straighten Image. Photoshop Elements aligns the image.
![]() Click the Crop tool in the toolbox, or press C.
Click the Crop tool in the toolbox, or press C.
![]() Crop the photo to remove the white edges.
Crop the photo to remove the white edges.
TIP
Severely Off-Angle?
If the subject is severely off-angle, use one of the Image, Rotate or Image, Transform commands instead; turn to Part 6, “Using Layers to Combine Photos and Artwork,” for help.
Like film cameras, digital cameras take all pictures in landscape orientation—with the long side of the frame horizontal. To take a portrait, you must physically rotate the camera. The most common reason to rotate an image in Photoshop Elements is so that you can view it correctly for editing and printing.
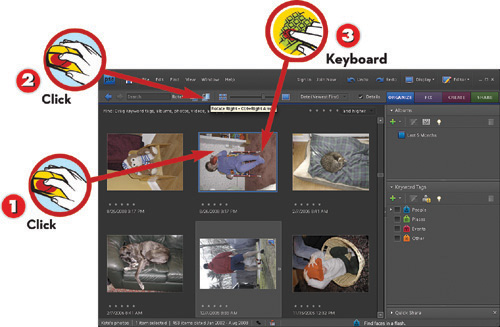
![]() In the Organizer, click the thumbnail of the picture you want to rotate.
In the Organizer, click the thumbnail of the picture you want to rotate.
![]() Click the Rotate Left or the Rotate Right button in the options bar.
Click the Rotate Left or the Rotate Right button in the options bar.
![]() Press Ctrl-I to open the file for editing.
Press Ctrl-I to open the file for editing.
TIP
Quick and Easy Rotation
This method of rotating a picture has the same effect as choosing one of the Image, Rotate commands from the menu bar. But you’ll find it’s more convenient for quickly rotating all your portrait shots. If you click multiple thumbnails before you do step 2, you can apply the same rotation to multiple shots with a single command.
Graphic artists call this type of rotation a Dutch angle. Perhaps the most familiar example is the nightclub poster with rotated glamour portraits of the performers. It’s a great technique for adding flair to greeting cards and family Web pages.
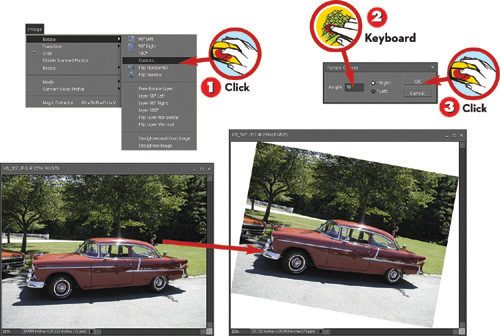
![]() With the picture open in the Editor’s Full Edit mode, choose Image, Rotate, Custom.
With the picture open in the Editor’s Full Edit mode, choose Image, Rotate, Custom.
![]() In the Rotate Canvas dialog, type a rotation angle in degrees (clockwise from 12 o’clock, or click Left for counterclockwise rotation).
In the Rotate Canvas dialog, type a rotation angle in degrees (clockwise from 12 o’clock, or click Left for counterclockwise rotation).
![]() Click OK.
Click OK.
NOTE
Auto-Adjust Canvas Size
Photoshop Elements automatically increases the canvas size to create a frame large enough to hold the rotated picture without reducing the image size. The area outside the picture is the current background color.
TIP
Continuous Rotation
You can choose Image, Rotate, Free Rotate Layer and drag a corner to rotate the image continuously. However, this method doesn’t increase canvas size, so the picture is cropped. If you apply this command to a background layer, Photoshop Elements asks if you want to convert it to a layer; click OK.
Digital photos are composed of a finite number of pixels. Resizing and resampling often go hand in hand: If you increase the size of an image, the result can look coarse unless you resample it to increase the resolution. If you reduce the image size, it decreases the resolution, resulting in a smaller file size.
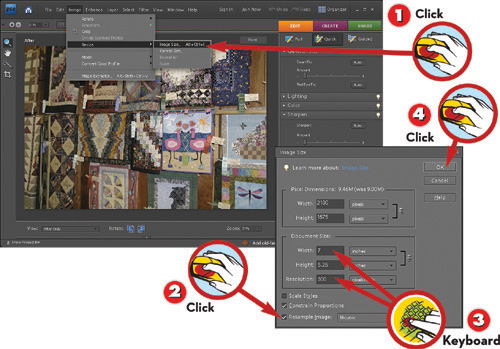
![]() With a picture open in the Editor, choose Image, Resize, Image Size.
With a picture open in the Editor, choose Image, Resize, Image Size.
![]() Click Resample Image.
Click Resample Image.
![]() Type a new width in either Width field and a new value in the Resolution field.
Type a new width in either Width field and a new value in the Resolution field.
![]() Click OK.
Click OK.
NOTE
Enter Width or Height
In step 3, enter width or height, but not both. If you enter one, the program calculates the other so that the image isn’t distorted. The Resolution value should be 72 for email or the Web, 150– 300 for making prints with a color inkjet printer.
Damage to old photos is a fact of life—but fortunately, it’s one that’s easy for Photoshop Elements to deal with. If your scanned photo shows rips or scratches—in this example, there seems to have been a light leak when the original print was developed—you can restore the parts of the image that have been obscured. You just have to take it slow and easy.
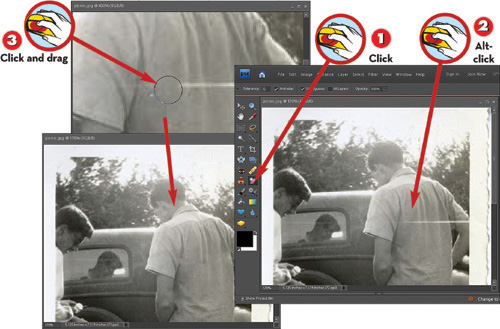
![]() With an image open in the Editor’s Full Edit mode, choose the Healing Brush tool from the toolbox.
With an image open in the Editor’s Full Edit mode, choose the Healing Brush tool from the toolbox.
![]() Press Alt as you click a clear area that matches the area you want to fix.
Press Alt as you click a clear area that matches the area you want to fix.
![]() Click and drag over the area you want to remove from the image.
Click and drag over the area you want to remove from the image.
NOTE
Know Your Tools
The Healing Brush works well for areas of relatively similar color and texture. If you need to fill in a more varied area, try using the Clone Stamp. Use several short strokes to blend the pixels in neatly.
NOTE
More Removal Magic
Turn to “Removing Blemishes,” p. 143, to learn more about using the Healing Brush and its sibling, the Spot Healing Brush.
The infamous red eye effect happens when the flash is mounted on or built in to the camera and the subject is looking directly into the lens. The retina of the eye bounces the light right back. Take these steps to dispel those smoldering looks.
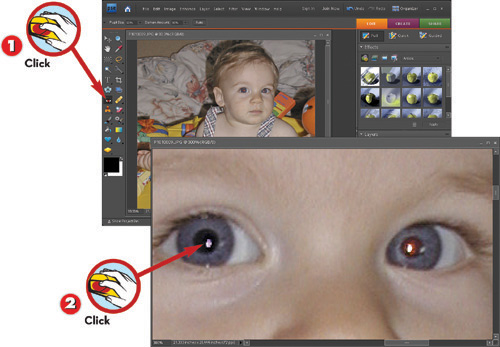
![]() With the photo that needs fixing open in the Editor’s Full Edit mode, choose the Red Eye Removal tool, or press Y.
With the photo that needs fixing open in the Editor’s Full Edit mode, choose the Red Eye Removal tool, or press Y.
![]() Click the red area in the photo to indicate the color you want to remove.
Click the red area in the photo to indicate the color you want to remove.
NOTE
Multicolored Reflections?
Remember that this command replaces only a single color. Red eye reflections may actually contain more than one shade of red. Repeat these steps for each individual color you need to remove.