Part 12 Just for Fun
It’s only after you’ve mastered a set of tools that you can begin to take real joy in using them. Then, you can let the logical, step-by-step calculating part of your brain take a back seat and let your imagination do the driving.
If you’ve worked through most, if not all, of the preceding tasks, you’re ready—and you’ve earned the right—to have some fun. Tasks in this Part are all about fooling around, experimenting, and exploring ways of manipulating electronic images like collage artists use paper cutouts and a set of paints.
There isn’t space in this little book to take you through all the things you can do with Photoshop Elements (if, with so many possible choices and combinations, it’s possible in any book). But with the basic skills you’ve picked up here, your work with this incredibly rich and flexible computer application will start to seem more like play. As you continue to explore, you’ll sweat the technical details less and less, and you’ll find a marvelous new outlet for your personal expression.
And if, perchance, some of your fantasies seem, er, just a bit bizarre—add a talk bubble or a clever caption and turn them into personalized greeting cards!

Ever wonder how to turn a simple portrait into a work of art?
Long ago, in a land far away...
Commands you might already have used for combining imagery are File, New from Clipboard; File, Import; and the pair Edit, Copy and Edit, Paste. Here’s a handy alternative, a quicker way to insert artwork from an external file that’s in one of the other Adobe formats (.ai, .eps, .pdf, or .pdp extensions).
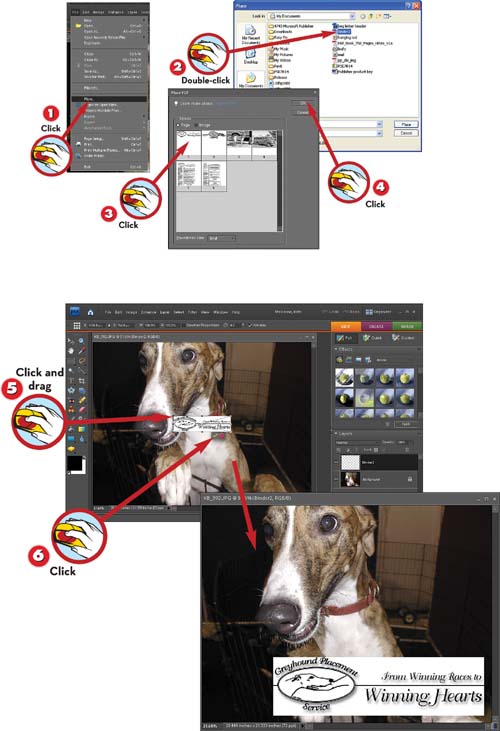
![]() With a background image in the active image area, choose File, Place.
With a background image in the active image area, choose File, Place.
![]() Locate and double-click the file that contains the artwork (or click it and click Place).
Locate and double-click the file that contains the artwork (or click it and click Place).
![]() If the file contains multiple pages, choose the page you want to insert.
If the file contains multiple pages, choose the page you want to insert.
![]() Click OK. The artwork or page is inserted into a new layer in the active image.
Click OK. The artwork or page is inserted into a new layer in the active image.
NOTE
Missing Fonts
If you see this warning window after step 3, choose Continue, and some other fonts that are available in your computer will be substituted.

![]() Optionally, drag a handle to move or resize the artwork to fit your canvas.
Optionally, drag a handle to move or resize the artwork to fit your canvas.
![]() Click the Commit button, or press Enter.
Click the Commit button, or press Enter.
TIP
Vectors Get Rasterized
Vector graphics in the source file get simplified, or rasterized (converted to pixels), when you click Commit. The objects take on the same resolution as the target image.

Hand-painted tiles are so expensive—and you have to be a real artist to create your own. Unless, that is, you have Photoshop Elements. Here’s a quick way to turn any photograph into a pretty convincing tile mosaic.
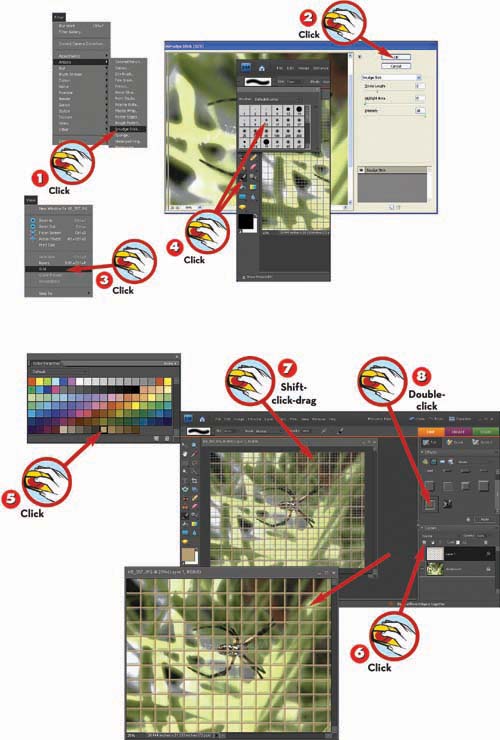
![]() With an image open in the Editor’s Full Edit mode, choose Filter, Artistic, Smudge Stick.
With an image open in the Editor’s Full Edit mode, choose Filter, Artistic, Smudge Stick.
![]() Click OK.
Click OK.
![]() Choose View, Grid.
Choose View, Grid.
![]() Choose the Brush tool and pick a small, soft brush.
Choose the Brush tool and pick a small, soft brush.
TIP
Making It Real
Mount your “tiles” on a tabletop using spray adhesive and a few coats of nonyellowing polyurethane varnish. Or, put your mosaic on a wall—but mount the paper on a thin sheet of wood first, so that you can take it with you when you move.
![]() In the Color Swatches palette (choose Window, Color Swatches if it’s not vislble), choose a foreground color for the grout between the tiles.
In the Color Swatches palette (choose Window, Color Swatches if it’s not vislble), choose a foreground color for the grout between the tiles.
![]() Click the Create New Layer button in the Layers palette, then click OK.
Click the Create New Layer button in the Layers palette, then click OK.
![]() Hold down Shift and click and drag to paint the grout lines along the grid.
Hold down Shift and click and drag to paint the grout lines along the grid.
![]() Double-click the Simple Sharp Pillow Emboss style in the Effects palette.
Double-click the Simple Sharp Pillow Emboss style in the Effects palette.
NOTE
Get Creative!
Try any filter or combination of filters in step 1—you don’t have to use Smudge Stick. You can also adjust the grout width (choose a different brush size).
Sometimes, no matter how great your camera is, its viewfinder just can’t contain the whole picture. When you want to show an image that’s wider than your camera’s image area, you need to create a panorama. Photoshop Elements has the smarts to blend the edges of several scenic photos seamlessly into one gorgeous panorama.
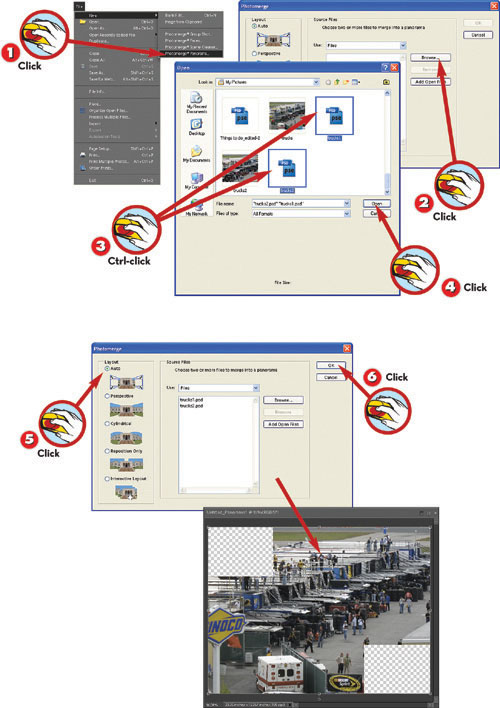
![]() With all files closed, choose File, New Photomerge® Panorama.
With all files closed, choose File, New Photomerge® Panorama.
![]() Click Browse.
Click Browse.
![]() Ctrl-click two or more images to combine.
Ctrl-click two or more images to combine.
![]() Click OK.
Click OK.
TIP
Pan Your Snaps
Shots must be adjacent so their edges align: Mount the camera on a tripod. Take your source photos all at the same vertical angle, panning from left to right, so that the edges overlap the scene.

![]() Choose a layout option. (Auto is usually the best choice.)
Choose a layout option. (Auto is usually the best choice.)
![]() Click OK.
Click OK.
TIP
Photomerge Options
Perspective can heighten the panoramic effect. Cylindrical emphasizes curvature. Reposition only doesn’t adjust perspective at all, just image rotation and size. Using Interactive Layout, you can drag the photos into the correct relative positions yourself.
Rubber stamps are just plain fun to play with, especially once you get into all the fancy inks, embossing powders, and the like. And with Photoshop Elements, you’re not restricted to the stamps you find at the store—you can make your own.
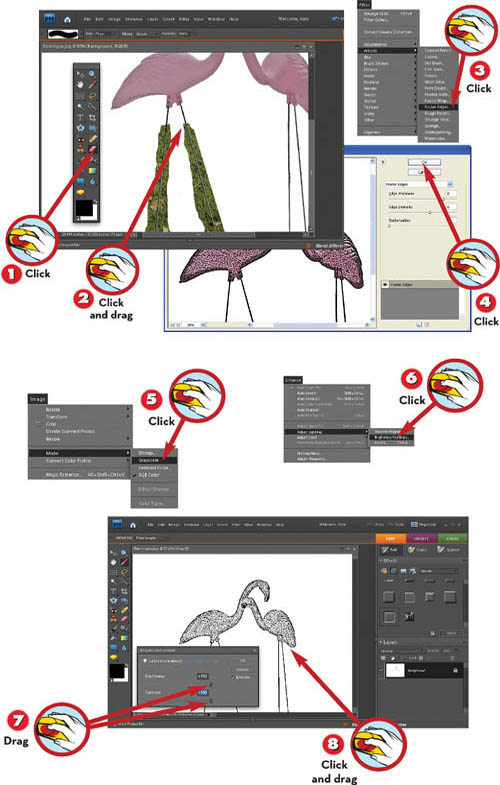
![]() With an image open, choose the Eraser tool.
With an image open, choose the Eraser tool.
![]() Click and drag to erase the image’s background, leaving only the portion you want to be the stamp.
Click and drag to erase the image’s background, leaving only the portion you want to be the stamp.
![]() Choose Filter, Artistic, Poster Edges.
Choose Filter, Artistic, Poster Edges.
![]() Adjust the settings so the areas that will be the stamp are black; then click OK.
Adjust the settings so the areas that will be the stamp are black; then click OK.
TIP
Contrast Is the Key
For the best results, choose a picture of an object against a contrasting background. It helps if there’s some contrast within the object’s outlines, too, unless it’s recognizable merely from its silhouette.
NOTE
From Concept to Reality
When your artwork is ready, convert it into a rubber stamp by using the services of Create a Stamp (www.createastamp.com), The Stampin’ Place (www.stampin.com), Simon’s Stamps (www.simonstamp.com), or other specialists.
![]() Choose Image, Mode, Grayscale, then click OK.
Choose Image, Mode, Grayscale, then click OK.
![]() Choose Enhance, Adjust Lighting, Brightness/Contrast.
Choose Enhance, Adjust Lighting, Brightness/Contrast.
![]() Drag both sliders all the way to the right and click OK.
Drag both sliders all the way to the right and click OK.
![]() Click and drag the Eraser tool to clean up around the stamp’s edges if necessary.
Click and drag the Eraser tool to clean up around the stamp’s edges if necessary.
TIP
Lighten Up
After step 5, if your picture has a lot of dark gray in areas that you want white, choose Enhance, Adjust Lighting, Levels, and drag the middle slider to the left to lighten the midtones so that they’ll drop out to white in step 7.
Of course, “antique” is relative to your age—or the ages of the relatives you want to transform. In this case, decreasing the saturation setting creates a look of old, faded Kodachrome. Adding Film Grain enhances the realism, and the Feather effect on the border adds to the impression of a faded snapshot.
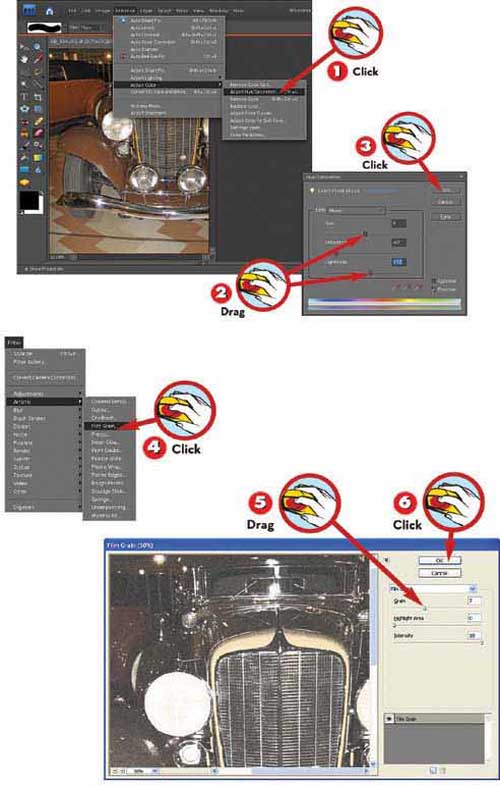
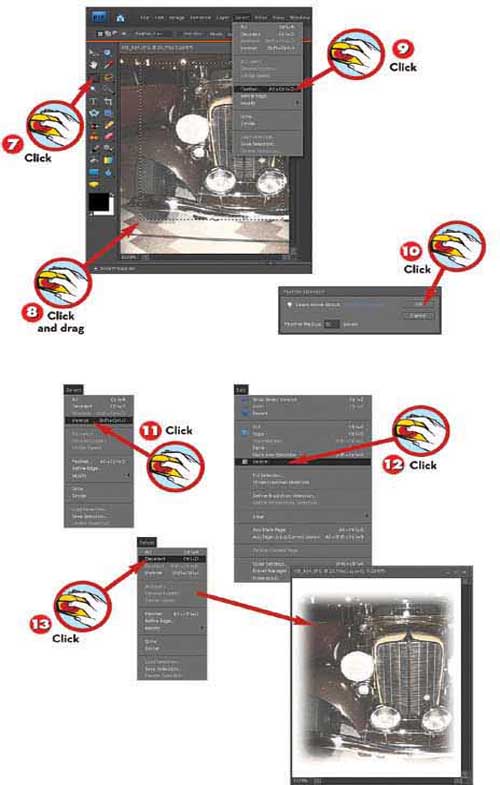
![]() With a photo in the active image window, choose Enhance, Adjust Color, Adjust Hue/Saturation.
With a photo in the active image window, choose Enhance, Adjust Color, Adjust Hue/Saturation.
![]() Drag the sliders to decrease the Saturation and adjust the Lightness as seems appropriate.
Drag the sliders to decrease the Saturation and adjust the Lightness as seems appropriate.
![]() Click OK.
Click OK.
TIP
Fading and Sepia
Decreasing Saturation can create a monochrome picture, but one that still contains color information. You can then apply Color Variations to get a sepia effect. By contrast, choosing Image, Mode, Grayscale discards all color.
TIP
Remove Color Command
An alternative conversion to grayscale that still preserves color information is the command Enhance, Adjust Color, Remove Color, which makes red, green, and blue values equal and reduces Saturation to zero.
![]() Choose Filter, Artistic, Film Grain.
Choose Filter, Artistic, Film Grain.
![]() Drag the sliders to adjust the effect, such as increasing the Grain size.
Drag the sliders to adjust the effect, such as increasing the Grain size.
![]() Click OK.
Click OK.
TIP
Film Grain
This same type of filter can be applied in the Adobe After Effects application to make your DV movies look like film.

![]() Choose the Rectangular Marquee tool, or press M.
Choose the Rectangular Marquee tool, or press M.
![]() Click and drag to size a border around the picture.
Click and drag to size a border around the picture.
![]() Choose Select, Feather.
Choose Select, Feather.
![]() Enter a Feathering value and click OK.
Enter a Feathering value and click OK.
TIP
Feather Radius
In step 10, remember that the size of the Feather effect is proportional to Image Size in pixels. For example, you may have to increase the Radius value to make the effect more obvious.

![]() Choose Select, Inverse, or press Shift+Ctrl+I.
Choose Select, Inverse, or press Shift+Ctrl+I.
![]() Choose Edit, Delete.
Choose Edit, Delete.
![]() Choose Select, Deselect, or press Ctrl+D.
Choose Select, Deselect, or press Ctrl+D.
TIP
Experiment!
This kind of experimentation with Photoshop Elements can bring into play any and all the techniques you’ve learned in this book. Have fun!

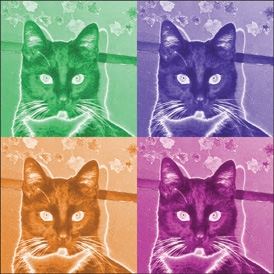
The biggest advantage of digital photo editing is that you can try dozens, hundreds, or even thousands of variations on a theme for each photo. And putting a few variations together in a collage format just happens to be a recognized art technique, one made famous by none other than Andy Warhol. Give it a try!
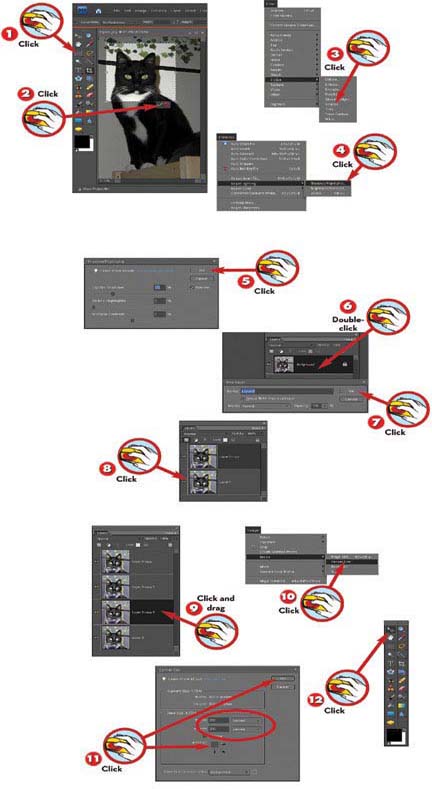
![]() With an image open in the Editor’s Full Edit mode, switch to the Crop tool and Shift-drag in the image to draw a square cropping marquee.
With an image open in the Editor’s Full Edit mode, switch to the Crop tool and Shift-drag in the image to draw a square cropping marquee.
![]() Click the Commit button below the cropping marquee.
Click the Commit button below the cropping marquee.
![]() Choose Filter, Stylize, Solarize.
Choose Filter, Stylize, Solarize.
![]() Choose Enhance, Adjust Lighting, Shadows/Highlights.
Choose Enhance, Adjust Lighting, Shadows/Highlights.
TIP
More Options
You don’t have to be restricted to different color schemes for your variations. Try applying different Artistic filters. Or line up several copies of an image in a row and make each copy a bit lighter or a bit darker than the one next to it.

![]() In the Layers palette, double-click the Background.
In the Layers palette, double-click the Background.
![]() Click OK.
Click OK.
![]() Drag Layer 0 onto the Create Layer button to duplicate it.
Drag Layer 0 onto the Create Layer button to duplicate it.
NOTE
Separation of Layers
Putting each copy of the image on its own layer makes moving it around and applying color changes to it easy.
TIP
Test Run
Make sure the picture you use has strong enough lines that you’ll still be able to tell what it is after you run the Solarize filter. If you’re not sure, test it by choosing Filter, Stylize, Solarize before you spend any time cropping it.
![]() Repeat step 8 twice to create a total of four layers in the image.
Repeat step 8 twice to create a total of four layers in the image.
![]() Choose Image, Resize, Canvas Size.
Choose Image, Resize, Canvas Size.
![]() Click the upper-left corner of the proxy grid and set the Width and Height to 200%; then click OK.
Click the upper-left corner of the proxy grid and set the Width and Height to 200%; then click OK.
![]() Choose the Move tool.
Choose the Move tool.
TIP
A Prerequisite
To select each layer with the Move tool, Auto Select Layer must be checked in the options bar.

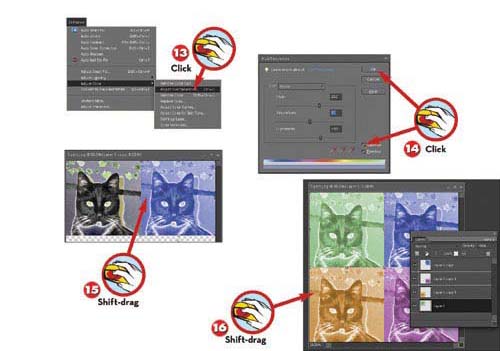
![]() Click in the upper-left corner of the image and choose Enhance, Adjust Color, Adjust Hue/Saturation.
Click in the upper-left corner of the image and choose Enhance, Adjust Color, Adjust Hue/Saturation.
![]() Click Colorize and drag the sliders until you like the image’s color; then click OK.
Click Colorize and drag the sliders until you like the image’s color; then click OK.
![]() Shift-drag the picture to the right side of the window.
Shift-drag the picture to the right side of the window.
![]() Repeat steps 13–15 to move the other picture duplicates to the bottom corners of the window and colorize them with different colors.
Repeat steps 13–15 to move the other picture duplicates to the bottom corners of the window and colorize them with different colors.
NOTE
Enlarging Your Color Palette
In step 14, you can adjust the Saturation and Lightness sliders. Leaving these settings the same for all four images provides a more consistent look, but varying them enables you to use a wider range of colors and tints.