Part 5 Adding Titles and Text
Printing text on your photos can turn your digital snapshots into greeting cards, invitations, postcards, or posters. An interesting photo with a caption can be a news item for a community newsletter or family Website. And, even if you don’t aspire to craft your own greetings or write your own news, including captions in your picture files is a much better way of identifying and describing your photos than writing on the back of the prints.
As you gain skill working with text, you’ll want the flexibility of keeping different pieces of text on separate layers, which work like clear sheets of plastic you can draw on. Layers permit you to add text and artwork without making any permanent changes to the underlying image. So be sure to take a look at the tasks in Part 6, “Using Layers to Combine Photos and Artwork.”
Don’t worry; none of this is complicated. Photoshop Element’s built-in features help you create professional-looking output, whether it be for a Website or picture postcard, without having to sweat the technical details.

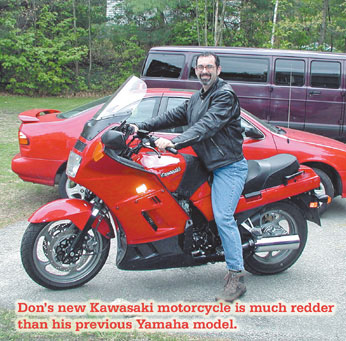
Adding a caption can give a photo “news value.”
Why not think of your life as a game–and you’re the star!
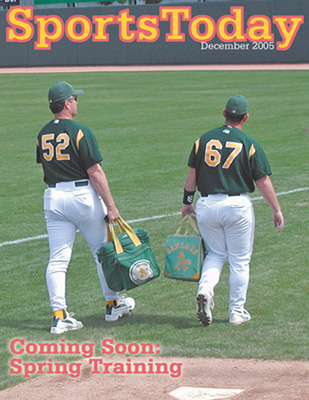
This method of adding a caption to a photo stores the text information with the image file. When you check the Caption check box in the Print Preview dialog box, your photo prints with the caption outside the image area, centered beneath it.
![]() With the Editor in Full Edit mode and an image open, choose File, File Info.
With the Editor in Full Edit mode and an image open, choose File, File Info.
![]() Type a descriptive caption in the Caption text field.
Type a descriptive caption in the Caption text field.
![]() Click OK.
Click OK.
![]() Choose File, Print.
Choose File, Print.
NOTE
Dear Diary...
In step 2, the Caption text field can hold about 25 double-spaced pages. That’s enough to paste a whole text document from the Clipboard. You could use it to hold your journal entries from a trip, for example.
NOTE
Title and Author Boxes
You can also type entries into the Document Title and Author boxes seen on the File Info dialog. However, only the Caption field is printed by this procedure.
![]() Check the Caption check box.
Check the Caption check box.
![]() Click Print.
Click Print.
![]() Click Print in the Print dialog box.
Click Print in the Print dialog box.
TIP
Fitting on the Page
If you haven’t sized the image to fit the canvas and the canvas to the paper size, choose Fit on Page from the Print Size pop-up menu in the Print Preview dialog box. Photoshop Elements will fit to the paper size chosen for the printer.

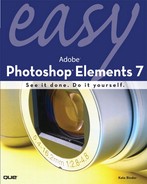
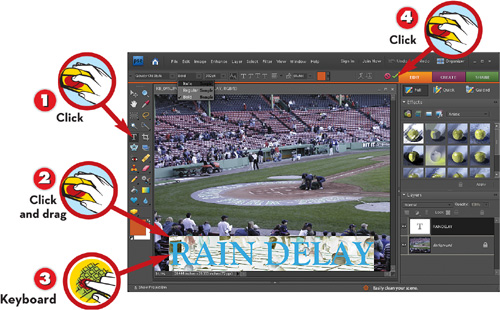
Here’s the direct approach—just type over an image anywhere you want. You can press Enter between typing multiple lines in the same block of text, or you can click the Commit button, and then repeat these steps to create a separate block that you can move and work with independently.

![]() With the Editor in Full Edit mode and an image open, choose the Horizontal Type tool.
With the Editor in Full Edit mode and an image open, choose the Horizontal Type tool.
![]() Click the position in the image where you want the text to begin.
Click the position in the image where you want the text to begin.
![]() Type a line of text. To start a second line, press Enter and keep typing.
Type a line of text. To start a second line, press Enter and keep typing.
NOTE
Alignment Options
The starting point for the text line in step 2 depends on the current Alignment setting in the options bar (Left Align, Centered, or Right Align).
In addition to point text (click and type), Photoshop Elements enables you to create paragraph text. This text stays within the bounding box you specify, wrapping to the next line whenever it hits the right margin. In every other way, paragraph text is just like point text, and you can edit it the same way.
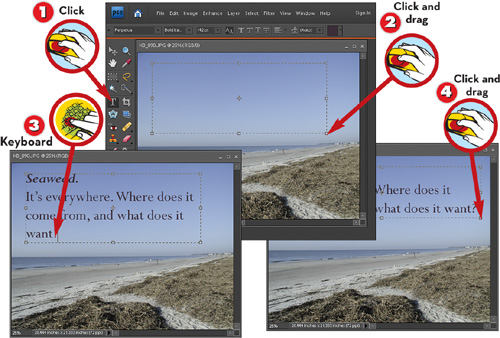
![]() Switch to the Horizontal Type tool.
Switch to the Horizontal Type tool.
![]() Click and drag in the photo to define the area you want the type to occupy.
Click and drag in the photo to define the area you want the type to occupy.
![]() Enter your text.
Enter your text.
![]() With the Type tool still active, click and drag a corner handle to reshape the type’s bounding box.
With the Type tool still active, click and drag a corner handle to reshape the type’s bounding box.
NOTE
When and Why
Use paragraph text when you’re adding more than just a few words of text and when the precise place where each new line begins isn’t important to you.
Before you can edit text, you must first highlight the letters you want to replace. This works just the same way it does in your favorite word processor: Click and drag across the text you want to select.
![]() Choose the Horizontal Type tool.
Choose the Horizontal Type tool.
![]() Click and drag over the characters you want to replace.
Click and drag over the characters you want to replace.
![]() Type the replacement characters.
Type the replacement characters.
![]() Click the Commit button in the options bar.
Click the Commit button in the options bar.
TIP
Inserting Characters
To add one or more characters to your text, rather than replace some, click at the insertion point in step 2 and type.
Words or even individual characters can have different properties, such as color or font, than adjacent characters in the same block.
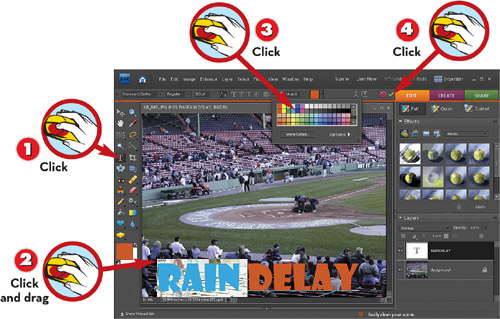
![]() Choose the Horizontal Type tool.
Choose the Horizontal Type tool.
![]() Click and drag over the characters you want to change.
Click and drag over the characters you want to change.
![]() Choose new text properties from the pop-up menus in the options bar, such as Color.
Choose new text properties from the pop-up menus in the options bar, such as Color.
![]() Click the Commit button in the options bar.
Click the Commit button in the options bar.
NOTE
Text Properties
Settings for all text properties become available in the options bar when a text object is selected in the Editor.
Oh, those wacky relatives and the wild things they say! A talk bubble can add a whimsical touch to your greeting cards and email. It’s actually just one of many shapes that Photoshop Elements can draw so that you don’t have to create them freehand.
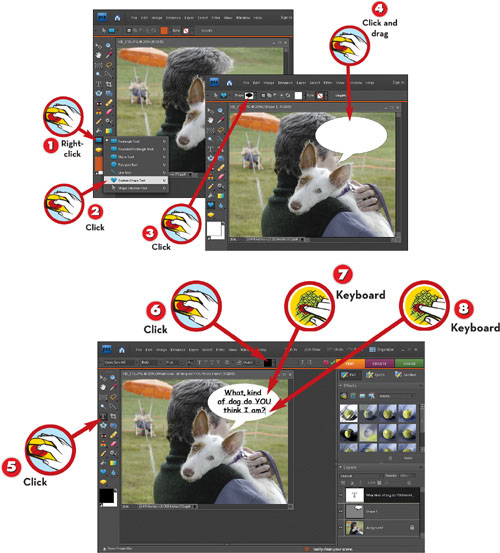
![]() Right-click the Rectangle tool.
Right-click the Rectangle tool.
![]() Choose the Custom Shape tool.
Choose the Custom Shape tool.
![]() Choose the talk bubble shape in the options bar and set the Color pop-up menu to White.
Choose the talk bubble shape in the options bar and set the Color pop-up menu to White.
![]() Click and drag to resize the shape in the image area.
Click and drag to resize the shape in the image area.
TIP
Hearts and Flowers
The talk bubble—or speech balloon—is just one of an assortment of custom shapes. To pick one, after choosing the Custom Shape tool, choose the Shape pop-up menu in the options bar.
NOTE
Oh, By the Way
After you create the talk bubble and the text, you’ll need to resize and position the text to fit correctly within the bounds of the bubble.
![]() Choose the Horizontal Type tool.
Choose the Horizontal Type tool.
![]() Choose a color from the Color pop-up menu in the options bar.
Choose a color from the Color pop-up menu in the options bar.
![]() Click inside the talk bubble and type some text.
Click inside the talk bubble and type some text.
![]() Press Enter on the numeric keypad when you have finished typing the text.
Press Enter on the numeric keypad when you have finished typing the text.
TIP
Don’t See a Talk Bubble?
The toolbar shows the Custom Shape tool you used last. If the talk bubble isn’t there, choose the Custom Shape tool and choose the shape you want from the Shape box in the options bar.
You can apply layer styles in the Effects palette to a selected type layer with a simple double-click. If Photoshop Elements didn’t include these “canned” effects, you’d have to be a skilled graphic artist (and it would take a lot more work) to reproduce them.
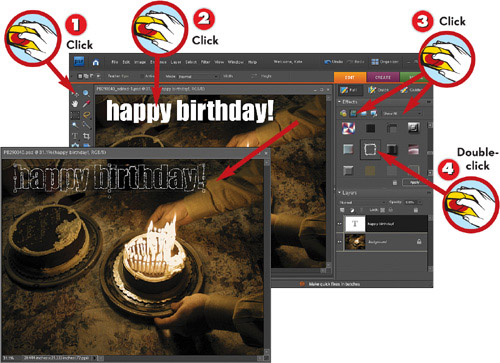
![]() Choose the Move tool, or press V.
Choose the Move tool, or press V.
![]() Click the text that needs the effect. (Auto Select Layer must be checked.)
Click the text that needs the effect. (Auto Select Layer must be checked.)
![]() In the Effects palette, click the Layer Styles button, and then choose Show All from the rightmost menu.
In the Effects palette, click the Layer Styles button, and then choose Show All from the rightmost menu.
![]() Double-click the effect you want, such as Salt.
Double-click the effect you want, such as Salt.
TIP
Effects Palette Open?
To clear your work area, you might want to close or dock the Effects palette when you’re finished. If it’s not in the Palette Bin, you can always get it back by choosing Window, Effects.
NOTE
Applying Text Effects
You’ll also find a range of neat text effects in the Content palette (choose Window, Content). Choose By Type from the first pop-up menu at the top of the palette, and then choose Text from the second menu. Double-click a thumbnail to apply that effect to the selected layer.
Place a drop shadow behind text to make it appear to “pop” out from the background so that it’s more readable. This is particularly handy when the background has both light and dark areas and you can’t find a solid area to serve as a background for the text that gives enough contrast.
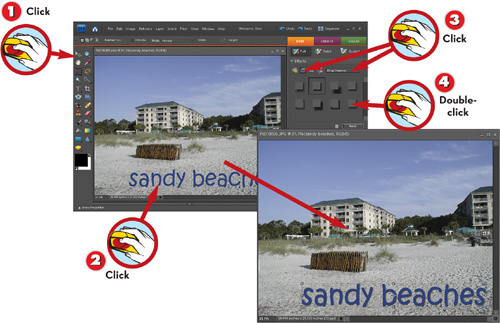
![]() Choose the Move tool, or press V.
Choose the Move tool, or press V.
![]() Click the text to which the drop shadow will be added. (Auto Select Layer must be checked.)
Click the text to which the drop shadow will be added. (Auto Select Layer must be checked.)
![]() Click the Effects palette’s Layer Styles button, and then choose Drop Shadows from the pop-up menu.
Click the Effects palette’s Layer Styles button, and then choose Drop Shadows from the pop-up menu.
![]() Double-click the drop shadow effect you want, such as Hard Edge.
Double-click the drop shadow effect you want, such as Hard Edge.
NOTE
Auto Select Layer
For step 2 to work, the Auto Select Layer box must be checked in the options bar (the usual setting). If it’s not checked, you must switch to the corresponding type layer using the Layers palette.