Part 8 Painting and Drawing
Many people think of Photoshop Elements mainly as a digital photo lab, but it’s also an art studio. So, welcome to your all-electronic work-and-play room—where you never have to wear a smock or clean a brush.
Those of you who start with a photo as a background may have a more practical purpose in mind—such as making ads and brochures. And along with adding text, combining your photos with your original artwork gives a wonderfully personal touch. Recipients of your greeting cards, party invitations, photo email, and newsletters will appreciate the care you took—even though none of this is nearly as hard as they might imagine!
Getting a bit more serious, you can also illustrate business presentations, school reports, and instructional materials with professional-looking diagrams and drawings. No more crude pencil sketches, and good-bye forever to stick figures!
But don’t stop there. Set aside a rainy weekend afternoon to discover the joy of digital painting and drawing. Vincent Van Gogh never had such a rich and varied set of tools!


This event logo was drawn and colored entirely in Photoshop Elements. Who needs paper and paints when you have pixels?
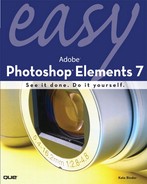
Photoshop Elements generates a variety of geometric shapes for you. Here we show drawing over an image. You can also start by choosing File, New, Blank Image to draw on a blank canvas.
![]() With an image open in the Editor’s Full Edit mode, click to choose a foreground color.
With an image open in the Editor’s Full Edit mode, click to choose a foreground color.
![]() Right-click the Shape tool and choose the shape tool you want, such as the Custom Shape tool. If you’re using the Custom Shape tool, choose the specific shape you want in the Options bar.
Right-click the Shape tool and choose the shape tool you want, such as the Custom Shape tool. If you’re using the Custom Shape tool, choose the specific shape you want in the Options bar.
![]() Click and drag in the image area to adjust the size and proportions of the shape.
Click and drag in the image area to adjust the size and proportions of the shape.
![]() To make the pixels of the shape editable, click the Simplify button.
To make the pixels of the shape editable, click the Simplify button.
TIP
Shift to Get Regular
Hold down the Shift key after you’ve started drawing to make Rectangles square, Ellipses circular. Lines follow the closest 45° angle.
New shapes can look plain and flat. Adding a bevel gives the shape a dimensional quality that can also make it stand out from the background. Photoshop Elements provides a nice selection of bevel styles that can give your object a bold, dimensional look. Just click the one you like, and it’s applied automatically.

![]() With a shape selected, click the Layer Styles button at the top of the Effects palette.
With a shape selected, click the Layer Styles button at the top of the Effects palette.
![]() Choose Bevels in the Style Libraries pop-up menu.
Choose Bevels in the Style Libraries pop-up menu.
![]() Double-click the bevel style you want to apply.
Double-click the bevel style you want to apply.
TIP
Free Samples
If you don’t like the bevel style you apply, just click another thumbnail to apply a different style—you don’t have to remove the first bevel before changing it.
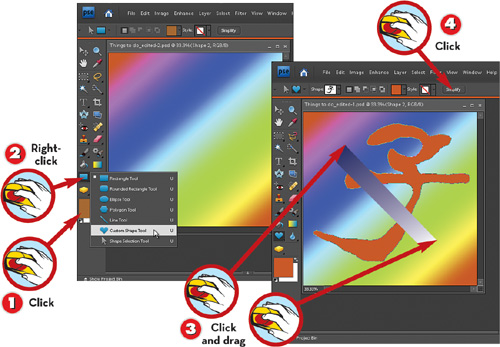
If you’ve worked through the tasks to this point, this won’t be the first time you’ve used the Paint Bucket tool. But notice how quickly and easily you can recolor a shape. Always remember that the Paint Bucket—like other painting tools—uses whatever you’ve set as the current foreground color.
![]() Having chosen the foreground color, switch to the Move tool, or press V. (Auto Select Layer must be checked.)
Having chosen the foreground color, switch to the Move tool, or press V. (Auto Select Layer must be checked.)
![]() Click to select the shape.
Click to select the shape.
![]() Switch to the Paint Bucket tool, or press K.
Switch to the Paint Bucket tool, or press K.
![]() Click inside the shape to apply the color.
Click inside the shape to apply the color.
TIP
Change the Fill Color
Before you do step 1, click the Foreground color swatch at the bottom of the toolbar and make a selection from the Color Picker.
Want to pick a color for a new shape or brush stroke that exactly matches some color in the image? The Eyedropper tool sucks up the color you click and loads it as the current foreground color. Whatever painting or drawing tool you use next applies that color.
![]() Click the Eyedropper tool, or press I.
Click the Eyedropper tool, or press I.
![]() Click a color you want to match in the image area. The Foreground color changes to the color of your sample, and you can now use it with any tool that applies color.
Click a color you want to match in the image area. The Foreground color changes to the color of your sample, and you can now use it with any tool that applies color.
TIP
Changing Sample Size
Before step 2, you can choose 3 by 3 Average or 5 by 5 Average on the Options bar to set the number of pixels in the area the Eyedropper will sample. (It’s an average, so the resulting color may be a blend of the sampled pixels.)
If you’ve ever browsed through color swatches at the paint store, you know how handy it can be to see a coordinated set of choices. It’s generally quicker and easier to make a choice from preset color swatches than to use the Color Picker (which, for most folks, has way too many).

![]() Choose Window, Color Swatches.
Choose Window, Color Swatches.
![]() Click the color you want to use next. The foreground color changes to the color of your sample, and you are ready to use any tool that applies color.
Click the color you want to use next. The foreground color changes to the color of your sample, and you are ready to use any tool that applies color.
TIP
Rolling Your Own
You can save your own favorite colors in the Swatches palette. To save the current foreground color, scroll down to the blank area at the bottom of the palette and click to add a swatch.
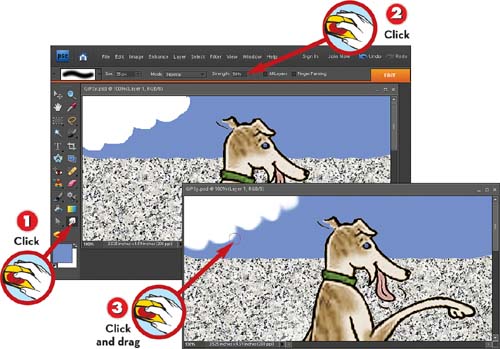
Use the Brush tool to do freehand painting (or Impressionist Brush to paint over and blur an existing image). The Pencil tool right beside it in the toolbar works much the same, except pencil lines don’t have soft edges.
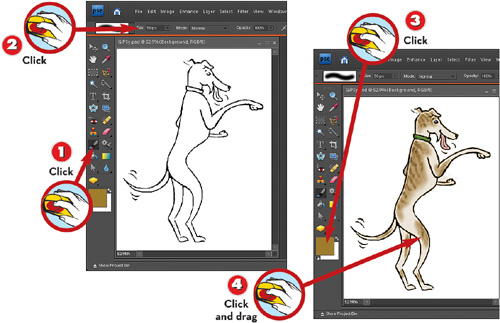
![]() Choose the Brush tool.
Choose the Brush tool.
![]() Set brush properties in the options bar, such as Size.
Set brush properties in the options bar, such as Size.
![]() Choose a foreground color.
Choose a foreground color.
![]() Click and drag in the image area to apply each brush stroke.
Click and drag in the image area to apply each brush stroke.
NOTE
Brush Stroke Technique
Keep holding down the mouse button and paint with a scrubbing motion to apply a single, continuous brush stroke. Or, click and release the mouse button frequently as you paint to apply dabs of color.
If you really want to get arty with brush tips, you can make all kinds of adjustments in the options bar, before you start painting. Also located there is the Airbrush button, which generates a spray of pixels at the brush tip. (Access the full range of options from the More Options pop-up menu.)
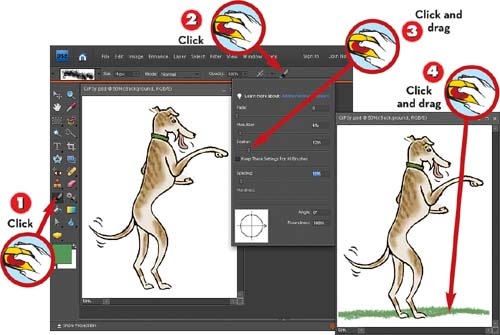
![]() Switch to the Brush tool.
Switch to the Brush tool.
![]() Click More Options in the options bar.
Click More Options in the options bar.
![]() Adjust how the brush works by dragging a slider or typing a new percentage for one or more options.
Adjust how the brush works by dragging a slider or typing a new percentage for one or more options.
![]() Click and drag in the image area to apply each brush stroke.
Click and drag in the image area to apply each brush stroke.
TIP
Lots to Choose From
The options bar contains more than a dozen categories of preset brushes, and you have the choice of fine-tuning any of them by making adjustments using the More Options pop-up menu.
Painting with a pattern is lots of fun—and something you can’t do nearly as easily with physical paint and paper. The result is more like making cutouts of wallpaper or fabric and pasting them down—much like collage and mixed-media art techniques.
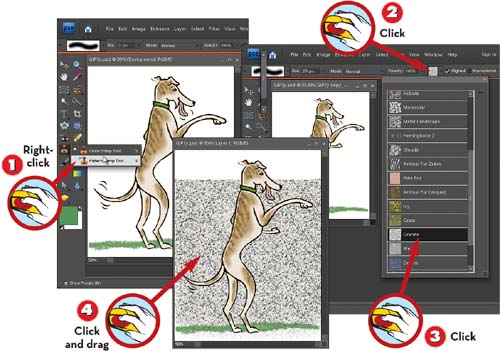
![]() Right-click the Stamp tool and choose Pattern Stamp Tool.
Right-click the Stamp tool and choose Pattern Stamp Tool.
![]() Click the pattern swatch to open the Pattern menu in the options bar.
Click the pattern swatch to open the Pattern menu in the options bar.
![]() Click to choose a pattern from the Pattern pop-up menu.
Click to choose a pattern from the Pattern pop-up menu.
![]() Click and drag in the image area to paint, just as you would with the Brush tool.
Click and drag in the image area to paint, just as you would with the Brush tool.
NOTE
The Other Stamp Tool
The Pattern Stamp’s roommate in the toolbar, the Clone Stamp, isn’t so much for painting as it is a tool for removing unwanted details, such as facial blemishes, from photos.
The Eraser tool works just like a brush—but removes pixels in its path instead of depositing them. It affects shapes on the currently selected layer only, so you might want to open the Layers palette first to get your bearings.
![]() Switch to the Eraser tool, or press E.
Switch to the Eraser tool, or press E.
![]() If you want, change the tool properties in the options bar.
If you want, change the tool properties in the options bar.
![]() Click and drag over the pixels you want to erase.
Click and drag over the pixels you want to erase.
TIP
Undo Instead?
Use the Eraser tool to partially erase objects in an image. To simply get rid of painting mistakes, Edit, Undo may be faster and cleaner.
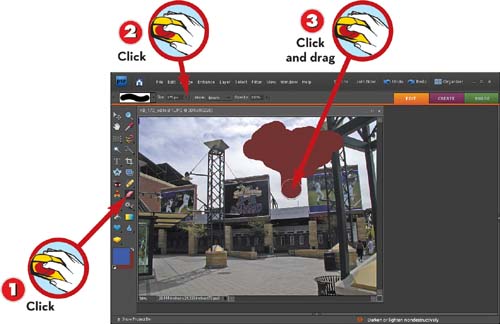
Some of the painting tools can be used either for painting or for retouching details in photos, and the Smudge tool is one of these. Artists who’ve worked with pastels will be familiar with the technique of rubbing chalk edges to soften them.
![]() With the edge you want to soften zoomed in the image area, switch to the Smudge tool.
With the edge you want to soften zoomed in the image area, switch to the Smudge tool.
![]() If you want, change the tool properties in the options bar.
If you want, change the tool properties in the options bar.
![]() Click and drag along the edge to soften it.
Click and drag along the edge to soften it.
TIP
Finger Paint, Oh Boy!
If you’re tempted to make a creative mess the clean, electronic way, check the Finger Painting box in the options bar before you do step 3.
TIP
Impressionist Brush Instead?
The effect of the Smudge tool may be too subtle for your taste. For more pronounced blurring, use the Impressionist Brush tool in one of the smaller brush sizes. Also try effects in the Filter, Blur submenu.