
Chapter 2
First Things First
In This Chapter
![]() Turning on the device
Turning on the device
![]() Selecting a language for the device
Selecting a language for the device
![]() Connecting to Wi-Fi
Connecting to Wi-Fi
![]() Registering your Kindle Paperwhite
Registering your Kindle Paperwhite
![]() Changing names
Changing names
![]() Putting your device to sleep
Putting your device to sleep
![]() Charging!
Charging!
![]() Understanding firmware updates
Understanding firmware updates
Are you ready to get started with your Kindle Paperwhite? Of course you are. In this chapter, you turn on the device for the first time, register it, and connect it to Wi-Fi. You also find out how to register your Kindle Paperwhite and give it a fun name, the differences between off and sleep, and some basics about the firmware that runs the device.
Making Your Kindle Paperwhite Come Alive
Your Kindle Paperwhite arrives in a simple black box that belies the magic that lies inside. Pull off the tear strip, open the box — perhaps ooh and aah a bit — and then, let's get started!
Over the next few pages, you will be doing the following:
- Turning on the device
- Selecting a language
- Turning on Wi-Fi
- Registering your Kindle Paperwhite
First things first: Turn on the Kindle Paperwhite by pressing and then releasing the power button.
Figure 2-1 illustrates the bottom of the device, where you'll find the power button as well as the USB port. The power button is the only physical button on the entire device.

Figure 2-1: The bottom edge of the Kindle Paperwhite.
If this is the first time you're using your Kindle Paperwhite, it will initiate a booting process, which will take a few minutes to complete.
The first option that you will see, after the logo is displayed, is a screen for choosing the language for your Kindle Paperwhite. On to the next section!
Selecting a Language
Following along from the preceding section, your next task is to select a language. After powering on your device, it displays the screen shown in Figure 2-2.

Figure 2-2: Select a language here.
Tap the language you want to use for the device, and then tap Next.
 If you want English but would prefer to see the time displayed using a 24-hour clock (for example, 3 p.m. will appear as 15:00), choose English (UK).
After you tap Next, the device finishes booting in the language you've chosen and the Kindle Paperwhite introduction screen appears, as shown in Figure 2-3. Tap Get Started to move to the next step.
Note that you can change your language choice at any time by tapping Menu⇒Settings⇒Device Options⇒Language and Dictionaries⇒Language.
Next up, connecting to a Wi-Fi network.
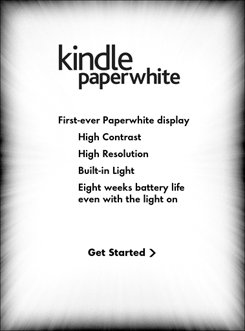
Figure 2-3: Hello, Kindle Paperwhite.
Setting Up Wi-Fi
All versions of the Kindle Paperwhite include Wi-Fi; 3G is an additional option. If you have a Wi-Fi–only Kindle Paperwhite, you need to set up Wi-Fi to receive e-books and content wirelessly.
If no Wi-Fi network is in range, you can add a network later by tapping the x in the upper-right corner of the Wi-Fi Networks dialog box and then tapping Complete Kindle Setup Later.
 If you do not connect to a Wi-Fi network and you do not have a 3G Kindle Paperwhite (see Chapter 1 for a discussion of the different types of devices), you will not be able to complete the registration process, the step after setting up Wi-Fi. You can register your device manually, as detailed later in this chapter.
If you have a Kindle Paperwhite 3G, you don't have to set up Wi-Fi to receive content — 3G works automatically without any additional setup. Still, if you have a Wi-Fi hotspot in your home or office, you probably want to go ahead and get it working, just for convenience.
 Do you want to send documents to your Kindle Paperwhite 3G through e-mail? If you do so using 3G, Amazon will charge you a small fee. (See Chapter 7 for details.) Documents transferred by e-mail using Wi-Fi are free. Another good reason to set up Wi-Fi!
To set up Wi-Fi, you need to know whether the network is password-protected. Home and office networks are usually password-protected. Wi-Fi hotspots in public locations, such as Starbucks and McDonald's, are generally not secured with a password.
To add a Wi-Fi network to your Kindle Paperwhite, follow these steps:
- If necessary, turn on your Kindle Paperwhite.
 Tap Menu⇒Settings.
- From the Settings screen, tap Wi-Fi Networks.
If the Kindle Paperwhite is in Airplane mode (that is, Wi-Fi is not turned on), you'll see a message asking if you want to turn off Airplane mode.
- If you see the message about turning off Airplane mode, tap OK.
- Select the network to which you want to connect, as shown in Figure 2-4.
If the network you want to connect to has a lock icon next to its name, you need to enter a password.
- If the network requires a password, enter it in the Wi-Fi Networks dialog box using the onscreen keyboard.
If you're connecting to a network at work and don't know the password, see the system administrator.
You can enter numbers and symbols by tapping the keyboard's 123!? key. Tap ABC to go back to the regular keyboard, as shown in Figure 2-5.
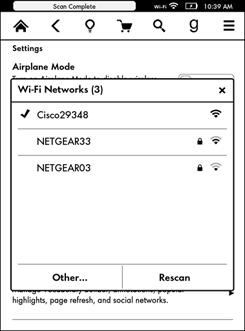
Figure 2-4: My device found this network.

Figure 2-5: This Wi-Fi network requires a password.
 If you are unable to connect to Wi-Fi, see Chapter 11 for steps on adding a network manually.
When your Kindle Paperwhite is connected to Wi-Fi, a wireless indicator appears in the upper-right corner of the screen, next to the battery charge meter. You see this indicator on the Home screen and when you display the toolbar while reading an e-book.
The wireless indicator can be one of the following icons:
 Wi-Fi: The Kindle Paperwhite is connected to a Wi-Fi network. The arcs on the fan next to Wi-Fi indicate the strength of the Wi-Fi connection.
 3G: The Kindle Paperwhite 3G is connected to a 3G network. This icon pertains only to the Kindle Paperwhite that includes 3G and Wi-Fi. The bars next to 3G indicate the strength of the 3G connection.
- 1X: The Kindle Paperwhite 3G is connected to a network through EDGE/GPRS (the predecessor to 3G in cellular network delivery). The 1X icon applies only to the Kindle Paperwhite 3G. As cellular networks become more widespread, you will rarely — if ever — see this icon.
Your final step is to register your device. Read on.
Registering Your Kindle Paperwhite
If you bought your Kindle Paperwhite through Amazon, it's delivered to you already registered. However, if you bought the Kindle Paperwhite from a store (such as Target, Staples, or Best Buy) or received it as a gift, you need to register it.
If you need to register your device, you'll see the screen shown in Figure 2-6 after you've set up Wi-Fi (see the preceding section).

Figure 2-6: Register your Kindle Paperwhite at Amazon.
If you have an Amazon account, tap the Use an Existing Amazon Account option. Enter your Amazon account e-mail and password. (The Kindle Paperwhite inputs its own serial number, so you don't need to enter it.) Tap Register.
If you don't have an Amazon account:
- Tap Create a New Account.
- Choose Country or Region from the menu that appears and then tap Continue.
- Enter your full name, your e-mail address, and a password. Confirm the password and then tap Create Account.
- Enter a payment method and billing address.
You need to set up a payment method for your account to purchase from the Kindle Store. The payment method can be a credit card or a gift card purchased from Amazon.
- Tap Continue Setup.
If you have social networks associated with your Amazon account, you'll be asked to verify that you want to connect those to your Kindle. You'll also have an opportunity to set parental controls. You can do both activities later.
That's it! You can now buy books and other content from Amazon and have them delivered wirelessly to your Kindle Paperwhite. If you've purchased content while waiting for your Kindle Paperwhite to arrive, those e-books will appear on the Home screen after the wireless is turned on and the device registers itself.
After the registration process is complete, a short tutorial will begin, showing you the basics of navigating the touchscreen. Don't worry if you forget some of the details they present — the same information and much more is covered in the following pages.
When the tutorial finishes, you see the Home screen, which lists a welcome letter, the Kindle User's Guide, and two built-in dictionaries: the New Oxford American Dictionary and the Oxford Dictionary of English. (For details on changing dictionaries, see Chapter 8.) Any content you have purchased will also be displayed.
If you ever need to deregister and then re-register your device, the following steps will guide you through the process.
- Make sure the wireless is turned on.
- Tap Menu⇒Settings⇒Registration.
When you tap Registration, if your Kindle Paperwhite is already registered, you'll see a warning that you are about to deregister your Kindle Paperwhite. Tap Cancel to stop this process.
- Choose to register using an existing Amazon account.
- Enter your Amazon login credentials (your account e-mail and password), and tap Register.
Changing Your Paperwhite's Name
By default, your Kindle Paperwhite is named Your Name's 1st Kindle, where Your Name is your first name. This name appears in the upper-left corner of the Home screen. You can change this name, if you want, to something more interesting or fun. For example, some people name their Kindles after famous literary characters or authors. Others choose meaningful words, such as Catalyst — the Paperwhite is a catalyst for reading. You can change the name from the device itself or from your computer.
To change your Kindle Paperwhite's name from the device, follow these steps:
- Tap Menu⇒Settings⇒Device Options.
- Tap Personalize Your Kindle⇒Device Name.
- Using the onscreen keyboard, enter a new name for your Kindle Paperwhite.
Some Kindle Paperwhite owners use their name and phone number as their Kindle Paperwhite's name. That way, if they misplace their Kindle Paperwhite, their contact information is prominently displayed on the Home screen for some kindhearted soul who finds the device and wants to return it to its rightful owner.
- Tap the Save button to complete the process.
To change the device name through your Amazon account on your computer, follow these steps:
- Go to www.amazon.com/myk.
- If prompted, enter your e-mail address and password.
- Click the Sign In Using Our Secure Server button.
- Click Manage Your Devices, which appears on the left side of the screen.
Your Kindle Paperwhite appears in the list of registered devices.
- Click Edit next to the Kindle's name.
- In the dialog box that appears, type a new name and then click the Save button.
You can also add personal information or a message to the Personal Info section of the Settings menu, as shown in Figure 2-7. For example, you might add “This Kindle Paperwhite belongs to your name. If found, please call xxx-xxx-xxxx.”
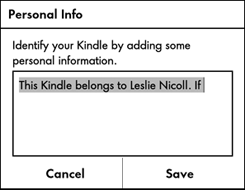
Figure 2-7: Adding a message to identify your Kindle Paperwhite.
To add information or a message, follow these steps:
- On the Kindle Paperwhite, tap the Menu icon.
- Tap Settings⇒Personalize Your Kindle⇒Personal Info.
- Use the onscreen keyboard to enter the desired information.
- Tap Save.
Note that this information appears only in the Personal Info section — not on the Home screen — and won't be readily apparent to anyone who happens to be looking at your Kindle Paperwhite.
Power Modes: On, Sleep, and Off
The Kindle Paperwhite has three modes for those times when you are not reading it:
- On: To turn on the Kindle Paperwhite, press and release the power button. On a device without special offers, you see the page that you last viewed before the device went into Sleep mode or was turned off. On a Kindle Paperwhite with special offers, you see the swipe-screen version of the current special offer. Swipe the screen (or tap the bottom of the screen) to go to the page you were on when the device went into Sleep mode or was turned off.
- Sleep: To put the Kindle Paperwhite in Sleep mode, press and release the power button. A screensaver appears on the display.
- Off: To turn off the Kindle Paperwhite, press and hold down the power button for five to seven seconds, until the charge indicator light (located next to the power button) blinks. The screen shown in Figure 2-8 appears. Select Screen Off and the screen will go blank.
Until November 2013, passengers were required to turn off their Kindles (all models, including the Kindle Paperwhite) when on a plane during takeoff and landing and anytime the plane was flying at less than 10,000 feet. However, the FAA has recently amended its rules to expand the use of personal electronic devices during all phases of a flight— they hope to provide passengers with a “gate-to-gate” reading, gaming, and video-watching experience. Each airline carrier will be able to decide individually how to implement these new rules on their planes. As a result, things will be “up in the air” for several months as airlines decide how to proceed. The takeaway for Kindle-reading passengers is to listen carefully to all announcements from the flight attendants and pilot and, if required, to turn off your Kindle during takeoff and landing.
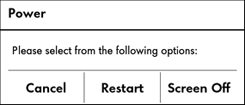
Figure 2-8: Choices when powering off the Paperwhite.
You can easily tell the difference between Sleep and Off modes by the presence (or absence) of a screensaver. A Kindle Paperwhite that is asleep has something displayed on the screen. When turned off, the screen is blank.
The Kindle Paperwhite uses its battery power only for page turns, so there's no difference in battery usage between putting the device in Sleep mode and turning it off. In general, it's best to simply put the device in Sleep mode instead of turning it off. (The device goes into Sleep mode automatically after ten minutes of inactivity.)
If you want to turn off your Kindle Paperwhite while reading a book, do so from the Home screen. Otherwise, the device may lose your place. This problem doesn't occur when you use Sleep mode, which is another reason why this mode is preferred over completely turning off your Kindle Paperwhite.
Charging Your Device
On the bottom of the Kindle Paperwhite is a micro-USB port for the charging cable (refer to Figure 2-1). The cable has a micro-USB plug on one end and a standard USB plug on the other. Insert the micro-USB plug into the Kindle and the standard USB plug into your computer or into a plug adapter, which is then plugged into an electrical wall socket.
The Kindle Paperwhite doesn't ship with a plug adapter. If you want to use a plug adapter, you must purchase one or use a compatible plug adapter, such as the one that comes with the Kindle 2, Kindle KBoard, or iPhone. In addition, the charger that comes with the Kindle Fire also works with the Kindle Paperwhite. See Chapter 10 for a picture of a plug adapter sold by Amazon.
When the Kindle Paperwhite is plugged into a power source and charging, the charge indicator light (located next to the power button) glows amber. When the device is fully charged, the light turns green.
The first time you charge your Kindle Paperwhite, the process will take about four hours. After that, charging through the USB cable and a computer takes about three hours and charging through the plug adapter takes one to two hours.
The battery charge meter is in the upper-right corner of the Home screen. I recommend recharging the battery when it has about a quarter of a charge remaining. You don't need to top off the battery on a daily or weekly basis.
You can read and use your Kindle Paperwhite while it charges. When the Kindle Paperwhite is plugged into an electrical socket, the display doesn't change and you can keep reading. However, when the device is plugged into the USB port on a computer, you see the following message:
- If you want to read or shop on your Kindle while continuing to charge over USB, please keep the USB cable attached, but eject your Kindle from your computer.
If you want to read on your Kindle Paperwhite while it's connected to your computer, leave it physically connected (or plugged in) to the USB port but “eject” the device through the operating system. To “eject” your Kindle Paperwhite:
- In Windows 8: Connect the Kindle Paperwhite to your computer, right-click the Paperwhite drive icon, and choose Eject from the menu that appears. A notification that it is safe to remove the Paperwhite from the computer appears on your computer screen; ignore this message. Your Kindle Paperwhite will blink and display the last screen viewed.
- In Windows 7, Vista, and XP: Either left- or right-click the Safely Remove Hardware icon in the lower-right corner of the taskbar and choose Eject Amazon Kindle. The screen blinks and returns to whatever was open previously.
- In Mac OS X: Press ⌘-E. You can also drag the Kindle icon from the desktop to the trash can, or choose File⇒Eject.
Updating Firmware
At the core of your Kindle Paperwhite is a small computer, complete with hardware, software, and a built-in network platform. The software that runs the Kindle Paperwhite is its firmware. Firmware is the core that controls how the device works.
Amazon periodically updates the firmware for the device. Generally, firmware updates fix minor bugs and glitches that may not be apparent to the casual user. However, occasionally a major upgrade or new feature is added. For example, with firmware update 2.5, Amazon added the capability to sort e-books into collections, a feature that had been repeatedly requested by users.
To find out which version of the firmware your Kindle is running, follow these steps:
- Tap the Menu icon.
- Tap Settings⇒Menu⇒Device Info.
The firmware version is listed, along with the serial number and the space available (in megabytes). The newest Kindle Paperwhite is included in the fifth generation of the devices that have been produced, so the firmware version begins with 5. At the time of this writing, the firmware is version 5.4.0.
If an update is available, your Kindle Paperwhite will download it when you turn on the wireless and connect to a network. If you notice a screen that says Your Kindle Is Updating, this is what's happening.
If you're curious as to whether a more current update is available, you can check at Amazon:
- Go to your Amazon account at www.amazon.com/myk and log in.
- In the left column, choose Manage Your Devices.
If a software update is available for your Kindle Paperwhite, a blue i in a white circle will be displayed.
- If you see the i in a circle, click the picture of the Kindle and follow the onscreen instructions to learn more.
If updates are available, you'll see instructions for determining whether you need to upgrade the firmware and, if so, how to download and manually update your Kindle Paperwhite, if you want.
You don't have to manually update your Kindle Paperwhite. Necessary updates happen automatically through the wireless connection. Just be aware that if the screen looks different or if you find new features, the device probably went through an automatic update.