
In this book, we've discussed apps that can help you get organized, let you communicate with others, or enjoy media in the form of music, books, videos, and photos. Now we're going to talk about three apps that turn your iPad into a powerful work platform.
The three apps are Pages, Numbers, and Keynote, together known as iWork for iPad. These Apple-produced apps can be purchased in the App Store for $9.99 each, and they provide much of the functionality that productive workers need while they're on the go. With that, we'll add a caveat: for serious work, you should consider using your iPad to remotely control your "real" work computer. Apps such as LogMeIn Ignition and iTeleport make this possible, although a detailed explanation of their configuration and use is not included in this book. In this chapter, we'll cover the basics of each app only, because a detailed dig into iWork could easily be the subject of another book.
Unlike many of the apps built into your iPad, iWork for iPad apps must be purchased and installed on your iPad. In Chapter 8, we told you about the App Store app and how it works on your iPad to assist you in browsing, purchasing, and installing iPad software.
You don't need to purchase all three of the apps if you don't need some of the functionality. For instance, if you just need a good word processing app and don't do any work that requires spreadsheets or presentations, you can just buy Pages. Presenters might just want to purchase Keynote, and budget managers could just pick up Numbers.
Here are some things you may choose to use each app for.
Pages:
Numbers:
Creating checklists
Making comparisons of mortgages or other loans
Developing a budget
Creating expense reports and invoices
Logging business and personal auto mileage
Drawing charts and graphs from data
Keynote:
Developing business presentations
Creating class presentations by both students and instructors
Making strikingly attractive personal slideshows
Using your iPad as a teleprompter for giving speeches
Launch the App Store app, and then type the word pages into the search box in the upper-right corner of the App Store. Tap the Search button on your keyboard, and a list of apps with pages in their names appear. Under iPad Apps, look for Pages (listed in the Productivity category), and then tap the price button. That button turns into a green Install App button. Tap it, and you'll be asked to enter your Apple ID. Pages downloads to your iPad and then automatically installs itself. The same process works with both Numbers and Keynote.
These apps are big—more than 20MB each—so be sure to have your iPad connected to a Wi-Fi network prior to installation. If you try to install any of the iWork apps while connected to a 3G network, a message will ask you to either install while you're on a Wi-Fi network or install the app through iTunes on your computer. Our recommendation is to purchase and install the iWork for iPad apps through iTunes on your computer.
Pages is more than a word processing app for iPad—it can be used to create sophisticated page layouts with graphics, tables, charts, and numerous text styles. The Mac version of Pages evolved over its lifetime to become a powerful writing and desktop publishing tool, but the iPad version was born with many of the same capabilities. The app is optimized for use with the touch interface of the iPad, making it a joy to use.
In this section, we'll familiarize you with the user interface and some of the functionality of Pages.
Launching Pages for the first time, you're greeted with a document with the title Tap to Get Started with Pages. It's more than just a pretty set of pages; it's an interactive tutorial into many of the features of the app. It coaxes you to use common iPad interface gestures to move, rotate, scale, and delete images, restyle text, and add objects to your documents.
The My Documents page, the first thing you see in Pages, looks like a piece of gray cloth on which all of your documents are nicely laid out side by side. To open a previously created document, tap it once.
To start with a blank piece of paper or perhaps a template, you can either tap the New Document button in the upper-left corner of the Pages window or tap the plus sign (+) icon in the middle of the bottom of the window. Tapping the plus sign below an existing document in the My Documents window gives you a choice of creating a new document from scratch or duplicating the existing document.
If you tap either of the New Document buttons, the first thing you see is a Choose a Template screen with a number of useful document types (see Figure 14-1). You can choose to start with a wide-open piece of paper or a well-designed document template. Templates help when you want to create a professional-looking document quickly or when you're faced with writer's block and need some ideas to launch your imagination.
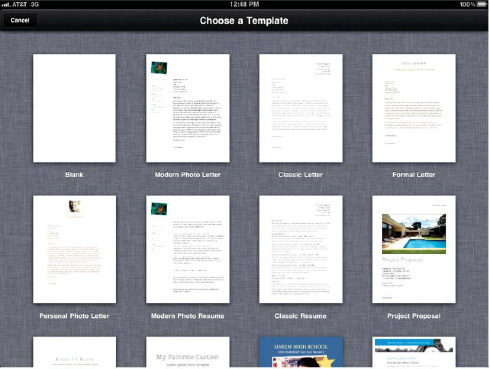
Figure 14.1. Creating a new document in Pages for iPad provides the option of starting with a blank page or using a professionally designed template.
For the purposes of this book, we'll start with a blank page. Tap the blank page in the upper left of the Choose a Template window, and you're ready to start writing. Before you begin, we'll explain a bit about what's on the top of the Pages window, as shown in Figure 14-2.
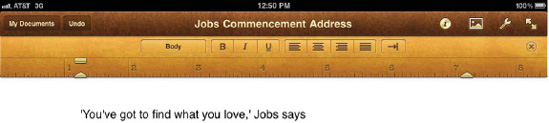
Apple named the ruler-like user interface element shown in Figure 14-2 the Style ruler, because it provides both a way to style your text and a ruler for aligning page elements. You can make the Style ruler disappear from your page by tapping the circled × in the upper-right corner, and you can make it reappear by double-tapping the barely visible edge of the ruler at the top of the screen.
The Style ruler is different from the toolbar just above it. The toolbar includes a button for returning to My Documents, an Undo button (for reverting to previous versions of a document), and a set of buttons on the right side that we'll describe in a moment. Unlike the Style ruler, the toolbar is always visible unless you switch into full-screen mode, as described later in this chapter. Full-screen mode hides all elements except the document.
The ruler features a number of buttons. The leftmost button (the one marked Body) applies styles to any currently selected paragraph. To apply a style, double-tap any text in a paragraph, and then tap the Paragraph Styles button. A scrolling pop-up appears with a list of common paragraph styles—title, subtitle, headings of various sizes, subheadings, body text, bulleted text, captions, headers and footers, and more. Selecting one of those styles applies it to the entire paragraph of text.
Did you just accidentally apply the incorrect style to a paragraph of text? No problem. Tap the Undo button on the toolbar at the top of the window, and the text reverts to the original style. If you later decide that you really meant to make a specific change, tap the Undo button again. A pop-up may appear allowing you to choose to redo an action. Unlike many other iPad apps, Pages does not support shaking the iPad from side to side to undo/redo.
The next set of buttons—B, I, and U—apply common styles to characters. B stands for bold, I for italic, and U for underlines. To select a word, double-tap it. When you select a word, it's highlighted with a light blue background and gains a pair of selection handles, one at each end (see Figure 14-3).
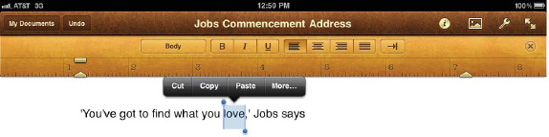
Figure 14.3. Double-tapping any word in a Pages document selects it, adds selection handles to either side to expand the selection, and displays a pop-up menu of actions.
Expand your selection by dragging the handles left or right, or select an entire paragraph by triple-tapping it. A pop-up also appears, showing actions that can be applied to the text. The most widely used actions—Cut, Copy, and Paste—appear in the pop-up. Tapping the More button provides several more actions—Copy Style, Replace, and Definition.
Cut, Copy, and Paste work just like they do in any word processing program on a Mac or Windows computer. It's possible to cut a word or phrase out and paste it somewhere else or to copy text to paste in another location. Copy Style copies the existing style of the text. For example, if you create your own style for a word by using bold and underlining it, you can apply bold and underlining to any other text by copying the style of the word and then pasting the style (which appears when you've copied a style) to another selected word or phrase.
Replace assumes that you've misspelled a word and displays possible replacements to apply. Tapping one of the replacement words inserts it in place of the existing word. Definition provides a one-tap dictionary lookup. When you select Definition, a pop-up appears with the dictionary definition of the word (see Figure 14-4).

Moving down the Style ruler, you come upon a set of icons covered with lines. From left to right, these are left-justify, center, right-justify, and fully justify text. The final button, the one that looks like an arrow pointing at a wall, pops up a menu from which you can apply tabs or breaks (see Figure 14-5).
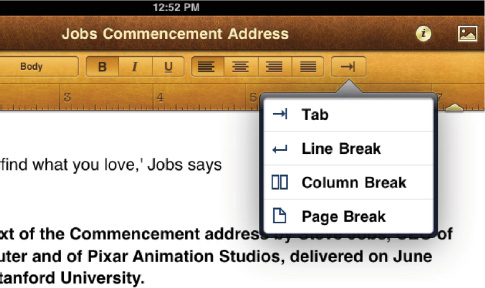
Figure 14.5. The final button on the Style ruler is used to apply tabs, line breaks, column breaks, and page breaks.
Applying a tab to the beginning of a line of text can be used to indent the text by half-inch increments. A line break ends the existing line of text and moves the insertion point (where new text appears) down a line. Column breaks work only when you have set up the document with more than one column, in which case applying a column break moves text located after the insertion point to the next column. Finally, a page break starts writing text on a new page.
Note
If you're using an external Bluetooth or USB keyboard or the Apple Keyboard Dock, you can use the Tab key in place of the Tab button. Other buttons on the top of the keyboard provide varying functions, including setting sound volume and increasing or decreasing the brightness of the iPad display.
If you'd like to set tabs at various points on the ruler, just tap the ruler and then drag the tab to the appropriate point. Now when you tap the Tab button several times in succession, it will jump between the tab points that you have set. A right tab, meaning that text is moved to the right of the tab point, is set by default. Double-tapping a tab once turns it into a center tab (text centered around the tab point), and double-tapping a tab twice converts a tab into a left tab (text aligned to the left of the tab).
The Style ruler also displays adjustable margins and a first-line indent tool. The small upward-pointing arrows (see Figure 14-6) indicate the margins, which default to 1 inch from each side of a traditional 8.5×11-inch sheet of paper. Those margins can be moved left or right depending on your needs. The first line of a paragraph can be indented by dragging the indent tool (the small rectangular block above the left margin indicator on a new page) to the right.
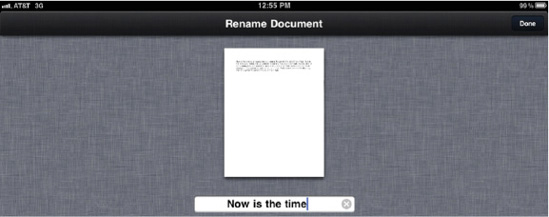
Moving back to My Documents by tapping the My Documents button, you can rename the "Blank" document by tapping the name that shows up beneath the image of the document. Type a new name, and then tap Done to save the name (Figure 14-7).
Now let's look at some of the other tools on the toolbar above the Style ruler. As we mentioned earlier, the Undo button lets you correct mistakes. In fact, it can correct a lot of mistakes—each time you tap Undo, another earlier action you took in Pages is undone.
After you read the following descriptions of the many other tools available to you in Pages and begin working with the app, you'll discover how powerful this iPad word processor and page layout tool can really be.
Migrating across the toolbar past the document name, you come to a small round icon that looks a lot like the international sign for information—a lowercase i. Apple calls this the Info button, and depending on what is currently selected on your iPad, text or an object, it provides different capabilities.
For text, the Info button gives you the tab choices of Style, List, and Layout, as shown from left to right in Figure 14-8.
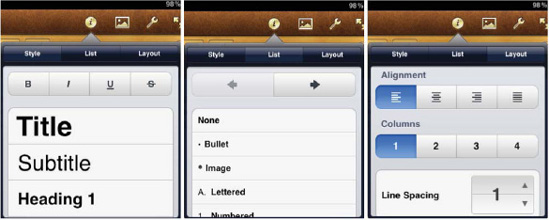
The Style tab reiterates the text styles you saw earlier; it allows bolding, italicizing, underlining, or striking through text and also (at the very bottom; they're not visible in Figure 14-8) text options such as size, color, and font. The List tab sets lists as bulleted, lettered, numbered, or bulleted with an image. Use the large arrows to increase or decrease the indentation of list items in formatted outlines. The Layout tab is another way to apply alignment to a document, set it up with up to four columns, or adjust the line spacing.
For objects (images, charts, tables, or shapes), the Info button changes to show the Style, Text, and Arrange tabs (see Figure 14-9).

When applied to an object, the Style tab adds a variety of frames, shadows, and reflections to provide a sense of depth to the object. The Style tab provides a number of options, including turning an image border on or off, scaling the border, changing the line type from whole to dashed, and choosing from a dozen different frames. The Text tab applies styles to text that is entered into an object. The Arrange tab moves an object backward or forward compared to other objects, allows you to flip an object vertically and horizontally, allows you to do some in-document cropping of images with masks, and allows you to set how text wraps around the object.
When we discuss Numbers, you'll learn about some other uses of the Info button, such as for setting options for charts and shapes.
The Insert button looks like a little drawing of a landscape. It inserts media from your Photos library, tables, charts, or shapes into your document (see Figure 14-10).
The Media tab adds pictures in the Photos app to your document. Tables provides a number of attractive and colorfully shaded preformatted tables for displaying tabular information in your document. With Charts, there's a choice of bar, column, area, line, scatter, and pie charts in six bright colors to add to your document. Double-tapping a chart you've inserted displays a simple spreadsheet for editing the charted information. Finally, if you need to add a box, a cartoon balloon, a line, or geometric shapes to your Pages document, just tap Shapes.

Figure 14.10. Use the Insert button to add images, tables, charts, or shapes to your Pages document.
Once you've added a table, a chart, or a shape to a document, tapping that element and then tapping the Info button displays a pop-up that makes changing options for that element a snap. We'll describe the table and chart options in more detail when we talk about Numbers.
The little wrench-like icon that's next on the toolbar is the Tools button (see Figure 14-11). It's used to change settings that apply to the document as a whole, and is also where to go if you want to print a Pages document.
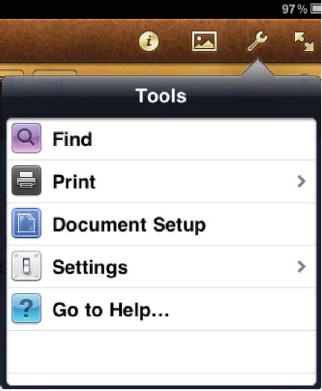
Figure 14.11. The Tools button in Pages provides features that apply to a complete document, not just a word or paragraph.
Do you need to find and replace a word or phrase in a document? Find searches your entire document for a set of characters, replaces them (if you've chosen the Find and Replace option), and can even match case or complete words if you need a more finely tuned search (see Figure 14-12).
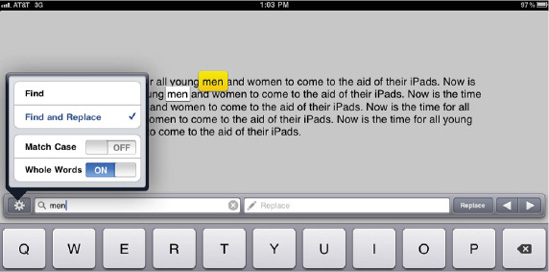
Figure 14.12. The Find function under the Tools button in Pages is a powerful tool for making global replacements throughout a document.
Printing was added to the iPad with the release of the iOS 4.2 operating system in late 2010. An Apple feature called AirPrint browses for compatible printers on your Wi-Fi network, and then displays those printers when you tap on the Print item under Tools. Selecting the number of copies for printing and tapping the Print button sends the current iWork document to the chosen printer.
Unfortunately, at the time of publication there were very few printers that were compatible with AirPrint right out of the box. However, several software vendors have developed applications for Mac and Windows that make any shared printer compatible with AirPrint.
Ecamm Network developed Printopia ($9.95, www.ecamm.com/mac/printopia/) for Mac, which gives Mac owners an opportunity to select the printers they wish to share with iPads on their networks (see Figure 14-13). For those who own Windows computers or Mac owners who want the ability to send photos directly to iPhoto can try Collobos FingerPrint ($7.99 for Mac, $9.99 for Windows, www.collobos.com/). Both applications also have added features, such as the ability to send documents to your PC or Mac, or save them to the popular Dropbox cloud storage service.
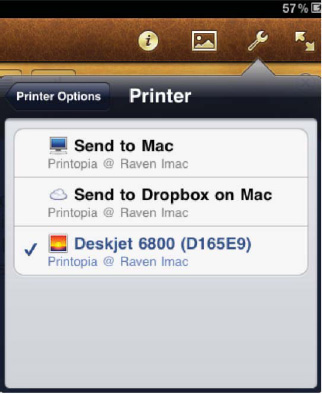
Figure 14.13. Print, found under the Tools button on the Pages toolbar, displays printers or print-to-file services hosted by applications such as Printopia or FingerPrint.
Tapping the Document Setup button on the Tools menu displays a blueprint-like layout of the document on which you can tap and edit headers and footers or move the document margins.
The Settings button under Tools provides access to settings such as turning center and edge guides on or off. What are center and edge guides? If you have more than one object on a page, dragging one of them will display alignment guides so you can see when the center or edges of the objects line up. Turning edge guides off means that only the center guides appear when moving objects, while disabling center guides makes only the edge guides visible. If you don't need alignment guides, you can disable them. There's also a word count feature that, when enabled, displays a running total of words in a document.
The last tool under Settings enables or disables the real-time spelling checker. As you type in a Pages document, words that might be misspelled appear with a red dotted underline. Tapping the word displays any possible replacements, and tapping one of those inserts the replacement word. If you find the constant reminders to be annoying, disable the spelling check.
Tapping the final button under Tools, Go to Help, starts up Safari and points you to Apple's online help for the iWork for iPad suite. There's a surprising amount of information contained in the online help, so if you get stuck using a certain feature in Pages, Keynote, or Numbers, be sure to check it out.
Coming to the final icon on the toolbar, one that looks like a pair of arrows pointing diagonally, you find the control that can display a full page without the toolbar, Style ruler, or anything else. This is most useful when you're reading a document and want to see as much of it as possible.
Once you're familiar with Pages on the iPad, it's easy to understand how to use Numbers. For people who need to organize data and numbers, the Numbers app creates, opens, and saves spreadsheets compatible with Microsoft Excel or the Mac version of Numbers.
Not only does Numbers for iPad contain a lot of the same spreadsheet features of its big brothers on Windows computers and Macs, but it contains charting tools for graphically representing information and even form tools for capturing data in a spreadsheet.
Follow along as we introduce you to Numbers.
Does Figure 14-14 look familiar? It should. My Spreadsheets is the Numbers equivalent of My Documents in Pages. In fact, everything about the user interface in My Spreadsheets is identical to My Documents. The Sharing, New or Duplicate Spreadsheet, and Delete icons below the image of a spreadsheet perform the same tasks as their Pages counterparts and you can tap the name of a spreadsheet to rename it.
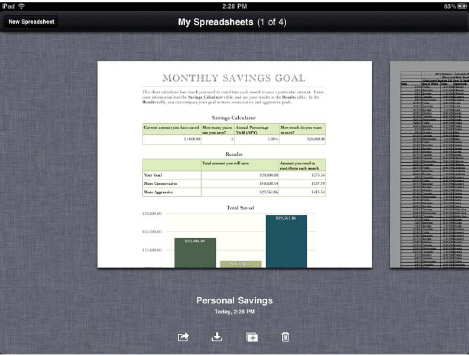
Figure 14.14. My Spreadsheets is analogous to My Documents in Pages. It's used to create new spreadsheets, rename them, delete them, and share them with others.
The New Spreadsheet button opens to a window that's the Numbers version of the New Document window. As with Pages, you can either select a blank spreadsheet or choose from a number of templates thoughtfully provided by Apple.
The Numbers templates (see Figure 14-15) range from simple checklists to mortgage calculators and from weight loss and running logs to class attendance sheets. Although not everyone may need a GPA calculator, it's available. Many of the templates exist to give you a taste of the range of tasks you can perform with Numbers.
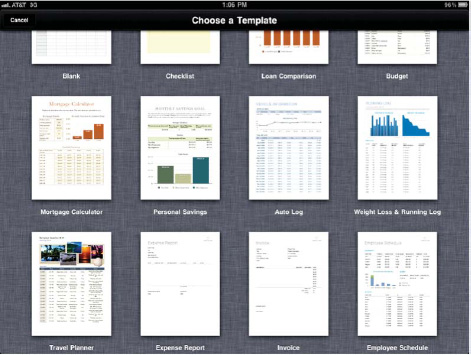
Figure 14.15. Apple includes 16 templates with Numbers, many of which can be used to perform useful calculations.
One unique Numbers user interface feature is the concept of tabs. As shown in Figure 14-16, tabs define different sheets or forms for a spreadsheet. As an example, a Numbers spreadsheet could consist of one sheet to describe how to use the spreadsheet, a form to capture data, and another sheet to perform calculations on the data you captured. Each of those pages displays its own tab at the top of the spreadsheet, making navigation between the pages as simple as tapping a tab.

If you're familiar with Microsoft Excel, just think of tabs as sheets and the group of sheets as an Excel workbook. To add a new tab, just tap the rightmost tab. It's marked with a plus sign, and tapping it displays a pop-up with two buttons—New Sheet and New Form. Any tab can be renamed by double-tapping the existing name and then typing a new name.
As in Pages, there's a very helpful Getting Started document that is a thinly disguised interactive Numbers tutorial. For iPad owners just getting started with Numbers, it is well worth the time and effort to go through the Getting Started pages.
A blank spreadsheet isn't very useful. Although even the "Blank" template contains a generic table that you can begin to type numbers or text into, tapping a tab creates a totally blank sheet. Where are the rows and columns you're used to? In Numbers, you need to add a table to the sheet to begin using it. As you'll recall, the Insert button in Pages let you add media, tables, charts, and shapes to a blank page. That's exactly what the Insert button does in Numbers as well. The Tables tab is slightly different, but Media, Charts, and Shapes tabs are identical to their siblings in Pages in that they provide a way to add pictures, create charts, or draw shapes on a page.
In Figure 14-17, we've added a simple five-column table to a blank sheet. As you can see, the first column contains a check box for each row, while the rest of the columns are blank. The table has a name—Table 2—and some things that look like scrollbars to the top and left of the table.

See those little things at the end of the scrollbars that look like buttons on a shirt? Dragging one of those to the right or down adds another column or row to the table. Dragging a button up or to the left removes a row or column from the table. To move the entire table around on the sheet, drag the button in the upper-left corner of the table.
The dark dots on the right and bottom edges of the table stretch the table when dragged, increasing the width of all the columns and rows without adding any new columns or rows. Likewise, you can make the table smaller by dragging those "handles" up or to the left.
Although we won't go through the details of the many spreadsheet functions that you can choose from in Numbers, let's talk about how you enter information into spreadsheet cells. Double-tapping a cell on the spreadsheet highlights it with a dark blue border, and a light green data entry field appears on the screen along with an appropriate keyboard (see Figure 14-18) and four buttons in a toolbar. On the far left you'll see a button with "42" on it, which indicates that you use this button to enter numbers into the cell. The numbers can be formatted as plain numbers, as currency (using the dollar sign button on the data entry keyboard below), as a percentage (using the percent sign button), as a star ranking from 1 to 5 (using the star button), or as a check box (0 or 1, using the check box button). Buttons on the right side of the keyboard take you to the next cell to the right or to the next cell down for quick navigation around the spreadsheet.
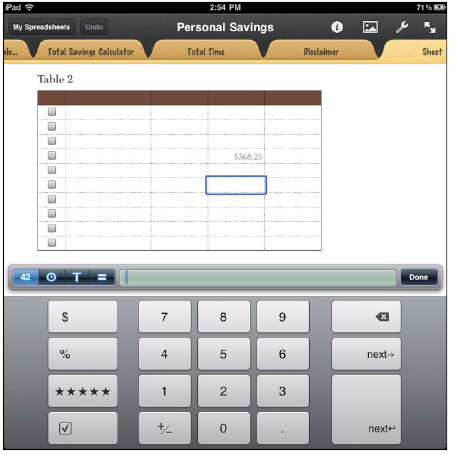
Note
SUBTLE JOKE ALERT! Are you wondering why the numeric entry button has "42" on it? In the classic science fiction series The Hitchhiker's Guide to the Galaxy, 42 is the answer to the ultimate question of life, the universe, and everything. We're speculating that someone on the Numbers development team is a sci-fi fan.
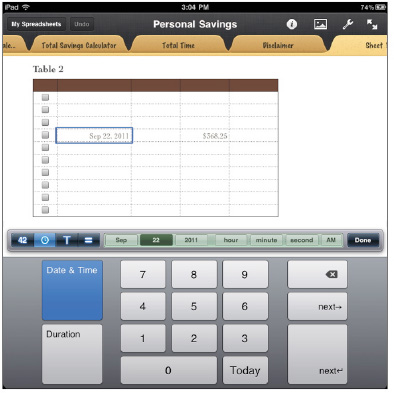
Use the next button (to the right of 42), which looks like a clock, to enter dates, times, or durations into spreadsheet cells. The keyboard looks different as a result of tapping this button (see Figure 14-19), featuring the months of the year on the keypad and buttons for denoting whether you're entering a date and/or time or a duration. What's the difference between a date or time and a duration? A date is a specific date, for example June 10, 2010, and a time is a specific time, like 4:32:06 p.m. A duration is a length of time that can be measured between two time points. One of our writers has a lifetime measured with a duration of 53 years, 7 months, 29 days, 1 hour, and 22 minutes at the time of writing this sentence.
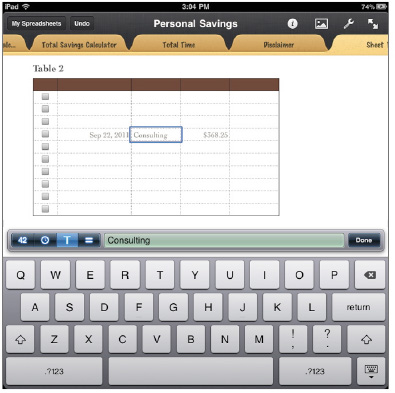
Moving further down the data entry toolbar there is a button with the letter T on it. Use this button to enter text into a cell. A standard text entry keyboard appears (see Figure 14-20) after tapping the button.
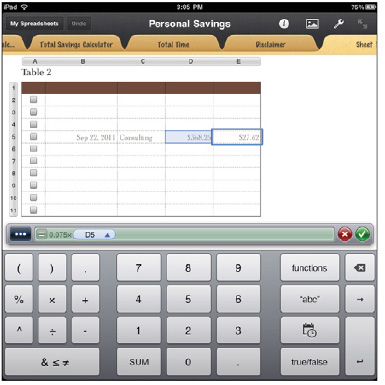
The last button has an equal sign (=) on it. Tapping this button displays the formula entry keyboard (see Figure 14-21). A formula operating on data contained in cells, using functions entered through the functions key, is typed into the data entry field and applied to the cell by tapping the check mark button at the end of the field. The keyboard also contains a set of mathematical operators (parentheses, plus, minus, multiply, divide, exponents, and logical operators) for use in spreadsheet formulas.
Remember the Info button in Pages? Numbers has one, too. Tapping the Info button when selecting a table displays a pop-up for changing table settings (see Figure 14-22).
The first tab, Table, applies a choice of different shading colors and types to a table from a palette of six prepackaged types. The Table Options button on this tab provides options for disabling the table name, deleting the border of the table, shading alternating rows in the table, turning off lines in the table grid, and changing the font and text size for any text or numbers in the table.
The Headers tab adds header rows, header columns, and footers to a table. You can choose to freeze header rows and columns so that they're always visible, even when you have scrolled the table down or to the right.
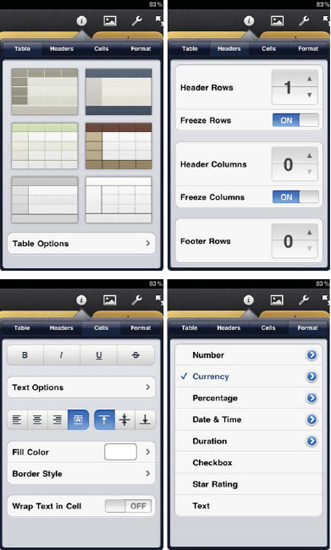
The Cells tab applies formatting to text cells on the table and is very useful for configuring header rows. The last tab, Format, applies special formats to cells or ranges of cells in the table. A cell can be formatted as a number, currency, a percentage, a date and/or time, a duration, a check box, a star rating (1 to 5 stars), or text.
Tapping the Info button while an image is selected causes the same three tabs (Style, Text, and Arrange) to appear that we described in the earlier section about Pages. When a chart is selected, tapping the Info button displays an entirely different pop-up (see Figure 14-23).
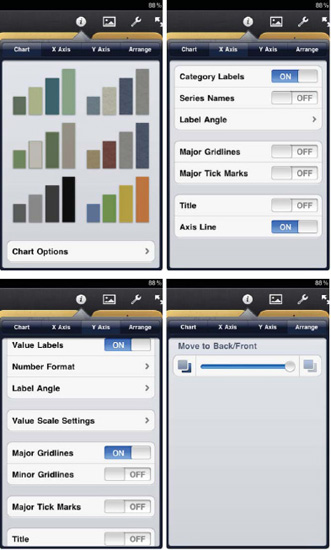
The Chart tab provides some preset options for the color of your chart. Tapping the Chart Options button at the bottom of this tab displays controls for enabling or disabling the chart tile, legend, and border; changing the text size and font; turning value labels on and off; or changing the type of chart.
The X Axis tab is available only when your chart displays both x and y axes—it wouldn't make sense on a pie chart. It controls the visibility of category labels and series names; allows you to orient the labels along the x axis of your chart horizontally, diagonally, or vertically; allows you to add gridlines or tick marks for the axis; and lets you enable or disable an axis title.
The Y Axis tab is similar to the X Axis tab but controls the options for the vertical axis of your chart. The Arrange tab moves your chart forward or backward in relation to other objects on the same page.
When you tap shapes that have been added to your sheets, the Info button displays the familiar Style, Text, and Arrange tabs (see Figure 14-24).

Figure 14.24. There is more to the Style tab than meets the eye. The Style Options button provides a set of fills, borders, and effects to modify shapes.
When the Style Options button is tapped, another set of tabs appears (see Figure 14-25). Fill provides a number of color and grayscale fills, Border enables or disables a border around the shape and changes the border's style, and Effects creates a shadow and determines the opacity of the shape. Believe it or not, you can actually use a transparent color shape as a "filter" for exciting image effects.
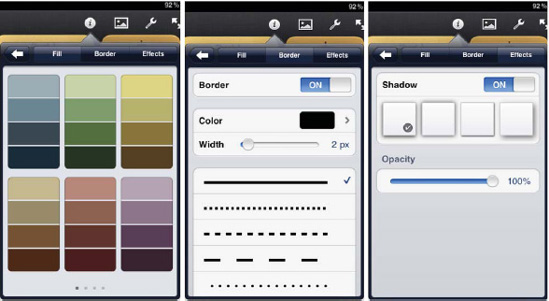
Figure 14.25. Tapping Style Options displays the Fill, Border, and Effects tabs displayed here. Note that these same tabs appear in Pages and Keynote when a shape is selected and the Info button is tapped.
For example, suppose you'd like to add a colored highlight to a photo to call out a certain object in the picture. Creating a red oval shape, setting it to be transparent, and then dragging it over the object in the photo makes a functional and professional-looking highlight.
The two other tabs that accompany Style in Figure 14-24 are Text and Arrange. The Text tab adds text styles to text typed into the shape, while Arrange once again places the shape in front of or behind other objects on the page.
The familiar wrench icon, otherwise known as the Tools button, resides in the toolbar of Numbers and acts as your gateway to Tools. Choices for Tools are fewer than in Pages, with only Find, Go to Help, Edge Guides, and Check Spelling showing up. As with Pages, there's a full-page mode in Numbers enabled by tapping the arrows icon on the far right end of the Numbers toolbar.
Remember, you can't really hurt anything by creating a new spreadsheet and playing with Numbers. It's a great way to become familiar with the app, and you'd be surprised what you can learn just by creating fun or useful spreadsheets.
If you have read the chapter up to this point, you are familiar with Pages, Numbers, and all of the many common features available in those two apps. Now you'll learn about Keynote, which is the presentation app of the iWork for iPad suite. Keynote is the only iWork app that can be used with the various video-out cables for the iPad for the purpose of projecting your presentation, so it is a powerful tool for teachers, businesspeople, and anyone else who needs to get their message across to groups of people.
This part of the chapter is shorter than the sections for Pages and Numbers, because we are assuming that you have read the sections describing those two apps. If you have not, you may want to review the information for Pages and Numbers because much of it is relevant to using Keynote.
Before we get too far into the topic of Keynote, it should be mentioned that not all imported PowerPoint or Keynote presentations will transfer to Keynote for iPad cleanly. Images may scale improperly, text sizes might be too large or small on your imported document, and transitions and builds are often lost. Do not assume that a presentation that has been moved to your iPad will be perfect—be sure to check the converted presentation on the iPad before "going public." Finally, the importation and conversion of large presentations is very time-consuming.
Launching Keynote by tapping it, the first thing you see is My Presentations (see Figure 14-26). This is analogous to My Documents in Pages and My Spreadsheets in Numbers. Also like its siblings in iWork for iPad, Keynote comes with a Getting Started presentation document that is useful in learning how the app works. It's interactive, teaching you how to work with Keynote as you follow the instructions provided in the presentation.

Figure 14.26. The My Presentations window is very much like the My Documents window in Pages and My Spreadsheets window in Numbers.
When you tap the New Presentation button in the upper-left corner of the My Presentations window, you're asked to choose a theme (see Figure 14-27). Apple provides a dozen themes that range from plain white to fancy.
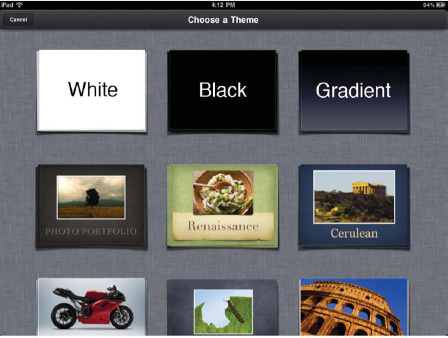
Figure 14.27. Pick a theme from one of the dozen professionally designed themes built into Keynote for iPad.
Tapping any one of the themes displays the first slide in your presentation deck, which by default is a title slide. Figure 14-28 shows the title slide and toolbar for the Renaissance theme.
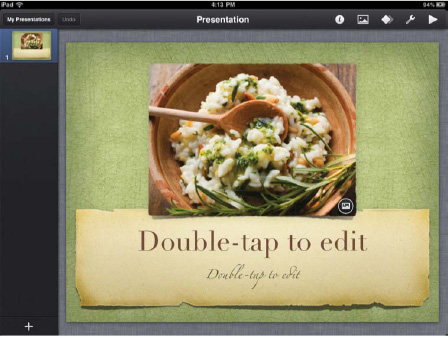
Although the risotto on the slide looks appetizing, that's probably not what you have in mind for your presentation. That's OK, since that image is just a placeholder, just like the "Double-tap to edit" text is waiting for you to edit it. To change the title slide image, tap the small circular image icon that is in the corner, and the familiar Photo Albums list is displayed. Select an image from your photos, and it takes the place of the placeholder.
The image placeholder may be smaller than your image, so your image is masked—part of it is made transparent so that it appears that the image is cropped. If you want to change the way the photo is masked, double-tap it, and the entire image appears (see Figure 14-29). Use your finger to slide the image up or down, or scale the image using the slider control. When things look the way you want them, tap the Done button.
Editing the text placeholders is done the same way. Double-tap them; the placeholder text disappears, and a standard iPad keyboard appears. Type in your new title and subtitle to make your title slide shine.
Unless you plan on giving a very short presentation, you're going to want to add more slides. That's what the plus sign at the bottom of the left sidebar is for. Tap the button, and a pop-up palette of slides appears (see Figure 14-30). All of them have been designed to match the colors, fonts, and general look and feel of your title slide.
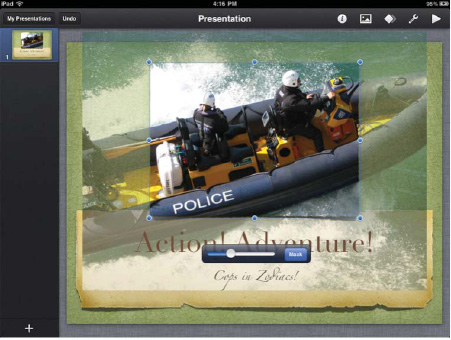
Figure 14.29. Masking an image is useful in making sure that your audience is focused on the most important details of your image.
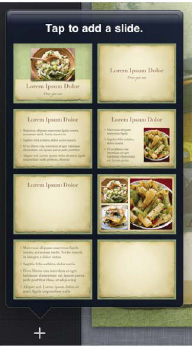
Figure 14.30. The Add a Slide pop-up presents a graphical representation of eight different slide types. Tap any one of the slide images to add a new slide to your presentation, and then edit the slide to your requirements.
Some of the slides show bulleted text, some are blank or nearly so, others are designed to display images, and several slides show text and images side by side. Tap the appropriate slide type for your next slide, and it is added to the slideshow under the title slide.
Like your title slide, the other slide types all contain placeholders. Double-tap text to edit it, and tap the image icon on an image to replace the placeholder image with your own picture. You don't have to add an image; since the tools in Keynote are similar to those in Pages and Numbers, the Insert button can provide you with a way to add tables, charts, and shapes as well. You edit and configure all of these objects using the same tools discussed earlier in the chapter.
Not only does the Insert button appear in the Keynote toolbar, but the Info button is there as well, and it works the same way that it does in the other two iWork apps. Our familiar friend the Tools button is also represented by the wrench icon, and it provides access to Find, Print, Presenter Notes, Settings, and Go to Help. When tapped, Presenter Notes displays a yellow lined notepad upon which you can write notes to jog your memory while delivering a presentation.
Settings provides a number of controls. Check Spelling turns spell checking on and off, and Slide Numbers enables the placement of small numbers on the bottom of each slide in a presentation deck. Edge and Center Guides, described earlier in the Pages section of this chapter are present in the Settings as well, along with another guide labeled Guides at 10%. When enabled, this places snap-to guides at horizontal and vertical locations every 10% of the slide width and height.
The other button that is unique to Keynote is the Animation button, which looks like a diamond and is found in the middle of the pack of buttons at the right end of the Keynote toolbar. The Animation button is used to add animated slide transitions to your slideshow, something that can really increase the impact of your presentation. The type of transitions available to you as a Keynote user vary by theme.
To add a transition to a slide, tap the slide in the sidebar to select it, and then tap the Animation button. A black arrow, initially marked with the word None, appears and is pointing at the slide you're adding the transition to. Tap the blue circle on the arrow, and a Transitions pop-up appears (see Figure 14-31). This scrolling list contains a number of different animated transition effects, all of which add life to otherwise dull presentations. To see how a specific transition works with your slide, tap the name of the transition, and it is demonstrated for you.
The Options button (see Figure 14-32) on the Transitions pop-up sets options such as direction, speed, delay, and when to start the transition. Each transition effect is a bit different, so each has its own options to set. Once you've changed option settings, you can see how the changes affect your transition by tapping the small Play button in the upper right of the Transitions pop-up.
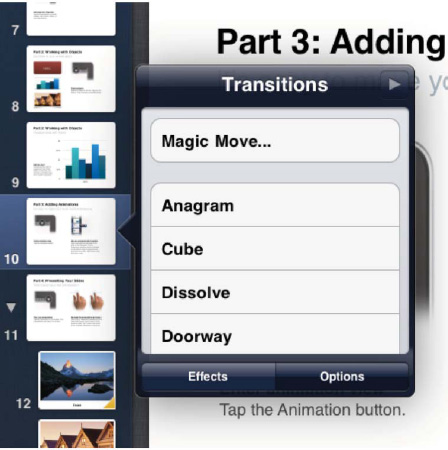
Figure 14.31. The Transitions pop-up contains a comprehensive list of eye-catching animations to use in transitioning between slides.
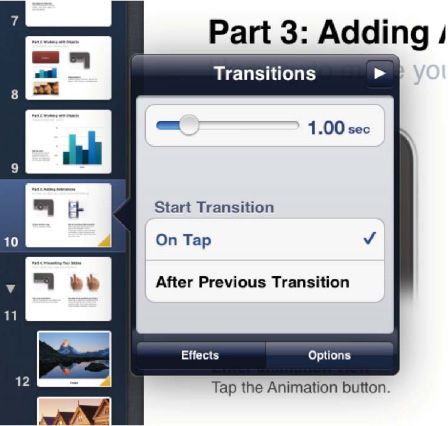
Figure 14.32. Each effect has a separate set of option controls to customize the speed, delay, direction, and other factors.
If you're familiar with setting up presentations in either Microsoft PowerPoint or the Mac version of Keynote, then you know that slide transitions aren't the only animations available to spice up your presentations. Animated builds, which add movement to slides by moving or spinning graphics or adding text bullets one at a time, can also rivet the attention of your audience.
To add a build effect to an object (graphic or text) on a slide, tap the Animation button, and then tap the object or text. A double-sided pop-up appears (see Figure 14-33) for adding a build-in (a transition where text or a graphic is being added to the slide) or build-out (a transition to remove text or a graphic from the slide).
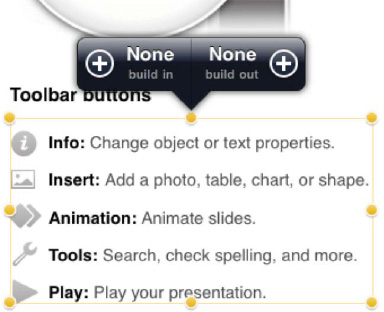
Figure 14.33. The Build pop-up. Tap the plus button on the left to create a text build to add one bullet at a time, and tap the button on the right side to create a build that removes the build when moving to a new slide or object.
Tapping the plus sign on the pop-up allows you to select the effect and change options. Two other buttons on the Build pop-up weren't on the Transitions pop-up—Delivery and Order. Delivery is usually available only for bulleted text, and it determines whether the text appears all at once or one bullet at a time. If you're using multiple builds on your slide, Order allows you to set the order in which the builds appear.
Although slide transitions and builds can be useful in creating an attractive presentation, be sure not to overuse them to the point of distracting from the goal of your slides—providing information to an audience.
At the far right end of the toolbar is the Play button. When it is tapped, the toolbar and sidebar disappear, and your presentation is displayed in full-screen. To advance slides or build bullet points in the presentation, tap the screen or swipe your finger to the left. Returning to a previous slide or bullet is accomplished by swiping your finger to the right. When using a video-out cable to project your presentation, the iPad display can provide a lot of useful information (see Figure 14-34).
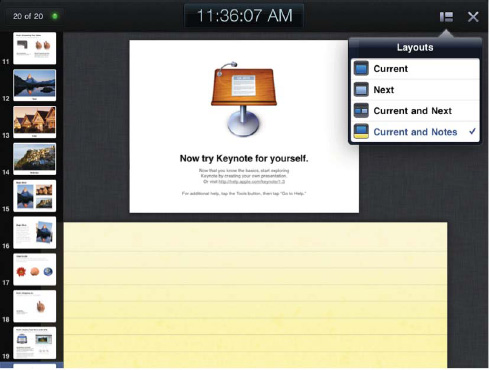
Figure 14.34. The Keynote Presenter Display. When you're giving a presentation from the iPad, this screen is a great assistant. The Presenter Display provides a view of upcoming and previous slides, what is currently on the projection screen, how long you've been talking, and even notes you've written.
At top left is a green light indicating that your presentation is being sent to the projector, along with a slide counter. In the figure, we're on the last of 20 slides, and a vertical strip showing your slides appears on the left side of the screen. You can see the current time at the top of the presenter display; tapping on it displays a timer showing how long you've been talking.
There's a small Layouts button at the top right, which displays four different presenter layouts when tapped. Current shows just the current slide, Next displays just the next slide in your presentation, Current and Next displays both the slide that is being projected and the next slide in your deck, and Current and Notes shows the current slide and any notes you may have written using the Presenter Notes tool. By the way, if you forgot your laser pointer back in the office, Keynote will save the day. Holding down your finger on the iPad screen creates a red virtual "laser pointer" that is useful in highlighting items on slides.
When your presentation is finished, tap the X button to return to the Keynote slide editor.
Many times, you may want to work on documents that you already created on your computer or that someone else sent to you through e-mail. In Chapter 11, we showed you how to open attachments that have been sent to you in Mail, so e-mailing documents to your iPad is one way to work on them while mobile.
Another method is to transfer the documents to your iPad by using iTunes on your computer. With your computer and iPad connected by the Dock Connector to USB Cable, launch iTunes on the computer. When the iPad appears in the Devices list in the left sidebar in the iTunes window, click it, and then click the Apps tab.
Scrolling past the list of apps on your iPad toward the bottom of the Apps tab, you'll find an area with the title File Sharing. There's a list of apps that can transfer documents between the iPad and computer, and the iWork apps that you've installed on your iPad will be in that list (see Figure 14-35).
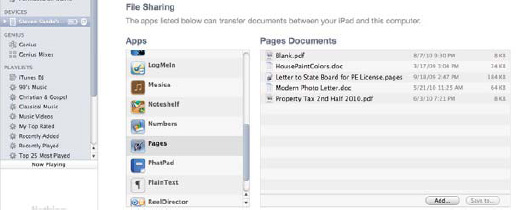
To transfer documents from your computer, click the appropriate app name on the left, and then click the Add button on the right side. A standard file Open dialog box for your computer appears, and then you can select one or more documents to transfer. Once the document files have been added to the list on the right side, clicking the Sync button in iTunes transfers the documents to your iPad.
Within any of the iWork apps, tapping the folder icon in the top-right corner of the My Documents, My Spreadsheets, or My Presentations window displays the documents stored on your iPad, and tapping the filename opens the file in the app.
A number of iPad file manager apps, like Air Sharing Pro and GoodReader, provide another way to move files to your iPad. These apps connect to MobileMe's iDisk, Dropbox, and other servers; allow you to view the files on the server; and then download and open them in iWork for iPad. With iPad printing support built into Air Sharing Pro, it makes a wonderful companion to iWork.
Moving documents out of iWorks is not as simple, because there is no common file store for these file managers to retrieve files from. In many cases, the only choices you may have for exporting documents are through e-mail (see Chapter 11), saving the documents to iWork.com (Apple's online repository for sharing iWork documents), or using iTunes as described earlier.
The iWork for iPad trio of Pages, Numbers, and Keynote is a powerful set of apps for creating documents for work or pleasure while you're on the go. These optional Apple apps work well with their Mac counterparts and, to a more limited degree, Microsoft Office.
In this chapter, we've provided a look at the user interface and major capabilities of Pages, Numbers, and Keynote. Although a more detailed discussion of each app could easily fill another book, we've given you the information you'll need to get started using iWork for iPad. Some important points to remember from this chapter include the following:
Pages, Numbers, and Keynote do not come with your iPad. To purchase the apps for $9.99 each and then install them, use the App Store app on your iPad while you're connected to a Wi-Fi network or purchase the apps in iTunes and then sync the iPad to your computer.
All three of the iWork for iPad apps include a page (My Documents/My Spreadsheets/My Presentations) displaying your existing documents, and you can choose to create a new document on a blank page or with a professionally designed theme or template.
The user interface is consistent between all three of the apps. If you become familiar with one of the iWork apps, you'll understand how to use the other two in no time at all.
Pages can be used both as a traditional word processor and as a page layout application, depending on your needs.
Numbers tabs are similar to sheets in an Excel workbook. Each tab can have one or more tables (spreadsheet) on it, as well as media (images), charts, and shapes.
Add transitions and builds to your Keynote presentations to make them more interesting and vibrant to your audience.
Transferring documents from your computer to your iPad is a great way to work on the go. You can transfer them by e-mail, through iTunes, or through a growing number of file management utilities.