
C H A P T E R 7
REST and AJAX
Until now we have been building quite a classic web application: we send a request to the server, the server processes the request, and we render the result and show it to the client. Over the last decade, however the way we build web applications has changed considerably. Now we have JavaScript and JSON/XML, which allow for AJAX-based web applications and also push more and more behavior push to the client, including validation, rendering parts of the screen, and so on.
In this chapter we start with REST1 (Representational State Transfer), a concept or architectural style that has influenced how we as developers think of web resources and how we should handle them. We next discuss AJAX and consider it in combination with REST.
The second part of this chapter covers file uploads. You will see how to do file uploading with the Spring Framework and how to handle the task in our controllers. However before we get into this let’s take a look at REST.
Representational State Transfer (REST)
This section briefly explains the topic of REST. The concept essentially has two parts: first the resources and how we identify them, and then the way we operate or work with these resources. REST was described in 2000 by Roy Thomas Fielding in a paper called ‘Architectural Styles and the Design of Network-based Software Architectures’.2 It describes how to work with resources using the HTTP protocol and the features offered by this protocol.
Identifying Resources
In Chapter 4 we briefly discussed the parts a URL (Unique Resource Locator) consists of. For REST this doesn’t really change; however, the URL is important as it points to a unique resource. Table 7-1 gives a couple of samples of resource locations.
_________

In REST it is all about a representation of a resource, and hence the URL/URI is important. It gives us the location of an actual resource (web page, image on the web page, mp3 file, or whatever). What we see in our web browser isn’t the actual resource but a representation of that resource. The next section explains how we can use this resource location to work with (modify, delete, and so on) that resource.
Working with Resources
The HTTP protocol specifies several methods (HTTP methods3) to work with information from our application. Table 7-2 gives an overview of the methods.

_________
In the previous section, “Identifying Resources,” we mentioned how a URL points to a resource. If we combine REST with the resources from Table 7-1, we could actually work with them, as outlined in Table 7-3.

The list of HTTP methods is larger than most web browsers support. In general, they only support the GET and POST methods, and not the other methods identified. To be able to use the different methods in a classic web application, we need to use a workaround; for this Spring MVC has the HiddenHttpMethodFilter.
HiddenHttpMethodFilter
The org.springframework.web.filter.HiddenHttpMethodFilter will transform a POST request to another specified type of request. It uses a request parameter to determine which method to use for the incoming request. By default it uses a request parameter with the name _method; however, this name can be configured. A POST request can be “transformed” to a PUT or DELETE by making sure the request parameter is there; the request will then be wrapped in a HttpMethodRequestWrapper (which is an inner class for the filter). A GET request is processed as is and will not be transformed into another type of request. This is because a GET request, unlike the other types, has all parameters encoded in the URL. By contrast the POST and PUT requests have them encoded in the request body.
Let’s configure the HiddenHttpMethodFilter for our web application. Open com.apress.prospringmvc.bookstore.web.BookstoreWebApplicationInitializer and let’s add a method that adds our filter. Listing 7-1 shows the modification needed.
Listing 7-1. BookstoreWebApplicationInitializer with HiddenHttpMethodFilter
package com.apress.prospringmvc.bookstore.web;


import java.util.EnumSet;


// javax.servlet imports omitted


import org.springframework.web.WebApplicationInitializer;

import org.springframework.web.filter.HiddenHttpMethodFilter;


public class BookstoreWebApplicationInitializer implements WebApplicationInitializer {


    private static final String DISPATCHER_SERVLET_NAME = "dispatcher";


    @Override

    public void onStartup(ServletContext servletContext) throws ServletException {

        registerListener(servletContext);

        registerDispatcherServlet(servletContext);

        registerHiddenHttpMethodFilter(servletContext);

    }


    private void registerHiddenHttpMethodFilter(ServletContext servletContext) {

        FilterRegistration.Dynamic registration;

        registration = servletContext.addFilter("hiddenHttpMethodFilter",

                                 HiddenHttpMethodFilter.class);

        registration.addMappingForServletNames(

                 EnumSet.of(DispatcherType.REQUEST, DispatcherType.FORWARD),

                 false,

                 DISPATCHER_SERVLET_NAME);

    }

    // Other methods omitted

}
Now that we have configured the filter, we need to modify our account page. Open up the account.jsp file and make sure there is a hidden field with the name _method and the value PUT. Listing 7-2 shows the start of the page; as you can see, the opening of the form has this hidden field defined.
Listing 7-2. Account.jsp Heading
<%@ taglib prefix="c" uri="http://java.sun.com/jsp/jstl/core"%>

<%@ taglib prefix="spring" uri="http://www.springframework.org/tags" %>

<%@ taglib prefix="form" uri="http://www.springframework.org/tags/form" %>


<form:form method="POST" modelAttribute="account" id="accountForm">

    <input type="hidden" name="_method" value="PUT" />

    <fieldset>

        <legend><spring:message code="account.personal"/></legend>


// Remainder of page omitted
When the page is submitted, the HiddenHttpMethodFilter will do its work and transform our POST request into a PUT request. The controller was already written with this in mind; see Listing 7-3 for the update method. Here we reused the same method for both POST and PUT, but we could have handled them separately.
Listing 7-3. AccountController Update Method
package com.apress.prospringmvc.bookstore.web.controller;


//Imports omitted


@Controller

@RequestMapping("/customer/account")

@SessionAttributes(types = Account.class)

public class AccountController {


    @RequestMapping(method = { RequestMethod.POST, RequestMethod.PUT })

    public String update(@ModelAttribute Account account) {

        this.accountRepository.save(account);

        return "redirect:/customer/account";

    }

    // Other methods omitted

}
The use of the filter is still a workaround to make REST possible with browsers and normal forms, which can be useful if we choose to use progressive enhancement or graceful degradation for our website. Progressive enhancement means adding rich behavior to a basic page and first making sure our basic page works as we want it to. Graceful degradation is the other way around—we develop a rich website and try to make sure the whole site still works even if certain features aren’t available.
Asynchronous JavaScript and XML (AJAX)
The term AJAX was coined4 by Jesse James Garrett5 in 2005. AJAX by itself isn’t a technology, it is a collection of technologies working together to create a rich user experience for our web application. AJAX incorporates the following technologies:
- Standards-based presentation by using HTML and CSS
- Dynamic display and interaction by using the Document Object Model (DOM)
- Data interchange and manipulation (using XML or JSON)
- Asynchronous data retrieval using the
XMLHttpRequest- JavaScript to bring all this together
Although the acronym stands for Asynchronous JavaScript and XML, it is often used with JavaScript Object Notation (JSON) to pass data between the client and server.
As AJAX has already been in use for a couple of years, there are quite a lot of JavaScript frameworks out there that make it easier to create a rich user experience. For Spring MVC, it doesn’t matter which JavaScript library you choose, and it is beyond the scope of the book to discuss the abundance of JavaScript libraries out there. For our example we use jQuery,6 as at the moment of writing it is one of the most widely used libraries out there. To be able to use jQuery, we need to load the JavaScript file containing this library. For this we modify the template.jsp file to include jQuery (see Listing 7-4).
Listing 7-4. Modified template.jsp Header
<!DOCTYPE HTML>

<%@ taglib prefix="c" uri="http://java.sun.com/jsp/jstl/core"%>

<%@ taglib prefix="spring" uri="http://www.springframework.org/tags" %>

<%@ taglib prefix="tiles" uri="http://tiles.apache.org/tags-tiles" %>


<html>

<head>

    <meta charset="utf-8">

    <c:set var="titleKey">

        <tiles:getAsString name="title" />

    </c:set>

    <title>Bookstore | <spring:message code="${titleKey}" text="Your Home in Books"/></title>

    <link rel="stylesheet" type="text/css" href="<c:url value="/resources/css/style.css"/>" >

    <script src="<c:url value="/resources/jquery/jquery-1.7.1.min.js"/>"></script>

</head>

//Body Omitted

</html>
This adds the jQuery JavaScript library to all of our pages; however, by itself it doesn’t do much. We still need to add logic to our page. In the next sections we are going to add AJAX behavior to our sample application. We will start with a simple form submit and along the way explore the features that Spring MVC offers to work with AJAX and how it helps us building REST applications.
_________
Adding AJAX to Our Application
Thanks to the flexibility of Spring MVC, it is quite easy to add AJAX behavior to our application and integrate it nicely with Spring MVC. In this section we will see how we can change our form submit into an AJAX-based form submit (with and without the use of JSON). However a form submit isn’t the only possible use for AJAX; it merely serves our sample application, it is also quite possible to create auto-completion fields, automatic field/form validation, and so on.
AJAX Form Submit with HTML Result
Let’s take a look at our book search page and transform that into a more dynamic web page. We will start by changing the normal form submit into an AJAX form submit. Open the search.jsp file and add the script as shown in Listing 7-5 right after the form or at the bottom of the page.
Listing 7-5. Book Search Page with AJAX Form Submit
<script>

$('#bookSearchForm').submit(function(evt){

    evt.preventDefault();

    formData = $('#bookSearchForm').serialize();

    $.ajax({

        url: $('#bookSearchForm').action,

        type: 'GET',

        data: formData

    });

});

</script>
This script replaces the actual form submit. It first prevents the actual submit from happening, and then builds an AJAX request that will pass the data to the server. If we now redeploy our application, navigate to our book search page, and press Submit, it looks like nothing happens. At least we don’t see anything change on the screen. If we debug our application, we can see the request arrive at the server and the search being issued. So why isn’t the result being rendered?
At the beginning of this section, we mentioned that AJAX is a collection of technologies, and one of those is asynchronous data retrieval using the XMLHttpRequest. This is also where our current problem lies. We send a request to the server but we haven’t included anything to handle the response from the server. Listing 7-6 shows the modified script (see the highlighted part) to actually render the returned page.
Listing 7-6. Book Search Page with Success Handler
<script>

$('#bookSearchForm').submit(function(evt){

    evt.preventDefault();

    formData = $('#bookSearchForm').serialize();

    $.ajax({

        url: $('#bookSearchForm').action,

        type: 'GET',

        data: formData,

        success: function(html) {

            resultTable = $('#bookSearchResults', html);

            $('#bookSearchResults').html(resultTable);

        }

    });

});

</script>
We added the success handler for this script and what it does is render the result we receive from the server. The result is the whole page as it would normally be rendered. We select the table with the results and we replace the current table on screen with the detected table. If the application is redeployed and a search is issued, the page would work again.
AJAX Form Submit with JSON Result
The previous section showed a basic AJAX form submit from which we got back HTML. Although this approach works, it is not very efficient. We send data to the server and we get the full page as we would normally render back. It would be better if we could simply return the data we need to render and process that on the client. For this we need to change a little in our JavaScript but we also need to extend our server side. We need an additional method to return JSON-encoded data to the client (see Listing 7-7).
Listing 7-7. BookSearch Controller with JSON Producing Method
package com.apress.prospringmvc.bookstore.web.controller;


import org.springframework.http.MediaType;

import org.springframework.web.bind.annotation.ResponseBody;


// Other imports omitted


@Controller

public class BookSearchController {


    // Other methods omitted


    @RequestMapping(value = "/book/search",

                    method = ( RequestMethod.GET ),

                    produces = MediaType.APPLICATION_JSON_VALUE )

    public @ResponseBody Collection<Book> listJSON(

        @ModelAttribute("bookSearchCriteria") BookSearchCriteria criteria) {

        return this.bookstoreService.findBooks(criteria);

    }

}
The method does the same as the original list method on the same controller; however, there are two important differences, which are highlighted. The first is that this method is invoked whenever an incoming request has specified that it wants to receive JSON (by setting the Accept headers as explained in Chapter 4). Second we use the org.springframework.web.bind.annotation.ResponseBody annotation to instruct Spring MVC to use the returned value as the body of the response (see the section “Supported Method Argument Annotations” in Chapter 5). The returned value is converted by using an org.springframework.httpconverter.HttpMessageConverter.
![]() Tip Spring MVC automatically registers the
Tip Spring MVC automatically registers the org.springframework.http.converter.json.MappingJacksonHttpMessageConverter when the Jackson Java JSON-processor7 is found on the classpath.
In addition to the controller, we also need to modify our JavaScript a little, to specify that we want to receive JSON from the server. Because we’ll receive JSON, we also need to use JSON to replace the content of our result table. In Listing 7-8 you can see the result for the search.jsp file.
Listing 7-8. Book Search Page with JSON Success Handler
<script>

$('#bookSearchForm').submit(function(evt){

    evt.preventDefault();

    formData = $('#bookSearchForm').serialize();

    $.ajax({

        url: $('#bookSearchForm').action,

        type: 'GET',

        dataType: 'json',

        data: formData,

        success: function(data) {

            var content = '';

            var books = data;

            var baseDetailUrl = <c:url value="/book/detail/"/>;

            var baseAddCartUrl = <c:url value="/cart/add/" />;

            for (var i = 0; i<books.length; i++) {

                content += '<tr>';

                content += '<td><a href="'

                           + baseDetailUrl + books[i].id+'">'

                           + books[i].title+'</a</td>';

                content += '<td>'+books[i].description+'</td>';

                content += '<td>'+books[i].price+'</td>';

                content += '<td><a href="'+ baseAddCartUrl +books[i].id+'">

                            <spring:message code="book.addtocart"/>

                            </a></td></tr>';

            }

            $('#bookSearchResults tbody').html(content);

        }

    });

});

</script>
_________
When the application is redeployed and a search is issued, our new method will be invoked and JSON will be returned to the client. The client will use the JSON objects to create a new table body, and when the body is created it will replace the current table body.
Sending and Receiving JSON
It is possible to send JSON to the server as well as to receive JSON from the server. . The advantage of sending JSON is that it is quite compact and therefore faster to send and process (both client and server side) than XML. A drawback can be that you need some hand-coding to prepare the JSON for sending to the server, especially when reusing existing objects (as we can see in our sample).
To make this possible, we need to modify our client-side JavaScript and also make some changes to our request handling method. The controller needs to know that we aren’t using a normal model attribute but instead want to use JSON for our BookSearchCriteria. To enable this, we are going to annotate our method argument with RequestBody; it is analogous to ResponseBody, but for incoming requests. Listing 7-9 highlights the changes that need to be made to the controller.
Listing 7-9. BookSearchController with RequestBody Annotation
package com.apress.prospringmvc.bookstore.web.controller;


import org.springframework.web.bind.annotation.RequestBody;


//Other imports omitted


@Controller

public class BookSearchController {


// Other methods omitted


@RequestMapping(value = "/book/search",

                method = { RequestMethod.POST },

                produces = MediaType.APPLICATION_JSON_VALUE)

    public @ResponseBody Collection<Book> listJSON(

                                 @RequestBody BookSearchCriteria criteria) {

        return this.bookstoreService.findBooks(criteria);

    }

}
Notice the change from a GET request to a POST request; this is needed because we are using the RequestBody annotation. As the name of the annotation implies, it operates on the body of a request, but a GET request in general encodes the data in the URL instead of the body.
![]() Note When using the
Note When using the RequestBody and ResponseBody annotations, Spring MVC doesn’t use the type conversion system to convert from an id to an actual object (like our category). That’s because in REST, everything to represent/build the resource should be part of the request.
Having modified our controller, we also need to modify our JavaScript again. We need to convert the data from the form into a JSON string that we can send to the server. Listing 7-10 shows what needs to be changed.
Listing 7-10. Book Search Page with JSON Form Submit
<script>

$('#bookSearchForm').submit(function(evt){

    evt.preventDefault();

    var title = $('#title').val();

    var category = $('#category').val();

    var json = { "title" : title, "category" : { "id" : category}};


    $.ajax({

        url: $('#bookSearchForm').action,

        type: 'POST',

        dataType: 'json',

        contentType: 'application/json',

        data: JSON.stringify(json),

        success: function(books) {

            var content = '';

            var baseDetailUrl = '<c:url value="/book/detail/"/>';

            var baseAddCartUrl = '<c:url value="/cart/add/" />';

            for (var i = 0; i<books.length; i++) {

                content += '<tr>';

                content += '<td><a href="'+ baseDetailUrl + books[i].id+'">'

                           +books[i].title+'</a></td>';

                content += '<td>'+books[i].description+'</td>';

                content += '<td>'+books[i].price+'</td>';

                content += '<td><a href="'+ baseAddCartUrl +books[i].id+'">

                            <spring:message code="book.addtocart"/>

                            </a></td></tr>';

            }

            $('#bookSearchResults tbody').html(content);

        }

    });

});

</script>
The first highlighted block is the conversion of our form data into a JSON object. The second highlighted line is the type. We need to change it to POST. This is needed because the content is the body of the request, and a GET request doesn’t have a body but encodes everything into the URL. The last highlighted line is the conversion of the JSON object into a JSON string which can be sent to the server. Everything else remains the same.
If the application is redeployed and we issue a search, the search results will be shown to the user again.
![]() Note jQuery has a plugin architecture, and there are a couple of plugins out there that make form-to-JSON conversion easier. We choose not to use a plugin, as that would focus too much on the plugin.
Note jQuery has a plugin architecture, and there are a couple of plugins out there that make form-to-JSON conversion easier. We choose not to use a plugin, as that would focus too much on the plugin.
Combining AJAX and REST
We briefly covered REST and we also touched on the subject of AJAX, but we covered each topic separately. However, it is also very easy to combine the two. In the REST section, we changed the account update form into a form that was issued with a PUT request, but this was a simulation using POST. With the JavaScript library we use, it is actually possible to create a real PUT request instead of a POST request that is being used as a PUT request.
To be able to issue and handle PUT requests, we need to do two things: the form must be submitted by AJAX as a PUT request, and we need to prepare the server to be able to handle PUT requests. There are some differences between the POST and PUT requests. A major difference is that a POST request must have the form data available (this is required by the specification), but for the PUT request that is not the case. Spring provides a org.springframework.web.filter.HttpPutFormContentFilter, which can help us here.
The filter kicks in when a PUT request with a content-type of application/x-www-form-urlencoded is detected. It parses the body of the incoming request (delegated to an org.springframework.http.converter.xml.XmlAwareFormHttpMessageConverter), and the result is a map of parameters that can be used just like normal form parameters. Listing 7-11 shows how to register the filter.
Listing 7-11. Register HttpPutFormContentFilter
package com.apress.prospringmvc.bookstore.web;


import org.springframework.web.filter.HttpPutFormContentFilter;

// Other imports omitted.


public class BookstoreWebApplicationInitializer implements WebApplicationInitializer {


    private static final String DISPATCHER_SERVLET_NAME = "dispatcher";


    @Override

    public void onStartup(ServletContext servletContext)

    throws ServletException {

        registerListener(servletContext);

        registerDispatcherServlet(servletContext);

        registerHttPutFormContentFilter(servletContext);

        registerHiddenHttpMethodFilter(servletContext);


    }


    private void registerHttPutFormContentFilter(

           ServletContext servletContext) {

        FilterRegistration.Dynamic registration;

        registration = servletContext.addFilter(

                           "httpPutFormContentFilter",

                            HttpPutFormContentFilter.class);

        registration.addMappingForServletNames(

            EnumSet.of(DispatcherType.REQUEST, DispatcherType.FORWARD),

            false,

            DISPATCHER_SERVLET_NAME);

    }

    // Other methods omitted

}
Next we also need to add some JavaScript to our account.jsp file. It is quite similar to the script we first added to our book search page, with one major difference—we now use a PUT instead of a GET. See Listing 7-12 for the JavaScript that is added right after the form or at the end of the page. The controller method (see Listing 7-3) remains the same, as it still is a PUT request for the controller.
Listing 7-12. Account Page PUT Ajax Form Submit
<script>

$('#accountForm').submit(function(evt){

    evt.preventDefault();

    formData = $('#accountForm').serialize();

    $.ajax({

        url: $('#accountForm').action,

        type: 'PUT',

        data: formData

    });

});

</script>
Progressive Enhancement
The way we have been applying the AJAX features is a technique called progressive enhancement. It means that one builds a simple web page that functions as is, and then add dynamic and rich behavior to the page with JavaScript.
The opposite approach is also possible; this technique is called graceful degradation, which means that we start with a page with all the behavior we want and depending on the features offered by the browser we scale down on the rich behavior used.
The trend nowadays is to use progressive enhancement because, in general, it is easier to build and maintain. It also has the advantage that we can enhance based on the capabilities of the device that connects to our application (an iPhone has different features than a Windows 7 PC with Internet Explorer 9).
Handling File Uploads
HTTP file uploading or form based file upload in HTML is defined RFC 1867.8 After adding an HTML input field with type file to the form and setting the encoding to multipart/form-data, the browser can send text and/or binary files to the server as part of a POST request.
To be able to handle file uploads we first need to register an org.springframework.web.multipart.MultipartResolver. Out of the box, Spring provides two ways of handling file uploads. The first is the multipart support as described in the Servlet 3.0 specification, and the second is by using the features offered by the Commons FileUpload9 project from Apache.
The Spring Framework provides two implementations: the org.springframework.web.multipart.support.StandardServletMultipartResolver and the org.springframework.web.multipart.commons.CommonsMultipartResolver. The first implementation can only be used in a Servlet 3.0 environment with multipart enabled on the servlet, and the second uses commons-fileupload.
For the actual handling of file uploads we need to modify the controller. These modifications are mostly independent from the file uploading technology used. Spring provides several abstractions to handle file uploads. We can write a request-handling method that takes an argument of the type org.springframework.web.multipart.MultipartFile (or collection); we could also use a org.springframework.web.multipart.MultipartHttpServletRequest and retrieve the files ourselves. When we are in a Servlet 3.0 environment and also use the multipart parsing support, we can also use the javax.servlet.http.Part interface to get the file.
The final way to indicate to do something with a file upload is to annotate the method argument with org.springframework.web.bind.annotation.RequestPart (see Chapter 4). When put on anything else as described above, Spring uses the type conversion system to transform the content of the file.
We will first discuss the configuration for the two different strategies. After that, we will look at how to handle file uploads inside a controller.
Configuration
The first step in enabling file uploads is to configure our environment. As Spring provides two different technologies out of the box, each of these requires a different set of configuration items. We will look at the Servlet 3.0 multipart support and afterward at commons-fileupload.
Which one to choose depends on the requirements. If the application is strictly to run in a Servlet 3.0 environment, use the standard multipart support as specified by the Servlet specification. If the application needs to run in older containers also, choose the commons-fileupload support.
_________
Configuring Servlet 3.0 File Uploading
The first step in multipart parsing on the org.springframework.web.servlet.DispatcherServlet we need to add, depending on our configuration, a multipart-config section to XML configuration or include a javax.servlet.MultipartConfigElement in our org.springframework.web.WebApplicationInitializer implementation (see Listing 7-13).
Listing 7-13. BookstoreWebApplicationInitializer with MultipartConfigElement
package com.apress.prospringmvc.bookstore.web;


import javax.servlet.MultipartConfigElement;


//Other imports omitted


public class BookstoreWebApplicationInitializer implements WebApplicationInitializer {


    private static final String DISPATCHER_SERVLET_NAME = "dispatcher";


    private static final long MAX_FILE_UPLOAD_SIZE = 1024 * 1024 * 5;

    private static final int FILE_SIZE_THRESHOLD = 1024 * 1024;

    private static final long MAX_REQUEST_SIZE = -1L;


    private void registerDispatcherServlet(ServletContext servletContext) {

        AnnotationConfigWebApplicationContext dispatcherContext;

        dispatcherContext = createContext(WebMvcContextConfiguration.class);

        ServletRegistration.Dynamic dispatcher;

        dispatcher = servletContext.addServlet(DISPATCHER_SERVLET_NAME,

                new DispatcherServlet(dispatcherContext));

        dispatcher.setLoadOnStartup(1);

        dispatcher.addMapping("/");


        dispatcher.setMultipartConfig(

            new MultipartConfigElement(null,

              MAX_FILE_UPLOAD_SIZE, MAX_REQUEST_SIZE, FILE_SIZE_THRESHOLD));

    }

    // Other methods omitted

}
When the servlet is configured for multipart parsing,we then need to add the StandardServletMultipartResolver to our configuration (Listing 7-14). There is no more configuration to be done for the multipart resolver; that is already done with the MultipartConfigElement.
Listing 7-14. WebMvcContextConfiguration with StandardServletMultipartResolver
package com.apress.prospringmvc.bookstore.web.config;


import org.springframework.web.multipart.MultipartResolver;

import org.springframework.web.multipart.support.StandardServletMultipartResolver;


// Other imports omitted


@Configuration

@EnableWebMvc

@ComponentScan(basePackages = { "com.apress.prospringmvc.bookstore.web" })

public class WebMvcContextConfiguration extends WebMvcConfigurerAdapter {


    // Other methods omitted


    @Bean

    public MultipartResolver multipartResolver() {

        return new StandardServletMultipartResolver();

    }

}
Configuring Apache Commons File Uploading
In older servlet containers or for a more portable way of file uploading, we can use the commons file upload support in Spring MVC. This requires only the registration of a CommonsMultipartResolver to enable file uploads (Listing 7-15). We don’t have the multipart parsing on the servlet anymore, and so we need to do configuration for max file size and the like on the multipart resolver.
Listing 7-15. WebMvcContextConfiguration with a CommonsMultipartResolver
package com.apress.prospringmvc.bookstore.web.config;


import org.springframework.web.multipart.MultipartResolver;

import org.springframework.web.multipart.commons.CommonsMultipartResolver;


// Other imports omitted


@Configuration

@EnableWebMvc

@ComponentScan(basePackages = { "com.apress.prospringmvc.bookstore.web" })

public class WebMvcContextConfiguration extends WebMvcConfigurerAdapter {


    private static final long MAX_FILE_UPLOAD_SIZE = 1024 * 1024 * 5; //5 Mb file limit

    private static final int FILE_SIZE_THRESHOLD = 1024 * 1024; // After 1Mb start

 writing files to disk


    // Other methods omitted


    @Bean

    public MultipartResolver multipartResolver() {

        CommonsMultipartResolver multipartResolver = new CommonsMultipartResolver();

        multipartResolver.setMaxInMemorySize(FILE_SIZE_THRESHOLD);

        multipartResolver.setMaxUploadSize(MAX_FILE_UPLOAD_SIZE);

        return multipartResolver;

    }

}
Request Handling Method for File Upload
In addition to configuring the upload, we also need a page with a form that can submit a file. For this we need to create a form that has its encoding set to multipart/form-data (Listing 7-16). This form doesn’t change if we change the different techniques available; it is only the way the uploads are handled that changes. When adding an input element with the type file, it is important to give it a name, especially if we do a single file upload. This name is also needed to retrieve the file from the request.
Listing 7-16. Upload Order Form for Account Page
<form id="orderForm" action="<c:url value="/order/upload"/>" method="POST"

 enctype="multipart/form-data">

    <fieldset>

        <legend>Upload order</legend>

        <input type="file" placeholder="Select File" id="order" name="order"/>

        <button id="upload"><spring:message code="button.upload"/></button>

    </fieldset>

</form>
We add this form to the account.jsp file right after the already existing form. When we now render the account page, it will look like Figure 7-1.

Figure 7-1. Account Page with File Upload
In the following sections we will explore the different ways of handling file uploads in a controller. Most of the methods are portable between the two different file upload technologies; however, the last one is only available when using the Servlet 3.0 multipart support. Each of the different request handling methods has the same output when a file is uploaded; it will print the name of the uploaded file and the size of the file, as shown in Figure 7-2.
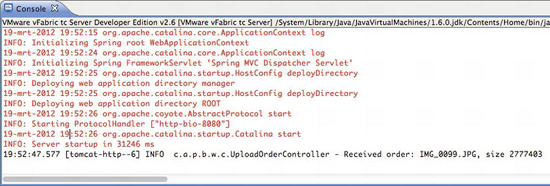
Figure 7-2. Sample File Upload Output
Writing a Request Handling Method with Multipart File
When writing a request handling method, if we want to do file upload and use the multipart file abstraction from Spring, we need to create a method, annotate it, and make sure it has a MultipartFile as a method argument. When there are multiple files uploaded with the same name, we can also receive a collection of files instead of a single element. Listing 7-17 shows a controller with a method that can handle file uploads using this technique.
Listing 7-17. UploadOrderController with MultipartFile
package com.apress.prospringmvc.bookstore.web.controller;


// Other imports omitted

import org.springframework.web.multipart.MultipartFile;


@Controller

public class UploadOrderController {


    private Logger logger;

    logger = LoggerFactory.getLogger(UploadOrderController.class);


    @RequestMapping(value = "/order/upload", method = RequestMethod.POST)

    public String handleUpload(MultipartFile order) {

        logFile(order.getOriginalFilename(), order.getSize());

        return "redirect:/customer/account";

    }


    private void logFile(String name, long size) {

        this.logger.info("Received order: {}, size {}", name, size);

    }

}
Using MultipartHttpServletRequest to Handle File Uploads
Instead of accessing the file(s) directly, it is also possible to use MultipartHttpServletRequest to get access to the multipart files (Listing 7-18). This interface defines some methods to get access to the files. The methods that are exposed to get access to the multipart files are defined in the super interface org.springframework.web.multipart.MultipartRequest.
Listing 7-18. UploadOrderController with MultipartHttpServletRequest
package com.apress.prospringmvc.bookstore.web.controller;


// Other imports omitted

import org.springframework.web.multipart.MultipartFile;

import org.springframework.web.multipart.MultipartHttpServletRequest;


@Controller

public class UploadOrderController {


    private Logger logger;

    logger = LoggerFactory.getLogger(UploadOrderController.class);


    @RequestMapping(value = "/order/upload", method = RequestMethod.POST)

    public String handleUpload(MultipartHttpServletRequest request) {

        Map<String, MultipartFile> files = request.getFileMap();

        for (MultipartFile file : files.values()) {

            logFile(file.getOriginalFilename(), file.getSize());

        }

        return "redirect:/customer/account";

    }


    private void logFile(String name, long size) {

        this.logger.info("Received order: {}, size {}", name, size);

    }

}
Using a Form Object to Handle Upload
Instead of handling the upload directly, we could also make it part of a form object (model attribute). This can be convenient if the upload is part of a form that includes more fields (like our customer account page, which includes a picture). To be able to do this we need to create a class that can be used as the form object, with an attribute of type MultipartFile (Listing 7-19).
Listing 7-19. UploadOrderForm
package com.apress.prospringmvc.bookstore.web;


import org.springframework.web.multipart.MultipartFile;


public class UploadOrderForm {


    private MultipartFile order;


    public MultipartFile getOrder() {

        return this.order;

    }


    public void setOrder(final MultipartFile order) {

        this.order = order;

    }

}
We need to modify the controller to take the form as a method argument (see Listing 7-20).
Listing 7-20. UploadOrderController with UploadOrderForm
package com.apress.prospringmvc.bookstore.web.controller;


// Other imports omitted

import com.apress.prospringmvc.bookstore.web.UploadOrderForm;


@Controller

public class UploadOrderController {


    private Logger logger;

    logger = LoggerFactory.getLogger(UploadOrderController.class);


    @RequestMapping(value = "/order/upload", method = RequestMethod.POST)

    public String handleUpload(UploadOrderForm form) {

        logFile(form.getOrder().getOriginalFilename(), form.getOrder().getSize());

        return "redirect:/customer/account";

    }


    private void logFile(String name, long size) {

        this.logger.info("Received order: {}, size {}", name, size);

    }

}
Writing a Request Handling Method Using Servlet 3.0
In a strict Servlet 3.0 environment, we can use the standard interface javax.servlet.http.Part to get access to the uploaded file. We simply create a method that takes the Part as an argument (see Listing 7-21) We need to create a method, annotate it, and give it a method argument. This technique only works in a Servlet 3.0 environment and is in that regard less portable than using the MultipartFile argument.
Listing 7-21. UploadOrderController with Part
package com.apress.prospringmvc.bookstore.web.controller;


// Other imports omitted

import javax.servlet.http.Part;


@Controller

public class UploadOrderController {


    private Logger logger;

    logger = LoggerFactory.getLogger(UploadOrderController.class);


    @RequestMapping(value = "/order/upload", method = RequestMethod.POST)

    public String handleUpload(final Part order) {

        logFile(order.getName(), order.getSize());

        return "redirect:/customer/account";

    }


    private void logFile(String name, long size) {

        this.logger.info("Received order: {}, size {}", name, size);

    }

}
Exception Handling
Uploading a file can also fail. The file could be too large to handle (larger than the configured maximum file size), or our disks could be full. There are many reasons it might fail. If possible, we want to handle the errors and show a nice error page to the users. We can use the exception handling (as explained in Chapter 6) to handle the exception for us and show a nice error page. When an exception occurs, the multipart support will throw an org.springframework.web.multipart.MultipartException, and we can use this exception to show an error page.
![]() Note The
Note The CommonsMultipartResolver throws a more specific MaxUploadSizeExceededException in this particular case, else it will throw a MultipartException.
Summary
This chapter covered Representation State Transfer (REST), as explained by Roy Thomas Fielding, and you saw how we can configure Spring MVC to facilitate the different methods as used by REST. We discussed the configuration of the HiddenHttpMethodFilter and the use-case for this filter.
Next we briefly explained Asynchronous JavaScript and XML (AJAX) and how we can use that on the client and have controllers react to those requests. Although AJAX was originally about XML, nowadays it is about JSON; and we explored the JSON features offered by Spring MVC by using the RequestBody and ResponseBody annotation.
It is also very useful to combine AJAX and REST and it allows for creating a REST-based API for our application. However to allow for easy processing of PUT requests we need to configure the HttpPutFormContentFilter, which makes the PUT body content available as request parameters.
The final part of this chapter looked at uploading files to our application. For this purpose we looked at the configuration needed for Servlet 3.0 multipart support and commons-fileupload support and then explored the different ways of writing a controller that can handle file uploads.