
C H A P T E R 8
Resolving and Implementing Views
So far we have mainly used Java Server Pages (JSP) as our view technology; however, Spring MVC provides a very powerful and flexible mechanism to resolve and implement views. We looked briefly at the view resolving mechanism in Chapter 4; in this chapter we will take a closer look at the different ViewResolver implementations and see how we can create and use our own implementation.
We will also see which view technologies are supported by Spring MVC out-of-the-box, and we will create some custom implementations. Before we dive into the internals, however, let’s recap the view rendering process and API.
View Resolvers and Views
In Chapter 4 we discussed the request processing workflow of the dispatcher servlet. Resolving and rendering a view is part of that process. In Figure 8-1 you can see the view rendering process (see the section “Render View” in Chapter 4 for a description).

Figure 8-1. View rendering process
The controller can return an org.springframework.web.servlet.View implementation or a reference to a view (view name). In the latter case the ViewResolvers configured are consulted to translate the reference into a concrete implementation. When an implementation is available it will be instructed to render; otherwise, a javax.servlet.ServletException is thrown.
The ViewResolver (see Listing 8-1) has only a single method that is used to resolve to a View.
Listing 8-1. ViewResolver API
package org.springframework.web.servlet;


import java.util.Locale;


public interface ViewResolver {


    View resolveViewName(String viewName, Locale locale) throws Exception;


}
When a view has been selected, the dispatcher servlet will call the render method (see Listing 8-2) on the view instance. The getContentType method is used to determine the type of content. This value is used to set the content type on the response; it is also used by the org.springframework.web.servlet.view.ContentNegotiatingViewResolver to determine the best matching view (see the upcoming section about this view resolver for more information).
Listing 8-2. View API
package org.springframework.web.servlet;


import java.util.Map;


import javax.servlet.http.HttpServletRequest;

import javax.servlet.http.HttpServletResponse;


public interface View {


    String getContentType();


    void render(Map<String, ?> model,

                HttpServletRequest request,

                HttpServletResponse response) throws Exception;


}
View Resolvers
In Chapter 4 we showed the hierarchy for the different ViewResolver implementations. Let’s take a closer look at the generic usable implementations, how they work, and how they can be configured. Figure 8-2 shows the different implementations again. The implementations specific to particular view technologies are explained in the “View Technologies” section. [
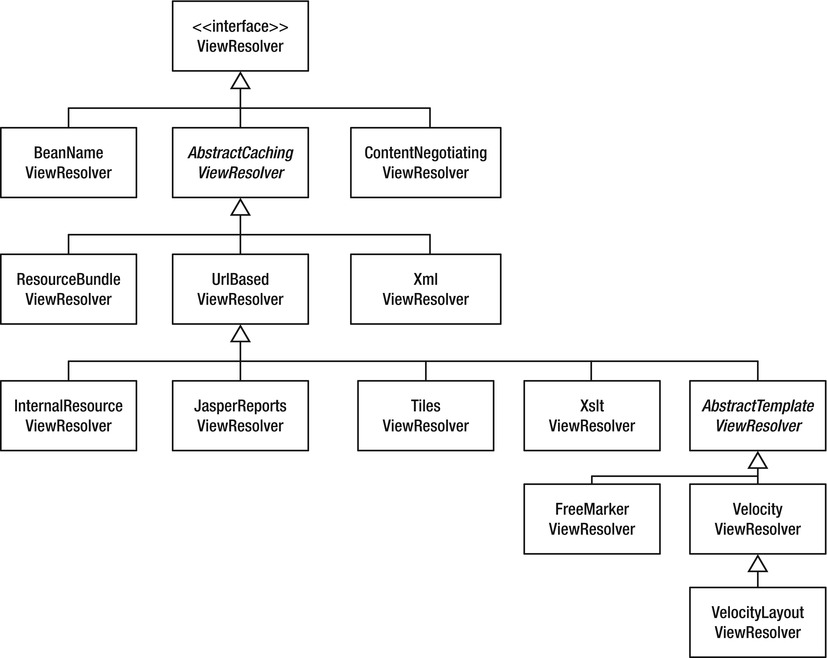
Figure 8-2. ViewResolver hierarchy
BeanNameViewResolver
The org.springframework.web.servlet.view.BeanNameViewResolver is the most basic implementation available and one of the default ones configured. It takes the name of the view and looks in the org.springframework.context.ApplicationContext to see if there is a View with that name. If there is, the resolver will return it; otherwise, it returns null. This view resolver is useful in small(er) applications; however, it has one big drawback in that each view needs to be configured in the application context. It has a single property that can be configured, and that is the order in which it is being called (see Table 8-1).

In Listing 8-3, you can see how and what we would need to configure to have our index page served and resolved by this view resolver. We have explicitly configured the BeanNameViewResolver; this is only needed if the defaults of the dispatcher servlet don’t suffice. We also need to add a View instance, and as we are using a JSP with JSTL support, we are returning an org.springframework.web.servlet.view.JstlView.
Listing 8-3. BeanNameViewResolver configuration
package com.apress.prospringmvc.bookstore.web.config;


// Other imports omitted

import org.springframework.web.servlet.view.BeanNameViewResolver;

import org.springframework.web.servlet.view.JstlView;


@Configuration

public class ViewConfiguration {


    @Bean

    public ViewResolver viewResolver() {

        BeanNameViewResolver viewResolver = new BeanNameViewResolver();

        viewResolver.setOrder(1);

        return viewResolver;

    }


    @Bean

    public View index() {

        JstlView view = new JstlView();

        view.setUrl("/WEB-INF/views/index.jsp");

        return view;

    }

}
XmlViewResolver
The org.springframework.web.servlet.view.XmlViewResolver is very similar to the BeanNameViewResolver with the difference that it requires an additional Spring XML configuration file to hold all the views. By default it will load the file named /WEB-INF/views.xml; however, this can be configured. Table 8-2 shows the available properties.

Listing 8-4 shows the configuration for the XmlViewResolver. Listing 8-5 shows the /WEB-INF/views.xml file used to configure the view for the index page.
Listing 8-4. XmlViewResolver configuration
package com.apress.prospringmvc.bookstore.web.config;


//Other imports omitted

import org.springframework.web.servlet.view.XmlViewResolver;


@Configuration

public class ViewConfiguration {


    @Bean

    public ViewResolver viewResolver() {

        XmlViewResolver viewResolver = new XmlViewResolver();

        viewResolver.setOrder(1);

        return viewResolver;

    }

}
Listing 8-5. Sample views.xml
<?xml version="1.0" encoding="UTF-8"?>

<beans xmlns="http://www.springframework.org/schema/beans"

    xmlns:xsi="http://www.w3.org/2001/XMLSchema-instance"

    xsi:schemaLocation="http://www.springframework.org/schema/beans

       http://www.springframework.org/schema/beans/spring-beans.xsd">


    <bean id="index" class="org.springframework.web.servlet.view.JstlView">

        <property name="url" value="/WEB-INF/views/index.jsp"/>

    </bean>

</beans>
ResourceBundleViewResolver
Very similar to the XmlViewResolver, this implementation uses a properties file instead of an XML file to hold the view configuration. The advantage of the org.springframework.web.servlet.view.ResourceBundleViewResolver is that we could have different views for different languages. This is because it uses the standard resource bundle mechanism in Java to load the configuration files. Table 8-3 lists the properties for this implementation.

Listing 8-6 shows the sample configuration for the ResourceBundleViewResolver. In Listing 8-7, we see the views.properties file in use.
Listing 8-6. ResourceBundleViewResolver configuration
package com.apress.prospringmvc.bookstore.web.config;


// Other imports omitted

import org.springframework.web.servlet.view.ResourceBundleViewResolver;


@Configuration

public class ViewConfiguration {


    @Bean

    public ViewResolver viewResolver() {

        ResourceBunldeViewResolver viewResolver;

        viewResolver = new ResourceBundleViewResolver();

        viewResolver.setOrder(1);

        return viewResolver;

    }

}
Listing 8-7. Sample views.properties
index.(class)=org.springframework.web.servlet.view.JstlView

index.url=/WEB-INF/views/index.jsp
UrlBasedViewResolver
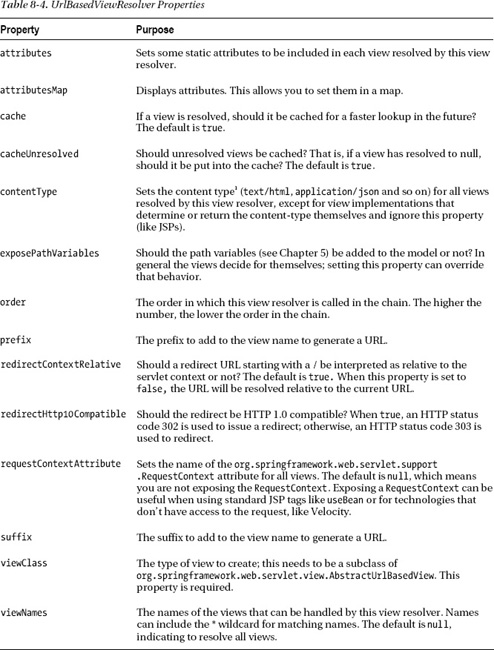
The org.springframework.web.servlet.view.UrlBasedViewResolver expects the view name to map directly to a URL. It can optionally modify the URL by adding a prefix and/or suffix to the view name. In general this class serves as a base class to the different view technologies like JSP and template-based view technologies (see section “View Technologies” later in this chapter). In Table 8-4 we can see the properties for this type of view resolver.
_________
In Listing 8-8 we see a sample configuration for this view resolver. We need to specify the view class (required,) and in general it is also necessary to add a prefix and/or suffix to generate a URL pointing to the actual view implementation. The advantage is that we can use a naming convention for our views and we don’t have to specify our views explicitly in the configuration (as we did with the BeanNameViewResolver, for instance).
Listing 8-8. UrlBasedViewResolver configuration
package com.apress.prospringmvc.bookstore.web.config;


// Other imports omitted

import org.springframework.web.servlet.view.JstlView;

import org.springframework.web.servlet.view.UrlBasedViewResolver;


@Configuration

public class ViewConfiguration {


    @Bean

    public ViewResolver viewResolver() {

        UrlBasedViewResolver viewResolver = new UrlBasedViewResolver();

        viewResolver.setOrder(1);

        viewResolver.setPrefix("/WEB-INF/views/");

        viewResolver.setSuffix(".jsp");

        viewResolver.setViewClass(JstlView.class);

        return viewResolver;

    }

}
InternalResourceViewResolver
This extension of the UrlBasedViewResolver is a convenience subclass that preconfigures the view class and adds some additional support to include beans in the model so that they are available in the view for rendering. Listing 8-9 shows a sample configuration for the org.springframework.web.servlet.view.InternalResourceViewResolver. The result is essentially the same as in Listing 8-8.
Listing 8-9. InternalResourceViewResolver configuration
package com.apress.prospringmvc.bookstore.web.config;


// Other imports omitted

import org.springframework.web.servlet.view.InternalResourceViewResolver;


@Configuration

public class ViewConfiguration {


    @Bean

    public ViewResolver viewResolver() {

        InternalResourceViewResolver viewResolver;

        viewResolver = new InternalResourceViewResolver();

        viewResolver.setOrder(1);

        viewResolver.setPrefix("/WEB-INF/views/");

        viewResolver.setSuffix(".jsp");

        return viewResolver;

    }

}
XsltViewResolver
The org.springframework.web.servlet.web.view.xslt.XsltViewResolver can be used to resolve the view name to an XSLT stylesheet to transform the model into something to show to the user. To work with this view resolver and views we need an XSLT template for transforming our model to a view. The returned view, an instance of org.springframework.web.servlet.view.xslt.XsltView, will detect which model object to render. It supports the following types:
javax.xml.transform.Sourceorg.w3c.dom.Documentorg.w3c.dom.Nodejava.io.Readerjava.io.InputStreamorg.springframework.core.io.Resource
The org.springframework.web.servlet.view.xslt.XsltView will take the supported type and use the XSLT stylesheet to transform it into what we want it to be. Although this mechanism can be powerful, it is the author’s belief that this isn’t something to be used to create a view layer for a web application. It in general is easier to return XML (or JSON) from the controller and directly process that on the client with JavaScript.
ContentNegotiatingViewResolver
The org.springframework.web.servlet.view.ContentNegotiatingViewResolver is a very special view resolver: it can resolve views by name and content-type. It works by first determining which content-type is requested, which it does by checking the file extension, checking the Accept header, or checking a request parameter (this is configurable; see Table 8-5). After the content-type is determined, the resolver consults all configured view resolvers to collect the candidate views by name. Finally, it selects the best matching view by checking if the requested content-type is supported. Table 8-5 shows the configurable properties of the view resolver.

![]() Note When multiple view resolvers are used, the
Note When multiple view resolvers are used, the ContentNegotiatingViewResolver must have the highest order to function correctly. This is already set by default, but if you change the order keep this in mind.
Implementing Your Own ViewResolver
This section explains how to implement our own view resolver. We will create a simple implementation that resolves the view name from a map of configured views.
Implementing your own view is quite easy to do; you just create a class and let it implement the ViewResolver interface (see Listing 8-1) and provide the necessary implementation. Listing 8-10 shows our com.apress.prospringmvc.bookstore.web.view.SimpleConfigurableViewResolver.
Listing 8-10. SimpleConfigurableViewResolver
package com.apress.prospringmvc.bookstore.web.view;


// Other imports omitted

import org.springframework.web.servlet.View;

import org.springframework.web.servlet.ViewResolver;


public class SimpleConfigurableViewResolver implements ViewResolver {


    private Map<String, ? extends View> views = new HashMap<String, View>();


    @Override

    public View resolveViewName(String viewName, Locale locale)

    throws Exception {

        return this.views.get(viewName);

    }


    public void setViews(Map<String, ? extends View> views) {

        this.views = views;

    }

}
We are going to use this implementation in the next section when we need to add views for PDF and Excel.
View Technologies
Spring MVC supports many different technologies, and if there isn’t support, you can probably add it yourself by implementing org.springframework.web.servlet.View or by extending one of the provided View classes. In this section we will discuss several view technologies and see how Spring MVC supports them. For some there is extensive support; for others very little. Figure 8-3 shows the View class hierarchy, where we can see some of the supported view technologies. For some of the technologies we need to specify a specific a ViewResolver to work, others work hand-in-hand with the already configured view resolvers.

Figure 8-3. View Hierarchy
The next part of this section briefly covers some of the supported view technologies. It will show the support classes and how to set up Spring to work with the specified technology. It does not provide in-depth coverage of all the different supported view technologies; there are books available for most of the technologies mentioned here.
![]() Note The
Note The TilesViewResolver has order 2 in most listings in this section. This is to make sure it is executed at the right moment, especially when using the ContentNegotiatingViewResolver, which should execute before (which is the default) the TilesViewResolver.
Java Server Pages
Until now we have been using Java Server Pages for our application. Spring has excellent support for it, including its own tag library (see Chapters 5 and 6). Spring has support and integration classes and in general it is the tool used with the org.springframework.web.servlet.view.InternalResourceViewResolver to enable JSTL support and integrate with the default formatting and functions library from Sun.
JavaServer Faces
JavaServer Faces (JSF) has very little support in Spring MVC in general. If you want to use JSF, it is suggested to use Spring Web Flow with JSF as the view layer; that approach provides for a rich environment. The Spring support for JSF is simply that we can reuse our beans from the application context. We do this by defining a customized javax.faces.el.VariableResolver (JSF 1.1) or javax.el.ELResolver (JSF 1.2+) to gain access to the spring beans in the JSF environment.
The easiest way to integrate Spring into a JSF environment is by configuring org.springframework.web.jsf.DelegatingVariableResolver, which will do lookups on the default resolver of the JSF implementation used. If a name cannot be resolved, the resolver will then delegate to the look up to the root application context. This allows for reuse of services and other general components within JSF. Listing 8-11 shows the configuration for the JSF part of the application. This can be found in faces-context.xml.
Listing 8-11. DelegatingVariableResolver sample configuration (faces-context.xml)
<faces-config>

    <application>

        <variable-resolver>

        org.springframework.web.jsf.DelegatingVariableResolver

        </variable-resolver>

    </application>

</faces-config>
There is also the org.springframework.web.jsf.SpringBeanVariableResolver, which works in a similar way; however, it first consults the root application context and afterwards the default resolver of the JSF implementation. This is useful when using scoped beans from the application context in JSF.
For a JSF 1.2+ environment, we could also configure the org.springframework.web.jsf.el.SpringBeanFacesELResolver, which does a lookup first in the root application context and then in the default resolver from the used JSF implementation. Listing 8-12 shows a sample configuration for this bean.
Listing 8-12. SpringBeanFacesELResolver sample configuration (faces-context.xml)
<faces-config>

    <application>

        <el-resolver>

        org.springframework.web.jsf.el.SpringBeanFacesELResolver

        </el-resolver>

    </application>

</faces-config>
If we have some custom JSF components and need access to the current application context, we can use org.springframework.web.jsf.FacesContextUtils. This utility class provides two convenience methods to gain access to the application context and retrieve beans from it, which in turn can be used from the custom component.
Tiles
Apache Tiles2 is a powerful page composition framework that allows you to compose your page of different page components (the tiles). These page components can be reused and configured in different page layouts. Originally it was designed as a JSP composition framework; however, it can also be used to compose Velocity and Freemarker-based views.
To get started with Tiles we must configure and bootstrap the engine for it. Next we also need to configure the view resolver to be able to return Tiles-based views, and finally we need to specify our page composition and add the different templates (tiles).
There is the org.springframework.web.servlet.view.tiles2.TilesConfigurer that we need to add to our configuration. Next to that we need the special org.springframework.web.servlet.view.tiles2.TilesViewResolver. Finally, we also need to specify our page compositions and add the templates.
Configuring Tiles
Before we can start using the tiles support we need to bootstrap Tiles. For this Spring provides the org.springframework.web.servlet.view.tiles2.TilesConfigurer class. Next we also need to configure a view resolver to work with tiles for this we can use org.springframework.web.servlet.view.tiles2.TilesViewResolver. Listing 8-13 shows the most basic configuration for tiles.
Listing 8-13. ViewConfiguration for Tiles
package com.apress.prospringmvc.bookstore.web.config;


// Other imports omitted

import org.springframework.web.servlet.view.tiles2.TilesConfigurer;

import org.springframework.web.servlet.view.tiles2.TilesViewResolver;


@Configuration

public class ViewConfiguration {


    @Bean

    public TilesConfigurer tilesConfigurer() {

        return new TilesConfigurer();

    }


    @Bean

    public TilesViewResolver tilesViewResolver() {

        TilesViewResolver tilesViewResolver = new TilesViewResolver();

        tilesViewResolver.setOrder(2);

        return tilesViewResolver;

    }

}
_________
The TilesConfigurer by default loads a file called tiles.xml from the WEB-INF directory; this file contains the page definitions. Before we take a look at the definition file, let’s look at the properties of the configurer in Table 8-6.

The TilesViewResolver has no additional properties to set; it has the same set of properties as the UrlBasedViewResolver. It is a convenience subclass that automatically configures the correct view type to return. For Tiles, we need to create instances of the org.springframework.web.servlet.view.tiles2.TilesView.
Configuring and Creating Templates
Tiles requires one or more files to define our pages; these are called the definitions files. The default file loaded by the TilesConfigurer is the /WEB-INF/tiles.xml (see Listing 8-14).
Listing 8-14. Tiles Definitions
<?xml version="1.0" encoding="UTF-8" ?>

<!DOCTYPE tiles-definitions PUBLIC

    "-//Apache Software Foundation//DTD Tiles Configuration 2.1//EN"

    "http://tiles.apache.org/dtds/tiles-config_2_1.dtd">


<tiles-definitions>


    <definition name="template" template="/WEB-INF/templates/template.jsp">

        <put-attribute name="header" value="/WEB-INF/templates/header.jsp"/>

        <put-attribute name="footer" value="/WEB-INF/templates/footer.jsp"/>

    </definition>


    <definition name="*" extends="template">

        <put-attribute name="title" value="{1}.title" />

        <put-attribute name="body" value="/WEB-INF/views/{1}.jsp" />

    </definition>


    <definition name="*/*" extends="template">

        <put-attribute name="title" value="{1}.{2}/title" />

        <put-attribute name="body" value="/WEB-INF/views/{1}/{2}.jsp" />

    </definition>


</tiles-definitions>
We have created three definitions: the definition with the name template is the general layout configuration, the other definitions extend this general layout (and could override the predefined attributes). We can add more definitions when needed. For Spring to select the correct definition, our definition name has to match the name of the view (or a * wildcard as we did in our sample). Our template page (template.jsp) consists of three tiles (header, footer and body), and we need a property title that contains a message key so that we can use our message source (see the Chapter 5 discussion of internationalization) to resolve the actual title. Listing 8-15 shows our template.jsp, which is used for the general layout. Listing 8-16 shows our index.jsp, which is used as the body for the welcome page. Figure 8-4 shows the resulting page.[Au: OK? CE]
Listing 8-15. Template JSP
<!DOCTYPE HTML>

<%@ taglib prefix="c" uri="http://java.sun.com/jsp/jstl/core"%>

<%@ taglib prefix="spring" uri="http://www.springframework.org/tags" %>

<%@ taglib prefix="tiles" uri="http://tiles.apache.org/tags-tiles" %>


<html>

<head>

    <meta charset="utf-8">

    <c:set var="titleKey">

        <tiles:getAsString name="title" />

    </c:set>

    <title>

        Bookstore | <spring:message code="${titleKey}" text="Your Home in Books"/>

    </title>

    <link rel="stylesheet" type="text/css" href="<c:url value="/resources/css/style.css"/>" >

</head>

<body>

    <div id="wrap">

        <tiles:insertAttribute name="header"/>

       <div class="center_content">

        <div class="left_content">

            <h1><spring:message code="${titleKey}" text="${titleKey}" /></h1>

            <tiles:insertAttribute name="body" />

        </div><!--end of left content-->


        <div class="right_content">


             <div class="right_box">


                <div class="title"><span class="title_icon"><img src="<c:url value="/resources/images/bullet4.gif"/>" alt="" title="" /></span><spring:message code="main.title.randombooks"/></div>

                    <c:forEach items="${randomBooks}" var="book">

                        <div class="new_prod_box">

                            <c:url value="/book/${book.id}" var="bookUrl" />

                            <a href="${bookUrl}">${book.title}</a>

                            <div class="new_prod_img">

                            <c:url value="/book/${book.isbn}/image" var="bookImage"/>

                            <a href="${bookUrl}"><img src="${bookImage}" alt="${book.title}"
title="${book.title}" class="thumb" border="0" width="100px"/></a>

                            </div>

                        </div>

                    </c:forEach>

             </div>


        </div><!--end of right content-->

       <div class="clear"></div>

       </div><!--end of center content-->


       <tiles:insertAttribute name="footer" />

    </div>

</body>

</html>
![]() Tip The highlighted code sets a variable based on the content of the
Tip The highlighted code sets a variable based on the content of the title attribute from our tiles.xml. That way, we can specify a key on the configuration and use the Spring message tag to resolve the actual value.

Figure 8-4. Resulting Welcome Page
Velocity and FreeMarker
Both Velocity3 and FreeMarker4 are templating frameworks for and written in Java. You can use them, among others, to create templates for HTML pages. They are text-based templating engines and both are widely used in applications for all kind of templating solutions.
_________
Velocity and FreeMarker templates aren’t compiled into Java code as JSPs are. They are interpreted at runtime by their templating engines; this is much like the XSLT processing we discussed earlier. One might think that this interpretation instead of compilation could lead to performance degradation of our application, but this is often not true. Both engines have extensive caching of interpreted templates, which make them quite fast.
Another advantage of using a templating approach over JSP is that in the latter case you might be tempted to put Java code in your JSPs. Putting Java code in your pages, although possible, is not an approach that one should take. It generally leads to pages that are hard to maintain and modify.
The disadvantage is that we need to add some extra configuration to our application. We first need to configure the templating engine of our choice, and next we need to configure view resolving for that templating engine.
Configuring the Template Engine
The Spring Framework extensively supports both Velocity and FreeMarker, and there are some helper classes to make configuring the engines easier. For Velocity there is the org.springframework.web.servlet.view.velocity.VelocityConfigurer (Table 8-7) and for FreeMarker there is the org.springframework.web.servlet.view.freemarker.FreeMarkerConfigurer (Table 8-8). Each is used to configure the respective templating engine.


The most important properties in these tables are the ones that set the location from which to load the templates. For Velocity this is the resourceLoaderPath and for FreeMarker the templateLoaderPath. It is a best practice to make them inaccessible for web clients, which can be done by putting them inside the WEB-INF directory.
![]() Note There are also
Note There are also org.springframework.beans.factory.FactoryBeans to configure the respective templating engines. These are for bootstrapping the engines for use as non-web templates, like email.
In addition to setting up the different engines, we also need to configure a view resolver to resolve to correct view implementations. Spring ships with the org.springframework.web.servlet.view.velocity.VelocityViewResolver or org.springframework.web.servlet.view.velocity.VelocityLayoutViewResolver. For FreeMarker there is the org.springframework.web.servlet.view.freemarker.FreemarkerViewResolver. It isn’t required to use these specialized view resolvers; an extensively configured InternalResourceViewResolver would also do. However, using these specialized view resolvers makes our life easier. Listings 8-17 and 8-18 show sample Velocity and FreeMarker configurations.
Listing 8-17. Velocity Configuration
package com.apress.prospringmvc.bookstore.web.config;


// Other imports omitted

import org.springframework.web.servlet.view.velocity.VelocityConfigurer;

import org.springframework.web.servlet.view.velocity.VelocityViewResolver;


@Configuration

public class ViewConfiguration {


    @Bean

    public VelocityConfigurer velocityConfigurer() {

        VelocityConfigurer velocityConfigurer = new VelocityConfigurer();

        velocityConfigurer.setResourceLoaderPath("WEB-INF/velocity");

        return velocityConfigurer;

    }


    @Bean

    public ViewResolver velocityViewResolver() {

        VelocityViewResolver viewResolver = new VelocityViewResolver();

        viewResolver.setSuffix(".vm");

        return viewResolver;

    }

}
Listing 8-18. FreeMarker Configuration
package com.apress.prospringmvc.bookstore.web.config;


// Other imports omitted

import org.springframework.web.servlet.view.freemarker.FreeMarkerConfigurer;

import org.springframework.web.servlet.view.freemarker.FreeMarkerViewResolver;


@Configuration

public class ViewConfiguration {


    @Bean

    public FreeMarkerConfigurer freeMarkerConfigurer() {

        FreeMarkerConfigurer freeMarkerConfigurer;

        freeMarkerConfigurer = new FreeMarkerConfigurer();

        freeMarkerConfigurer.setTemplateLoaderPath("WEB-INF/freemarker");

        return freeMarkerConfigurer;

    }


    @Bean

    public ViewResolver freeMarkerViewResolver() {

        FreeMarkerViewResolver viewResolver = new FreeMarkerViewResolver();

        viewResolver.setSuffix(".ftl");

        return viewResolver;

    }

}
When a controller now returns index as the view name, for Velocity a template would be loaded from WEB-INF/velocity/index.vm, and for FreeMarker it would become WEB-INF/freemarker/index.ftl. The resourceLoaderPath/templateLoaderPath is prefixed to the view name. Both the view resolvers also allow for setting an additional prefix (inherited from the UrlBasedViewResolver). Table 8-9 describes the different properties for the view resolvers.

The Templating Language
Now that we have configured our environment, we also need to write a template that shows the page to us. Both templating languages are very similar. Listings 8-19 and 8-20 show the book search page written for Velocity and FreeMarker, respectively.
Listing 8-19. Velocity Template
<!DOCTYPE HTML>

<html>

<head>

<title>Booksearch</title>

</head>

<body>

<h1>#springMessage("book.title")</h1>


<p>


    <form method="POST">

        <fieldset>

            <legend>#springMessage("book.searchcriteria")</legend>

            <table>

                <tr><td>#springMessage("book.title")</td><td>#springFormInput

("searchCriteria.title" "")</td></tr>

                <tr><td>#springMessage("book.category")</td><td>#springFormSingleSelect

("searchCriteria.category" $categories "")</td></tr>

            </table>

        </fieldset>

        <button id="search">#springMessage("button.search")</button>

    </form>


    #if ($bookList.empty eq false)

        <table>

            <tr><th>#springMessage("book.title")</th><th>#springMessage

("book.description")</th><th>#springMessage("book.price")</th></tr>

            #foreach($book in $bookList)

                <tr><td>${book.title}</td><td>${book.description}</td><td>$

{book.price}</td><td><a href="#springUrl("/cart/add/${book.id}")">#springMessage

("book.addtocart")</a></tr>

            #end

        </table>

    #end

</p>


</body>

</html>
Listing 8-20. FreeMarker Template
<#ftl>

<#import "/spring.ftl" as spring />

<!DOCTYPE HTML>

<html>

<head>

<title>Booksearch</title>

</head>

<body>

<h1><@spring.message code="book.title" /></h1>


<p>


    <form method="POST">

        <fieldset>

            <legend><@spring.message code="book.searchcriteria" /></legend>

            <table>

                <tr><td><@spring.message code="book.title" /></td><td><@spring.formInput

"searchCriteria.title" /></td></tr>

                <tr><td><@spring.message code="book.category"

/></td><td><@spring.formSingleSelect "searchCriteria.category", categories, "" /></td></tr>

            </table>

        </fieldset>

        <button id="search"><@spring.message code="book.search" /></button>

    </form>


    <#if bookList?has_content>

        <table>

            <tr><th><@spring.message code="book.title"/></th><th><@spring.message

code="book.description"/></th><th><@spring.message code="book.price" /></th></tr>

            <#list bookList as book>

                <tr><td>${book.title}</td><td>${book.description}</td><td>$

{book.price}</td><td><a href="<@spring.url "/cart/add/${book.id}"/>"><@spring.message

code="book.addtocart"/></a></tr>

            </#list>

        </table>

    </#if>

</p>


</body>

</html>
Looking at the templates, we can see that they are similar to the JSPs we wrote in the previous chapters. The Velocity (Listing 8-19) and FreeMarker (Listing 8-20) templates also have tag libraries available (in the listings bound to Spring). Both libraries offer more or less the same support as the Spring Form Tag library for JSP. Table 8-10 provides an overview of the different tags, or better macro libraries, for both Velocity and FreeMarker.

The parameters to any of the macros listed have consistent meanings:
- path: the name of the field to bind to (that is, "
searchCriteria.title").- options: a map containing all the available values that can be selected from in the input field. The keys to the map represent the values that will be POSTed back from the form and bound to the command object. The values belonging to the key are used as the labels to show to the user. Usually such a map is supplied as reference data by the controller. Any Map implementation can be used, depending on required behavior.
- separator: where multiple options are available as discrete elements (radio buttons or checkboxes), the sequence of characters used to separate each one in the list (for example,
<br>).- attributes: an additional string of arbitrary tags or text to be included within the HTML tag itself. This string is echoed literally by the macro. For example, in a textarea field you may supply attributes as '
rows="5" cols="60"' or you could pass style information such as 'style="border:1px solid silver"'.- classOrStyle: for the showErrors macro, the name of the CSS class that the span tag wrapping each error will use. If no information is supplied (or the value is empty), the errors will be wrapped in
<b></b>tags.
![]() Tip The two macros marked (*) in the table exist for FreeMarker; however, they are not actually required, as you can use the normal
Tip The two macros marked (*) in the table exist for FreeMarker; however, they are not actually required, as you can use the normal formInput macro specifying hidden or password as the value for the fieldType parameter.
The difference between the FreeMarker and Velocity macros is that with FreeMarker you can, as in JSP, specify which library to use. This isn’t possible with Velocity macros, because they are global and are included (and accessible) on every page. For FreeMarker we need to specify the library by using the import directive (see top of Listing 8-20).
Dates and Numbers
Velocity has several useful tools available for formatting dates and numbers. Spring can also integrate with those tools so that they can use the current selected locale. To enable this support we need to set the dateToolAttribute and/or the numberToolAttribute. Setting these properties will expose the tools to the model so that they can be used in the view template.
Spring uses the iText library5 to add PDF support. To enable this we need to write our own view implementation and for that we need to extend org.springframework.web.servlet.view.document.AbstractPdfView. When we extend this class we must implement the buildPdfDocument method.
We are going to create a PDF that gives an overview of one of our orders on our account page. Listing 8-21 shows the view implementation.
Listing 8-21. View Implementation to Create a PDF
package com.apress.prospringmvc.bookstore.web.view;


// Other imports omitted

import org.springframework.web.servlet.view.document.AbstractPdfView;


import com.apress.prospringmvc.bookstore.domain.Order;

import com.apress.prospringmvc.bookstore.domain.OrderDetail;

import com.lowagie.text.Document;

import com.lowagie.text.Paragraph;

import com.lowagie.text.Table;

import com.lowagie.text.pdf.PdfWriter;


public class OrderPdfView extends AbstractPdfView {


    @Override

    protected void buildPdfDocument(Map<String, Object> model,

                                    Document document,

                                    PdfWriter writer,

                                    HttpServletRequest request,

                                    HttpServletResponse response)

    throws Exception {


        Order order = (Order) model.get("order");


        document.addTitle("Order :" + order.getId());

        document.add(new Paragraph("Order date: " + order.getOrderDate()));

        document.add(new Paragraph("Delivery date: " + order.getDeliveryDate()));


        Table orderDetails = new Table(4);

        orderDetails.addCell("Title");

        orderDetails.addCell("Price");

        orderDetails.addCell("#");

        orderDetails.addCell("Total");


        for (OrderDetail detail : order.getOrderDetails()) {

            orderDetails.addCell(detail.getBook().getTitle());

            orderDetails.addCell(detail.getBook().getPrice().toString());

            orderDetails.addCell(String.valueOf(detail.getQuantity()));

            orderDetails.addCell(detail.getPrice().toString());

        }


        document.add(orderDetails);


    }


}
_________
Next let’s add org.springframework.web.servlet.view.ContentNegotiatingViewResolver to our view configuration. We do this so that we can have our order page rendered in HTML or PDF, and we don’t want to change our com.apress.prospringmvc.bookstore.web.controller.OrderController because that is already doing what we want, adding the selected order to the model. Listing 8-22 shows the changed com.apress.prospringmvc.bookstore.web.config.ViewConfiguration. This is also where we will start using our custom view resolver (see the discussion of implementing your own view resolver).
Listing 8-22. ViewConfiguration with ContentNegotiatingViewResolver
package com.apress.prospringmvc.bookstore.web.config;


// Other imports omitted

import org.springframework.web.servlet.view.ContentNegotiatingViewResolver;

import org.springframework.web.servlet.view.document.AbstractPdfView;


import com.apress.prospringmvc.bookstore.web.view.OrderPdfView;

import com.apress.prospringmvc.bookstore.web.view

       .SimpleConfigurableViewResolver;


@Configuration

public class ViewConfiguration {


    @Bean

    public ContentNegotiatingViewResolver contentNegotiatingViewResolver() {

        ContentNegotiatingViewResolver viewResolver;

        viewResolver = new ContentNegotiatingViewResolver();

        List<ViewResolver> viewResolvers = new ArrayList<ViewResolver>();

        viewResolvers.add(pdfViewResolver());

        viewResolver.setViewResolvers(viewResolvers);

        return viewResolver;

    }


    @Bean

    public ViewResolver pdfViewResolver() {

        SimpleConfigurableViewResolver viewResolver;

        viewResolver = new SimpleConfigurableViewResolver();

        Map<String, AbstractPdfView> views;

        views = new HashMap<String, AbstractPdfView>();

        views.put("order", new OrderPdfView());

        viewResolver.setViews(views);

        return viewResolver;

    }

    // Other methods omitted, see Listing 8-13

}
The changed configuration contains our own view resolver, and we use it to resolve the com.apress.prospringmvc.bookstore.web.view.OrderPdfView. We do this because we also want to be able to resolve an order view for an Excel document (see the “Excel” section ).
After these changes we need to redeploy our application, if we log in and navigate to our account page we can now click the PDF link and actually get a PDF instead of the HTML version. Figure 8-5 shows the result of clicking the PDF link.
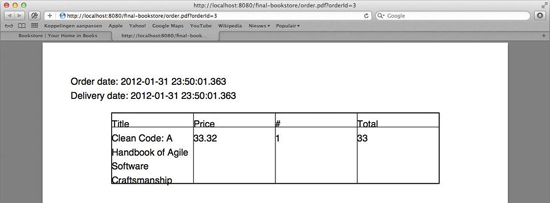
Figure 8-5. Generated PDF
Although this approach is very flexible, the drawback is that we would need to code the construction of PDFs for each PDF we want. If we have some complex PDF or need to apply a certain style, this will be quite cumbersome and hard to maintain. In such cases, it might be worthwhile to look at solutions like JasperReports (see the section “JasperReports”).
Excel
Spring has two ways of rendering an Excel document. The first is by using the JExcel library,6 and the other is using the Apache POI library.7 Both approaches need us to implement a view (just as with a PDF); to do that, we extend either org.springframework.web.servlet.view.document.AbstractJExcelView or org.springframework.web.servlet.view.document.AbstractExcelView. They are respectively for JExcel and Apache POI. Both implementations hide the setup and allow for a template xls to be loaded and processed; we need to add the view-specific rendering. We need to implement the buildExcelDocument method for that. Listing 8-23 shows a JExcel example of an order as an Excel document.
_________
package com.apress.prospringmvc.bookstore.web.view;


// Other imports omitted

import jxl.write.DateTime;

import jxl.write.Label;

import jxl.write.WritableSheet;

import jxl.write.WritableWorkbook;


import org.springframework.web.servlet.view.document.AbstractJExcelView;


import com.apress.prospringmvc.bookstore.domain.Order;

import com.apress.prospringmvc.bookstore.domain.OrderDetail;


public class OrderExcelView extends AbstractJExcelView {


    @Override

    protected void buildExcelDocument(Map<String, Object> model,

                                      WritableWorkbook workbook,

                                      HttpServletRequest request,

                                      HttpServletResponse response)

    throws Exception {

        Order order = (Order) model.get("order");


        WritableSheet sheet = workbook.createSheet("Order", 0);

        sheet.addCell(new Label(1, 1, "Order :" + order.getId()));

        sheet.addCell(new Label(1, 2, "Order Date"));

        sheet.addCell(new DateTime(2, 2, order.getOrderDate()));

        sheet.addCell(new Label(1, 2, "Delivery Date"));

        sheet.addCell(new DateTime(2, 2, order.getDeliveryDate()));


        sheet.addCell(new Label(1, 4, "Title"));

        sheet.addCell(new Label(2, 4, "Price"));

        sheet.addCell(new Label(3, 4, "#"));

        sheet.addCell(new Label(4, 4, "Total"));


        int row = 4;

        for (OrderDetail detail : order.getOrderDetails()) {

            row++;

            sheet.addCell(new Label(1, row, detail.getBook().getTitle()));

            sheet.addCell(new jxl.write.Number(2, row, detail.getBook().getPrice()

.doubleValue()));

            sheet.addCell(new jxl.write.Number(3, row, detail.getQuantity()));

            sheet.addCell(new jxl.write.Number(2, row, detail.getPrice().doubleValue()));

        }

    }


}
Next to the view we need to add a view resolver. In our sample application we are going to add this, just like the PDF view, to our ViewConfiguration class. We are going to add another instance of our custom implementation (see Listing 8-24) and let the ContentNegotiatingViewResolver decide what to do.
Listing 8-24. ViewConfiguration with OrderExcelView
package com.apress.prospringmvc.bookstore.web.config;


//Other imports omitted, see Listing 8-22

import org.springframework.web.servlet.view.document.AbstractJExcelView;

import org.springframework.web.servlet.view.document.AbstractPdfView;


import com.apress.prospringmvc.bookstore.web.view.OrderExcelView;


@Configuration

public class ViewConfiguration {


    @Bean

    public ContentNegotiatingViewResolver contentNegotiatingViewResolver() {

        ContentNegotiatingViewResolver viewResolver;

        viewResolver = new ContentNegotiatingViewResolver();

        List<ViewResolver> viewResolvers = new ArrayList<ViewResolver>();

        viewResolvers.add(pdfViewResolver());

        viewResolvers.add(xlsViewResolver());

        viewResolver.setViewResolvers(viewResolvers);

        return viewResolver;

    }


    @Bean

    public ViewResolver xlsViewResolver() {

        SimpleConfigurableViewResolver viewResolver;

        viewResolver = new SimpleConfigurableViewResolver();

        Map<String, AbstractJExcelView> views;

        views = new HashMap<String, AbstractJExcelView>();

        views.put("order", new OrderExcelView());

        viewResolver.setViews(views);

        return viewResolver;

    }

    // Other methods omitted see Listing 8-22

}
But, wait, isn’t our application going to break because we have multiple view implementations resolving to the order view name? The special view resolver ContentNegotiatingViewResolver is going to help us here. It will determine which of the resolved views best matches the content-type requested. So without changing our controller and by simply adding some configuration (and view implementations), we can differentiate which view is being served.
To test, click the xls link and an Excel document will be downloaded for you to view.
XML and JSON
Spring MVC has another way of serving XML or JSON to our clients. We can use the ContentNegotiatingViewResolver to our advantage. Spring has two special view implementations to convert objects to XML or JSON, respectively, org.springframework.web.servlet.view.xml.MarshallingView and org.springframework.web.servlet.view.json.MappingJacksonJsonView. The XML-based view uses the Spring XML support to marshall our model to XML. The JSON view uses the Jackson library. We can quite easily configure our view resolver to also expose XML and/or JSON to our clients. We simply can add a default view for XML and JSON (we can also add additional view resolvers, as we did for the PDF and Excel documents). Listing 8-25 is the modified configuration (see the highlighted parts).
Listing 8-25. ViewConfiguration for XML and JSON
package com.apress.prospringmvc.bookstore.web.config;


// Other imports omitted


import org.springframework.oxm.Marshaller;

import org.springframework.oxm.xstream.XStreamMarshaller;

import org.springframework.web.servlet.view.json.MappingJacksonJsonView;

import org.springframework.web.servlet.view.xml.MarshallingView;


import com.apress.prospringmvc.bookstore.web.view.OrderExcelView;

import com.apress.prospringmvc.bookstore.web.view.OrderPdfView;


@Configuration

public class ViewConfiguration {


    @Bean

    public ContentNegotiatingViewResolver contentNegotiatingViewResolver() {

        ContentNegotiatingViewResolver viewResolver;

        viewResolver = new ContentNegotiatingViewResolver();

        List<ViewResolver> viewResolvers = new ArrayList<ViewResolver>();

        viewResolvers.add(pdfViewResolver());

        viewResolvers.add(xlsViewResolver());

        viewResolver.setViewResolvers(viewResolvers);

        List<View> defaultViews = new ArrayList<View>();

        defaultViews.add(jsonOrderView());

        defaultViews.add(xmlOrderView());

        viewResolver.setDefaultViews(defaultViews);

        return viewResolver;

    }


    @Bean

    public MappingJacksonJsonView jsonOrderView() {

        MappingJacksonJsonView jsonView = new MappingJacksonJsonView();

        jsonView.setModelKey("order");

        return jsonView;

    }


    @Bean

    public MarshallingView xmlOrderView() {

        MarshallingView xmlView = new MarshallingView(marshaller());

        xmlView.setModelKey("order");

        return xmlView;

    }


    @Bean

    public Marshaller marshaller() {

        return new XStreamMarshaller();

    }


    // Other methods omitted, see listings 8-22 and 8-24

}
For XML to work, we also need to configure an org.springframework.oxm.Marshaller implementation. We choose here to use the XStream8 library because that is quick and easy to use. To use another solution, simply configure the appropriate marshaller. More information on marshalling and XML can be found in the Spring Reference guide.
![]() Caution When using these type of views together with an ORM implementation (like in our sample) one could get issues like lazy loading or loading half the database due to collections getting initialized.
Caution When using these type of views together with an ORM implementation (like in our sample) one could get issues like lazy loading or loading half the database due to collections getting initialized.
If we now change the URL in the browser to end in either .json or .xml, we will get a JSON or XML representation of our order (Figure 8-6 is the JSON sample). We have now five different ways of viewing our order (HTML, PDF, Excel, JSON and XML) without touching our controller and by simply changing our configuration.

Figure 8-6. JSON Representation of our Order
_________
JasperReports
Spring MVC provides support for the reporting engine called JasperReports.9 This reporting engine uses report designs in XML and can output different formats based on that XML. There is a powerful report designer called iReport Designer which can be used to create the report designs. One could use an XML or text editor to create the designs, but that isn’t recommended because the XML is very verbose.
Spring supports JasperReports with a view resolver and six different view implementations. The view resolver is, not surprisingly, the org.springframework.web.servlet.view.jasperreports.JasperReportsViewResolver. The view implementations can be found in the same package. They are
JasperReportsCsvViewJasperReportsHtmlViewJasperReportsPdfViewJasperReportsXlsViewConfigurableJasperReportsViewJasperReportsMultiFormatView
The first four implementations produce a predefined format, either CSV, HTML, PDF, or Excel. For the fifth you can configure the format to export; it allows for setting the specific net.sf.jasperreports.engine.JRExporter implementation to use to generate a report. The last view implementation acts as a wrapper around the first four views or can be configured with specific implementations. It maps a format to a specific view implementation. Table 8-11 lists the defaults.

To use one of the views, we need to add the view and configure the URL of the report design. This can be either an XML file (.jrxml file) or in a compiled form (.jasper file). Either way, internally a compiled version of the report is needed for performance reasons. It can be wise to precompile the reports for production usage. Listing 8-26 shows a sample configuration for a JasperReports-based PDF view of our order.
_________
Listing 8-26. JasperReports View Configuration
package com.apress.prospringmvc.bookstore.web.config;


// Other imports omitted


import org.springframework.web.servlet.view.jasperreports

       .JasperReportsPdfView;


@Configuration

public class ViewConfiguration {


    @Bean

    public View jasperReportsView() {

        JasperReportsPdfView orderPdfView = new JasperReportsPdfView();

        orderPdfView.setUrl("/WEB-INF/jasper/order.jrxml");

        return orderPdfView;

    }

  // Other methods ommitted see Listing 8-18

}
The special org.springframework.web.servlet.view.jasperreports.JasperReportsMultiFormatView needs the format to be rendered available in the model. By default there should be a key named format in the model that tells us which format to render. It is more flexible and less intrusive to use the ContentNegotiatingViewResolver to resolve the correct view implementation to use. This allows you to configure the views without modifying your controllers. The multi-format view needs our controller to be modified, and we need to put logic in there to determine what to render.
Filling the Report
Just as in the PDF and Excel examples earlier, it would be nice if there were something to show to our users. Like the other view implementations, the View implementations for Jasper Reports use the data from the model for rendering. However, Jasper does this a little differently than other view technologies.
If our model contains a single attribute and it is a net.sf.jasperreports.engine.JRDataSource, net.sf.jasperreports.engine.JRDataSourceProvider or javax.sql.DataSource, it will be used as is (in the case of a DataSource it expects a query in the report). If the attribute is a Collection or array, it will be converted into a usable JRDataSource implementation.
If our model contains multiple attributes, we need to specify which attribute we want to use. We do this by setting the reportDataKey property on the view. Failing to do so might lead to unexpected results, as the first JRDataSource, Collection or array detected is used to fill the report.
The net.sf.jasperreports.engine.JRDataSource is needed by the report to retrieve the data and render the report. There are several implementations available from JasperReports for different data sources, ranging from databases to Excel documents.
Summary
This chapter covered the view part of Spring MVC. We looked at view resolving by covering several general-purpose ViewResolver implementations. We also covered several view technologies supported by Spring MVC and explained how to configure Spring to use them. We started with JSPs and we briefly touched on JSF and how you can integrate Spring into a JSF application. Next we looked at several templating solutions; specifically, we covered Tiles, Velocity, and FreeMarker.
After the web-based views, we looked at different view technologies like how to create PDF and Excel without changing our controllers but by simply adding a ContentNegotiatingViewResolver and an appropriate View implementation.
In the previous chapter we covered JSON, and in this chapter we covered another way of exposing (part) of our model as JSON or XML. Finally we looked at JasperReports for creating reports based on a templating language.
One important thing to take away from this chapter is the separation of controller logic and view logic (which was demonstrated by the different representations of our order). This shows the power of applying separation of concerns and the flexibility it gives one.
We will probably never use all the technologies in a single application. It will probably be limited to two or three different technologies (for our pages and probably creating a PDF or Excel file). But it is nice to have the flexibility to change or simply add a new view layer to our application.