
C H A P T E R 9
Testing Spring MVC Applications
Testing is in most projects a bit of a struggle point. We all know testing is important, but we also know that testing takes time and writing good tests is difficult. Testing also requires adequate infrastructure in your code base.
Testing is also not very sexy. It doesn’t involve producing flashy UIs with cool effects, and it doesn’t require you to make brilliant designs either (don’t get us wrong, testing requires good design, but it is mostly repetitive and not as engaging as production code can be). Maybe the biggest challenge is that your project doesn’t seem to move forward when you are writing tests. It feels like you are wasting time while you could be building functionality instead. Because of this, testing is sometimes “forgotten,” or promises are made to write tests later on.
While there are numerous books and even more references to be found on the Internet, we are not going to talk about methodologies and the like. In this chapter, we want to start by reminding you why tests are really so important, and we’ll also try to define how we are going to approach testing throughout the chapter.
In the code examples, we will introduce you to a way of testing using Spring’s test support that will be appealing and easy to handle. We will show different methods for testing your application and how to build those tests.
The title of this chapter is “Testing Spring MVC Applications,” and this is meant in the broader sense, as we will discuss testing on every level of the application. We will start with the easy part, how to test our back-end modules: the repositories and services using Spring’s test support. We’ll also show you how and when to use mock objects. Later, we will discuss how to test MVC controllers and finally perform full-fledged browser tests of our pages.
Introducing Testing
Before we dive into the code, we want to make sure you are aware why writing tests is so beneficial. We will also look at some important things you can do to make (and keep) testing attractive within your project. When writing tests is a pain, you can be sure that the test quality is poor or even worse, no tests are written. To conclude our introduction we will look at the different kind of tests. We will explain the differences among them and look deeper into the kind of tests we will be covering in this chapter. So let’s start by having a look why you should be investing your time in writing tests.
Why Should I Bother Writing Tests?
Testing should be a natural reflex that is part of your daily development process, just like writing functionality, delivering builds, fixing bugs, tracking issues and so on.
Testing takes time and we know that. Writing good test cases sometimes can be more complex than writing the code to implement the actual business case. Therefore you should do everything in your power to make testing within your project as smooth and easy as possible. This is the first requirement for having successful testing within a project. If it takes too much trouble to write a test, or a test is never automatically run, people will find excuses not to write them. A test should be considered a first-level citizen within your project.
We all know the feeling; after you changed some code, how can you be sure the code actually works? Some might argue that depending on your experience, background, and skills this fact alone does not require a test per se. That might be so, but what about the impact of your change? Your code might work fine, but do you know it doesn’t break any other code depending on it? Also, have you thought about the people coming behind you who will need to change your code? They are looking for some guarantee that what they did is actually OK and did not break anything else.
Without testing, your implementation might look like Figure 9-1 before you even realize it:
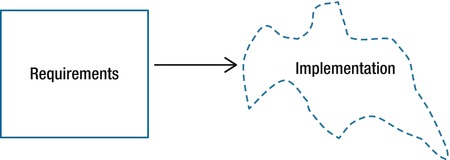
Figure 9-1. Implementation deformation without tests
This diagram represents the requirements to be implemented and the actual implementation. It is referred to as the “amoeba effect” in Jaroslav Tulach’s book Practical API Design1 – admittedly in a different context, but the idea is also applicable here. If we were all perfect developers, writing 100% correct code, the implementation would have the same rectangular shape as the requirements. Unfortunately, that is not the case, and the implementation will be deformed. You can also call it “buggy,” or “not compliant” in terms of what has been asked for.
![]() Note Here we consider the requirements as being the absolute truth, since they are drawn in straight lines forming a rectangular shape. In practice, this is also not true. The requirements will also contain a failure margin beyond to what is really been asked for. But from the developer’s point of view the requirements are what they are, and the code should resemble them 100% (if not, the requirements should be changed first).
Note Here we consider the requirements as being the absolute truth, since they are drawn in straight lines forming a rectangular shape. In practice, this is also not true. The requirements will also contain a failure margin beyond to what is really been asked for. But from the developer’s point of view the requirements are what they are, and the code should resemble them 100% (if not, the requirements should be changed first).
So, wouldn’t it be great to have some kind of robot super developer that is integrated in the project, and that told you every time your implementation was going to deform, so you could have stopped this?
Deformation might sneak into your code in different ways. You might have caused it by simply refactoring something in the application, or after changing some functionality. After performing even the smallest change, you could call the robot developer for free and ask it to check all dependencies and analyze all impacts of your work. After a couple of seconds, the robot developer could say; “you did a good job, I inspected all code and everything seems to be OK!” Or maybe the robot says: “Attention, you broke a business rule in that class at line x!” In both cases you will be very happy. In the first case you will be experiencing the “cozy warm feeling effect.” In the second case you are thankful to the robot pointing out a potential bug. In that case you continue by changing your code (or your test) so it maintains the rectangular form as closely as possible.
_________
1 Jaroslav Tulach, Practical API Design: Confessions of a Java Framework Architect (Apress 2008)
That robot developer exists and is hidden in your tests. But you have to build it, bit by bit. Every time you can write a test case, you should. Every time you write a test case, you should make the best out of it and you should treat it as important as the code you are testing. Test cases are investments, and they safeguard the future of your project.
After you have a suitable test harness (a suite of tests), you can make sure that after every change your code still complies with the harness. The harness is formed after the requirements, which means that each test tests a part of the requirements. If you add up all the tests, you ideally have tested all the requirements of your project (see Figure 9-2).

Figure 9-2. Adding a test harness to keep the code in line with the requirements
In this figure we added a test harness that attempts to map our testing to our requirements. As you can see, the test harness isn’t a perfect rectangle either, but it is a lot closer than the badly deformed implementation. A test harness cannot be perfect, because it never truly tests everything and also can contain bugs itself. However, applying the harness on this deformed implementation will yield a lot of failures that you can fix until your implementation becomes more and more like your requirements. And above all, after fixing this code to map closely to the requirements, your test harness will act as a monitor for your code. Every time a new deformation occurs, you will be alerted so you can take proper action.
How you write your tests, before or after your actual production code is up to you. That discussion is beyond the scope of this chapter. But it can be said that if you write a test after writing the code, it’s best to keep the interval as short as possible. In the model shown in Figure 9-2, the implementation that we are testing should be seen as a very small part of your project. It would represent a single class or even a single method, for which you write a unit test— as soon as possible after writing the code.
Promoting Testing Within Your Project
If it is too hard to write a test, or a lot of refactoring has to be done in your code to test a particular module, you can be sure that no single test is going to be written. Many developers see testing as an extra task that they have to fulfill. In this section we want to give some tips to promote testing within your project, so that writing tests becomes easier and more appealing. The project should be as supportive as possible to write tests for. This section is of course not exhaustive, but we hope it gives an idea about the more important aspects.
Goals: The first thing you can do within a project is setting a testing goal; for example, targeting a high percentage of production code covered by tests is a nice goal to strive for. EclEmma2 is a very nice plug-in that will do that for you. We will show you its output after we have written our first test in the next section. There is also a plug-in for Gradle and Maven to run Emma3 in an automated fashion. You could even set minimum goals of coverage before a build is considered successful. Code coverage can work psychologically to make developers have a target; to get the percentage of covered code as high as possible. This is a form of “gamification”; it helps motivating ourselves to do the best job possible in writing tests by engaging ourselves to obtain a high as possible coverage rate. However, beware that quantity is not more important than quality, so one should not lose sight of the quality aspect. Writing a test that gives 100% coverage is not very difficult, but that doesn’t mean the code by itself is well tested. Code testing coverage is a minimum indicator to get a feel about the test quality.
Infrastructure: We are talking about frameworks and structure within your project. Without a good infrastructure, testing becomes painful. You should start building out a good platform to write your tests upon. As mentioned before, writing tests is an investment, and that investment should be well protected. Tests are like your car’s comprehensive insurance. It costs money and it doesn’t buy you anything. But if anything happens to your car it will pay for the costs, and oh boy, when this happens you are glad you paid for that insurance! The same is true with tests (only accidents will happen on a daily basis, and using your tests is free once you build them). They will start to pay off as soon as you start to refactor or change your application.
Importance of testing: Tests are sometimes more important than the code they test, because they are the proof that the code is working. Without a test the code doesn’t mean anything, as its behavior is an unverifiable state. Even if you can really be sure that the code will work, you probably have no idea about the impact. Others are depending on your code and might suddenly notice a change in behavior breaking your project. If every component was adequately tested, this would immediately show up after running the tests.
Understanding: You should understand the different levels of testing and when to apply which type of test in which situation. You could test an entire application by using frontend testing, but that would be a bad idea. You should also understand where testing should stop. You are not required to test Spring, or Hibernate, or whatever library you are using. They have their own test sets.
_________
Environment: Your tests (both unit and integration) should run on a constant basis. You should have a dedicated machine just building your project on every commit. For a CI (Continuous Integration) system, we advise you to check out Jenkins4 (which was called Hudson before they changed the name for legal reasons). It is extremely simple to set up and works very well. It will check out THE (?) code from your Version Control System (VCS) and build it. If your project can be built with a build tool (like Gradle, Ant, Maven, and so on) it will only take a few minutes to schedule an automated build. Also, because you will be using such tools to automate your build, your tests should be environment-agnostic. They should be able to run even on your Smartphone without requiring any resource or environment dependency. Tests should be able to run everywhere. Tests should also be easy to run, preferably with a single command without requiring any form of configuration or setup.
![]() Note The best way to verify your project’s test suite is to take a random device that is able to run Java, perform a checkout from your VCS, disable all network interfaces, and enter a single command that should perform a build and run your tests. There should be no failures, and your test coverage should clearly indicate that the major part of your project is tested. There is also a great tool called sonar5 (open source) which does exactly that, checking out your code from VCS and applying all kinds of metrics to it, including test coverage. We would certainly advise you to try this, as it is very easy to set up and the advantages for safekeeping your code quality are major.
Note The best way to verify your project’s test suite is to take a random device that is able to run Java, perform a checkout from your VCS, disable all network interfaces, and enter a single command that should perform a build and run your tests. There should be no failures, and your test coverage should clearly indicate that the major part of your project is tested. There is also a great tool called sonar5 (open source) which does exactly that, checking out your code from VCS and applying all kinds of metrics to it, including test coverage. We would certainly advise you to try this, as it is very easy to set up and the advantages for safekeeping your code quality are major.
Different Types of Testing
Testing comes in different types. It is important that we decide which level of testing we are going to cover, and most of all give a clear definition of it. In this chapter we will look at unit, integration, and system testing. We will start by giving an overview of the different types of testing and a word of explanation. This list is not exhaustive, but it gives an idea of the level of testing we are going to cover.
- Unit Testing: The basic definition of a unit test is “a discrete test condition to check correctness of an isolated software module.” A unit test functions at the lowest possible level of a software module, preferably a single method of a class, without having any dependencies (like resources). We will look into unit testing in more detail in the next sub section.
- Integration Testing: Unlike a unit test, integration tests have a larger scope that involves testing several layers of your application. We will look at integration testing in more detail in the “Integration Tests” section.
_________
- System Testing: Like integration testing but using the real resources. The resources could be scaled-down versions of the actual production resources, but it is important that the environment setup and topology match as closely as possible. This will make sure that the transition of your project to other environments goes smoothly. The tests are also written without any internal knowledge of how the application is built; they treat the application to test as a black box. Front-end testing with a real browser is also a form of system testing.
- User Acceptance Testing: Acceptance testing is testing performed by users interacting with the interface of the application. It is a manual kind of testing that is performed whenever a piece of the software is implemented. It is a good thing to perform acceptance testing frequently and as early as possible; however, unit and integration tests should locate most of the issues before they ever reach the users. So acceptance testing should not be seen as a replacement for unit and integration testing.
- Performance Testing: Ideally performed on as close as possible a mirror of the production setup where the application will finally be deployed. By setup we mean everything—the hard- and software, but also the dependencies such as the databases (including data), external services, and so forth. Performance tests aim at detecting what the throughput of the application will be under normal load. For web applications it can be the average response time of requests with a predicted user load. The results of performance testing can verify whether the application will be able to comply with the proposed Service Level Agreements (SLAs).
- Stress Testing: Ideally requires the same setup as performance testing. However here we are putting the application under an abnormal amount of load (or stress). It aims at detecting weak spots such as transactions that start to break or other failures that do not appear under normal operation. In general it gives an idea about the stability and robustness of the entire setup when the borders of normal load are crossed.
As explained we will limit ourselves to discussing unit, integration, and system testing. For system testing we will limit ourselves to automated front-end testing. These three layers are the ones that should make up 90% or more of your entire (automatic) test set. They are the ones that will prove that your code is working and will remain working when features are added or code is refactored. These tests will be able to run automatically and everywhere. At this level Spring’s test support will also prove itself to be the most useful. Let’s continue by taking a closer look into unit tests.
Unit Tests
A unit test accompanies the code on its lowest level possible and is written at development time. It can take many forms, from a basic test that verifies the behavior of a domain object to a more compelling test that verifies the behavior of a business service. Most important, a unit test is system independent and does not depend on any resource whatsoever. If a piece of code depends on a resource, that resource is “simulated” one way or the other. We will discuss mock objects, or mocks (which are a form of simulators) in the coming sections, but for now it’s enough to understand that a mock is a code replacement for a resource. The most important criteria a good unit test should comply with can be listed as follows. A good unit test should do all of the following:
- Run fast: A unit test must run extremely fast. If it needs to wait for database connections or external server processes, or to parse large files, its usefulness will quickly become limited. A test should provide an immediate response and instant gratification.
- Have zero external configuration: A unit test must not require any external configuration files, not even simple text files. The test’s configurations must be provided and set by the test framework itself by calling code. The intent is to minimize both the runtime of the test and to eliminate external dependencies (which can change over time, becoming out of sync with the test). Test case conditions should be expressed in the test framework, creating more readable test conditions.
- Run independent of other tests: A unit test must be able to run in complete isolation. In other words, the unit test can’t depend on some other test running before or after itself. Each test is a stand-alone unit. In fact, every test method inside a test should be stand-alone and not depend on another method or on the test methods being run in a certain order.
- Depend on zero external resources: A unit test must not depend on any outside resources, such as database connections or web services. Not only will these resources slow the test down, but they are outside the control of the test and thus aren’t guaranteed to be in a correct state for testing.
- Leave external state untouched: A unit test must not leave any evidence that it ever ran. Unit tests are written to be repeatable, so they must clean up after themselves. Obviously, this is much easier when the test doesn’t rely on external resources (which are often harder to clean up or restore).
- Test smallest unit of code possible: A unit test must test the smallest unit of code possible in order to isolate the code under test. In object-oriented programming, this unit is usually a method of an object or class. Writing unit tests such that a method is tested independently of other methods reduces the number of code lines that could contain a potential bug.
Integration Tests
An integration test accompanies the code and is written at development time, just like a unit test. However, unlike the unit test, an integration test spans multiple layers and tries to use as many resources as it possibly can. In our case integration tests are designed to never depend on “real” system resources in such a way that the test depends on a specific environment. Your tests should be able to run anywhere and anytime.
An example that breaks this rule might be a prepopulated external database. In that case you can only run the test in the environment where you can access the database. If the database is down or experiences problems, you will be unable to run your tests. Also, all users should have their proper database tables. Otherwise, multiple users will not be able to run the tests at the same time without interfering with each other. When you are developing remotely and don’t have a VPN connection, you won’t be able to connect to the database and thus won’t be able to run the tests. All of this makes your life harder than it should be and may quickly demotivate you from writing good and complete tests.
Our integration tests will use in-memory equivalents of these resources: in-memory databases, in-memory directory servers, in-memory browsers, and so forth. They allow testing the “integration” of several layers of our application without being affected by the environment. If at a certain point it becomes impossible to fall back on such resources, mock objects are used in the same way as with unit testing.
An integration test is no replacement for system testing using the real resources. But it tries to simulate the target environment as closely as possible, reducing issues when performing the actual system or user acceptance testing. Real system testing is usually more resource-intensive and harder to automate. You will benefit in these latter testing stages if you have created a solid integration testing harness, because many problems will already have been detected and solved thanks to these integration tests.
The important thing to remember is that these tests are all accompanying the project. They are made at development time, by developers. They are run by developers in an automated fashion. If any test fails, your project is “broken.” Also, don’t forget that integration testing that isn’t dependent on actual resources and users enables you to nail down a lot of fundamental problems in an efficient manner early in the project’s lifecycle. This makes later system testing and user acceptance testing smoother and easier. It is always better to use a resource (which runs in memory or does not create a dependency) than to use a static simulator or a mock.
As a final word on in-memory resources: it could well be that your project uses special queries that only run on a specific DMBS, and hence there is no use in firing them at another database. It might also be the case that the statements in question are not even supported. In most cases these special queries only take up a very small amount (for an average project) of the code base. It is better to create resource-dependent (system) tests just for those specific cases than to make your entire test set dependent on real resources.
Also, if you are using DBMS-specific features or complex query logic that is impossible to simulate on another resource, are you sure that your Java code is the right place for it? Isn’t a database object such as a (materialized) view, procedure or function a better solution? This point leads into an architectural discussion, but it is important to consider and can have impact not only on your overall architecture and reusability but also the testability of your (Java) project.
![]() Note There is not always a clear separation between a unit and an integration test, although this discussion has emphasized the idea of a noticeable dividing line. Sometimes you just need to test that business algorithm without being bugged with “how to get the data.” We would call that a unit test. In another situation, you want to make sure that an HQL or JPQL query translates to executable SQL and performs what you want. This is something we would execute against an in-memory database and hence call it an integration test.
Note There is not always a clear separation between a unit and an integration test, although this discussion has emphasized the idea of a noticeable dividing line. Sometimes you just need to test that business algorithm without being bugged with “how to get the data.” We would call that a unit test. In another situation, you want to make sure that an HQL or JPQL query translates to executable SQL and performs what you want. This is something we would execute against an in-memory database and hence call it an integration test.
Setting Up a Basic Unit Test
In this section we will explain how to set up a basic unit test using the JUnit framework6 without any Spring involvement. We will address some specific JUnit features using annotations. If you are already familiar with JUnit,6 feel free to skim this section quickly.
_________
![]() Note From experience we know that most developers are at least familiar with JUnit. Since we want to explicitly show you the Spring testing framework, we opted to do this in combination with JUnit. However, we also advise you to take a look at TestNG.7 While it is not source-compatible with JUnit, they look the same on the surface. If you know JUnit, using TestNG will be a breeze. However, TestNG has noticeably more features related to ordering tests, expressing dependencies, and managing greater amounts of tests. TestNG is also more flexible than JUnit. There is also an STS (Eclipse) plug-in (and build plug-in for Gradle and Maven). See this IBM8 resource for a nice comparison between the two frameworks and see what suits you and your project best.
Note From experience we know that most developers are at least familiar with JUnit. Since we want to explicitly show you the Spring testing framework, we opted to do this in combination with JUnit. However, we also advise you to take a look at TestNG.7 While it is not source-compatible with JUnit, they look the same on the surface. If you know JUnit, using TestNG will be a breeze. However, TestNG has noticeably more features related to ordering tests, expressing dependencies, and managing greater amounts of tests. TestNG is also more flexible than JUnit. There is also an STS (Eclipse) plug-in (and build plug-in for Gradle and Maven). See this IBM8 resource for a nice comparison between the two frameworks and see what suits you and your project best.
Our basic setup starts by creating a Java class (which will become our test) in the test class path (src/test/java). We will be using JUnit4, which uses annotations to denote specific functionality. We create a DummyDao class in the production classpath (src/main/java), which will serve as our class to test (see Listing 9-1). The DummyDao will execute operations on a virtual database, in our case a simple ArrayList. The DummyDao class has three operations: delete an entry from the database, add an entry to the database, and search for entries in the database that contain the given query word.
Listing 9-1. A simple class representing a DAO (Data Access Object) that we are going to unit-test
package com.apress.prospringmvc.bookstore.dao;


public class DummyDao {


    private List<String> database;


    public DummyDao(List<String> database) {

        this.database = database;

    }


    public void delete(String element) {

        database.remove(element);

    }


    public void add(String element) {

        database.add(element);

    }


    public List<String> find(String queryWord) {

        List<String> result = new ArrayList<String>();

        for (String element : database) {

            if (element.contains(queryWord)) {

                result.add(element);

            }

        }

        return result;

    }

}
_________
Next we add tests for each of the methods (see Listing 9-2).
Listing 9-2. The test case for DatabaseDao
package com.apress.prospringmvc.bookstore.basic;


import static junit.framework.Assert.assertEquals;

import static junit.framework.Assert.assertTrue;


import org.junit.Before;

import org.junit.Test;


import com.apress.prospringmvc.bookstore.dao.DummyDao;


public class BasicUnitTest {


    private List<String> database;

    private DummyDao dummyDao;


    @Before

    public void dataSetup() {

        database = new ArrayList<String>();

        for (int i = 0; i < 20; i++) {

            database.add("test" + i);

        }

        dummyDao = new DummyDao(database);

    }


    @Test

    public void testDeleteQuery() {

        assertEquals(1, dummyDao.find("test0").size());

        dummyDao.delete("test0");

        assertEquals(19, database.size());

        assertEquals(0, dummyDao.find("test0").size());

    }


    @Test

    public void testAddQuery() {

        assertEquals(0, dummyDao.find("test20").size());

        dummyDao.add("test20");

        assertEquals(21, database.size());

        assertEquals(1, dummyDao.find("test20").size());

    }


    @Test

    public void testFindQuery() {

        List<String> results = dummyDao.find("2");

assertEquals(2, results.size());

     for (String result : results) {

        assertTrue(result.equals("test2") || result.equals("test12"));
The @Test annotation denotes a method as a test method. This method will be picked up and executed by JUnit. Inside this test method you will write the code to test your actual production code. Other methods in the test class not carrying a specific annotation are left alone. The @Before annotation is run before every test method. It will make sure our database is populated with our initial data. If a @Test method changed the data, we will make sure the data is reset to its initial state. It is important that each method runs as an independent test. You should not make dependencies between @Test methods, as your test code becomes brittle and hard to understand very fast. Also, you have no control over the order in which the @Test methods are executed.
STS comes shipped with a JUnit plug-in out of the box. Once you have at least one @Test method, you can right-click on the class and select Run As. The extra run option JUnit Test will automatically appear. Click it to run the test.
The assertTrue and assertEquals methods were imported as static imports from the junit.framework.Assert class (as you can see at the top of Listing 9-2). These methods allow you to verify the behavior, and let the test stop if the behavior is not what you expect. This is just a bit of sugar syntax, as it makes your code more fluent to read. Mostly you don’t need a lot of these methods. With assertTrue and assertEquals, you will already get far.
If we take the testDeleteQuery method as an example, we first execute the delete query to delete an entry in our database. Next we check to see whether the database indeed contains one entry less. When this is not the case, the assertEquals fails and that particular test method is marked as failed, as shown in Figure 9-3.

Figure 9-3. A JUnit test failure
If all tests succeed, you see a green bar like the one in Figure 9-4.

Figure 9-4. A JUnit test success
Besides the @Before method, there is also @After. The @After method is run after each test method, even if the method throws an exception or if one of the assertions fails. There are also the @BeforeClass and @AfterClass, which are executed once, before the first test method starts and after the last test method ends, respectively. You can see the order visualized in Figure 9-5.

Figure 9-5. JUnit annotation execution order
The @BeforeClass, @Before, @After and @AfterClass are of course optional annotations (that’s why they are shown in dashed rectangles). If you don’t specify an @Before, for example, JUnit will immediately start with your test method, and then, if you specified it, execute the @After method. If you didn’t specify it, the next test method will run. Don’t forget that @Before and @After run before and after every test method. @BeforeClass and @AfterClass run only once, at the beginning of the test and at the end. JUnit has a few more extra features such as Suites and Categories, but they are outside the scope of this chapter. You can find more information on the JUnit website9 and in the JavaDoc.10
This wraps up our quick introduction to JUnit and how to write a quick test. This will be sufficient for the remainder of this chapter.
Testing Code Coverage
Using the STS plug-in EclEmma, you can get an overview of the code that has been tested by your test. This is as easy as going to the Spring dashboard, clicking the extension tab on the bottom of the view, and typing eclemma in the search field, and installing the EclEmma plug-in (see Figure 9-6).
_________

Figure 9-6. Installing EclEmma
After installing the plug-in you can right click on your test and select Coverage as ä JUnit test. The result will come in a separate panel, as shown in Figure 9-7. If this panel doesn’t show up, you can open it manually by selecting Window in the STS menu bar, and then Show View ä Other. If you then type coverage in the text field that appears, one result will appear in the list: “Java” with “Coverage” underneath it. Select Coverage and then click OK.
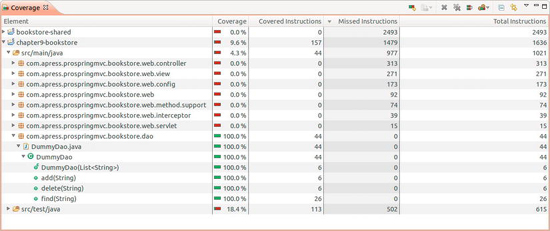
Figure 9-7. Code coverage after running EclEmma
We can clearly see that our DummyDao class has been tested 100%, so every line of code has been touched by our test case. Depending on the type of class you test, it is not always possible to get 100% coverage, but this is the goal you should strive to for each test you create. Note that in some cases it is not feasible or simply not required to have 100% coverage. For example, if your object has multiple get/set methods (generated by your IDE), then testing those is a bit superfluous, even though it results in not getting 100% coverage. However, don’t give up too soon, either. If you lose coverage because of code depending on resources, you can use in-memory resources or mocks as we will discuss in the next sections.
After performing the coverage, you can also double-click on the actual production class you have tested: DummyDao in our case. EclEmma will indicate the lines that have been (or have not been) tested. In this run everything will turn up green, since every line of code has been tested. We also performed a second run, removing all references in the test method to the find method of the DummyDao. We placed the results next to each other in Figure 9-8.

Figure 9-8. EclEmma showing tested (green) and untested (red) lines of code
On the left you can see the 100% code coverage of our first run (all green). On the right you see the run where we removed every reference to the find method in our test. The find method will turn up in red, as it has not been touched by our test. The diamond icons on the left of some lines indicate whether the loop ran for each element in the list or not. For example, if we put a break statement after the if, the loop would only run once, and the first diamond would appear yellow and indicate that the branch was not completely covered. The same goes for the second diamond, which covers the if statement. If this statement was not executed, the diamond would also show up in orange.
Using Spring’s Test Support
In the previous section you saw how we can create a basic unit test using JUnit. This was a very isolated test, not requiring any dependencies like Spring or other resources, as a unit test should be. In this section we will introduce Spring’s test support to create integration tests that actually use these dependencies together in the test.
The Spring test support is all about integrating Spring within your tests. With a couple of annotations, you can load a Spring context and make it available to your unit test. This allows you to inject dependencies directly in the test using, for, example autowiring.
Setting Up Our Integration Test
Next we are going to setup an integration test that will test our com.apress.prospringmvc.bookstore.repository.JpaBookRepository. We start by creating a normal class in the test classpath (see Listing 9-3). Ideally you place your test in the same package as the class you are going to test, but on the test class path instead of the production classpath (which is src/main/java). So we will create a com.apress.prospringmvc.bookstore.repository.JpaBookRepositoryTest in the src/test/java classpath.
Listing 9-3. The start of our integration test testing JpaBookRepository, in src/test/java
package com.apress.prospringmvc.bookstore.repository;


public class JpaBookRepositoryTest {

}
To enable the Spring test context, we tell JUnit it has to bootstrap Spring, by adding the following annotation on top of the class, as shown in Listing 9-4.
Listing 9-4. Adding the runner to enable Spring’s test support
package com.apress.prospringmvc.bookstore.repository;


import org.junit.runner.RunWith;

import org.springframework.test.context.junit4.SpringJUnit4ClassRunner;


@RunWith(SpringJUnit4ClassRunner.class)

public class JpaBookRepositoryTest {

}
SpringJUnit4ClassRunner is a Spring-specific integration class for JUnit. JUnit inspects those classes with the @RunWith annotation. When you indicate you want to run a class as a JUnit test, the test class is passed as a parameter to the JUnit runtime (in our case this is done by the IDE). JUnit will then scan for @RunWith annotations. In our case it will execute org.springframework.test.context.junit4.SpringJUnit4ClassRunner. This class will start Spring’s test support by using the Spring org.springframework.test.context.TestContextManager and org.springframework.test.context.TestContext. This will enable all Spring functionality, such as loading your application context (based upon the @ContextConfiguration, as we will see next), enabling autowiring, and executing implementations of org.springframework.test.context.TestExecutionListener. The latter are special listeners that can be executed before initialization of a test class, before running a test class, and before running a test method within a test class. They can be registered using the TestExecutionListener annotation. There are three listeners registered by default:
org.springframework.test.context.support.DependencyInjectionTestExecutionListenerorg.springframework.test.context.support.DirtiesContextTestExecutionListenerorg.springframework.test.context.transaction.TransactionalTestExecutionListener
For our purposes here, only the last one is relevant as it will manage our transactions within our tests; we will discuss this later on.
Finally, we have to indicate which (test) context we want to load for our test class. At this point you have two options:
- One way is to load one or more production contexts. These are the contexts your application is actually using. If you want to differentiate between test runs and the actual application run, you can make use of Spring profiles.
- You can also opt for setting up specific contexts just for your test. This way you can specify exactly which resources you need.
Each of these approaches has its pros and cons, so you should weigh them based on your application and what you are going to test to determine which is best. The more modular your Spring configuration is (either in terms of annotated classes or XML configuration files), the easier it will become to mix both approaches. When you have a Spring configuration listing your repositories, but a separate configuration for the datasource, you could load the production configuration for the repositories in your test combined with a separate test context for the datasource (which will in that case point to an in-memory database).
When you have identified which contexts you want to load, you can use the @ContextConfiguration annotation on top of the class to specify them. Using this annotation you can either specify a context XML file, using the locations attribute (which takes an array of XML config files) or the classes attribute, which takes an array of @Configuration classes to load the context. You cannot use both. If you want to mix XML and classes, you have to load the one from the other. That means that if you want to work with XML, but also need to load @Configuration classes, you have to load them from one of the XML context files. If you are working with @Configuration classes, you have to use @ImportResource in one of these classes to load the desired XML config file.
We are going to use our production context classes, so we will use the classes attribute (see Listing 9-5).
Listing 9-5. Adding the context configuration for loading our Spring config
package com.apress.prospringmvc.bookstore.repository;


import org.junit.runner.RunWith;

import org.springframework.test.context.junit4.SpringJUnit4ClassRunner;

import com.apress.prospringmvc.bookstore.config.

       InfrastructureContextConfiguration;

import com.apress.prospringmvc.bookstore.config.TestDataContextConfiguration;

import org.springframework.test.context.ContextConfiguration;

@RunWith(SpringJUnit4ClassRunner.class)

@ContextConfiguration(classes = { InfrastructureContextConfiguration.class,

 TestDataContextConfiguration.class })

public class JpaBookRepositoryTest {


}
That is all. When you run the test as a JUnit test, the Spring context will be booted thanks to the Spring test support (which is itself initially booted by the SpringJUnit4ClassRunner). In our case this means that all repositories and services are loaded into the context, and an in-memory database is started and prepopulated with data.
In this section we are only going to test the JpaBookstoreRepository. But there are plenty of other classes to test. We will create a matching test for each of them and apply the same annotations to load the context for each test class.
![]() Note Instead of repeating the annotation configuration for each test class independently, we could have moved it to a common superclass from which each test could extend. This would have saved us repeating the same annotation configuration in each test class. The same goes for JUnit annotations, like the ones we saw before (
Note Instead of repeating the annotation configuration for each test class independently, we could have moved it to a common superclass from which each test could extend. This would have saved us repeating the same annotation configuration in each test class. The same goes for JUnit annotations, like the ones we saw before (@Before, @After, and so on). However, to make every class complete by itself we duplicated the configuration. Also, you should not create superclasses merely to avoid repeating annotation configuration. Only do that if the classes have something more in common. For example, to test your repositories you could set up a superclass that has the annotation configuration and sets up a minimal data set useful for all repository tests. Creating superclasses containing only annotation configuration can quickly result in the wild growth of those classes and make your code less clear.
Because this is a small project, the context almost loads instantly. For bigger projects, that might take some more time. To make sure the context is not loaded separately for each class independently, the Spring Test Framework provides consistent loading of Spring application contexts and caching of those contexts. Support for the caching of loaded contexts is important, because startup time can become an issue, not because of Spring itself, but because the objects instantiated by the Spring container take time to instantiate. For example, a project with many Hibernate mapping files might take several seconds to load because of the parse time required for each of the mapping files. If the context is only loaded once, an extra load time of 5 seconds won’t be noticeable. But if it loaded for each test individually (and you have 200 tests, for example) then 5 seconds extra load time means that your test set runs 16 minutes longer without any good reason. If your tests run slowly, this starts to degrade your infrastructure, which could then result in excuses not to write tests “because they run so slow.” It is important to keep your test set lean and mean, so that it costs as little time as possible to run the test set.
By default, once the configured ApplicationContext is loaded, it is reused for each test. Thus the setup cost is incurred only once (per test suite), and subsequent test execution is much faster. In this context, the term test suite means all tests run in the same JVM. However, when you run tests from STS one by one, this means the application context will be booted separately for each of them. The solution (using JUnit) is to build a suite, or run them using your build tool, in our case Gradle. In that case the application context will only be loaded once for all tests that are run. Building the chapter9 sample project with Gradle will automatically run the tests. You start the build by first going into the chapter9 sample directory, and then issue following Gradle command:
$ gradle build
The output will look similar to this:
:bookstore-shared:compileJava UP-TO-DATE


--further gradle output omitted for brevity--


:chapter9-bookstore:testClasses

:chapter9-bookstore:test

22:30:31.392 [Thread-15] INFO  o.s.c.s.GenericApplicationContext - Closing
org.springframework.context.support.GenericApplicationContext@39518cc: startup date [Thu Mar
29 22:30:28 CEST 2012]; root of context hierarchy

22:30:31.397 [Thread-15] INFO  o.s.b.f.s.DefaultListableBeanFactory – Destroyi


-- further gradle output omitted for brevity--


22:30:31.401 [Thread-15] INFO  o.s.o.j.LocalContainerEntityManagerFactoryBean - Closing JPA
EntityManagerFactory for persistence unit 'bookstore'


:chapter9-bookstore:check

:chapter9-bookstore:build


BUILD SUCCESSFUL


Total time: 17.033 secs
In the above example all tests were run by Gradle, and thus share a single application context instance. In the unlikely case that a test corrupts the application context (for example by modifying a bean definition or the state of an application object) and requires reloading, Spring’s test support can be configured to reload the configuration and rebuild the application context before executing the next test. The latter can be accomplished by putting the @DirtiesContext annotation on the class, or even the test method, that is altering the application context. The next test class (or test method) will get a refreshed application context. You can also inject the ApplicationContext directly if that would be required (see Listing 9-6).
Listing 9-6. If required, the application context can be autowired.
@Autowired

Private ApplicationContext ApplicationContext
Because we enabled Spring’s test support, we now enabled Spring for our test cases with the supplied configuration. All Spring features are now enabled from out tests. We can for example autowire any bean directly in our tests that is loaded in our Spring configuration. Our test class has now become fully Spring-aware.
Managing Transactions from Within the Test
Since we are going to write an integration test that will access our in-memory database (through the repository we are testing), we need to manage our transactions from within the test case. In our production code the transactions are managed by the services and not the repositories themselves. The repositories take part in the transaction started by the service. So in this case we need our test case to start the transaction, since we will be testing the repositories directly. We will do this by putting the @Transactional annotation on the test class, making each test method start a transaction first.
When such an annotation is found the automatically registered TransactionalTestExecutionListener will assure a transaction rollback by default when the test method ends. As mentioned earlier in the chapter, TransactionalTestExecutionListener is one of the default listeners that are registered by the Spring’s test support. To give you a quick insight; these listeners (and all other possible registered TestExecutionListener’s) are invoked before (and after) a test method is executed. This listener in question will automatically mark the transaction for rollback after the test method ended. Remember, this is something specific to Spring’s test support. These listeners are not there when you boot your application context the normal way. So in a normal production scenario the transaction would commit when no exceptions occurred.
Rolling back is actually the behavior you want. It means that CUD operations (Create, Update and Delete) will not modify data in our database. Allowing them to do so would be the least desirable approach, since that might create data dependencies between tests. When tests are changed, or for some reason the order in which tests are run is altered, some tests suddenly might start to fail because they depend on data being added by another test that has not yet run. The best pattern here is to insert the data you need on the method level and let the transaction roll back. This way the data is not persisted in the database and no traces remain.
![]() Note When testing a repository, you will probably need some default data setup that can be used for each test method. Instead of repeating the same data setup over again for each test method, you can safely create this data in an
Note When testing a repository, you will probably need some default data setup that can be used for each test method. Instead of repeating the same data setup over again for each test method, you can safely create this data in an @Before annotated method. This method will automatically run before each test method. It will also run in the same transaction as the test method itself, and hence data inserted, modified, or deleted will be rolled back the same way as with the test method that is being executed.
This approach of automatically rolling back the transaction at the end of each test method also has a drawback. When using an ORM (Object Relational Mapping), rolling back works great for Read operations, since all queries have been sent to the database, giving you a complete coverage. However, when using an ORM like Hibernate (directly or via JPA), CUD operations might not be flushed. Hibernate does write-behind. It flushes statements to the database when it thinks the time has come or at least when the transaction commits. So while you called that method which triggered an update or insert statement, the statement might never be flushed to database when rolling back the transaction. In that case you never had the certainty the query was actually executed on the database. You have two options for handling this:
- Let the transaction commit anyway. You can do this by adding
@Rollback(false)on the test method. You can then create a tear-down method (@After) which removes the data you inserted.- Before the end of the test method, call
flushon theEntityManager(in the case of JPA) to let it flush all outstanding statements to database. Remember that the transaction will roll back, so the changes will not remain persistent. But they have been received and verified by the database, so you are sure they will work.
Choosing one of the two approaches is a matter of preference; both will yield the same result. The first approach requires you to have some additional code in the teardown method. The second approach is more automatic, but requires some more understanding of the ORM you are using. For the second solution you could also put the flush in a @After method, perhaps inherited from a superclass.
As we mentioned before, the integration test doesn’t give a 100% guarantee. For starters, we are working against a different RDMBS than your actual target environment. When rolling back transactions instead of committing them, you’re increasing the possibility that something might go wrong when it actually commits. However, when applying any of the previously discussed strategies, it is very unlikely that this will happen. If you flush, all statements have been processed by the database, so there is normally no reason the commit will fail. Although in very specific scenarios there might still be something that goes wrong, chances of that are very small. The big advantage is that your tests remain independent and you will never have to figure out why suddenly 10 tests are starting to fail when you add another test that by itself is fully working. Your test set will also be resource-independent and run everywhere. It is clear that these are major advantages.
![]() Note As you know, a big code base is hard to manage in terms of design, API, consistency and so on. Do not forget that your tests might even become a bigger code base than your actual production code. Take care of them and they will take care of you.
Note As you know, a big code base is hard to manage in terms of design, API, consistency and so on. Do not forget that your tests might even become a bigger code base than your actual production code. Take care of them and they will take care of you.
Testing the JpaBookRepository
We now have all the bits and pieces to start building our test. For the transaction strategy, we will choose the second option. That is, we depend on the infrastructure to start and roll back the transaction and we will manually call flush on test method that perform CUD operations.
Next, we continue to define a test method for each of the methods exposed by the BookRepository interface and test them. For the sample code we will restrict the test to two read methods and one create method of the BookRepository. The other methods are tested in the same fashion and would not show anything new. We will also create a setup method (annotated with @Before) which will load the common data used by each of the test methods. Let’s first look at the test code in Listing 9-7.
Listing 9-7. The complete test class in src/test/java
package com.apress.prospringmvc.bookstore.repository;


import static junit.framework.Assert.assertEquals;


import javax.persistence.EntityManager;

import javax.persistence.PersistenceContext;


import org.junit.After;

import org.junit.Before;

import org.junit.Test;

import org.junit.runner.RunWith;

import org.springframework.beans.factory.annotation.Autowired;

import org.springframework.test.annotation.Rollback;

import org.springframework.test.context.ContextConfiguration;

import org.springframework.test.context.junit4.SpringJUnit4ClassRunner;

import org.springframework.transaction.annotation.Transactional;


import com.apress.prospringmvc.bookstore.config.

       InfrastructureContextConfiguration;

import com.apress.prospringmvc.bookstore.config.TestDataContextConfiguration;

import com.apress.prospringmvc.bookstore.domain.Book;

import com.apress.prospringmvc.bookstore.domain.Category;

import com.apress.prospringmvc.bookstore.domain.support.BookBuilder;

import com.apress.prospringmvc.bookstore.domain.support.CategoryBuilder;

import com.apress.prospringmvc.bookstore.domain.support.EntityBuilder.

       EntityBuilderManager;


@RunWith(SpringJUnit4ClassRunner.class)

@ContextConfiguration(classes = { InfrastructureContextConfiguration.class, TestDataContextConfiguration.class })

@Transactional

public class JpaBookRepositoryTest {


    @Autowired

    private BookRepository bookRepository;

    @Autowired

    private BookBuilder bookBuilder;

    @Autowired

    private CategoryBuilder categoryBuilder;

    @PersistenceContext

    private EntityManager entityManager;


    private Book book;

    private Category category;


    @Before

    public void setupData() {

        category = categoryBuilder.name("Evolution").build();

        book = bookBuilder.description("Richard Dawkins' brilliant

               reformulation of the theory of natural selection")

               .author("Richard Dawkins").title("The Selfish Gene:

                         30th Anniversary Edition")

               .isbn("9780199291151")

               .category(category).build();

    }


    @Test

    public void testFindById() {

        Book book = bookRepository.findById(this.book.getId());

        assertEquals(this.book.getAuthor(), book.getAuthor());

        assertEquals(this.book.getDescription(), book.getDescription());

        assertEquals(this.book.getIsbn(), book.getIsbn());

    }


    @Test

    public void testFindByCategory() {

        List<Book> books = bookRepository.findByCategory(category);

        assertEquals(1, books.size());


        for (Book book : books) {

            assertEquals(this.book.getCategory().getId(), category.getId());

            assertEquals(this.book.getAuthor(), book.getAuthor());

            assertEquals(this.book.getDescription(), book.getDescription());

            assertEquals(this.book.getIsbn(), book.getIsbn());

        }

    }


    @Test

    public void testStoreBook() {

        Book book = bookBuilder.description("Something").author("JohnDoe").title("John Doe's

life")

                .isbn("1234567890123").category(category).build();

        bookRepository.storeBook(book);


        // Explicitly flush so any CUD query that is left behind is sent to the database

        // before rollback

        entityManager.flush();

    }

}
In this code we make our test transactional by default. For the read methods we insert additional data using the already discussed JUnit @Before method. We use the Builder pattern to build our data and it is by default inserted using an EntityManager instance injected in the builders. This data is also removed when the test method ends because of the transaction rollback.
![]() Note We said before that one should perform a flush in a test method testing functionality that performs CUD, to make sure all statements are flushed to database. While testing a read-only method, we first inserted data in the database using JPA. What about flushing these insert statements? Well, actually, we don’t care. The ORM will flush them as it sees fit to make sure our read operations work on the latest data. It might hold back the insertion of the category and book, but from the moment it sees our query to select a book by ID, it will first flush the book and category to database. The point is that we are not testing any of our CUD operations. How the ORM manages the write-behind internally to make sure our read operations see the latest data is not our concern.
Note We said before that one should perform a flush in a test method testing functionality that performs CUD, to make sure all statements are flushed to database. While testing a read-only method, we first inserted data in the database using JPA. What about flushing these insert statements? Well, actually, we don’t care. The ORM will flush them as it sees fit to make sure our read operations work on the latest data. It might hold back the insertion of the category and book, but from the moment it sees our query to select a book by ID, it will first flush the book and category to database. The point is that we are not testing any of our CUD operations. How the ORM manages the write-behind internally to make sure our read operations see the latest data is not our concern.
In our method that tests the creation of new book records, we explicitly flushed before the test method ends. This way we are sure that the insert statement (generated by the query in the storeBook method of our repository) was send to database (which is probably the only statement). After that, the test method ends and the transaction is rolled back.
Using Mock Objects
In this section we will introduce you to using mock objects. When creating a unit test, you want to make sure your test is as isolated as possible and does not depend on resources. In your integration tests, on the other hand, you try to use as many resources as you can, as long as you remain in control and they don’t make your test dependent on a specific resource or environment. For those cases where you are not able to accomplish this, mock objects will help you. Let’s start at looking what mock objects really are.
What Are Mock Objects?
As explained in the introduction, in some cases you want to isolate a certain algorithm to unit-test. That algorithm might depend on a repository feeding it data, and you don’t want to fiddle with setting up data for testing the algorithm. You want to concentrate the test on the algorithm alone. A mock object is a good solution here, as it enables you to plug in a replacement of the real resource and preprogram it with data. Whenever the algorithm makes a call to the mock, it is able to return data that you programmed it with as part of the test setup.
Mocks also have other benefits. A mock is smart. For example, it can be designed to return data only if the parameter of the method call matches a certain value. A mock can also be verified. When the test is done, you can ask the mock to check if all methods you programmed it with were indeed called with the expected parameters. If not, it will let your test fail. Another use case for mock objects is for resources for which there are no easy in-memory alternatives; for example, you have a dependency on a legacy system.
Mock objects fall in the category of so called “test doubles.” There are different kinds of test doubles, but only one of them is a real mock. In his article “Mocks Aren’t Stubs,”11 Martin Fowler distinguishes the different test doubles and names them appropriately. Let’s have a look at them:
- Dummy. Dummies are mostly real implementations of a given interface. We could, for example, build a
DummyBookRepository. The method bodies of dummies are mostly empty. If their signature requires them to return a value, it is mostly “null.” Dummies are useful to build objects that you are going to test and have a mandatory dependency on the dummy. But the dependency in question is not used for testing the given functionality.- Fake. A fake is a working replacement for a real resource, such as an in-memory database or an in-memory implementation of a web service. It is clear that in-memory fakes enjoy real advantages over any external dependency, since those would again break our rule that our tests should be able to run everywhere, while still supplying a high level of guarantee that your code will work against the real resource once the fake is replaced with the real resource.
- Stub. Stubs are replacement objects that are able to return preprogrammed values when their methods are called. They normally don’t respond outside the values that they have been programmed with. The way they capture state is very basic, and the verification process mostly does not allow you to do behavior verification. These are sometimes also referred to as “simulators.”
- Mock. Mocks add extra functionality in the training (setting up the preprogrammed data) and verification phase compared to a stub. A mock will allow you to verify not only that a given method was called on the mock, but also that it was called with the desired parameters. This is normally built in the mock framework and is not something you have to build yourself (unlike with stubs).
From our experience, all of these deserve a certain place in the project. While all test doubles can in fact also be replaced by mocks, you probably shouldn’t do so. A mock object is something that is built on the fly in your test, is programmed with data, expects certain behavior, and is verified before the test ends. A dummy is a real class that sits in your project code. In addition to the com.apress.prospringmvc.bookstore.repository.JpaBookRepository, there could also be a “DummyBookRepository.” It is not supposed to do anything, besides being there. The advantages are that you could use Spring profiles or selective context loading in your test to wire up the one or the other. This might keep your code base cleaner and tests easier to understand. Also, when using a mock where you really want a dummy, you will be sending out wrong signals to other developers reading your code. They will see a mock, which is not programmed and not verified, so they will think it is a developer error. Using a dummy, you clearly indicate that the dependency is not relevant in the scope of the test you are performing, but the object you are testing has a mandatory dependency on it and so you gave it a dummy implementation.
_________
At certain points you want to build a real integration test. In the previous section we tested our JpaBookRepository against an in-memory database. Although we could have mocked the EntityManager, not doing so added an enormous value; it taught us that our JPQL queries were translated to SQL that was actually correct and could be executed by an RDBMS. Replacing this with a mock would cut critical things from our test and degrade its effectiveness.
Stubs are probably only useful in special integration testing when there is no in easy fake available for a given resource, for example for a legacy system. The stub could then be wired in as a “dummy with data.”
As a final note, think carefully about which kind of testing double you will be using. When writing a unit test, think about using dummies first. If you really need state and behavior verification for the dependency, consider a mock. If you are integration testing, consider using in-memory fakes as much as you possibly can. If you are doing integration testing from another interface (front-end testing using an in-memory browser, for example) consider using stubs.
In this discussion we will limit ourselves to using and creating mocks for our unit tests. In the next section we will dive into the code and test our AccountService, while using a mock for its AccountRepository dependency.
Testing the AccountService
Our com.apress.prospringmvc.bookstore.service.AccountService has two methods: save, which saves a new com.apress.prospringmvc.bookstore.domain.Account to the database, and login, which takes a username and password as parameters and verifies the credentials. If the credentials are correct, it returns the Account that belongs to the given user. It does that by loading an Account from the database where the username matches. After that, it tries to verify passwords. The passwords are SHA-256 hashed. So the service first creates a hash from the password parameter and then compares it with the value retrieved from the database (where we store only the hashed values of the passwords).
We are writing a unit test that will test the login method. In order to do this, we will create a mock for com.apress.prospringmvc.bookstore.repository.AccountRepository (this is the repository used to load the Account from database based upon the username). We will create a test method that tests a successful login and another that performs a negative test, in which we intentionally supply bad credentials, which should lead produce an exception. Let’s look at our first version of the test in Listing 9-8.
Listing 9-8. Setting up the AccountServiceTest in src/test/java
package com.apress.prospringmvc.bookstore.service;


// Other imports omitted, see Listing 9-7


import static junit.framework.Assert.assertEquals;


import org.mockito.Mockito;

import org.springframework.context.annotation.Bean;

import org.springframework.context.annotation.Configuration;


import com.apress.prospringmvc.bookstore.domain.Account;

import com.apress.prospringmvc.bookstore.domain.support.AccountBuilder;

import com.apress.prospringmvc.bookstore.repository.AccountRepository;


@RunWith(SpringJUnit4ClassRunner.class)

@ContextConfiguration

public class AccountServiceTest {


    @Autowired

    private AccountService accountService;

    @Autowired

    private AccountRepository accountRepository;


    @Test(expected = AuthenticationException.class)

    public void testLoginFailure() throws AuthenticationException {

        accountService.login("john", "fail");

    }


    @Test()

    public void testLoginSuccess() throws AuthenticationException {

        Account account = accountService.login("john", "secret");

        assertEquals("John", account.getFirstName());

        assertEquals("Doe", account.getLastName());

    }


    @Configuration

    static class AccountServiceTestContextConfiguration {


        @Bean

        public AccountService accountService() {

            return new AccountServiceImpl();

        }


        @Bean

        public AccountRepository accountRepository() {

            return Mockito.mock(AccountRepository.class);

        }

    }

}
Mockito12 is a state of the art mock framework that we will be using. It is flexible and has a very intuitive API. Throughout this section we will make you more familiar how you can use Mockito for all your mocking needs. The line in bold is all that is needed to create a mock using Mockito. You pass along an interface or class, and Mockito will return a mock object which is not yet programmed.
What further happens is that when adding the ContextConfiguration annotation, Spring will automatically scan for @Configuration classes within the scope of the class and find our AccountServiceTestContextConfiguration. Alternatively, you can also specify classes directly on the ContextConfiguration annotation using the classes attribute, or XML files with the locations attribute. In the AccountServiceTestContextConfiguration configuration class, we created two beans: the first one is the AuthenticationService, the second is the AccountRepository. For the second case we have used Mockito to create a mock. Spring will now auto-inject the AccountRepository into the AuthenticationService when creating the context (remember, Spring will be injecting our mocked version of the AccountRepository).
At this point the test will not run, since we have not yet programmed our mock. When the login method of the AuthenticationService calls a method on our AccountRepository mock, it will return null values. So the next thing to do is program our mock as can be seen in Listing 9-9.
![]() Note The
Note The testLoginFailure (being a so called “negative” test) uses a JUnit feature to verify that indeed an exception is thrown: @Test(expected = AuthenticationException.class). In this case we require that the AuthenticationException is actually thrown. If it isn’t, the test fails.
Listing 9-9. Programming the mock
@Before

public void setup() {

    Account account = new AccountBuilder() {

        {

            address("Herve", "4650", "Rue de la gare", "1", null,
                    "Belgium");

            credentials("john", "secret");

            name("John", "Doe");

        }

    }.build(true);


    Mockito.when(accountRepository.findByUsername("john"))

           .thenReturn(account);

}
We first created the data that our mock will have to return. In our case it is an instance of an Account. The last line of code of Listing 9-9 programs the mock. Whenever the mock receives a call on method findByUsername with the parameter "john", it will return the account. If it receives calls with other parameters (or other methods that aren’t programmed), null is returned. This logic is put in an @Before method since we will reset our mock after every test method invocation. The mock will be reprogrammed before a new test execution starts.
_________
Finally, in Listing 9-10, we have the @After method, which will verify the mock’s state. It will check that the method we programmed the mock with was indeed called. Here we will strictly check that the method was called once (exactly once). After that we reset to mock so it forgets about its programmed data and verification state. It can then be reprogrammed (which will happen in the @Before method before the next method is executed).
Listing 9-10. Verifying the mock’s state and resetting it
@After

public void verify() {

    Mockito.verify(accountRepository,

                   VerificationModeFactory.times(1))

                   .findByUsername(Mockito.anyString());


    // This is allowed here: using container injected mocks

    Mockito.reset(accountRepository);

}
The first line verifies that the findByUsername method was called exactly once. If it hadn’t been, the verify method would raise an error, letting our test fail. In the second line we reset the mock. You might notice the comment above the reset method. Resetting a mock is normally bad practice. Normally you create a mock in scope of a single test method. You create it, program it, verify it, and that’s it. In the next test method you create a new instance of the mock. However, in our case the AccountRepository is autowired (by Spring) in the AccountService. When we create a new instance of the mock, we need to find a clean way to inject it in the AccountService. Yes, as an alternative we could have opted for an extra (AccountRepository) setter on the AccountService, so we could have set the AccountRepository using the setter. This is a matter of preference. In any case we are not violating any rules by resetting the mock this way. Just be sure you don’t reset a mock in the middle of a test, for example. In that case you should probably have created two test methods instead.
![]() Note You can also use static imports for Mockito methods, just as we did with JUnit. It is in fact a recommended practice, as it keeps your code clean and readable. In the code examples, we deliberately left the classes visible to make it clear that it is a Mockito object rather than a JUnit object (which might not be obvious if you are new to Mockito or mocks in general).
Note You can also use static imports for Mockito methods, just as we did with JUnit. It is in fact a recommended practice, as it keeps your code clean and readable. In the code examples, we deliberately left the classes visible to make it clear that it is a Mockito object rather than a JUnit object (which might not be obvious if you are new to Mockito or mocks in general).
Listing 9-11 shows the complete test case.
Listing 9-11. The complete test case
package com.apress.prospringmvc.bookstore.service;


// Other imports omitted, see Listing 9-7


import static junit.framework.Assert.assertEquals;


import org.mockito.Mockito;

import org.mockito.internal.verification.VerificationModeFactory;

import org.springframework.beans.factory.annotation.Autowired;

import org.springframework.context.annotation.Bean;

import org.springframework.context.annotation.Configuration;


@RunWith(SpringJUnit4ClassRunner.class)

@ContextConfiguration

public class AccountServiceTest {


    @Autowired

    private AccountService accountService;

    @Autowired

    private AccountRepository accountRepository;


    @Before

    public void setup() {

        Account account = new AccountBuilder() {

            {

                address("Herve", "4650", "Rue de la gare", "1", null,
                         "Belgium");

                credentials("john", "secret");

                name("John", "Doe");

            }

        }.build(true);

        Mockito.when(accountRepository.findByUsername("john"))

               .thenReturn(account);

    }


    @After

    public void verify() {

        Mockito.verify(accountRepository,

                        VerificationModeFactory.times(1))
                        .findByUsername(Mockito.anyString());

        // This is allowed here: using container injected mocks

        Mockito.reset(accountRepository);

    }


    @Test(expected = AuthenticationException.class)

    public void testLoginFailure() throws AuthenticationException {

        accountService.login("john", "fail");

    }


    @Test()

    public void testLoginSuccess() throws AuthenticationException {

        Account account = accountService.login("john", "secret");

        assertEquals("John", account.getFirstName());

        assertEquals("Doe", account.getLastName());

    }


    @Configuration

    static class AccountServiceTestContextConfiguration {


        @Bean

        public AccountService accountService() {

            return new AccountServiceImpl();

        }


        @Bean

        public AccountRepository accountRepository() {

            return Mockito.mock(AccountRepository.class);

        }

    }

}
This concludes the testing of our AccountService using a mocked AccountRepository. We hope we have shown you how easy it is to set up and verify mocks using Mockito and how useful they are in isolating logic to be tested. There are plenty of other features that can help you set up the desired mocking environment. Those are out of scope for this chapter, so we invite you to take a look at the Mockito website for a good starting point.
Testing Your MVC Logic
As shown in Figure 9-9, Spring MVC consists of our view layer (JSPs), the controller (Spring internal code), our model, and our application controllers. It is important that we first decide which of these components we should actually test and which not.
To test JSPs, you need a running servlet container. This will be part of our system tests and we will test it later in this chapter in the section “Automated Front-End Testing.” We don’t need to test the controller, as this is Spring Framework internal code. We explained before how to test the domain using unit and integration tests, so these are already tested. The only things left to test are our application controllers.

Figure 9-9. Components in an MVC architecture
com.apress.prospringmvc.bookstore.web.controller.LoginController is the application controller we are going to test, more specifically the handleLogin method. Our first advice is to keep the logic inside the application controllers as limited as possible. E.g., when you have extensive validation, put that code in separate classes. This way they become standalone components which are easy to test without requiring your application controller. If you apply this rule consistently, you will be able to test 90% (or more) of your code on the frontend using plain unit tests. This way the application controller will only remain a thin layer between the controller framework and these standalone (easy to test) classes and your model.
Using Spring Mock Objects
When the time has come to test your application controller, you can use the helpers from Spring: org.springframework.test.web.ModelAndViewAssert combined with MockHttpServletRequest, MockHttpServletResponse, and MockHttpSession (all found in org.springframework.mock.web). Although they are named “Mock” they are more like stubs by our definition of the terms. You can, for example, add attributes to the MockHttpSession via MockHttpServletRequest and retrieve them later on (MockHttpServletRequest uses MockHttpSession internally as its session stub). Depending on things you set or do, some MockHttpServletRequest methods might react differently when you call them (it also contains some inner logic to simulate the HttpServletRequest where possible). We will first show the handle login method, in Listing 9-12, so you can easily follow what we are testing.
Listing 9-12. The handleLogin method from the LoginController
@RequestMapping(method = RequestMethod.POST)

public String handleLogin(@RequestParam String username, @RequestParam String

                          password, HttpSession session)

                          throws AuthenticationException {

    Account account = this.accountService.login(username, password);

    session.setAttribute(ACCOUNT_ATTRIBUTE, account);

    String url = (String) session.getAttribute(REQUESTED_URL);

    session.removeAttribute(REQUESTED_URL); // Remove the attribute


    if (StringUtils.hasText(url) && !url.contains("login")) {

        // Prevent loops for the login page.

        return "redirect:" + url;

    } else {

        return "redirect:/index.htm";

    }

}
The method in Listing 9-12 takes care of handling the login from the login page. It accepts a username and password submitted from the login form. It will then authenticate the user using the AccountService and put the result (an Account) on the HTTP session using the constant ACCOUNT_ATTRIBUTE as key. You can see the SecurityHandlerInterceptor defined in the Chapter 6 section “Implementing a HandlerInterceptor.”
Next we show the test case (see Listing 9-13) and then discuss some specific code snippets.
Listing 9-13. The test for the LoginController handleLogin method
package com.apress.prospringmvc.bookstore.web.controller;


// Other imports omitted, see Listing 9-7


import static junit.framework.Assert.assertEquals;

import static junit.framework.Assert.assertNotNull;

import static junit.framework.Assert.assertNull;


import org.mockito.Mockito;

import org.mockito.internal.verification.VerificationModeFactory;

import org.springframework.beans.factory.annotation.Autowired;

import org.springframework.context.annotation.Bean;

import org.springframework.context.annotation.Configuration;

import org.springframework.mock.web.MockHttpServletRequest;


import com.apress.prospringmvc.bookstore.service.AccountService;

import com.apress.prospringmvc.bookstore.service.AuthenticationException;

import com.apress.prospringmvc.bookstore.web.interceptor.

       SecurityHandlerInterceptor;


@RunWith(SpringJUnit4ClassRunner.class)

@ContextConfiguration

public class LoginControllerTest {


    @Autowired

    private LoginController loginController;

    @Autowired

    private AccountService accountService;


    @Before

    public void setup() throws AuthenticationException {

        Account account = new AccountBuilder() {

            {

                address("Herve", "4650", "Rue de la station", "1", null,

                        "Belgium");

                credentials("john", "secret");

                name("John", "Doe");

            }

        }.build(true);


        Mockito.when(accountService.login("john",

                     "secret")).thenReturn(account);

    }


    @After

    public void verify() throws AuthenticationException {

        Mockito.verify(accountService,

         VerificationModeFactory.times(3)).login("john", "secret");

        Mockito.reset();

    }


    @Test

    public void testHandleLogin() throws AuthenticationException {


        MockHttpServletRequest mockHttpServletRequest =

           new MockHttpServletRequest();

        mockHttpServletRequest.getSession().setAttribute(

           SecurityHandlerInterceptor.REQUESTED_URL, "someUrl");


        String view = loginController.handleLogin("john", "secret",

           mockHttpServletRequest);


        Account account = (Account)

           mockHttpServletRequest.getSession().getAttribute(

           SecurityHandlerInterceptor.ACCOUNT_ATTRIBUTE);


        assertNotNull(account);

        assertEquals("John", account.getFirstName());

        assertEquals("Doe", account.getLastName());

        assertNull(mockHttpServletRequest.getSession()

                   .getAttribute(SecurityHandlerInterceptor.REQUESTED_URL));

        assertEquals("redirect:someUrl", view);


        // Test the different view selection choices

        mockHttpServletRequest = new MockHttpServletRequest();

        view = loginController.handleLogin("john", "secret",

               mockHttpServletRequest);

        assertEquals("redirect:/index.htm", view);


        mockHttpServletRequest = new MockHttpServletRequest();

        mockHttpServletRequest.getSession().setAttribute(

           SecurityHandlerInterceptor.REQUESTED_URL, "abclogindef");

        view = loginController.handleLogin("john", "secret",

           mockHttpServletRequest);

        assertEquals("redirect:/index.htm", view);

    }


    @Configuration

    static class LoginControllerTestConfiguration {


        @Bean

        public AccountService accountService() {

            return Mockito.mock(AccountService.class);

        }


        @Bean

        public LoginController loginController() {

            return new LoginController();

        }

    }

}
As you can see, we use mocking to mock out the AccountService the same way we mocked out the AccountRepository while testing the AccountService, so this should already be familiar to you. The only noticeable new element is the use of the MockHttpServletRequest. First we use the MockHttpServletRequest to set a session attribute that our LoginController will use to decide on which view to redirect to:
mockHttpServletRequest.getSession().setAttribute(SecurityHandlerInterceptor.REQUESTED_URL,

 "someUrl");
This is actually the URL that was requested before the user was redirected to the login page. Thanks to the stub, the LoginController is able to retrieve this value from the MockHttpSession (via MockHttpServletRequest) and perform its logic, which we will validate later on using
assertEquals("redirect:someUrl", view);
When the user was authenticated successfully, the LoginController also puts an attribute on the session. This is the account attribute having the Account as value. Here we validate that this is indeed the case:
Account account = (Account) mockHttpServletRequest.getSession().getAttribute(

                SecurityHandlerInterceptor.ACCOUNT_ATTRIBUTE);
In the last two tests (below the comment: // Test the different view selection choices) we tested how the code reacts when we have no initial REQUESTED_URL set on the MockHttpServletRequest. The first test simply tests with no value at all. The last test tests with a value that contains login. In both cases we verify that the view rendered is the index (home) page.
Introducing Spring MVC Test
Another option for testing application controllers is using the brand-new Spring MVC test module.13 At the time of writing it is not yet integrated with Spring, but it is scheduled to be included in Spring 3.2. There is, however, already a usable snapshot which is fairly stable (the 1.0.0 snapshot).
Before we proceed, we have to warn you that depending on snapshots (particularly when there isn’t a prior release) implies some risks, as things still might change. Therefore we won’t go into detail, but just cover the ideas and the basic setup. Things will probably change here and there, making in-depth coverage outdated before the module is released into Spring. However, the ideas that we are showing here should remain stable and should still be applicable in later versions.
Having said that, to be able to use this module we added the dependency in the build.gradle of our chapter9 sample:
testCompile 'org.springframework:spring-test-mvc:1.0.0.BUILD-SNAPSHOT'
Because this is a snapshot dependency, we also added the snapshot repository to the list of repositories in the dependency management configuration. We did this in build.gradle in the root of the sample directory:
repositories {

    mavenRepo url: 'http://maven.springframework.org/release'

    mavenRepo url: 'http://maven.springframework.org/snapshot'

    mavenCentral()

    mavenRepo url: 'http://maven.springframework.org/milestone'

    mavenRepo url: 'https://repository.jboss.org/nexus/content/repositories/releases/'

    mavenRepo url: 'http://download.java.net/maven/glassfish/org/glassfish/'

}
_________
Spring MVC test aims at making your application controllers easier to test, extending the idea behind the MockHttpServletRequest, MockHttpServletResponse and MockHttpSession helpers, which we used in the previous section. It tries to simulate Spring MVC even better without having to boot an actual Servlet container. For example; with Spring MVC test you will be able to verify which JSPs were actually selected to render when using Tiles as the view resolver. This is something that was not possible until now, and could only be verified at runtime (possibly using front-end tests). The more we can test using unit or integration tests, the better.
The example we will create will show how to use the basics. The first step is to bootstrap an org.springframework.test.web.server.MockMvc. This object initializes the MVC infrastructure, and will be your main entry into the API. You can initialize it in different ways:
- From one or more MVC annotated configuration classes
- From one or more Spring XML files
- Using a
WebApplicationContext- Individual
@Controllerclasses
The first three possibilities are managed modes. In these cases there is an application context started. Controllers that are required to process the request you fire at them are looked up from the application context. Also, the MVC environment will be configured as it will be at runtime, with the same view resolvers, resource handlers, interceptors, and so on, just as you have specified in the configuration.
The last possibility is the so called standalone mode. In this mode you supply the application controllers directly, and the minimum set of Spring MVC infrastructure components are instantiated—only those required for the processing of requests with the registered application controllers. The set of infrastructure components is very similar to that provided by the MVC namespace or the MVC Java configuration. Important to note is that the actual Spring MVC configuration will not be tested (because it was never loaded).
The desired method of initialization is the one where the entire Spring MVC configuration is loaded. However, if you instantiate the MockMvc for every test, it can become expensive. The preferred way is to use the third method using the WebApplicationContext, which will combine the best of both worlds. The WebApplicationContext is injected into the test. The configuration is loaded by Spring’s test support as usual. For the configuration (supplied in the classes attribute) you will use your Spring MVC annotated configuration classes. It could be something like this:
@RunWith(SpringJUnit4ClassRunner.class)

@ContextConfiguration(classes = { ....})

public class ApplicationControllerTest {


  @Autowired

  private WebApplicationContext wac;
This will load the @Configuration classes you indicated with the classes attribute and boot up a WebApplicationContext. You will then be able to construct a MockMvc object from the injected WebApplicationContext, which will be inexpensive. Spring’s test support will cache the initialization of the contexts that it loads, which are indicated via @ContextConfiguration, possibly loading only one instance for the entire test suite. At this time, however, the WebApplicationContext support is not yet available, though it will be starting in Spring 3.2.
After you initialized the MockMvc object (one way or the other), you can start throwing requests at it. It will process them using actual Spring MVC logic and invoke your controller. At the end you are able to verify the results. In Listing 9-14 we have rewritten the LoginControllerTest using Spring MVC test. To keep things simple we constructed the MockMvc object in standalone mode. Let’s have a look at the code first.
Listing 9-14. Rewriting the LoginController test using Spring MVC test
package com.apress.prospringmvc.bookstore.web.controller;


// Other imports omitted, see Listings 9-7 and 9-13


import static org.springframework.test.web.server.request.

              MockMvcRequestBuilders.post;

import static org.springframework.test.web.server.result.

              MockMvcResultMatchers.redirectedUrl;

import static org.springframework.test.web.server.result.

              MockMvcResultMatchers.request;

import static org.springframework.test.web.server.result.

              MockMvcResultMatchers.status;


import org.springframework.test.web.server.MockMvc;

import org.springframework.test.web.server.setup.MockMvcBuilders;


@RunWith(SpringJUnit4ClassRunner.class)

@ContextConfiguration

public class SpringMvcTestLoginControllerTest {


    @Autowired

    private LoginController loginController;


    @Autowired

    private AccountService accountService;


    private Account account;


    @Before

    public void setup() throws Exception {

        account = new AccountBuilder() {

            {

                address("Herve", "4650", "Rue de la station", "1", null,

                        "Belgium");

                credentials("john", "secret");

                name("John", "Doe");

            }

        }.build(true);


        Mockito.when(accountService.login("john",

                     "secret")).thenReturn(account);

    }


    @Test

    public void testHandleLogin() throws Exception {

        MockMvc mockMvc = MockMvcBuilders.standaloneSetup(loginController)

                          .build();

        mockMvc.perform(post("/login")

               .param("username", "john")

               .param("password", "secret"))

               .andExpect(status().isOk())

               .andExpect(request().sessionAttribute(

                       SecurityHandlerInterceptor.ACCOUNT_ATTRIBUTE, account))

               .andExpect(redirectedUrl("/index.htm"));

    }


    @After

    public void verify() throws AuthenticationException {

        Mockito.verify(accountService, VerificationModeFactory.times(1))

               .login("john", "secret");

        Mockito.reset();

    }


    @Configuration

    static class LoginControllerTestConfiguration {


        @Bean

        public AccountService accountService() {

            return Mockito.mock(AccountService.class);

        }


        @Bean

        public LoginController loginController() {

            return new LoginController();

        }

    }

}
The initial setup remains unaltered and is the same as in LoginControllerTest. For example; we are still using Mockito to mock the AccountService, and we are still injecting the LoginController using the local Spring configuration setup via the LoginControllerTestConfiguration class.
The first thing we did is construct the MockMvc object in standalone mode. We did that by supplying it our LoginController as a constructor argument:
MockMvc mockMvc = MockMvcBuilders.standaloneSetup(loginController)

                          .build();
The LoginController is pretty straightforward to test, so all defaults loaded by the standalone mode are sufficient. You can, however, apply customizations before calling build if that would be required. For example, a custom view resolver would be set like this:
MockMvc mockMvc = MockMvcBuilders

                  .standaloneSetup(loginController)

                  .setViewResolvers(viewResolver)

                  .build();
When the context is initialized we can let it process a request. Our LoginController only accepts HTTP post requests, so we build a post request with two parameters:
mockMvc.perform(post("/login")

    .param("username", "john")

    .param("password", "secret"))
The methods such as post and param are included via static imports on top of the class (see Listing 9-14). In this case we left this on purpose to show you how compact the syntax becomes when applying this strategy. In the beginning however it takes some time to get used to the different methods that are available. Finally we verify the result. We check that the HTTP status code is 200 (isOk), that the account has been set on the session, and that we are being redirect to the index.htm page:
.andExpect(status().isOk())

.andExpect(request().sessionAttribute(

        SecurityHandlerInterceptor.ACCOUNT_ATTRIBUTE, account))

.andExpect(redirectedUrl("/index.htm"));
This looks pretty sweet. You don’t have to create separate mock objects for request, response, and session, because this is all taken care of by the Spring MVC test module. If you compare this with our previous test case, LoginControllerTest, you will immediately see that this code looks a lot better, is more compact, and above all tests the complete controller including the Spring MVC annotations.
By the way, building a MockMvc in managed mode that actually loads the configuration based upon @Configuration classes is not much different and would look as follows:
MockMvc mockMvc = MockMvcBuilders

              .annotationConfigSetup(WebMvcContextConfiguration.class,

                                     InfrastructureContextConfiguration.class,

                                     TestDataContextConfiguration.class,

                                     LoginControllerTestConfiguration.class)

               .configureWebAppRootDir("src/main/webapp", false)

               .build();
This wraps up our short introduction to Spring MVC test. We hope that we have shown you something which will become a very powerful tool in testing your Spring MVC application controllers with a minimum of effort. We already look forward having this fully integrated in Spring!
Automated Front-End Testing
Automated front-end testing is the last piece in the unit testing puzzle. It helps us test our final untested component, our views. JSPs can be tested, just like all the other components, in an automated fashion. There are many forms of front-end testing. You can, for example, test your web application on different browser to check that the look and feel is similar. You can also test your application for performance, render times, and usability. All of these are tests which are probably applied in other testing phases possibly using external tools.
The testing that we are after here is to make sure that all our pages render, and that all functionality offered by them also works. Nothing more, nothing less. When you have done a good job testing all previous components, this should be a breeze. Be sure that you have:
- Set up a good infrastructure for front-end testing. This requires a running container, data setup, and possibly fakes or stubs for certain resources and functionality. The tests also need to run (like any unit test) automatically via your continuous integration system, meaning it should all be integrated in your build system.
This is not as easy as it seems, since you have one little problem: you need to start up a Servlet container that can run your application (see Figure 9-10). There are plug-ins for Gradle (and Maven) like Cargo,14 which can start a container and deploy your application before these tests are run.
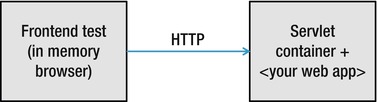
Figure 9-10. Running a front-end test against Tomcat
- Designed your views well. Normally you will have already tested your views by hand when you were designing them. So normally when every level is well-tested, there should be only minor faults coming out of your front-end testing.
The most important part is that they enforce your “test harness.” Even when you forgot to test something in your services, it could well be tested be one of your frontend tests. Also, if someone refactors your views later on, you still have the test harness that ensures that your pages are still working.
To set up a front-end test we have chosen Selenium.15 It can be run in two modes, using a real browser like Firefox, and using HtmlUnit, which is an in-memory browser.
HtmlUnit is capable of running JavaScript and handling AJAX. This can all run completely in memory and does not have any external dependency, that way it can be considered as an integration test.
Front-End Testing Using Selenium
The current version of Selenium, which we will be using, is Selenium 2.x (we will refer to Selenium 2.x as “Selenium” from now on). Selenium makes use of the so called WebDriver project. This enables Selenium to run tests against a browser of choice out of the box without having the need of additional software. With the previous version (Selenium 1.x) this was different. It required you to have a so called Selenium RC server running between the test case and the browser. You can see this in Figure 9-11. However, the Selenium RC server can still be used in combination with the current version of Selenium. To explain this, we will first look at how Selenium 1.x works.
_________
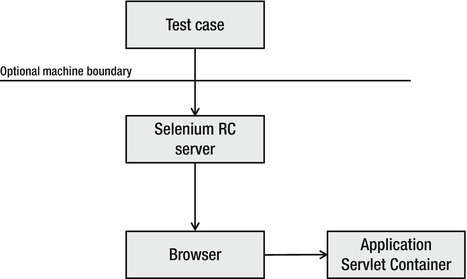
Figure 9-11. Selenium 1.x with the Selenium RC server setup
With Selenium 1.x the communication between the test case and the Selenium RC server goes over the network (your test commands are translated into HTTP requests being sent to the Selenium RC server). Potentially the Selenium RC server can be running on another machine than where the actual test is running. The Selenium RC server then translates the commands received over HTTP to JavaScript calls and injects them into the target browser. This is a nontrivial process, but it is shielded from the user. While this setup considered deprecated, it might still be interesting to see how it works. You can read more about it on the Selenium documentation page.16
Selenium now offers a different method, using WebDriver, which controls the browser directly using the browser’s native API. So it no longer requires a complex (internal) setup as with Selenium RC that Selenium 1.x used. Using Selenium you can directly control the browser without having a need for the Selenium RC server. You simply select the appropriate driver via the API, depending on the browser you want to use.
However, you can still use the RC server. In that case the RC server will also use WebDriver. Instead of your test directly using WebDriver to control a browser on your local machine, you now instruct the RC server running on a different machine to communicate with a local browser using WebDriver. The main difference between the Selenium RC server setup and Selenium 1.x is that the Selenium RC server does much more than that; it also injects JavaScript and acts as proxy, which with WebDriver is no longer needed. It just functions as a “remote JVM,” enabling you to control a browser on a remote machine.
_________
![]() Tip Using Selenium RC server is especially interesting for those cases where you want to run the test on machine A but use machine B’s browser. For example, you could run the test on your CI, which is a Unix-type machine. You want to run your front-end tests against IE 7, 8 and 9. To do so, you could set up three virtual machines, each installed with Windows and one of the three browsers, and running a Selenium RC server. You could then run the test suite three times. The first time you would use the IP address of the virtual machine running IE 7. The second time the IP address of the virtual machine running IE 8, and so forth. You could create Spring test profiles to dynamically inject another IP address depending on the profile with which the tests are run.
Tip Using Selenium RC server is especially interesting for those cases where you want to run the test on machine A but use machine B’s browser. For example, you could run the test on your CI, which is a Unix-type machine. You want to run your front-end tests against IE 7, 8 and 9. To do so, you could set up three virtual machines, each installed with Windows and one of the three browsers, and running a Selenium RC server. You could then run the test suite three times. The first time you would use the IP address of the virtual machine running IE 7. The second time the IP address of the virtual machine running IE 8, and so forth. You could create Spring test profiles to dynamically inject another IP address depending on the profile with which the tests are run.
Writing a Selenium Test
Now that we have seen some theory about Selenium and its predecessor Selenium 1.x, let’s have a look how we can actually use it. Before we can start we have to add its dependencies in build.gradle. We will add them in the gradle build file of chapter9-bookstore sample.
testCompile 'org.seleniumhq.selenium:selenium-java:2.20.0'

testCompile 'org.seleniumhq.selenium:selenium-firefox-driver:2.20.0'

testCompile 'org.seleniumhq.selenium:selenium-htmlunit-driver:2.20.0'
We added the core dependency (selenium-java) and a WebDriver dependency for Firefox and HtmlUnit. Other drivers17 currently are selenium-android-driver, selenium-chrome-driver, selenium-ie-driver, selenium-iphone-driver, and selenium-remote-driver. Next let’s look at the Selenium test for the LoginController in Listing 9-15.
Listing 9-15. Testing the login sequence with Selenium
package com.apress.prospringmvc.bookstore.web.frontend;


// Other imports omitted, see Listing 9-7


import static org.junit.Assert.assertEquals;


import org.openqa.selenium.By;

import org.openqa.selenium.WebDriver;

import org.openqa.selenium.firefox.FirefoxDriver;


public class SeleniumLoginFrontendTest {


    private WebDriver browser;


    @Before

    public void setup() {

        browser = new FirefoxDriver();

    }


    @Test

    public void startTest() {

        browser.get("http://localhost:8080/chapter9-bookstore/");


        browser.findElement(By.id("login")).click();


        // Will throw exception if elements not found

        browser.findElement(By.id("username")).sendKeys("jd");

        browser.findElement(By.id("password")).sendKeys("secret");


        browser.findElement(By.id("loginButton")).click();

        browser.findElement(By.id("account")).click();


        assertEquals("John", browser.findElement(

                             By.id("firstName")).getAttribute("value"));

    }


    @After

    public void tearDown() {

        browser.close();

    }

}
_________
In the setup method we start our browser, which is the actual API to control the browser from within our test case. Here we are using Firefox via the FirefoxDriver:
browser = new FirefoxDriver();
If we want to switch to an in-memory browser (HtmlUnit) all code would remain the same. We just need to assign the HtmlUnitDriver instead of the FirefoxDriver:
browser = new HtmlUnitDriver();
Running this will run the tests against the in-memory browser. There will be no browser popping up when we run the tests like this. To get an idea of which browsers are supported and their specifics, the best resource is the Selenium documentation.18
_________
![]() Note if you want to use Selenium RC server with WebDriver, you can use
Note if you want to use Selenium RC server with WebDriver, you can use org.openqa.selenium.remote.RemoteWebDriver. On the target machine you will have to run the Selenium RC server in order for this to work. You can use the org.openqa.selenium.remote.DesiredCapabilities class to further configure the driver. For example: browser = new RemoteWebDriver(new URL("remoteHostRunningSeleniumRC:4444"), DesiredCapabilities.firefox()); This tells Selenium that we will be using RemoteWebDriver, and that it should connect to a Selenium RC server running on host remoteHostRunningSeleniumRC on port 4444. It also tells the remote instance that it should run the tests against Firefox (which will then be started on the remote machine).
To continue with the overview of the test class, we will now proceed to the actual test method startTest. The first line of the test method tells the browser to which URL to open:
browser.get("http://localhost:8080/chapter9-bookstore/");
The next lines of code take care of the navigation (clicking on links, entering text, and so forth). When we click on a link or a button we are using the ID. You can, however, use more advanced selectors, like CSS and XPath. You can find more about them in the Selenium reference guide.19
Using the Selenium IDE
When you look back at Listing 9-15, you will see that navigation with the browser requires you to look at the JSP source and check the identifiers of the elements you want to use. For example, to click a button you have to know its ID and then write this line of code:
browser.findElement(By.id("login")).click();
In this case we are clicking on a button with ID "login". Our scenario was a very short one, but for longer scenarios this can be become time-consuming and pretty boring. Fortunately there is a great tool called Selenium IDE which will be able to generate this code for you. It creates not only Java code, but also other languages as we will see. The Selenium IDE comes as a plug-in for Firefox. According to the Selenium website,20 the Selenium IDE runs only in Firefox at this time. In order to download the Selenium IDE plug-in, go to the Selenium website21 and follow the instructions. You basically click the Download link and Firefox will present you with a question to install the software as can be seen in Figure 9-12.
_________

Figure 9-12. Installing Selenium IDE for Firefox
After clicking Allow, you will get a display like Figure 9-13, asking for your permission to install.

Figure 9-13. Installing selenium IDE for Firefox
After installation you have to restart Firefox. You can then open Selenium IDE by selecting it from the Tools menu. After that a separate window should appear, as in Figure 9-14.
Figure 9-14. The Selenium IDE main window
Selenium IDE will inspect the interactions you do on a page within Firefox and “record” all the events, such as clicking a button, entering text, and so forth. In order to set this up, you have to add the application for which you want to record in the Base URL text field (See Figure 9-15). Next you switch back to Firefox and navigate to the application you want to capture a scenario from. In our case we will navigate Firefox to http://localhost:8080/chapter9-bookstore. When you are on the home page of the chapter9-bookstore application, you switch back to the Selenium IDE window and click the Record button, which is the round red button on the right top, just below the Base URL input (it looks like an “indicator” but is actually a button you can click). After clicking it, Selenium will be in recording mode. You can now go back to your browser and perform a test scenario. We will perform the same actions as we did in the test. So we will click the Login link, enter username and password, click Login, and then click the Account link. After that, you can go back to the Selenium IDE window and you will see that lines have appeared in the Table tab, as shown in Figure 9-15.

Figure 9-15. Selenium recording a scenario
You can click the Record button again to disable recording. You can now export the captured interactions to Selenium commands for a specific language. Among the supported languages are Ruby, C#, Python, and of course Java. First we select the language to which we will export; we will choose JUnit 4 with WebDriver as shown in Figure 9-16.

Figure 9-16. Selecting the language to export the scenario to
Now, copy all lines in the Table list, by selecting them, right-clicking, and selecting Copy, as can be seen in Figure 9-17.

Figure 9-17. Copying the scenario to the clipboard
After copying, you can paste this right in your test class file. The scenario will immediately be in the desired format, as you can see in Listing 9-16.
Listing 9-16. The scenario in Selenium WebDriver JUnit style generated by the Selenium IDE
driver.get(baseUrl + "/chapter9-bookstore/index.htm");

driver.findElement(By.id("login")).click();

driver.findElement(By.id("username")).clear();

driver.findElement(By.id("username")).sendKeys("jd");

driver.findElement(By.id("password")).clear();

driver.findElement(By.id("password")).sendKeys("secret");

driver.findElement(By.id("loginButton")).click();

driver.findElement(By.id("account")).click();
This is almost the same code as we came up with ourselves in the example. The only difference here is that Selenium also performs an explicit clear of the fields before adding text to them.
Besides using the plug-in to generate code from recorded scenarios, you can also replay scenarios using the plug-in. For more information we recommend visiting the Selenium IDE documentation page.22
Running the Front-End Tests via Gradle
Besides the normal unit and integration tests, we also want to run the front-end tests via our build tool. When we run the normal build using Gradle (with the command gradle build), the front-end tests are not run. We created a separate task called systemTest which can be run separately just to run the front-end tests. The systemTest command makes use of the Cargo plug-in to deploy the application to Tomcat. It will then run the tests that end in FrontendTest. The systemTest task looks as follows in our root build.gradle:
task systemTest(type: Test) {

    include '**/*FrontendTest.*

    dependsOn(war)

    doFirst {

        cargoStartLocal.execute()

    }

}
The systemTest tasks include every class that ends in FrontendTest. It also depends on the war task, which means that Gradle will first build a war of the project. Finally the task cargoStartLocal is executed, which is available because we enabled the Cargo plug-in. This task will start Tomcat and deploy the war file, which was previously generated by the war task.
In order to exclude these FrontendTests from the normal Gradle test lifecycle, we extended the test task to specifically exclude these files:
test {

    exclude '**/*FrontendTest.*'

}
Running FrontendTests is as easy as opening a command-line interface, navigating to the Chapter 9 sample directory, and typing:
_________
In order for the system tests to work, Firefox should be installed on your system. The tests will take some time as the application needs to get deployed on Tomcat. During the tests you will also see Firefox opening and closing, as this is the Selenium test at work. At the end you should get a “Build successful” confirmation and if you to go the build/reports/test directory in Chapter 9 and open index.html, you can see the report (see Figure 9-18) that both tests have been run.

Figure 9-18. The test result report
![]() Note There are problems reported with the current version of Selenium not being compatible with the latest version of Firefox (which is version 12 at the time of writing). The code was, however, developed and tested when Firefox was still at version 11. If you experience problems running the system tests, use Firefox 11 or check the Selenium website for newer versions that fix this issue (which are expected to become available anytime soon).
Note There are problems reported with the current version of Selenium not being compatible with the latest version of Firefox (which is version 12 at the time of writing). The code was, however, developed and tested when Firefox was still at version 11. If you experience problems running the system tests, use Firefox 11 or check the Selenium website for newer versions that fix this issue (which are expected to become available anytime soon).
Summary
In this chapter we have seen that it is important to really think about how to handle testing in your project. It is clear that a project deserves adequate testing to be able to grow and to be maintainable. Your test should be considered as important as the actual production code. We have introduced some guidelines; making sure that you test at the right level, and how you can assure that testing remains attractive in your project, as that is one of the key elements to ensure that tests are actually written adequately.
We also explained the different levels of testing. We started with a basic unit test and continued by introducing Spring’s test support, which we used to write an integration test, testing our repositories using an in-memory database. On the MVC side we showed how you can test an application controller using Spring’s test support and the brand-new Spring MVC test. With these two tools at hand you are now capable of increasing your overall code coverage even further.
We wrapped up with a full-fledged front-end test, testing our view but also indirectly testing all the logic behind it. We showed you that it is possible to create a system test using a real browser with Selenium, but that you can also configure it to use an in-memory browser instead (HtmlUnit), making it an integration test.
We hope that the philosophy and techniques introduced here will help you write more and better tests. The only thing left to do is go out there and put these testing strategies into practice!