
![]()
Pixel-accurate collisions
After completing this chapter, you will be able to:
- Collide textured objects accurately
- Understand the efficiency concerns of pixel-accurate collision
- Program with pixel-accurate collision effectively and efficiently
- Create a new game object that follows a few simple rules of physics
As you saw in the previous chapter, by including a few mathematical concepts and some software architecture principles, you can create game objects with more advanced and interesting behaviors while maintaining the simplicity and structure of your game implementation. This chapter continues in that same vein by further enhancing game object behaviors for more specific solutions. You will see how to make collision detection between textured objects more precise and how to apply simple physics concepts to your game objects to create more natural and interesting behaviors.
You can think of both pixel-accurate collision and simple physics as attributes for your game objects. These attributes (and others that we’ll cover) provide your game objects with the customized behaviors that define your game. However, adding many attributes or behaviors also has trade-offs. As you will see in this chapter, creating an object with every advanced attribute can be detrimental to your game because it can degrade performance; therefore, you should be conscious of the pros and cons of each behavior.
Pixel-accurate collision
Until now, you have handled all collisions by checking whether two primitives (or in your case, rectangles) overlap. While this is a good solution for many projects, you sometimes need more accurate collision detection. In this project, you will see how to achieve pixel-accurate collision detection between two separate textures. However, keep in mind that this is not an end-all solution. While the collision detection itself is more precise, the trade-off is that you sacrifice potential performance. This sacrifice occurs because as an image becomes larger and more complex, it also has more pixels that need to be checked for collisions (as opposed to the simple primitive calculations in you used in previous examples).
The Pixel-Accurate Collision project
This project demonstrates how to detect collision between a large and a small texture. The textures themselves vary widely in complexity. Both textures contain both transparent and nontransparent areas. A collision occurs only when the nontransparent pixels of one texture overlap those of the other texture. In this project, when a collision occurs, a soccer ball appears at the collision point. You can see an example of this project in Figure 5-1.
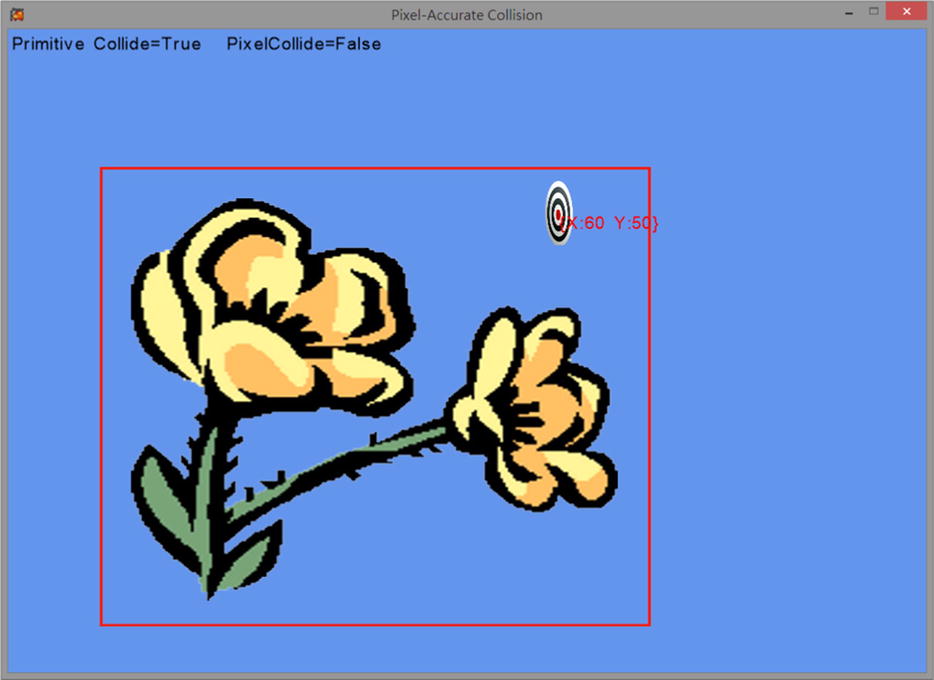
Figure 5-1. Running the Pixel-Accurate Collision project
The project’s controls are as follows:
- Right thumbstick (arrow-keys) Moves the small texture
- Left thumbstick (WSAD-keys) Moves the large texture
The goals of the project are as follows:
- To demonstrate how to detect nontransparent pixel overlaps
- To understand the pros and cons of using pixel-accurate collision detection
The steps for creating the project are as follows:
- Extend the textured primitive class to support pixel-accurate collision.
- Modify the GameState class to use the new collision detection.
Before moving forward, let’s first define the requirements needed for collision between two textured primitives. Foremost is that the texture itself needs to contain an area of transparency, in order for this type of collision detection to provide any increase in accuracy. Without transparency in the texture, you can and should use simple primitive-based collision detection. If one or both of the textures contain transparent areas, then you’ll need to handle two cases of collision. The first case is to check whether the bounds of the two primitives collide. You can see this reflected in Figure 5-2. Notice how the bounds of the primitives overlap, yet none of the nontransparent colored pixels are touching.
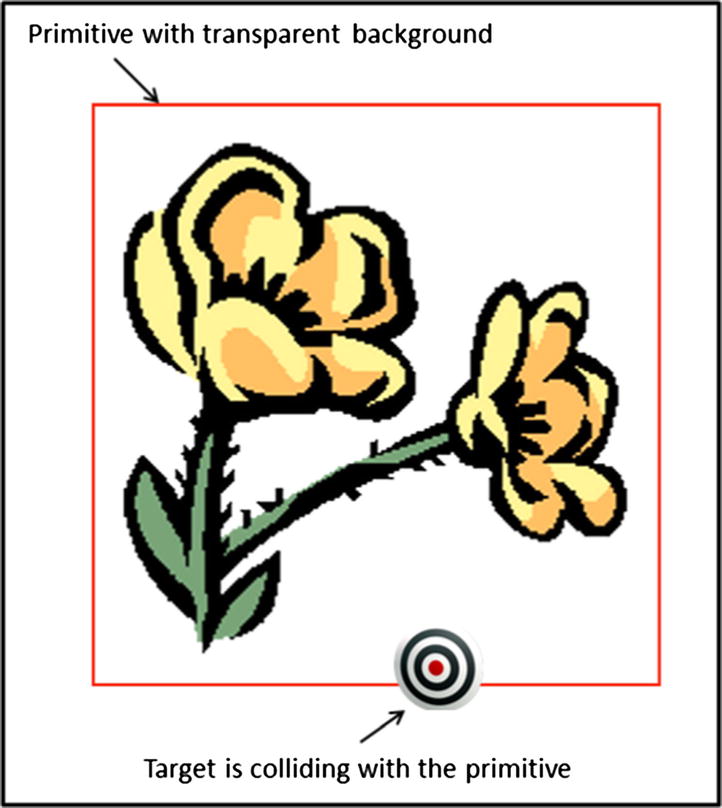
Figure 5-2. A large texture and small texture colliding with only their primitives
The next case is when the colored pixels (nontransparent) of the texture overlap. Take a look at Figure 5-3. The flower texture and the target texture are clearly in contact with one another.

Figure 5-3. Pixel collision occurring between the small texture and the large texture
Now that the problem is clearly defined, here’s the logic or pseudocode you need to achieve this type of behavior:
- Given two images, Image-A and Image-B
- If the bounds of the primitive of Image-A and Image-B collide then
- for each Pixel-A in Image-A
- pixelCameraSpace = pixel position in camera space
- Transform pixelCameraSpace to Image-B space
- Read Pixel-B from Image-B
- If Pixel-A and Pixel-B are not both completely transparent then
- A collision has occurred
The per-pixel transformation to Image-B space from pixelCameraSpace is required because collision checking must be carried out within the same coordinate space. Additionally, notice the runtime requirements for this behavior. Each pixel within Image-A must be checked, so the runtime is O(N), where N is equal to the number of pixels in Image-A, or Image-A’s resolution. To mitigate some of this performance hit, you should use the smaller of the two images (the target in this case) as Image-A. However, at this point, you can probably see why the performance of pixel-accurate collision is of concern. Checking for these collisions during every update with many high-resolution textures on screen can quickly bog down performance.
Now let’s take a look at how you can implement pixel-accurate collision for the TexturedPrimitive class.
Extending the TexturedPrimitive class
- To begin, create a new file in the GraphicsSupport folder and name it TexturedPrimitivePixelCollide.cs. This class will extend the original TexturedPrimitive class. To do this, add the keyword partial to the existing TexturedPrimitive class and name the newly created class TexturedPrimitive so their names match within the code. You can see an example of this following:
public partial class TexturedPrimitive
{
    ...
} - Create an array to hold the value of every pixel’s color within the texture. Add a function to initialize the color array with the proper size and data of the image. In addition, add an accessor that returns the color of the specific pixel within the image:
private Color[] mTextureColor = null;

private void ReadColorData()
{
    mTextureColor = new Color[mImage.Width * mImage.Height];
    mImage.GetData(mTextureColor);
}

private Color GetColor(int i, int j)
{
    return mTextureColor[(j * mImage.Width) + i];
} - You must call the ReadColorData() function from the InitPrimitive() function. Recall that the InitPrimitive() function was defined in the original TexturedPrimitive.cs file, and thus you must perform the modification in that file as well.
protected void InitPrimitive(String imageName,
    Vector2 position, Vector2 size, String label = null)
{
    ...

    ReadColorData();    // For pixel-level collision support
} - Add a function for transforming indexes into the camera’s coordinate space. You can see this demonstrated in the code that follows, where the index values of i and j are converted into a position in camera space and returned.
private Vector2 IndexToCameraPosition(int i, int j)
{
    float x = i * Width / (float)(mImage.Width - 1);
    float y = j * Height / (float)(mImage.Height - 1);

    return new Vector2(Position.X + x - (mSize.X * 0.5f),
                        Position.Y - y + (mSize.Y * 0.5f));
} - You also need a function to convert a position in camera space into the corresponding pixel index within the image. An important note for the caller of this function is that, because the camera space is often larger than the images, it is important to first check to see whether the returning position is within the bounds of the image. Take note of how the following code achieves this:
private Vector2 CameraPositionToIndex(Vector2 p)
{
    Vector2 delta = p - Position;
    float i = mImage.Width * (delta.X / Width);
    float j = mImage.Height * (delta.Y / Height);
    i += mImage.Width / 2;
    j = (mImage.Height / 2) - j;
    return new Vector2(i, j);
} - With the support functions completed, you can now build the primary function for pixel-accurate collision.
- Create a function called PixelTouches() that returns a bool and accepts a TexturedPrimitive and an out Vector2.
public bool PixelTouches(TexturedPrimitive otherPrim, out Vector2 collidePoint)
{
    ...
}
Note In C#, the keyword out is used as a parameter modifier to indicate that the argument is being passed by reference. This is similar to the argument modifier ref; however, an out argument does not need to be initialized beforehand.
 - Within the function, first check whether the bounds of the two primitives overlap. If they don’t, you can return false. However, when the bounds of the primitives overlap, then you need to check whether the texture pixels overlap. To do this, create while loops to iterate through every pixel within the image, transforming each to camera space. Then make sure the pixel in question is not transparent, and test whether it collides with the other image. You can see an example of this in the code that follows. Note the check that ensures the returned pixel index is within the bounds of the image.
bool touches = PrimitivesTouches(otherPrim);
collidePoint = Position;

if (touches)
{
    bool pixelTouch = false;

    int i=0;
    while ( (!pixelTouch) && (i<mImage.Width) )
    {
        int j = 0;
        while ( (!pixelTouch) && (j<mImage.Height) )
        {
            collidePoint = IndexToCameraPosition(i, j);
            Color myColor = GetColor(i, j);
            if (myColor.A > 0)
            {
                Vector2 otherIndex =
                    otherPrim.CameraPositionToIndex(collidePoint);
                int xMin = (int)otherIndex.X;
                int yMin = (int)otherIndex.Y;

                if ((xMin >= 0) && (xMin < otherPrim.mImage.Width) &&
                    (yMin >= 0) && (yMin < otherPrim.mImage.Height))
                {
                    pixelTouch = (otherPrim.GetColor(xMin, yMin).A > 0);
                }
            }
            j++;
        }
        i++;
    }
    touches = pixelTouch;
}
return touches;
- Create a function called PixelTouches() that returns a bool and accepts a TexturedPrimitive and an out Vector2.
- Lastly, you need to update the PrimitivesTouches() function to perform a simple bounds check:
public bool PrimitivesTouches(TexturedPrimitive otherPrim)
{
    Vector2 myMin = MinBound;
    Vector2 myMax = MaxBound;
    Vector2 otherMin = otherPrim.MinBound;
    Vector2 otherMax = otherPrim.MaxBound;
    return
        ((myMin.X < otherMax.X) && (myMax.X > otherMin.X) &&
            (myMin.Y < otherMax.Y) && (myMax.Y > otherMin.Y));
}
Now you just need to modify the GameState class to support the new functionality of the TexturedPrimitive class.
- Start by adding the following code to the UpdateGame() function, which is separated into two sections by the comments:
- The step 1a portion of the function handles primitive movement via the gamepad by mapping the primitive position to the thumbsticks.
- The step 1b portion of the function handles the collision detection. Note that, as prescribed earlier, the mSmallTarget.PixelTouches target is used instead of mLargeFlower.PixelTouches, because the small target contains fewer pixels than the large flower. This means that the runtime is O(100 × 100) instead of O(2413 × 2467).
public void UpdateGame()
{
    #region Step 1a.
    mLargeFlower.Position += InputWrapper.ThumbSticks.Left;
    mSmallTarget.Position += InputWrapper.ThumbSticks.Right;
    #endregion

    #region Step 1b.
    mPrimitiveCollide = mLargeFlower.PrimitivesTouches(mSmallTarget);
    if (mPrimitiveCollide)
    {
        Vector2 p;
        mPixelCollide = mSmallTarget.PixelTouches(mLargeFlower, out p);
        mCollidePosition.Position = p;
    }
    else
    {
        mPixelCollide = false;
    }
    #endregion
}
- Lastly, draw the images via their draw functions and output the results using the FontSupport class:
public void DrawGame()
{
    mLargeFlower.Draw();
    mSmallTarget.Draw();

    FontSupport.PrintStatus("Primitive Collide=" +
        mPrimitiveCollide + "    PixelCollide=" + mPixelCollide, null);
    FontSupport.PrintStatusAt(mSmallTarget.Position,
        mSmallTarget.Position.ToString(), Color.Red);

    if (mPixelCollide)
        mCollidePosition.Draw();
}
In the previous section, you saw the basic operations required to achieve pixel-accurate collision. However, as you may have noticed, the previous project applies only when the textures are aligned along their x,y-axes. This means that the function will overlook collisions between rotated images. For example, if the larger flower image was rotated the collision detection algorithm would not operate correctly.
This section explains how you can achieve pixel-accurate collision even when images are rotated. The fundamental concepts of this project are the same as in the previous project, but this version is a bit more complex, because you need some new calculations to ensure that the algorithm behaves correctly for rotated images.
The General Pixel Collision project
This project demonstrates how to detect a collision between two rotated images with pixel-level accuracy. In this project, a user can rotate each image by pressing the appropriate buttons, as detailed following. As before, when the two images collide, a soccer ball appears (as well as a test confirmation). You can see an example of this project running in Figure 5-4.

Figure 5-4. Running the General Pixel Collision project
The project’s controls are as follows:
- Right thumbstick (arrow-keys) Moves the small texture
- Left thumbstick (WSAD-keys) Moves the large texture
- Button A (K-key) Rotates the large flower texture in the clockwise direction
- Button B (L-key) Rotates the large flower texture in the counterclockwise direction
- Button X (J-key) Rotates the small target texture in the clockwise direction
- Button Y (I-key) Rotates the small target texture in the counterclockwise direction
The goal of the project is as follows:
- To generate a pixel-accurate collision test for rotated images
The steps for creating the project are as follows:
- Review vector decomposition.
- Modify the TexturedPrimitive class’s pixel-accurate collision to support rotation.
- Modify the GameState class to support the new rotation behavior.
Vector review: Components and decomposition
Before continuing, here’s a brief review so you can better understand vector components and how to decompose a given vector into its components. First, remember that two perpendicular directions can be used to represent the components of a vector. For example, Figure 5-5 contains two normalized vectors that can be used to represent vector ![]() . The normalized vector
. The normalized vector ![]() represents the x-axis direction of vector
represents the x-axis direction of vector ![]() and the normalized vector
and the normalized vector ![]() represents the y-axis direction of vector
represents the y-axis direction of vector ![]() .
.
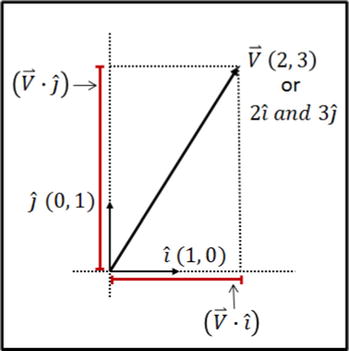
Figure 5-5. The normalized component vectors of vector ![]()
With that in mind, given the normalized perpendicular vectors ![]() and
and ![]() and any vector
and any vector ![]() , the following formulas will always be true. You can see a representation of this principle in Figure 5-6.
, the following formulas will always be true. You can see a representation of this principle in Figure 5-6.

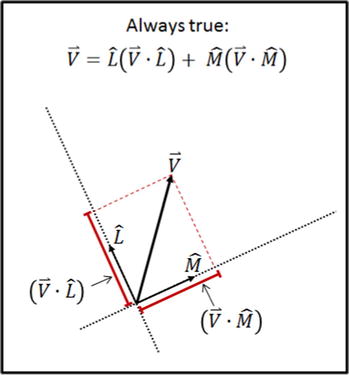
Figure 5-6. Rotated component vectors
A vector’s components are relevant to this projec tbecause of the new challenge presented by rotating the image around its axes. Without rotation, the orthonormal set (normalized perpendicular set) simply consists of vectors along the default x-axis and y-axis. You handled this case in the previous project. You can see an example of this in Figure 5-7.

Figure 5-7. An axis-aligned texture
However, after the image has been rotated, the reference vector set no longer resides on the x,y-axes. Therefore, the collision computation must take into account the newly rotated axes ![]() and
and ![]() , as shown in Figure 5-8.
, as shown in Figure 5-8.
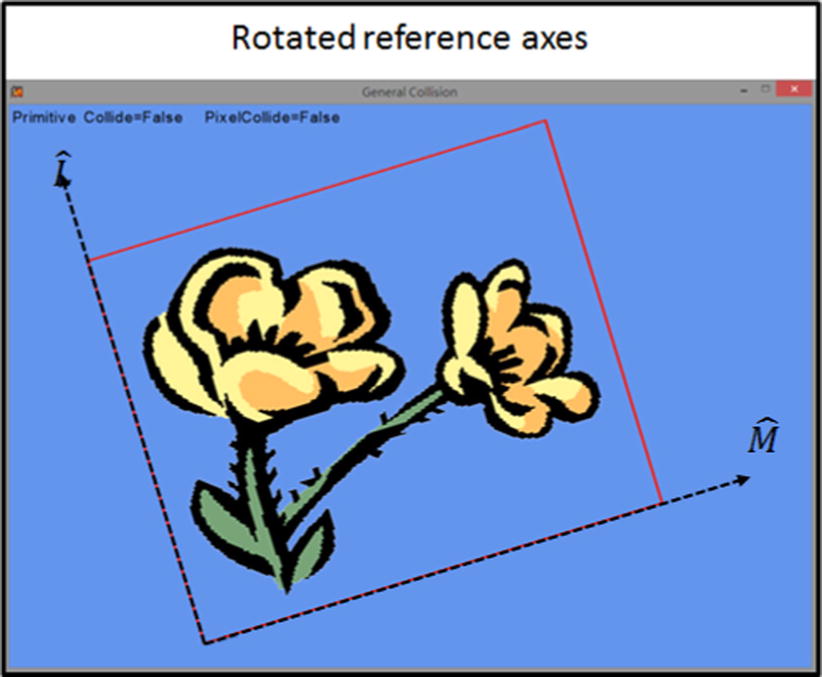
Figure 5-8. A rotated texture and its component vectors
In the following step, the modifications will take place in the TexturePrimitivePixelCollide.cs file, which defines part of the TexturedPrimitive class.
Modifying the TexturedPrimitive class
- Start by adjusting the IndexToCameraPosition() function, taking into account the new rotated axes to compute the correct position in camera space. You do this by modifying the return values of vector r with the incoming vectors xDir and yDir. In this case, xDir and yDir are the and component vectors. You can see this in the following code:
private Vector2 IndexToCameraPosition(int i, int j, Vector2 xDir, Vector2 yDir)
{
    float x = i * Width / (float)(mImage.Width - 1);
    float y = j * Height / (float)(mImage.Height - 1);

    Vector2 r = Position + (x - (mSize.X * 0.5f)) * xDir - (y - (mSize.Y * 0.5f)) * yDir;

    return r;
} - Similarly, adjust the camera space–to–pixel space function by using the rotated axes. You do this by using the incoming vectors xDir and yDir to calculate the x and y offsets and then applying them to the images’ width and height, as shown in the following code:
private Vector2 CameraPositionToIndex(Vector2 p, Vector2 xDir, Vector2 yDir)
{
    Vector2 delta = p - Position;
    float xOffset = Vector2.Dot(delta, xDir);
    float yOffset = Vector2.Dot(delta, yDir);
    float i = mImage.Width * (xOffset / Width);
    float j = mImage.Height * (yOffset / Height);
    i += mImage.Width / 2;
    j = (mImage.Height / 2) - j;
    return new Vector2(i, j);
} - Lastly, the PixelTouches() function needs some modification. Following, in step 3a, because you know the angle of rotation, and you know the initial orthonormal set (the x and y unit vectors), you can compute the rotated orthonormal set (). Then, in step 3b, you can use the newly computed orthonormal set to compute the offset or camera space transformations.
public bool PixelTouches(TexturedPrimitive otherPrim, out Vector2 collidePoint)
{
    bool touches = PrimitivesTouches(otherPrim);
    collidePoint = Position;

    if (touches)
    {
        bool pixelTouch = false;

        #region Step 3a.
        Vector2 myXDir = ShowVector.RotateVectorByAngle(Vector2.UnitX, RotateAngleInRadian);
        Vector2 myYDir = ShowVector.RotateVectorByAngle(Vector2.UnitY, RotateAngleInRadian);
        Vector2 otherXDir = ShowVector.RotateVectorByAngle(
            Vector2.UnitX, otherPrim.RotateAngleInRadian);
        Vector2 otherYDir = ShowVector.RotateVectorByAngle(
            Vector2.UnitY, otherPrim.RotateAngleInRadian);
        #endregion

        #region Step 3b.
        int i=0;
        while ( (!pixelTouch) && (i<mImage.Width) )
        {
            int j = 0;
            while ( (!pixelTouch) && (j<mImage.Height) )
            {
                collidePoint =
                    IndexToCameraPosition(i, j, myXDir, myYDir);
                Color myColor = GetColor(i, j);
                if (myColor.A > 0)
                {
                    Vector2 otherIndex =
                        otherPrim.CameraPositionToIndex(
                            collidePoint,
                            otherXDir,
                            otherYDir);
                    int xMin = (int)otherIndex.X;
                    int yMin = (int)otherIndex.Y;
                    if ((xMin >= 0) && (xMin < otherPrim.mImage.Width) &&
                        (yMin >= 0) && (yMin < otherPrim.mImage.Height))
                    {
                        pixelTouch = (otherPrim.GetColor(xMin, yMin).A > 0);
                    }
                }
                j++;
            }
            i++;
        }
        #endregion
        touches = pixelTouch;
    }
    return touches;
}
Lastly, modify the update function to support rotating both the small and large textures using the gamepad’s A, B, X, and Y buttons.
public void UpdateGame()
{
    #region Step 1a. Select to work with PA or PB
    ...

    if (InputWrapper.Buttons.A == ButtonState.Pressed)
        mLargeFlower.RotateAngleInRadian += MathHelper.ToRadians(1f);
    if (InputWrapper.Buttons.B == ButtonState.Pressed)
        mLargeFlower.RotateAngleInRadian -= MathHelper.ToRadians(1f);
    if (InputWrapper.Buttons.X == ButtonState.Pressed)
        mSmallTarget.RotateAngleInRadian += MathHelper.ToRadians(1f);
    if (InputWrapper.Buttons.Y == ButtonState.Pressed)
        mSmallTarget.RotateAngleInRadian -= MathHelper.ToRadians(1f);
    #endregion

    ...
}
Simple physics
Now that you’ve learned a lot of the building blocks for general game object interaction, such as collision, you can now move on to more advanced game object behavior, including concepts such as acceleration, gravity (free fall), elasticity, and friction. Basic behaviors such as these are often considered pieces of a larger concept known as physics. While these behaviors barely scratch the surface of what can physics engines can include, they provide a good starting point for understanding how to approximate these types of behaviors in a game. It is important to note that the behaviors being implemented are not attempts at mimicking the real world. Rather, they only attempt to enhance gameplay by approximating behaviors that players are familiar with. Creating a realistic physics engine would require a book unto itself.
The Simple Physics project
This project demonstrates how to simulate a ball falling under gravitational pull, or free fall, while also taking into account both the elasticity and friction associated with the ball when it collides with an object. You can see an example of this project running in Figure 5-9.

Figure 5-9. Running the Simple Physics project
The project’s controls are as follows:
- Hold Button A (K-key) Respawns the ball
- Release Button A (K-key) Releases the ball
The goals of the project are as follows:
- To simulate the following simple physical behaviors:
- Rotational velocity
- Gravitational free fall
- Elasticity
- Friction
The steps for creating the project are as follows:
- Gain an overview of the simple physics being implemented.
- Review the math required to calculate the arc of a circle.
- Add a gravity constant variable.
- Create a RotateObject class for the ball.
- Create a Platform class to interact with the ball object.
- Modify the GameState class to include the support for the new objects.
Simple physics overview
Here’s a quick overview of the basic physics concepts you’ll implement in this project:
- Velocity: This changes the position on every update.
- Acceleration: This changes the velocity on each update.
- Free fall (gravity): This is downward acceleration for which each update decreases the y component of a velocity.
- Friction: This causes the slowdown of objects on horizontal surfaces. The amount that it slows is approximated by a percentage of the object’s current x velocity.
- Elasticity: This determines how bouncy an object is after collision. The amount an object bounces is approximated by a percentage of the object’s current y velocity.
To start, let’s do a quick review of what is needed to calculate the length along part of the circumference, or arc, of a circle. More specifically, take a look at Figure 5-10. The red line, which lies upon the outer edge of the circle, is the arc of interest.
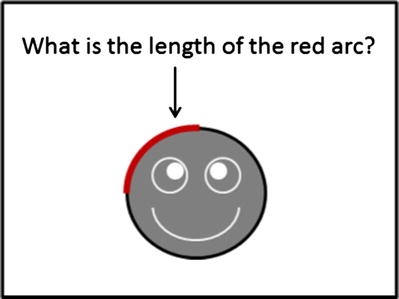
Figure 5-10. A circle with a portion of its circumference highlighted
Recall that the circumference of a circle is equal to 2πr: the radius, r, of the circle, multiplied by the angle subscribed by the circle, 2π. In general, an arc length s is equal to r multiplied by the angular displacement, θ. You can see this in Figure 5-11.
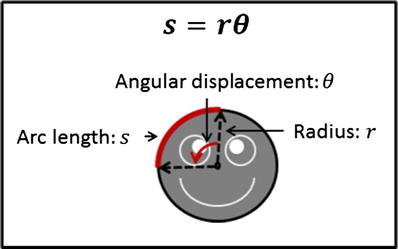
Figure 5-11. The data needed to calculate arc on the circumference
Now, to simulate a rolling ball, you need to rotate the texture while the ball moves. For example, if a circle were to roll across a flat surface, then the speed at which the circle is moving is defined by the object’s x velocity component, which is equal to the corresponding rotational displacement, or arc length of the circle. You can see this in Figure 5-12.
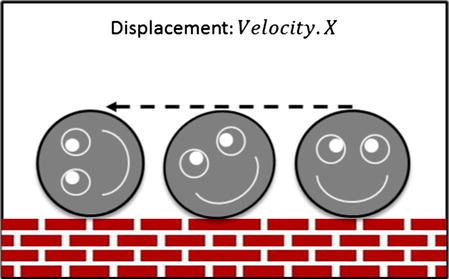
Figure 5-12. The displacement of a circle rolling across a horizontal surface
Now, with your knowledge of the following equation:
![]()
you can derive the following:
![]()
![]()
Before you start adding new behavior, you first need to add the constant gravity variable into the GameState class. Make sure the variable is defined as static and public so that it can be accessed throughout the project.
public class GameState
{
    // Global constant for simple world physical properties
    static public float sGravity = 0.01f;

    ....
}
Creating the RotateObject class
- Create a new class called RotateObject that inherits from the GameObject class, and include an accessor for the radius of the object.
public class RotateObject : GameObject
{
    public RotateObject(String image, Vector2 center, float radius)
            : base(image, center, new Vector2(radius*2f, radius*2f))
    {
    }
    public float Radius {
            get { return mSize.X / 2f; }
            set { mSize.X = 2f * value; mSize.Y = mSize.X; }
    }

    ...
} - Override the Update() function in the new RotateObject class so the object’s behavior can be modified. Remember to call the base update function so that the velocity is applied. Here’s what happens:
- The velocity is modified by the gravity constant at each update to simulate a free-falling state.
- Then, the object is rotated in accordance with its speed in the x direction, via the implementation of the equation
 derived earlier.
 - Lastly, the rotation direction, clockwise or counterclockwise, is applied:
override public void Update()
{
    // Moves object by velocity
    base.Update();

    #region Step 2a.
    Vector2 v = Velocity;
    v.Y -= GameState.sGravity;
    Velocity = v;
    #endregion

    #region Step 2b.
    // Now rotate the object according to the speed in the x direction
    float angularDisplace = (v.X / Radius);
    #endregion

    #region Step 2c.
    // This assumes object is rolling "on top of" surfaces
    if (v.X > 0)
        mRotateAngle += angularDisplace;
    else
        mRotateAngle -= angularDisplace;
    #endregion
}
Now that you have a rotating object or ball, you can create a platform for it to bounce on.
- Create a new class called Platform that inherits from the TexturedPrimitive class. Have its constructor pass its parameters to the base class. Additionally, define variables and accessors for both friction and elasticity. You can see this in the code that follows:
public class Platform : TexturedPrimitive
{
    // Slows down by 2% at each update
    private float mFriction = 0.98f;
    // Retains 70% of velocity at each bounce
    private float mElasticity = 0.7f;
    public Platform(String image, Vector2 center, Vector2 size)
            : base(image, center, size)
    {
    }

    public float Friction { get { return mFriction; } set { mFriction = value; } }
    public float Elasticity {  get { return mElasticity; } set { mElasticity = value; } }

    ...
} - Now add a BounceObject() function. This function causes an object that collides with the platform to bounce, and applies friction to the object. Make the function virtual so that you can implement subclasses with varying amounts of friction and/or bounce effect. First, check to see if there is any collision, and if collision occurs, then do the following:
- Update the object’s velocity by applying the elasticity and friction variables. Remember that friction affects the x velocity and elasticity affects the y velocity.
- Make sure the object does not penetrate and get stuck in the platform. Do this by checking whether the object has penetrated the platform, and if it has, push the object out.
virtual public void BounceObject(GameObject obj)
{
    Vector2 collidePoint;
    if (obj.PixelTouches(this, out collidePoint))
    {
        #region Step 2a.
        // Limitation: Only collide from top/bottom, not from the sides
        Vector2 v = obj.Velocity;
        v.Y *= -1 * mElasticity;
        v.X *= mFriction;
        obj.Velocity = v;
        #endregion

        #region Step 2b.
        // Make sure object is not "stuck" inside the platform
        Vector2 p = obj.Position;
        if (p.Y > Position.Y)
            p.Y = Position.Y + Size.Y * 0.5f + obj.Size.Y * 0.5f;
        else
            p.Y = Position.Y - Size.Y * 0.5f - obj.Size.Y * 0.5f;
        obj.Position = p;
        #endregion
    }
}
- Return to the GameState class and add the following variables for the rotation object, platform, and position:
public class GameState
{
    ...

    private Vector2 kInitBallPosition = new Vector2(3f, 48f);
    // Objects in the world
    Platform mSlowStone, mBrick, mStone;
    RotateObject mBasket;

    ...
} - Next, initialize the rotation object (ball) and the three platforms within the constructor. Provide the three platforms with different textures, friction, and elasticity. You can see the default values used in the code that follows:
public GameState()
{
    // Create the platforms
    mBrick = new Platform("BrickPlatform", new Vector2(15, 40), new Vector2(30f, 5f));
    // How rapidly object slows down: Retains most speed
    mBrick.Friction = 0.999f;
    // How bouncy is this platform: 90%
    mBrick.Elasticity = 0.85f;

    mStone = new Platform("StonePlatform", new Vector2(50, 30), new Vector2(30, 5f));
    // How rapidly object slows down: Retains some speed
    mStone.Friction = 0.99f;
    // How bouncy is this platform: Slightly more than half: 60%
    mStone.Elasticity = 0.5f;

    mSlowStone = new Platform("StonePlatform", new Vector2(85, 20), new Vector2(30, 5));
    // How rapidly object slows down: Very rapidly
    mSlowStone.Friction = 0.9f;
    // How bouncy is this platform: Not very
    mSlowStone.Elasticity = 0.2f;

    // Both outside of the camera, so neither will be drawn
    mBasket = new RotateObject("BasketBall", new Vector2(-1, -1), 3f);
} - When the user presses the A button, you want the update function to create a ball at its initial position with a random velocity. If the ball is within the camera window, apply its update and bounce check for each platform. Here’s the code:
public void UpdateGame()
{
    if (InputWrapper.Buttons.A == ButtonState.Pressed)
    {
        mBasket.Position = kInitBallPosition;
        Vector2 v = new Vector2((float)(0.3f + (Game1.sRan.NextDouble()) * 0.1f), 0f);
        mBasket.Velocity = v;
    }

    if (mBasket.ObjectVisibleInCameraWindow())
    {
        mBasket.Update();
        mSlowStone.BounceObject(mBasket);
        mStone.BounceObject(mBasket);
        mBrick.BounceObject(mBasket);
    }
} - Finally, draw the platforms within the DrawGame() function. Only draw the ball if it is within the camera window.
public void DrawGame()
{
    mSlowStone.Draw();
    mStone.Draw();
    mBrick.Draw();

  if (mBasket.ObjectVisibleInCameraWindow())
        mBasket.Draw();
}
Summary
This chapter showed you how to provide your game objects with more sophisticated behavior than in earlier chapters—specifically, more accurate collision detection, and basic physics to create more interesting interactions between objects. You saw some negatives and positives associated with these behaviors, so you can assess whether future game objects you create should implement these behaviors.
While implementing pixel-accurate collision, you first tackled the basic case of working with aligned textures. After that implementation, you went back and added support for collision detection between rotated textures. Tackling the easiest case first lets you test and observe the results, and helps define what you might need for the more advanced problems (rotation in this case).
The implementation of simple physics behaviors shown in this chapter prioritized functionality over realism. This type of behavior lets you create interesting behaviors that draw inspiration from the real world with relative ease. In the next chapter, you will add more specialized and unique behaviors to your game objects by creating more advanced game object states.
Quick reference
To |
Do this |
|---|---|
| Detect if the boundary of two primitives overlap | Call the PrimitivesTouches() function. |
| Detect if any of the pixels of two TexturedPrimitive objects overlap | Call the PixelTouches() function. Remember, for efficiency concerns, to always call this function according to the resolution of the involved primitives: smallTexture.PixelTrouches(largeTexture). |
| Simulate rotation | Rotate the object according to its traveling speed by For example, to simulate rotation in the horizontal direction, at each update, rotate the object by |
| Approximate gravitational free fall | Decrease the y component of a velocity by some constant at each update. |
| Approximate elasticity | Decrease the y component of a velocity when two objects collide. |
| Approximate friction | Decrease the x component of a velocity when two objects collide. |