
You can install and run Juniper routers with GNS3 in several ways. In this chapter, I show you how to use VirtualBox and Quick Emulator (QEMU) to create GNS3-ready Juniper devices and then install Juniper’s vSRX Firefly firewall.
QEMU is an open source PC emulator similar to VirtualBox. It’s less polished but has many powerful features and is fully integrated into GNS3. Using QEMU, you can run many network operating systems including Cisco ASA, IDS, IOS-XR, NX-OSv, and a special version of Juniper’s Junos OS known as Juniper Olive. In this chapter, I focus only on Juniper.
If you installed GNS3 on Windows or OS X, then QEMU should have been installed for you already. The GNS3 installer may have installed two versions of QEMU: a stable version that was configured automatically during the GNS3 installation and a newer version that contains additional, untested features. If you need your projects to be completely stable, I recommend using only the preconfigured version.
If you installed GNS3 using the defaults outlined in Chapter 2, you should find the QEMU applications under C:Program FilesGNS3qemu-0.13.0 on both 32-bit and 64-bit Windows systems, but keep in mind that this directory will change as new versions of QEMU are introduced and added to GNS3. On OS X, you should find QEMU under /Applications/GNS3.app/Contents/Resources/qemu/bin/.
QEMU on Ubuntu can be installed using a package or compiled from source code. To install from a package, update your package manager and install QEMU from the command line.
$ sudo apt-get update
$ sudo apt-get install qemu
Alternatively, you can install the qemu-system-x86 package. This is a much smaller installation that should be capable of running any operating system that you want to use with GNS3. To install the x86 architecture–only version of QEMU, use the following commands:
$ sudo apt-get install qemu-system-x86
$ sudo apt-get install qemu-utils
You may want to compile QEMU from source code, depending on what version of QEMU is available for your system. Although precompiled packages of QEMU exist on many Linux distributions, they may not be the newest version available and may not include the GTK toolkit that provides the QEMU graphical user interface. In that case, you can access the QEMU interface by installing a VNC viewer program, like GNC Viewer.
When you install from source code, you also have to install other packages required by QEMU before compiling the source. Update your package manager and install these packages now:
$ sudo apt-get update
$ sudo apt-get install flex
$ sudo apt-get install bison
$ sudo apt-get install zlib1g-dev
$ sudo apt-get install libglib2.0-dev
$ sudo apt-get install libgtk2.0-dev
$ sudo apt-get install libncurses5-dev
$ sudo apt-get install libpcap-dev
$ sudo apt-get install dh-autoreconf
Next, download the QEMU source code from the QEMU website (http://www.qemu-project.org/) and unzip the file, as shown here:
$ wget http://www.qemu-project.org/download/qemu-2.1.2.tar.bz2
$ bunzip2 qemu-2.1.2.tar.bz2
$ tar xvf qemu-2.1.2.tar
After unzipping the files, move to the QEMU installation directory and enter the configure and make commands to compile the source code.
$ cd qemu-2.1.2
$ ./configure
$ make
Finally, complete the process by installing the compiled files on your system. This must be done using elevated root privileges.
$ sudo make installWhen the installation is complete, you should find QEMU binaries under /usr/local/bin/, and the QEMU support files should be in the /usr/local/share/qemu/ directory.
With QEMU installed, you’re ready to start creating and using QEMU devices in GNS3.
Most people have heard of Cisco, but relatively few have heard of Juniper Networks. Like Cisco, Juniper produces a wide range of networking hardware, and Internet service providers use its extremely high-throughput devices to efficiently route billions of packets for their customers.
All Juniper devices are designed around a common FreeBSD code base, though not every Juniper device runs the FreeBSD operating system. Instead, they use its kernel only as a framework for another operating system known as Junos OS. However, because Junos OS is designed around FreeBSD, you can run a special version of the software on your PC called Juniper Olive.
Juniper Olive is a functional version of Junos OS. Because it runs on a regular PC and not an actual Juniper chassis, it lacks the proprietary ASIC hardware to achieve the high throughput of a real Juniper device. Otherwise, it’s the real deal and not a simulation of the operating system. This makes it well suited for studying for the Juniper Networks Certified Associate (JNCIA) certification and other entry-level certifications.
It’s been said that if you give a person a fish, you feed them for a day, but if you teach a person to fish, you feed them for a lifetime. This adage holds true when creating a Juniper Olive, so let’s go fishing! Although there are many ways to configure and install Olive (including scripts that automate the process or preconfigured virtual machines that can be found on the Internet), learning to do it manually allows you to adjust the parameters as necessary when new Olive versions become available.
When used with GNS3, the Juniper Olive software is often installed using VirtualBox or QEMU. In this section, you’ll work with QEMU, but before you can create an Olive, your system must meet the following requirements:
8GB available disk space
1024MB available memory for QEMU/Juniper
QEMU installed on your system
FreeBSD-4.11 mini ISO
Juniper Olive software
Let’s look at how to create an Olive and where to get the software to do it.
The Juniper Olive installation software works a lot like a common parasite, with FreeBSD as its unsuspecting host. To create an Olive, you’ll install a copy of FreeBSD using QEMU or VirtualBox. Next, you’ll copy a gzipped tarball of the Juniper Olive software to your FreeBSD virtual machine. There, you’ll unzip the package and make a small modification, and then you’ll zip the files back into a FreeBSD installable package. Finally, you’ll install the package and reboot the FreeBSD system.
This is where things get interesting. The first time you boot your system, the Juniper Olive software invades its FreeBSD host. It will repartition the FreeBSD hard disk, copy new files to the system, and keep any FreeBSD files that it needs. When it’s finished, you should have a functional Juniper router.
A FreeBSD CD image is required to install FreeBSD with QEMU. Several versions are available that are suitable for creating Juniper Olive, but I recommend a mini ISO. It contains all the necessary files, and it’s the fastest to download. Download the 4.11-RELEASE-i386-miniinst.iso file from the FreeBSD archive (ftp://ftp-archive.freebsd.org/). I recommend this FreeBSD version instead of more recent ones because it seems to work well with almost any Olive version.
Note
You can find a ready-to-use QEMU (and VirtualBox) image with FreeBSD already installed at the GNS3 website (http://www.gns3.com/) in the Download section, under QEMU appliances.
Next, you need to acquire the Juniper Olive software. The software is available as a FreeBSD installable package and should have a name like jinstall-12.1R1.9-domestic-olive.tgz. Because Juniper Olive is not supported by Juniper, you cannot get a copy of the software directly from Juniper.
After you have the Juniper Olive software, you need a way to copy the package to your FreeBSD virtual machine to install it. There’s more than one way to do this, but the simplest way is to mount an ISO image file on your FreeBSD virtual machine, just as you would a regular CD. Before you can do that, you have to create your own ISO image of the Olive software.
To create an ISO image file using Windows, you first need to install ISO image creation software. I recommend ISO Recorder (http://isorecorder.alexfeinman.com/isorecorder.htm). It’s free, easy to install, and works well. Download the software and launch the installer. Then click Next and follow the prompts to complete the installation.
After installing ISO Recorder, you should be able to create an ISO image of the Juniper Olive software. Create a folder and copy your gzipped Olive file into the folder (named juniper-olive, for example). Then, right-click the folder and select Create ISO image file.
The ISO Recorder Creation Wizard appears, as shown in Figure 6-1.
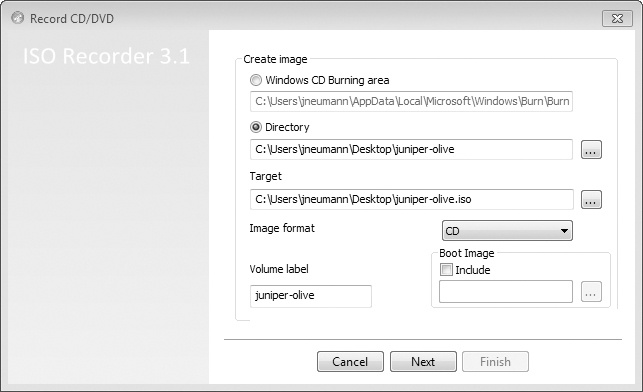
Under Create image, select the Directory radio button, change the Image format to CD, click Next, and follow the prompts to create your ISO image. After you have a Juniper ISO, you’re ready to install Juniper Olive on Windows.
On computers running OS X, copy your Juniper image file to a folder and use hdiutil to create an ISO image of the folder’s contents. In the following listing, I’ve created an ISO image file named juniper-olive.iso using a folder named JUNOS:
$ mkdir JUNOS
$ cp jinstall-12.1R1.9-domestic.tgz JUNOS
$ hdiutil makehybrid -iso -joliet -o juniper-olive.iso JUNOS
Now that you have a suitable ISO of the Olive software, you’re ready to install Juniper Olive on OS X.
Creating an ISO image on Ubuntu Linux is almost the same as on OS X, except you use the mkisofs application. Copy your Juniper image file to a folder (JUNOS, for example) and enter the following commands to create the ISO:
$ mkdir JUNOS
$ cp jinstall-12.1R1.9-domestic.tgz JUNOS
$ mkisofs -o juniper-olive.iso JUNOS
Now that you have your ISO, there are only a few things left to do before you create a Juniper Olive.
The first step in creating a Juniper Olive is to create a QEMU virtual machine of FreeBSD. QEMU doesn’t have a graphical user interface, so you’ll do everything from the command line. You will use the qemu-img program to create a virtual disk image file and the qemu program to install and test your virtual machine.
Note
Not all QEMU installations are alike. On some installations, the QEMU application file might be named qemu-system-i386 or qemu-system-x86_64, or you may have both installed. If you’re unsure, check your QEMU installation directory.
Start by creating a build directory and then copy the FreeBSD installation ISO and the Juniper Olive ISO files to the directory, as in the following example:
$ mkdir Juniper
$ cp 4.11-RELEASE-i386-miniinst.iso Juniper
$ cp juniper-olive.iso Juniper
If you’re using Windows, open a command prompt window and enter the following commands instead:
c: mkdir Juniper
c: copy 4.11-RELEASE-i386-miniinst.iso Juniper
c: copy juniper-olive.iso Juniper
Now that everything is prepped in your build directory, you can begin installing the system.
In this section, you’ll create a virtual hard disk using qemu-img and install FreeBSD on the virtual disk. I’ll only cover the basics of preparing FreeBSD for Olive and won’t go into a lot of detail about FreeBSD itself.
If you’re a Windows user, install the Telnet Client application from the Programs and Features Control Panel before you begin.
If you’re a OS X user, you’ll want to add the QEMU file directory to your OS X search path. Verify the installation path to your QEMU files. If you installed QEMU manually, you should look for the qemu-img file in /opt/local/bin or /usr/local/bin. If you’re using QEMU that was installed with GNS3, you should find the file under /Applications/GNS3.app/Contents/Resources/qemu/bin/. Enter the following commands to add the QEMU binaries to your OS X search path. Make a backup copy of your .bash_profile file before you begin.
$ cd ~
$ cp .bash_profile .bash_profile-backup
$ sudo echo 'export PATH=/Applications/GNS3.app/Contents/Resources/qemu/
bin:$PATH' >> .bash_profile
After entering the commands, close and reopen a terminal window to enable the new search path. To verify your path is correct, enter the following command:
$ echo $PATHThe previous command will display your path configuration. If it’s not correct, you may need to restore your .bash_profile-backup file and try again. If it is correct, then you’re ready to move on.
Begin the installation by creating an 8GB virtual disk image file named juniper.img in your build directory. The qemu-img command options used here should work on all Unix-like systems.
$ cd Juniper
$ qemu-img create juniper.img 8G
Next, boot QEMU from the FreeBSD mini ISO using the following command:
$ qemu-system-i386 -m 512 -hda juniper.img -localtime -cdrom 4.11-RELEASE
i386-miniinst.iso
Windows users should open a command prompt window and use the following commands instead. Be sure to enter the path command if QEMU isn’t already in your Windows path.
c: cd Juniper
c: path="c:program filesGNS3qemu-0.13.0"
c: qemu-img create juniper.img 8G
c: qemu-system-i386w -m 512 -hda juniper.img -localtime -cdrom 4.11-RELEASE-
i386-miniinst.iso
When FreeBSD boots, the Kernel Configuration Menu appears, as shown in Figure 6-2.
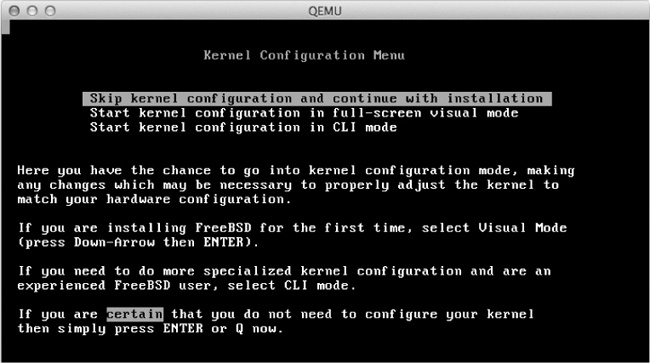
Press ENTER to skip the kernel configuration and continue with the installation.
Next, the FreeBSD sysinstall Main Menu appears, shown in Figure 6-3.

Use the arrow to move down, select Standard to begin a standard installation, and then press ENTER to continue.
The next screen, shown in Figure 6-4, displays basic information about using the FDISK Partition Editor.

Read the instructions and press ENTER to continue to the FDISK Partition Editor menu, shown in Figure 6-5.

The FDISK Partition Editor allows you to choose how much disk space you want to allocate to FreeBSD. Choose A to use the entire disk and then select Q to finish.
The Install Boot Manager menu should appear next, as shown in Figure 6-6.

Use the arrow to move down, select Standard to install a standard master boot record (MBR), and press ENTER to continue.
FreeBSD then displays a message about creating BSD partitions inside your newly created FDISK partition, as shown in Figure 6-7.
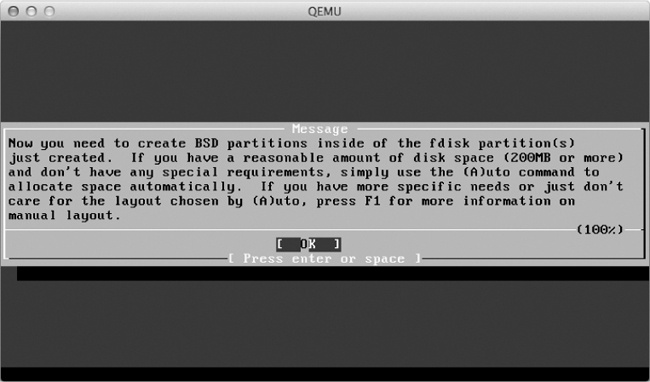
After reading the message, press ENTER to continue to the FreeBSD Disklabel Editor.
The next step is to create Juniper-compatible partitions. It’s important to pay close attention to how you partition the virtual hard disk because the Juniper Olive package must see the correct FreeBSD partitions or the installation will fail. You also must create your partitions in a specific order.
To create your first partition, select C and type the partition size in the field provided, as shown in Figure 6-8.

I entered 1024M to create a 1GB partition. Press ENTER to accept this value, and you’ll see the partition type option screen, shown in Figure 6-9.
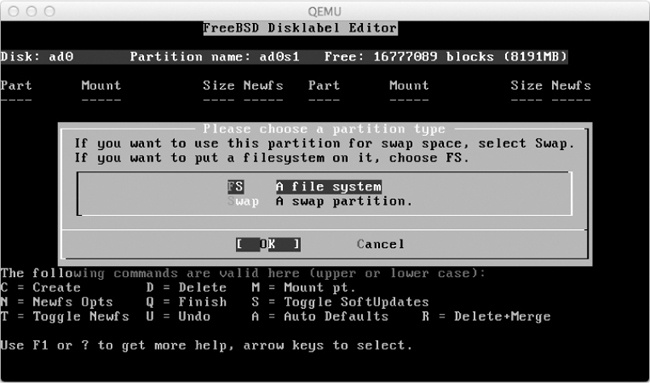
Press ENTER to create a filesystem (FS) partition type, and you’ll be given the option to choose the mount point for the partition, as shown in Figure 6-10.

To create a mount point for your root partition, type a forward slash (/) and press ENTER to complete the configuration of your first partition.
Using Table 6-1, follow the same procedure to create the complete filesystem layout. The order is important! After creating your root partition (/), work your way down the list, finishing with the /var partition. When you get to the swap partition, make sure you choose swap and not FS as your partition type. The /var partition is last, so when you create it, accept the default partition block size. This value uses the remaining free space on your partition. Remember, if the partitions are not created in sequential order, the partition names won’t match the mount points, and Juniper Olive won’t install properly.
Table 6-1. FreeBSD Partitioning for Juniper Olive
Part | Mount | Size |
|---|---|---|
ad0s1a |
| 1024 MB |
ad0s1b |
| 1024 MB |
ad0s1e |
| 1024 MB |
ad0s1f |
| remaining space |
There are many ways to partition FreeBSD in preparation for the Olive install, but I’ve found this method to be the most reliable across different versions of Juniper Olive. When you’re done, the filesystem should look exactly like the one in Figure 6-11.

Once you’ve configured all the partitions, choose Q to complete the partitioning process and then choose your distribution set, as shown in Figure 6-12.
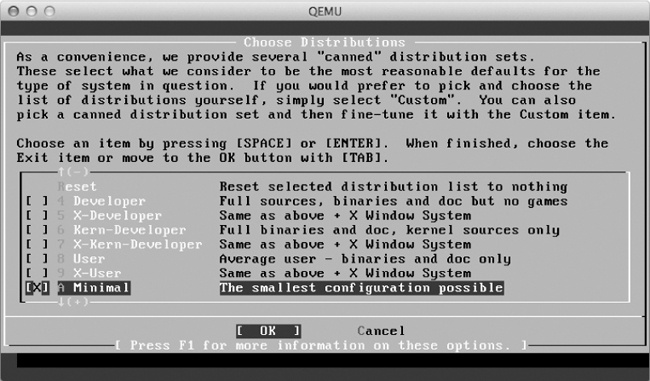
Use the arrow keys to scroll down, select Minimal, and then press the spacebar to make the selection. Now press TAB to select OK and press ENTER to finish.
Next, choose your installation media, as shown in Figure 6-13.
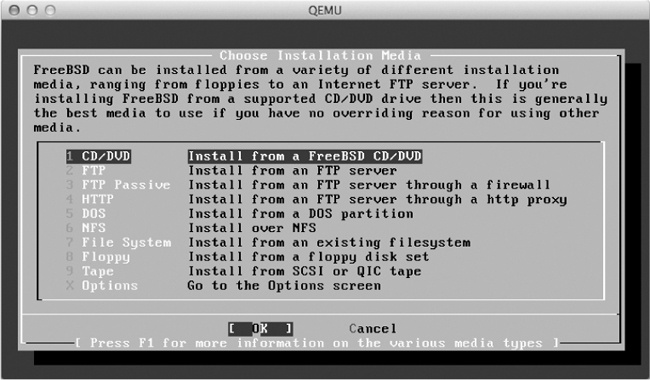
Press ENTER to choose CD/DVD as your installation media, and the installation will begin. When it’s finished, the message shown in Figure 6-14 appears.

Because you’re using FreeBSD as a host for Junos OS, you don’t need to concern yourself with any of the FreeBSD configuration questions that follow this screen. Answer “no” to all remaining questions, and when asked to create a password for the root account, press ENTER to leave it blank. When you’re finished answering questions, allow the system to reboot, log on as root, and shut down FreeBSD using the halt command. Then close the window and quit the QEMU program.
Now that the FreeBSD installation is complete, you can install the Juniper Olive package.
Boot FreeBSD using QEMU with the following command to ensure that you can mount the juniper-olive.iso CD image file you created earlier. (On Windows, replace qemu-system-i386 with qemu-system-i386w.)
qemu-system-i386 -m 512 -hda juniper.img -localtime -cdrom juniper-olive.isoIf FreeBSD loads correctly, a login prompt should appear. Log in as root at the prompt; you shouldn’t need to enter a password, so just press ENTER. Then use the mount command to mount the juniper-olive.iso CD image.
# mount /cdromCreate a temporary directory named olive on the /var partition and extract the Juniper Olive package into the temporary directory.
# mkdir /var/tmp/olive
# cd /var/tmp/olive
# tar zxvf /cdrom/jinstall-12.1R1.9-domestic.tgz
Next, modify Junos OS to allow you to install the software on your QEMU virtual machine.
# mkdir temp
# cd temp
# tar zxvf ../pkgtools.tgz
# cp /usr/bin/true bin/checkpic
Extract the pkgtools directory from pkgtools.tgz to another temp directory within the olive directory, and replace the checkpic file with the FreeBSD true file. This removes the Junos OS checkpic protection.
After the modification, gzip the temp directory contents back into a tarball named pkgtools.tgz and remove the temp directory you created.
# tar zcvf ../pkgtools.tgz *
# cd ..
# rm -rf temp
Next, create a new Olive installation package and install it on your FreeBSD system. In the following listing, I’ve named the installation package olive.tgz:
# tar zcvf ../olive.tgz *
# pkg_add -f ../olive.tgz
After you install the Olive package, you should see an error message followed by some warning messages, which tell you that the package will erase any files that aren’t Junos configuration files and that you need to reboot to load the Junos OS software.
Any other onscreen instructions displayed can be ignored because they apply to an actual Juniper router, not an Olive installation on a PC. However, before continuing, you need to shut down the FreeBSD system using the halt command and quit QEMU.
# haltThe final step in installing Olive is to reboot the system and give the package time to complete its takeover of FreeBSD. At this point, you must provide the installer with extra memory, or the install will fail. Although Junos OS runs comfortably with 512MB of RAM, the installer needs 1024MB of RAM to create the RAM disk that it uses during installation.
In Linux and OS X, boot Juniper Olive with 1024MB of RAM to complete the installation, as follows:
$ sudo qemu-system-i386 -m 1024 -hda juniper.img -serial telnet:127.0.0.1:1001,
server,nowait,nodelay -localtime
Windows users should enter the following command instead:
c: qemu-system-i386w -m 1024 -hda juniper.img -serial telnet:127.0.0.1:1001,
server,nowait,nodelay -localtime
After you boot the system, you can watch the Olive software being installed by using telnet to connect to port 1001 of your localhost. (On Windows you may have to install the Telnet Client program from the Programs and Features Control Panel first.) Open a second Windows command prompt or terminal window, and enter the following command to see the installation output displayed on the console:
telnet localhost 1001I highly recommend monitoring your install. It’s a great way to troubleshoot whether something goes wrong. Otherwise, you won’t know why an installation failed. A common problem is that not enough memory has been allocated to your virtual machine; another is that your partition sizes are too small or were created incorrectly.
The Juniper Olive installation can take 15 minutes or longer, depending on your hardware, because the installer performs a lot of tasks, such as repartitioning your FreeBSD hard drive and extracting various packages. When everything is complete, the system should automatically reboot, load Junos OS, and present you with what appears to be a FreeBSD login prompt, shown in Figure 6-15.

This prompt is where you’ll log in to Junos OS. If you see the previous messages and the login prompt, then your Juniper router is ready to use.
After you create a working Olive, make a backup copy of the image for safekeeping. After all, who wants to go through all that work again? Not me!
First, properly shut down Junos OS to prevent triggering a dirty filesystem. A dirty filesystem occurs when files have not been properly closed. This condition can cause file corruption and can even break the Junos operating system. If the filesystem is marked as dirty, a filesystem check is triggered the next time you start Junos OS, and it may take longer than usual to boot until the system is checked and marked clean again (meaning no errors were found, or all errors were fixed).
To shut down Junos OS, log in as root (no password necessary) and enter the following commands:
Login: root
root@% cli
root> request system halt
Halt the system ? [yes,no] (no) yes
It’s safe to quit QEMU after you see a message indicating that the operating system has halted, as shown here:
The operating system has halted.
Please press any key to reboot.
To make a backup copy of your Juniper image, enter the following command from the directory where your image file is saved:
$ cp juniper.img backup-juniper.imgWindows users can use this command instead:
c: copy juniper.img backup-juniper.imgNow that you have a Juniper router, you need to configure GNS3 so it can be used in your projects.
To configure a Juniper router in GNS3, select Edit ▸ Preferences on Windows and Linux or GNS3 ▸ Preferences on OS X. Double-click QEMU from the sidebar and select QEMU VMs to open the QEMU VMs preferences window, shown in Figure 6-16.

From here you can create, edit, and delete QEMU virtual machines, allowing you to bring your Juniper virtual machine into GNS3.
To add your Juniper virtual machine to GNS3, click New to start the New QEMU VM wizard. Enter a name for your virtual machine and leave Type set to Default. Click Next to set the QEMU binary and memory options, shown in Figure 6-17.
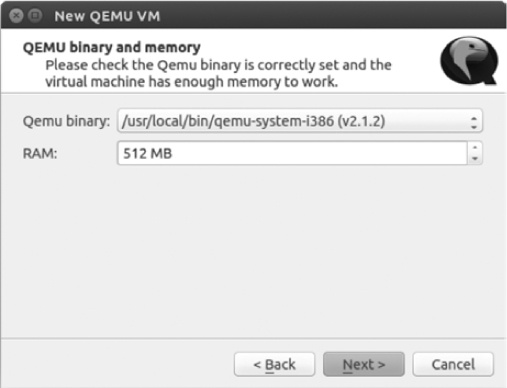
Select qemu-system-i386 from the Qemu binary drop-down menu. You’re choosing this QEMU program because Juniper Olive runs on a 32-bit version of FreeBSD. Give your Olive 512MB of RAM and then click Next. Click Browse to locate and select the juniper.img file that you created previously, and then click Finish.
Note
Two QEMU binary applications are often used in GNS3: qemu-system-i386 and qemu-system-x86_64. The difference between them is that qemu-system-i386 is designed to emulate 32-bit architecture, and qemu-system-x86_64 is designed to emulate 64-bit architecture. The qemu-system-x86_64 application is supposed to be 32-bit backward compatible, but it is not compatible with all 32-bit virtual machines (including IOS-XRv, for example).
After creating your virtual machine, go back and add more Ethernet interfaces. I recommend using six interfaces. Highlight your virtual machine and select Edit. Click the Network tab and change the number of interfaces to 6. Now select the Advanced settings tab and enter the -nographic option under Additional settings, as shown in Figure 6-18.
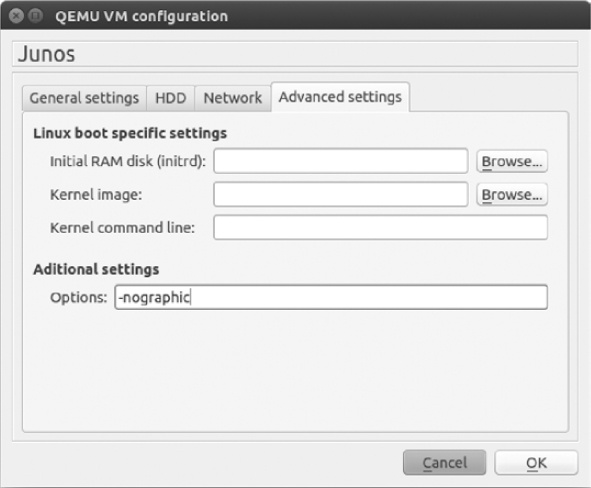
The -nographic option prevents the QEMU GUI interface from displaying when you start your QEMU virtual machine. Although the GUI can be useful in troubleshooting a virtual machine, it’s more often a nuisance and should be disabled. This option can be used with any QEMU virtual machine, not only Juniper. When you’re done, click OK to close the window and then click Apply and OK to save all your changes.
Before creating projects that include Juniper routers, it’s a good idea to test connectivity between a Cisco router and a Juniper router. If you’re unable to successfully ping between the devices, there might be a problem with your installation, and it’s better to find out early before you spend hours designing a project that doesn’t work.
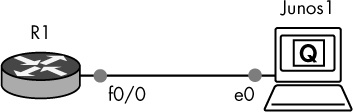
Drag a Cisco router node and a Juniper router node to your workspace from the Devices toolbar, and create a link from the Cisco router to interface e0 of the Juniper router, as shown in Figure 6-19.
Start the routers and open a console to the Cisco router. Assign an IP address to the interface that’s connected to your Juniper router (f0/0, in this example).
R1> enable
R1# configure-terminal
R1(config)# interface f0/0
R1(config-if)# ip address 10.10.10.1 255.255.255.0
R1(config-if)# no shutdown
Now open a console to your Juniper router, log on, and configure an IP address using the same subnet as your Cisco router.
  Login: root
  root@% cli
  root> edit
➊ root# set system root-authentication plain-text password
  New password: olive1
  Retype new password: olive1
  root# set interfaces em0 unit 0 family inet address 10.10.10.2/24
  root# commit
  commit complete
For security, Junos OS requires that you assign a root password ➊ before you can commit any other configuration changes to the router, so do that now. I set the password to olive1, but you can enter any password you want.
Note
In this example, you can see that Juniper syntax is entirely different from Cisco syntax. If Juniper syntax is new to you, visit the Juniper website (http://www.juniper.net/) for detailed information about configuring Juniper routers.
After configuring both devices, ping your Cisco router to test connectivity.
root# exit
root> ping 10.10.10.1
If the ping test fails, there could be a problem with your IP addresses or QEMU installation. If you compiled QEMU from source code, verify that you installed a version known to work with Juniper Olive. If necessary, compile and reinstall QEMU again. If the problem persists, try installing or compiling another version of QEMU.
You can also create an Olive using VirtualBox. The procedure is basically the same as QEMU, but you’ll use the VirtualBox GUI tools instead of the command line. When you create your VirtualBox virtual machine, set Type to BSD and set Version to FreeBSD (32-bit).
In addition to Junos OS, you can run a virtual version of Juniper’s SRX Firewall, called vSRX Firefly. If you register with Juniper, you can download an evaluation of Firefly from the website for free (http://www.juniper.net/). You’ll want to download the Firefly VMware Appliance - FOR EVALUATION! package. As you can see from the name, it’s designed to run on VMware, but you can tweak it to run on VirtualBox or QEMU. I’m covering VirtualBox here, so make sure the VirtualBox program is installed on your system before you begin.
After you’ve downloaded the Firefly software, notice that it’s an Open Virtual Appliance (OVA) file, named something like junos-vsrx-ver.x-domestic.ova. An OVA file is a special package file that can be unarchived using the tar command. To extract the contents from the file on Linux or OS X, use the following command:
$ tar xvf junos-vsrx-ver.x-domestic.ovaNote
If you’re running Windows, you can use the 7-zip application (http://www.7-zip.org/) to extract the files.
After all the files have been extracted, you need to convert the VMware virtual machine disk file (the file with extension .vmdk) to a virtual disk image (VDI) file that can be used by VirtualBox. To convert the file, use the vboxmanage utility that comes with VirtualBox.
$ vboxmanage clonehd -format VDI junos-vsrx-ver.x-domestic-disk1.vmdk
junos-vsrx-ver.x-domestic-disk1.vdi
After converting the disk image, you can delete all the Firefly files except the new VDI image file (junos-vsrx-ver.x-domestic-disk1.vdi in this example). This is the hard disk image file that you will import into VirtualBox.
You need to create a new virtual machine in VirtualBox and import the Firefly hard disk image file. Launch VirtualBox and click New to open the Create Virtual Machine dialog, shown in Figure 6-20.
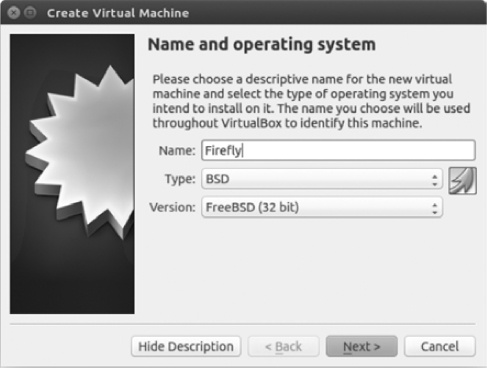
Give the virtual machine a name (Firefly in this example), set Type to BSD, and set Version to FreeBSD (32-bit). When you’re done, click Next to assign the memory size, as shown in Figure 6-21.
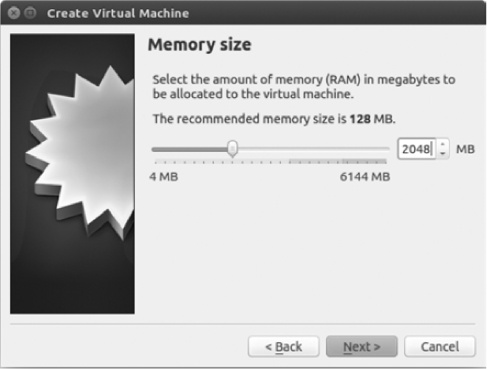
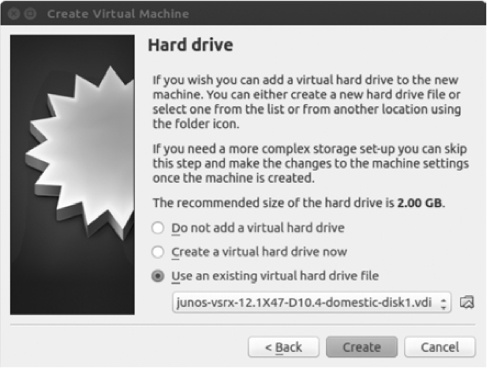
Follow the instructions from Juniper to set the proper memory size. In this example, I’ve chosen 2048 MB, because that’s what Juniper recommends for my version of Firefly. When you’re done, click Next, and check Use an existing virtual hard drive file, as shown in Figure 6-22.
Use the browse icon to locate and choose the VDI image file you created previously. When you’re finished, click the Create button to create the virtual machine.
After creating the virtual machine, you have to increase the number of processors to two because vSRX Firefly needs two processors to run properly. If your virtual machine is configured with only one processor, Firefly will boot and run, but you will not be able to see or configure any Ethernet interfaces.
Select your virtual machine name in VirtualBox, go to Settings ▸ System, and click the Processor tab, shown in Figure 6-23.
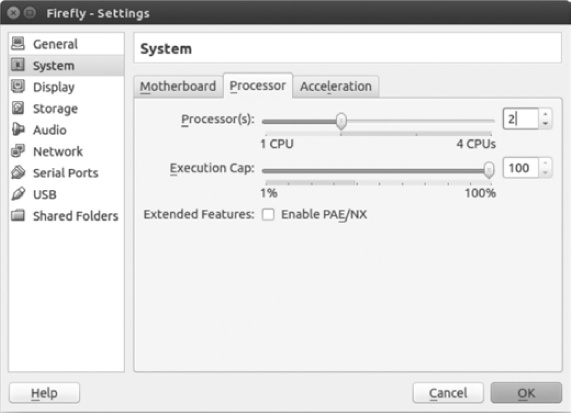
Use the slider tool to select two processors, and click OK. After you’ve configured your Firefly virtual machine, right-click your virtual machine in VirtualBox and select Clone to create a copy of it to work with in GNS3. The original virtual machine will remain unused, and you’ll always have a clean, unconfigured master of your virtual machine.
Once you’re done creating the Firefly virtual machine, you’ll need to add it to GNS3 before you can use it in your projects.
Launch GNS3 and select Edit ▸ Preferences on Windows and Linux or GNS3 ▸ Preferences on OS X. Double-click VirtualBox in the pane on the left, and select VirtualBox VMs to open the VirtualBox VMs preferences window, shown in Figure 6-24.
To add your Firefly VirtualBox virtual machine to GNS3, click New to start the New Virtual VM wizard. Select your Firefly virtual machine from the drop-down menu and click Finish. Next, click Edit.
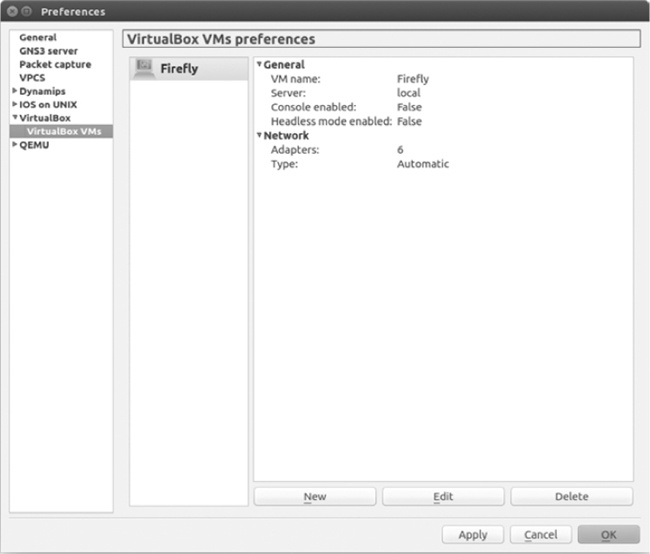
On the General settings tab, place a check next to Enable remote console and Start VM in headless mode. This will allow you to use the console to log on to Firefly. Finally, click the Network tab, change the number of interfaces to 6, and set the network type to Paravirtualized Network (virtio net). You’re now ready to create a project using Firefly.
In this section, you’ll create a simple project using vSRX Firefly as a network firewall. Firefly is similar in functionality to Cisco’s ASA firewall, but it’s different to configure. I won’t go into a lot of detail, but this project should get you started. If you want to learn more about Juniper SRX, you can find plenty of detailed documents at Juniper’s website (https://www.juniper.net/).
Let’s start by creating the GNS3 project shown in Figure 6-25. Drag a Firefly device from the End Devices toolbar to your workspace. Next, drag two Cisco routers to your workspace and link the devices together. Link R1’s interface f0/0 to interface e1 of vSRX Firefly. Link R2’s interface f0/0 to interface e0 of vSRX Firefly.
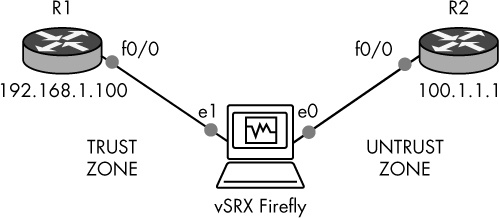
Router R1 will be configured to use a Firefly trust zone. R1 represents a trusted host on your LAN. Router R2 will be configured to use a Firefly untrust zone. The untrust zone represents an untrusted network, like the Internet. You’ll configure Firefly so that your trusted host (R1) can ping your untrusted host (R2) through the vSRX Firefly firewall using NAT.
Begin by configuring router R1 with an IP address and default gateway.
R1(config)# interface f0/0
R1(config-if)# ip address 192.168.1.100 255.255.255.0
R1(config-if)# no shutdown
R1(config-if)# ip route 0.0.0.0 0.0.0.0 192.168.1.1
Next, configure an IP address on the untrusted router R2. No gateway configuration is necessary here.
R2(config)# interface f0/0
R2(config-if)# ip address 100.1.1.1 255.255.255.0
R2(config-if)# no shutdown
With the router IP addresses configured, you can turn your attention to Firefly. Log on using the root account to configure the vSRX Firefly firewall. Because this is a new installation, you should not be asked for a password. After logging on, enter the following commands to create your firewall; you’ll start by creating a password and configuring the network settings:
  root@%cli
  root>edit
➊ root#set system root-authentication plain-text-password
  New password:firefly1
  Retype new password:firefly1
➋ root#set interface ge-0/0/0.0 family inet address 100.1.1.2/24
➌ root#set interface ge-0/0/1.0 family inet address 192.168.1.1/24
➍ root#set routing-options static route 0.0.0.0/0 next-hop 100.1.1.1
Like a Juniper router, you cannot save any configuration changes on an SRX device until you’ve assigned a password to the root account, so start by going to edit mode and creating a root password ➊. I’ve entered firefly1, but you can choose any password you’d like.
Next, at ➋, you set the IP address on the WAN interface (ge-0/0/0.0), and at ➌, you set the LAN interface (ge-0/0/1.0). Finally, at ➍, set the default gateway address using the untrusted router’s IP address (100.1.1.1).
Complete the configuration by defining your security zones and security trust policies.
➊ root#set security zones security-zone trust interfaces ge-0/0/1.0
➋ root#set security nat source rule-set interface-nat from zone trust
➌ root#set security nat source rule-set interface-nat to zone untrust
➍ root#set security nat source rule-set interface-nat rule rule1 match
   source-address 0.0.0.0/0 destination-address 0.0.0.0/0
➎ root#set security nat source rule-set interface-nat rule rule1 then source-nat
   interface
➏ root#set security policies from-zone trust to-zone untrust policy permit-all
   match source-address any destination-address any application any
➐ root#set security policies from-zone trust to-zone untrust policy permit-all
   then permit
➑ root#commit
Assign your LAN interface to the trust zone ➊. Set the interface-nat source zone to trust ➋ and the interface-nat destination zone to untrust ➌, and create a rule that matches any source and destination IP addresses (0.0.0.0/0) ➍. In a production environment, you would tighten this up a bit, but for your practice GNS3 lab, it’s fine. Now configure NAT overloading on the WAN interface ➎.
Note
vSRX Firefly’s interface-nat command is used to achieve the equivalent of Cisco NAT/PAT overloading.
To finish the configuration, define the type of traffic that’s allowed to go between the zones ➏. In this case, you’re allowing all protocols and applications from the trust zone to the untrust zone. Finally, create the security policy ➐ and commit your changes ➑, and you’re done!
Verify your configuration by entering the show security nat source summary command.
root>show security nat source summary
Total port number usage for port translation pool: 0
Maximum port number for port translation pool: 33554432
Total pools: 0

Total rules: 1
Rule name     Rule set            From          To           Action
rule1➊       interface-nat➋     trust➌        untrust➍    interface➎
This information indicates that rule1 ➊ allows packets via NAT ➋ from the trust zone ➌ to the untrust zone ➍, and IP data sourced from the trust zone will be overloaded onto the untrusted interface ➎. By default, that’s interface ge-0/0/0.0 (your WAN interface). If your summary matches the one in this book after entering the command, then you’re ready to test the connection. If your output looks different, then you’ve probably mistyped something, so you need to go back and check all your configuration settings.
Log on to router R1 and enter the ping command to test connectivity with router R2.
R1#ping 100.1.1.1

Type escape sequence to abort.
Sending 5, 100-byte ICMP Echos to 100.1.1.1, timeout is 2 seconds:
!!!!!
Success rate is 100 percent (5/5), round-trip min/avg/max = 4/10/24 ms
If your ping is successful, as indicated by !!!!!, then you’ve done everything correctly. If it failed, then you may need to go back and check your configuration settings. You should also make sure your Cisco routers have the correct IP addresses and subnet masks and that the Ethernet interfaces are not shut down.
In this chapter, you learned about Juniper and Juniper Olive, and I showed you how to create a Juniper Olive using QEMU and VirtualBox. I also introduced you to vSRX Firefly, and I provided some insight about how to configure a basic zone-based firewall using an SRX device.
In most cases, Juniper runs a little slower using QEMU than using VirtualBox. However, QEMU allows you to add an unlimited number of Juniper routers to your projects without cloning, and GNS3 will store your Juniper configurations with your projects. As a rule, VirtualBox loads and runs devices faster than QEMU, but your configurations are saved with each virtual machine instance in VirtualBox, not in GNS3. Because of this, you have to create a unique virtual machine instance of your devices using the VirtualBox clone feature. The cloned devices are then used in your GNS3 projects.
Juniper is less popular than Cisco in the corporate world, but it’s a big player in larger environments, like campus sites and the ISP routing and switching market. If you take your networking career into one of those realms, Juniper certification could set you apart from other applicants, and GNS3 is a great way to learn Juniper routers and SRX devices! You should start with JNCIA certification, which is the entry-level Juniper certification (Juniper’s equivalent to Cisco CCNA), and it’s a prerequisite for more advanced certifications. Juniper’s training website (http://www.juniper.net/us/en/training/) provides all the information you need to get started.