
When we first learned After Effects-even after we’d figured out what all the buttons, sliders, doohickies and thingamabobs on the interface did, we were still confused about the effects. Each one seemed like a whole new program.
We got over our fear-slowly-by applying effects to test images, adjusting a single property to see what it did, resetting the effect, and adjusting a second property. We kept doing this until we’ mastered every property of every effect.
At this point, we understood each effect individually, but how to combine them remained a mystery. But we found that after time went by, and we became more and more comfortable using each effect alone, effect mixes started to occur to us naturally. Now they occur to us in our sleep.
In this chapter, we share some of our favorite effect mixes and techniques.

Curves are great tools for color correction-and much easier to use in Photoshop than After Effects. This is because Photoshop’s Info Palette displays extra color data while you’re adjusting the Curves’ filter, information you don’t see in AE. Also, in Photoshop, if you have Curves’ dialogue window open and Option-click (Alt-click) in your image, Photoshop will display a point on the curve that represents the image pixel you clicked. If you Command-click (Control-click) in the image, Photoshop will plot a point on the curve.
How does this help you in After Effects?
![]() Try exporting a representative frame of your image as a Photoshop file by moving the Current Time Indicator to that frame and choosing Composition>Save Frame As> File.
Try exporting a representative frame of your image as a Photoshop file by moving the Current Time Indicator to that frame and choosing Composition>Save Frame As> File.
![]() Then make Curves adjustments to this image in Photoshop (Image> Adjustments> Curves). Before closing out of the Curves dialogue, click Save, and Photoshop will prompt you to save as an ACV file.
Then make Curves adjustments to this image in Photoshop (Image> Adjustments> Curves). Before closing out of the Curves dialogue, click Save, and Photoshop will prompt you to save as an ACV file.
![]() In AE, apply the Curves effect (in the Adjust category) to the layer, and, in the Effect Controls Palette, click the Open icon (the folder). Open your ACV file, and AE will use the saved Curves from Photoshop.
In AE, apply the Curves effect (in the Adjust category) to the layer, and, in the Effect Controls Palette, click the Open icon (the folder). Open your ACV file, and AE will use the saved Curves from Photoshop.
Do you Know You’re Out of Focus
For an interesting variation on the Gaussian Blur effect, try Compound Blur (in the Blur and Sharpen category). You apply compound blur to the layer you want to make blurry (or partially blurry), but you need another layer in your timeline as well.
This extra layer should be a grayscale layer. It can be a gradient that you make in Photoshop. You can also make grayscale layers in After Effects, but if you do so, you have to Pre-compose them before using them for the Compound Blur effect.
Regardless of where you make your gradient layer, Compound blur will overlay it on top of the layer you’re blurring. (It doesn’t literally need to be on top in the Timeline). It will use this overlaid layer as a filter for the blur effect. Wherever the overlay layer is white, the blur will have full effect; wherever it is gray, the blur will have partial effect, and wherever it is black, the blur will have full effect.
Try this cool recipe:
![]() Add a movie or still image layer to the comp.
Add a movie or still image layer to the comp.
![]() Duplicate the layer.
Duplicate the layer.
![]() Apply the Stylize> Find Edges effect to the dup.
Apply the Stylize> Find Edges effect to the dup.
![]() Pre-compose the dup, selecting the “Move all attributes” option.
Pre-compose the dup, selecting the “Move all attributes” option.
![]() Turn the pre-comp’s eyeball off.
Turn the pre-comp’s eyeball off.
![]() Apply Blur and Sharpen>Compound Blur to the original layer.
Apply Blur and Sharpen>Compound Blur to the original layer.
![]() In the Effect Controls palette, choose the pre-comp for the Blur Layer property.
In the Effect Controls palette, choose the pre-comp for the Blur Layer property.
For variation, open the pre-comp and invert the Find Edges effect. Or, replace the Find Edges effect with the Adjust>Threshold effect.
Can You Direct Me to the Blur?

Try adding the Blur and Sharpen>Directional Blur effect and apply the following expressions to its two properties:
To Direction: wiggle(3,360)
To Blur Length: wiggle (3, 100)
To adjust the effect, change the numbers inside the parenthesis. The first number (3) is the number of random changes to Direction and Blur per second. The second number set (360 and 100) is the magnitude of change. The number 360 for direction means that the blur can be in any compass direction. The number 100 for Blur Length means that the blur can be a smear of 100 pixels maximum.
In the early days of AE there was a great set of plug-ins called Final Effects. Soon came Studio Effects, followed by a new set and a rebirth as Final Effects Complete. The package was picked up by Metacreations and sold for many years. It moved onto become part of the ICEd Effects package and later saw ‘life’ from Media 100, which sold it with a VERY restrictive license.
Many an AE user lamented about the day when those great plug-ins would come back and be readily available. Well.. . that day is now! With After Effects 6.5 you’ll find those great effects bundled as Cycore FX.
They’ve been updated and all 61 effects work with multi-processor machines and work with other new AE features. This addition alone is worth four times what the upgrade to After Effects 6.5 costs. When was the last time you got 61 plug-ins in a bundle from Adobe? To find out more about the effects visit Cycore’s website (www.cycorefx.com).

Need a wavy line? Try this:
![]() Make a solid the width of your comp (i.e. 720 pixels wide) but only 10 or 20 pixels high.
Make a solid the width of your comp (i.e. 720 pixels wide) but only 10 or 20 pixels high.
![]() Set the layer quality switch to high.
Set the layer quality switch to high.
Then apply the Distort>Warp effect. Choose Flag for the Warp Style then keyframe Bend changing from -100 to 100 over the course of a second. Option click (Alt click) Bend’s stopwatch and add the following expression:
![]() loopOut(“cycle”, 0)
loopOut(“cycle”, 0)
![]() This will make the wave loop so that it waves over and over again.
This will make the wave loop so that it waves over and over again.
![]() Finally, duplicate the effect (not the layer) five or six times to heighten the wave.
Finally, duplicate the effect (not the layer) five or six times to heighten the wave.

Photoshop users can rejoice-After Effects brings over some timesaving color correction tools from its more stationary sibling. In AE 6.5 you can now access Auto Contrast, Auto Color, Auto Levels. While it’s still a good idea to know how to fix exposure problems manually, it’s nice to have some options that give you time back.

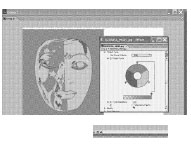
If you don’t want to buy a third-party morphing plug-in, you can roll your own morph in After Effects using the Distort>Reshape effect.
Say you’ve got two layers, a handgun and a water faucet, and you want the faucet to morph into the gun.
![]() You’ll need to create two masks, one outlining the shape of the faucet and the other outlining the shape of the gun.
You’ll need to create two masks, one outlining the shape of the faucet and the other outlining the shape of the gun.
![]() Assuming you’ve drawn the gun mask on the gun layer, copy it to the clipboard and paste it onto the faucet layer, so the faucet layer contains both masks.
Assuming you’ve drawn the gun mask on the gun layer, copy it to the clipboard and paste it onto the faucet layer, so the faucet layer contains both masks.
![]() Then copy the faucet mask to the clipboard and paste it to the gun layer, so that it also contains both masks. You may want to set your mask blending modes to None, to better see your layers.
Then copy the faucet mask to the clipboard and paste it to the gun layer, so that it also contains both masks. You may want to set your mask blending modes to None, to better see your layers.
![]() Apply the Reshape effect to both layers.
Apply the Reshape effect to both layers.
![]() On the faucet layer, choose the faucet mask for the Source Mask and the gun mask for the Destination Mask.
On the faucet layer, choose the faucet mask for the Source Mask and the gun mask for the Destination Mask.
![]() On the gun layer, choose the gun mask for the Source Mask and the faucet mask for the Destination Mask.
On the gun layer, choose the gun mask for the Source Mask and the faucet mask for the Destination Mask.
![]() On both layers, set the Boundary Mask to None, and keyframe Percent from 0 percent to 100 percent over the course of a few seconds.
On both layers, set the Boundary Mask to None, and keyframe Percent from 0 percent to 100 percent over the course of a few seconds.
![]() Finally, cross-fade one layer into the other by keyframing the top layer’s opacity.
Finally, cross-fade one layer into the other by keyframing the top layer’s opacity.

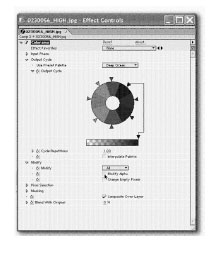
Image Control> Colorama is the most advanced color correction/color enhancement/color effect plug-in that ships with After Effects. It works by stripping all of the original color from the image and applying new colors. You can see the new colors it is applying by twirling open the Output Cycle parameter group.
Anything that was originally black in your image will be mapped to the top of the color wheel, which is red by default. Formerly black things in your image will be red. Then, as the original colors get lighter and lighter, they will be mapped to other colors on the Output Cycle wheel, traveling clockwise around the wheel. White, like black, will also be mapped to red, at the top of the wheel.
• To change colors on the wheel, double click any triangle (color stop) around the wheel.
• To delete a color stop, drag it away from the wheel.
• To add a new color stop, click anywhere on the wheel where there isn’t already a color stop.
• Cmd+drag (Ctrl+drag) a color stop to copy it to a new location around the wheel.
Or, choose cool wheel presets from the Use Preset Palette dropdown.
In Living Colorama II: Force Colors
Do you ever need to make sure an image contains certain colors and only those colors? Then Colorama is your baby.
![]() Set the Output Cycle wheel so that the color stops display the colors you want.
Set the Output Cycle wheel so that the color stops display the colors you want.
![]() Then uncheck Interpolate Palette. Whereas normally Colorama creates gradients that include your color stop color and also blends between them, if you uncheck Interpolate Palette, you’ll get only the color stop color.
Then uncheck Interpolate Palette. Whereas normally Colorama creates gradients that include your color stop color and also blends between them, if you uncheck Interpolate Palette, you’ll get only the color stop color.
![]() If you don’t need the colors to be 100 percent exact, but you’re trying for a poster look, add a slight Gaussian blur to the image.
If you don’t need the colors to be 100 percent exact, but you’re trying for a poster look, add a slight Gaussian blur to the image.
In Living Colorama 11: Alpha Blues
It's easy to fall in love with Colorama until you notice it messing up your alpha channel. It does this because it loves to modify colors on any channel-even alpha channels. To stop it from doing this, twirl open the Modify parameter group and uncheck Modify Alpha.
In Living Colorama IV: Spot Color

If you want to change the color of an object in a scene, such as someone's shirt, do so with Colorama.
Twirl open the Pixel Selection parameter group and change Matching Mode to RGB. Use the Eyedropper next to Matching Color to click on the shirt. Only the shirt colors will be modified by the Output Cycle color wheel.
If you'd like to mix Colorama's changes with the original colors in the image, you can do so in a couple of ways.

• For instance, you can click on any of the color stops and observe the lines that connect the stop to a checkerboard below the wheel. If you drag the color stop above the checkerboard to the left, that color will get more and more transparent as you drag, allowing the original color to show through..
• You can also scrub the Blend with Original slider, near the bottom of the parameter list, to fade the original image back in.

Windows users, beware: the version of Colorama that shipped with AE 6.0 is buggy. It will let you choose presets, but other than that, you can't customize the output cycle.
To fix this error, download the Colorama update from Adobe.com, which comes with an updated Radial Blur filter (also buggy in the original release of AE 6.0). After downloading and unzipping the replacement plug-ins, drop them in the folder called Program FilesAdobeAfter Effects 6.OSupport FilesPlug-insStandard and then restart After Effects.
Mac users, Colorama works fine as is, but you should also visit Adobe.com and pick up the latest patch, which fixes some other errors.
Mac update:
http://www.adobe.com/support/downloads/product.jsp?product=&platform=Macintosh
PC update:
http://www.adobe.com/support/downloads/product.jsp?product=&platform=Windows

In AE 5.5, there was a wonderful plug-in called Fractal Noise in the Render category. Alas, in AE 6.0 it’s gone. Gone from the Render category, that is. They moved it, and you can now find it by going to Effect>Noise>Fractal Noise.
If you’re used to buying interesting background treatments (swirling colors and designs), you might want to put your wallet back in your pocket and introduce yourself to Fractal Noise instead. It’s AE’s one-stop-shop for all funky patterns and backgrounds.
Sure, it looks like Photoshop’s Clouds when you first apply it, but dig a little deeper to mine gold.
• Play with the different effects in the Fractal Type dropdown.
• Adjust brightness and contrast
• Twirl open the Transform properties to find a slew of really cool properties that animate.
• Hint: uncheck Uniform Scaling, and increase the Scale Width category to create water or wood-like textures.

The patterns you design with Fractal Noise go on forever in all directions.
• Try adjusting (or animating) the Offset Turbulence property to roam in the fractal landscape.
• You might also enjoy animating the Evolution property, which will make your funky background morph into other funky backgrounds.
• If you animate Evolution to rotate completely around the circle (and as long as you don't animate any other property), you will create a seamless loop

Fractal Noise patterns look layered because they are. For each pattern, AE draws multiple fractals (complex patterns) on top of each other.
• You can specify the number of fractals it draws by adjusting the Complexity parameter. Beware of increasing it much higher than the default (six) because can cause AE to slow to a grinding halt.
• On the other hand, you might like the simpler effects you get by decreasing Complexity.
• The parameters under Sub Settings adjust all layers above the top layer.
• For the ultimate trip, try rotating the sub layers clockwise while rotating the top layer counterclockwise. You can rotate the top layer by adjusting Rotate in the Transform parameter group
More Noise IV: It’s a Gray World

Nice pattern, but why so gray? The one thing missing from Fractal Noise is color. To add color to your pattern, you’ll have to apply a second effect.
• You could use Adjust> Hue/Saturation (check the Colorize option).
• You could place a solid layer above and set it to Color or Hue mode.
• We suggest using the mighty Colorama effect in the Image Control category. Try applying Colorama’s presets to a Fractal Noise pattern until you find a look you like.

Possibly the most fun effect that ships with AE is Shatter, in the Simulation category. Shatter is one of those effects that animates without you even having to keyframe it. Just apply Shatter, and your layer blows up. Specifically, it shatters into flying bricks. Most people who use this effect never learn how to change the shapes from bricks to anything else. And we’re getting darn sick of looking at those bricks, folks.
![]() So please, twirl open Shape and choose a different Pattern (i.e., glass). Or, be more original and create your own shatter shapes.
So please, twirl open Shape and choose a different Pattern (i.e., glass). Or, be more original and create your own shatter shapes.
![]() If you check the White Tiles Fixes option, any shapes you draw as white-filled areas will not shatter, which gives you a way to blow something up and leave specific pieces behind. For example, the layer could shatter, leaving behind a word or logo shape
If you check the White Tiles Fixes option, any shapes you draw as white-filled areas will not shatter, which gives you a way to blow something up and leave specific pieces behind. For example, the layer could shatter, leaving behind a word or logo shape

If you’ve tried to control when Shatter shatters, you may have shattered your computer in frustration. Here’s the trick (assuming you want to delay the shatter until two seconds into your comp):
![]() With the Current Time Indicator at the start of the Timeline, turn the stopwatches on for Radius (in the Force 1 parameter category) and Gravity (in the Physics category). Set both properties to zero.
With the Current Time Indicator at the start of the Timeline, turn the stopwatches on for Radius (in the Force 1 parameter category) and Gravity (in the Physics category). Set both properties to zero.
![]() At two seconds, set another Radius keyframe, also at zero, and another Gravity keyframe, also at zero.
At two seconds, set another Radius keyframe, also at zero, and another Gravity keyframe, also at zero.
![]() Press the Page Down key to move forward one frame and set Radius to its default, .40 and Gravity at its default, 3.00.
Press the Page Down key to move forward one frame and set Radius to its default, .40 and Gravity at its default, 3.00.
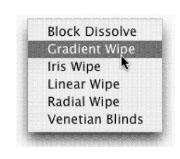
Cool Transitions: Gradient Wipe
Our favorite transition is the incredible Gradient Wipe. After Effects can use any gradient layer as a “transition map.” Create or modify a gradient in Photoshop first. You can combine gradient layers, blend modes, and filters to create an interesting map.
![]() Import the gradient map into After Effects.
Import the gradient map into After Effects.
![]() Add the gradient to your timeline but leave its visibility off. Make sure the gradient layer is the length of your composition.
Add the gradient to your timeline but leave its visibility off. Make sure the gradient layer is the length of your composition.
![]() Apply the Gradient Wipe (Effect> Transition> Gradient Wipe) to the intended layer.
Apply the Gradient Wipe (Effect> Transition> Gradient Wipe) to the intended layer.
![]() Define the Gradient Layer source.
Define the Gradient Layer source.
![]() Turn up the Transition’s softness for a smoother transition.
Turn up the Transition’s softness for a smoother transition.
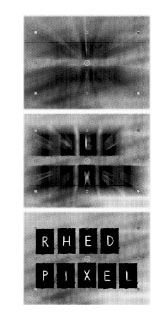
![]() Start the transition 100 percent complete, and then set a second keyframe to 0 percent where you want the transition to end. When you play back the comp, you’ll notice that the light areas on the gradient make certain corresponding pixels on the image layer vanish first; black areas cause other pixels to vanish last; gray pixels cause corresponding image pixels to vanish in the middle of the transition.
Start the transition 100 percent complete, and then set a second keyframe to 0 percent where you want the transition to end. When you play back the comp, you’ll notice that the light areas on the gradient make certain corresponding pixels on the image layer vanish first; black areas cause other pixels to vanish last; gray pixels cause corresponding image pixels to vanish in the middle of the transition.
Generally, you will need a stack of three layers in your Timeline when applying Gradient Wipe. You’ll need the two images (or videos) you’re transitioning between, and the gradient layer. It doesn’t matter where the gradient layer sits in the stacking order, because you’ll be turning its visibility off, but the other two layers should be stacked in order of what you want to see first and what you want to see second (first above second). Apply the gradient wipe to the first image. Don’t apply it to the gradient!
The Radial Blur Filter offers several possibilities for interesting transitions, especially on text and logos. The filter is very render-intensive however, so we usually leave the antialiasing set to low and apply it for only a short time.
![]() Highlight the layer where you’d like to apply the effect.
Highlight the layer where you’d like to apply the effect.
![]() Choose Effect> Blur> Radial Blur.
Choose Effect> Blur> Radial Blur.
![]() There are two methods to choose from, Radial and Zoom. Most often, we use Zoom.
There are two methods to choose from, Radial and Zoom. Most often, we use Zoom.
![]() Keyframe the amount of blur. If you use the slider in the effect window, you can only achieve a blur radius of 118. If you adjust the blur in the timeline, a radius of 1000 is possible.
Keyframe the amount of blur. If you use the slider in the effect window, you can only achieve a blur radius of 118. If you adjust the blur in the timeline, a radius of 1000 is possible.
![]() For a transition, start with a high value, and end at 0. You can also add a small opacity fade into the layer to make the transition smoother.
For a transition, start with a high value, and end at 0. You can also add a small opacity fade into the layer to make the transition smoother.
![]() To improve the effect, try animating the center point of the effect.
To improve the effect, try animating the center point of the effect.

A frequent effect that does not see much play is the Minimax effect. This effect is really a portal to accessing a Minimium and Maximum command or a combination of the two. The official purpose of the effect is to expand light or dark pixels, often to improve mattes. With that said, After Effects pros routinely use tools in unconventional ways.
![]() Highlight the layer where you’d like to apply the effect.
Highlight the layer where you’d like to apply the effect.
![]() Choose Effect> Channel> Minimax..
Choose Effect> Channel> Minimax..
![]() You can choose from four methods:
You can choose from four methods:
![]() Keyframe the amount of the effect. A starting value of 300-500 is usually sufficient.
Keyframe the amount of the effect. A starting value of 300-500 is usually sufficient.
![]() The effect generally works best on color channels.
The effect generally works best on color channels.
![]() Experiment with the direction menu as well.
Experiment with the direction menu as well.
The generated effect creates a nice digital stream or pixelization effect.

Tired of the same text effects? Apply a horizontal Fast Blur to your text.
![]() Select your text layer and Choose Effect>Blur & Sharpen>Fast Blur.
Select your text layer and Choose Effect>Blur & Sharpen>Fast Blur.
![]() Make your Blur Dimensions Horizontal.
Make your Blur Dimensions Horizontal.
![]() The slider for Blurriness only goes to 127 so click on the numeric value and type 500.
The slider for Blurriness only goes to 127 so click on the numeric value and type 500.
![]() Make a keyframe at the beginning of the layer for 500 and make a second keyframe for 0 Blur a couple of seconds later in the timeline.
Make a keyframe at the beginning of the layer for 500 and make a second keyframe for 0 Blur a couple of seconds later in the timeline.
![]() Ram preview: “ooh.. .pretty.”
Ram preview: “ooh.. .pretty.”

If you spend time setting up and animating Effect properties but want to try a variation, select the Effect in the Effects Palette and Press Cmd+D (Ctrl+D) to duplicate the effect. Turn off your original Effect after pressing the Show Effect Box in the Effects Palette. Change the duplicate effect and toggle between the two to see the difference.
If it’s taking a while for AE to render the effect, take a snapshot in the Composition Window and toggle between that and a duplicate effect. This is all non-destructive as you still have the original effect and keyframes.

Another way to animate wavy lines is to apply the stroke effect to an animated mask shape.
![]() Choose Layer> New> Solid or press Cmd+Y (Ctrl+Y).
Choose Layer> New> Solid or press Cmd+Y (Ctrl+Y).
![]() Choose the Pen Tool from the Tools Palette and be sure the RotoBezier option is not selected. Draw a wavy mask with at least 3 vertex points in the Composition Window
Choose the Pen Tool from the Tools Palette and be sure the RotoBezier option is not selected. Draw a wavy mask with at least 3 vertex points in the Composition Window
![]() Make sure the layer is selected and choose Effect> Render> Stoke.
Make sure the layer is selected and choose Effect> Render> Stoke.
![]() Choose Mask 1 as the path.
Choose Mask 1 as the path.
![]() Keyframe the shape of your mask and change it over time.
Keyframe the shape of your mask and change it over time.
![]() You can also animate the start or end values of the Stroke Effect.
You can also animate the start or end values of the Stroke Effect.
Lots of smoothly animated, different colored strokes make for great backgrounds.

Appearing tonight.. .Polka dots!
![]() Choose Layer> New> Solid or press Cmd+Y (Ctrl+Y)
Choose Layer> New> Solid or press Cmd+Y (Ctrl+Y)
![]() Select the layer and double click on the Ellipse Tool from the Tools Palette. (If you don’t see the Ellipse Tool, hold down the Rectangle Tool to reveal the Ellipse Tool beneath).
Select the layer and double click on the Ellipse Tool from the Tools Palette. (If you don’t see the Ellipse Tool, hold down the Rectangle Tool to reveal the Ellipse Tool beneath).
![]() Select the mask and press Cmd+T (Ctrl+T) to access the Free Transform Points Tool. You may need to make the Ellipse more circular.
Select the mask and press Cmd+T (Ctrl+T) to access the Free Transform Points Tool. You may need to make the Ellipse more circular.
![]() Press the Shift+Cmd (Shift+Ctrl) to scale the Ellipse to a smaller size from the center of the layer.
Press the Shift+Cmd (Shift+Ctrl) to scale the Ellipse to a smaller size from the center of the layer.
![]() Choose Effect> Render> Stroke. Change the Brush Size to a value larger than 10.
Choose Effect> Render> Stroke. Change the Brush Size to a value larger than 10.
![]() Change the Spacing to 100 percent-voila! Pokka Dots!
Change the Spacing to 100 percent-voila! Pokka Dots!
![]() Animate the Start or End values and watch your dots appear or disappear.
Animate the Start or End values and watch your dots appear or disappear.

A twist on animating a stroke is to use the new Scribble Effect.
![]() Select a layer with a closed mask.
Select a layer with a closed mask.
![]() Choose Effect>Render> Scribble.
Choose Effect>Render> Scribble.
![]() Select a Fill Type.
Select a Fill Type.
• For varying stroke, increase Path Overlap Variation.
• For more concentrated Scribble, decrease Spacing.
Scribble can be applied to more than one mask and will break up a mask it finds difficult to fill with one line. Check the Fill Paths Sequentially box if you are animating the start or end of a Scribble and want the masks to behave as one. If a layer doesn't have a mask, use Scribble in conjunction with Auto Trace, which generates masks. (Choose Layer> Auto Trace).
Use that Scribble for an alpha! Draw with white and set up the layer as a Luma Track Matte.

Make your own Pleasantville effect by using the Leave Color Effect.
![]() Select a footage layer on choose Effect>Stylize> Leave Color.
Select a footage layer on choose Effect>Stylize> Leave Color.
![]() Use the Eyedropper to choose the color you want to keep, and change the Amount to Decolor to 100 percent.
Use the Eyedropper to choose the color you want to keep, and change the Amount to Decolor to 100 percent.
![]() Go through each frame to check to see if you have achieved the effect you want.
Go through each frame to check to see if you have achieved the effect you want.
![]() Use the Eyedropper to select colors at key points to fix discrepancies.
Use the Eyedropper to select colors at key points to fix discrepancies.
A great way to use this effect is to use it in conjunction with Time Remapping. Apply Time Remapping to a layer and freeze the action for a few seconds. Apply the Leave Color Effect to focus attention on a part of the layer.
You can effectively turn this effect off by increasing the tolerance to 100 percent. Select the keyframes and choose Animation> Toggle Hold Keyframe to turn leave color on for the few seconds the video is frozen.
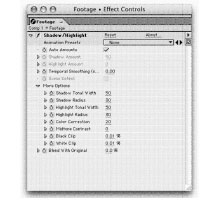
Have some footage with blown out skies and subjects who are drifting into the Shadows? Adobe has a great solution called Shadow Highlights in After Effects 6.5. Be sure to deselect the Auto Options and then twirl down the More Options portion of the effect controls. This is a powerful and intuitive way to fix troublesome footage.
Since we always needed another Blur Filter, the fine folks at Adobe offer us one more choice in After Effects 6.5. You can now access a Box Blur, which produces an effect similar to a Gaussian Blur. So why choose it? Well, it’s a good deal faster and that may be reason enough alone.
The (Free) Secret Effects Book

How did we learn to use all of the effects? Easy, we read the book. You know, the book that explains how every parameter of eve y effect works.
What? You don’t know about the book? Well, you own it. It’s on your AE installation CD. Just pop it into your hard drive and navigate to the AE6 DocumentationEnglish folder. The book is an Adobe Acrobat file called help-effects.pdf. We recommend that you print it out, take it to a stationary shop, and pay a couple of bucks to have it bound. It may just prove to be the most valuable AE book you own.
• Among its other virtues, this is the only book that explains, in detail, how to use the five free (awesome) effects you downloaded when you registered your copy of AE at Adobe.com. You did download the free effects, didn’t you? If not, reregister AE so you can grab them. You don’t want to miss out on the fun of Card Wipe, Card Dance, Foam, Caustics, and Wave World.
• After printing the effects book, you might also want to print the Keylight and 3D Assistants’ manuals, which are also on the installation CD.
• If you’re missing your install CD, you can download the AE 5.5 version of the effects books, which is almost exactly the same as the AE 6 book. Pick it up here: http://www.adobe.com/products/aftereffects/zip/ae-effects-pdfs.zip.