
The Paint Effect is new to AE 6 and we love it. Learn to get more out of the new tool as well Vector Paint effect. Vector Paint has been available, first as a plug-in by Cult Effects for AE 3 and 4 and was then integrated into the AE package in version 5. Learn to harness the power of all the Paint options as a compositing tool and to create eye-catching treatments for footage and stills.

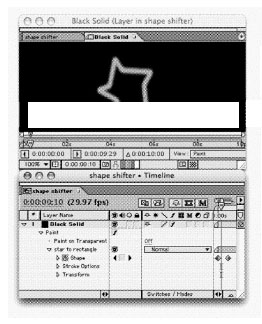
To use the Brush Tool, you have to launch a layer in the layer window. It will be opened as a tabbed window where your Composition window is.
• To open the Layer Window, double click the layer in the timeline that you want to paint.
• It’s a good idea to view the Layer Window and the Composition Window simultaneously by dragging the Layer Window to it’s own space on the desktop. Click on the Layer Window tab in the and drag out
You can do this with many other windows and palettes in AE and most Adobe programs.

Paint, Clone, and Erase Palettes

Once you have launched the Layer Window, you can click on the Brush Tool in the Tools Palette. Open Auto Palettes is handy to have checked as it automatically opens the Paint Palette and the Brush Tips Palette. Otherwise you can click the palette icon.
If you prefer to use the keyboard to select tools, press Cmd+B (Crtl+B). Keep pressing Cmd+B (Crtl+B)to toggle between the Paint, Clone, and Erase Tools. If you are using the keyboard shortcuts because you lack monitor real estate, double-clicking on any palette will collapse it and save you room.
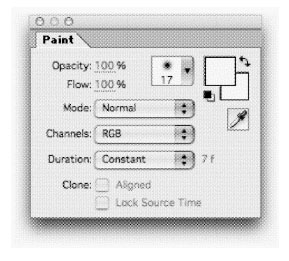
Besides the usual options you’d expect to have in a paint palette (like a Color Picker), you can also choose the duration of your stroke and which channel you want to paint on (Alpha, RGB, or RGB+Alpha Channels).
If you are unsure what effect you are looking for, or got excited and started painting before you considered the options (easy to do), you can always modify these options after you’ve painted. Most of these options can be changed under Stroke Options in the timeline by a quick click
You can animate the duration by keyframing the Start and End values of a stroke. Notice that if you select Write-On for a stroke that AE places keyframes on the End value as you paint. You can always speed up or slow down a Write-On effect by dragging these keyframes further apart or closer together.

Sometimes the masks from Paint Strokes have lots of Vertex Points. It’s not a bad idea to smooth the mask. If you have access to Illustrator, this extra step will make you work, but the results are great.
![]() In Illustrator, paste a stroke from AE.
In Illustrator, paste a stroke from AE.
![]() Choose>Object>Path>Simplify.
Choose>Object>Path>Simplify.
![]() Choose Preview to see the Simplification, and Show Original to see the original mask. Turn the curve precision up quite high. The goal is to vastly reduce the number of points while retaining the mask shape. Or, close the mask shape, depending on how much smoothing you want.
Choose Preview to see the Simplification, and Show Original to see the original mask. Turn the curve precision up quite high. The goal is to vastly reduce the number of points while retaining the mask shape. Or, close the mask shape, depending on how much smoothing you want.
![]() Click OK
Click OK
![]() Select and copy the new mask.
Select and copy the new mask.
![]() In After Effects, paste the simplified Mask into the Mask Shape keyframe.
In After Effects, paste the simplified Mask into the Mask Shape keyframe.

The Paint, Clone, and Erase Brushes have a selection of dynamic properties: size, angle, roundness, opacity, and flow. These can only be used with a pressure-sensitive tablet like those from Wacom.
You can link these dynamics to pen pressure, pen tilt, or a stylus wheel. (Some tablet accessories such as Wacom’s Intuos Airbrushes include a stylus wheel). Using Dynamics adds more professional functionality to the Paint Effect and you may want to get a tablet if you don’t have one. Other than the ease of drawing with a pen you can vary the size, angle, roundness, opacity, and flow within the same paint stroke.
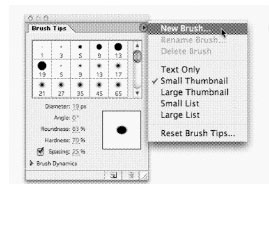
You can select any of the preset brushes, modify them, and save your new brushes to the library so they always appear in the Brush Tips Palette.
• A fast way to modify a brush from the comp window is to hold the Cmd Key (Ctrl) and drag in or out with your mouse.
• Cmd+Shift+Drag (Crtl+Shift+Drag) changes the size of the brush in bigger increments.
• Releasing the Cmd key (Crtl) while maintaining the drag will edit the hardness of the brush.
After modifying a brush, hit the New Brush Tip Icon on the lower right part of the window or choose New Brush from the Palette Menu. To rename or delete brushes, context-click (control-click or right-click) on a brush
Finer Control, Better Navigation

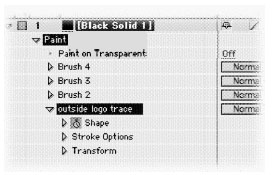
Feeling dizzy yet? Are you tired of twirling down the triangles to see the paint effects 2 you’re applied? It’s time for more shortcuts.
• Press PP to see only the Paint, Clone, or Erase strokes.
• Want to change the name of your strokes? Select the stroke and press return (enter), type a new name, press return (enter) again. It’s easier to remember what "flower petal 1" refers to than "brush 14".
Not only are there ten or more properties you can animate under each stroke option, but each stroke also has it’s own transform properties separate from the layer transform properties. Wow! Because each stroke is vector have no fear of scaling up a stroke.
Brush strokes (including any keyframes) and individual keyframes can be copied from one layer to another and you can duplicate strokes within a layer.
You can also animate the shape of a stroke by hitting the shape stopwatch for a selected stroke and then going to a different point in time and drawing another paint stroke. (Make sure that stroke is selected after you move in time.

Is your video missing a precious alpha channel? Have no fear, the Paint Effect is here!
• Adding an alpha with paint effects gives you utmost control and you can edit the alpha directly in AE.
• When you paint, choose Alpha in the Paint palette.
• You can change channels after you have painted a stroke if you forgot to choose Alpha.
• White will have no effect (1000/0 opaque), black will be totally transparent, and all other colors will be changed to various shades of transparency depending on their gray value.
You may prefer to do your pen and drawing work on Adobe Illustrator and the good news is you can copy and paste masks from Illustrator! This only works on a paint stroke but that’s OK because you can always make a paint stroke act like an eraser stroke by changing the Channel to Alpha.
![]() Launch the Layer Window (either by doubling clicking or pressing Enter on the numeric keypad)
Launch the Layer Window (either by doubling clicking or pressing Enter on the numeric keypad)
![]() Select the paint tool, and paint a stroke
Select the paint tool, and paint a stroke
![]() Turn on the stopwatch for Shape and make sure you have a keyframe.
Turn on the stopwatch for Shape and make sure you have a keyframe.
![]() In Illustrator and draw your stroke and copy it by pressing Cmd+C (Ctrl+C)
In Illustrator and draw your stroke and copy it by pressing Cmd+C (Ctrl+C)
![]() In AE, make sure your paint stroke is selected and paste the Illustrator mask by pressing Cmd+V (Ctrl+V).
In AE, make sure your paint stroke is selected and paste the Illustrator mask by pressing Cmd+V (Ctrl+V).
You can paste it over the stroke you painted, or paste it at a different point in time and watch AE interpolate the transformation for you.
Maybe Not So Perfect After All

There are some limitations to pasting masks as strokes. You don’t have options like you do when working with masks.
• You can’t change the first vertex, which means you may get strange interpolationeven from similar looking shapes.
• Smart Mask Interpolation is not available for Paint Stroke Shape. You can cheat a little though because you can also copy and paste masks from AE into a paint stroke.
• You still may get strange interpolation, and even though these are vector strokes, you can’t clean up the intermediary strokes without pasting another shape.
• If you find you want to paste masks as paint strokes a lot you may want to consider just using masks and applying a stroke effect to them.

Rotoscoping is the art of painting directly on frames. Before Vector Paint and Paint Effects, rot0 was done in AE by animating masks which is still a valid way to work. Some people may find the act of painting a stroke more intuitive though.
• When rotoscoping with AE remember that the PgDn button will advance one frame, and the PgUp button will go a back a frame.
• You can also advance a custom amount by changing the custom duration in the duration pop-up menu and pressing Cmd+PgDn or Cmd+PgUp (Ctrl+PgDn or Ctrl+PgUp).
The following are some additional tips to keep in mind.
• To zoom in the layer window, press the Period key
• To zoom out the layer window, press the Comma key.
• Regardless of what tool you’re using, holding the space bar will change your tool to the hand tool for fast and easy navigation in the Layer or Composition Windows.

Paint is pretty great but if it’s not working out for you, try exporting a movie as a Filmstrip and painting in Photoshop. A filmstrip opens in Photoshop as a series of frames in a column, with each frame labeled by number, reel name, and timecode.
You can break the filmstrip file into any number of smaller files by setting the work area to a different portion of the composition before rendering each portion.
When editing a filmstrip in Adobe Photoshop, use the following guidelines for best results:
• You can paint on the gray lines dividing the frames of the filmstrip without damaging the file. After Effects will display only the part of each frame that lies within the frame border.
• You can edit the red, green, blue, and alpha channels in the filmstrip file. Use only channel #4 as the alpha channel.
• Do not resize or crop the filmstrip.
• Flatten any layers you add in Adobe Photoshop.
To render, modify, and re-import a filmstrip:
![]() Choose Compositior>Make Movie
Choose Compositior>Make Movie
![]() In the Render Queue window click the Output Module template
In the Render Queue window click the Output Module template
![]() Choose Filmstrip from the Format pop-up menu. Specify the rest of the settings you want and click OK and Render the Filmstrip
Choose Filmstrip from the Format pop-up menu. Specify the rest of the settings you want and click OK and Render the Filmstrip
![]() Open the Filmstrip in Photoshop and paint on the frames
Open the Filmstrip in Photoshop and paint on the frames
![]() Save the file
Save the file
![]() In AE, go to File>Import>File and choose the edited Filmstrip
In AE, go to File>Import>File and choose the edited Filmstrip
![]() Drag the Filmstrip to the New Composition button in the Project Window
Drag the Filmstrip to the New Composition button in the Project Window
Treat the Filmstrip like video footage

Like the Photoshop Clone Stamp Tool, the AE Clone Stamp Tool works best with small strokes. It’s useful to make several samples near the blemish. If your blemish lasts for longer than a frame, or if the area changes color as time progresses, make sure Lock Source Time in the Paint Palette is off.
• Lock Source Time will apply your cloned pixels from a single frame to all successive frames
• By unlocking source time, the pixels will be constantly sampled.
• Before cloning, decide which method you want because you can’t change this after the fact.
• Aligned cloning will keep your sample point even if you start a new cloning stroke.
• Unchecking the Aligned option will mean that with every new stroke, you will clone the same sample (until you Option-click again to select a new sample).

Cloning is mostly used to cover blemishes or for wire removal but can also be used in other ways.
• For example, if you have a part of a video that is not lit properly, you can clone that part with a nice soft brush over itself, and select a blending mode like Add or Screen to bump up that area.
• You can also use Multiply to "burn" an overexposed area.
• Cloning offers great new ways to composite layers, so be sure to play! Instead of using track mattes, you can now do a lot of those effects using by cloning.

To apply Vector Paint to a layer:
![]() In either the Composition or Timeline window, select the layer you want to paint.
In either the Composition or Timeline window, select the layer you want to paint.
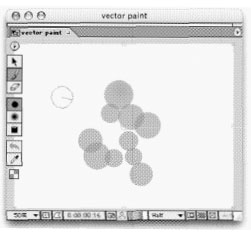
![]() Choose Effect>Paint>Vector Paint. The Vector Paint effect appears in the Effect Controls window, and the Vector Paint toolbar appears on the left side of the Composition window.
Choose Effect>Paint>Vector Paint. The Vector Paint effect appears in the Effect Controls window, and the Vector Paint toolbar appears on the left side of the Composition window.
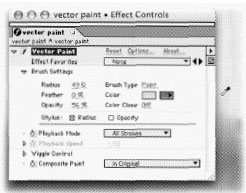
![]() In the Effects Control Window, make sure you’re happy with the Radius, Opacity, Feather, and Color. But you can change these settings after you paint your strokes.
In the Effects Control Window, make sure you’re happy with the Radius, Opacity, Feather, and Color. But you can change these settings after you paint your strokes.
![]() Click the little triangle icon in the upper-left corner of the comp window; a menu will pop up with additional vector paint options. (The triangle icon will only appear if you have the Vector Paint effect selected in the Effect Controls window or Timeline).
Click the little triangle icon in the upper-left corner of the comp window; a menu will pop up with additional vector paint options. (The triangle icon will only appear if you have the Vector Paint effect selected in the Effect Controls window or Timeline).
![]() From this menu, choose Shift Paint Records>Continuously.
From this menu, choose Shift Paint Records>Continuously.
![]() Make sure your Current Time Indicator is parked at the beginning of the Timeline
Make sure your Current Time Indicator is parked at the beginning of the Timeline
![]() Paint in the comp window with the Shift key held down. You can press and release the mouse button as much as you’d like, but you must keep the Shift key held down the entire time you’re painting.
Paint in the comp window with the Shift key held down. You can press and release the mouse button as much as you’d like, but you must keep the Shift key held down the entire time you’re painting.
![]() When you’re done painting, set Playback Mode to Animate Strokes.
When you’re done painting, set Playback Mode to Animate Strokes.
![]() If the animation is too slow, move the Current Time Indicator to the point in time when you’d like the animation to be finished, then scrub the Playback Speed property until you see your entire drawing. This will ensure that the entire drawing is finished by that point in time.
If the animation is too slow, move the Current Time Indicator to the point in time when you’d like the animation to be finished, then scrub the Playback Speed property until you see your entire drawing. This will ensure that the entire drawing is finished by that point in time.
Showdown! Paint vs. Vector Paint

With all the fantastic options of AE 6’s Paint Effects, you may wonder if you will never use Vector Paint again. But Vector Paint still offers a useful option or two.
Although it’s meant for specialized effects, the wiggle effect on a stroke is great for imitating stop motion type.
A benefit is that all the strokes are contained within one effect so any composite option will affect all the strokes simultaneously. For example, if you wanted to animate a drawing painting itself, it’s best to use Vector Paint (yes, you can use Paint, but you have to animate each stroke separately.
There are important settings that you can only access from the Vector Paint options menu.
![]() To open this menu, click the Options button in the Effects Controls palette for Vector Paint. You can also get to options by clicking on the little triangle icon in the upper-left corner of the comp window.
To open this menu, click the Options button in the Effects Controls palette for Vector Paint. You can also get to options by clicking on the little triangle icon in the upper-left corner of the comp window.
![]() The toolbar appears only when Vector Paint is selected, either in the Effect Controls window or in the Timeline.
The toolbar appears only when Vector Paint is selected, either in the Effect Controls window or in the Timeline.
![]() If the rulers in the Composition window interfere with your view of the Vector Paint toolbar, choose View>Hide Rulers.
If the rulers in the Composition window interfere with your view of the Vector Paint toolbar, choose View>Hide Rulers.
When you use Vector Paint on a layer, you can start over at any time by deleting all strokes or the Vector Paint effect itself. To delete the effect, select Vector Paint in the Effect Controls window and press Delete or Backspace.
We often change our minds in the middle of a project. You can quickly set your brush Radius and Feather amounts as you paint:
![]() Press either the Radius or Feather Brushes in the Composition Toolbar.
Press either the Radius or Feather Brushes in the Composition Toolbar.
![]() Press Cmd (Ctrl) and click anywhere in the Composition window.
Press Cmd (Ctrl) and click anywhere in the Composition window.
![]() Then drag in or out to resize the brush.
Then drag in or out to resize the brush.
![]() To change the value by larger increments, hold down Shift as you drag.
To change the value by larger increments, hold down Shift as you drag.
![]() The Eyedropper Tool can select a color to paint with from a sampling anywhere on the desktop.
The Eyedropper Tool can select a color to paint with from a sampling anywhere on the desktop.
![]() Press the Escape key to cancel the Eyedropper
Press the Escape key to cancel the Eyedropper

If you need an effect that keeps track of the X and Y position of the paintbrush a 311 times, Write-On is the only effect that does this. This is great for expressions.
![]() Animate a painting with Write-On, add the beam effect to a layer above.
Animate a painting with Write-On, add the beam effect to a layer above.
![]() Set the beam layer to high quality and set the beam length to 100 percent.
Set the beam layer to high quality and set the beam length to 100 percent.
![]() Place the beam’s end point below the bottom of the comp (centered horizontally).
Place the beam’s end point below the bottom of the comp (centered horizontally).
![]() Add an expression to the beam’s start point and Pickwhip Write-On’s brush position. It will appear as if the beam is painting the Write-On stroke!
Add an expression to the beam’s start point and Pickwhip Write-On’s brush position. It will appear as if the beam is painting the Write-On stroke!

One of the main benefits of working with Vector Paint is that you can clone colors from 2 other layers while you paint. The stroke color is determined by the pixels at the position where you begin to paint.
• The Color Clone affects strokes only while you draw and has no effect on a s completed stroke. This is the only Brush Setting you can’t apply after drawing. Clicking either the Eyedropper or Color swatch turns off the Color Clone feature.
• Additionally, try Shift-clicking the Color Swatch to open the Set Value dialog box for Opacity (without turning off Color Clone.)
• This works especially well if the layer you are painting is below the layer you are cloning from within the timeline. Drag the layer window out from the comp window tab.

You can copy a mask into a Paint layer, but did you know you could go the other way!? It’s awesome.
![]() Draw a closed stroke in either Vector Paint or Paint Effects.
Draw a closed stroke in either Vector Paint or Paint Effects.
![]() Select the stroke:
Select the stroke:
![]() Copy the stroke by pressing Cmd+C (Ctrl+C).
Copy the stroke by pressing Cmd+C (Ctrl+C).
![]() It gets a bit confusing here but click on the pen tool and draw a mask-any kind.
It gets a bit confusing here but click on the pen tool and draw a mask-any kind.
![]() Make a mask shape keyframe and with that keyframe selected, paste (Cmd+V or Ctrl+V) the Stroke as a Mask. Wow!
Make a mask shape keyframe and with that keyframe selected, paste (Cmd+V or Ctrl+V) the Stroke as a Mask. Wow!