Welcome to the finish line.. . or the end of the road. This is where your good ideas and hard work bear results. Inside the Render Queue is where your motion graphics come to life. But birth can be painful, or easy, it all depends on your approach
This chapter will share several secrets to gain back time and achieve consistent results with your render. By harnessing templates and After Effects’ powerful media management abilities, your graphics will come to live faster (and with fewer errors). Stop wasting time and get the results you need, faster!

You’ve gone through all the trouble to set up your render and tweak your render and output settings. Now save those custom settings for future use.

Good menus start with good design decisions.
![]() Click on the render settings or Output Module pop-up menu.
Click on the render settings or Output Module pop-up menu.
![]() Choose Make Template from the list.
Choose Make Template from the list.
Want consistent results? Use templates. After Effects comes with several built-in templates that addresses several of the more common production needs. After Effects offers both render setting templates (for establishing quality, resolution, and duration) and output module (for defining file formats). If these built-in options don't do it for you however, you can easily create your own.

Good menus start with good design decisions.
![]() Choose Edit > Templates> Render Settings.. . or Output Module.. ..
Choose Edit > Templates> Render Settings.. . or Output Module.. ..
![]() Click New to create a new setting or Duplicate to modify a copy of an existing setting.
Click New to create a new setting or Duplicate to modify a copy of an existing setting.
![]() Modify the settings to match your needs. When finished click OK.
Modify the settings to match your needs. When finished click OK.
![]() If you’d like, you can choose one of your settings to be the default.
If you’d like, you can choose one of your settings to be the default.
Want to define the default standards for your render settings out Output module? Sure you could go all the way up to the Edit menu, but why bother when you can set it in the render queue.

Good menus start with good design decisions.
![]() Be sure your current setting of choice is saved as a template.
Be sure your current setting of choice is saved as a template.
![]() Hold down the Command (Control) key as you select the preset name.
Hold down the Command (Control) key as you select the preset name.
![]() The default settings are now changed for all future comps added to the render queue.
The default settings are now changed for all future comps added to the render queue.
Want to give AE more power to devote solely to your render? Try these tips to dedicate your computer’s power.

Good menus start with good design decisions.
• Choose Edit > Purge > All to release any RAM being held by previews or cache files
• Close the Comp Window (unless you like watching paint dry). This will free up the bigger benefit in closing this window. more memory and computer resources for the render. The more layers you have,the bigger benefit in closing this window.
• Quit any other applications running.
• Leave After Effects as the foreground application (in other words if you need to check email or play solitaire, use another machine).
Many people are attracted to Frame Blending and Motion Blur. While its true that these settings can generate smoother motion quality, they only do so in specific situations.

• Enable motion blur on a layer if you are animating its position, rotation, scale, or anchor point greatly. This will add realistic blur as the object changes speed. Applying motion blur to slow moving, or static objects has no visible effect (except on your render times). Also, motion blur has no impact for most effects if the motion is created within an effect (such as the Offset or Basic 3D effect). Notably, the Particle Playground effect however is affected by Motion Blur.
• Enable frame blending only if you have changed the speed of a clip. It is most helpful on clips that have been slowed down. However there are some benefits on sped up clips as well. The point here is that frame blending is useless unless there is a speed change in the clip.
Instead of rendering to QuickTime or AVI, you might consider going to an image sequence. After Effects allows you to write your render to s series of consecutive PICT, PNG, TARGA, or TIFF files. The benefits of this method include.

• You can use QuickTime to spot-check the render partway, without interrupting the render. Thus if the thing doesn’t look how you want, you don’t have to wait till the entire render is finished to find that out.
• Crashes, power outages, etc. don’t hurt so badly, because you just pick up where you left off.
• Nearly all video and 3D applications can import an image sequence; hence you can get around the issue of codecs and such.
Tip idea by Mark Simpson, Jam Digital, Redondo Beach, California, USA
A common misunderstanding about rendering is that many think you must render for each output that you want. In other words if you need a movie at different compressions and want an image sequence, you must render each separately, Fortunately, this is FAR from true.

![]() Highlight the required sequence in the Render Queue.
Highlight the required sequence in the Render Queue.
![]() Choose Composition > Add Output Module.
Choose Composition > Add Output Module.
![]() Modify the settings to suit your needs.
Modify the settings to suit your needs.
![]() Save the project.
Save the project.
![]() Click Render when you are ready to launch the Render Queue.
Click Render when you are ready to launch the Render Queue.
There’s nothing worse than running out of space in the middle of a batch render. You return expecting everything to be done; yet you are confronted with warnings that rendering was aborted due to a lack of space. If you have additional internal or external drives, a quick change to your preferences may eliminate the problem.
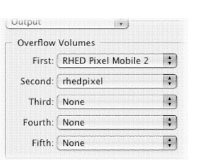
![]() You need to access your preferences menu. Choose After Effects > Preferences > Output (Edit > Preferences > Output).
You need to access your preferences menu. Choose After Effects > Preferences > Output (Edit > Preferences > Output).
![]() In the Overflow volumes area you can specify up to 5 drives to handle renders when the original volume fills up.
In the Overflow volumes area you can specify up to 5 drives to handle renders when the original volume fills up.
![]() While you are there, be sure that the Minimum Disk Space Before Overflowing box is set to at least 500 MB. Otherwise you may experience data loss or hard rive lock-up.
While you are there, be sure that the Minimum Disk Space Before Overflowing box is set to at least 500 MB. Otherwise you may experience data loss or hard rive lock-up.
![]() Click OK.
Click OK.
We are firm believers that old computers should not be sold, but rather re-purposed. It is not uncommon for a professional motion graphic artist to tie up 2 to 4 machines with their workflow. Here are some tips for multi-machine environments.

• Learn to preview your compositions at reduced quality. In other words, set the comp window to Full or Half Quality (depending on your comfort level), but perform RAM previews at Quarter Quality.
• Increase the RAM in your older machines until they are maxed out. AE eats RAM like potato chips.
• Build on all machines, but use your best machine as the render horse. While an iMac or old laptop may be great for building your animations, you’d be MUCH better off sending it over to a dual Xeon (or better yet a G5) to chew through that render.
Are you producing animations for multiple formats? Chances are likely that you’ll often need both a DV and a Standard Definition output. Simple enough right? Render twice.. . if you like wasting time that is. A better way is to use two output modules.

![]() Set your initial composition up at the larger size, such as 720 × 486.
Set your initial composition up at the larger size, such as 720 × 486.
![]() Add the comp to the render queue and set the Render Settings. For best results choose to Field Render with lower field first.
Add the comp to the render queue and set the Render Settings. For best results choose to Field Render with lower field first.
![]() Next, set your output module for the first video and choose the settings you need.
Next, set your output module for the first video and choose the settings you need.
![]() For the Digital Video render, add a second output module by choosing Composition> Add Output Module.
For the Digital Video render, add a second output module by choosing Composition> Add Output Module.
![]() Set this new output module for DV by choosing the QuickTime DV NTSC 48kHz setting.
Set this new output module for DV by choosing the QuickTime DV NTSC 48kHz setting.
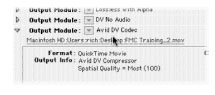
![]() In the second output module, the one for DV, we need to remove six lines of information. It is important to preserve field order. Click on the Output Module name to open its settings.
In the second output module, the one for DV, we need to remove six lines of information. It is important to preserve field order. Click on the Output Module name to open its settings.
![]() Check the Crop box and speclfy to crop 2 lines from the top and 4 from the bottom.
Check the Crop box and speclfy to crop 2 lines from the top and 4 from the bottom.
![]() Name both output modules, be sure to clearly identify the DV render with a unique name.
Name both output modules, be sure to clearly identify the DV render with a unique name.
![]() Close all open windows except for the render queue.
Close all open windows except for the render queue.
![]() Save your work.
Save your work.
![]() Click Render
Click Render
Ready to add a comp to your render queue? Simply press Command + Shift + / (control + Shift + /). To send it on its way. An easy way to think of this shortcuts it to 4 look at the keys involved, Shift plus / generates a question mark. So you can think of this tip as Command + QUEstion.. . pretty close to Queue.

Do you need to limit your render size so it can fit on a particular type of media? Say 640 MB so you can burn them to CD-R for delivery to your client? You can configure After Effects so movies automatically segment at a certain file size.

![]() You need to access your preferences menu. Choose After Effects > Preferences > Output (Edit > Preferences > Output).
You need to access your preferences menu. Choose After Effects > Preferences > Output (Edit > Preferences > Output).
![]() Check the Segment Movie Files At box and specify the desired size. For example use 640 MB for a standard CD-ROM and 4.3 GB for a DVD-ROM.
Check the Segment Movie Files At box and specify the desired size. For example use 640 MB for a standard CD-ROM and 4.3 GB for a DVD-ROM.
![]() Click OK.
Click OK.
Need to render an animation for multiple video systems? Perhaps you need to create a video file for use on older ABVB Avid systems (upper field first) and newer Meridienbased systems (lower field first). Field rendering is set in the Render Settings, not the Output module.

Solution #1: Render twice.
Solution #2: Add a second Output Module. For the upper field first movie, enter +1 in the Top field and -1 in the Bottom field.
nstead of running a blur or levels command on each layer of your composition, try applying it to all layers simultaneously. One effect can often render faster than 5 effects. The Adjustment layers work very well for global adjustments.

![]() Choose Layer > New > Adjustment Layer.
Choose Layer > New > Adjustment Layer.
![]() Apply any needed filter to the Adjustment Layer
Apply any needed filter to the Adjustment Layer
![]() All layers below will be affected.
All layers below will be affected.
![]() To modify the strength of the adjustment, you can change the Adjustment Layer's opacity and blend mode.
To modify the strength of the adjustment, you can change the Adjustment Layer's opacity and blend mode.
Oftentimes in the middle of a creative session, we get a little sloppy. We find ourselves dragging files in, dumping things on the desktop, or even reading right from a network. That's fine when you are sitting in front of the machine, but we prefer our renders to be autonomous. The best way to ensure a smooth render is to pull all files together into one folder.

![]() Choose File > Collect Files
Choose File > Collect Files
![]() Specify if you want files For All Comps, For Selected Comps, or only for Queued Comps.
Specify if you want files For All Comps, For Selected Comps, or only for Queued Comps.
![]() When ready, click Collect.
When ready, click Collect.
![]() The needed files will be copied to a new folder that you specify. The original files are still left behind.
The needed files will be copied to a new folder that you specify. The original files are still left behind.
![]() You can choose to leave the original files around (in case other projects or users need them) or manually erase them.
You can choose to leave the original files around (in case other projects or users need them) or manually erase them.
![]() To find stray files, you can also run the Collect Files Feature on the original project, but this time generate a report only.
To find stray files, you can also run the Collect Files Feature on the original project, but this time generate a report only.
Setting the Work Area is ve y important. It allows you to define what portion of your composition is loaded for RAM previews as well as define which portion to render. You can set the Work Area by dragging handles in the Timeline Window, however there is a more precise method.

![]() Position your Current Time Indicator at the beginning of the Work Area and press B (for Beginning).
Position your Current Time Indicator at the beginning of the Work Area and press B (for Beginning).
![]() Position your Current Time Indicator at the end of the Work Area and press N (for eNd).
Position your Current Time Indicator at the end of the Work Area and press N (for eNd).
Alternately, you can use your selected layers to define the Work Area. Simply press Cmd + Option + B (Ctrl + Alt + B) to set the Work Area to selection.
If we have several projects that we need to output, we’ll often create a ‘rendering’ project. This way we can set up one render queue and really leave our machines unattended for a while.

![]() Set up the individual projects as needed, including adding items to the render queue and specifying settings
Set up the individual projects as needed, including adding items to the render queue and specifying settings
![]() Create a new project and save it.
Create a new project and save it.
![]() Choose File > Import > File or press Cmd+I (Ctrl+I).
Choose File > Import > File or press Cmd+I (Ctrl+I).
![]() Select the projects you’d like to import and merge together.
Select the projects you’d like to import and merge together.
![]() Check the Render Queue and make sure all of the output paths are still valid.
Check the Render Queue and make sure all of the output paths are still valid.
![]() Save the Project
Save the Project
![]() Click Render and go enjoy the weekend or a night away from the office for a while.
Click Render and go enjoy the weekend or a night away from the office for a while.
After Effects 6 now supports scripts. One of those scripts can actually render a file then email you upon completion. If you’re a tech geek, the gears in your head are already spinning. Most pagers and cell phones can receive text messages via the Internet. Just think, the leash has been cut!

![]() Open up your General Preferences and be sure that the Allow Scripts to Write Files and Access Network box is checked.
Open up your General Preferences and be sure that the Allow Scripts to Write Files and Access Network box is checked.
![]() Add your files to the Render Queue like normal.
Add your files to the Render Queue like normal.
![]() Choose File > Run Script > render_and_email.jsx, you will now be prompted for your ernail settings.
Choose File > Run Script > render_and_email.jsx, you will now be prompted for your ernail settings.
![]() Enter server smtp address: such as mail.mac.com, click OK
Enter server smtp address: such as mail.mac.com, click OK
![]() Enter the reply to address: such as the email you want to use to send the message.
Enter the reply to address: such as the email you want to use to send the message.
![]() If your server required log-in (most do), click YES and enter your ID and password. Click Ok
If your server required log-in (most do), click YES and enter your ID and password. Click Ok
![]() Enter the recipients email address. Click OK
Enter the recipients email address. Click OK
![]() An email with the subject AE Render complete will be sent when the queue is finished.
An email with the subject AE Render complete will be sent when the queue is finished.
How cool is that?
You are happy with your animation and have successfully previewed it using RAM Preview. Now its time to send it over to the client or producer for approval. Time to go to the render queue right? Not so fast.. . you just rendered it. Save some time.

• You can create and save a RAM Preview simultaneously by pressing Cmd + 0 on the numeric keypad (Ctrl + 0 on numeric keypad).
• You can create and save a Shift RAM Preview simultaneously by pressing Cmd + Shift + 0 on the numeric keypad (Ctrl + Shift + 0 on numeric keypad).
After effects creates graphics using the full RGB spectrum of values. This can cause problems when they are brought into nonlinear editing systems. Some systems Wrn such as those made by Avid as you if you used RGB values when you import, this will systems however will not make this fix, so you can save render time on the Nonlinear properly compensate for the difference between RGB and W V color spaces. Most Editing side by getting your color right in AE.

![]() Create a new adjustment layer at the top of your layer stack by choosing Layer > New > Adjustment Layer.
Create a new adjustment layer at the top of your layer stack by choosing Layer > New > Adjustment Layer.
![]() Apply the Broadcast Safe Effect (Effect > Video > Broadcast Safe).
Apply the Broadcast Safe Effect (Effect > Video > Broadcast Safe).
![]() Specify your format of choice (NTSC or PAL) in the Broadcast Locale menu.
Specify your format of choice (NTSC or PAL) in the Broadcast Locale menu.
![]() Adjust the Maximum Signal sliders to set the IRE level at which pixels above will be altered. The range is between 100 to 120 IRE. A level of 100 can cause noticeable color shift while a level of 120 is often considered risky. The default value of 110 IRE units is usually the best choice.
Adjust the Maximum Signal sliders to set the IRE level at which pixels above will be altered. The range is between 100 to 120 IRE. A level of 100 can cause noticeable color shift while a level of 120 is often considered risky. The default value of 110 IRE units is usually the best choice.

Once you get into things, you may want to be mobile. Keep your media in one folder on a portable drive. Here’s a real-world situation and advice from an experienced After Effect artist.
“If I have ten section titles all based on the same basic layout, I will build the first four,” said Rich Rubasch of Tilt Media. He then copies the project to another machine and starts it rendering. Then he returns to the original computer and “finishes the builds on the first system.)
By remembering to use multiple machines, an AE artist can speed up their render workflow.
Need to render your file so you can composite it in another application such as an editing application? Be sure to choose a codec (compressor decompressor) that supports embedded alpha channels. Many users will prefer the animation codec as it provides a good balance of quality to size.

![]() Click on the Output Module in the Render Queue
Click on the Output Module in the Render Queue
![]() Choose Animation codec by clicking on the Format Options button and selecting it from the next window.
Choose Animation codec by clicking on the Format Options button and selecting it from the next window.
![]() While there specify Millions + colors. Click OK.
While there specify Millions + colors. Click OK.
![]() The Channels menu should now say RGB + ALPHA and depth set to Millions of Colors +. If not, adjust them so they are properly set.
The Channels menu should now say RGB + ALPHA and depth set to Millions of Colors +. If not, adjust them so they are properly set.
![]() Your animation is likely pre-multiplied against Black so change it to set the color to Straight (Unmatted).
Your animation is likely pre-multiplied against Black so change it to set the color to Straight (Unmatted).
![]() Click OK and Render when ready.
Click OK and Render when ready.
For one reason or another, it always happens, the need to rerender. Perhaps a small tweak to a keyframe or a timing issue. Chances are while your animation may have needed refining, the render queue was perfect. Save yourself some time and Re-Queue that animation.
![]() Select a previously rendered animation.
Select a previously rendered animation.
![]() Press Command + Shift + D (Control + Shift + D) to duplicate the render item with the same settings and output name. This will rewrite over the previous file to the exact same destination.
Press Command + Shift + D (Control + Shift + D) to duplicate the render item with the same settings and output name. This will rewrite over the previous file to the exact same destination.
![]() Save your work, then click Render when ready to output.
Save your work, then click Render when ready to output.
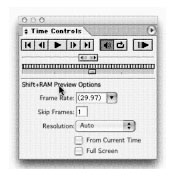
By now you’ve probably noticed that the importance of RAM previews. There is the standard one which you normally see in the Time Control Window and can be invoked by pressing 0 on the numeric keypad.
The other RAM Preview controls can be accessed by click on the words “RAM Preview Options.” This preview is usually a lower quality method, but can be configured to the user’s preference. To launch this alternate preview, Shift + click on the Preview button or press Shift + 0 on the numeric keypad.
Want to speed up your render times? Try pre-rendering backgrounds and other elements in a complex composition? You can of course turn to the Lossless Animation codec, but better options exist.

Theory, LLC offers two products that do the trick well.
• QuickTime NONE16 codec is freeware. The obvious benefit is cost, but you do not get the benefits of support. The file produces excellent quality when rendering out 16 bit files.
• If you want to move up a level, check out the affordable Microcosm codec. Microcosm is the world’s first lossless 64bit QuickTime codec for creating 64-bit or 32-bit files at a fraction of their original size.
For more information on both Microcosm and NONE16, check out www.digitalanarchy.com.
Part of render speed is determined by how quickly your source files can be accessed. Trying to read media files from a network or an optical drive can significantly impact render times. For best results, copy all source files to the local machine. You should always try to run media from internal drives or s high-speed disk array.

Want to create a QuickTime Movie that can be keyed through an alpha channel? It’s very do-able if you know what options to pick.
![]() Determine if your codec supports embedded alpha channels. Many uncompressed or low compression formats do. If you are using DV however, you must choose Animation.
Determine if your codec supports embedded alpha channels. Many uncompressed or low compression formats do. If you are using DV however, you must choose Animation.
![]() Be sure to choose RGB + Alpha in the Output dialog box if it is an option.
Be sure to choose RGB + Alpha in the Output dialog box if it is an option.
![]() Specify Millions of Colors + if you want to embed an alpha as well.
Specify Millions of Colors + if you want to embed an alpha as well.
Render out your file or Export. As long as you have chosen a proper codec and specified to include the alpha, you will get great results when keying your graphic.
A Codec is a Compressor/Decompressor that allows you to write an animation file to a smaller size that can then be read (without conversion) into a nonlinear editing system. Many designers are confused about WHAT codec to use when rendering from their AE timeline. There are several things to consider when outputting your file.
![]() Always check with the editor or producer who is going to be using the file to find out specifics about the edit system to be used.. Be sure to get version numbers as codecs will often change depending upon which version of the editing software is in place.
Always check with the editor or producer who is going to be using the file to find out specifics about the edit system to be used.. Be sure to get version numbers as codecs will often change depending upon which version of the editing software is in place.
![]() Most NLE manufacturers post codecs and render specs on their websites. Look in their support or download section for details,
Most NLE manufacturers post codecs and render specs on their websites. Look in their support or download section for details,
![]() A detailed and helpful website for information about using After Effects and Avid Editing systems is www.wesplate.com. Wes is the creator of Automatic Duck (www.automaticduck.com), a helpful utility for moving Avid and Final Cut Pro timelines into After Effects.
A detailed and helpful website for information about using After Effects and Avid Editing systems is www.wesplate.com. Wes is the creator of Automatic Duck (www.automaticduck.com), a helpful utility for moving Avid and Final Cut Pro timelines into After Effects.
![]() When in doubt, use the Lossless setting. This will use the Animation codec, an incredibly high-quality codec that is universal. File sizes will be larger (and you will have to convert upon import or in the timeline) but they file is ‘universal.’
When in doubt, use the Lossless setting. This will use the Animation codec, an incredibly high-quality codec that is universal. File sizes will be larger (and you will have to convert upon import or in the timeline) but they file is ‘universal.’
After Effects can output several specialized formats, however you won't find them in the render queue. Instead, check File>Export for several specialized formats. Some options (like the FLV exporter) require you to have optional software installed. Here's a list of some that you may encounter:

| Adobe Motion Exchange (.amx) for LM2 | Allows you to save data out for use in a LiveMotion project. |
| Live Motion is SWF authoring tool from Adobe that supports | |
| advanced animation. | |
| Macromedia Flash (SWF) | This will write a standard Macromedia SWF file in the Flash 5 |
| format. | |
| AlFF | An audio only format used mostly by Macintosh machines |
| AVI | A'well established' windows video format |
| DV Stream | A raw stream of Digital Video. |
| Image Sequence | A series of still graphics for each frame of the comp. Useful for |
| sending files when the output codec is questionable. | |
| Macromedia Flash Video (FLV) | If you have Flash MX 2004 Professional installed, you can write a |
| compressed video format that works well for Flash authoring. | |
| MPEG-4 | A compressed file format for web delivery. It is usually better to |
| render a QuickTime first, then compress | |
| QuickTime Movie | Use the Render Queue instead |
| Wave | An audio only format used mostly by Windows machines |
| μ Law | An audio only format |
Need to find a file after you rendered it? No problem, just flip the triangle down next to Output Module in the Render Queue. For all completed renders, you should see a drive name and the file listed. Click on the blue link and it will reveal the file for you at the Finder (desktop) level.
Normally when you click Stop on an item in the render queue, it adds it to the bottom of the list and will pick up where it left off. That may be what you want, but often you intended to bust the render, tweak it, and re-render. To stop a render and re-queue it to begin at the beginning, hold down the Option (Alt) key when clicking Stop Render. This will avoid the pickup and add the item to be re-rendered from the start of the original output settings.

After Effects offers you a powerful feature called Post-Render Actions. These allow youto choose from a list of pre-defined actions that you'd like to happen after the file is rendered.

![]() Choose Composition>Pre-render or flip down the triangle next to the Output Module of an existing item in the render queue.
Choose Composition>Pre-render or flip down the triangle next to the Output Module of an existing item in the render queue.
![]() Choose one of the following Post-Render Actions
Choose one of the following Post-Render Actions
• None - Does Nothing (the default)
• Import - Adds the rendered file into the project window when rendering is complete
• Import & Replace Usage - Imports the file into the project and replaces usage for specified items. You determine which files will be replaced via the pickwhip. We find this most useful to replace precompositions that appear in multiple comps (such as the motion background in a group of show bumpers).
• Set Proxy - Allows you to use the rendered file as a proxy for a specified project item (again use the pickwhip). This will speed up previews. For more on proxies, be sure to look at Chapter 11.
After Effects 6.5 Pro adds some REALLY cool software as far as networked rendering goes. We’ve only just begun to play with the new X-Factor developed by GridIron Software. But its results are impressive. It allows you to gang up to 3 machines together to tackle a tough render. It even allows you to gang machines up for preview purposes.
Few things to keep in mind:

• We’ve seen results nearly three-times faster by using three comparable machines.
• The software is well documented and easy to set-up. It uses a peer-to-peer approach with no administration, configuration, or management needed,
• You can buy more licenses if you want to go beyond the three machine limit.
• On a Mac, you must install XLR8 must be installon the same hard drive as After Effects.
• Don’t have footage items with the same filename. Even if they reside in different directories, it wil cause problems when rendering.
• You can even take a few older machines and add to your render station. Just get the machines configured and then leave them waiting to help.
• You’ll get better results using Ethernet networks rather than wireless, but both work.
• Be sure to check out Adobe’s help documentation as well as GridIron Software for more information (www.gridironsoftware.com).
My wife, Meghan, for her patience, love, and commitment. As we welcome our first child into the world, I am grateful you are by my side.
My family for their support and guidance. All that I have, I owe to you. Thanks for all of the good advice and teaching throughout the years.
My coauthors, Marcus and Rachel. Thanks for saying “yes” to this idea. Your insight and knowledge have made this a much better book.
-Richard Hawington
Thanks to the strong and supportive AE community, especially Trish and Chris Meyer. Thanks Rich and Marcus for having me be part of this book. And thanks to my friends and family.
-Rachel Max
My best friend and wife, Lisa, who suffers through all my geeky pursuits with grace, humor and intelligence.
My parents, who gave me these After-Effects-loving genes, and who raised me in a house so full of wonders that my mind was continually open. To my brother Daniel, for “sound” advice and long, patient, very helpful emails.
To Rich and Rachel, for sharing my obsession.
--Marcus Geduld
The authors would like to thank the following for making this book possible:
| George Annab | DVPA | Mac Design Magazine |
| Frank Brogan | Dan Ebberts | Trish & Chris Meye |
| Kay Christy | The Foundry | NAPP |
| Dorothy Cox | Future Media Concepts | Jason Paruta |
| The Creative Cow community | Rod Harlan | Paul Temrne |
| Zax Dow | Scott Kelby; | Total Training |
| DV Magazine | Ben Kozuch | Jim Tierney |