
So you want to be fast? Concert pianists don’t use a mouse to pick one note at a time from a menu; their hands flow across the keys. Don’t think of After Effects as a tool; think of it as a creative extension.
Mastering the interface will keep you from stumbling in the dark, hitting the wrong keys, and malting a lot of noise. You have to know what all your tools do,where to find them, and how to access their power instantly.
Over time, you’ll gain confidence with all the controls. You want to be able to make the interface “disappear,” which will allow you to reach “inside” the computer and create. Great designers know that the more brainpower they can put toward their graphics (not graphic system), the better the results.
Although learning an interface may not be as “fun” or “sexy” as a good effect, it’s infinitely more important. Don’t skimp on learning AE’s interface–after all, you paid good money for a Baby Grand, so learn to play it well.

When doing complex effects or color correction, it is often important to check the channel view of your footage. You can do this by clicking on the small strips of red, green, blue, or white (for the alpha) at the bottom of the comp window. These views can also be toggled from the keyboard. Press the following keys to switch between channel views:
| To show the red channel | Option+l (Alt+l) | |
| To show the green channel | Option+2 (Alt+2) | |
| To show the blue channel | Option+3 (Alt+3) | |
| To show the alpha channel | Option+4 (Alt+4) | |
| To toggle back, press the same keyboard shortcut again. | ||

Looking for a quick way to compare multiple frames within (or even between) your compositions? Instead of jumping around and waiting for AE to reload the frame, take a snapshot. After Effects supports a view of up to Four Snapshots.

![]() To Take a Snapshot, press Shift+F5, F6, F7, or F8. You can use any of these F keys (or even all of them) as a frame buffer.
To Take a Snapshot, press Shift+F5, F6, F7, or F8. You can use any of these F keys (or even all of them) as a frame buffer.
![]() To view the Snapshot, just hold down F5, F6, F7, or F8 and it will load in the viewer as long as the key is depressed.
To view the Snapshot, just hold down F5, F6, F7, or F8 and it will load in the viewer as long as the key is depressed.
Need access to your tools? To change tools on the fly without clicking (or even seeing) the Tools Palette, try these shortcuts:
| V | Selection Tool | |
| W | Rotation Tool | |
| C | Toggles between Orbit Camera, Track XY Camera and Track Z Camera Tools | |
| H | Hand Tool | |
| Z | Zoom Tool | |
| Y | Pan Behind Tool (Also works as Trim) | |
| Ctrl+B | Cycles between Brush, Clone Stamp, and Eraser Tools | |
| Cmd+B | ||
| Q | Cycles between Rectangular and Elliptical Mask Tool | |
| Cmd+T | Cycles between Horizontal and Vertical Type Tools | |
| Ctrl+T | ||
| G | Cycles between Pen, Add Vertex, Delete Vertex and Convert Vertex Tools | |

Before rendering, it’s important to ensure you are in best quality mode for each layer.On the other hand, draft mode is useful for speeding up previews. Looking for a quick way to flip a layer’s quality switch from draft to full?
• Cmd+U (Ctrl+U) to switch selected layers to Best Quality.
• Cmd+Shift+U (Ctrl+Shift+U) to switch selected layers to Draft Quality.

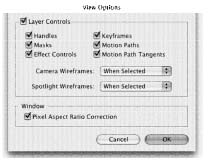
Is your comp window showing the controls you need? If not, bring the Comp View Options up. Go to the Comp Window and click on the triangular submenu or press Cmd+Option+U (Ctrl+Alt+U). Once there, you can modify several options including:
• Layer Controls visibility.
• Camera & Spotlight wire frames.
• Pixel Aspect Ratio correction.
By default, After Effects presents you with a black background in the comp window. While this is often useful, it may not work in all situations. Sometimes a contrasting background color may be needed when adjusting shadows or dark tones. Choose Composition>Background Color or press Cmd+Shift+B (Ctrl+Shift+B) to pick a new color. This color is temporary, and is not included in the render. It will be replaced with black when the comp is rendered.

Lowering the resolution of the Comp window can dramatically speed up previews. For example, switching from Full Resolution to Half Resolution speeds up previews four times (as it reduces both the width and height in half). In fact, previewing at half quality with the comp window set to 50 percent often provides a perfectly acceptable preview. To switch preview resolution quickly, use the following shortcuts.
| For Full Resolution | Cmd+J (Ctrl+J) | |
| For Half Resolution | Cmd+Shift+J (Ctrl+Shift+J) | |
| For Quarter Resolution | Cmd+Option+Shift+J (Ctrl+Alt+Shift+J) | |

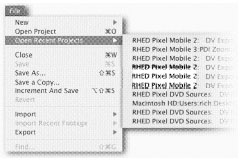
When you launch After Effects, it can be a little lonely. You can quickly get back to the last project that you worked on. By default, After Effects tracks the last ten projects you’ve worked on. Simply go to File>Open Recent Projects, and pick. Or, if you want to go back to the last project you worked on, just press Cmd+Option+Shift+P (Ctrl+Alt+Shift+P).
If you are a Photoshop user, you might be more comfortable working with a transparency grid instead of a colored background. In the submenu of the Composition window, choose Transparency Grid to set the comp window to transparent. When you render the file, After Effects will fill the transparency with black.
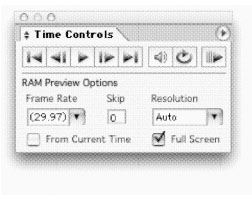
Want to take your RAM previews full screen? By clicking the Full Screen box in the Time Controls Window, After Effects will do just that. When the RAM Preview is started, the screen goes black and the preview is loaded. Press the spacebar to start the preview mid-load. To exit, press the ESC key.
Have a few too many toolboxes open? Don’t worry. You can quickly hide all floating toolboxes by pressing the Tab key. If you’d like to get rid of all floaters except the Tools palette, press Shift+Tab. This shortcut works in most other Adobe applications as well.

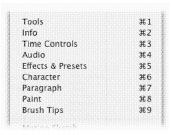
There are several floating palettes in After Effects, more than you'll usually want to deal with at once. To access the palettes, go to the Window menu or press the following shortcuts.
| Cmd/Ctrl 1 | Show/Hide Tools | |
| Cmd/Ctrl2 | Show/Hide Info | |
| Cmd/Ctrl3 | Show/HideTime Panel | |
| Cmd/Ctrl4 | Show/Hide Audio | |
| Cmd/Ctrl5 | Show/Hide Effects and Presets Palette | |
| Cmd/Ctrl6 | Show/Hide Character Palette | |
| Cmd/Ctrl7 | Show/Hide Paragraph Palette | |
| Cmd/Ctrl8 | Show/Hide Paint Palette | |
| Cmd/Ctrl9 | Show/Hide Brush Tips Palette | |
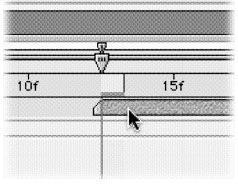
What we were thinking is that it would be pretty convenient to have dragged items snap to marks. By holding down the Shift key, your dragged item's in-point will snap to the current time indicator, markers, in- and out-points, and visible key frames. If you want to snap the out-point, hold down the Option (Alt) key.
Grids can be useful when laying out your design freehand. To turn grids on, choose View>Grid or press Cmd+’ [Single Quote] (Ctrl+’). Even more useful is the ability to turn on Snapping to the grid by pressing Cmd+Shift+’ [Single Quote] (Ctrl+Shift+’). To adjust grid options, go to the preference menu and set frequency. (You have to have the Composition Window selected to use grids. Command+‘ toggles between the Composition Window and the Timeline. Command+Shift+‘ toggles between the Project Window and Comp Window.)
Rulers are useful for checking the position of elements in your composition. Choose View>Show Rulers or Press Cmd+R (Ctrl+R) to bring them out. Once they’re out, rulers can unlock a lot of useful features.
• You can adjust the rulers’ center point by clicking in the upper left corner of the comp window. Click and drag to reposition the rulers.
• You can drag guides from the rulers for use in your composition.
• You can turn Snapping on for guides, by pressing Cmd+Shift+; [semicolon] (Ctrl+Shift+;).
• To toggle guide visibility, press Cmd+; [semicolon] (Ctrl+;).
• To lock guides in place, press Cmd+Option+Shift+; [semicolon] (Ctrl+Alt+Shift+;).

Need to toggle visibility on a layer? You can quickly turn a layer on or off by pressing Cmd+Option+Shift+V (Ctrl+Alt+Shift+V). While that shortcut is pretty long, it is related to another. Pressing Cmd+Shift+V (Ctrl+Shift+V) will turn the visibility of all BUT the selected tracks off.

Perhaps you’ve noticed how many input controls offer the ability to scrub, that is, to drag left and right on a property’s name to adjust it numerically. If you’re looking for greater control, however, try these two modifier keys when scrubbing.
| Command (Control) | Scrub at a slower speed when adjusting values | |
| Shift | Change scrubbing at a higher value | |

Looking for a fast way to get your windows back in shape? Maybe you’ve lost a window off-screen as well? Not a problem. To return to the default layout, simply choose Window>Workspace>One Comp view.

You’ve configured your windows perfectly. Every palette and the time controls are exactly where you want them. The timeline has just enough room. Now save that window arrangement.
![]() Choose Window>Workspace> Save Workspace.
Choose Window>Workspace> Save Workspace.
![]() Name the workspace and click OK.
Name the workspace and click OK.
![]() It now appears at the top of your Workspace list.
It now appears at the top of your Workspace list.
• After modifying a workspace, save it again with the identical name, and when prompted, choose Yes to overwrite the old workspace.
• Workspaces are saved in, and become part of your user settings when you quit After Effects.
• To delete a workspace choose Window>Workspace>Delete Workspace.

Are the tabs in the comp window or timeline annoying? Double click on the thin bar below the title bar, and the tabs will go away. This is also a good way to eke out a little more space when working on a laptop.

When working on a small screen or laptop, the time controls are big. If you don’t plan to change the preview options, click the up arrow next to the phrase ‘Time Controls’ to reclaim a good deal of screen space. When you need the extra controls back, click the down arrow or the Time Controls palette submenu.
If you decide to reclaim even more screen space, close the Time Controls palette entirely, and invoke a RAM preview by pressing 0 on the numeric keypad.

Need to pan around the comp window or timeline? Activate the hand tool by pressing the spacebar. This is a temporary switch. Adjust the viewed portion on the timeline or comp window, then release the spacebar.

The Info Palette is a hidden gem. To leave it open all the time, which we recommend, choose Window>Info or press Cmd+2 (Ctrl+2). Then, when you apply an effect, take a gander at it. Many effects print helpful information in the Info Palette. For instance, Particle Playground lists the current number of particles on the screen, and the 3D Channel effects list Z-depth information about any pixel you click. The only caveat is that you must bring up the Info Palette before applying the effect. If you bring it up after, you won’t see the effect’s info.

Where Did That Palette Come From?
Helper palettes should pop up when you click on the Type Tool, the Brush Tool, the Eraser Tool or the Clone Stamp Tool. When you click m e Tool, AE should automatically bring up the Character and Paragraph Palettes; when you click any of the brush tools (Brush, Eraser or Clone Stamp), AE bring up the Paint and Brush Tips palattes
If you don’t see palettes automatically popping up but want them to do so, select a tool and check the Auto Open Palettes option at the bottom of the Tools palette, which you’ll see only when the Text, Brush, Eraser or Clone Stamp tool is selected).
If you’d rather not be surprised by pop-up palettes, uncheck the Auto Open Palettes option. You can manually summon the helper palettes by clicking the palette icon in the bottom-left corner of the Tools palette.

Those darn Effects categories! Where is Change Color, anyway? Adjust, Image Control? Stylize? Next time you’re searching for an effect, don’t click the Effect Menu and search through the categories. Instead, choose Window>Effects, or press Cmd+5 (Ctrl+5). A handy effects search engine will pop up.
In the text box at the top, start to type the name of the effect you want. If you type D, the window will list all effect names that contain the letter D. If you type Displace, the window will list Displacement Map, Turbulent Displace and Time Displacement. To apply an effect to the selected layer, double-click its name. Or, drag the effect from the Effect window and drop it on any layer in the Timeline or Comp Window.

Wouldn’t it be nice to focus only on what you care about? You can do just that in the AE world. Why preview the entire comp window when it is much faster to look only at the part of your composition that interests you. Here’s how.
Enable the Region of Interest by clicking on the small icon next to the resolution menu in the comp window.
Drag out the area you’d like to see.
When starting a preview, only the highlighted area is seen.
To exit, click on the Region of Interest icon again.
Using Region of Interest has no impact on your rendered file.

Most compositing Applications, such as Shake and Combustion, ship with the interface set to 50% gray. This makes it easier to make complex judgments about color and contrast. After Effects 6.5 now gives you the ability to adjust the brightness of windows and palette backgrounds.
![]() Choose Adobe After Effects>Preferences>User Interface Colors (Edit>Preferences>User Interface)
Choose Adobe After Effects>Preferences>User Interface Colors (Edit>Preferences>User Interface)
![]() Adjust the User Interface Brightness slider to adjust brightness.
Adjust the User Interface Brightness slider to adjust brightness.

Using a RAM preview in After Effects is great as it’s a quick way to preview your work. Great that is until you run out of RAM! In After Effects 6, when you run out of RAM, AE must purge frames from the buffer.
After Effects 6.5 changes this though and helps speed up your workflow. Now when the RAM cache gets full, frames are cached to your hard drive. Don’t worry though, you can set a cache limit and the cache is emptied when you quit AE.
To set up disk caching:
![]() Choose After Effects>Preferences>Memory & Cache (Edit>Preferences>Memory & Cache)
Choose After Effects>Preferences>Memory & Cache (Edit>Preferences>Memory & Cache)
![]() Check the checkbox to Enable Disk Cache.
Check the checkbox to Enable Disk Cache.
![]() The Choose Folder dialog box automatically opens and you need to specify where to write the cache. For best results place the frames on a local drive, but if possible, not the same drive as your source footage.
The Choose Folder dialog box automatically opens and you need to specify where to write the cache. For best results place the frames on a local drive, but if possible, not the same drive as your source footage.
![]() Specify an amount for Maximum Disk Cache Size in megabytes (the default is 2000 MB)
Specify an amount for Maximum Disk Cache Size in megabytes (the default is 2000 MB)

Mac users previously had the ability to preview their AE comps over Firewire or a video card. Now, with the release of AE 6.5, PC users can too! Plus Adobe has enhanced the ability of the preview all around. It is possible to preview the contents of a Layer, Footage, or Composition window on an external video monitor.
You can set Video Preview preferences by choosing After Effects>Preferences>Video Preview (Edit>Preferences>Video Preview). Choose one or more of the following interaction types.
• Previews: Both RAM preview and standard (spacebar) preview load on the external monitor. Choose Mirror on Computer Monitor to if you want to see the preview simultaneously on the computer screen and the external monitor, however mirroring reduces performance.
• Interactions: Interactive previews such as scrubbing and dragging in the Composition window on the external monitor. Interactive previews are always mirrored.
• Renders: Each frame is shown the external monitor during a render. All renders are also mirrored.
You can toggle video output by pressing forward slash “/” on the numeric keypad. This is a great way to turn this handy feature on and off.
