
In Chapter 2, Preparing a Test Environment, you created the pfSense virtual machine, so now we will configure it. Start up the virtual machine. Press I to proceed with installation. Use the following settings, in sequence where appropriate, when prompted:
- Accept these Settings
- Quick/Easy Install
- OK
- Standard Kernel
- Reboot
Once the machine reboots, you will be presented a screen of the possible options for the configuration of the machine. You should see that the machine has been configured with the two interfaces, one (NAT) is set via DHCP, and the other has been set by the installer as 192.168.1.1. An example of this is shown in the following image:

This shows that the internal interface is set at the wrong address and is not what we want since we configured the switch for our inside network to be connected to VMnet9. We will correct this now.
Before we can begin, we need to set up the built-in DHCP server so that our other machines can pick up addresses on the VMnet9 interface without having to be manually configured. Using the pfSense to manage the DHCP connections provides us with more control than if we simply use the built-in functionality of the virtualization tool.
- At the Enter the number of the interface you wish to configure: prompt, we need to type 2 to choose the LAN interface, and press Enter.
- Type the following IP address when prompted:
192.168.175.5and press Enter. - At the Enter the new LAN IPv4 subnet bit count prompt, type
24and press Enter. - On the next screen, accept the default and press Enter. We are setting up a LAN and as such do not have a requirement for an upstream gateway address.
- We are not using IPv6, so press Enter again.
- Type Y at the prompt when asked if you would like to enable the DHCP server on LAN. Press Enter to continue.
- When asked to provide the starting address range, type:
192.168.75.10and press Enter. - You will be asked to select the ending DHCP range. Type
192.168.75.50and press Enter. - The next screen will ask you if you want to revert to HTTP as the webConfigurator protocol. Select N and press Enter.
The changes will be saved to the machine and the configuration will be reloaded; for an example of the final installation message, refer to the following image:

As the image shows, we can now access the firewall configuration via a web browser. When we configured the settings, we could have selected the HTTP protocol if that was something we would want to do. In the name of security, it is best and recommended to use HTTPS.
The systems should be booted in the following order every time you load up your testing network:
- pfSenseVLAN1
- Kali
- KioptrixVM Level 3
- KioptrixVM Level 3 Clone
- Ubuntu_TestMachine_1
Tip
Remember that in Kali or Ubuntu, you can use the
dhclientcommand-line command at any time to release and renew the IP addresses. Check the addresses usingifconfigafterwards to ensure that the DHCP server is working properly.If you are experiencing issues with the machine picking up IPs from the wrong DHCP server, you will also need to turn off the VMware DHCP servers we enabled in the previous chapters.
We can now log in to the web console of our virtual pfSense firewall to set up static IPs for the two Kioptrix machines.
Open up the Iceweasel web browser that comes preinstalled in Kali and head over to http://192.168.175.5, which is the web console interface for the pfSense virtual machine. You are using the HTTPS protocol and will have to accept then confirm, allowing the connection. If everything is configured properly, you will be asked for your username and password:
- Username:
admin - Password:
pfsense
Once you log in, you will have the configuration wizard for pfSense prompt; click on the logo, and close out of the wizard to bring up the main dashboard. An example of this is shown in the following image:

As the image shows, at the time of this writing, there was an update available. If you have an update available, and you have the time, you can update the firewall.
The pfSense dashboard provides a significant amount of data. For now, we are focused only on setting up the load balancing. Follow these steps to allow pfSense to load balance the web application for the two Kioptrix guest machines:
- First, we need to know which MAC addresses belong to each Kioptrix machine so that we can set up static leases. This can be accomplished by checking the VMware settings for each box and looking at the virtual machine settings. To access this, click on Edit virtual machine settings | Network Adapter | Advanced. An example of this is shown in the following image:

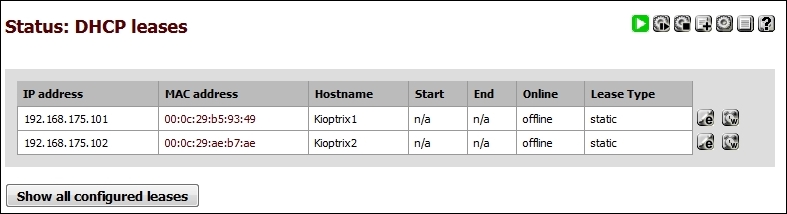
- In the pfSense web console, click on Status | DHCP Leases for a listing of current leases. Match the IP up to the MAC address for each Kioptrix machine.
- Set up static IP address assignments for both machines, using the button to the right of the entry to open the static assignment window:

- In the Services:DHCP:Edit static mapping window, you will need to type in an IP address that is outside of the DHCP range. This will ensure that each time the machine connects, it receives the same IP address. Type
192.168.175.102in the IP address field. - Enter Kioptrix2 in the Hostname.
- Do the same thing for the Kioptrix1 machine, and enter an address of
192.168.175.101. - Click on Save at the end of each change.
An example of the completed settings is shown in the following image:
To practice detecting load balancers, we will need to set one up in our virtual lab. We can use our existing Ubuntu machine for this task. The first thing we have to do is install HAProxy. In a terminal window on the Ubuntu machine, enter the following:
apt-get install HAProxy
After the installation has completed, you should have a working program, but we have some more configuration to do:
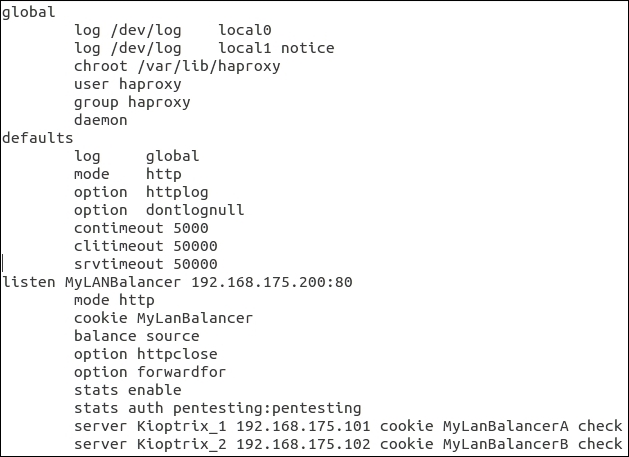
- We need to edit the configuration file to set up a load balancer for our two Kioptrix machines. Open up a terminal session and edit the
/etc/haproxy/haproxy.cfgfile. Remember to escalate privilege withsudofor write access. Remove all other.cfgfiles from this directory afterwards:# sudo nano /etc/haproxy/haproxy.cfgYour file should match the following before saving and exiting:
- Our Ubuntu machine already has a web server running, so we must disable it for this exercise to work properly:
# sudo /etc/init.d/apache2 stop - It is time to start up the load balancer:
# sudo haproxy -f /etc/haproxy/haproxy.cfg
If everything is configured properly, you will find that you can now browse to your Kioptrix machines using the IP address 192.168.75.200. An example of this is shown in the following image:

Let's add Kioptrix3.com to our hosts file on Kali and try our luck at detecting which machine is being accessed. In your Kali terminal, change directory to /etc, open up the hosts file in an editor of your choice, and add the following to the file:
192.168.175.200 kioptrix3.com
Verify connectivity by pinging kioptrix3.com:
# ping kioptrix3.com
  PING kioptrix3.com (192.168.75.200) 56(84) bytes of data.
  64 bytes from kioptrix3.com (192.168.75.200): icmp_seq=1 ttl=64 time=0.981 ms
Tip
If you are having problems reaching the machine, ensure the default gateway is pointing to the pfSense firewall; it is a common mistake to have the default gateway configured to the wrong address. This is because the NAT interface is connected to the Internet. You can change the default gateway in the VMware Workstation by navigating to Edit | Virtual Network Editor | VMnet8 | NAT Settings.