
The type and scope of the penetration test will determine the need for being stealthy during a penetration test. The reasons to avoid detection while testing are varied; one of the benefits would include testing the equipment that is supposedly protecting the network; another could be that your client would like to know just how long it would take the Information Technology team to respond to a targeted attack on the environment. Not only will you need to be wary of the administrators and other observers on the target network, you will also need to understand the automated methods of detection such as web applications, networks, and host-based IDSs that are in place to avoid triggering alerts.
Tip
When presented with a particularly opportune target, take the time to validate that it is not some sort of honeypot that has been set up to trigger alerts when abnormal traffic or activity is detected! No sense in walking into a trap set by a clever administrator. Note that, if you do find a system like this, it is still very important to ensure that it is set up properly and not inadvertently allowing access to critical internal assets due to a configuration error!
In this chapter, we will review the following:
- Pentesting firewalled environments
- Sliding in under the IDS
- Setting up shop internally
- Reviewing network traffic
- Using standard credentials
- Cleaning up compromised systems
To follow along with the examples in this chapter, a bit of lab preparation will be necessary.
Tip
Throughout this book, there has been a strong focus on being able to emulate a target network. This is critical to being able to learn and practice the latest and greatest techniques as the excellent minds in the security research field continue to surprise us with new vulnerabilities and possible attack vectors. This book cannot cover every possible method of testing a network, but building the labs is an attempt at adding long-lasting value that will hopefully lead to a lifetime of the "hacker mentality." If you continue to build your personal lab and increase the difficulty of the practice challenges that you set for yourself, you will quickly become comfortable with testing any sort of environment.
An example of the machines we'll be using is shown in the following figure:

We have to make a number of configuration changes in preparing for the exercises.
This machine will need to be connected to the 192.168.75.0/24 subnet. Ensure that only one network adapter is enabled. The adapter should use the VMnet8 NAT network option. An example of this is shown in the following screenshot:

We can assign the IP address (192.168.75.10, in this case) to an Ethernet adapter (eth0) from within Kali by typing the following command into a terminal:
# ifconfig eth0 192.168.75.20 netmask 255.255.255.0 broadcast 192.168.75.255 promisc
As the pfSense machine will need to be our router as well, we need to set it up as the default gateway. This can be accomplished as follows:
# route add default gw 192.168.75.10
The Ubuntu machine will be used as the target. It needs to be configured to connect to VMnet3, which is a new internal network we have not used before. Your settings should be similar to the following:

Configuring our firewall involves a bit more work. It needs to be able to route restrictive traffic from the VMnet8 (NAT) network to the VMnet3 subnet. There are several configuration changes we will need to make to ensure this works properly.
Tip
pfSense offers the option to reset to factory defaults from the configurations menu. Be aware that the adapters will have to be reconfigured if this option is chosen. This is not difficult, but all previous settings will be lost. Be sure to make a copy/snapshot of your pfSense machine if you are concerned about losing the previous configuration.
Our firewall guest machine will use two network adapters. One will be used for the VMnet8 (NAT) segment and the other for the VMnet3 segment. VMnet8 (NAT) will be treated as an untrusted wide area network for the examples within this chapter. An example of this is shown in the following screenshot:

The remaining networking setup will need to be performed from within the guest machine:
- Boot up your pfSense virtual instance. There may be an additional delay as pfSense attempts to configure the WAN adapter. Allow it to fully load until you see the following menu:

- The WAN and LAN interfaces will need to be configured properly. Select option 2) Set interface(s) IP address.

- Select option 1 – WAN (em0 - dhcp, dhcp6).
- When asked to configure the WAN interface via DHCP press N for no.
- The IP for the WAN adapter should be
192.168.75.10. - Subnet bit count should be set to 24. Type
24and press Enter. - Press Enter to return to the configuration menu.
- Press N as required to the prompts for configuring IPv6; we are not using it in our architecture.
- After the IPv6 configuration, press N to revert to HTTP.
An example of these settings is shown in the following screenshot:

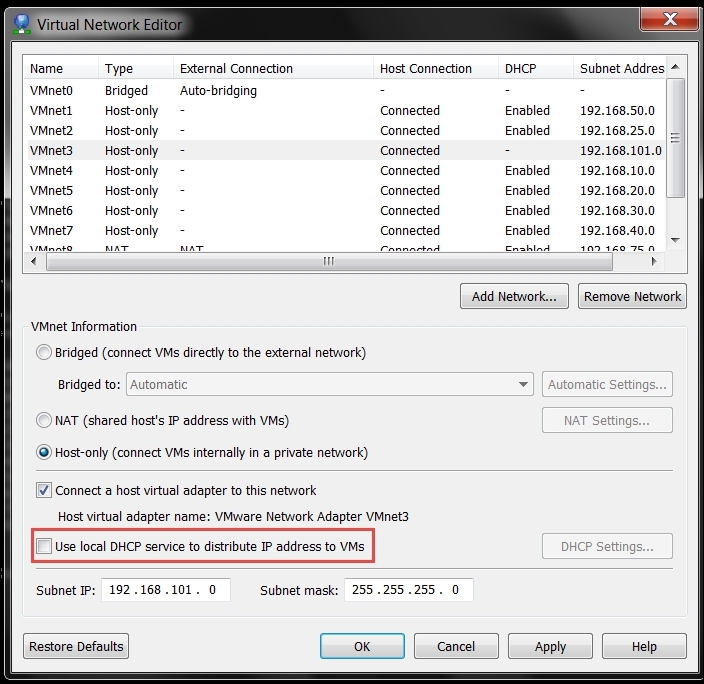
After the configuration has been completed, press Enter to continue. This will return you to the main menu. The next thing we want to do is disable the VMware DHCP server that is connected to our VMnet3 switch; we are doing this because we want to use the DHCP server on pfSense. To disable the VMware DHCP server, in VMware Workstation, click on Edit | Virtual Network Editor | VMnet3 and remove the check mark in the DHCP section. As a reference, refer to the following screenshot:
We can set up the LAN IP information from the configuration menu as well. One benefit of configuring the LAN here is that we can have a DHCP server configured for VMnet3 at the same time.
- Select option
2from the configuration menu to start the LAN IP configuration module. - Choose the LAN interface (option
2). - When prompted to enter the IP address, type
192.168.101.10. - The bit count should be set to
24. - When asked if you would like a DHCP server to be enabled on the LAN, press Y for yes.
- The DHCP Client IP range start will be
192.168.101.100. - The DHCP Client IP range stop will be
192.168.101.110. - Press Enter.

- Press Enter again to return to the configuration menu.
Your LAN and WAN IP ranges should match the following:

pfSense can be configured using its intuitive web interface. Boot up the Ubuntu machine, open a terminal, and perform sudo dhclient to pick up an address from the pfSense DHCP server on VMnet3 (192.168.101.0/24). In a web browser on the Ubuntu machine, type http://192.168.101.10/ to access the configuration panel. If you have to reset the factory defaults, you will need to step through the wizard to get to the standard console.
To view the current firewall rules, choose Firewall | Rules and review the current configuration. By default, the WAN interface should be blocked from connecting internally as there are no pre-established rules that allow any traffic through. An example of this is shown in the following screenshot:

For testing purpose, we will enable ports 80, 443, 21 and allow ICMP. Add the rules as follows:
- Click on the add a new rule button displayed in the preceding screenshot.
- Use the following rule settings to enable ICMP pass-through:
- Action:
Pass - Interface:
WAN - Protocol:
ICMP - All others: Defaults
- Click on the Save button at the bottom of the screen
- Click on the Apply Changes button at the top of the screen
- Action:
- Use the Interface | WAN navigation menu to enter the WAN interface configuration menu and uncheck Block private networks. Apply the changes and return to Firewall | Rules.
- Click on the add new rule button. An example of this is shown in the following image:

- Use the following rule settings to enable HTTP pass-through:
- Action:
Pass - Interface:
WAN - Protocol:
TCP - Destination port range as follows:
- From:
HTTP (80) - To:
HTTP (80)
- From:
- Action:
- Continue adding ports until the configuration matches the following:

At this point, any machine connected to VMnet8 (NAT) can communicate through the open ports and can ping machines on the VMnet3 segment, as can be seen in the following image (this system running the scan is at 192.168.75.20):
