
In this section, we will go through the two ways of setting up a development environment for Intel Galileo on our host development system. In the previous section, we created the Intel Galileo SDK, and now we will go through how to use it:
- Go to the deployment folder of your build directory:
$ cd $BUILD_DIR/meta-clanton/yocto_build/.tmp/deploy/sdk - Run the SDK installer to install the Intel Galileo toolchain on your host filesystem. By default, the installation directory has been set to the
/opt/clanton-tiny/1.4.2directory; you can install any directory you want. You will get the following terminal output when you run the SDK installer script:$ sudo ./clanton-tiny-uclibc-x86_64-i586-toolchain-1.4.2.sh Enter target directory for SDK (default: /opt/clanton-tiny/1.4.2): You are about to install the SDK to "/opt/clanton-tiny/1.4.2". Proceed[Y/n]?Y Extracting SDK... Setting it up...done SDK has been successfully set up and is ready to be used.
The Intel Galileo SDK is installed on your host filesystem, and your host system is ready to compile and build C/C++ applications for the Intel Galileo development board.
To start development, you can either use basic text editors and compile the source code on your host machine's console, or you can configure an IDE to use the Intel Galileo SDK to develop applications.
If you don't want to use any IDE for software development, you can just use any text editor and compile your code from the Linux terminal after you set up the SDK environment variables.
After you install the SDK, it copies a Bash script to the SDK directory, and running it is enough to set up environment variables for the GCC compiler and linkers.
You can source the environment variables for the current session on your host machine as follows:
$ source /opt/clanton-tiny/1.4.2/environment-setup-i586-poky-linux-uclibc
You can check whether the setup is completed correctly for C, C++ cross compilers, and linker variables, respectively, as shown in the following code. $CC is a variable for the C compiler, $CXX is a variable for the C++ compiler, and $LD is for the Intel Galileo toolchain linker:
$ echo $CC
i586-poky-linux-uclibc-gcc -m32 -march=i586 --sysroot=/opt/clanton-tiny/1.4.2/sysroots/i586-poky-linux-uclibc
$ echo $CXX
i586-poky-linux-uclibc-g++ -m32 -march=i586 --sysroot=/opt/clanton-tiny/1.4.2/sysroots/i586-poky-linux-uclibc
$ echo $LD
i586-poky-linux-uclibc-ld --sysroot=/opt/clanton-tiny/1.4.2/sysroots/i586-poky-linux-uclibc
Let's write a simple Hello World C code with a text editor, compile it on the host console, and run it on Intel Galileo using the following steps:
- Create an empty
.cfile with your favorite text editor or any console text editor. Write aprintffunction, as follows, and compile it:$ nano hello_world.c #include <stdio.h> int main (void){ printf("Hello World "); return 0; } $ $CC hello_world.c –o helloworld - You can copy the binary file on to the Intel Galileo development board with the
scpcommand. SSH and SCP tools are installed with the full image we built to boot with the SD card. - If the board is connected to your local network, you can easily transfer files with the
scpcommand to the board from your host machine. Secure Copy Protocol (SCP) securely transfers computer files between a local host and a remote host. Therefore you can transfer files from Intel Galileo to your development PC or from your PC to the Intel Galileo board.$ scp helloworld [email protected]:/home/root/appsTip
Together with the Telnet protocol and the installation of the
sshdaemon (sshd) on Intel Galileo, you can connect to the board's terminal from thesshclient of your host system:$ ssh [email protected] - Open the Intel Galileo board's terminal and run the application from the folder you copied in the binary file:
$ cd /home/root/apps
$ ./helloworld
Hello World
This method can be used to develop any application and deploy it to Intel Galileo. If you don't have a local network connection, it may be difficult for you to transfer files to the Intel Galileo board with a USB stick or with the SD card.
Another and more efficient way of working with embedded devices is to use the Eclipse IDE. Eclipse provides a good C/C++ development environment and remote debugging utilities for developers. Another reason to select the Eclipse IDE is that the Yocto Project has a plugin for Eclipse, and this makes it very easy to set up the SDK's location and cross-compile.
In this section, we will go through the setup process for the Eclipse IDE for development and for remote debugging.
Download the latest Eclipse IDE from its official download site at https://www.eclipse.org/downloads/ or install it from the Ubuntu repository, as follows:
$ sudo apt-get install eclipse
If Java is installed on your host system, you can start the Eclipse IDE from the command line:
$ eclipse
We need to install some necessary plugins for Eclipse before installing the Yocto Project plugin on it:
- To install new software on the Eclipse IDE, from the menu bar, go to Help | Install New Software.
This will prompt you with a window to start the installation.
- First, you need to select the download site for the plugins. On the host I use, Eclipse Kepler (the previous version is Juno) is installed so, from the Work With drop-down list, select the correct site.
- Click on http://download.eclipse.org/releases/kepler.
This action will load the available plugins to the following list.
Select the required plugins to be installed. Perform the following steps to select plugins from the available software:
- Expand Linux Tools and select LTTng – Linux Tracing Toolkit.
- Expand Mobile and Device Development and select the following items from the list:
- C/C++ Remote Launch (Requires Remote System Explorer)
- Remote System Explorer End-user Runtime
- Remote System Explorer User Actions
- Target Management Terminal
- TCF Remote System Explorer add-in
- TCF Target Explorer
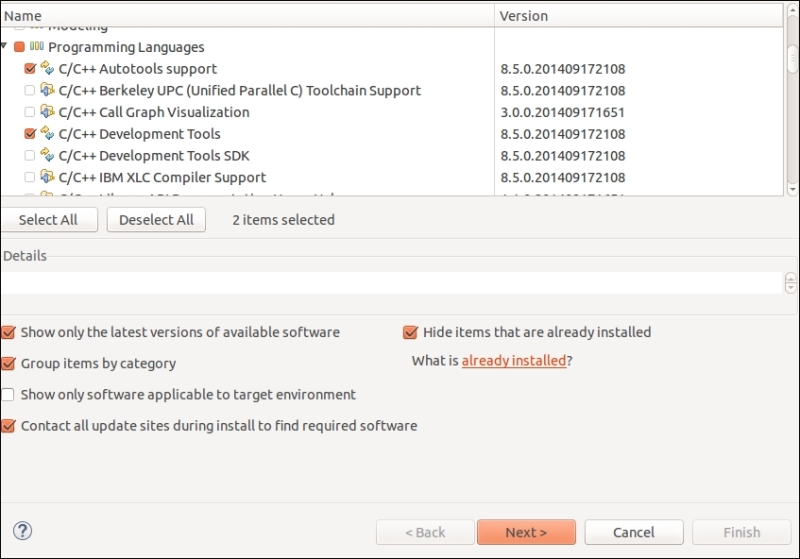
- Expand Programming Languages and select C/C++ Autotools support and C/C++ Development Tools.
Then, click on the Next > button and read and accept the licenses agreement. This will install the plugins and restart the Eclipse IDE. The following screenshot shows you what to select from the list:
When C/C++ development and support tools for the Eclipse IDE have been installed, as described in the previous section, we are good to go with the Yocto Project's plugin installation.
You can perform the following steps to set up the Yocto Project plugin onto Eclipse:
- Open the Install New Software Window again.
- This time you should add the link for the Yocto Project plugin. Click on the Add button, which will open a smaller window. Enter a meaningful name (for example,
Yocto ADT Plugin), enter http://downloads.yoctoproject.org/releases/eclipse-plugin/1.6/kepler, and click on Add. - When you add and select the new link from the Work with: menu, it will refresh the list of available packages to be installed.
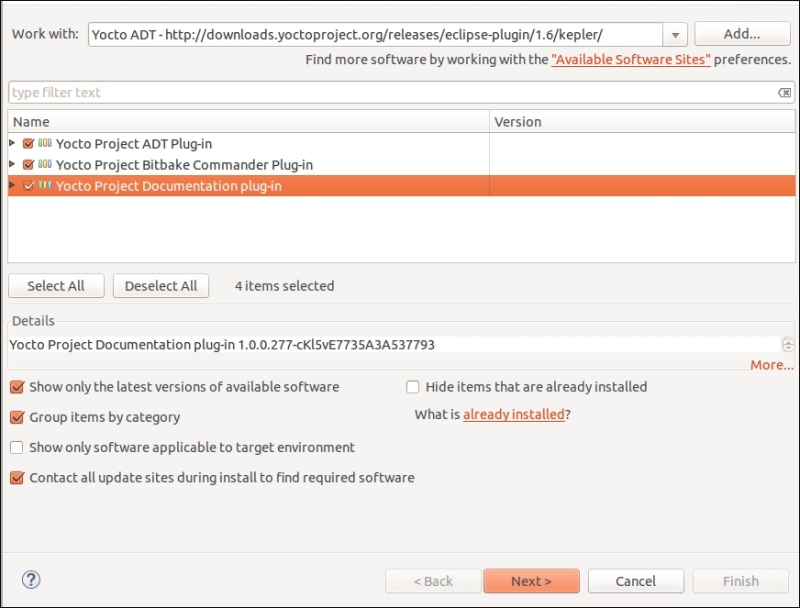
- Check the Yocto Project ADT Plug-in, Yocto Project Bitbake Commander Plug-in, and Yocto Project Documentation plug-in boxes.
- Click on the Next > button, read and accept the license agreements, and finish the installation as shown in the following screenshot:
The Yocto plugin requires some parameters, such as the location or path of the toolchain on your host machine filesystem, to be pointed by the user.
To configure the Yocto plugin, follow these steps:
- Click on Window from the Eclipse IDE menu and select Preferences from the list.
- A new window will appear; from the list that appears on the left-hand side of the window, select Yocto Project ADT.
- You need to enter the paths where you installed the toolchain, as shown in the following screenshot:
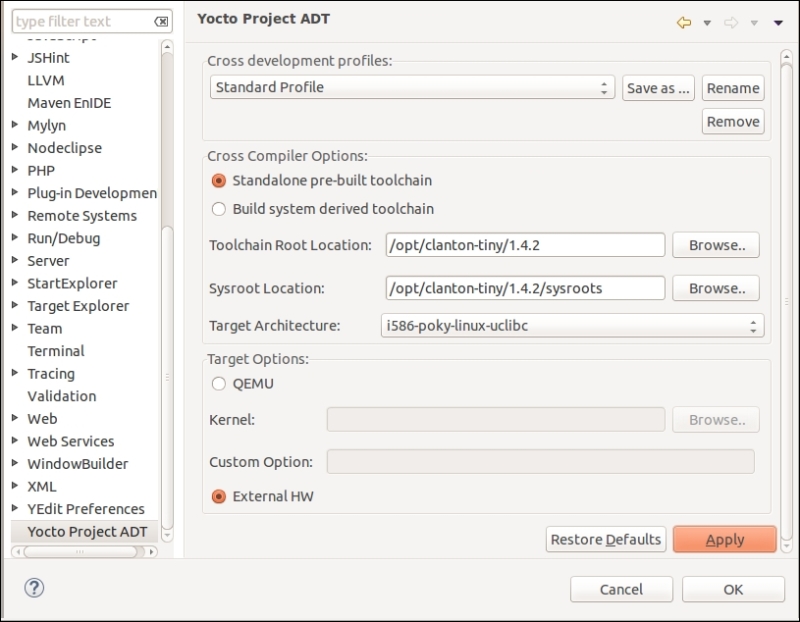
- Click on Apply; if the Yocto Project plugin doesn't complain about anything, the configuration should work.
One last step in the Eclipse configuration is to configure the remote device. The Eclipse IDE makes it easy for developers to deploy and debug applications on remote devices. If we don't use a helpful tool such as Eclipse to deploy applications, we need to copy the binary to a remote device from the console or copy files to a USB stick in order to transfer the compiled binary to Intel Galileo.
The Eclipse IDE also makes it easy to debug applications on remote devices with the help of a user friendly Graphical User Interface (GUI): the Debug perspective. There are a couple of steps that need to be performed to complete the remote device configuration:
- First, we will open Remote System Explorer in the Eclipse IDE.
- Click on Window in the Eclipse IDE menu, hover over Open Perspective if Remote System Explorer is on the list. Click on it if it is not; then, click on Other and select Remote System Explorer in the opened window.
- In the new perspective, define a new connection by clicking on the button where Remote Systems are listed or right-click to add a new connection.
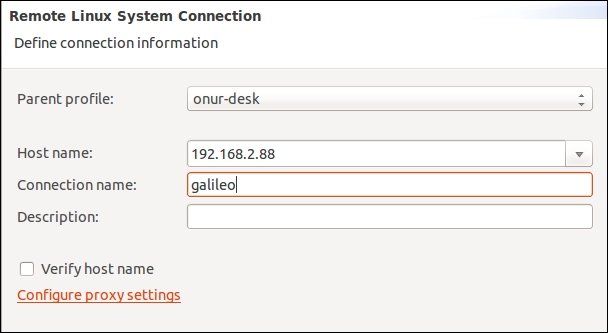
- This will open a new window called Select Remote System Type; select Linux and click on Next.
This will show you a window, as shown in following screenshot, where you need to type in the Intel Galileo development board's IP address and a description for the connection:
- Select SSH Types in the following window when processing
.sshfiles,processes.shell.linux,ssh.shells, andssh.terminals.This process defines a remote connection. Now we need to configure Eclipse in order to run applications on a remote device, as follows:
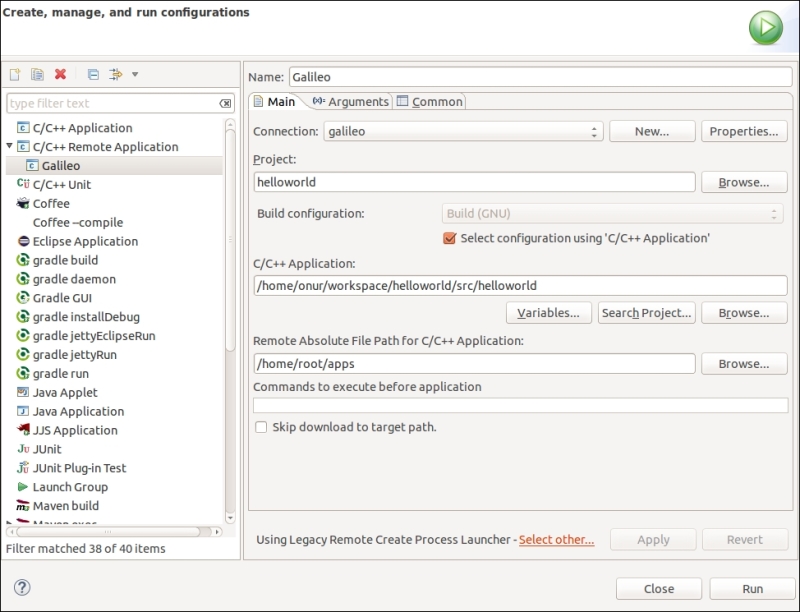
- In the Eclipse menu, click on Run and select Run Configurations. When the new window appears, click on the icon with a plus sign on it in order to create a new configuration.
- You need to fill the spaces according to your host system's configuration. Select the remote connection and remote path to deploy the application.
- If you save this instance, you can use it later for any other project you create on Eclipse to run on Intel Galileo.
The fully configured remote device is shown in the following screenshot:
We completed all the necessary configurations for Eclipse, so we can easily create an application now without reconfiguring the Eclipse IDE for the Intel Galileo toolchain. Eclipse will create C/C++ projects with toolchain configurations, and you will be able to develop C/C++ applications easily with the Eclipse IDE.
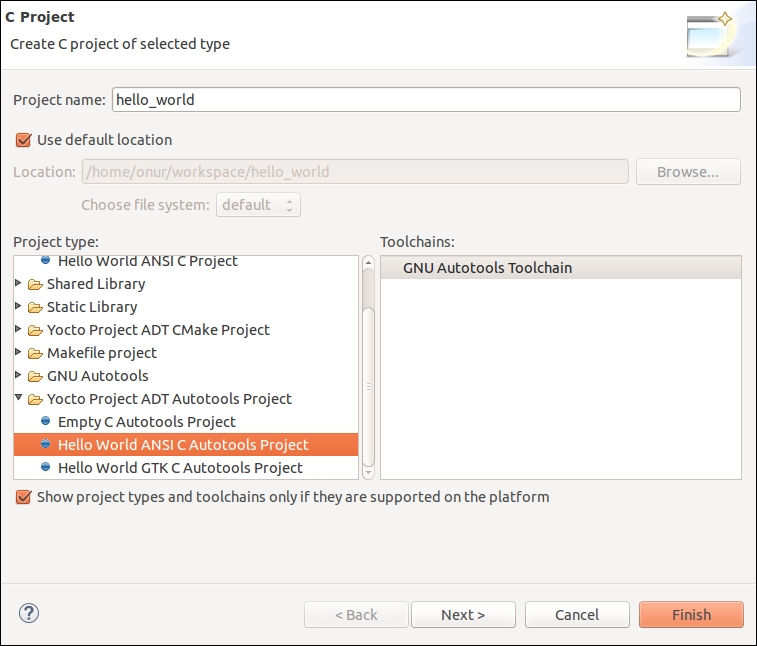
After performing a couple of easy steps, you will be able to create a C project for Intel Galileo with all the toolchain configurations, as shown here:
- Click on File from the Eclipse IDE menu, select New, and then click on C Project. This will open a new window, as shown in the following screenshot.
- Expand Yocto Project ADT Autotools Project and select Hello World ANSI C Autotools Project:
- After you finish this, all the related files will be created. You can just build the
Hello Worldsample by clicking on Build and running with the selection Run As, Remote Application on Intel Galileo.