
In the previous chapters, we examined Intel Galileo and developed sample applications with C programming languages. All our applications run on the Linux operating system. We aimed to work with devices and sensors, which are frequently used in home automation systems for our applications. Finally, in the previous chapter, you had an overview of the methods to add applications into the default Linux system to act as a service in the operating system.
However, all our application user interfaces are based on the command line. The command line is a good tool to interface for developers and engineers, but it is not practical and the visualization is limited to the defined ASCII characters.
In order to make the control of the home automation application by the user or easier by switching off the wall plug anywhere you are connected, you need to check the energy consumption from any device like a smartphone, tablet, smart TV, or your game console.
We will start by investigating Node.js and will use its basic capabilities to create a basic web server. The web server will also be serving a simple web interface to send commands to the home automation application in Intel Galileo. We will follow up with a simple Android application. Our Android application will read the current status of the home from the served file and send commands from web sockets defined in the previous chapter.
This chapter will not teach Node.js and Android in depth, and so we suggest you do further reading for a quick review of JavaScript and Java programming languages. Then you need to investigate Android SDK. Let's start with Node.js in the following section.
Node.js is a cross-platform framework to build network applications with JavaScript programming languages. Applications developed with Node.js use an event-driven method, and its most important feature is to develop a non-blocking I/O model for a network application. Node.js applications mainly use network sockets for I/O.
There are also some APIs provided to developers to interact with low-level C APIs in order to develop applications with sensors connected to platforms. Node.js is embraced by the maker community as well. They use it to build simple applications for devices like Intel Galileo. When we build the full image for an SD card, it will include Node.js and we can work with it.
Note
The official Node.js website is http://nodejs.org. You can read the API documentation from the given link.
Before going further with the Node.js sample application, it is highly recommended to follow up with the following blog: https://docs.nodejitsu.com/articles/
The blog includes tutorials, which contain the main building blocks of our Node.js application presented in the following sections.
Let's learn how to use Node.js with a "hello world" sample. We need to create a JavaScript file with a .js extension from the Intel Galileo terminal. You can also create the file on your host with your favorite text editor and copy the file to Intel Galileo with the SCP tool:
$ vi helloworld.js
console.log("Hello World");
We created the helloworld.js file. Node.js is a scripting language such as Python or shell. You just need to run it as shown here:
$ node helloworld.js
Hello World
This is the basic workaround for Node.js. We will need some basic utilities of Node.js. We will work to implement a web server, execute Linux processes, parse JSON files, serve HTML pages, and reply to incoming requests in our application.
Let's start by implementing our basic web server with Node.js. In order to create a HTTP web server with Node.js, we will include the Node.js HTTP module. The HTTP module will listen to a given socket for incoming network requests:
$ vi httpserver.js
var http = require('http'),
http.createServer(function (request, response){
    response.writeHead({'Content-Type' : 'text/plain'});
    response.write("Hello World");
    response.end();
}).listen(2000);
Run this code after you save from the terminal. Then type http://galileo_ip:2000 from any web browser you have; it will prompt Hello World on the web browser.
That was an introduction to Node.js. In the following section, you will learn how to develop our home server application to interact with the Smart Home native application and present a user interface to manage the home.
In this section, we will proceed step by step on the home server application. The source code of the home automation server can be seen and downloaded from the following URL:
https://github.com/odundar/galileo_ha/tree/master/webinterface
Let's first import the required Node.js modules, which we need to use in the application, like the HTTP module.
/*
 * Required NodeJS Modules to Include...
 */
var http = require('http'),
var path = require('path'),
var fs = require('fs'),
var url = require('url'),
var exec = require('child_process').exec;
var child;
We require HTTP to create a web server. We need the path and fs Node.js modules to read files on the file system. The URL module needs to parse the incoming requests from the client. Finally, we require the child_process module to execute the shell commands and write on the named pipe of the Smart Home application.
Now we will define the variables with the named pipe JSON files to read the status of devices; commands can be sent to the Smart Home application and the network port from which we want to start our web server.
var jsonFilePath = "/home/root/smarthome/home.json";
var commandsFilePath = "/home/root/smarthome/commands.json";
var pipePath = "/home/root/smarthome/SMARTHOMEPIPE";
var resourcePath = "res/";
//Server Listen Port
var PORT = 3000;
We picked /home/root/smarthome as our root directory to store files. We also need to change the corresponding paths inside the Smart Home application to create the named pipe file inside this directory. res/ folder includes the images that we will show on our web interface.
Before going further in the code, we need to read the home status from a saved JSON file. This JSON file has been created by the Smart Home application. A simple saved JSON file is shown in the next few lines. It has been named as home.json. The Smart Home application updates this file if there is any change in the status of any device. We will read this file to get information about devices.
Tip
JSON or JavaScript Object Notation is a format defined to make the interchange or storage of data easy. It is easier to parse than format the files as XML, and so it's getting more popular. The official JSON website is http://www.json.org/.
We are using the JSON file as it is very easy to parse the JSON format with Node.js and many other programming languages. You can also use XML, but it is easier with Node.js. A random sample from a home.json file can be seen in the following lines:
{
  "home": {
  "last_update_date": "Tue Jan  2 02:28:18 2015 ",
  "device": [
  {
    "id": "1",
    "name": "SHT11 Sensor",
    "status": "Active",
    "temperature": "24.000000",
    "humidity": "70.000000"
  },
  {
    "id": "2",
    "name": "Philio Multi-Sensor",
    "status": "Sleeping",
    "temperature": "76.000000",
    "lumination": "10.000000",
    "motion": "DETECTED",
    "door": "CLOSED",
    "battery": "0",
    "power_level": "Nor"
  },
  {
    "id": "3",
    "name": "Fibaro Wall Plug",
    "status": "Active",
    "switch": "ON",
    "power_meter": "0.600000",
    "energy_meter": "2.130000",
    "power_level": "Normal"
  },
.. .. .. Rest of the devices defined in this part .. .. ..
  {
    "id": "7",
    "name": "D-Link Network Camera",
    "status": "Active",
    "port": "134555744"
  } ] } }
Before going for the parsing method in the Node.js HTTP server application, let's make a quick revisit to the Smart Home application to check how we created this JSON file. As we mentioned in Chapter 6, Home Surveillance and Extending Security Use Cases, we defined variables in the device.h file to save an XML file. We also defined a new path for our JSON file in the device.h file as #define JSON_FILE_NAME "/home/root/smarthome/home.json".
Then we saved the latest values by using the C programming language FILE pointer. We wrote values in the form of a text file with the correct JSON formatting. The following is a piece of the update_device_json(const char* filename) function:
void update_device_json(const char* file_name) {
  FILE* json_file;
  json_file = fopen(file_name, "w");
  //TimeStamp for Last Update
  time_t rawtime;
  struct tm * timeinfo;
  time(&rawtime);
  timeinfo = localtime(&rawtime);
  char time_buf[BUFFER];
  sprintf(time_buf, "%s", asctime(timeinfo));
  int i = 0;
  while(time_buf[i] != '
'){
    i++;
  }
  time_buf[i] = ' ';
  fprintf(json_file, "{
    "home": {
");
  fprintf(json_file,
  "	"last_update_date": "%s",

  	"device": [
", time_buf);
  //Device 1 Temperature Sensor
  fprintf(json_file,
  "	{
	"id": "1",

  	"name": "%s",

  	"status": "%s",

  	"temperature": "%f",

  	"humidity": "%f"
	},
", TemperatureSensorName, temperature_sensor_status, temperature_c, relative_humidity);

// .. .. .. Some Code Here To Add Other Devices
//.. .. .. End of Function

  fprintf(json_file,"    	]
	}
}
");
  fclose(json_file);
}
We call the update_device_json function when there is any change in the devices or when the thread requests updates from them. Now we can continue to our Node.js application.
The following lines are enough to read the JSON file to a JSON object named homestatus:
//Parse JSON File for Home Status
var homestatus;
fs.readFile(jsonFilePath, 'utf8', function (err, data) {
  if (err) throw err;
  homestatus = JSON.parse(data);
});
You can read the last_update_date with a simple line of code like the following one:
homestatus["home"]["last_update_date"]
If you want to read the power_meter value, you can use the following line:
homestatus["home"]["device"][2].power_meter
We get the second index and power_meter element to reach the value.
We will use the homestatus object to read the current status of devices. This will help us create a more dynamic user interface. As you have seen from the basic sample, you can send the text output to your browser. We will create our own HTML output when a connection request comes from an external device. In order to do a nice HTML user interface easily, with a list of devices, we will use external tools like jQuery.
Note
jQuery is a JavaScript library. jQuery makes it easy to manipulate HTML document styling and scripting. You can read more information about this from the jQuery official web site http://jquery.com/.
We have implemented a JavaScript function to read the JSON object and create a list with the latest status of devices. The following function takes the response parameter of the HTTP server. Then it creates an HTML file by writing all the corresponding lines.
function JSONtoHtmlUI(res,message) {
  /**
  * Create HTML UI with jQuery List View
  */
  res.writeHead({'Content-Type': 'text/html'});
  res.write('<!DOCTYPE html>'),
  res.write('<html>'),
  res.write('<head>'),
  res.write('<meta charset="UTF-8">'),
  res.write('<meta name="viewport" content="width=device-width, initial-scale=1">'),
  res.write('<link rel="stylesheet" href= "http://code.jquery.com/mobile/1.4.5/jquery.mobile- 1.4.5.min.css">'),
  res.write('<script src= "http://code.jquery.com/jquery-1.11.1.min.js"></script>'),
  res.write('<script src= "http://code.jquery.com/mobile/1.4.5/jquery.mobile- 1.4.5.min.js"></script>'),
  res.write('</head>'),
  res.write('<body>'),
  res.write('<div data-role="page" id="pageone">'),
  res.write('<div data-role="main" class="ui-content">'),
  if(message != ""){
    res.write('<p> Message: ' + message + '</p>'), }
  res.write('<h4> Home Status: ' + homestatus["home"]["last_update_date"] + '</h4>'),
  res.write('<ul data-role="listview" data-inset="true">'),
  // List Devices
  // SHT11 Sensor
  res.write('<li>'),
  res.write('<a href=/>'),
  res.write('<img src="'+ resourcePath + 'sht11.png">'),
  res.write('<h3>' + homestatus["home"]["device"][0].name + '</h3>'),
  /** In this part of this function we are repeating similar responses for other devices **/
  res.write('</ul>'),
  res.write('</div>'),
  res.write('</div>'),
  res.write('</body>'),
  res.write('</html>'),
  res.end();
}
Information about each device has been added inside the <li> tag to create a row in the list. For each device, we loaded the device's image to the list row and added the corresponding text. In the first few lines, we defined the jQuery links.
We will respond with the above function to show the user interface when the user makes a connection to our application. In case the user makes a request to switch off the lamp holder or wall plug, we need to handle the request and send a command to the Smart Home application. We need to define another function to send commands to the Smart Home application pipe. We can send commands to the Smart Home's pipe from the Linux shell. Node.js includes the child_process module and it can execute shell commands. Therefore, we used the echo command from the Linux shell to write the corresponding command to the Smart Home application, as shown here:
function sendCommand(command_id) {
  // Parse Commands JSON
  var commands = JSON.parse(fs.readFileSync(commandsFilePath, 'utf8'));
  console.log("Parsing Commands JSON...");
  var command = 'echo ' + commands["commands"]["command"][command_id].text + ' > ' + pipePath;
  console.log("Executing....:" + command);
  child = exec(command, function(error, stdout, stderr) {
    if (error != null) {
      console.log('exec error: ' + error);
    }
  });
}
The sendCommand function first reads the commands.json file from the given path to a JSON object. Then it executes the command according to the given command ID. An example of this is echo switch on 4 > /home/root/smarthome/SMARTHOMEPIPE.
The commands.json file has been created with the reference of the defined commands in the Smart Home application; the file is static and doesn't change at runtime. The following lines form a part of the commands.json file:
{
  "commands": {
    "command": [
      {
        "id": "1",
        "text": "show home status"
      },
.. .. .. .. .. .. Other Commands .. .. .. .. .. ..
      {
        "id": "5",
        "text": "switch on 3"
      },
.. .. .. .. .. .. Other Commands .. .. .. .. .. ..
      {
        "id": "11",
        "text": "help"
      } ] } }
We are done with helper functions and variables. Now we will define our HTTP server's handler function in the following lines to define how to respond to the incoming request:
function handler(request, response) {
  if (request.method !== 'GET') {
    response.writeHead(405);
    response.end('Unsupported request method', 'utf8'),
    return;
  }
  console.log("Parsing Device File...")
  fs.readFile(jsonFilePath, 'utf8', function (err, data) {
    if (err) throw err;
    homestatus = JSON.parse(data);
  });
  var request = url.parse(request.url, true);
  var action = request.pathname;
  // Consolo Output for Request
  console.log(action);
  /**
  * Handle HTTP Get Requests
  */
  if (action === '/'){
    JSONtoHtmlUI(response,"");
    return;
  } else if(action == '/switch4'){
    console.log("Switch Request....");
    var switch_action;
    // Switch off
    if(homestatus["home"]["device"][3].switch == "ON"){
      switch_action = "OFF";
      sendCommand(7);
    } else { // Switch on wall plug
      switch_action = "ON";
      sendCommand(6)
    }
    homestatus["home"]["device"][3].switch = switch_action;
    JSONtoHtmlUI(response,"Switched " + homestatus["home"]["device"][3].name + " " + switch_action);
    return this;
    // Switch On or Off LampHolder
  } else if(action == '/switch3'){
    console.log("Switch Request.....");
    var switch_action;
    if(homestatus["home"]["device"][2].switch == "ON"){
      switch_action = "OFF";
      sendCommand(5);
    } else{
      switch_action = "ON";
      sendCommand(4);
    }
    homestatus["home"]["device"][2].switch = switch_action;
    JSONtoHtmlUI(response,"Switched " + homestatus["home"]["device"][2].name + " " + switch_action);
    return this;
    // Capture Frame from Network Camera
  } else if(action == '/capture'){
    sendCommand(8);
    JSONtoHtmlUI(response,"Captured From Network Camera");
    return this;
  }
  /**
  * Serve Requested Static Files
  */
  var filePath = path.join(__dirname, action);
  var stat = fs.statSync(filePath);
  fs.exists(filePath, function (exists) {
    if (!exists) {
      // 404 missing files
      response.writeHead(404, {'Content-Type': 'text/plain' });
      response.end('404 Not Found'),
      return;
    }
    var readStream = fs.createReadStream(filePath);
    readStream.on('data',function(data){
    response.write(data);
    });
    readStream.on('end',function(data){
    response.end();
    });
  });
  return;
}
Our handler function parses the incoming requests from the browser. It takes the appropriate action for each request. If a file requested is http://galileo_ip:3000/home.json, it servers the corresponding file. If the user requests a resource file with the URL http://galileo_ip:3000/res/sht11.png; the browser loads the image. If the user wants to switch the wall plug on or off, the user requests this with http://galileo_ip:3000/switch3.
Finally, we create the HTTP server with only one line of code, as shown in the following line:
http.createServer(handler).listen(PORT);
We have completed our home server application and are now ready to run the application. Save the code to a JavaScript file. In this sample, we saved the code to the homeserver.js file inside the /home/root/smarthome folder, which is shown in the following lines:
$ cd /home/root/smarthome
$ node homeserver.js
Now our Node.js application is working. Let's first try connecting from our host PC browser; type the Galileo IP address and port, which is http://192.168.2.235:3000 in our case. The user interface has been tested only on the Firefox and Chrome browsers on a PC. Look at the following screenshot from a desktop Firefox browser on the left and an Android mobile browser on the right:
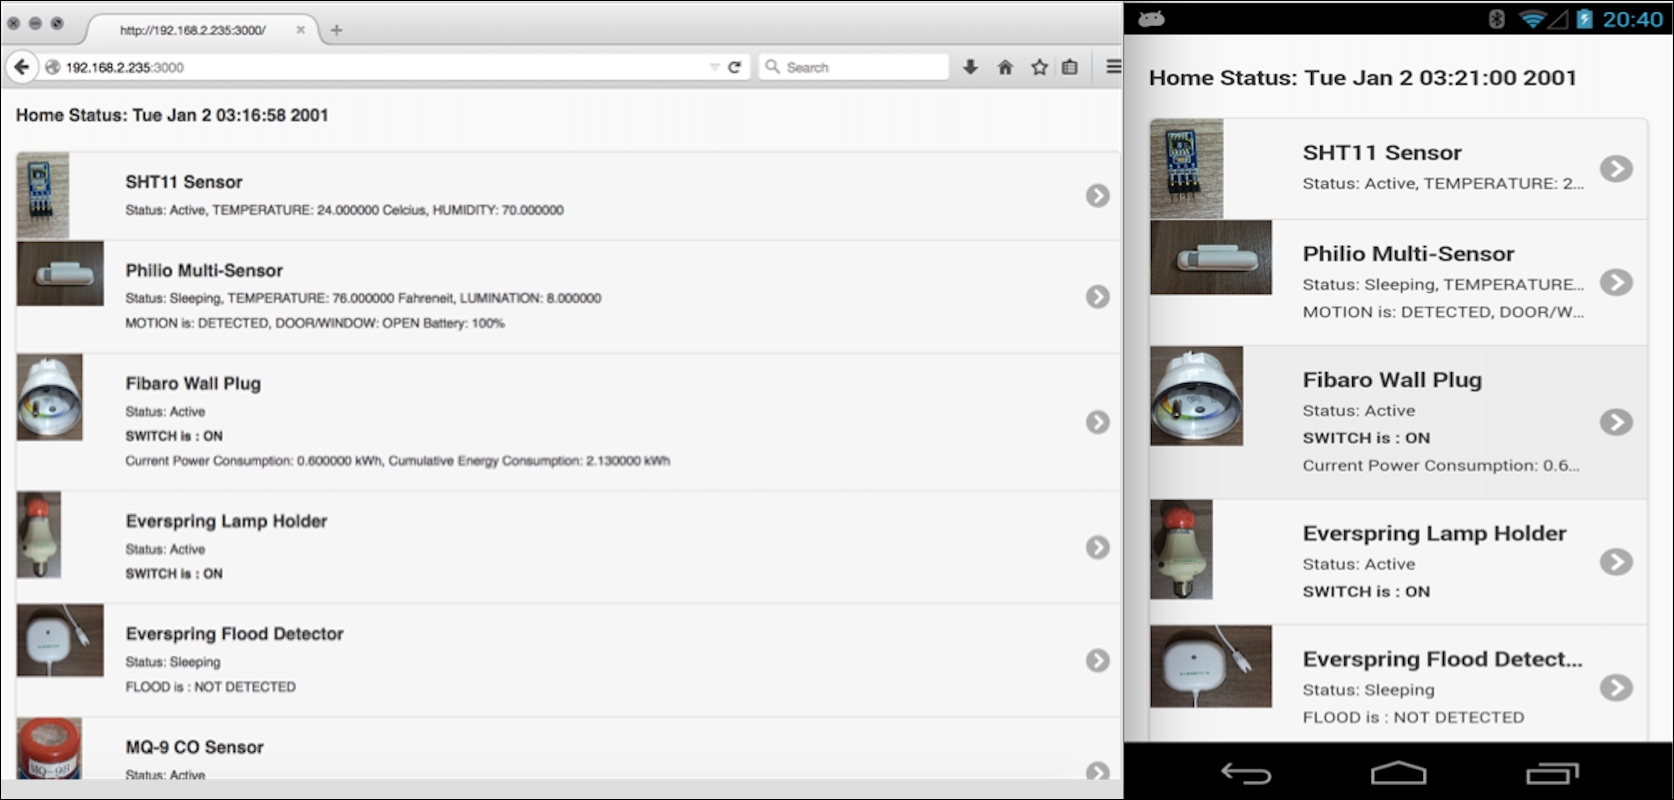
Now we can click on the Fibaro Wall Plug item on the list to switch it on or off from our smartphone.
You can improve the application by adding more features and beautify the user interface for a better experience. If your devices are different to the ones presented here, you can change and add custom requests to handle using the Node.js application.
We will keep the Node.js application running to serve the home.json and commands.json files for the next section's smartphone application.
In the previous chapter, we made an application to run as a web server, present a web interface and send commands to the Smart Home application. However, you can extend your applications with Node.js using some very cool options. As it is easy to program network applications with Node.js, you can connect any cloud or web service to Node.js.
One idea could be to integrate your Node.js application with Twitter. Twitter provides APIs for many platforms; there are many open source APIs for Twitter as well and they can be used easily with Node.js.
It is a very nice option to use the tweet feature if there is any motion detected at home. You can tweet if there is any change in the devices such as a flood or gas leak detected. We have sent commands from a web interface; it is also possible to define your application with the help of the Twitter API, to read the incoming direct messages to send commands to the Smart Home application. For example, you can create a new account for the home automation application. A Node.js application can send tweets if there is any change at home and can read Twitter direct messages to send commands to the Smart Home application.
Twitter is only one example; there are many free services with public APIs. You can add the feature to your home to control it wherever you are connected.
In this section, we tried to cover the basics of Node.js with a sample application. There are tons of use cases that you can add to Node.js to polish the home automation application. Now we will proceed by developing an Android application.