
We have developed a Node.js application as a web server as well as to present an HTML user interface in order for users to interact with the home automation application. Another way to interact with the Smart Home application on Intel Galileo could be by developing native applications for your device; the device could be your personal computer, tablet, game console, smart TV, tablet, or smartphone.
The native application can send commands to the Smart Home application network socket, which we introduced in the previous section. You can also simply interact with the Node.js application from your native application instead of using a web browser. As Android is very popular, we will show how to develop a native application on our Android smartphone to interact with the Smart Home application.
Note
If you are not used to Android, this section may be hard to grasp. It is recommended to review the Android operating system, SDK, and the application development environment.
Developing Android applications with Android SDK requires you to know the Java programming language. It is also a good idea to review the Java programming language.
The following URL's include tutorials and examples for Android application development. It would be very useful for you to follow them: http://developer.android.com/index.html, http://developer.android.com/training/index.html, http://www.vogella.com/tutorials/AndroidListView/article.html
Before starting to develop with Android SDK, you need to install Java onto your host PC. Then you should install Android SDK; an easy way to start is to download the Android ADT Bundle, which includes both Eclipse IDE and Android SDK. Another option for this is to download Android Studio. You can find more information at http://developer.android.com/sdk/index.html. We will be using Eclipse IDE to develop our Android application.
In this section, we will describe the main steps to develop a home automation application for Android. You can see and download the source code of the application from the repository at https://github.com/odundar/galileo_ha/tree/master/smarthome_app.
In order to start the development, we need to create the Android application project from IDE. In our sample, we named the project SmartHome. While creating the application, it prompts you to create an Android activity. For this application, we will have one Android activity named SmartHome in the SmartHome.java file. The Android activity handles the entire user interface, workload, and logic. When we create the activity while creating the Android project, it also populates an XML file, which holds the Android application's user interface data and elements. It is automatically named as activity_smart_home.xml.
Look at the following screenshot from our Android project. You can see the Java classes and XML files for this project. We also copied all the images of the devices to the res/drawable-hdpi folder under the project folder. In the Node.js application, we are loading the images from Intel Galileo but, to make the application faster, it is better to use local resources in the Android application.
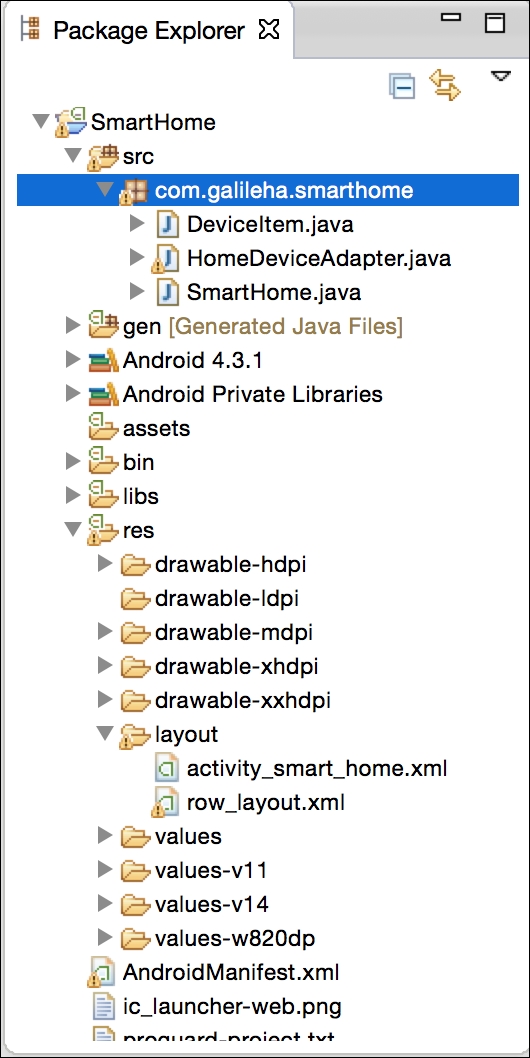
As you can see in the project folder, we also have the DeviceItem.java, HomeDeviceAdapter.java classes, and the row_layout.xml file. We created these files to build a custom list to store the image of the device, the name of the device and the latest status of the device and show them in an Android ListView widget. Android ListView widgets can be assigned to a data adapter and automatically fill the list with the given items.
Let's first check our ListView widget's custom row layout from the row_layout.xml file. XML files store the user interface structure. In order to show an image in an Android device, the ImageView class can be used; to write text on an Android application, TextView objects are used.
<LinearLayout xmlns:android="http://schemas.android.com/apk/res/android"
  android:layout_width="fill_parent"
  android:layout_height="fill_parent"
  android:orientation="vertical" >
  <ImageView
    android:id="@+id/photo"
<!--Here the Properties of View described-->/>
    <TextView
      android:id="@+id/name"
<!--Here the Properties of View described--> />
    <TextView
<!--Here the Properties of View described--> />
</LinearLayout>
The DeviceItem class is a Java class to store device information to fill each row.
public class DeviceItem {
  private String deviceName;
  private String deviceStatus;
  private int deviceImage;
  /*
  * Rest of the code is getters and setters of private members of this function
  */
  public String getDeviceName() {
    return deviceName;
  }

  public void setDeviceName(String deviceName) {
    this.deviceName = deviceName;
  }
//// Some Code Here, deviceStatus and deviceImage Getters and Setter////
}
The HomeDeviceAdapter is a child class, which inherits the BaseAdapter class from Android SDK; it is required to override its getView function to fill the ListView widget with the given items. In our case, it will pass the DeviceItem objects to fill the ListView widget of our application to show the home status.
public class HomeDeviceAdapter extends BaseAdapter {
  private final ArrayList<DeviceItem> itemsArrayList;
  private LayoutInflater inflator;
  public HomeDeviceAdapter(Context context, ArrayList<DeviceItem> itemsArrayList) {
    super();
    this.itemsArrayList = itemsArrayList;
    inflator = LayoutInflater.from(context);
  }
  /* … Here Other Inherited Methods from BaseAdapter  Methods Code ….*/
  @Override
  public View getView(int position, View convertView, ViewGroup parent) {
    ViewHolder holder;
    if (convertView == null) {
      convertView = inflator.inflate(R.layout.row_layout, null);
      holder = new ViewHolder();
      holder.deviceName = (TextView) convertView.findViewById(R.id.name);
      holder.deviceStatus = (TextView) convertView .findViewById(R.id.itemDescription);
      holder.deviceImage = (ImageView) convertView .findViewById(R.id.photo);
      convertView.setTag(holder);
    } else {
      holder = (ViewHolder) convertView.getTag();
    }
    holder.deviceName.setText(itemsArrayList.get(position). getDeviceName());
    holder.deviceStatus.setText(itemsArrayList.get(position) .getDeviceStatus());
    holder.deviceImage.setImageResource(itemsArrayList.get (position).getDeviceImage());
    return convertView;
  }
  static class ViewHolder {
    TextView deviceName;
    TextView deviceStatus;
    ImageView deviceImage;
  }
}
In the preceding code, we also defined the private members itemsArrayList parameter and inflator to use in the getView method. The LayoutInflator inflator needs to be created from the current context of the application to populate rows of the ListView widget in the current application. The itemsArrayList parameter contains the passed DeviceItem objects.
Now we will proceed to implement the SmartHome activity to do all the work. When we first create the activity during project creation, it inherits the Android SDK, Activity objects' properties, and the onCreate(Bundle savedInstanceState) function. The onCreate function is called in Android applications when you run the application for the first time; it is mostly used to initialize the user interface elements or initialize the required variables to be used during the application. Let's first add the required variables to use in the activity class:
private URL homeJSONUrl;
  private URL commandsJSONUrl;
  private String lastUpdateDate;
  private JSONObject homeInfo;
  private String[] commands;
  private String[] deviceNames;
  private String[] deviceStatus;
  private Integer[] deviceImages = { R.drawable.sht11, R.drawable.philio, R.drawable.fibaro, R.drawable.everspring, R.drawable.flood,
    R.drawable.mq9, R.drawable.dlink };
  private Socket galileSocket;
  private static final int GALILEOPORT = 3500;
  private static final String GALILEO_IP = "192.168.2.235";
  volatile public boolean filesdownloaded = false;
  volatile public boolean socketcreated = false;
  ArrayList<DeviceItem> listItems;
  ListView deviceListView;
  TextView updateDateText;
We have defined the socket port, the Intel Galileo IP address, the user interface elements to manipulate them in the code, and arrays to store information read from JSON files.
We need to handle network operations in separate threads. The Android activity is a thread needed to handle user interaction and user interface elements drawing to a smartphone screen, and so it doesn't allow us to interrupt the thread to fetch information from the network. We will define three different threads to handle JSON file readings and the network socket creation.
The following code shows the threads that we will use in the code:
Thread socketThread = new Thread(new Runnable() {
  @Override
  public void run() {
    // TODO Auto-generated method stub
    InetAddress serverAddr;
    try {
      serverAddr = InetAddress.getByName(GALILEO_IP);
      galileSocket = new Socket(serverAddr, GALILEOPORT);
      socketcreated = true;
    } catch (UnknownHostException e) {
      e.printStackTrace();
    } catch (IOException e) {
      e.printStackTrace();
    }
  }
  });
  /**
  * JSON Worker to Fetch JSON Files from Intel Galileo
  */
  Thread jsonFetcher = new Thread(new Runnable() {
    @Override
    public void run() {
      // TODO Auto-generated method stub
      try {
        // Initialize URLs
        homeJSONUrl = new URL("http://192.168.2.235:3000/home.json");
        commandsJSONUrl = new URL(
          "http://192.168.2.235:3000/commands.json");
        getHomeStatus();
        getCommandsList();
        // Fill String Arrays
        initalizeHomeArray();
        fillListAdapter();
        filesdownloaded = true;
      }
      /* Catch Block Code */
    }
  });
  /**
  * Update Adapter
  * Periodically Read the home.json File and Update ListView Adapter
  */
  Thread updater = new Thread(new Runnable() {
    @Override
    public void run() {
      // TODO Auto-generated method stub
      while (true) {
        try {
          try {
            Thread.sleep(10000);
          } catch (InterruptedException e) {
            e.printStackTrace();
          }
          // Initialize URLs
          homeJSONUrl = new URL("http://192.168.2.235:3000/home.json");
          getHomeStatus();
          // Fill String Arrays
          updateHomeArray();
          // Clear Adapter
          listItems.clear();
          fillListAdapter();
        }
/* Catch Block Code */
      }
    }
  });
The updater thread works in ten second periods to read the home.json file periodically to update the ListView widget if there is any change. The jsonFetcher parameter works at the start of the application to fetch the initial states of JSON files. The socketThread parameter creates the network socket which we will use to send commands to the Smart Home application on Intel Galileo.
Let's proceed to our onCreate function to see how we initialize the user interface for the application. In the application, we first set the application layout, which is activity_smart_home.xml. In the main user interface layout, we have the header text, a list of devices, and finally an update button to update the list any time we want. The following lines show the XML file content:
<LinearLayout xmlns:android="http://schemas.android.com/apk/res/android"
  xmlns:tools="http://schemas.android.com/tools"
  android:layout_width="fill_parent"
  android:layout_height="fill_parent"
  android:background="#bdc3c7"
  android:orientation="vertical"
  tools:context="com.galileha.smarthome.SmartHome" >
  <TextView
    android:id="@+id/skip"
    <!--Here the Properties of View described--> />
  <TextView
    android:id="@+id/updateDate"
    <!--Here the Properties of View described--> />
    <LinearLayout
      android:layout_width="fill_parent"
      android:layout_height="wrap_content" >
      <ListView
        android:id="@+id/list"
        android:layout_width="fill_parent"
        android:layout_height="380dp" >
      </ListView>
    </LinearLayout>
    <Button
      android:id="@+id/update"
      <!--Here the Properties of View described--> />
</LinearLayout>
Then we initialize the user interface elements and start threads to fetch the JSON files. The following function is used to fetch the home.json file inside the Android application:
public void getHomeStatus() throws IOException, MalformedURLException, JSONException {
  // Set URL
  // Connect to Intel Galileo get Device Status
  HttpURLConnection httpCon = (HttpURLConnection) homeJSONUrl .openConnection();
  httpCon.setReadTimeout(10000);
  httpCon.setConnectTimeout(15000);
  httpCon.setRequestMethod("GET");
  httpCon.setDoInput(true);
  httpCon.connect();
  // Read JSON File as InputStream
  InputStream readStream = httpCon.getInputStream();
  Scanner scan = new Scanner(readStream).useDelimiter("\A");
  // Set stream to String
  String jsonFile = scan.hasNext() ? scan.next() : "";
  // Initialize serveFile as read string
  homeInfo = new JSONObject(jsonFile);
  httpCon.disconnect();
}
We finally filled our adapter to populate the ListView widget with corresponding data in the onCreate function. Then we defined a listener, which is responsible for sending a command according to the clicked list item.
@Override
  protected void onCreate(Bundle savedInstanceState) {
    super.onCreate(savedInstanceState);
    setContentView(R.layout.activity_smart_home);
    deviceListView = (ListView) findViewById(R.id.list);
    updateDateText = (TextView) findViewById(R.id.updateDate);
    listItems = new ArrayList<DeviceItem>();
    jsonFetcher.start();
    while (!filesdownloaded);
    HomeDeviceAdapter deviceAdapter = new HomeDeviceAdapter(this, listItems);
    deviceListView.setAdapter(deviceAdapter);
    deviceListView.setOnItemClickListener(new OnItemClickListener() {
      @Override
      public void onItemClick(AdapterView<?> parent, View view, int position, long id) {
        JSONObject homeDevices;
        JSONArray devices;
        JSONObject clickedObject = null;
        try {
          homeDevices = homeInfo.getJSONObject("home");
          devices = (JSONArray) homeDevices.getJSONArray("device");
          clickedObject = devices.getJSONObject(position);
        } catch (JSONException e) {
          // TODO Auto-generated catch block
          e.printStackTrace();
        }
        // Switch ON/OFF Wall Plug or LampHolder
/* We check for other positions in this code block */
        } else {
          Toast.makeText(SmartHome.this, "No Available Command for Selected Device", 	Toast.LENGTH_LONG).show();
        }
      }
    });
    updateDateText.setText(lastUpdateDate);
    socketThread.start();
    while (!socketcreated);
    updater.start();
    Log.d("SOCKET", "Socket Thread Started");
  }
When we click on a list item, it sends the corresponding command to the Smart Home application network socket. The following methods get a string parameter to send to the network socket. The use of the function can be seen in the onCreate function. We also introduced the update button, which updates the user interface elements when we click on it. You can define which function to call when the button is clicked in the XML layout. In this case, we defined the android:onClick="onUpdate" method. You can see the onUpdate function shown here:
public void writeToSocket(String message) {
  try {
    PrintWriter out = new PrintWriter(new BufferedWriter(
      new OutputStreamWriter(galileSocket.getOutputStream())), true);
    out.println(message);
   Log.d("SOCKET", "Message " + message + " Sent to Socket");
  } catch (IOException e) {
    // TODO Auto-generated catch block
    e.printStackTrace();
  }
}
public void onUpdate(View v) {
  updateDateText.invalidate();
  deviceListView.invalidateViews();
  deviceListView.refreshDrawableState();
  updateDateText.setText(lastUpdateDate);
  updateDateText.refreshDrawableState();
  Log.d("JSON", "Updated Views....");
}
Finally, our application will look like the following image: a screenshot from the Android device, and we'll be able to see the devices' status and manage them.

Android is very rich in supporting libraries to enhance your application with cool features.
It is also possible with Android to directly connect to network camera and get a stream to your application. Android includes Media API to play the network video. More information about Media API can be found from http://developer.android.com/reference/android/media/package-summary.html.
You can use Bluetooth API to communicate with Intel Galileo from the Android application. You would need a Bluetooth device attached to Intel Galileo and need to program it to send the right information to the smartphone when it is connected. For more information about the Android Bluetooth API, you can access the following link: http://developer.android.com/reference/android/bluetooth/package-summary.html
These are some cool features that can be integrated with the application; you can delve into Android API for more on this. In this book, we only go over the Android operating system, but you may also try creating a similar application for iPhone and Windows Phone according to your experience and interest.