Chapter 4: Managing Resources, Activities, and Conditional Access
Living in a world where synchronous web conference delivery is a major part of content delivery means that your on-demand resources and activities need to be easily accessed, clearly mapped to course objectives, and incorporated into a web conference if needed. Further, as you develop your courses and curriculum in Moodle, it is important to plan well so that there is a level of consistency in an organization and presentation. Not only will you standardize your curriculum – you will also standardize your courses. Although it's easy to think that the flashiest content or assessment should be showcased, the reality is that you should keep your attention focused on the course learning objectives. All your content and assessments should map directly to the learning objectives. This chapter does not focus on specific resources or activities; that content is covered in later chapters. Our goal for this chapter is to provide an overview of the content that goes into your course and how to manage it at the course level. We'll introduce resources and activities but will not go into detail about each one until later chapters. Right now, the goal is to be able to see the big picture in order to plan your courses.
Before we begin, keep in mind that Moodle 4.0 has redesigned icons for the resources and activities, which makes it easier to incorporate scaffolding so that students can move forward through a course in a way that builds on the knowledge they're gaining, giving them a chance to apply it in a way that is more likely to result in success.
The goal of this chapter is to show you how to add content that provides instruction and assessment. You will also learn how to control students' access to resources, activities, and assessments.
The following topics will be covered in this chapter:
- Getting content ready
- Mapping your approach
- Identifying course goals and learning objectives
- Common settings
- Universal design for learning
- Adding a resource or activity
- Entering a name and description
- Showing and hiding a resource
- Setting the availability of a resource
- Rearranging items on the course home page
By the end of the chapter, you'll be able to list the types of resources and activities that Moodle offers and identify uses for them. You will be able to put together lessons with a wide variety of content and be able to align them to learning objectives. You'll also be able to use the resources and activities to engage your learners and keep them focused and energized about learning.
Course material – resources and activities
In Moodle, course material is either a resource or an activity. A resource denotes instructional material in the form of digital files used by students. They can be viewed, read, listened to, or saved. They can include web pages, links, files, graphics, videos, audio, and embedded social media.
An activity can include interactive applications, including polls, quizzes, assignments, tests, discussion forums, and wikis. They all involve interaction, either independently or with other students. Keep in mind that activities are interactive, while resources are not. Learners actively engage with activities, while resources can be passive.
Activities can be assessments, and thus can be graded. Keep in mind that if you are developing a course curriculum for a certificate or degree program, you will need to ensure that they are presented in a consistent manner. You may wish to create a set of guidelines in a Course Design Document (CDD), which you can share with all the instructors and instructional designers/technologists that are involved in creating courses or materials for it. The CDD can translate to a template, customized for all the courses and the curriculum. Your CDD can include your course map, which links the resources and activities to their corresponding learning objective.
Now that we have introduced the resources and activities, and we've discussed the importance of using a planning document such as a Course Design Document (CDD), we will review the steps to follow while getting your content ready for use in the course.
Getting content ready
It is a good idea to create a list of the resources that you will use and incorporate them in your course outline and a spreadsheet. You may wish to create a plan in the form of a storyboard, especially if you have a clear sequence of content and plan to incorporate different types of media. Your resources and activities are learning objects, which means that you can upload or link to them as objects and place them where it is most convenient. If any of your resources require plugins, make sure that they are installed.
Mapping your approach
Mapping your course materials (resources and assessments) to your learning objectives will help you avoid creating a course that confuses students, and it will help them achieve their learning goals.
The best sequence for mapping is to follow a simple workflow, depicted as follows:
- Identify your learning objectives.
- Create a course sequence (chapters or units).
- Write the specific learning goals for each chapter or unit, and tie them to your main learning objectives.
- For each unit or chapter, you'll have the following:
- Chapter learning objectives
- Course content (directly tied to learning goals)
- Activities (should be measurable and tied directly to your learning objectives)
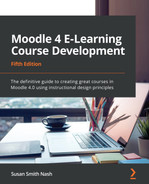
One popular way to create a course map is to develop a spreadsheet that creates an "at a glance" planning guide. Here is a very simple example of an initial course map. We will build it out further a bit later and use it as the foundation for the CDD:
Once you have mapped your course materials to your learning objectives, you can move ahead to developing a course design plan, which can be in the form of a template-type document. Some people find a storyboard approach to be most convenient; others prefer to maintain a course map.
Identifying course goals and learning objectives
The learning objectives for a course correspond to the measurable performance that you would like your students to be able to accomplish by the end of the course. Course goals and learning objectives are often used interchangeably, although technically speaking, they should not be. Learning outcomes are statements that describe the knowledge or skills students should acquire by the end of a particular assignment, class, course, or program, helping students understand why that knowledge and those skills will be useful to them.
Learning objectives are similar to goal statements, but they are more specific and often relate to Bloom's taxonomy. They describe what students will be able to do by the end of a learning activity, using verbs that relate to cognitive levels:
- They are specific and measurable.
- They are student-centric.
- The verbs correlate to a hierarchy of cognitive skills, such as Bloom's taxonomy.
The best way to approach this is to develop a CDD that serves as a template and a checklist for the things to include in each course, as well as the offiline/paper format. The CDD is organized around the overall learning goals and then the more specific learning objectives, which are then aligned with the course instructional materials and assessments.
As you develop your template (the CDD), you'll need to ask a few questions. How do you actually frame learning objectives on the course and at the unit level? How do you ensure that you frame them so that they're measurable and also at the correct cognitive level?
Bloom's taxonomy is the standard used for writing learning objectives, particularly in the cognitive domain. Bloom's taxonomy is used to classify educational learning objectives into levels of complexity and specificity. First developed in 1948 by Benjamin Bloom and later modified, the tool provides a framework for selecting the verbs used in describing outcomes and then mapping them to activities.
As one can see in the following diagram, in Bloom's taxonomy, the lowest rung of the ladder is the least complex, and it ascends to finally achieve the highest level of complexity:

Figure 4.1 – A representation of Bloom's taxonomy
The value of using Bloom's taxonomy for developing a course as well as an instructional strategy is that it assures both clarity and consistency in design.
Further, by using Bloom's taxonomy, you can ensure that students follow a sequence, from less complex to more complex, and properly scaffold the learning so that concepts and skills build on each other at levels of increasing complexity and difficulty.
Now that you have mapped your course and have identified the learning objectives, you are ready to learn how to add and manage resources and activities in your course.
The map – CDD
We've mentioned planning and mapping the course. Now, we will go into more detail. If you are working in schools, it is likely that you are already required to develop a plan and follow the format established in your school. However, if you are in charge of corporate training, you may not be required to produce planning documents. Nevertheless, it is an excellent idea, especially if you require your employees to complete training in order to comply with regulations.
Let's return to the concept of a map for your course. This is known as the Course Design Document (CDD). It is also often called the Instructional Design Document. It is a document that contains the basic organization, structure, formatting, and style elements to make sure that all the units are uniform and consistent. It also incorporates the instructional strategy, which will describe when and where to incorporate activities and items intended to engage the learner, connect to course learning objectives, practice for mastery, and retain knowledge.
You'll use the CDD as a guide for developing courses in your organization, allowing you to make sure that they are consistent. Here is an example of the items to include:
- The main learning goal of the course
- Learning objectives for the course (not more than seven or eight)
- Information about who should take this course
- A unit learning objective
- A unit engager ("Did you know?" questions)
- Unit instructional content (readings, videos, audio lectures, and graphics)
- Learning activities – types and so on
- Unit assessment(s) – types and so on
- A template with formatting
The CDD will help you not only in the design of courses but also in working for accreditation visits. The CDD can take the form of a spreadsheet that builds on the course map. In the following table, you can see the design of the first module, which has more elements to make the course effective and engaging. This example only contains Module 1 because all the other modules would contain the same elements. Note that I've covered a scenario where some of the content and activities in a module can actually satisfy more than one learning objective:
CDD FOR THE FIRST MODULE IN THE COURSE

Your CDD can be a part of your self-review, in which you discuss all the different elements of the course content preparation and implementation and explain your strategy for keeping things consistent.
A universal design for learning
As you start to develop your course material, use Universal Design for Learning as a guideline to make sure that your learners have access, regardless of any physical or cognitive limitations. Universal Design for Learning (UDL) seeks to make learning possible for all learners, and it utilizes three different core areas – emotions, cognition, and physicality. Here is a link to the website: https://udlguidelines.cast.org/.
Using UDL will help you appeal to all kinds of learning styles, and learners who have audio, visual, or kinesthetic learning preferences will be accommodated. The three main areas of UDL are engagement, representation, and action and expression.
Further, UDL seeks to make sure that multiple ways of presenting material are incorporated so that someone who may have low mobility, low vision, low hearing, or cognitive challenges is able to participate:
The goal of Universal Design for Learning is to make sure that multiple means are used to achieve the following: Engagement, Representation, and Action and Expression. We will describe each one now:
- Engagement: UDL asks course designers to make sure that there are multiple means of engagement. UDL provides a number of different strategies to recruit interest and then, once interest has been gained, sustain effort and persistence. Finally, UDL provides strategies to develop a course that automatically builds self-regulation. For example, you might take a building block approach and break up large tasks into smaller activities so that students can make progress in bite-sized chunks along the way and then get rewarded for it.
- Representation: UDL provides strategies for designing a course that has materials that can be accessed in many different ways and use different senses. For example, if you have an audio recording, make sure to include a text transcript. Likewise, if you have a text, make sure that it can be converted to speech through an app. Make sure that when you develop your course, you include glossaries for specialized vocabulary and symbols and that your presentations are clear. Make sure you can promote understanding across languages, perhaps by including a translation function. Finally, be sure to use a scaffolding approach and facilitate comprehension by providing background knowledge, making it easy for a learner to see the big ideas. You can use resources for this such as content files, and you can also incorporate "check your knowledge" interactive activities.
- Action and expression: UDL asks you to think about what your learners will do when they encounter content or activities. How can you make sure that they can navigate easily and accomplish the task, even if they lack physical mobility? Also, what if they have low vision or low hearing? How will you make sure they have access and that you can make accommodations? Make sure that you build in assistive technologies where possible, and provide links to obtain them. Expression and communication are important for UDL, and make sure that you accommodate diversity and different cultural ways of understanding content. Use multiple media for communication, and as you ascend the levels of difficulty with Bloom's taxonomy, design the course so it ascends gradually rather than jumping around between levels of difficulty. Finally, help your learners succeed by building in goal-setting activities. You can include checklists or a clear set of guidelines. You can build in a framework for periodic announcements that help keep students on track. You can build in a template for instructors to fill in to help provide supportive tasks, such as guides to searching databases in the online library, or quick tips for designing discussion prompts that encourage students to share their lived experiences so that the virtual classroom is a place of community and supportive attitudes.
As you start to think about the course material, get to know who your learners will be. What are their backgrounds? Are they busy working adults? Are they part of a specific cohort from a degree program, certificate, or corporate training group? What do they plan to do with the knowledge once they have it?
As we move forward with our course map and our UDL strategy, let's familiarize ourselves with settings.
Settings that are common to all resources and activities
Once you have mapped out your course and made a list of the resources and activities that you'd like to add, you're ready to start taking a look at settings.
For all the different kinds of resources and activities, the first few clicks for adding them are the same. Also, there are some common settings that you will need to choose for all the resources and activities that you add. The following sections will explore these common settings in detail.
Adding a resource or activity
Here's the way to get started as you add a resource or activity. This applies to all resources and activities that you may wish to add.
Start by logging in as an administrator, course creator, manager, or teacher. Then, click on Turn editing on, which is found in the upper-right corner of the homepage or the Administration menu.
Here are the steps to add a resource or activity:
- In a topic or week where you want to add the resource, click on Add an activity or resource. Go ahead and create placeholder activities or resources. You can move them around the course later.
- To select the kind of resource or activity that you want to add, click on the kind of resource or activity in the Add an activity or resource dialog.
- Click on the Add button.
- Next, you can add more details that are particular to each resource or activity:

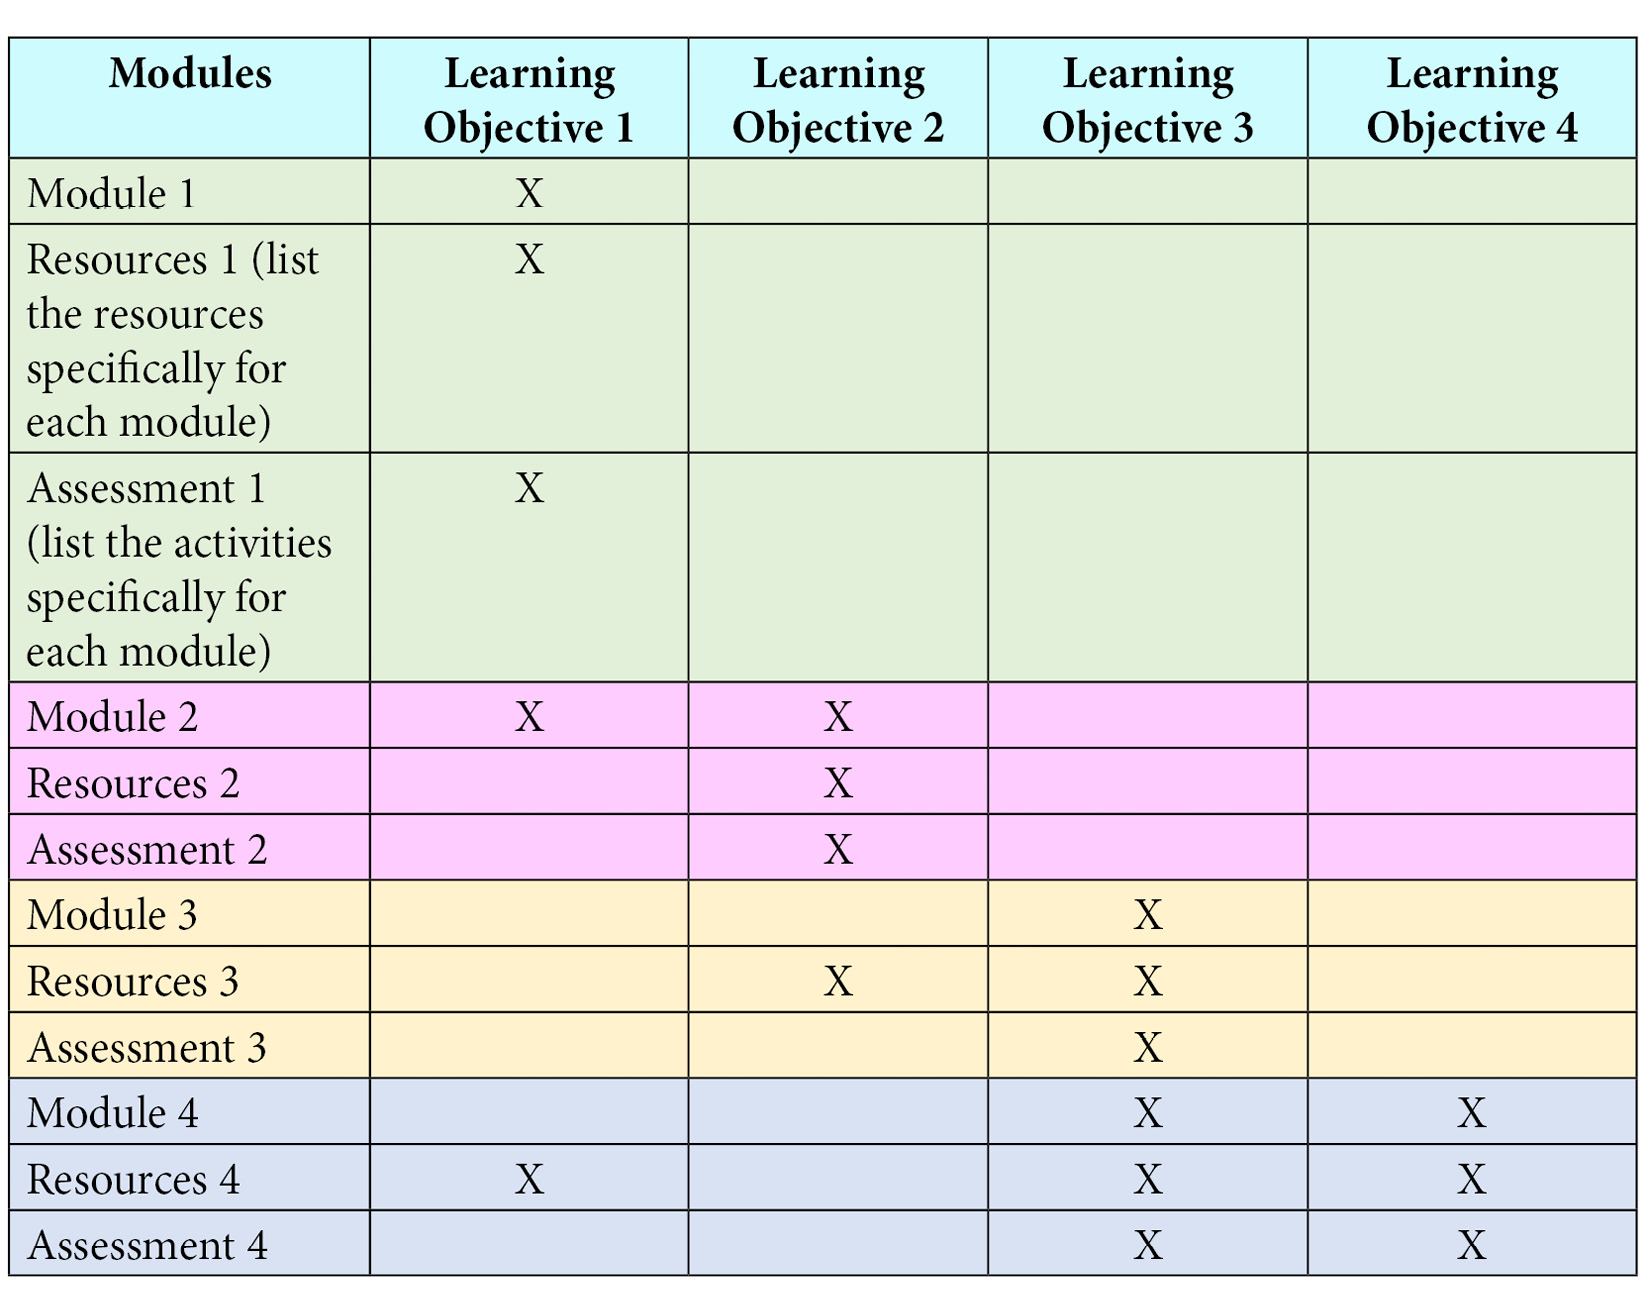
Figure 4.2 – Add an activity or a resource
Entering the name and description
For every resource or activity that you add, you must enter a name and description. You will also choose whether and when the description is displayed. As these fields are common to every resource or activity that you add, let's cover them under the respective sections.
Here is what you will see when you click on Add an activity or resource. If you are familiar with earlier versions of Moodle, you will see immediately that the menu displays icons instead of a list of names. It also includes i links that take you to an informational description of the resource or activity, along with helpful tips on effective ways to use them. Moodle 4.0 has updated and modernized the icons so that they are easy to recognize and use with all kinds of devices.
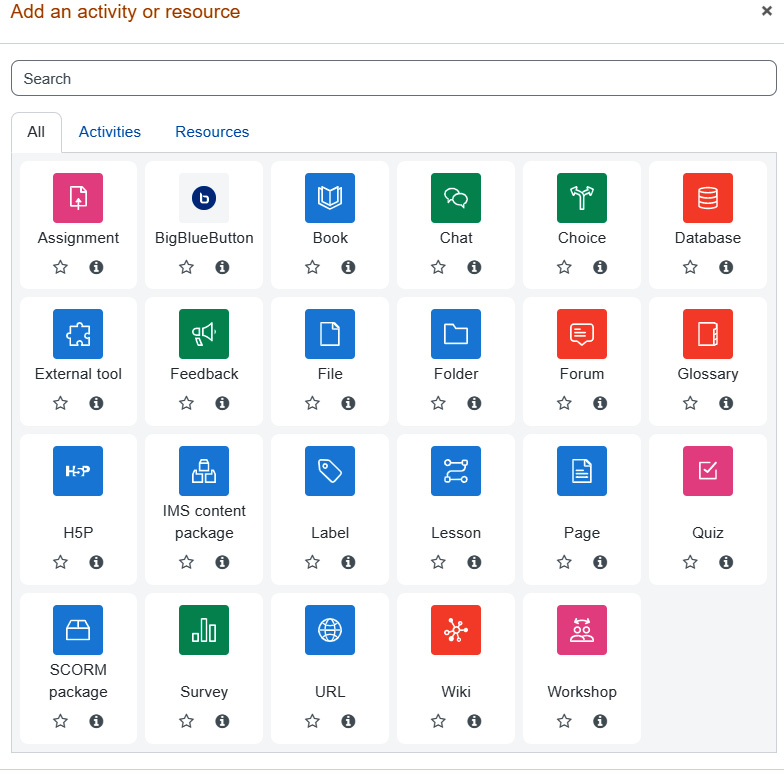
Figure 4.3 – A screenshot of the Add an activity or resource screen where you select the kind of activity or resource you need to add
To give a name and description to a resource or an activity, do the following to add a page:
- Enter a name in the Name block:

Figure 4.4 – How to update a page
When you are done with editing and saving the resource or activity, this name will appear as a link on the course page.

Figure 4.5 – The screen in Moodle that shows how to enter a description in a Description block
The item's description can appear on the course home page and also when the item appears in a list of resources for your course.
Showing and hiding a resource or an activity
When you add a resource or an activity to a course, you can make the item invisible to students until you are ready for them to see it. For example, you might want to keep a web page hidden until you have finished writing it. Alternatively, you might want to reveal a series of activities as the class completes them, as a group.
When you hide an item, it is still visible to a teacher, course manager, and site administrator. It is hidden only from students and visitors.
To show or hide an item, click on the eye icon next to it.

Figure 4.6 – Showing and hiding items
Setting the availability of a resource or an activity
Every resource or activity that you add will have Common module settings. If conditional access and/or completion tracking is enabled for the site, Restrict access settings are also added. As each item comes with these settings, we'll go through them once in the following sections.
Using the visibility setting to show or hide a resource
Under Common module settings, which are the settings you'll see when configuring any resource or activity, the visibility setting determines whether the resource or activity is visible to students, as shown here:

Figure 4.7 – How to add common module settings
Teachers and site administrators can always see the item. Setting this to Hide from students will, as expected, hide the item from students. Teachers can hide some resources and activities at the beginning of a course and reveal them as the course progresses. Alternatively, you can keep an item hidden while you're developing it and reveal it only when it's complete. This ties in with the Show and Hide setting on the course's main page. To determine whether it is visible or hidden to students, take a look at the eye icon. If the eye icon has a line through it, it is not visible.
The gradebook
You can collect and track grades using the course gradebook. The gradebook brings together the results of assessments that you have set up in your course. Keep in mind that the gradebook displays as a spreadsheet that contains rows for the course, the category, and then columns for each graded activity.
Let's take a look at the course display. Along the top of the report are rows that correspond to Assignments, Quizzes, and Lessons. Then, each row will have columns that align to each specific graded activity.
You can display the categories in different ways:
- Grades only (without the total column)
- Collapsed (the category total column only)
- Full view (the totals column for each category)
Keep in mind that you can hide columns or individual grades. It depends on what level of detail you need in order to keep track of your course and what kind of information you need in order to create reports for your organization.
The following screenshot shows the options you have to customize the gradebook and how it is displayed. Moodle 4.0 gives you more options than ever before, and it also makes it easier to go to a single place for all the gradebook and grade settings. Note that the appearance is laid out in a way that is intuitive so that even if you forget what each option means, you can click on the pull-down menu and discover your options.
Figure 4.8 – How to modify the way that the gradebook and grader reports are calculated and displayed
Rearrange/move items on the course home page
After you've created resources and activities, you may need to change the order in which they appear to students. It's easy to do so because you can easily rearrange and move items on the home page so that they appear in a way that is most convenient for them (and the instructors).
As you build your course, you will be adding resources and activities to the course page. Moodle enables you to easily reposition these items. It's so easy to reposition them that I recommend not even worrying about getting them in the right place as you create them. Just go ahead and create, and you can rearrange them later.
Rearranging items on the course page can be done like this:
- Log in to your course as a teacher or site administrator.
- At the upper-right corner of the page, if you see a button that reads Turn editing on, click on the button. If it reads Turn editing off, you do not need to click on this button.
- Next to the item that you want to move, place the mouse pointer over the crosshairs icon.
- Drag the item to where you want it on the course page and drop it.

Figure 4.9 – How to move sections
Restricting access
The Restrict access setting enables you to set conditions that control whether a student can see this resource. You can use four kinds of conditions – dates, grades, user profiles, and customized fields. Restricting access can be a good way to ensure that students progress through the course in a way that builds on the knowledge they're gaining, and thus sets up effective scaffolding. We will examine more specific examples later, but it is a good idea for you to have an idea of this functionality now.
Also, keep in mind that we're talking about access to a resource in a course and not the course itself. In the following screenshot, we can see the restrictions and conditions for access to a resource:

Figure 4.10 – Adding restrictions and conditions for access to a resource
In the following screenshot, the user is adding a date restriction to a resource. When might you want to restrict access? Restricting access is often a good idea if you want students or team members to make sure that they progress through a course in a synchronized way so that they are communicating clearly. It is also important if you want to motivate students by requiring them to achieve a minimum passing score on an assessment in order to progress. When an activity or resource is not yet open to a user, you can prevent users from seeing it on the course home page. The following example shows the eye icon next to the access condition. If the eye icon is open, then the student sees the activity/resource listed on the course home page even before the user has access. The activity/resource will be displayed in gray type. If the eye icon is closed, the item will be hidden from the user until the user has access:

Figure 4.11 – A user adding a date restriction
Adding a from restriction makes the resource available on that date and time onward. If you do not add a from restriction, the resource becomes available immediately.
Adding an until restriction sets a date and time when the resource becomes unavailable. If you do not add a from restriction, the resource defaults to the time you establish the first date, and thus is closed immediately.
If your students report that they can't see an activity or resource, be sure to go back and check your settings. It's possible that you've not given them access.
The Grade condition setting enables you to specify the grade that a student must achieve in another activity in this course before being able to access the item.
In the following screenshot, you can see that the item will become available to the student only after the student scores at least 70 percent in the course. You may wish to refer back to Chapter 2, Installing Moodle and Configuring Your Site, for more details. Note that the course has established a start date and last available date.

Figure 4.12 – How to configure it so that it is necessary to earn 70 percent in order to progress
Creating the activity completion settings
Depending on the type of activity, it is necessary to set the conditions and the completion requirements:
- Select an activity or resource.
- Under the Administration menu for the activity or resource, select Edit settings. In the following example, we are working with a forum in the course.
- The Settings page is displayed. Scroll down to the section that is labeled Activity completion.
- The Completion tracking field determines how this activity or resource gets marked as complete.
Either the student deliberately marks it as complete (Students can manually mark the activity as completed) or the student does something and then the activity is automatically marked as complete (Show activity as complete when conditions are met). Don't worry about which activities at this point. Just keep in mind that Moodle has a wide array of activities, which we will explore in more detail in future chapters.
If you choose to have the student manually mark the activity or resource as complete, the student will mark it as complete from the home page of the course.
If you choose to have the activity or resource automatically marked as complete, choose the following conditions that cause it to be so:
- If you selected Show activity as complete when conditions are met, you must select the conditions that will cause the activity or resource to be marked as complete.
If this is a resource, the student cannot earn a grade for it. Only Student must view this activity to complete it will be available.
If this is an activity, both Student must view this activity to complete it and Student must receive a grade to complete this activity will be available.
- At some point, you might want to run a report. You will learn how to run reports later in the chapters but to familiarize you with some of the capabilities early on, we're mentioning them here. For example, you may want to run the activity completion report. If you think you will want to use that report, then enable the setting for the expected completion date. This does not display the expected completion date to the student. You are not setting a due date with this setting. Only the teacher will see this date in the activity completion report. If you want to tell the student to complete this activity or resource by a specific date, you will need to use some other method to do so.
- Once you have finished setting the completion conditions, either save the activity or resource, or continue modifying the other settings on the Settings page and then save.
Creating the activities or resources that will be restricted
Now that you have created the activities that need to be completed and set their completion conditions, you are ready to create an activity that will be restricted.
As stated earlier, the later chapters show you how to create resources and activities. Once you've created the resource or activity that will be restricted, proceed to the next set of instructions. To do so, you can refer back to the course map and the CDD, as shown earlier in the chapter.
Setting the competency conditions
Finally, in the resource or activity that we are trying to restrict, let's choose when it becomes available, as follows:
- Select an activity or resource.
- Under the Administration menu for the activity or resource, select Edit settings.
- The Settings page is displayed. Scroll down to the section that is labeled Competencies.
- For the Activity completion condition field, select the activity or resource that must be completed.
- Select the Send for review condition.
- You can add more completion conditions by clicking on the Upon activity completion button.
- Either save the activity or resource, or continue modifying the other settings on the Settings page.
The following screenshot is an example of a course that has many activities, and the instructor wants the students to follow a specific sequence and not jump around.

Figure 4.13 – Requiring students to complete activities before gaining access to a section that has restricted access
This setting is especially useful for quizzes. You can ensure that students review the material they need before taking a quiz and that they know what is required before the quiz becomes available. This is a good place to stop and reflect on how to enhance students' abilities to learn and retain knowledge.
Tip
You can also drag and drop entire topics. You'll know that you can do this if you see a crosshairs icon next to a topic. Just drag the crosshairs icon and drop it where you want the topic to go.
One of the most effective ways to ensure that your students move seamlessly through a course and that they're ready for the next level is to tie forward progress to the successful completion of a section, unit, or module. Be sure to keep the overall course design in mind, and also to make sure that the activities and resources are in ascending levels as per Bloom's taxonomy. Also, as you're creating your course flow, make sure you refer to the course map and the CDD.
Summary
In this chapter, you learned how to plan your courses so that you can map resources and activities to course learning objectives. You learned how the CDD can serve as a blueprint for course development and form the cornerstone and cognitive foundation of an instructional strategy. The chapter also covered the difference between resources and activities and the basics of adding them to a course. You also went through settings that are common to the different kinds of resources and activities.
Moodle 4.0's redesigned Resources and Activities icons are quickly identifiable and help users quickly recognize an activity or resource, appearing in the user's timeline for easy navigation.
In the next few chapters, you will learn about specific settings for specific resources and activities and how to make the best use of them. While you're learning how to work with those items, you can refer back to this chapter for a reminder on how to use common settings.