Chapter 5: Adding Resources to Your Moodle Course
Resources are the instructional materials that students use to achieve the learning and performative outcomes of a course. In a world where face-to-face instruction is often severely curtailed, and synchronous web conferencing and asynchronous deliveries are often blended, readings, videos, maps, podcasts, and other kinds of documents are the key building blocks that are used in each course. Moodle gives you a way to organize the materials so that they flow in accordance with your course plan, and you can make the resources available in a way that makes sense, given your learning goals. The flexibility that Moodle offers has become increasingly important in today's environment of blended synchronous and asynchronous learning. This chapter will teach you how to add those resources to a course, as well as how to make the best use of them. We will also discuss how to select, sequence, and deploy the resources so that they contribute to student success in achieving outcomes.
In this chapter, we will cover the following topics:
- Tying resources to course outcomes
- Adding different kinds of resources
- Adding URLs and embedded resources
- Adding pages
- Adding files for your students to download
- Adding media – video and audio
- Organizing the resources
By the end of this chapter, you will be able to identify the appropriate resources to add and achieve the course learning objectives, manage the resources, and then use them effectively.
Tying resources to course outcomes
This is the time to review your course plan, which will involve the course map and Course Design Document (CDD), which we discussed in Chapter 3, Creating Categories and Courses. As you may recall, the course map and CDD constitute a storyboard and learning outcomes. In Moodle, "resources" refer to the content that you'll include in the course. The interactive assessments and engagers are referred to as "activities," but we'll cover that in Chapter 6, Adding Assignments, Lessons, Feedback, and Choice. For now, let's consider the best way to develop the course materials that will best align with the course goals.
It is great to have lots of resources, especially those that align with all kinds of learners in the course. However, unless they are organized well, and they tie clearly to course outcomes, you'll generate frustration instead of confidence.
Planning and organization are the keys to success in selecting, sequencing, and deploying your resources. Always tie them first to the learning outcomes, and then ensure that they are grouped in ascending order of complexity so that you're building a strong foundation and then scaffolding it at higher levels.
So, the first step should always be to list the course outcomes and then create an outline of your course in which you start to identify the resources you'll need:
- List course outcomes.
- Review your course outline.
- Identify the resources you'll need.
- Map the resources to your outcomes and identify any gaps that may exist.
- Develop your storyboard or CDD to place the materials in sequence.
The following is a planning grid or framework that you can use to keep track of your resources and make sure there are no gaps when it comes to your learning objectives and the Bloom's taxonomy levels. Keep in mind that the following table is simply a framework and that the entries I've incorporated are simply to help you get started. To make it easier to conceptualize, I'm using the example of a course called English 1102: Writing about Literature:


Figure 5.1 – Course map (planning grid)
It is also a good idea to tie course resources to delivery methods (synchronous, asynchronous, blended pedagogy, and so on) so that you can optimize the way that they are deployed. For example, a 90-minute video might be appropriate for asynchronous or on-demand courses, but not for a synchronous course, where live interaction is where most of the learning takes place.
Now that you've learned how to connect your resources to learning outcomes, you'll learn how to add the resources to your course so that you can use them effectively.
Adding different kinds of resources
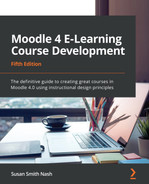
The following table lists the types of resources that are available in Moodle. Resources can be added from the Add an activity or resource drop-down menu. Using this menu, you can add the following resources:


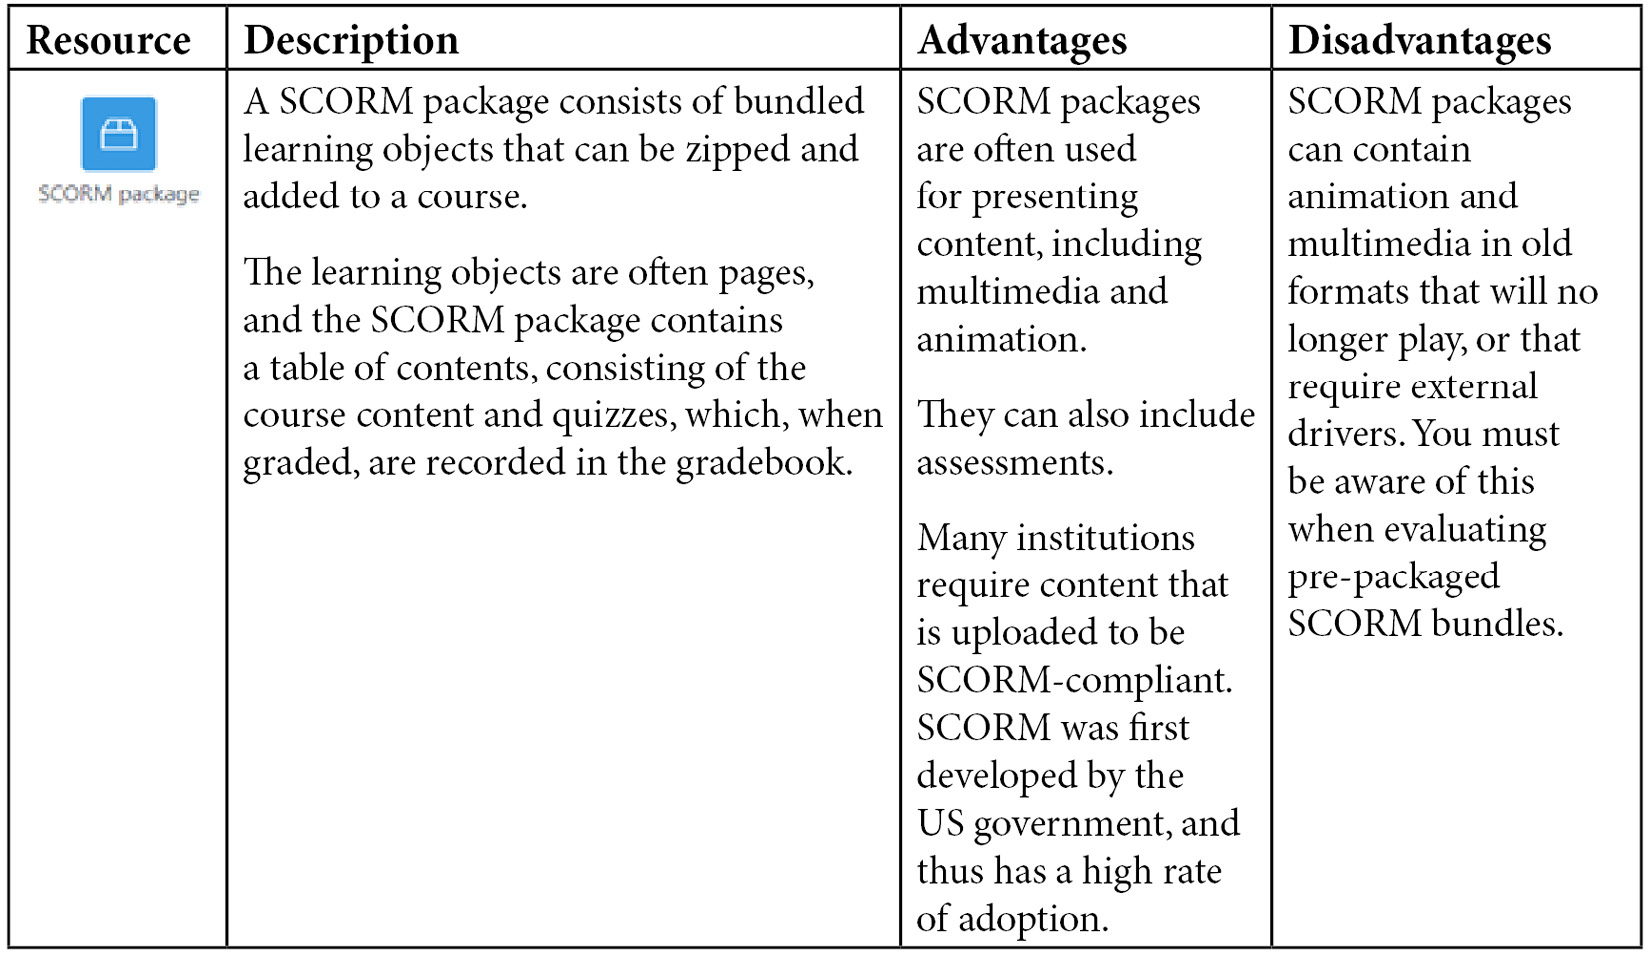
Figure 5.2 – Different kinds of resources
Having a selection of resources that comprise your instructional materials and connect to the learning objectives will help you have a successful course, as well as helping your students have a very positive user experience. Now that you know what is possible, you will learn how to link to them and embed them for maximum functionality.
Adding URLs and embedded resources
On your Moodle site, you can show content from anywhere on the web using a link. You add this link to your course's home page. When the student clicks on the link, the linked item is displayed.
When using content from outside sites, you need to consider the legality and reliability of using the link. Is it legal to display the material within a window on your Moodle site? Will the material still be there when your course is running? When in doubt, link to the resource. Take a moment to review the Creative Commons license, as well as resources that are available for educational use under FAIR guidelines: https://creativecommons.org/licenses/.
Display options – Embed, Open, and In pop-up
You can choose how the page is displayed; there are three options:

Figure 5.3 – Configuring the appearance of the URL or embedded resource
You can embed the linked page into a Moodle page. Your students will see the Navigation bar; any blocks that you have added to the course and navigation links will be shown across the top of the page, just like when they view any other page in Moodle. The center of the page will be occupied by the linked page.
Open will take the student off your site and open the linked page in the window that was occupied by Moodle.
Finally, In pop-up will launch a new window on top of the Moodle page, containing the linked page:

Figure 5.4 – Configuring the resource to create a pop-up window
We will look at these options in detail in the following sections.
Embed
To embed a page or a player, you will need to copy and paste the embed HTML code when you select a resource to include. You will see the options, and when the window for embed opens, you can simply paste the code into the box.
Open
When the user clicks on the link to the resource on the course home page, Moodle displays the page, along with the description of the link and a link to the outside page:
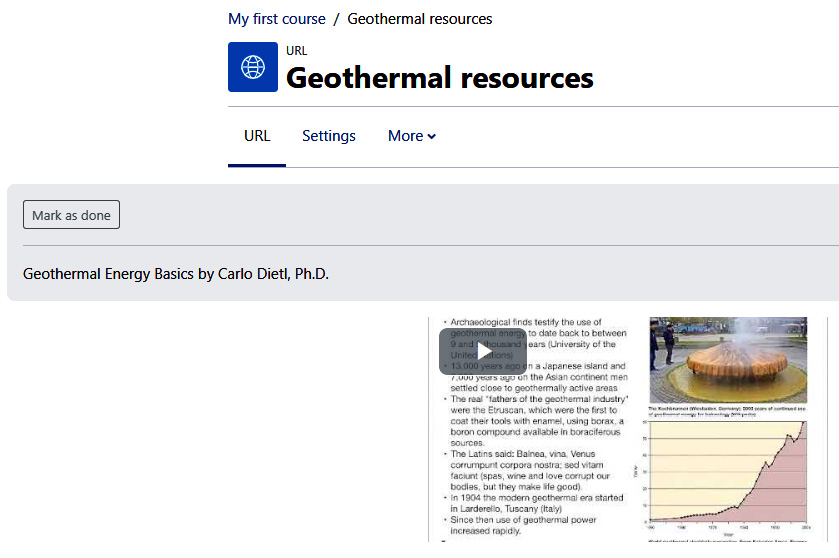
Figure 5.5 – An example of how an embedded page is displayed within Moodle
Clicking on the link activates the player, which is now embedded in your page. The learner can now view the resource while staying in Moodle (in this case, a YouTube video). However, sometimes, the video might be too tiny for the detail, and the learner would like to watch it in full screen. In that case, they would click on the enlarge square, which will take the learner outside Moodle and directly to the YouTube video:

Figure 5.6 – Clicking the bracketed square in the embedded YouTube view will expand the view to full page
In pop-up
When the learner clicks on the link to the resource on the course home page, Moodle displays the page with the description of the link and a link to the external page:

Figure 5.7 – The link to the resource that's been set to pop-up mode
Clicking on the link opens a pop-up window containing the external page. It is displayed on top of the window that's displaying your Moodle site:
Figure 5.8 – In pop-up mode
Clicking a link when you're using In pop-up mode will open the page of an external website on top of the window.
The following section contains instructions for creating a link on your course home page, and for using these options.
Adding links
To add a link to a resource on the web, follow these steps:
- In the topic or the week where you want to add the resource, click Add an activity or resource. If you're not sure where you want to add the link, just make your best guess. You can move it around the course later.
- The Add an activity or resource dialog box will be displayed. Click on the radio button next to URL.
- Click on the Add button.
- Enter a Name and Description for the link. To learn more about how the name and description affect the learner experience, please refer to Chapter 4, Managing Resources, Activities, and Conditional Access.
- In the External URL field, enter the web address for this link.
- Under Appearance, from the Display drop-down menu, select the method that you want Moodle to use when displaying the linked page – that is, Embed, Open, or In pop-up. Choosing Automatic will make Moodle choose the best method for displaying the linked page.
For more information about these display options, check out the Display options – Embed, Open, and In pop-up section, explained previously.
The Display URL description checkbox will affect the display of the page, but only if Embed is chosen as the display method. If selected, the Description details will be displayed below the embedded page.
- Under Appearance, you can set the size of the pop-up window. If you don't select In pop-up as the display method, these fields will have no effect.
- Under Parameters, you can add parameters to the link. In a web link, a parameter will add information about the course or a student to the link.
- Common Module Settings, the ID number field, and the Restrict Availability settings were covered in Chapter 4, Managing Resources, Activities, and Conditional Access.
- Click on one of the Save buttons at the bottom of the page to save your work.
In addition to URLs and embedded pages from outside websites, it is possible to add additional pages to the course. In the next section, you will learn how to add pages and then add content to them.
Adding pages
Moodle enables you to compose a web page and add it to your course. The page that you add will be created and stored on your Moodle site. Be very strategic when adding Moodle pages. If you are not careful, you'll create confusion. Here are the best ways to use pages:
- Add content that ties to the course outline: You may have short narratives or an entire chapter. Creating pages rather than a file allows you to also include links and for the navigation to flow very smoothly so that your students stay within Moodle at all times.
- Add portal pages with introductions, plus links, files, and books: You may wish to have a long introduction to your content for a specific unit or chapter of your course. You can create a page, add your introduction (including graphics and text), and then have an organized set of links, files, folders, and even books.
When you add a page to your course, Moodle displays a text editor. Using this editor, you can put almost anything onto the Moodle web page that a normal web page can contain.
A link to the page that you create will appear on the course's home page.
If you can use a basic word processor, you can use most of the web page editor's features. A full discussion of the editor's features is beyond the scope of this section. Instead, we will examine a few of the key features that are available in Moodle's editor. Please note that you can include math and chemical symbols, as well as HTML.
Adding a page to your course
To add a page to your course, follow these steps:
- In the topic or the week where you want to add the resource, click on Add an activity or resource. If you're not sure where you want to add the link, just make your best guess. You can move it around the course later.
- The Add an activity or resource dialog box will be displayed. Click on the radio button next to Page.
- Click on the Add button.
- Moodle will display the Settings page for this resource.
- Enter a Name and Description for the page. The name will become the link to this page and will appear in the section that you added it to on the course's home page.
If you select the Display description on course page checkbox, the description will appear on the course's home page. You can use this feature to tell the student what to expect when they view the page and tell them its purpose:
Figure 5.9 – Selecting the checkbox to display the description on the course page
To learn more about how the name and description affect the user experience, please refer to Chapter 4, Managing Resources, Activities, and Conditional Access.
On the Settings page, you can compose the web page. Scroll down to the Content section; you will see a text editor for composing the page and for editing the page's content:

Figure 5.10 – The text editor in the Settings page, which allows you to compose the new page
Adding images
When you select an image to add to a Moodle page, you can choose images from those that you have already uploaded in Moodle, or you can upload a new image. Uploading huge image files can take up space and slow down page load times. It is a good idea to optimize your images.
A less obvious feature is the ability to link to a picture that is hosted on another website. If you are using pictures hosted on another website, you can add the link, but be aware that link addresses change often. Also, be sure to give credit.
Inserting an image file
This procedure is for inserting an image file that you have archived on your computer or an external hard drive or flash drive. In this example, the user has a diagram that they want to insert into the page, as follows:

Figure 5.11 – Adding details when inserting an image file
To insert an image file, follow these steps:
- On the Moodle page, click to place the insertion point where you want the image to appear.
- Click on the Choose File icon, as shown here:
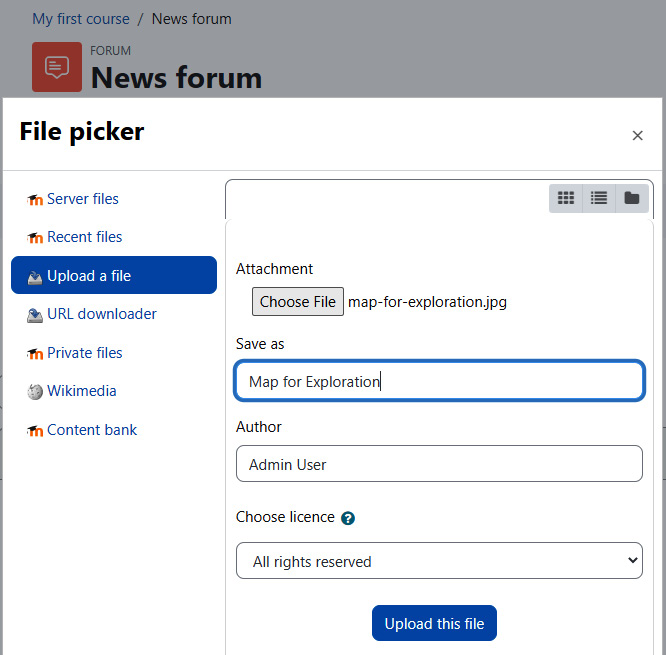
Figure 5.12 – Inserting an image in a news forum by clicking on the Insert Image icon
- The Insert/Edit image window will appear. In this window, click on the Find or upload an image button.
- The File picker window will be displayed. In this window, click on the Upload a file link.
- Click on the Choose File button.
- Locate the file on your computer and select it.
- Click on the Open or OK button.
- In the Save as... field, give the file a user-friendly name. You can use special characters and spaces.
- The Author field is automatically filled in with your name. If someone else is the owner of this file, enter their name here.
- From the drop-down list, choose a license for this file. This allows you to inform other Moodle teachers who want to use this file about what they can legally do with the file.
- Click on the Upload this file button. The file will be uploaded to your Moodle system and you will be returned to the Insert/edit image window.
- It is good practice to fill in the Image description field. This is used by visually impaired users who can't see the image and by search engines to index the image.
- If needed, fill out the fields under Appearance. You may want to resize the picture since Moodle will, by default, display the picture at its original size.
- Click on the Insert button. The picture will be inserted into the page.
Pasting text
Many times, we prefer to write text in our favorite word processor instead of writing it in Moodle, or we find text that we can legally copy and paste into Moodle. Moodle's text editor allows you to do this.
However, ensure that you keep in mind that Microsoft Word's various versions can do strange things to formatting. You may wish to strip out all the macros that create very clean text. You can use Notepad, or even Notepad++ (https://notepad-plus-plus.org). Once you've stripped out Microsoft's macros, you'll have to go back in and format (bold, underline, and so on), and you'll have to make your URLs live.
To paste text into a page, you can just use the keyboard shortcut. Try using Ctrl + V for Windows PCs and Command + V for Mac. If you use this method, the format of the text will be preserved.
Stripping out the formatting when pasting text from Microsoft Word
When you paste text from a Microsoft Word document onto a web page, it usually includes a lot of non-standard HTML code. The same thing occurs with other word processing programs, such as Google Docs. This code doesn't work well in all browsers and it makes it more difficult to edit the HTML code on your page. Many advanced web page editors can clean up Word HTML code. Keep in mind that the editor cleans up any code that could be dangerous and create vulnerabilities that could be exploited by hackers. So, don't be surprised if your text looks different than you had expected.
Moodle's web page editor can also clean up Word HTML code. You can also use Moodle's editor function to include math and chemical symbols.
When pasting text that was copied from Word, use the Clear Formatting icon. This will strip out most of Word's non-standard HTML code:
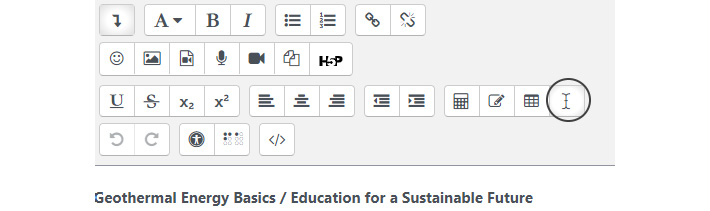
Figure 5.13 – The Clear Formatting icon
To strip out extraneous coding from Microsoft Word, Google Docs, or another program, click on the Clear Formatting icon.
Accessibility checker – do you need to add headings for assistive technologies?
To determine whether or not you need to add more headings to your text so that people who rely on assistive technologies can access the content, click on the button with a person with their arms out, as highlighted in the following screenshot. Doing so will help you align with Universal Design for Learning principles:

Figure 5.14 – The Assistive Technologies icon
To make sure your text is accessible for assistive technologies, click the Clear Formatting icon.
Composing in an HTML editor and uploading to Moodle
There are a few disadvantages of relying on Moodle to strip out Microsoft Word macros. First, the spacing is rarely exactly right, and to correct it takes quite a bit of time. However, it may not be possible to be online all that time, so you may wish to work offline and not in Moodle. So, you may want to compose your web page in an HTML editor such as Adobe Dreamweaver or even the free web-based HTML editor SeaMonkey. This is especially true if you want to take advantage of these editors' ability to insert advanced features into your web page. How, then, do you get that page into your Moodle course? You can copy and paste the HTML code from your web page editor into the Moodle page editing window. To do this, you must do the following:
- Select the HTML view in your web page editor. For example, in Dreamweaver, you would select View | Code, and on the front page, you would select View | Reveal Codes:
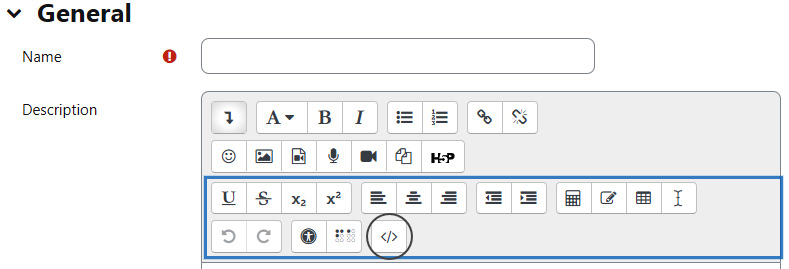
Figure 5.15 – The HTML icon
To reveal the HTML code in Moodle and edit it, click the HTML icon.
- Select the HTML code in your web page between the two body tags – that is, drag from just after the <body> tag near the top, to just before the </body> tag at the end. Copy the code with Edit | Copy or by pressing Ctrl + C. Then, do the following:
- Switch over to Moodle and create the new web page.
- Show the HTML code by clicking on the icon.
- Paste the code by pressing Ctrl + V.
A second method is to publish your web page someplace outside of Moodle and create a link to it from your course. Linking to your website is a good idea because when you paste text into the editor, Moodle will remove anything that it identifies as "dangerous."
Learning more about HTML
To learn more about HTML code, you can start with the organization responsible for defining the standards. The World Wide Web Consortium maintains the complete standards for HTML online at https://www.w3.org/standards. It maintains a basic tutorial at https://www.w3schools.com/html/html_intro.asp. Everything that's covered in this basic guide can be done using the editor in Moodle in its normal mode. The advanced HTML guide at http://www.w3.org/MarkUp/Guide/Advanced.html covers some features that you would need to go into the HTML view to add, such as defining clickable regions within images and using rollovers.
In addition to adding pages that contain content, it is possible to add files for students to download. Please note that Moodle often has a limited amount of space for hosting content on Moodle (either on-premises or in the cloud). So, you may consider having students download files from a cloud-based file-sharing site such as OneDrive, Dropbox, or Google Drive.
In the next section, you will learn how to add files for students to download, as well as how to make sure that they can both download and open them so that they can use them.
Adding files for your students to download
You can add files to a course so that your students can download them onto their personal computers. Some examples of files you may want students to have are forms to fill out, readings to complete before class, and word processing files to edit.
When a student selects a file from the course
When a student selects a file from your course, the student's computer will attempt to open that file. Moodle will only pass the file to the student's computer. For example, if it's a PDF file, your student's computer will probably try to use Adobe Reader or the Preview app to open the file. If it's a word processing file, your student's computer will attempt to use Word or some other word processor to open it. If your student's computer doesn't have a program that can open that type of file, it will probably prompt the student to save the file. In the case of a graphic or a sound file, their computer will use whatever resident application's most convenient. It is usually not the ideal one.
You can override this behavior with a setting called Force download. When you choose that setting, your student's computer will not try to open the file. Instead, it will download the file and prompt the student to save it.
If you want the student to use the file immediately upon accessing the file, just go with the default behavior. If you want the student to save the file for future use, select the Force download setting.
You will see this setting in the next section, when we look at the instructions for adding files to your course.
File repositories
Every file that you upload into a Moodle course is stored in a Moodle repository. Before we add files to our course, we need to understand how repositories work and how to choose the right kind for our course.
Types of repositories
A repository is a storage area that Moodle can access. The repository doesn't need to be on your server – it just needs to be accessible to your Moodle system. For more information about how to increase functionality and customize Moodle, you may wish to read a book on Moodle administration Moodle 3 Administration, https://www.packtpub.com/product/moodle-3-administration-third-edition/9781783289714
Repositories need to be enabled by the site administrator, under Site administration | Plugins | Repository | Manage repositories. Here are some examples of file repositories:
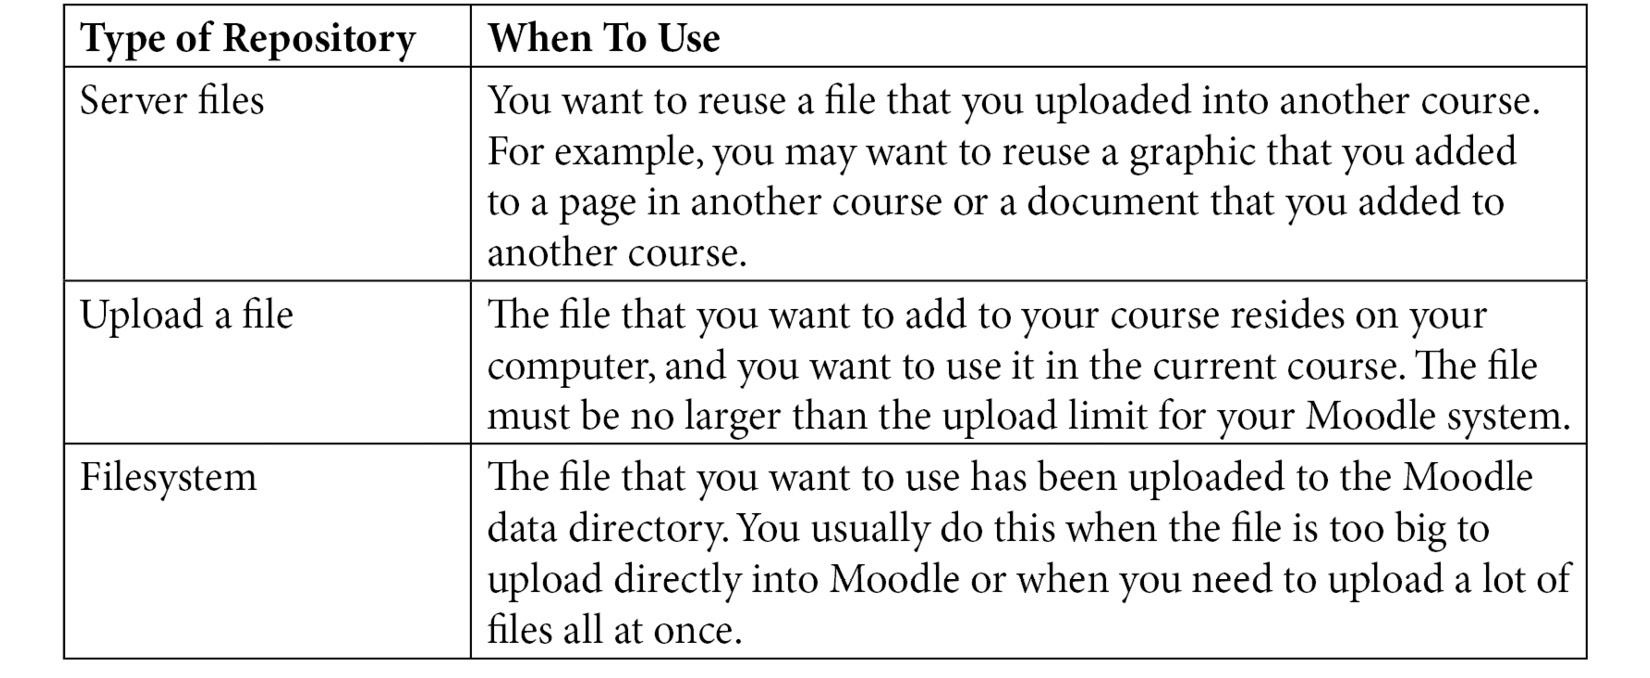

Figure 5.16 – When to use different types of repositories
Now that we have reviewed the different types of repositories, let's discuss when and how to use them.
Using file-sharing services to collaborate
When you use a file repository such as Dropbox, Google Drive, or OneDrive, you are storing your files outside of Moodle. This is a great way to collaborate. It is a good idea to use file-sharing services as well when collaborations continue beyond the time and scope of the course.
Using repositories to overcome Moodle's limit on file sizes
There is a limit to the size of a file that can be uploaded into your Moodle system. This limit changes for different Moodle sites. If you are using MoodleCloud, then there are even more compelling reasons to use repositories. Here, you can create a master document with links to the content that lives outside your course.
Three settings limit the size of a file that can be uploaded into Moodle. Two of those settings are on your web server. The administrator for your web server will need to change them. If you are using a shared hosting service, you may not be able to change these settings. The third setting is in Moodle; it can be changed by the system administrator.
The size limit for uploaded files is the smallest of these three settings.
In Moodle, under Site administration | Courses | Course default settings, look for the Maximum upload size setting. The maximum size available under that setting is taken from the php.ini file. You can set a lower limit than this but not a higher limit. For this, please check with your site administrator or check out Packt's book, Moodle Administration, at https://www.packtpub.com/product/moodle-4-administration-fourth-edition/9781801816724.
When you upload a file into Moodle, it will be placed in a file repository. By default, it will appear in the Server Files repository. If the Recent Files repository is enabled, the file may also appear there. If the file is too large, Moodle will not allow it to upload.
Functionality Booster
In today's environment of hybrid synchronous and asynchronous delivery, Moodle can be a lifesaver. If you are using BigBlueButton or another web-conferencing platform, you can make resources immediately available by posting them in Resources within Moodle, and also by including a link in the chat room of Zoom.
You may also record a Zoom meeting. Later, you can download the version of the .mp4 video file that you prefer. You can also download the transcript. Once you've downloaded it, you can upload the .mp4 video file to the video hosting service you prefer, which could be YouTube, Vimeo, or another service.
The transcript of the audio can be a vital tool, particularly for those who may be hearing-impaired or whose first language may not be English (or the language of the webinar). Having an audio transcript available helps you adhere to the principles of Universal Design. Keep in mind that you may need to do a bit of copy-editing.
Once you've added descriptions and transcripts of media, you can add the media itself. You will learn how to do so in the next session.
Adding media – video and audio
If you want to add video or audio to your course, you have three choices:
- First, you can add it as a resource or file. If you do that, when the student selects the file, one of two things will happen: either the media file will be downloaded to the student's computer and played by the software on their computer, or Moodle will try to play that file with its built-in media player. If multimedia plugins are enabled under Site administration | Plugins, Moodle will try to play the file in its built-in media player. If multimedia plugins are not enabled, the file will be played using whatever media player is on the student's computer. HTML5 was designed to make it easy to play media of all kinds from all kinds of devices (phones, tablets, and laptops) and all browsers. Moodle accommodates HTML5.
- Second, you can embed the media on a Moodle page (please refer to the Adding pages section). This will cause the media to be played on the web page.
- Third, you can copy and embed code into the HTML of your page in Moodle. You will see a small screenshot containing the URL and a Play icon. The player looks like it is in Moodle, but it's being played from the host (YouTube, Vimeo, and so on). You can also add entire packages containing multimedia by uploading a SCORM package or HTML5 via the H5P functionality.
Adding video or audio to a page
This procedure will add video, audio, or an applet to a Moodle page. You must own the file that you are adding – that is, the file is on your computer and not on another website. If the file that you want to appear is on another website, see you will need to embed the media rather than uploading it.
- On the Moodle page, click to place the insertion point where you want the media to appear.
- Click on the Insert Moodle media icon:

Figure 5.17 – To incorporate media, click on the Insert Moodle media icon
- A pop-up window will appear. In this window, click on the Insert media button. You will have a chance to insert a link, video, or audio. In each, you have the option to upload from a URL, which is what I'm doing here. If you do not want to do that, you can click on Browse repositories… and go to the file picker:
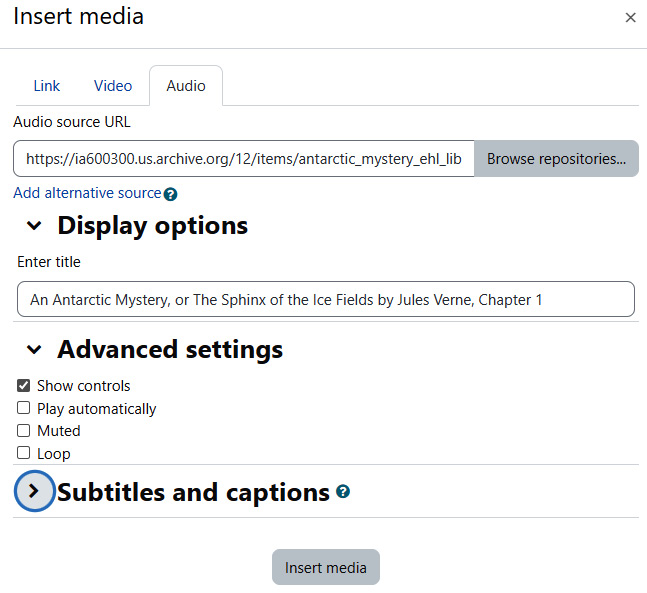
Figure 5.18 – Configuring the view of inserted media resources
- If your media is on your server, you can upload it from the file picker menu. The File picker window will be displayed. In the File repositories section, you learned how to add a file from a repository. In this example, we'll upload the file from your computer. Click on the Upload a file link:

Figure 5.19 – To add a file from a repository, click on the Upload a file icon
- Click on the Choose File button.
- Locate the file on your computer and select it.
- Click on the Open or OK button.
- Optionally, give the file a name that you want it to have in Moodle. This is in the Save as field.
- By default, the Author field contains your name. If someone else created this file, give them proper credit by entering their name as the author.
- The Choose license drop-down list allows you to select a license so that other teachers know what kind of copyright the file has:

Figure 5.20 – Selecting copyright or licensing options
- Click on the Upload this file button; the file will be uploaded to your Moodle system.
- If needed, fill out the fields under Appearance. You may want to resize the picture since Moodle will display the media at its original size by default.
- Click on the Insert button. The media will be inserted into the page.
If you are inserting a podcast, you may not be able to insert only the .mp3 file. In the case of a podcast, you'll need to embed the HTML code. The following is an example of SoundCloud:
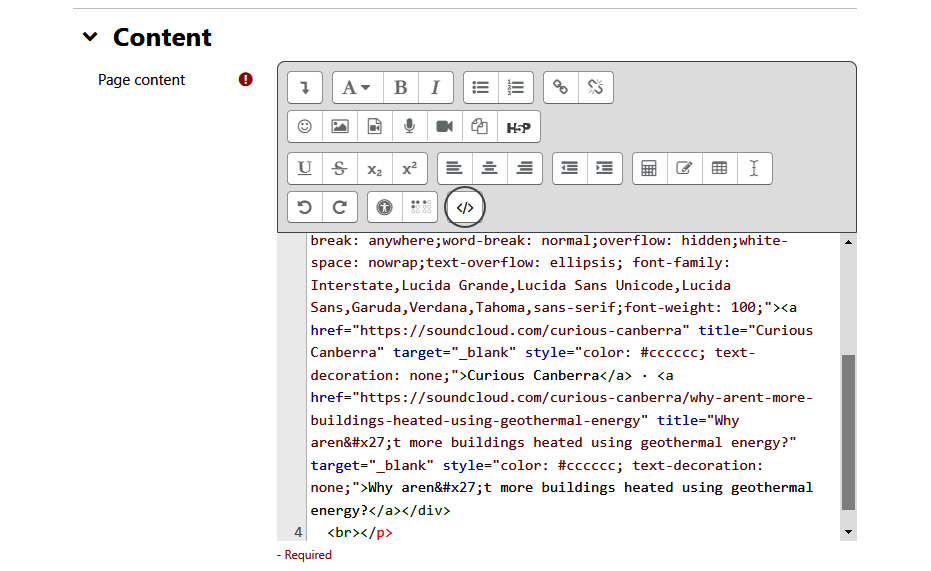
Figure 5.21 – As you edit the media description, you may not see the media
Once you've saved the pasted embed code, the podcast player will show up, and it will include any graphics that are in the podcast as well:

Figure 5.22 – Media player with description
The media player and the description will both appear in the window once you save the description.
To embed a video on a page, follow these steps:
- Find the media that you want to link to. For example, you may find a video on several different sites. Here are a few: https://vimeo.com/ , https://youtube.com, and https://www.ted.com/talks.
- Check the license for the material to ensure that you have the right to use it as you intend.
- Somewhere on the page, you will see a button or link that will give you the HTML code to embed the video, either by copying and pasting the URL or the entire embed code block:

Figure 5.23 – Embedding media
To embed media, click on the Share link, then copy and paste the HTML code, either for the link or the full embed code block.
- Copy the code for embedding the video.
- Switch back to Moodle, where you are editing the page.
- On the Moodle page, click to place the insertion point where you want the media to appear.
- Click on the Edit HTML source icon. You can add text and more items if you want. Note that Moodle 4.0's HTML editor is very easy to use and automatically positions the media in the middle of the page:
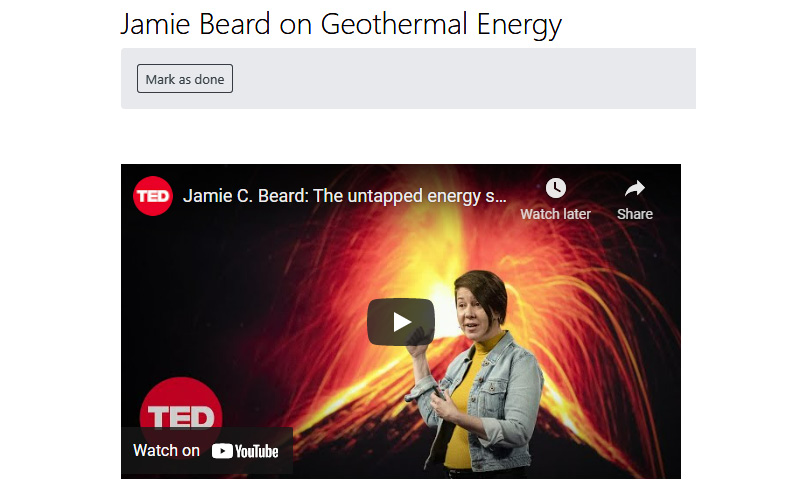
Figure 5.24 – The embedded media automatically centers in the middle of the Moodle page
Functionality Booster
In a hybrid course that has synchronous webcasting (Zoom, for example), you may find that people are not as engaged as you may wish. Some people like to combat audience apathy by including periodic polls or opinion questions in Chat. This is a good idea, and you can save the responses as a historical reference and an engager.
If you want to be able to save the polls and opinion questions, you can build them as a choice question in Moodle and then simply link to them in the Chat section of Zoom. I suggest that students keep two windows open: one with the Zoom meeting and the other with Moodle, where they can participate in Choice. By incorporating Choice into Moodle, webinar attendees who watch the recording can still participate in the poll or opinion question.
Once you have added items such as media to your course, you can add labels to the items that you've added to make it easier for students to identify them. To make it even easier to navigate and to improve the user experience, let's learn how to move material around on the course page.
Using labels to further organize your course
The main tools for organizing a course in Moodle are sections and labels. In this section, we'll learn how to use them and how to move material around on the course page.
Naming your topics
In a course that uses the topics format, your topics are automatically named and numbered, as shown in the following screenshot:

Figure 5.25 – Adding a label to help further indicate what the topic is about
You can move the label so that it appears immediately under the topic:

Figure 5.26 – Moving the label's position
You may wish to add graphics for engagement to the label. You can do so by opening the label and modifying it. In this case, I clicked on the Insert media icon, then clicked on Repositories. I selected Wikimedia from the File picker window and then entered geothermal energy New Zealand as my search term. Success! I have quite a few to choose from:
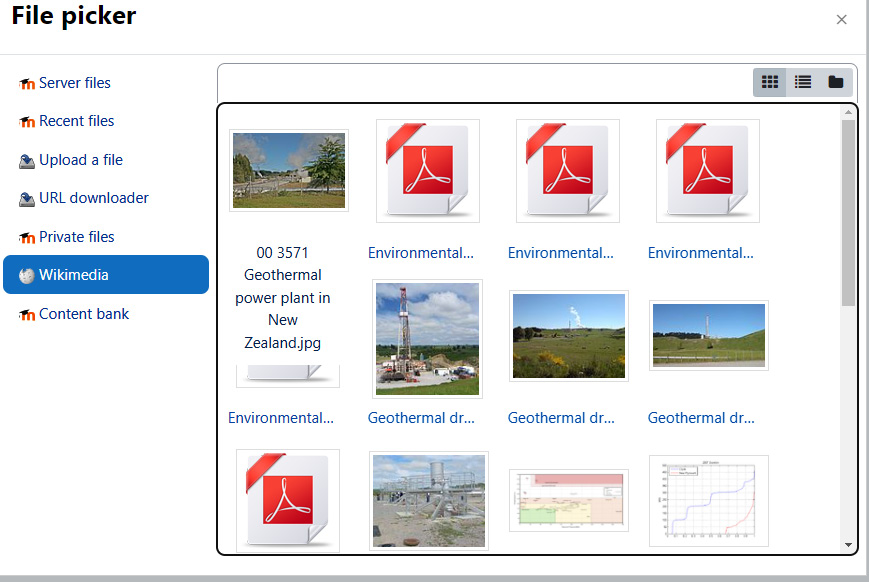
Figure 5.27 – Wikimedia label and images
You can add graphics that illustrate your topic by adding a label and then selecting from Wikimedia or other sources.
The result is very attractive and engaging. The label looks like it is a part of the topic, and it gives you a chance to add items that will engage the learners:

Figure 5.28 – Using the label to describe the graphic
After making all the necessary changes to the label, you may want to modify your topic's name. To add a name and description to a Topic, follow these steps:
- Log in to your course as a teacher or a site administrator.
- In the top-right corner of the page, if you see a button called Turn editing on, click on it. If it's called Turn editing off, you do not need to click on this button.
- Next to the topic's number, click on the Edit summary button:

Figure 5.29 – To edit the summary, click on the Edit Summary icon
- The Summary page for your topic will be displayed. You must uncheck the Use default section name checkbox. If there is a checkbox in this field, you cannot edit the name or description of the topic.
- In the Section name field, enter the name of your topic.
- In the Summary field, enter a description. This is a full-featured web page editor, so you can enter text, graphics, and media:

Figure 5.30 – Configuring the summary
- Save your work. You will be returned to the course home page. The name and summary of the topic will be displayed.
Rearranging/moving items on the course home page
As you build your course, you will be adding resources and activities to the course page. Moodle allows you to easily reposition these items. It's so easy to reposition them that I recommend that you don't even worry about getting them in the right place as you are creating them. Just forge ahead and create – you can rearrange later.
Rearranging items on the course page can be done like so:
- Log in to your course as a teacher or a site administrator.
- In the top-right corner of the page, if you see a button called Turn editing on, click on it. If it's called Turn editing off, you do not need to click on this button.
- Next to the item that you want to move, place your mouse pointer over the Crosshairs icon
- Drag the item to where you want it on the course page and drop it.
"Instant course" with videos in the public domain – a good idea?
In the last few years, the number of educational videos has proliferated, and they are often of very high quality. For example, the United States Department of Agriculture (USDA) has made a number of their food inspection training videos available on their website: https://www.fsis.usda.gov/inspection/inspection-training-videos/regulatory-education-video-seminars. If you are a school that offers vocational training, you're probably thrilled that such high-quality resources exist and that they are free to use for educational purposes.
It may be tempting to simply upload the videos into separate modules. You say to yourself, "Yippee! Instant course!" and you tell yourself it's all good. After all, the videos contain instructions. But is such an approach legitimate? Is it a full course? The short answer is "no." Even if the video has learning objectives within it, you still need to frame the instructional video within an instructional strategy.
So, if you are lucky enough to find resources in the public domain that perfectly align with your goals, you'll still need to create a course map and a CDD that include the elements we discussed earlier in this chapter.
Summary
In this chapter, we looked at the resources that are available in Moodle. They are non-interactive course materials (books, pages, URLs, files, and labels) that form the core of most online courses.
Adding static material first gives you a chance to think about how the material will be discussed and used. Later, you can add more dynamic resources, and make connections to the course objectives and the assessments. The intent of Moodle 4.0 is to enhance your learning experience, as well as giving you more opportunities to deploy resources in ways that trigger thoughts and connections to the learning objectives and course goals, and help you demonstrate mastery.
What we emphasized in this chapter was the importance of selecting, sequencing, and deploying resources so that they always advance the goals of the course and help students meet their learning objectives. We also discussed how to incorporate current practices that include blended asynchronous/synchronous delivery, particularly when there is a desire to include webinars, which are then recorded (with transcripts).
Organizing your resources for students so that they know which chapter or unit they correspond to can help instill a sense of confidence and an "I can do it!" attitude in them. We also provided functionality tips for strategies to boost student engagement for blended synchronous and asynchronous courses.
In the next chapter, you will learn how to add some interactive material. Instead of just reading and viewing material that you post, the student will produce work and interact with their teacher and peers online.