
Chapter 3: Creating Categories and Courses
This chapter shows you how to create a new blank course. In this chapter, you will see how to create the course, choose the best format for your course considering your course objectives, and enroll students in the course. In addition, we will ensure that the course is well designed and that you are continuously aware of how learning will take place.
Moodle 4.0 offers major user experience (UX) improvements, and they are evident from the moment you start creating courses. First, there are navigation improvements that allow you to see your courses at a glance, navigate back to the last place you visited, and see all your courses at a glance in an improved Dashboard that merges calendars and timelines from all courses. You will also learn how to create course categories and use those categories to organize your course catalog. In keeping with current methods of instruction, which often involve Zoom, Teams, BigBlueButton, and other web conferencing software, you can also make it clear which courses are fully online or which have a blended delivery, with both synchronous and asynchronous elements. They should align with your institution's mission and vision so that you maintain a coherent presence. You will also be able to use the results for marketing and promoting your programs and your institution.
This chapter will cover the following main topics:
- Planning based on your institution's mission and vision
- Accreditation considerations
- Creating courses
- Enrolling teachers and students
By the end of this chapter, you will be able to set up blank courses and then group them into categories for your new course in Moodle 4.0.
Planning based on your institution's mission and vision
Many learning organizations offer similar courses, yet their students feed back remarkably different experiences and outcomes. How can that be, if the content is identical? The reality is that your course content is just a part of the learning equation because it's all about the learning, not the teaching. A large component has to do with how the content is framed, contextualized, and then applied. Each ties into the primary mission and vision of your organization.
As your organization decides what it wants to be in the world and how it wants to make an impact, it must devise its primary mission – that is, the how we will do it component to the overarching what our ideal world looks like question. If you think this sounds a bit utopian, you are right. It is. The best learning organizations want to create a better world, even if that utopia will never actually exist in the real world, and to get there, they need to determine action steps, which translate to a mission implemented by strategy and tactics that can be implemented as follows:
- Framework: Think of the framework as the pillars that hold up your mission and vision. Define them. Then, as you do, they will help you create structures and categories of your organization's offerings.
- Contexts: Who do you identify as your main student body? What is your main target? Who are your learners? Where are they? What are their main strengths, abilities, and cultural backgrounds? You will need to define your audience as well as your instructors if you want to have an effective learning organization. You'll also need to have a sense of your learners, the learning environment, and the limiting/enabling technologies in order to sequence your courses and ensure that they are at the correct level and presented in the right order.
- Application: Engaged students are the ones who are actively working with the content. They are the ones who are focused on being able to do more than simply memorize facts, answer questions, and then forget it all. Application involves invoking experiential learning and connecting to real-world situations and problems. So, as you create your courses and classify them, be sure to think about how it will be possible for your learners to put learning blocks together across a curriculum and prepare themselves to be completely autonomous.
You may think that frameworks, contexts, and application are too much to think about right now. After all, aren't you just putting together a list of courses? Yes and no. The list cannot be properly categorized if you do not know its ultimate purpose, its level, and what you want your students to do with the knowledge. This is particularly the case as you start thinking about ways to build on knowledge and have your students develop knowledge that will have real-world implications.
Further, the way you put together your list of courses will help you as you prepare your organization for its accreditation reviews. As you will see in the next section, the way you set up your presence in Moodle will have a significant impact on how you are viewed in accreditation and certification reviews.
Accreditation considerations – organization and alignment
In order to maintain accreditation, colleges and universities must undergo periodic reviews. With the proliferation of online courses, it is more important than ever to clearly map out an overall curriculum and course goals, and ensure that courses align with the institutional mission and vision, along with long-term goals and objectives. Further, with the need to be flexible with synchronous and asynchronous course delivery, it is important to demonstrate that you are including faculty training. Most accredited organizations that offer online instruction require instructors to take and successfully complete, at the very minimum, a course in the subject. They may also take courses covering the basics of instructional design and student motivation.
One of the best strategies for demonstrating that your courses and curriculum have been designed with a plan in mind and that they adhere to a mission is to create categories and subcategories that then appear on your Moodle site. If you use personalized learning that allows students to advance to higher levels of learning once they have demonstrated mastery of concepts or skills, this is a time to map out competency frameworks. Basically, each learning objective aligns with an assessment, and when the assessment is completed with a passing score, that competency has been satisfied, and the student can move on to the next section.
Every Moodle course must be assigned to at least one course category. The categories should correspond to your institution's course catalog, the document that you prepare for your self-review study, and then later, the document you submit to the accreditation team. This is an excellent example of how Moodle's organization can help you achieve consistency in all the places where you display courses, ranging from the course catalog to the strategic planning documents. Moodle can function as your foundation.
Choosing the best option for your front page or dashboard
When you are deciding which option to use for your front page, try to put yourself into your student's situation:

Figure 3.1 – The Dashboard options
Now that we have discussed how each option can affect how your student sees and uses the site, let's create course categories. As you are planning, be sure to create a list of the categories and courses.
Creating course categories
You must be a site administrator to create, edit, and delete course categories. Throughout this chapter, we are assuming that you are a course administrator or manager. Perform the following steps to create course categories:
- If you're not logged in as the administrative user, log in now. Use the Login link at the upper-right corner of the page.
- You should be looking at the home page of your new Moodle site.
- From the Administration menu on the left of the page, click on Site administration | Courses | Manage courses and categories. This displays the Course categories page. On this page, you create new categories and courses. Here, you can also arrange the order in which the categories are displayed on the front page.
- Click on the Create a new category link. The Add new category page is displayed.
- Select where in the hierarchy of categories this one will be. In the following example of a new category, Entrepreneurship, we will go into the Parent category, which is the top level:

Figure 3.2 – Editing category settings
- In the Category name field, enter a name for the category. Your users will see this in the category list.
- In the Description field, enter a description for the category. If you configure your front page to show a list of categories, the user will see this description upon selecting a particular category. Enter some information in order to help your users decide whether this is the category they need.
The category description can have the same features as any Moodle web page. For example, you can add a graphic to the category description, as shown in the following screenshot:

Figure 3.3 – Adding the category description
In Chapter 4, Managing Resources, Activities, and Conditional Access, we will show you how to use Moodle's web page editor. This is the same editor that you saw in the preceding screenshot.
- Click on the Create category button. Moodle creates the category and redirects you to the Manage courses and categories screen.
Rearranging course categories
You must be a site administrator to rearrange course categories. The order in which you put them on this page is the order in which your users will see them listed.
If you're not logged in as a site administrator, log in now. Use the Login button at the upper-right corner of the page. Here are the steps to follow:
- You should be looking at the home page of your new Moodle site.
- From the Administration menu on the left of the page, click on Site administration | Courses | Manage courses and categories. This displays the Course categories page.
To move a category up or down in the list, click on the arrow button next to the category:

Figure 3.4 – Moving course categories up or down
- To convert a category into a subcategory, select the category and then use the Move selected categories to drop-down list:

Figure 3.5 – Converting a category to a subcategory
- You do not need to save your changes. The changes you make on this page are automatically saved as you click on the corresponding buttons.
Now that you have learned how to create categories, you'll now move on to creating the courses that you'll use to populate the categories. You will also learn how to classify the courses, create descriptions, and develop them so that they are both easy to find and place in different parts of your Moodle site.
Displaying courses and categories on your dashboard and front page
The Dashboard gives you a place to bring together all the items you will access often, and it keeps you from having to navigate through many links. For example, you can see Learning plans, Recently accessed courses, Online users, Recently accessed items, and a Timeline, all on one screen, as demonstrated in the following screenshot:

Figure 3.6 – A combo list for the Dashboard of your new site
If you have a large number of categories and courses, or they are complex, a combo list might be too long for your front page. In that case, you can display just the course categories. Then, the user would select a category and see the courses under that category, as they show up as drop-down menus or a simple list.
You have the option to create new categories and also to organize them so that they appear in the order that you would like. Keep in mind that these categories will appear in a block on the left. You can also edit the names of the courses if they are too long for the space.
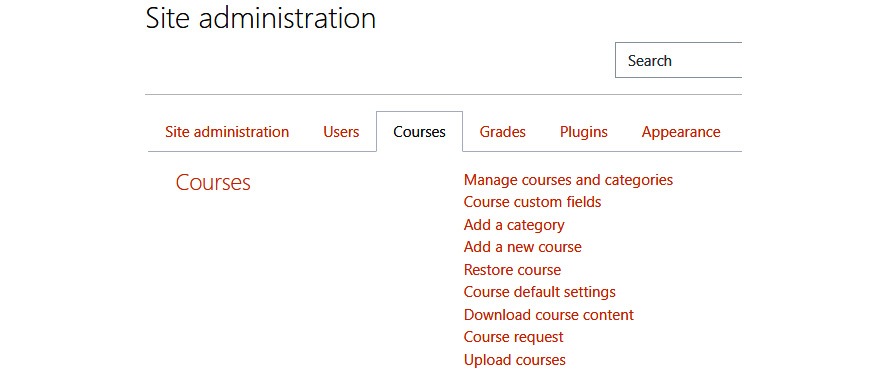
Figure 3.7 – Selecting the Manage courses and categories option
To set up a new course category, you will complete the fields. You may wish to include your course under an existing category or start a new one without a parent category, as illustrated in the following screenshot:

Figure 3.8 – Creating and managing course categories
Note that when you open the Course and category management page, you have the opportunity to customize the category itself. You can edit the category, add a description (through Edit), assign roles, create permissions, create cohorts of students who are enrolled in Moodle, and create filters. You can also upload a learning plan template and a competency framework. There are many competency frameworks available through the Plugins library, or you can develop your own:

Figure 3.9 – Selecting menu items to modify categories
There are several ways to display categories on your home page (the front page) of your Moodle site. Note that some people refer to the front page as the home page (as per Moodle docs), while others may refer to it as the course Dashboard. To begin, look at the left side of your Dashboard, where you will see a menu:
- Click on Site administration and then on Plugins. Blocks are under Plugins, so be sure to navigate to Blocks after clicking on Plugins.

Figure 3.10 – The Blocks page
To include the course category in the recently accessed block items to make navigation easier, click Recently accessed courses and then click the checkbox next to Default: Yes. Then, click Save Changes.
- You can also make sure that the Dashboard contains the course category, summary, card, and list by clicking Course overview from the menu in the Blocks section shown in Figure 3.9, and then checking the following options:

Figure 3.11 – Configuring what will appear on the Dashboard
- Once you have created a Courses block, the block will appear as a menu in the upper-right-hand corner in the Classic theme. Once you have your Courses block, you can then add items to it from the right-hand menu, as demonstrated in the following screenshot:

Figure 3.12 – Adding a block from your course
The list that shows both course categories and the courses is called the combo list. You can configure the courses block to make it visible on the left or right of the screen in the Classic theme, as shown here:

Figure 3.13 – Displaying recently accessed courses on the Dashboard in version 4.0
Functionality booster
As you create categories and subcategories, consider creating two new categories – asynchronous courses, and blended synchronous and asynchronous courses. If you do not want to have these categories show up on the front page, you can hide those subcategories by going to Site administration | Front page | Front page settings | Maximum Category Depth.
Displaying an uncategorized list of courses on your front page
Another option for showing courses on the front page is as an uncategorized list. This is a good option if your site has only a few courses or you are trying to establish a new brand or certificate program that contains an unusual combination of courses. If you include an uncategorized list, you may wish to describe the reasons for offering the courses, and tie them to your program's overall vision.
Keep in mind that your categories can be aligned with topics, subjects, fields of study, or even delivery mode. You can have 100% asynchronous, blended synchronous and asynchronous, or blended face-to-face and asynchronous. Some institutions have classified categories as online courses (100% asynchronous), blended courses (asynchronous, plus Zoom), and "live" web courses (synchronous delivery).
The site in the following screenshot shows a simple list of courses with the course descriptions:

Figure 3.14 – Displaying the available courses with descriptions
In this section, we learned about the ways to set up site-wide categories and course classifications so that when we create courses, we can organize them well. Now, we will learn how to create courses.
Creating courses
As stated earlier, every course belongs to a category. Don't worry if you mistakenly put a course into the wrong category.
Creating a course and filling it with content are two different functions. In this section, we will talk about creating a blank course, with no content. In the later chapters, we will learn how to add material to a course.
To create a course, a user must have the site-wide role of the site administrator or manager. To add material to a course, a user must be a site administrator, course creator, manager, or teacher (usually, the teacher adds material). The following tables show what the different roles can do.
Moodle site roles:

Figure 3.15 – Moodle site roles
Moodle course roles:


Figure 3.16 – Moodle course roles
In this section, we have learned about site-wide roles and course-specific roles. Next, we will look at creating a new blank course.
Creating a new blank course
When you create a blank course, most of your choices and settings will be done on the settings page for the course. The Moodle Help icons on this page do a good job of explaining the purpose of each setting. However, the directions do not specify the implications of the choices you make on this page.
In the instructions given next, I've added some commentary content to help you determine how your choices will affect the operation of your course and how the student/teacher is affected by those choices. My goal is to help you make the right choices in order to create the teacher/student experience you want.
The result of this procedure is a new course, ready for course material to be added. To create a new blank course, follow these steps:
- Log in to the site as a site administrator, manager, or course creator.
- Select Site Administration | Courses | Manage courses and categories.
- Click on the Create new course link. The Edit course settings page is displayed.
- From the drop-down list at the top of the page, select a category for the course. You can use the drop-down list to change the category at any time. The list shows both visible and hidden categories.
As your site grows and you add more categories, you might want to reorganize your site. However, if a student logs in while you are in the middle of creating categories and moving courses, they might be confused. You can speed up the reorganization time by hiding your categories as you create them. This lets you take your time while thinking about what categories to use. Then, move the courses into the categories.
Each course will disappear until you finally reveal the new categories.
- Enter a full name and a short name for the course.
- The full name of the course appears at the top of the page when viewing the course, and also in the course listings. The short name appears in the breadcrumb, or navigation bar, at the top of the page. In the following example, the full name is The Happy Little Trees of Bob Ross: Pop Art and Kitsch, and the short name is BobRossPopArt.
- You can add the course summary in Description.

Figure 3.17 – Adding a new course
The full name also appears in the page's title and metadata, which influences how it appears in the search engines. The metadata may not be too important for some course creators, but for those who are marketing the courses and want them to appear in search results, it is important. The following is the HTML code, generated by Moodle, for the preceding example:
<head>
<title>Course: The Happy Little Trees of Bob Ross: Pop Art and Kitsch </title>
<link rel="shortcut icon" href="http://localhost/moodle/theme/image.php/standard/theme/1359480837/fav icon" />
<meta http-equiv="Content-Type" content="text/html; charset=utf-8" />
<meta name="keywords" content="moodle, The Happy Little Trees of Bob Ross: Pop Art and Kitsch " />
Note the full course name in the <title> and <meta> tags. Many search engines give a lot of weight to the title tag. If your Moodle system is open to search engines, choose your course title with this in mind.
- Enter a course ID number. Chapter 2, Installing Moodle and Configuring Your Site, talked about using an external database for enrollment information. If you are using an external database to enroll students, the ID number that you enter into this field must match the ID number of the course in the external database. If you're not using an external database for enrollment information, you can leave this field blank.
- Enter a course summary. If you choose to display a list of courses on the front page, the course summaries are displayed with the names of the courses, as shown in the following screenshot:

Figure 3.18 – Displaying course summaries
You can add a description of the course through the course summary. It appears in the text box in the Description section, next to Course summary, as shown below. You can format it in many ways, including selecting a special font, using bold-face, italics, and even including multimedia content:
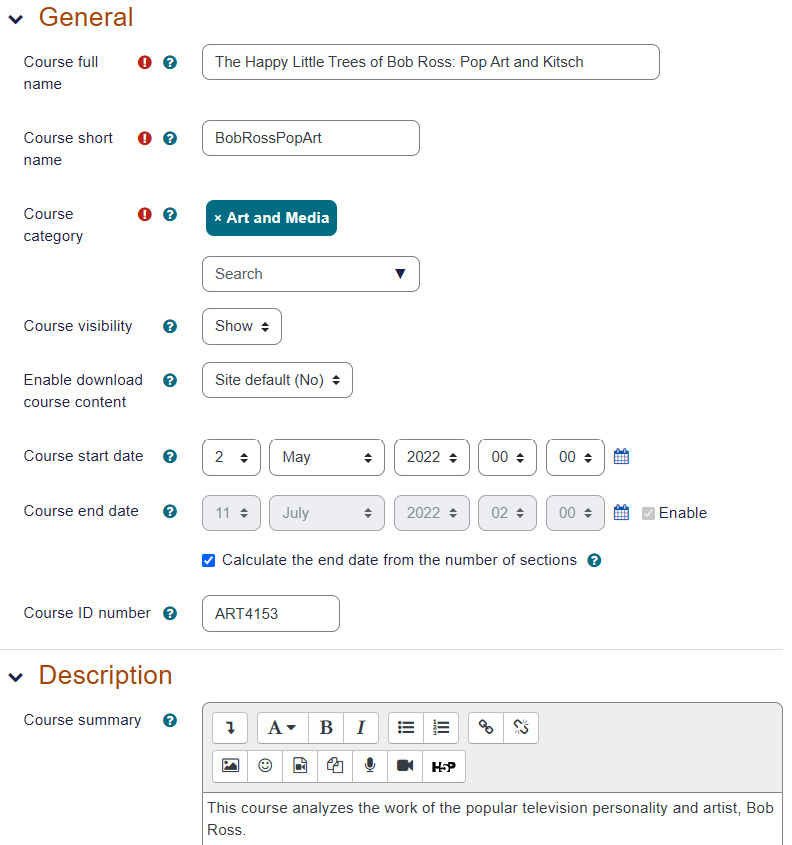
Figure 3.19 – Formatting the course summary
- If you allow visitors to see your front page without logging in, they will probably read your course summaries before enrolling. Consider the summary to be a résumé of the course. Your course summaries need to be informative and work as a sales tool. They should offer enough information to help your visitors decide whether they want to enroll and should describe the courses in their best light. The summary can include learning objectives and the duration of the course.
- Select a format for the course. Among your choices are the following:
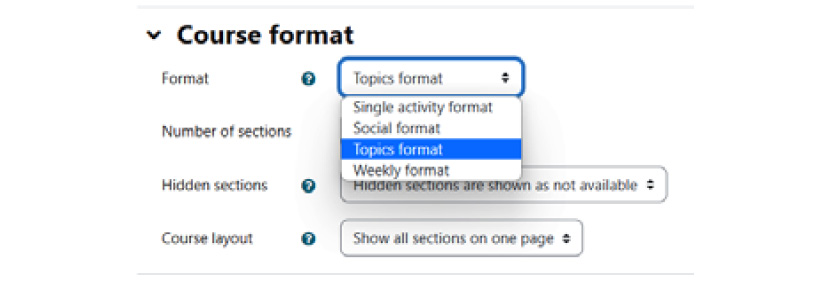
Figure 3.20 – Selecting the course format
- Topics: The Topics format is the most intuitive format to use for a course. As it displays each part of the course as a numbered topic, this format encourages most students to proceed through the course sequentially. However, by default, Moodle does not enforce this sequence, so students are free to jump back and forth in the course.

Figure 3.21 – The topics format
- Weekly: Unless this is changed by the site administrator, this is the default format for a new course.

Figure 3.22 – The weekly format
- Social:The Social format turns the entire course into one discussion forum. Discussion topics are displayed on the home page of the course. Replies to a topic are added and read by clicking on Add discussion topic. The Social format is very different from a traditional, sequential course. It lacks the ability to add activities and resources in the main course area, which you find in the Topic and Weekly formats. However, because the Social format turns the entire course into a discussion forum, it offers you the chance to put a discussion forum right into the course listings. Then, you can have a discussion appear in the course listing on the front page of your site.

Figure 3.23 – The social format
- Single Activity: The Single Activity format looks like the Social format and usually centers around a discussion thread or forum.
When Should I Use the Sharable Content Object Reference Model (SCORM) Format?
If you want to use a SCORM package as a part of your course, use the Topics or Weekly format. Then, you can add the SCORM package as an activity in the course.
In the previous section, we learned how to set up and format a new course. Now, we can fine-tune the structure of the course by selecting the way the content modules are organized. The modules are labeled as weeks or topics, and you can adjust how many you have. In the following steps, you will learn how to configure your modules.
Before you start, it is a good idea to outline your course structure so that they align with your course goals. Course planning is vital in order to achieve your course objectives. So, to get started, you'll need to take a look at your learning objectives and then map them across the course. To do so, each module will relate to at least one learning objective. Each module will contain course content and activities, which we will cover in later chapters.

For now, make sure that your modules align with your organization's timelines and academic structure. For example, if you use a semester structure, you may wish to use the weekly format. Then, you can make sure to distribute the work (instructional materials, assessments, and activities) in a way that makes sure you cover the content comprehensively.
A course map can simply be a spreadsheet in which you list the learning objectives and then align them with the modules and the content.
Here is how to format your modules:
- Select the number of weeks/topics in the course window. If you selected the Topics or Weekly format for your course, you must specify how many topics or weeks your course will have. You can change the number of weeks or topics in a course whenever you want. If you increase the number, blank weeks/topics are added. If you decrease the number, weeks/topics are deleted, or so it seems. One of Moodle's quirks is that when you decrease the number of sections in a course, the topics that are dropped are not really deleted; they're just not displayed to the students. If you increase the number of topics, those hidden topics will again be displayed to the students with their content intact. Also, teachers who are in editing mode will see the dropped topics as grayed out, in a section called Orphan. The teacher can still access and edit those orphaned topics.
- Note that this is different from hiding weeks/topics from students. When you hide topics or weeks, students can't see them, but the teacher can. When a section disappears because the number of weeks/topics in the course is reduced, it is unseen to everyone, even the teacher. The only way to bring it back is to increase the number of weeks/topics.
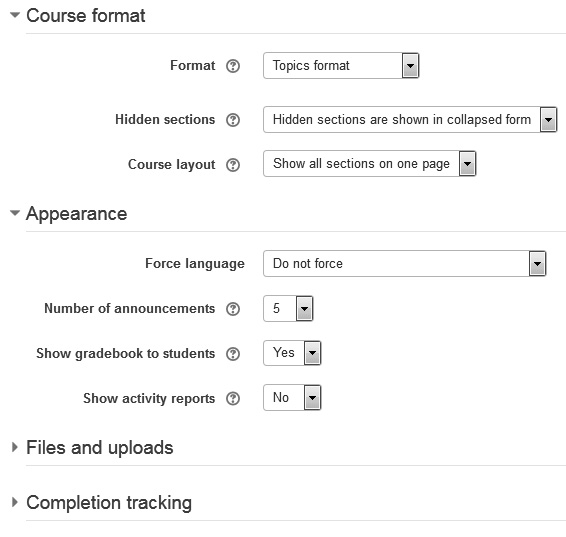
Figure 3.24 – Configuring the course format
- For a Weekly course, this field sets the starting date shown. It has no effect on the display of Topic or Social courses. Students can enter a course as soon as you display it; the course start date does not shut off or hide a course until the start date. The only other effect of this field is that logs for the course activity begin on this date.
- If you want to limit the dates on which a course is available for the students to enroll, look under Course administration | Enrolled users | Enrolment methods. Enable the Self enrolment enrollment method. Then, in the settings for Self enrolment, set the enrolment duration.
- If you want to test a course without creating user records, enter a date in the future for Enrolment duration. As you test the course, your activity will not be included in the logs. The same applies to administrators and teachers.
- Select how the course will display hidden sections. You can keep a section that you're working on hidden and then reveal it when you're finished. If you want to modify an existing section, you can create a hidden duplicate of the section, work on it, and with a few clicks in a few seconds, hide the old section and reveal the new one. For example, if you are keeping sections hidden to keep your students together, be sure to add a signpost at the end of each one that tells them there is more to come. For example, you could congratulate them for successfully completing the module and that more will be available, as per the schedule or syllabus.
Tip
You can move resources between sections in a course. This makes a hidden section a convenient place to hold the resources that you might want to use later or that you want to archive. For example, if you find a site on the web that you might want to use in your course later but you're not sure, you can create a link to the site in a hidden section. If you eventually decide that you want to use the site, you can just move that link from the hidden section to one of the sections in the use-later pile.
- Specify how many news items to show in the Announcements block. The maximum number of news items that the block will show is 10.
- If Show gradebook to students is set to Yes, a student can view a list of all their grades for the course by clicking on the Grades | Grade item settings link in the Site administration block, as shown in the following screenshot:
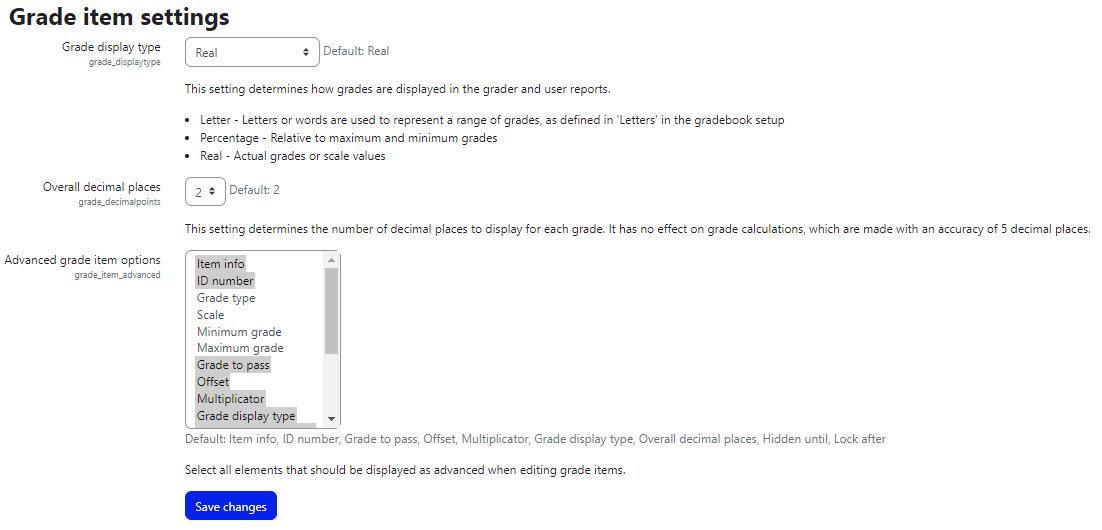
Figure 3.25 – Configuring the grade item settings
If the course allows Guest access, the guests will not be able to earn grades. So, if your site has a free sample course and you want people to see how Moodle displays their grades, you might want to encourage people to register for that free sample.
The setting for the maximum upload size limits the size of a file that a student can upload to this course. There is also a site-wide limit set under Site Administration | Security | Site policies. The smaller of the two settings – site-wide or course-wide – takes precedence here.

Figure 3.26 – Selecting the maximum upload size
The color and icons that Moodle uses are determined by its theme. Usually, you would use the same theme throughout your site. In the screenshot below, you can see the choice of either Boost or Classic theme.

Figure 3.27 – Selecting the theme
Tip
A theme can do more than just provide a pleasant color scheme. For example, you can assign courses a distinctive theme for each teacher or assign the same theme to all the courses in a category. Themes are selected by the site administrator in the Site administration menu. For more about themes, check out the official Moodle site at https://moodle.org/.
- Select Group mode.
Later in the book, you will learn how to separate the students in a course into groups. This setting determines how the individual activities in the course react to the presence of groups in the course. If you do not use groups in the course, this setting has no effect.
When set to No, all students in the course are considered to be in one big group. When set to Separate, students in a group cannot see the names of any other groups – that is, the work done by different groups is kept separate. When set to Visible, students in different groups can see each other.
You can change this setting for individual activities. For example, suppose you want to run groups through a course separately. However, you have one project where you want all the students, in all the groups, to be able to see each other's work. You can choose Separate for the course and, for that one project, override the setting with Visible. Now, only for that one project, each group can see the other group's work.
Functionality Booster – If It's a Hybrid Course, Clearly Indicate Web Conferencing
Make sure that your groups have access to the web-conferencing links. If you are using BigBlueButton, the controls are easily accessible through Moodle. However, if you're using Teams or Zoom, you'll need to make sure that you provide the links and access information in a clear place. If you use groups, be sure that the web-conferencing information is clearly available and updated so that a student can access the web conference while in Moodle, or directly.
- Normally, the group mode of a course can be overridden for each activity. When a course creator adds an activity, a teacher can choose a different group mode than the default one set for the course. However, when Force group mode is set to Yes, all activities are forced to have the same group mode as the course.

Figure 3.28 – Configuring group mode
- The default grouping for the course determines how groups are filtered in the gradebook. This setting has no effect unless you are using groupings. A grouping is a group of groups. It can consist of one or more groups from the course. All groups can then be managed as a single group.
- While you're working on a course, you may want to set Course visibility to Hide. This will completely hide your course from the students' view. Teachers and administrators can still see the course, so you can collaborate on the course content with them.

Figure 3.29 – Making the course visible or not
- Select a setting for Force language. Selecting Do not force enables a student to select any language on the pull-down list of languages.
Remember that the languages on the pull-down list are limited by the setting you choose under Site administration | Language | Language settings | Display language menu and Languages on language menu. Also, you must have the language pack installed for any language that you want to use. Also, remember that only the standard Moodle menus and messages are translated automatically when a student selects a different language.
- If you want to use different terms for the roles in your course, you can use Role renaming. Moodle inserts your term for a teacher or student into its standard messages. You can substitute the term teacher with instructor, leader, or facilitator. For students, you can use terms such as participant or member.

Figure 3.30 – Renaming roles

Figure 3.31 – Adding meta tags
- Course custom fields allow you to assign the number of credits.To find the course custom fields, you need to go back to the Site administration page, then click on Courses. You will then see Course custom fields in the list of options after Manage courses and categories.

Figure 3.32 – Determining the number of credits
Congratulations! You now have a new blank course. You're ready to start configuring and filling it with great material. In the next section, you will learn how to enroll students in the course and assign roles, giving them customized levels of access and permissions.
Enrolling teachers and students
Who will teach your course? Also, how will students be enrolled? The settings that you choose for your course enrollment will determine that. In this section, will learn how to enroll teachers and students in Moodle.
Assigning teachers
After a site administrator, manager, or a course creator has created a blank course, they can assign a teacher to build the course.
To assign a teacher to a course, carry out these steps:
- Enter the course as an administrator or manager.
- From within the course, select My Courses | Participants | Enrolled users.
- In the upper-left corner of the page, click on the Enrol users button. The Enrolled users window is displayed, as shown in the following screenshot:

Figure 3.33 – Enrolling users
- To find a user, enter any part of the user's name into the search field and then press Enter or Return on your keyboard:

Figure 3.34 – Finding enrolled users
- From the Assign role drop-down list, select Teacher.
- Next to the user's name, click on the Enrol button. The display of that user's name will change to indicate that they are enrolled.
- When you have finished enrolling users, click on the close box for this window. On returning to the Enrolled users page, you will see the user added to the list of enrolled users.
How to set enrollment methods
A teacher can enable, disable, and arrange only the interactive enrollment methods. Interactive enrollment happens when a user tries to enroll in a course. The user must do something to be enrolled, such as select a course and confirm that they want to enroll, or pay for a course. Non-interactive enrollment methods are checked when a user tries to log in to a course – for example, an external database or Lightweight Directory Access Protocol (LDAP) server. Only a site administrator can enable or disable a login-time enrollment method. These are managed not at the course level but the site level.For in-depth guidance about enrollment methods, visit Moodle Docs https://docs.moodle.org/400/en/Main_page.
However, you may need to customize the methods for a specific course. So, for each course, you can enable or disable any or all of these enrolment methods. The following steps will guide you:
- Enter the course as a site administrator or teacher.
- Select Site Administration | Plugins | Enrolments | Self enrolment. The Self enrolment page allows users to choose which courses they want to participate in, as shown in the following screenshot:

Figure 3.35 – Displaying the self enrolment methods
- To enable or disable an enrollment method for a course, click on the eye icon. When it is open, the enrollment method can be used for that particular course. When the eye is closed, that enrollment method is not available for that course.
- Place the enrollment methods in the order in which you want this course to use them. Do this by clicking on the up and down arrows next to each enrollment method.
Many enrollment methods have a separate page for settings where you can configure the method, as follows:

Figure 3.36 – Configuring self-enrollment options
If you enable an enrollment method, you should at least look at the settings page for that method and determine whether you need to change any of the settings.
Summary
In this chapter, we learned how to start the process of building courses. We started by identifying how to work with categories and then configure courses in several different ways.
Moodle 4.0 includes a number of enhancements to give administrators more flexibility in how to display information in the Dashboard and on the Site home page, which greatly enhances the UX. The new options and flexibility mean that an administrator has more options, which in turn means more complexity in configuring the site and courses.
In this chapter, we covered how to customize the appearance of your courses so that it matches the needs of our learners and use Moodle as a powerful tool for creating the documentation necessary for accreditation reviews.
We also discussed the importance of including links to web conferencing in the case of synchronous and hybrid synchronous/asynchronous courses.
In general, make your best guesses when you first create a course, and don't let uncertainties about any of these settings stop you. As you add static, interactive, and social materials in the upcoming chapters, you can revisit the course structure and settings in this chapter and change them, as needed. In the next chapter, we will learn about resources in Moodle and how to use them.