Chapter 2: Installing Moodle and Configuring Your Site
In today's world of cloud computing, it is most efficient and economical for organizations to opt into a cloud-based Moodle installation provided by a Moodle partner or Moodlecloud.com. Your students will be accessing Moodle from an array of different devices, and Moodle 4.0's brand-new default theme, which is based on Boost, is completely responsive, with new Site home options and an easy-to-follow Dashboard. The result is a user experience that helps you stay organized, never miss a deadline, and always know how to get back to the last pages you visited.
In this chapter, we will focus on getting Moodle up and running for your organization, with an emphasis on cloud-based Moodle. We will help you create the user experience that you want by choosing the right settings for your Moodle installation. By configuring your site to enhance the user experience, you'll enhance the user's learning experience as well. In this chapter, you will learn how to configure your Moodle site. Specifically, you will learn how to do the following:
- Configure Moodle.
- Set permissions and select default options.
- Enable site administration, configure permissions, and enroll students.
This chapter will cover the following main topics:
- A brave new Zoom world – planning for blended/hybrid synchronous and asynchronous delivery
- Exploring the site administration menu
- Different languages used in cloud-based Moodle
- Configuring the Dashboard and the Site home page
After completion of this chapter, you will be able to get Moodle 4.0 up and running, not only for your organization but also for your personal "sandbox" use. To do so, we focus on cloud-based Moodle, and we review the kinds of considerations you need to keep in mind as you plan for "live" and "on-demand" delivery, and learning that takes place through well-planned interaction, collaboration, and assessment.
Theme and Appearance
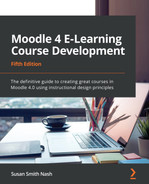
Note that in this book I will be using the new Moodle 4.0 theme, as well as the MoodleCloud Classic theme. Moodle 4.0 has continued to enhance the user experience, which includes setting up Moodle. Here's a screenshot that uses the Moodle 4.0 Boost theme and shows the new 4.0 Dashboard, with the Timeline at the top, the "at a glance" calendar at the bottom, and Recently accessed items on the right:
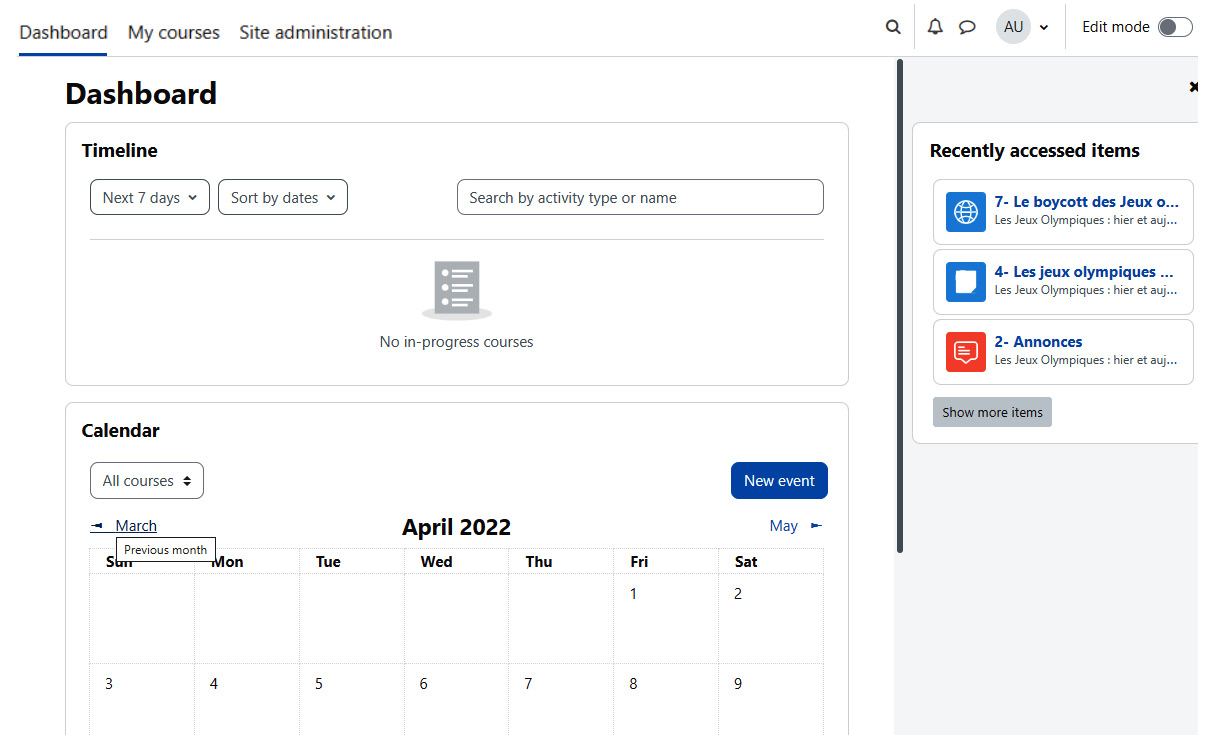
Figure 2.1 – Moodle 4.0 Boost-based theme
Moodle provides very convenient standards, which makes it easy for you to create uniform courses that have an attractive appearance. They can be used for all types of delivery modes that have become popular in today's environment, with institutions often required to offer courses in synchronous, asynchronous, and "blended" delivery modes.
A locally hosted installation
We recommend a cloud-based Moodle installation for most of you because we assume that your primary concern will be to develop and administer online courses that your students, teachers, and administrators will be able to develop and use effectively, even in situations where you have very little lead time.
Nevertheless, there may be situations where you need to install Moodle locally because you would like to save monthly hosting fees, develop a custom solution, or use the installation to experiment.
In some cases, you may wish to install Moodle on a standalone machine. If that is the case, it is recommended that you visit "one-click" installers for Windows and macOS. Keep in mind that they are not suitable for production servers.
The complete install packages that you may wish to use can be found at Moodle.org's Windows download page: https://download.moodle.org/windows/. Each is designed for a standalone computer, and they use the XAMPP Apache Friends packages (https://download.moodle.org/windows/) and OS X packages. You can download the latest development version of Moodle 4.1, as well as a stable version of Moodle 4.0. You can also download Moodle 3.11.6+. In this book, we are using the stable version of Moodle 4.0.
Moodle is constantly expanding its options, and Moodle 4.0 focuses on giving you choices. You can have a locally installed version, which is a Standard version. You can then expand it by choosing among the 1,982 (of this writing) plugins. Finally, Moodle now has a downloadable app. We will show you where to find each of these options in the next section.
Installing Standard Moodle, enhancing it with plugins, and adding the Moodle app
It is not within the scope of this book to give you detailed instructions on how to install and run Moodle on your own server. However, this section will show you where to go to get the specific instructions and also point out that there are options. You can find all of them on the Moodle downloads page at https://download.moodle.org/. Standard Moodle is the base version of Moodle. To be able to add functionality, such as a calendar, you'll need to enhance it with plugins.
Standard Moodle
We'll begin with Standard Moodle. To get started, you will need a web server such as Apache and a database such as MySQL, MariaDB, or PostgreSQL. You'll need to configure PHP because Moodle requires a number of PHP extensions.
For specific installation instructions, please visit Moodle downloads at https://download.moodle.org/.
The latest release at the time of writing this book is Moodle 4.0.1. The following screenshot shows the links for downloading packages or downloading Moodle via Git. Please note that the version is updated every week:

Figure 2.2 – Moodle's download page
As shown in the preceding screenshot, this page includes links to installer packages and information about the latest version.
After you have successfully installed the latest Standard version of Moodle, you may wish to enhance it with plugins. You can add plugins individually for courses or groups of courses, and you can make the plugins systemwide in the version of Moodle you're hosting on your own server. Here is the link to the location where you can search for plugins: https://moodle.org/plugins/. Plugins include activities, themes, and blocks. The following screenshot shows you the redesigned plugin download interface, and the fact that you can search by purpose, popularity, number of downloads, and more:
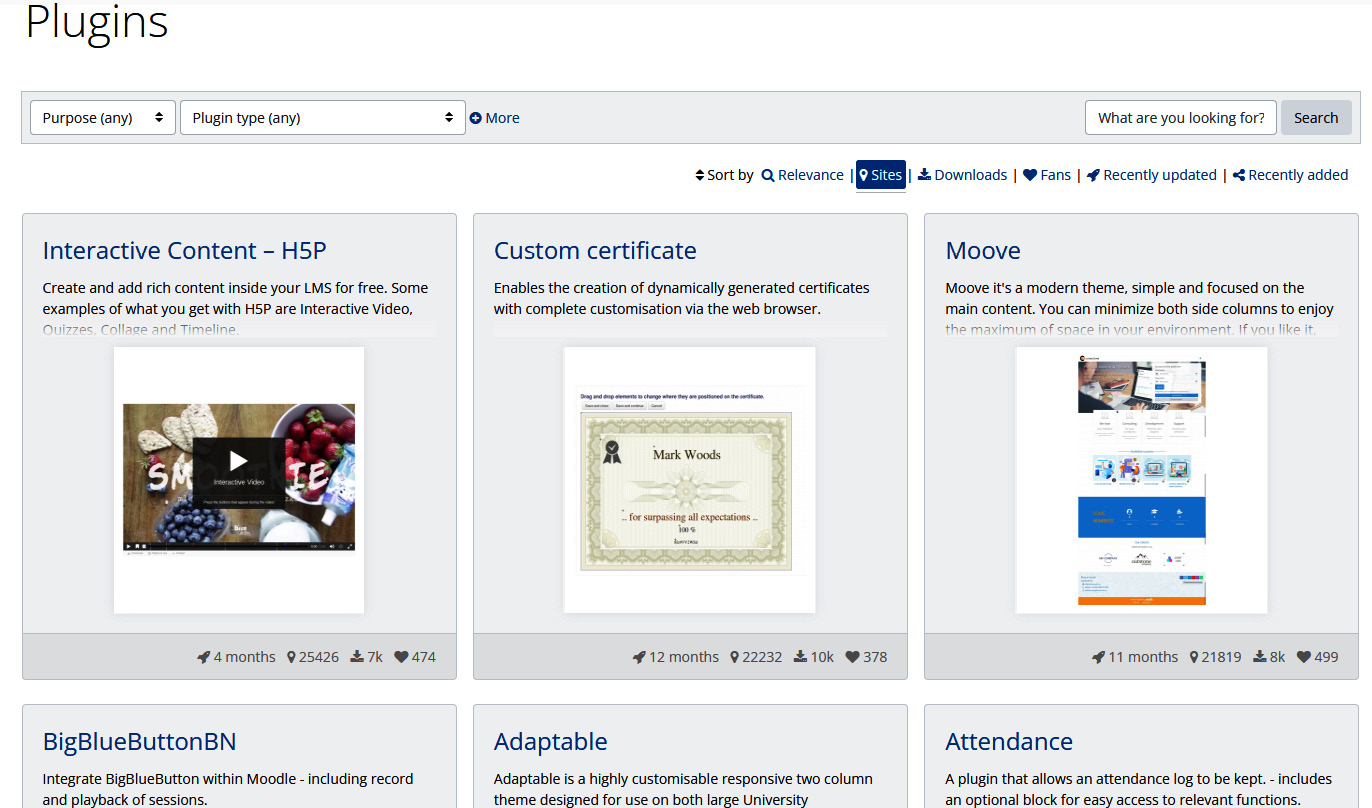
Figure 2.3 – Moodle's searchable page for downloading plugins for an installation on your own server
Moodle Mobile
Moodle Mobile is an app that makes using Moodle on Android devices much easier than always accessing it from the internet.
Specifically, the Moodle app has features that allow you to do the following:
- Browse course content even when offline.
- Find and connect with other people on your courses.
- Receive messages, submissions, and grading notifications.
- Submit assignments from your mobile devices (including uploading files).
- Track course completion progress.
- Complete activities even when offline.
The app is available for Android and can be downloaded from the Google Play Store, or you can download the Android Package Kit. The link to the app documentation and also the download is here: https://download.moodle.org/mobile/.
The site administrator will need to enable mobile services in the on-premises installation or MoodleCloud.
Now that we have learned how to install Moodle and have reviewed how to enhance Moodle's functionality with plugins, we will look at the best ways to use it in today's world of online, blended, hybrid, synchronous, and asynchronous delivery.
A brave new Zoom world – planning for online, blended, and hybrid synchronous and asynchronous delivery
In 2020, when the global pandemic forced educational institutions to offer courses online, many opted for synchronous solutions in which the bulk of the instruction took place via a web-conferencing application. A learning management system (such as Moodle) was then used as the repository of digital documents, assessments, and grade books. Students who formerly studied exclusively in face-to-face environments now had to navigate the unfamiliar territory of the online classroom and the learning management system. While it was a positive thing to be able to view one's instructor or classmates online via web-conferencing software such as BigBlueButton, Microsoft Teams, or Zoom, web conferencing alone was not enough. The best design brought together synchronous with asynchronous, with collaboration, interaction, and hands-on guided experimentation incorporated into the learning management system.
At the same time, the dramatic shift to synchronous online instruction made it all the more apparent that the experience of web conference-based synchronous instruction and collaborative learning (discussions and team projects in breakout rooms) is dramatically different than the asynchronous experience. Learning is different without a "live" instructor presence, and students cannot see each other in real time. On the positive side, asynchronous is much more flexible because it can be self-paced and materials can be accessed on demand. With Moodle, you have the flexibility to offer synchronous, asynchronous, and blended solutions. For a more in-depth theoretical background and research findings, please refer to the rubrics and findings in Quality Matters (https://www.qualitymatters.org/) or the UK's Institute of Education (https://eppi.ioe.ac.uk/cms/Default.aspx?tabid=3847).
As you consider your user experience, take a moment to reflect on how it affects a student's ability to learn. You'll want to keep the learning objectives and outcomes first and foremost in the learner's mind, even as you're setting up your site and thinking about what should be visible to the students. Then, you'll want to ensure that they know what they should be doing next and how this ties to the courses. Informing your decisions is the knowledge of what you'd like the students to accomplish. Specifically, this means you are thinking ahead about how you will clearly map the learning objectives to the course content, activities, and assessment. Mapping the learning objectives can be enhanced using storyboarding. The overall sight should make sense, and your learner should have an idea of how an activity or content will lead to the ability to perform a task and demonstrate skill or mastery.
The following screenshot shows the Activity menu and gives you an idea of the range and variety of activities that can be done in both synchronous and asynchronous delivery:
Figure 2.4 – The Activity modules page
These activity modules correspond with both synchronous and asynchronous course design. A blend of synchronous (web conferencing with BigBlueButtonBN, for example) and asynchronous (a forum) can be highly effective.
An easy way to maintain awareness of the user experience is to use the CORN mnemonic:
- C – Clear: Your outcomes should be clear, as should the process of working through the course. Think of a map and how it guides you to a final destination. A clear map contains just the right amount of information, is not superfluous, and provides help when needed.
- O – Outcome-focused: Ensure that you're always tied to the learning outcomes, which are clearly stated at the outset. Then, ensure that each unit or module also contains objectives. Also ensure that you organize your course in a way that provides sufficient scaffolding so that the sequence makes sense.
- R – Relevant: Although it can be interesting to include reference blocks, materials, or activities that are not totally related to the course as enrichment, keep in mind that you could confuse or derail a student. The material should tie directly to the learning outcomes and help students successfully complete the assessments. Likewise, the assessments need to be relevant and meaningful. If your course contains a synchronous element, make sure that your discussions stay on track and you do not become distracted by tangential topics.
- N – Needs-based: Provide the tools your students need to be able to perform their tasks. Make sure that the tools are easy to access and that they enhance the learning experience by giving a student more confidence. Also, ensure that their learning preferences are acknowledged and you're focused on meeting their needs. A prime determinant of user satisfaction is the degree to which a student feels in charge of their own destiny, something that requires them to develop a high degree of self-efficacy and an "I can do it!" attitude. Further, to motivate your students, you'll need to satisfy their needs. They may need a sense of recognition, and so building in rewards and recognition will be part of the way you configure your site.
In this chapter, we're focusing on the settings. Later, we'll go into more depth about how to design and arrange content, activities, and assessments.
In all of these settings, you have choices. Many of the choices in settings that you make will be easy to decide. For example, will you allow your users to select their own time zone? Other choices are not so obvious. You can spend a lot of time trying different settings to see how they affect the user experience. These are the settings that we will focus on in this chapter. The goal is to save you time by showing you the effects that key settings will have on your site.
Tip
If your system administrator or webmaster has installed Moodle for you, you may be tempted to just accept the default configuration and skip this chapter. Don't do that!
Even if you did not install Moodle or are using a cloud-based provider such as MoodleCloud instead of a self-hosted installation, we encourage you to read the configuration sections in this chapter. If you want, work with your system administrator to select the settings that you want. Your administrator can create a site administrator account that you can use for configuring Moodle, or they can select these configuration settings for you.
In the next section, we will describe how to set up Moodle if you're using a cloud-based solution such as MoodleCloud.
Using MoodleCloud
This chapter started with a self-hosted solution. However, what if you're using MoodleCloud, Moodle's cloud-based solution? The good news is that MoodleCloud is extremely customizable, and you will have a great deal of flexibility in the site administration area. There are numerous Moodle hosting providers and partners. However, MoodleCloud is the only one developed and operated by Moodle. Nevertheless, there are a number of Moodle partners, and they offer a wide array of solutions that are often tailored to fit specific needs. Moodle Partners are organizations that have been recognized by Moodle to provide services to schools, institutions, and other organizations that can benefit from Moodle's unique learning management system.
At the time of writing, there are more than 100 Moodle Partners who offer services as experts in Moodle and who can help you configure your site. In many cases, Moodle Partners also offer hosting services with customization. For an up-to-date list, please visit Moodle's list of Certified Moodle Partners: https://moodle.com/solutions/certified-service-providers.
MoodleCloud (https://moodlecloud.com/app/en/login) is very economical and is a perfect site for teachers, instructional designers, and instructional technologists to develop templates, try out new designs, and pilot an entirely new curriculum or approach. Moodle pricing varies depending on the number of users.
MoodleCloud is cloud-based, as the name indicates, so you do not have to install anything on your computer or a server. You will need the latest versions of your browser (Chrome, Microsoft Edge, Firefox, or Safari). Ensure that cookies are enabled for your site. MoodleCloud has been designed to be very efficient, and it is also responsive, which means that it has been designed to look good on all devices, from laptops to tablets and smartphones.
One advantage of MoodleCloud is that you always have the latest version of Moodle, and when new capabilities emerge, you will be able to use them. For example, you are now able to configure your courses to be compatible with smartphones as well as with tablets, laptops, and computers, for a truly mobile solution.
A potential disadvantage of MoodleCloud is that you do not have the same number of design options because there is a limited number of built-in themes, as opposed to an on-premises solution. Further, MoodleCloud is no longer the most inexpensive version, nor is it free. To learn more, visit MoodleCloud: https://moodlecloud.com/app/en/login.
Even though there are a few limitations, MoodleCloud includes features that are valuable to all designers, and you can add a wide array of multimedia resources and activities that include assessment and automatic badge and certificate generation. In the next section, we will learn how to set basic configurations in the site administration menu.
Exploring the site administration menu
After installing Moodle, it is good to set some basic configuration options. Some of these settings determine how the site functions, such as how users are authenticated, what statistics the site keeps, and which modules are turned off and on. Other settings just affect the user experience, such as which languages are available, the color scheme, and what is displayed on the front page and Dashboard. All these settings are available through the Site administration menu. The MoodleCloud Site administration menu is similar, but it also includes a setting for the mobile application so that your users can easily use their phones or tablets. If your on-premises installation does not include the Mobile App menu, ensure that you select a theme that is responsive, which means that it will work on all devices automatically.
The default theme for Moodle demos is Boost, and for MoodleCloud, it's Classic. In this example, we will be using version 4.0.
To access the Site administration menu, you must be logged in as an administrative user. Under the Administration menu, click on Site administration to expand the menu:

Figure 2.5 – The Site administration menu
In this chapter on configuring your site, we'll cover some of the settings under the Site administration menu. Other settings will be covered as we build our courses, teach, calculate grades, and update our site.
Tip
The important idea here is that, unlike many other applications, in Moodle, the Site administration menu isn't something that you set and forget. You return to the configuration settings as your site develops.
Now, let's go through the settings you use to configure your site for the kind of user experience that you want to create.
Configuring authentication methods
Authentication is what happens when a user is logging into your site. When a user is created, an authentication method must be chosen for that user. This can be changed for the user later.
Moodle offers a variety of ways to authenticate users. The following ones should be enabled:
- MoodleCloud: Enables authentication for MoodleCloud when using it
- Email-based self-registration: Enables a user to create their own account via the Create new account button on the login page
You'll find these options under Administration | Site administration | Plugins | Authentication | Manage authentication. You can find a brief explanation for each of these options by clicking on Settings for a specific option:
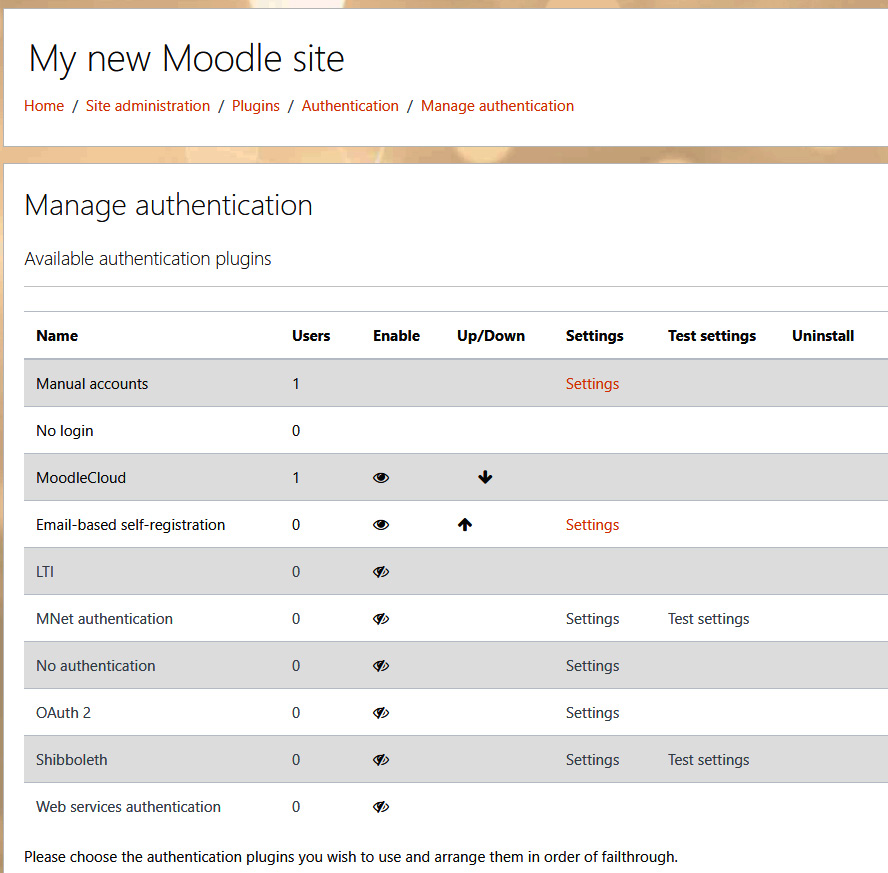
Figure 2.6 – The Manage authentication menu
In the next section, we will talk about how to create new users.
Manually creating a new user
To create a new user, follow these steps:
- Log in with your administrator account.
- Go to the left panel and click Site administration.
- Click the Users tab.
- Click Add a new user.
- Add the user details.
- Click Create user.
The following screenshot shows the dialog for adding a user, which requires the administrator to assign a username, password, authentication method, what user information should be displayed, and MoodleNet profile:
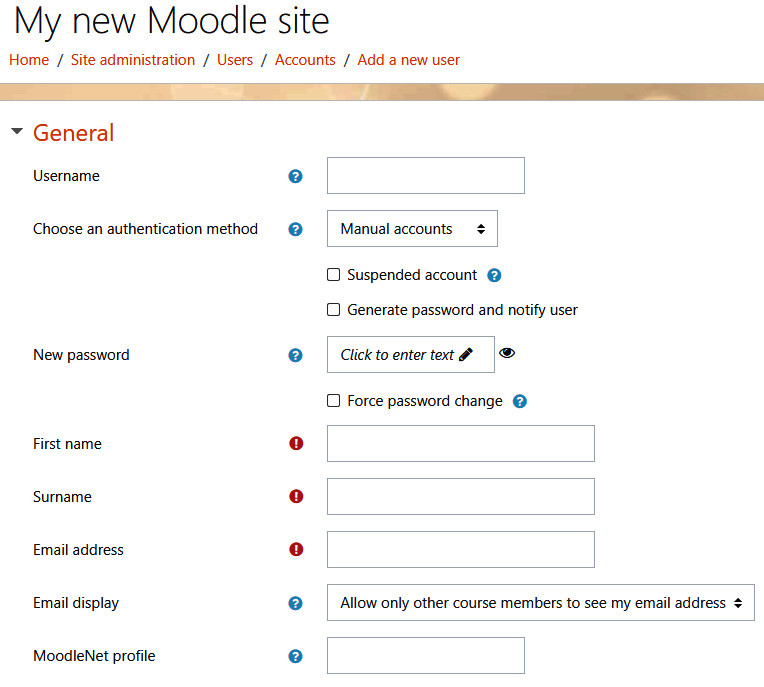
Figure 2.7 – The dialog for adding a user
Suspending a user's account
You may need to suspend a user's account if they have not paid their tuition. The result of this procedure is that the user's authentication method is changed to no login:
- From the Administration menu on the left of the page, click on Site administration | Users | Accounts | Browse list of users. The Users page will be displayed. On this page, search for the user.
- In the New filter area, enter all or part of the user's name.
- Click on the Add filter button. The user will appear in the list at the bottom of the page.
- Next to the user's name, you will see an "eye" icon. Mouse over it to activate the "suspend user" command, then click on it. When activated, a line will go through the eye icon indicating it is not visible. Once the eye has a line through it, the user's account has been suspended.
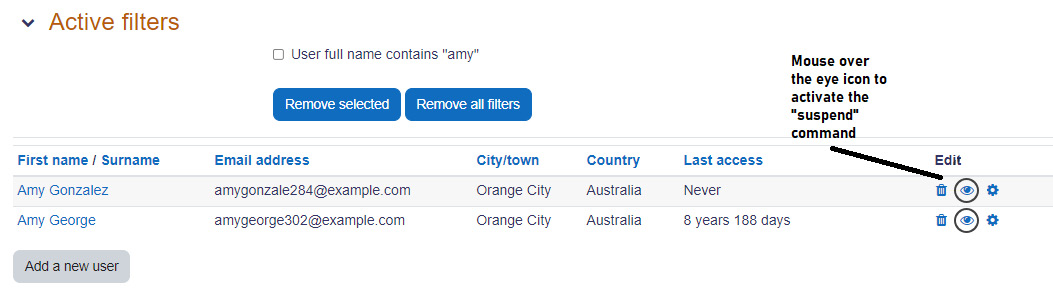
Figure 2.8 – Users and accounts
User roles
There are a number of user roles. Moodle allows you to enable and also configure them.
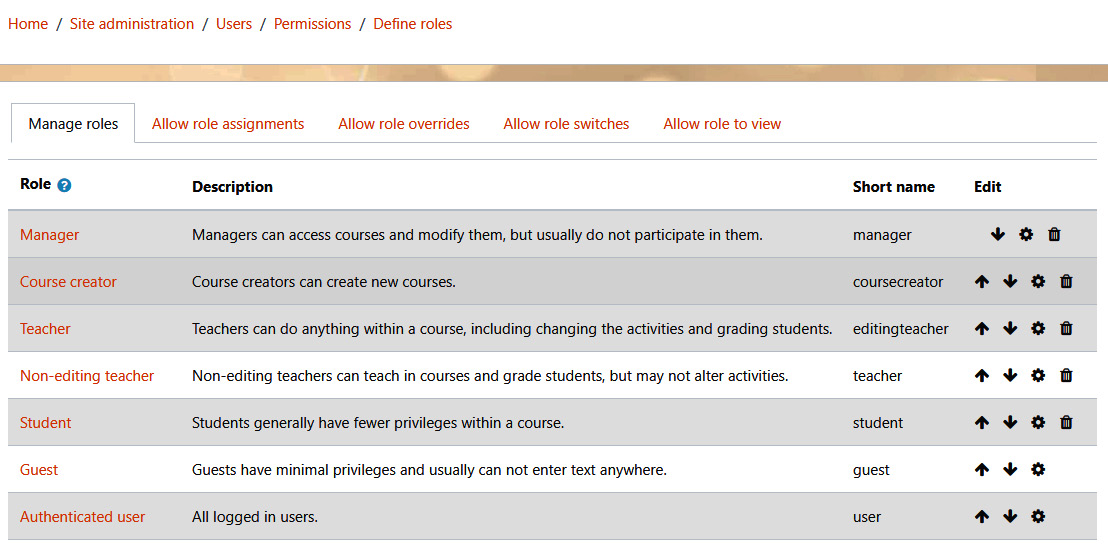
Figure 2.9 – User role configuration
Moodle makes adding a new user fairly flexible. You can give the user a username that corresponds to a unique ID for the institution, such as the user's email address, and you can also set up authentication methods, a password, and a unique profile. It is a good idea to set up username protocols and also authentication methods in a way that is uniform across all courses and programs in the institution.
Here are the standard roles in Moodle:
- Site administrator: Has the ability to do everything on the site.
- Manager: An administrator but with fewer permissions.
- Course creator: Can create courses.
- Teacher: Can manage and add content to courses.
- Non-editing teacher: Can grade student work and post.
- Student: Can access and participate in courses.
- Guest: Can observe courses but not participate.
- Authenticated user: All logged-in users have this role.
Your Moodle site has a special user category called Guest. It is a practical designation because it allows people to enter your course for a number of different purposes. This user can be granted access to courses, without requiring them to be enrolled. Essentially, you are allowing anonymous users to access your site and/or course.
In the following screenshot, the "Guest" button indicates that guest access has been enabled for this site. If you disable guest access, this button does not appear:
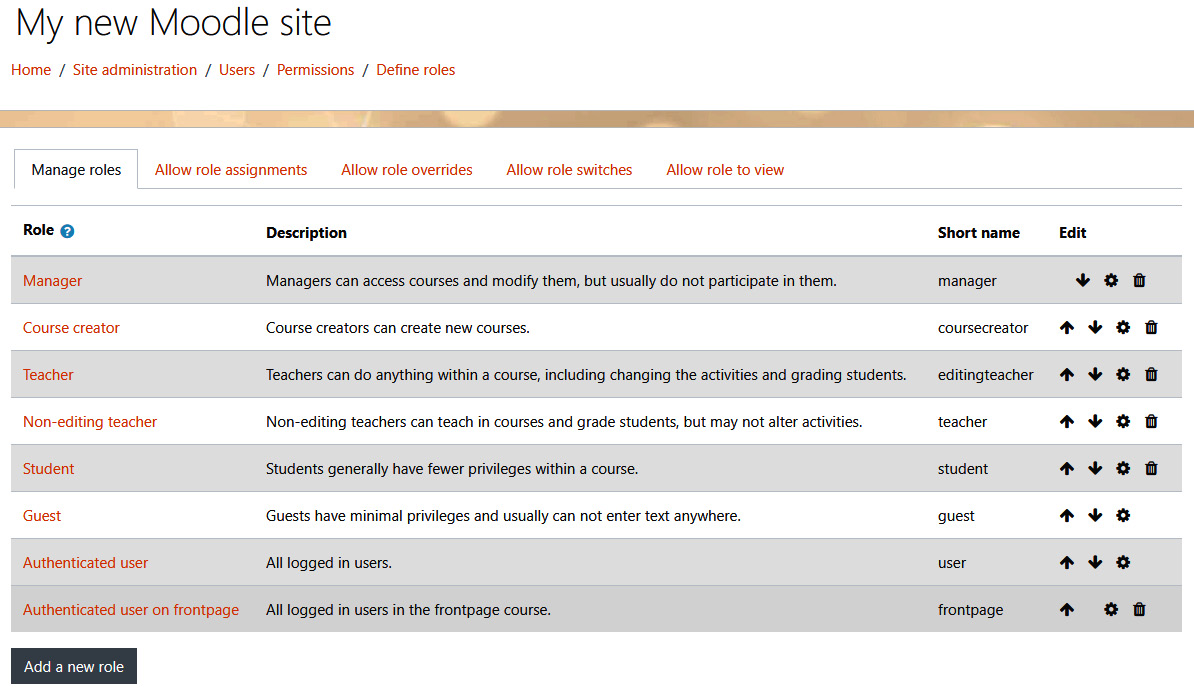
Figure 2.10 – On the permissions screen, enabling login as a guest
Who Is This Guest?
Who is your guest visitor? Although you cannot identify a guest by name, you will usually know who the guest is because you will give access for special short-term purposes. It is a good idea to avoid having too many guests. Guest spots should be reserved for special purposes. Remember that in the logs showing guest activities, you are looking at the activities performed by every visitor who used the guest account.
The Permissions page for guest access allows you to set the role:
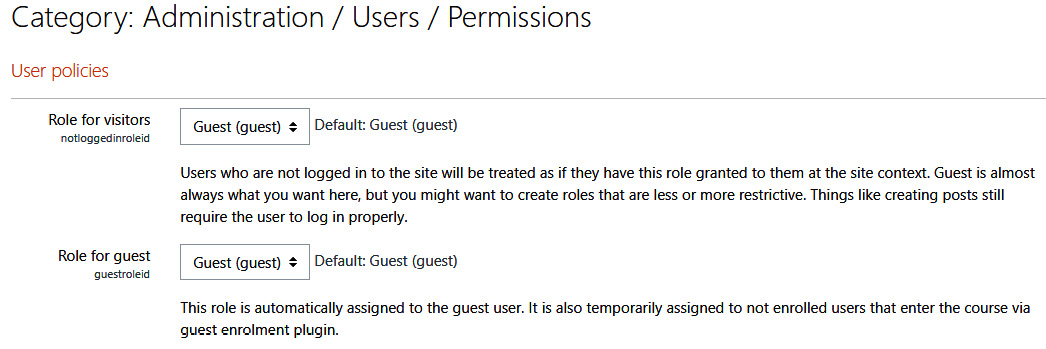
Figure 2.11 – Setting permissions for guest access
Now that you have added users, they can be enrolled in courses.
Enrollment methods
In Moodle, enrollment is referred to as "enrolment." It's a way to indicate the role of users so that they can participate in different levels in the course. The process is completed via a plugin, and there are several options. To access all of them, please go to Site Administration | Plugins | Enrolments.
Manual enrolments should be enabled sitewide to let students get added manually. To configure preferences, please go to Site Administration | Plugins | Enrolments | Manual enrolments
Guest access can be useful for course observers who will need access but are not actually enrolled as users. To configure Guest access, go to Site Administration | Plugins | Enrolments | Guest access.
Cohort sync is useful if you are using cohorts. You can access this at Site Administration | Plugins | Enrolments | Cohort sync
Self enrolment is helpful if you want users to be able to enroll themselves. Head to Site Administration | Plugins | Enrolments | Self enrolment
Manage enrol plugins allows the administrator to enable all the plugins described above, and many other plugins too. Going into the details of enrollment plugins (called "enrol plugins") is outside the scope of this book, but it is useful to see that Enrolment on payment and PayPal are options. Once enabled (by clicking on the eye icon), one can change the settings by clicking Settings. You can do this by navigating to Site Administration | Plugins | Enrolments | Manage enrol plugins.
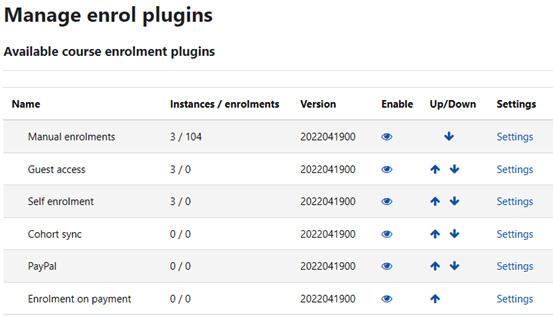
Figure 2.12- List of enabled enrolment methods visible through "Manage enrol plugins"
Self enrolment
This allows users to enroll themselves in courses. As with guest access, you must enable this method under Site administration for your entire site and also activate it for a specific course.
On the Settings page for Self enrolment, you can choose to require an enrollment key:
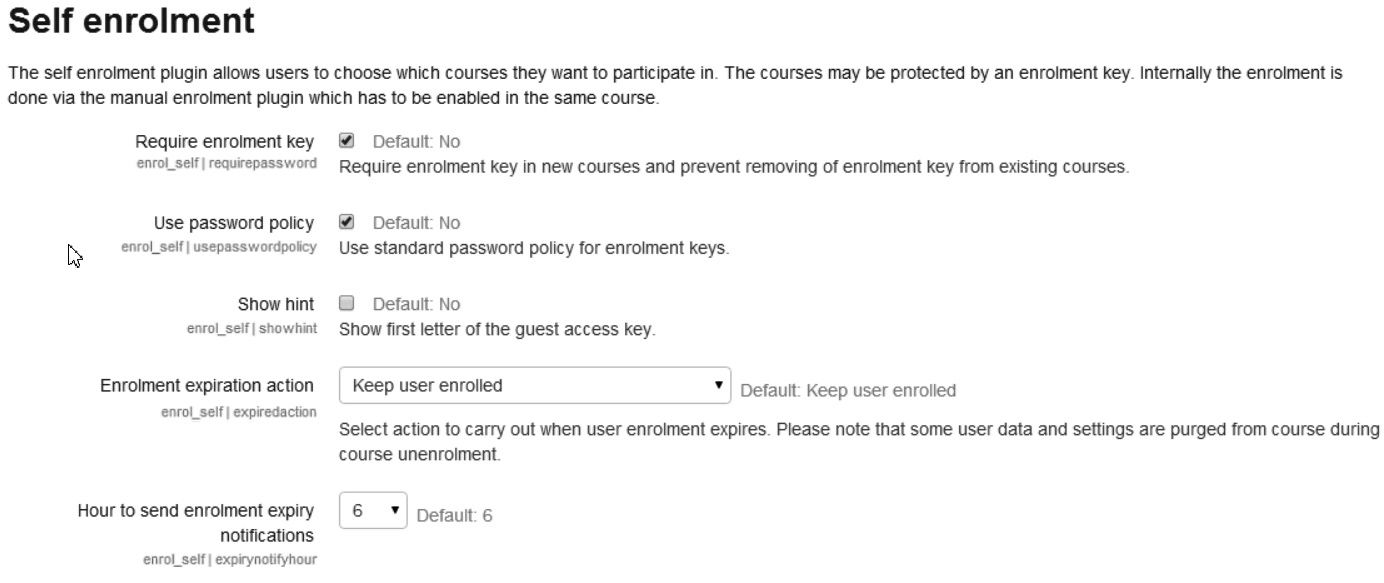
Figure 2.13 – The Self enrolment screen with customizable features for new users
For the self-enrolment option, start with Plugins, and then open Site administration - Plugins -> Enrolments – Self enrolment.
The enrollment key is a code that the user must enter when enrolling in a course. You can manage enrolment keys by scrolling down and finding the part of the menu labeled Enrolment instance defaults. Once the user is enrolled, the enrollment key is no longer needed. Now that we have enrolled our students, we can move on to other key settings that will affect the functioning of the site. In the next section, we will learn how to configure the front page and default dashboard.
Tip
The enrollment key ensures that only those to whom you give the key can enter your course. You may wish to add two-factor identification to avoid people passing the key on to others.
Configuring the front page and the Default Dashboard
In Moodle 4.0, the Dashboard has been updated and streamlined to make it easier to configure and use, and it makes working in Moodle easier and more enjoyable. The Default Dashboard page contains a Timeline, which consists of activities that have been assigned a due date, and thus can appear on a calendar. Note that, by default, only activities taking place in the upcoming 7 days will show up. There is also the option to sort by dates and also to search by activity type or name. The calendar allows you to look at all the courses at once or just one at a time to be able to plan and stay up to date with assignments and other activities.
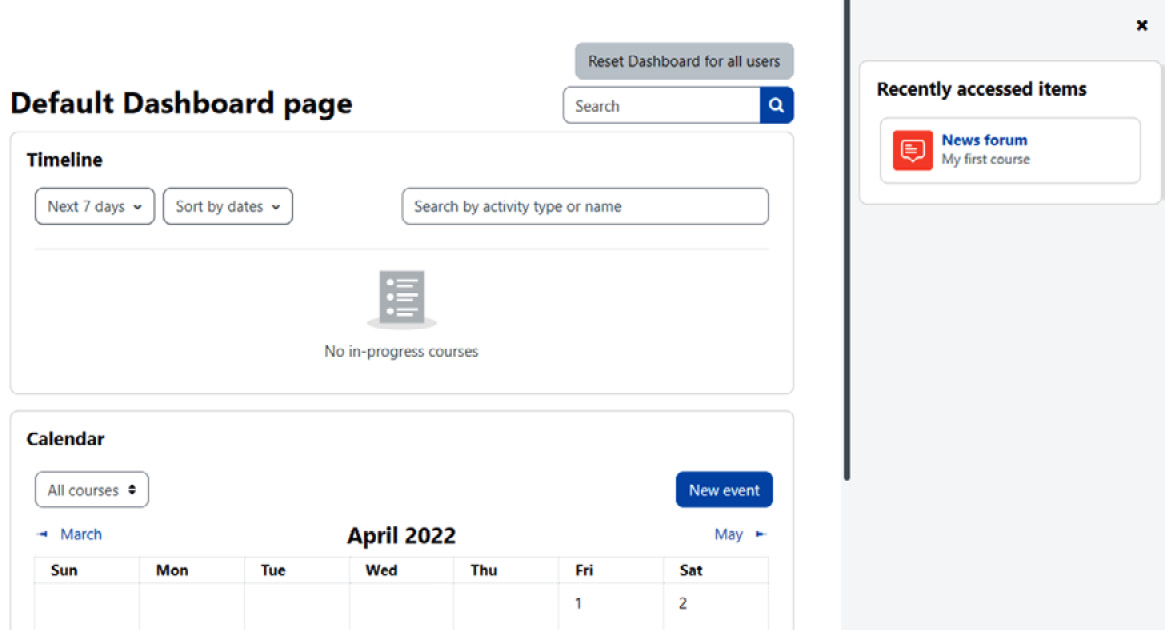
Figure 2.14 – Customizing the Default Dashboard page
One new feature of Moodle 4.0 is the Recently accessed items feature in the right-hand column. The purpose of the feature is to give you a "breadcrumb trail" to easily return to the items last accessed quickly and efficiently, without having to return to the main menu and click through all the screens. This feature is one of the most useful of the Moodle 4.0 user experience improvements, as it improves navigability.
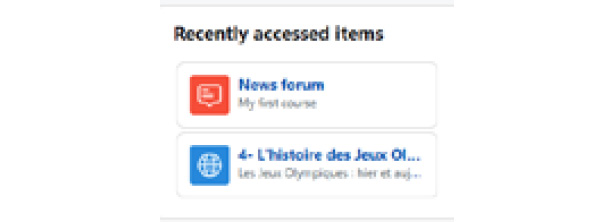
Figure 2.15 – Recently accessed items on the Default Dashboard page
Keep in mind that students will probably not see your site front page unless you've made the default start page your Site home page. If you do make the site home page your start page, you can use the Site home drop-down menus, which allow you to modify what appears on the front page.

Figure 2.16 – Customizing the configuration of your Site home page (the front page)
Early in the process of building your site, you can make some decisions about the look and functioning of your Site home page. This section deals with the settings that make sense to select when you're first building your site. However, some configuration settings on the Site home page won't make sense until you've created some courses and seen how Moodle works.
The front page settings page
In Moodle 4.0, the front page is now referred to as Site home. Thus, the settings for the front page of your site are found under Site administration | Site home | Site home settings.
The full site name
The full site name appears at the top of the Site home page, in the browser's title bar, and also on the page tab when browsing with tabs.
You can create a summary of the site. Enter your summary in the Site home summary box, and it will appear on your Site home page (the front page). On MoodleCloud, you will not see this. You'll need to manually set your front page. The instructions can be found here: https://docs.moodle.org/400/en/Change_your_front_page. You may wish to include your institution's mission statement here as well:

Figure 2.17 – Adding a summary of your site that will appear to users
This summary appears in the left or right column of your site's front page. As you write your course descriptions and keywords, consider how you want to connect to specific social media sites. That will help you determine the terms and links to include.
Summary
Moodle 4.0 makes it easier for students, teachers, and administrators to navigate the platform by adding new navigation options and placing an activity history on the side of the Dashboard. Individuals and organizations that want to install a Standard version on their own servers can still do so, and they can enhance the global functionality with plugins. We also discussed Moodle Mobile, which is an app for Android users that enables them to access and use Moodle even when offline. In this chapter, we learned how to get started with Moodle, beginning with configuration and then selecting the available roles for users. We discussed the Dashboard's new features and also how Moodle 4.0 has enhanced the user experience. We covered the settings that, from experience, you are most likely to change. Many of these settings affect the behavior of the entire site. You don't need to get these choices perfect the first time because you can return to these settings and edit them at will. As you proceed with building your site, you will probably want to experiment with some of them. You will find that Moodle 4.0 is more customizable than ever.
In the next chapter, we will create courses and categories for our Moodle site.
A brave new Zoom world – planning for online, blended, and hybrid synchronous and asynchronous delivery