
Chapter 9: Collaborating with Wikis and Glossaries
Collaboration can be a cornerstone of social constructivism and a place where students truly learn from each other. They can share their insights, set goals and targets, and bring prior learning to their collaborations. In addition, collaborations allow students to develop a body of knowledge or a project plan that can be implemented in the real world.
One strategy for collaboration is to engage students in activities that require each person to contribute to the final product. Two popular activities are informative wikis and topic-based glossaries. While wiki and glossary activities can be completed individually, they are perfect vehicles for collaboration. The key is to examine the learning objectives and determine how best to implement them. In this chapter, we'll discuss various strategies for getting your students engaged in collaborations and excited about learning from each other.
This chapter teaches you how to develop effective collaborative activities that allow you to achieve your learning objectives by adding wikis and glossaries to your course. It is a way to build up social constructivism and implement the theories first developed by psychologist Lev Vygotsky, who discussed how people first learn in a group context and then, later, on an individual level. While such learning happens in any interaction (such as a forum, a workshop, and more), in wikis and glossaries, the focus is on a collaborative end product, so the interactions can be even more focused. These activities enable students to work together and build up a body of knowledge. The resulting collection of knowledge (the completed wikis and glossaries) can be reused by students in future courses. As the course evolves, the wikis and glossaries that past students created can be retained, edited, referenced, and grown.
Specifically, in this chapter, we will learn about the following topics:
- Determining the best collaborative activity to use with asynchronous, synchronous, and blended Moodle courses
- Aligning glossary and wiki activities with our learning objectives
- Developing glossary activities for collaboration in all kinds of delivery modes
- Developing wiki activities for collaboration in all kinds of delivery modes
In this chapter, we will bring together the emerging needs for synchronous, asynchronous, and blended delivery with collaboration, which is a powerful learning strategy. By the end of this chapter, you will be able to use Moodle's wikis and glossaries for effective collaborative learning.
Using collaboration as an instructional strategy that replicates today's work environment
In our distributed world, where people move from place to place and still communicate with each other and develop work products together, it is necessary to understand how to collaborate productively in a virtual environment. Therefore, there is a pragmatic side to the emphasis on collaboration. Moodle's wiki and glossary activities replicate how people use cloud-based collaboration in the workplace to generate reports, guides, marketing materials, and more.
While wikis and glossaries are often asynchronous, they can also incorporate synchronous web conferencing. This also replicates today's workplace, making the Moodle classroom even more effective for training people not only in the subject matter but also in new ways of working and learning.
We use Moodle precisely for its flexible architecture – a structure that encourages learning from each other. The ability to contribute to glossaries, wikis, and other collaborative activities allows students to contribute knowledge in a way that reinforces and rewards. Thus, it is an instructional strategy that brings together motivation, self-confidence, and curiosity, which creates conditions for learning. Additionally, it is a way to reinforce prior knowledge and build up experience as students recall past learning, add to what they already know, and reflect on what others are contributing. It's also a strategy for overcoming the negative effects of isolation and distance and for rehumanizing the experience of working in isolation, which can be disconcertingly difficult.
Therefore, collaboration can be a very effective instructional strategy, and glossaries, wikis, and other areas where students can contribute can form the cornerstones of the knowledge and skills that they will demonstrate in the future. As you work through this chapter, please refer to Chapter 13, Features for Teachers: Logs, Reports, Guides
too. In that chapter, you will learn how to connect many different elements in Moodle. We'll start with the glossary activity.
Glossary
The Glossary activity is one of the most underrated activities in Moodle. On the surface, a glossary is a list of words and definitions that students can access. However, a course creator allows students to add entries to the glossary. Adding entries transforms the glossary from a static list of vocabulary words into a collaborative tool for learning purposes. It also has an auto-linking feature that means that any time the word is used in the course, it automatically links to the glossary entry:

Figure 9.1 – Glossary icon
If your learning objectives require individuals to be able to identify, define, and describe items or phenomena, the Glossary activity is ideal. For example, you might have a course on tourism and wish to develop a glossary of terms that are specialized in a specific area; for example, the terms regarding culture tourism. Students can collaborate and make a customized glossary that can help them during the course and, later, in their careers.
A text filter, called auto-linking, creates links to the glossary entries in your course. When this is turned on by a site administrator and a word from the Glossary activity appears in the course, it's highlighted. Clicking on the word brings up a pop-up window with the word's entry in the glossary. The entry can consist of text, images, media, and links. It is a miniature page devoted to defining and elucidating the glossary term. The auto-linking feature makes collaborative possibilities even richer. For example, students might be assigned specific glossary terms that they will use as the basis of an illustrative paragraph or passage.
You can use a glossary to build a class directory, a collection of past exam questions, famous quotations, or even an annotated collection of pictures.
Let's take a look at how we enable glossaries and auto-linking in Moodle.
Enabling glossaries and auto-linking
Let's start with a bit of administrative housekeeping. Before teachers can set up a glossary assignment, it needs to be enabled on the system. So, please be sure that the site administrator sees this first. There are several places where a site administrator will need to enable Glossary and its features.
When Glossary auto-linking is turned on, a glossary term appears for the course and is linked to its glossary entry. This is what the link looks like:

Figure 9.2 – Auto-linking in the glossary function
Auto-linking creates links when a glossary term is used in the same course in which the glossary is located.
Enabling glossaries for your site
First, under Site administration | Plugins | Activity Modules | Manage activities, the site administrator must enable the Glossary activity. By default, the Glossary activity is enabled on Moodle. Enabling it is only necessary if you do not see the glossary in the Add Resource or Activity... menu:
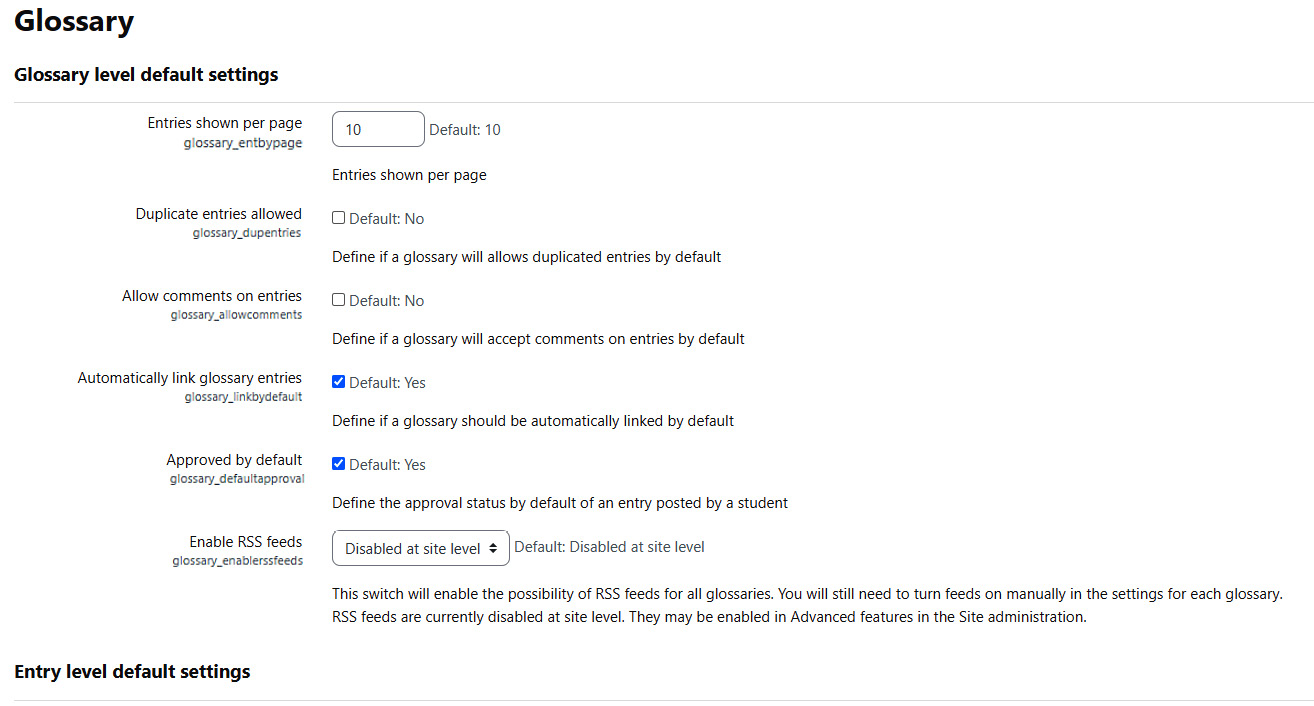
Figure 9.3 – Enabling glossaries for your entire site
After you have enabled glossaries for the entire site, you can determine what happens with it.
Enabling auto-linking
Glossary auto-linking needs to be enabled in several places at the site, course, and activity level. If you create a glossary term and it's not being auto-linked to your course, check that glossary auto-linking is enabled at the site, course, and activity/resource level. Each of these levels will be covered as we proceed.
Enabling auto-linking for the site
Under Site administration | Plugins | Filter | Manage filters, the site administrator can turn on glossary auto-linking:

Figure 9.4: The site administration page showing Filters
When you see the filter options, click on Manage filters. You will be able to enable glossary auto-linking, as follows:

Figure 9.5 – The site administration page showing how to turn on Glossary auto-linking
The Disabled setting removes the teacher's ability to turn on auto-linking in the course. By default, the Off, but available setting turns off auto-linking, but it enables the teacher to turn it on during the course. The On setting turns on auto-linking for all courses on your site.
In the right-hand column, note that the user has chosen to have auto-linking in the content of activities and resources. Additionally, you can select Content and headings, which will turn on auto-linking for the content of an activity or resource along with the words in the heading of that activity or resource.
Enabling auto-linking for the course
If the site-wide setting for auto-linking is set to On, you do not need to enable it at the course level. If the site-wide setting is set to Disable, it's not possible to enable it at the course level. This setting is available and only necessary if the site-wide setting is Off, but available.
Under Administration | Course administration | Filters, the teacher must turn on Glossary auto-linking. If this is disabled, auto-linking will not work for any of the glossaries within the course.
Enabling auto-linking for the activity or resource
If you have auto-linking enabled for the site and the course and it's still not working, check the auto-linking setting for the activity or resource that you are in. In the Administration menu, look for the administration options for the resource or activity that you are in. Select Filters, and on the filters page, turn on Glossary auto-linking:
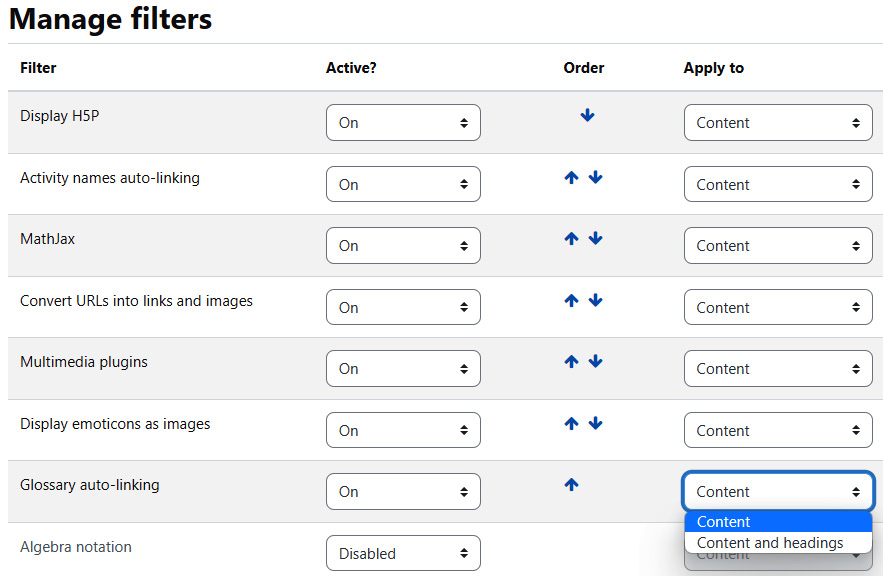
Figure 9.6 – Making sure that auto-linking is enabled within the site home page settings
After you've enabled glossaries on the site, you can start adding individual glossaries that align with the categories or topics covered by your course and are necessary to fulfill the learning objectives.
Adding and configuring a glossary
Now that the site administrator has enabled and configured the glossary activity, you are ready to start adding and configuring a glossary. Add a glossary by clicking on Add an activity or resource on your course page, and then select Glossary. When the glossary settings page is displayed, you will need to choose the correct setting to create the kind of glossary that you want for your class. Let's look at the settings that are unique to a glossary.
You will find these settings under Administration | Glossary administration | Edit settings:
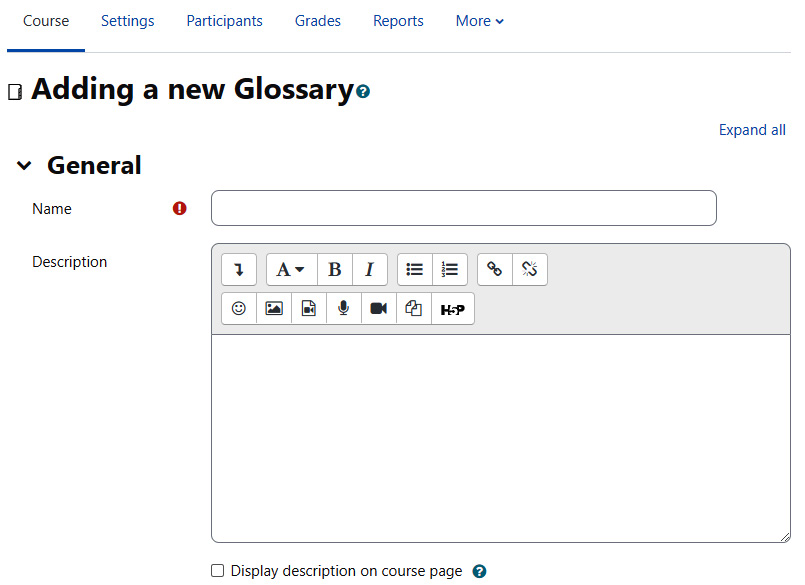
Figure 9.7 – Adding a new glossary and entering its name and description
Global glossaries versus local glossaries
By default, a glossary only applies to the course in which it resides. However, you can choose to make a glossary global. In this case, the words from this glossary will be highlighted and clickable wherever they are on your site. The work done in one course will then become available to all the courses on your site. If your site's subject matter is highly focused, consider using a global glossary. If your site's subject matter is very broad, such as in a university-wide learning site, you should use local glossaries to avoid confusion. For example, imagine that you have a course in chemistry and another in statistics. Both use the word granular, but chemistry uses the term to indicate a powdered substance, while statistics uses it to indicate a fine level of detail.
Important Note
Only an administrator can create a glossary in the global glossary. If you only have teacher rights, get an administrator to do this for you.
You may wish to empower your students to create their own glossaries and glossary terms. In that case, it's good to know about secondary glossaries.
Main glossaries versus secondary glossaries
The Glossary type setting enables you to designate a glossary as either Main or Secondary. The Main glossary setting refers to a glossary that will include terms from other glossaries. The Secondary glossary setting refers to a glossary that stands alone; it does not include terms from any other glossaries. For example, you might have an overall glossary for science terms and standalone glossaries such as physics, chemistry, biology, and geology as secondary glossaries. This is an important distinction when creating collaborative activities if you want the students to be able to add new terms. However, if you want to keep the glossary terms limited to the ones that align with your learning objectives, it's best to avoid secondary glossaries.
If you want students to be able to add entries to a glossary, you must make it a Secondary glossary type. Only teachers can add terms to a Main glossary type.
You can export terms from a Secondary glossary type to a Main glossary type, one at a time. So, you can create a secondary glossary that students will add terms to. Then, you and/or the students can export the best terms to the main glossary. Imagine a course with one main glossary and a secondary glossary each time the course is run. The main glossary will become a repository of the best terms added by each class.
However, sometimes, you might wish to have entries automatically approved. In that case, you can request Moodle to approve them. We will learn how to do that next.
Entries approved by default
If you turn on the setting for Approved by default, as soon as a student adds an entry to a glossary, this entry will appear in the glossary. If it's turned off, the teacher will need to approve each entry.
If you turn this setting on and students add entries that you think are inappropriate, you can always delete those entries and turn the setting off.
If Approved by default is turned off, new terms will await the teacher's approval before being added:

Figure 9.8 – Configuring entries in the glossary
If you would like the students to learn from each other by contributing definitions for the same term, you can set Moodle up so that they can contribute terms and then collaborate to come up with a final version. We'll discuss how to do that in an upcoming section.
Always allow editing and Duplicate entries allowed
Always allow editing and Duplicate entries allowed are two separate settings. However, they can work together in an interesting way.
If you turn on Always allow editing, students can edit entries that have already been made. So, if two students have different definitions for a term, they can each contribute their definition to the same entry. In this case, the second student will not need to create a duplicate entry; they can just add their definition to the existing entry.
If you turn the Always allow editing setting off, consider allowing duplicate entries. Then, if two students have different definitions for the same term, they can each create an entry for that term.
Allowing comments
If you turn the Allow comments on entries setting on, students and teachers can add comments to a glossary entry. These comments will appear at the bottom of the entry. Comments are visible to all the readers of the glossary.
Automatically linking glossary entries
If you turn the Automatically link glossary entries setting on, this will not always result in all entries becoming links on your course. Instead, when an entry is created, its editing page will have the option to turn on auto-linking for that entry.
As you develop your glossaries, you will need to think about how they will appear on the page. How many do you want to show on a page? Much depends on what the glossary entries are and how you plan to use them for collaboration.
Appearance settings
In the Appearance section, you will find settings that affect the presentation of the glossary. These settings affect the layout of the glossary page, how many entries are shown on a page, the links that users are given, and more.
Outcomes
Outcomes, also referred to as "competencies" or "goals," are descriptions of what the student has demonstrated after the completion of the activity or course.
Moodle 4.0 is flexible and designed to be used for courses in any possible delivery mode. The Glossary activity includes the outcomes, which enable you to indicate if you'll be using the glossary as a class participation activity, a supplement to a face-to-face course, or for team-based collaboration. Remember that to enable outcomes, you'll need to go to Site administration and select Advanced features. Then, click on Enable outcomes and save the changes. To add the course-level outcome, simply click on Edit outcomes from the link in Course administration. Then, click on Add a new outcome. Complete the form, and select Save changes.
After you've set up the outcomes, you might wish to set up the appearance. Here is the drop-down menu inside the Appearance menu:

Figure 9.9 – Configuring the Appearance menu in the glossary
To determine the best settings for your situation, experiment with the following steps:
- Log in as a teacher.
- Create a few glossary entries.
- Open another browser, log in as a student, and open the glossary.
- As a teacher, try different settings within the Appearance menu.
- Each time you change the settings as a student, refresh the Glossary page:

Figure 9.10 – Setting up the outcomes for the glossary
Including outcomes can be a great motivator. Three excellent ways to keep your students on track are to do the following:
- Connect the glossary to an assignment and include a due date so that it appears in the Calendar block of the dashboard.
- Manually add a calendar entry for the Glossary activity on specific days when you'd like students to add a glossary entry.
- Enable the Check when complete option in Activity completion, which will show up on the student's dashboard as a completed activity:

Figure 9.11 – Specifying how students track activity completion and making sure this shows up on the calendar in the student's dashboard
Functionality booster – enabling ratings
You can give students the ability to rate glossary entries, just like they can rate forum postings. The question is what do you want students to rate? The glossary entry's clarity, its helpfulness, or your writing skill in creating an entry? You'll need to consider what you want students to rate and create a custom scale that supports that rating. The criteria can align with the learning objectives and the learning plan. For example, they could tie to activities that align with "identify," "describe," and "explain." You can determine who can rate glossary entries, along with what scale to use, on the Settings page:

Figure 9.12 – Selecting the rating scale on the Ratings settings page
Note that only the Manager, Teacher, and Non-editing teacher roles can rate the entries in this glossary. In the next step, the teacher modifies the permissions to allow students to rate entries, too.
The following is the process to allow students to rate glossary entries. It consists of three parts:
- Creating the rating scale
- Selecting the scale for the glossary
- Giving students permission to use the ratings
In order to make it possible for the learners to easily rate the entries, it is necessary to create a rating scale. The following steps show you how to create a rating scale:
- Select Administration | Grade administration | Scales:
Figure 9.13 – Setting up grading for the glossary
- Click on the Add a new scale button.
- On the new Scale page, give a name to the scale. Note that only the teacher can see this name.
- In the Scale field, enter the values that the user will select in order to give the glossary definition a rating. The scale must have more than two items.
- In the Description field, enter a short description. This will help you remember the purpose of this scale.
- Save your changes.
The following steps show you how to select the scale for the glossary:
- Navigate to the Settings page of the glossary.
- In the Scale field, select the scale that you have just created.
- Modify any other settings that you want on this page,
- Save your changes.
For students to be able to actually implement the ratings, you'll need to turn on the permissions. To give students permission to use ratings, perform the following steps:
- From the main menu, select Administration | Glossary administration | Permissions:

Figure 9.14 – Setting permissions for the glossary ratings
- On the Permissions page, scroll down to the Activity: Glossary section.
- Click on the plus sign located next to Rate entries:
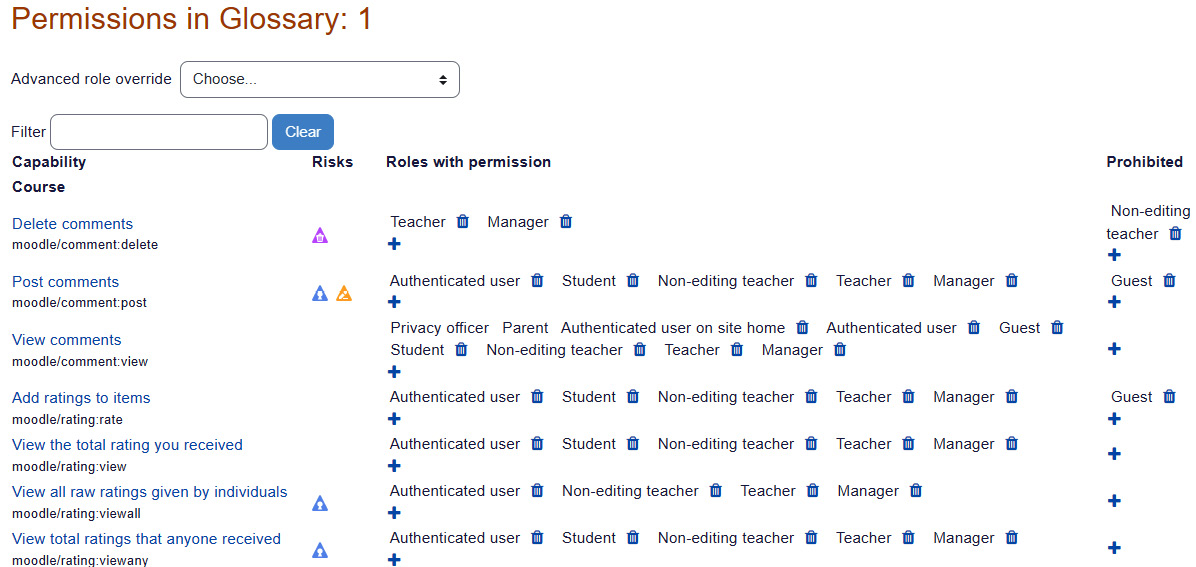
Figure 9.15 – Giving students permission to rate entries
Once roles have been enabled, students and anyone who has permission to create glossary entries can now begin adding glossary entries.
Adding glossary entries
Selecting a Glossary activity from the course menu displays the glossary's introductory page. From this page, you can edit and browse the glossary.
The following screenshot shows the Add a new entry button, which appears under every tab in the glossary:
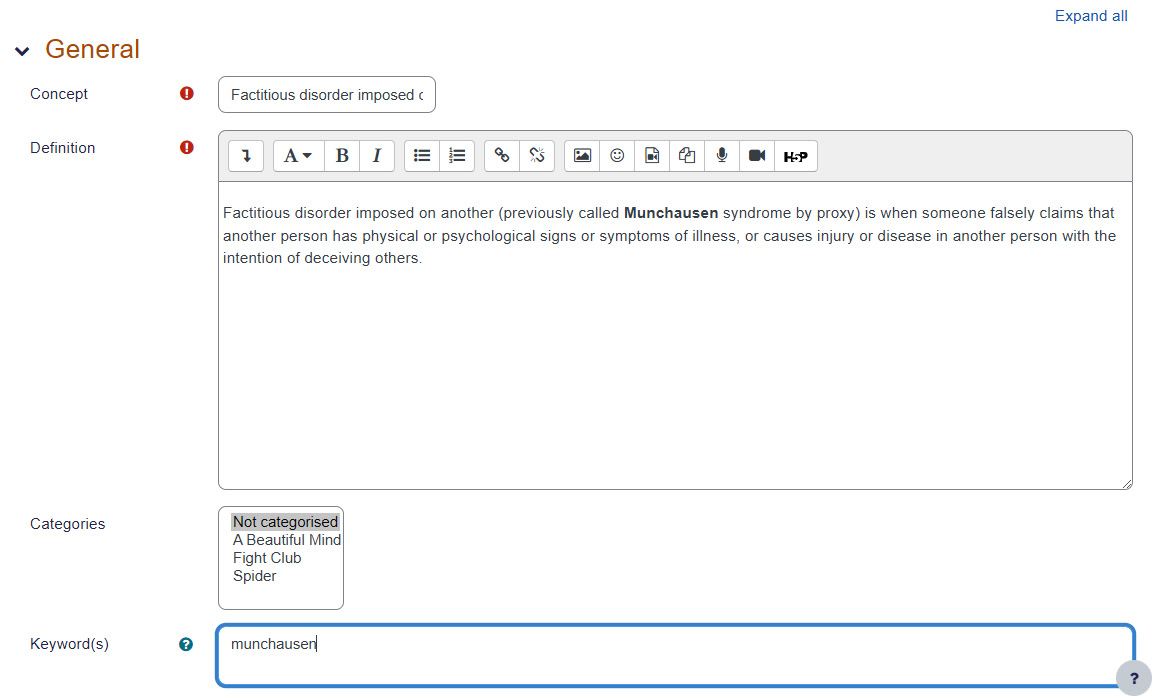
Figure 9.16 – The Add a new entry button allows you to create another glossary entry
Create new Glossary categories by navigating to the Browse by category page and then clicking on the Add a new entry button. This button appears under each of the tabs when you browse the glossary, so it's always available.
On this page, Concept is the term that you will add to the glossary. Keyword(s) are synonyms that are equivalent to a See also section in an index or dictionary. These terms will link to the same definition as the concept.
Note that you can add a picture or media file to Description using the icons in the toolbar: ![]()
You can also upload these kinds of files as an attachment, which is what this user chose to do.
If auto-linking has been enabled, the bottom half of Add a new entry contains the settings, as shown in Figure 9.17:

Figure 9.17 – Another auto-linking screen
When the glossary term appears within your course, you can have it linked to its glossary entry. The Auto-linking option determines if and when this word should link to its glossary entry.
Once you have a number of glossary entries, you might wish to use them in different applications and even share them with other instructors or put them on other courses. You can do that by importing and exporting entries, which we will address in the next section.
Importing and exporting entries
The Import entries and Export entries links enable the teacher to exchange glossaries between courses and even Moodle installations:

Figure 9.18 – The list of settings allows you to import and export glossaries and glossary entries between courses
You might want to begin a course with a small glossary and let students add to it as they discover new concepts. If you do this, export the beginning glossary so that it is available for the next course. The next time you teach a course, you can choose to export everything from the completed course (except the student information and the glossary). In the new copy, just create a new and blank glossary and import the beginning glossary.
Also, note that the editing window enables you to include hyperlinks in the definition (via the ![]() icon). This can be used to link to freely available information on the web, such as http://www.wikipedia.org/.
icon). This can be used to link to freely available information on the web, such as http://www.wikipedia.org/.
A glossary is effective for learning activities, whether individual or collaborative, that center around definitions. In this case, the learning objectives that are satisfied tend to be at the lower levels of Bloom's taxonomy, in the "Remember" category, which is at the base of the pyramid. To be able to satisfy higher-level cognitive skills and demonstrate mastery of the higher levels of Bloom's taxonomy, you can choose a wiki. Moodle has a very robust and flexible wiki that we will explore in the next section.
Wiki
The Moodle Wiki module enables students to collaborate on a group writing project, build a knowledge base, and discuss class topics. Students can also collaborate on developing rating criteria for a competition, a team-led event, or a business plan for a start-up company or organization.
Here is Moodle 4.0's redesigned Wiki icon:

Figure 9.19 Wiki icon
As a wiki is easy to use, interactive, and organized by date, it encourages collaboration among its participants. This makes it a powerful tool to create group knowledge. The key difference between a forum and a wiki is that when users enter a forum, they see a thread devoted to a topic. Each entry is short. Users read through the thread, one entry at a time. The result is that the discussion becomes prominent. In a wiki, users see the end result of the writing. To see the history of the writing, they must select a History tab. The result is that the end result of the writing becomes prominent.
Older wiki content is never deleted and can be restored. Additionally, wikis can be searched just like other course material. In the following section, we'll look at the settings on the Editing wiki page and how they affect user experience. There are advantages to using the wiki in Moodle. Collaborating using Google Docs or Teams/Sharepoint is similar in the sense that everyone can contribute. However, if students lose access to the outside platform (Google or Microsoft), they're unable to continue to contribute.
Using a wiki for student contributions and explanations of a topic
A wiki can be used to help explain a topic. For example, let's say that a course on entrepreneurship is planning to have a start-up competition. It will be useful to include a list of criteria for judging. Additionally, it will be very useful to include a wiki that contains definitions, processes, and procedures. It's a useful tool for instruction because the instructor can provide guidelines and pointers.
Using a wiki to create a list of judging criteria for evaluating a competition
Shark Tank (or Dragon's Den in the UK) is a popular show on television in which entrepreneurs come before a panel of potential investors and make presentations to entice the panel members to invest. It is an entertaining and informative program, and having Shark Tank/Dragon's Den as a class project can be equally informative, entertaining, and engaging.
One good way to plan a student Shark Tank/Dragon's Den project is to use a wiki. The first step will be to set up a list of judging criteria along with a clear set of guidelines that indicate what is expected in an outstanding pitch that will convince the investor to put money into the project or start-up company. Then, the students can also share their evaluations of the start-up pitches in the competition:

Figure 9.20 – How the wiki appears on the course page
Another excellent use of a wiki is to keep a collaborative journal:
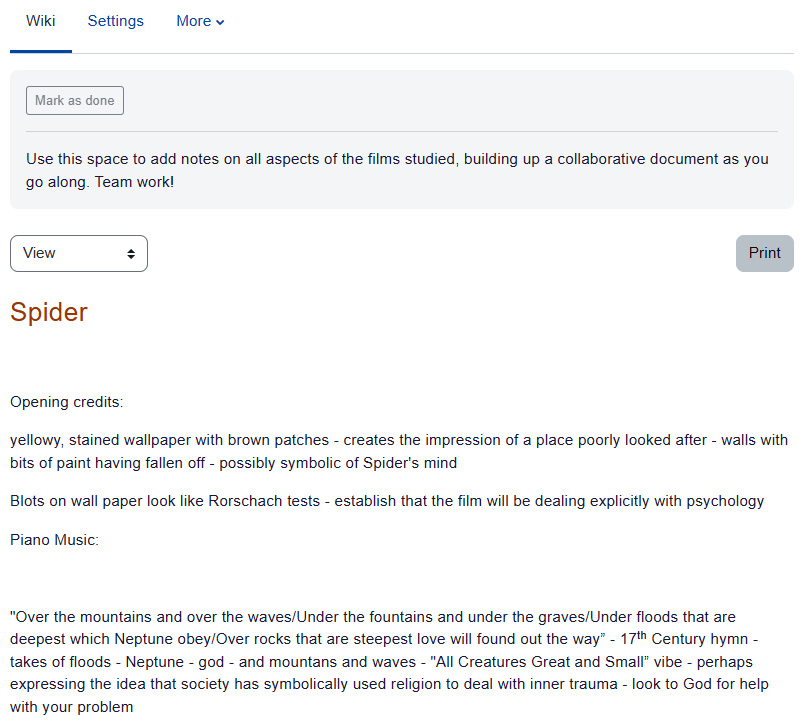
Figure 9.21 – An example of a collaborative wiki
You can switch to the History view to see who has commented and when:
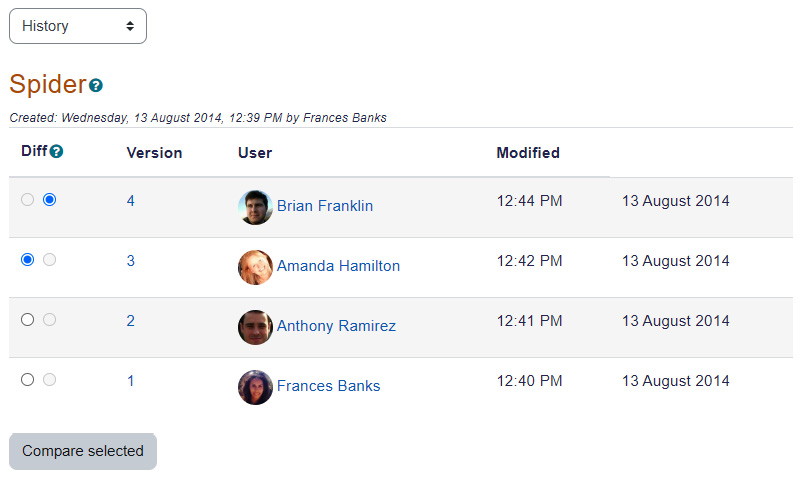
Figure 9.22 – The History view of the wiki allows you to see who has posted and when
Planning collaborative projects – using the wiki type and groups mode to determine who can edit a wiki
There are several ways to use wikis that focus on a collaborative, actionable project rather than creating a simple repository of knowledge. In the case of Shark Tank, one collaborative activity could be to develop a business plan. Another could be to develop a directory of potential financial backers, which could include angels, venture capital firms, private equity firms, and partners who will help commercialize the product.
Event planning
A wiki can be used to identify the tasks, roles, and resources of an event. For example, let's take the task of planning a wedding. There will be many different elements, ranging from the flowers, the decorations during the wedding ceremony, the reception, the catering, the invitations, and more. The wiki can be used to identify the different tasks, and then further define and refine the tasks as they are listed. Following this, the wiki can be taken one step further and be used for developing a timeline with action steps.
Business plan for a start-up
As mentioned earlier, a class in entrepreneurship that includes a Shark Tank competition would be the perfect place to have a collaborative business plan. The wiki can contain the following elements:
- Key elements of a business plan
- Strengths, Weaknesses, Opportunities, Threats (SWOT) analyses
- Financial projections
- Goals and desired outcomes
- Diagrams of the product
- Materials used to market the products
Using the wiki type and groups mode to determine who can edit a wiki
Wiki content is open to editing by the entire class, a group, the teacher, or a single student. Additionally, the wiki can be available for viewing by the entire class, a group, the teacher, or a single student. Note that the teacher determines who can see and edit the wiki content; the settings differ.
The settings for who can edit the wiki content are done using the Wiki mode drop-down box.
The settings for who can simply see the wiki content are done using the Groups mode.
In this case, the wiki can double as a learning journal, which is a great place for students to develop reflection-based knowledge. Making a wiki editable by only a single student appears to turn the wiki into a personal journal. However, the difference between a single student wiki and a journal is that a journal can be seen only by the student and the teacher. You can keep a single student wiki private, or you can open it to change the settings and make it collaborative for the student's group or the entire class:

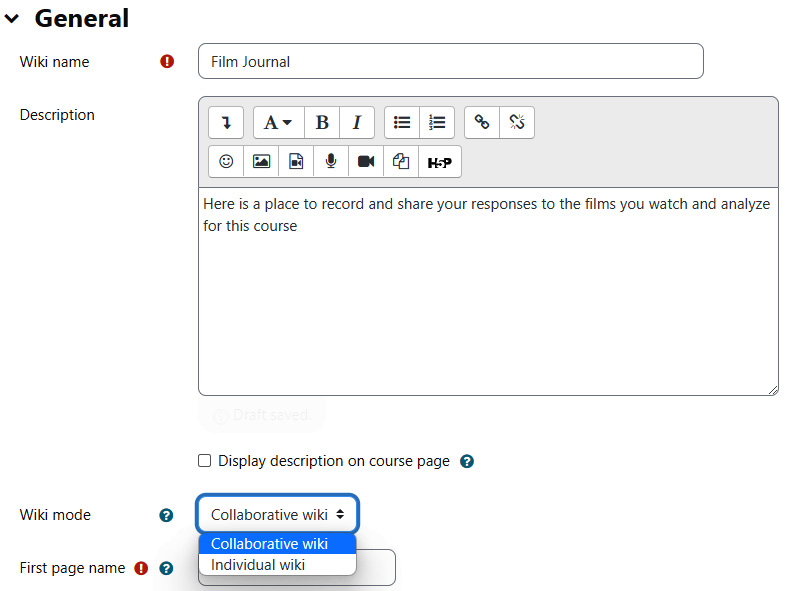
Figure 9.23 – Adding a new collaborative wiki
The first-page name
The name on the first page of the wiki will be taken from this field. A screen to add a page will pop up after you set up the new wiki. Teachers and administrators can delete pages. Students cannot.
If there is one wiki for the entire class, then when the first student enters the wiki, that student will see the starting page(s). If that first student edits any page, the next student who enters will see the edited version, and so on. If there is one wiki for each group in the class, each group will get a fresh wiki with the starting page(s) that you created. Also, if each student gets their own wiki, each student will see their starting pages when they enter their wiki:

Figure 9.24 – Adding the first-page name for the wiki
The default format
The Default format setting determines whether wiki authors use standard wiki markup or HTML code while editing. If you will use the HTML editor for other student activities, setting this to HTML can simplify this activity for your students. They will get familiar with the HTML editor and won't need to learn the wiki markup language. However, if your students are accustomed to wikis, you might want to select Creole. This enables them to use a common wiki markup, which is faster for experienced typists. Creole is a lightweight markup language, aimed at being a common markup language for wikis, enabling and simplifying the transfer of content between different wiki engines. NWiki is a wiki engine based on the SOA paradigm. It is a set of components and services to embed wiki capabilities in any .NET application.
If you do not select the Force format, then when a student enters the wiki, they will be able to use HTML for editing purposes. After you have created a new wiki, a screen will appear that allows you to start a new page. Take a look at the following screenshot:
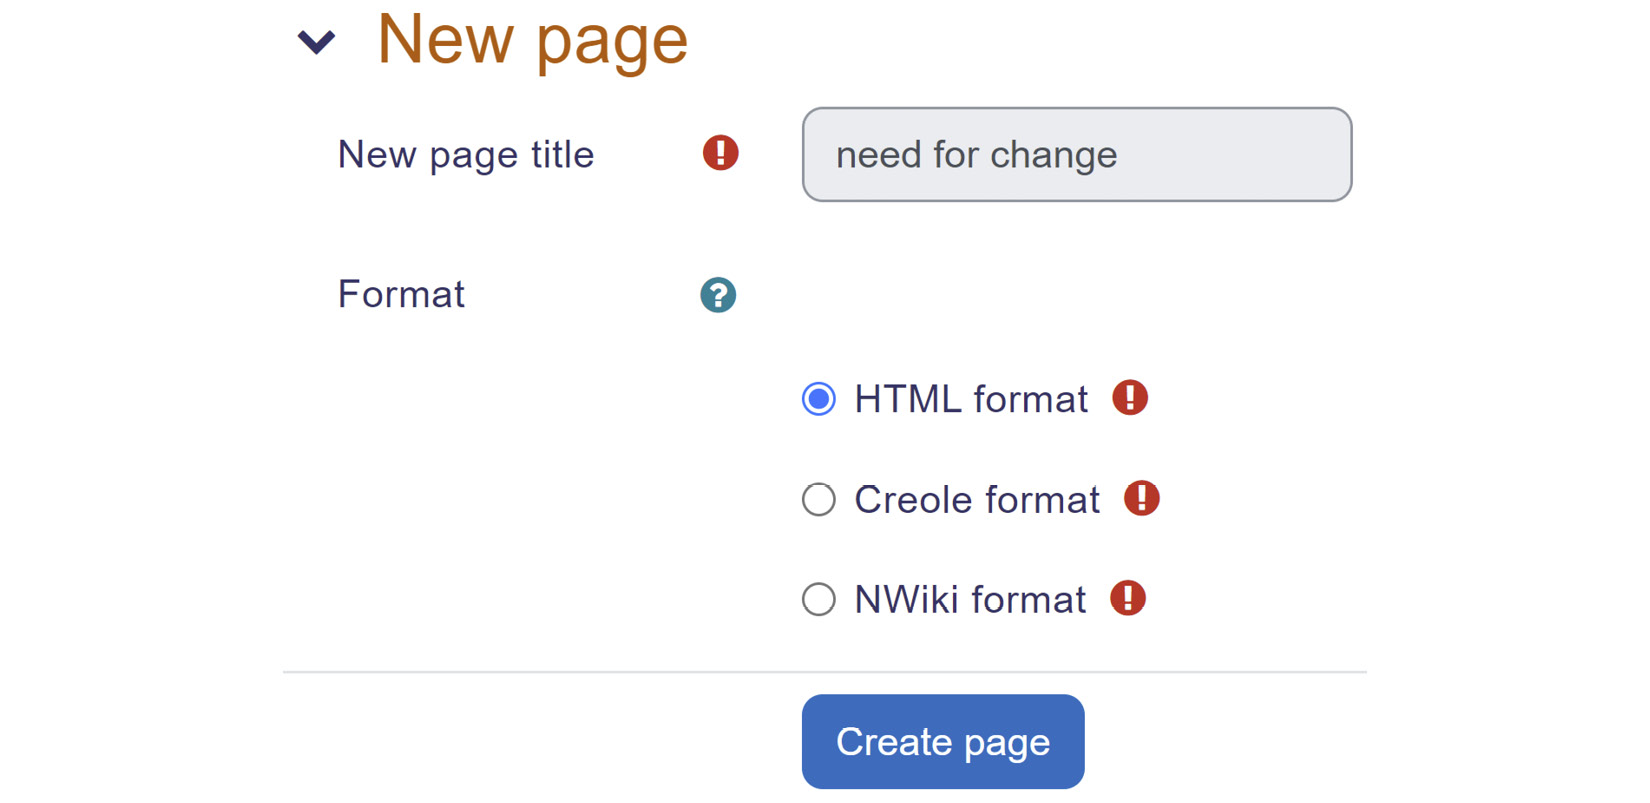
Figure 9.25 – Starting a new page with the Format options
As you can see, wikis are powerful and can be utilized in courses that require a group project, presentation, or proposal. The actual collaborative work can be done in both synchronous and asynchronous ways. For example, students can make contributions to the wiki asynchronously and then meet through Moodle's built-in web conferencing, BigBlueButton, or by linking to their own institution's subscribed platforms, such as Zoom or Teams.
Functionality booster
It is possible to collaborate using Google Docs, Microsoft Teams, or OneDrive, rather than doing all the collaboration within the glossary or wiki entries. This is highly recommended if several teams are collaborating or if there are different phases of a glossary or wiki entry (for instance, initial, revision, or an annotated bibliography). However, there are disadvantages if people are from different institutions, if they lose access to the outside platform, or if they run out of space there. There can also be security features and firewalls that could impede some users.
For example, one team could be in charge of posting the initial definitions. They could collaborate in Google Docs and then upload their final document to the glossary or wiki entry. The second team could go in and add references from refereed journals to specific terms. The third could add annotations:
Team 1: Enter the primary definition.
Team 2: Add key references from the refereed journals.
Team 3: Add annotations to the journals.
Each team would collaborate outside Moodle and then upload the clean, final version to add to the appropriate entries.
Now that we've taken a look at how glossaries and wikis work in Moodle, along with how they can blend with the cloud-based platforms that learners and institutions can use, we are ready to move on and work with them.
Summary
Moodle offers several options for students to collaborate on building a body of knowledge. For instance, a class can work together to build a glossary that can be imported and reused in future classes. They can work together to write a wiki, which provides an opportunity for them to organize their knowledge into a narrative. Moodle 4.0 is designed for maximum flexibility, and it puts social interaction at the heart of its core philosophy. That means that collaborative wikis and glossaries are perfect activities in Moodle 4.0, and they can be used in conjunction with 100% online activities alongside those that incorporate in-person, face-to-face interactions.
Both glossaries and wikis are very effective for a combination of synchronous and asynchronous learning. For example, group members can chat with each other as they develop their definitions (glossaries) or collaborative projects (wikis). Additionally, they can schedule synchronous web conferences by integrating and embedding BigBlueButton or linking to an outside platform such as Zoom, Google Meet, or Microsoft Teams.
Such engagement is highly motivating, and students will be more likely to stay involved with the course and also learn from each other. Incorporating collaborative glossaries and wikis can also help students feel more confident about learning and take their knowledge easily from coursework to real-world applications.
In the next chapter, you will learn how to use Moodle to run a workshop. In it, we will cover workshops, group projects, combinations of group and individual projects, workshop strategies, and the four phases of a workshop.