
Chapter 13: Features for Teachers: Logs, Reports, and Guides
Some of the most useful new features of Moodle 4.0 have to do with automatically generating progress reports that help students as well as teachers. For example, there is a new activity completion indicator that tracks the student's progress on their assigned tasks in each course. Similarly, the Dashboard has an updated Timeline block and a highly functional Calendar block that bring all the course deadlines together on one page.
For administrators, there are performance reports that have to do with the functioning of Moodle. This new feature of Moodle can be found by accessing the Site Administration menu, and following this path: Site administration > Reports > Report builder > Custom reports. Thus, the administrator can build custom reports that are useful for different constituencies within the organization, ranging from students, teachers, managers, and administrators.
For teachers, tracking progress, generating activity logs, and determining levels of engagement are vital in assessing satisfactory academic progress (SAP) and Moodle offers several features that are of special interest. These focus on determining how well your students are progressing through a course. Reports and logs show you who has done what on your site, or in your course. They can be invaluable tools in letting you know how students are achieving learning goals, and they can serve as useful gap analyses that allow you to make adjustments to your content and assessment strategies.
You may need to generate student progress reports at different times during the term. First, you may need to report which students never attended so that you can drop them for non-attendance. Then, you may need to generate mid-term progress reports. Finally, you may need to provide metrics on students' time on task and completion rates. Moodle's logs and reports can help you.
In this chapter, you will learn how to do the following:
- Identify the types of reports and logs available in Moodle
- Determine the types of reports needed based on course outcomes
- Prepare logs and reports that are needed
In the next section, we identify and generate logs and reports that can be used for several student progress assessments, as well as compliance for accreditation.
Student views of performance and progress
As a student, Moodle 4.0 gives you a chance to see where you are in your courses, as well as see "at-a-glance" reports of how your performance stacks up against others in the course.
First, there is the streamlined new Course Index, which is a column on the left-hand side of the screen if you're using a tablet or laptop. So, on the left-hand side of the screen on your tablet/laptop, you'll see the Course Index, which contains various topics (modules) and activities. In the center, you will see the navigation bar, which provides course information, announcements, links to resources and activities, and more. On the right-hand side are blocks that track activity, display performance in your course, and give you a link to collaborative activities if your teacher or administrator has permitted you to see them:

Figure 13.1 – View of the Course Index on the left-hand column
The redesigned Calendar and Timeline blocks are available to all users. They are especially helpful to students because upcoming assignments appear in the order that they are due, and they also appear on the redesigned Calendar block, which appears directly below. On the right-hand side is a redesigned Learning plans block, along with Recently accessed items, which features the newly redesigned activity and resources icons:
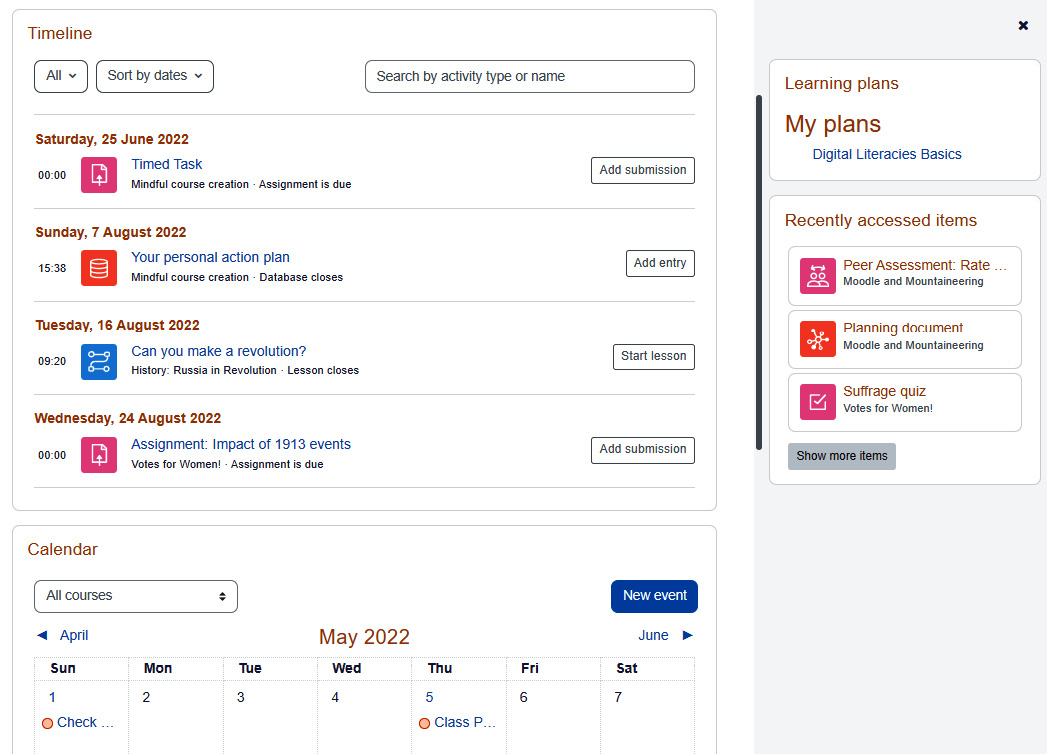
Figure 13.2 – View of the Timeline and Calendar blocks
The newly redesigned Courses page lets students know how many of their courses they have completed. For example, as shown in the following screenshot of the My Courses screen, the student has completed 42% of Mindful Course Creation but only 27% of Celebrating Cultures. Notice that the course category appears directly below the name of the course, which makes it easier to navigate:
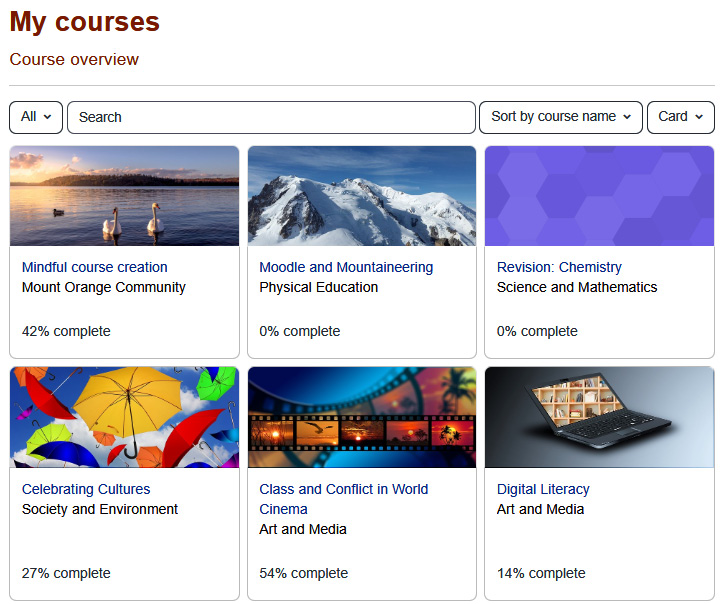
Figure 13.3 – Newly designed My courses page
So, while the progress reports for students are not technically found in the Reports section, they are reports and are extremely helpful in achieving satisfactory academic progress, and more.
Now, let's take a look at the logs and reports that you will need as a teacher, manager, or administrator.
Logs and reports
Moodle keeps detailed logs of all the activities that users perform on your site. You can use these logs to determine who has been active on your site, what they did, and when they did it.
Important Note
Some reports are available at the course level; teachers can access these reports. Other reports are available at the site level; you must be a site administrator to access these reports. Both are covered in this chapter.
Moodle has a modest report viewing system built into it, which has been enhanced in Moodle 4.0 as a report builder. The Report builder feature allows administrators to create and share custom reports. To build a custom report, go to Site administration | Reports | Report builder | Custom reports. Once you've created the reports, you can customize when they are released and where they are sent. You can also manage access to the reports. Keep in mind that when you are scheduling the reports, you can also automate when, where, and to whom they are sent.
However, for sophisticated log analysis, you need to look outside Moodle. It is a good idea to look at third-party plugins that are compatible with Moodle. A list can be found here: https://docs.moodle.org/400/en/ad-hoc_contributed_reports.
To view the logs and reports for a course, you must be logged in as a teacher or a manager. Then, select My courses | Name of course | Reports:

Figure 13.4 – View of the Reports screen
If you are a student, you will see your competency breakdown.
Competency breakdown
The competency breakdown keeps a log of which competencies are being fulfilled as course activities are completed. They appear in the student's learning plans. To activate automatic updating, it is necessary to tie the course activity completion logs to competencies or student learning plans.
Viewing course logs
Note that Moodle's display of the log files can be filtered by course, participant, day, activity, and action. You can select a single value for any of these filters, as shown in the following screenshot:
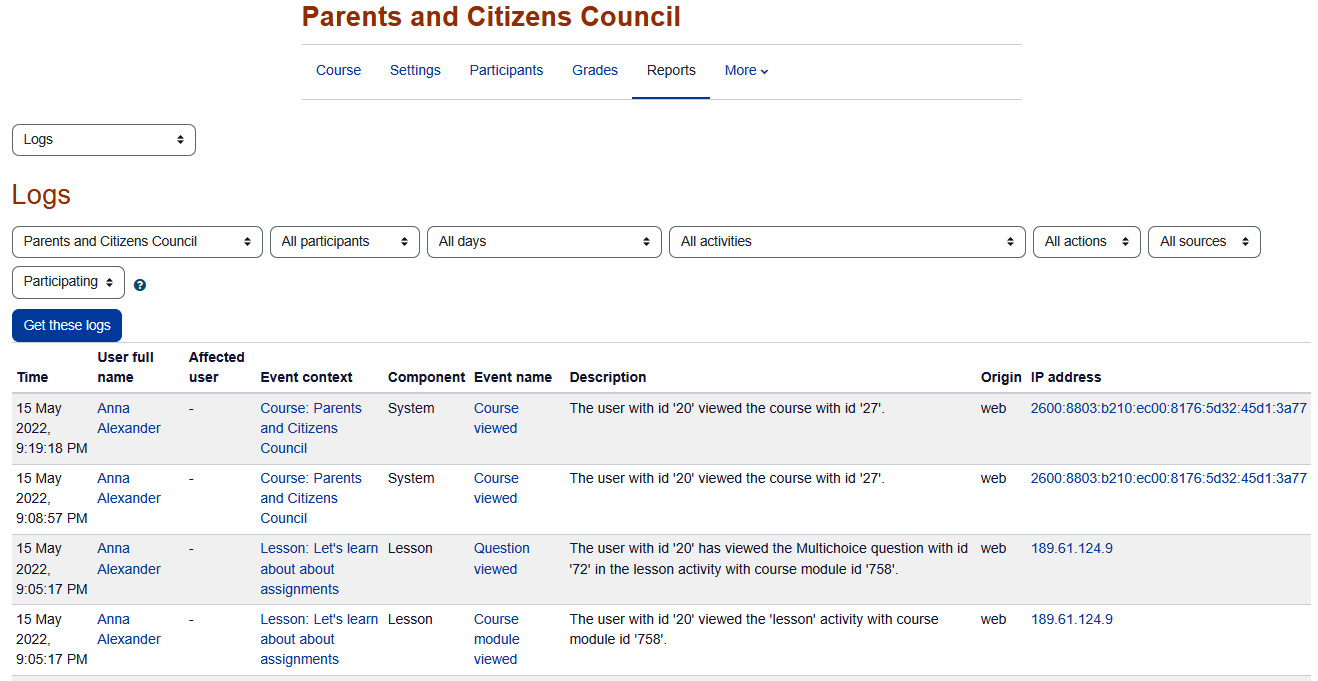
Figure 13.5 – How to view course logs
You cannot select multiple values for any of these filters – that is, you cannot look at the logs for two courses at the same time, four participants at the same time, or for a few days at the same time. If you want a more sophisticated view of the logs, you must use a tool other than Moodle's built-in log viewer.
Fortunately, you can download the logs as text files and import them into another tool, such as a spreadsheet. To download the logs, use the Download table data as drop-down menu at the bottom of the page, as shown in the following screenshot:

Figure 13.6 – Using the Download table data as drop-down menu to download logs
For example, you can use Excel's data menu to format, chart, and analyze the data. A complete discussion of Excel's data functions is beyond the scope of this book, but there are many sources of help for these functions. Here is Microsoft's support page: https://support.microsoft.com/en-us/office/excel-functions-by-category-5f91f4e9-7b42-46d2-9b1-63f26a86c0eb.
There are two ways to get information from several courses in the same place. First, you can run the report as an administrator, from the administrative interface. This enables you to run a report for all the courses on the site. Second, as a teacher, you can download the data from each course separately and combine it in one Excel sheet or workbook.
Functionality booster
In certain cases, you may be able to use live logs as proctoring tools. You can combine the live log with a streaming video (Zoom, BigBlueButton, or another web conferencing application) that shows the student at the computer as they work on their proctored assignment. These are best for courses that have directed readings or sections with few enrollments.
Viewing Live logs
Live logs shows what has happened in the current course, for the past hour:
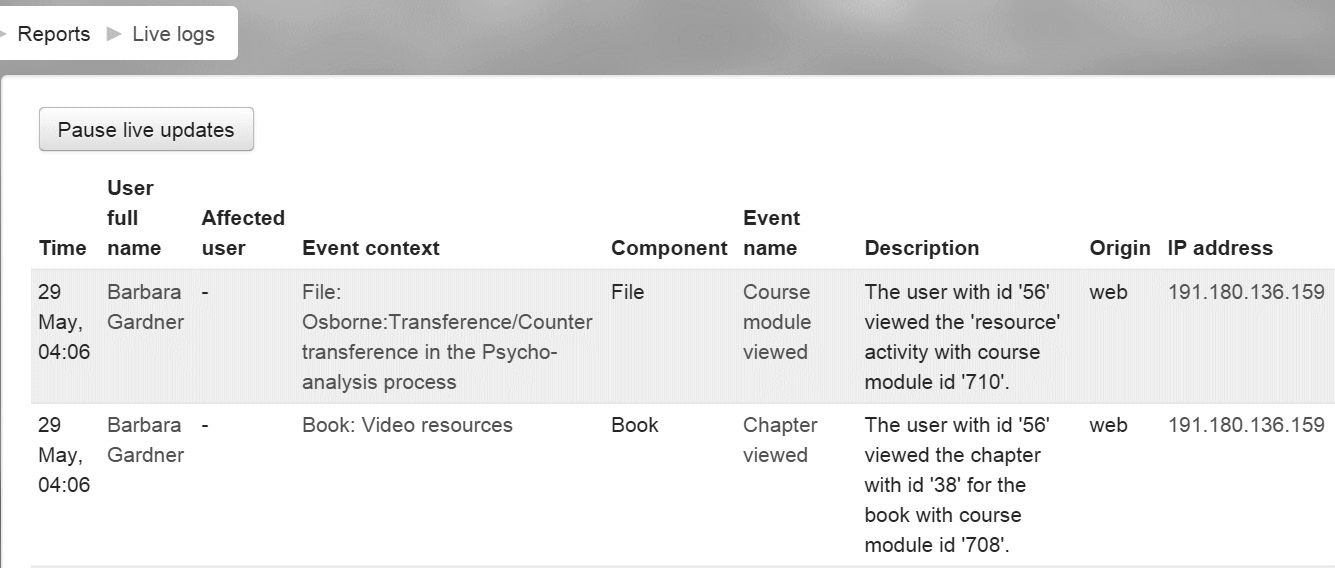
Figure 13.7 – Using Live logs to track activity
Use Live logs if you want to observe the students as they use the course. For example, you may monitor the course while students take a scheduled quiz.
In the next section, we will learn how to generate activity reports and analyze them.
Viewing activity reports
An activity report offers a user-friendly view of an activity in a single course. While the logs show complete information, an activity report just shows the course items, what was done in each item, and the time of the latest activity for that item. When you first select Activity report from the menu, you will be presented with a list of all the activities in the course, as shown in the following screenshot:
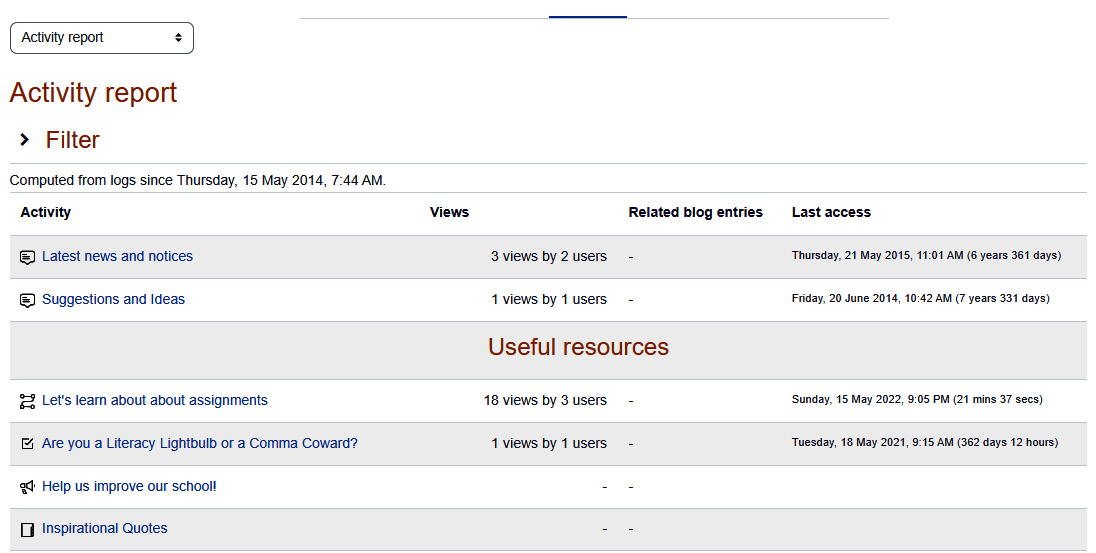
Figure 13.8 – View of the Activity report area
From this list, you can select the activity you want a report for, and you will be taken to that activity. In this example, the teacher selected Assignment 1, which opened that activity. Then, the teacher can select View all submissions to see how the students participated in this activity:

Figure 13.9 – Viewing the Submissions log/report
Note that an activity report only acts as a link to the activities in a course. Once you select an activity, you will use that activity's method for viewing a report.
Now, let's look at the participation reports that we can generate.
Participation reports – reports used for interventions to assure persistence
The Course participation report is especially useful for discovering which students need to complete an activity and sending them a reminder to complete it.
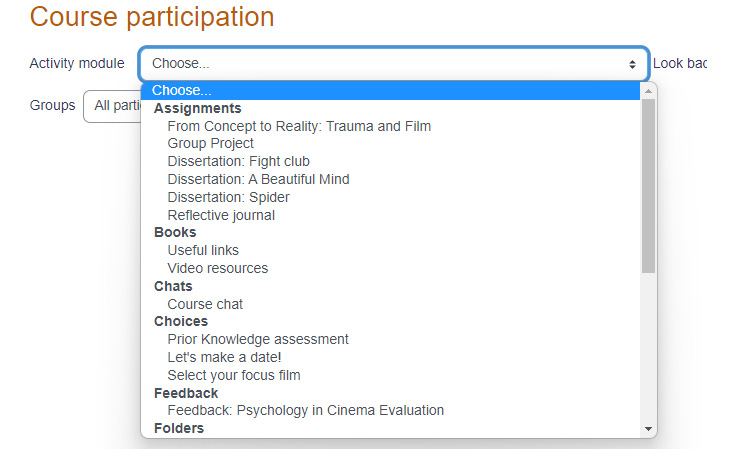
Figure. 13.10 – A menu showing the different types of Course participation reports
In the following example, the teacher is looking at the report for a feedback activity called Psychology in Cinema Evaluation. The teacher wants to see who submitted their feedback for the course:
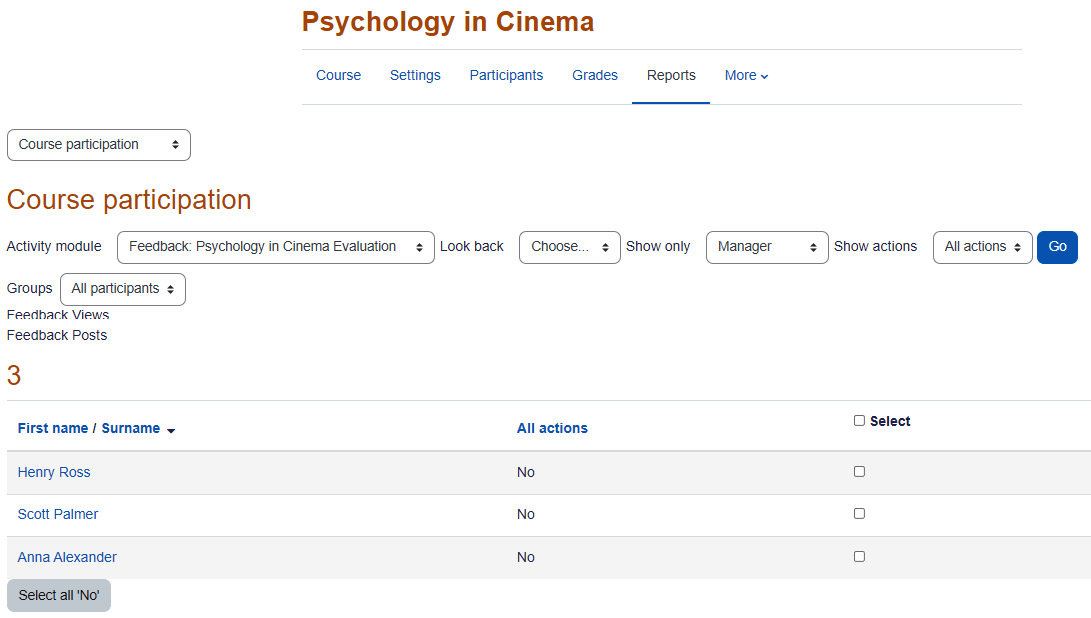
Figure 13.11 – A Course participation report that shows who submitted feedback for a course
In this demonstration course, the teacher wants all the students to give their feedback. So, the teacher will send a message to the students who have not completed the activity. To do this, they can select the students and then, from the With selected users... drop-down list, select Send a message:

Figure 13.12 – A method for requiring students to provide feedback
This takes the teacher to a page where they can create and send the message. The message will be sent to the students' email addresses and also stored in their Moodle messages.
Now, let's learn how to monitor at a more precise level.
Using activity completion
You can take monitoring to a more precise level. If the course has activity completion enabled, you can view a report showing the completion status of the activities in the course. Note that activity completion can be overridden with the right capability too. Activity completion allows you to modify and set completion criteria in each activity's settings. You can use it as a gateway for progress. For example, the student must achieve a certain score before progressing. This is common in mastery learning:
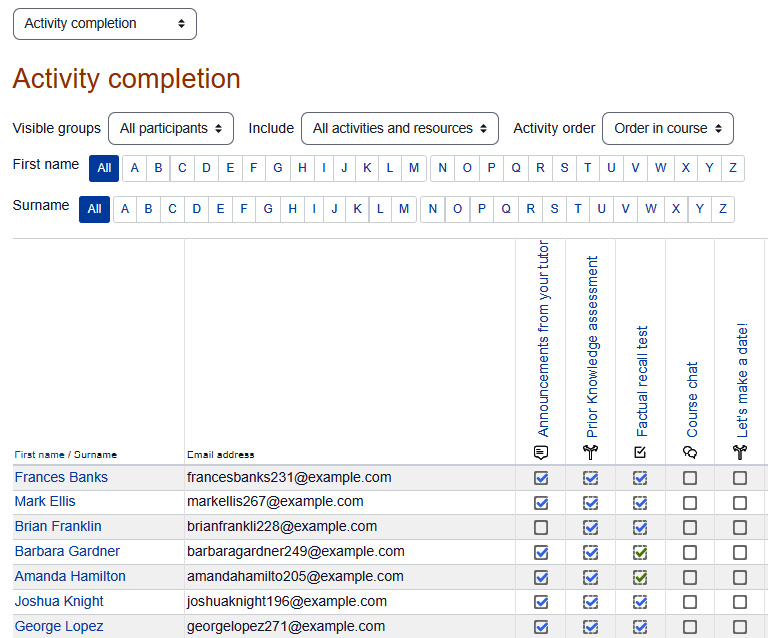
Figure 13.13 – Generating a report to show the completion status of activities
Note that you can show activities for just one group or all the students in the course. Also, this report only shows those activities whose completion status is being tracked.
Making sure that students achieve a mastery-level score (often 80 percent or higher) is a cornerstone of competency-based or proficiency-based learning. Competency-based learning (CBE) denotes a learning plan that sets out the categories of learning required for a certain skill or knowledge area. In CBE, the student will not receive a certificate or credit until completing the course with the designated score.
Now, let's learn how to review student achievement and grades.
Reports and accreditation
Keep in mind that these reports are often used in self-study for accreditation, particularly in relation to student progress, such as metrics for SAP, as well as for metrics to do with persistence.
Viewing grades
To access grades, select the course that you want to see the grades for and then select Grade administration | Grader report. This will display a summary of the grades for that course:

Figure 13.14 – Generating a Grader report with student grades in one place
Note that, in the preceding screenshot, some students have not completed the first assignment in this course – that is, From Concept to Reality.... Also, note the Turn editing on button in the top-right corner of the page; the teacher can use this button to override the grades being displayed by entering new ones. When the teacher clicks on that button, the grades on this page become editable.
In our example course, the teacher wants to investigate the lack of grades for the From Concept to Reality... assignment, so they must click on the name of the assignment, which will take them out of the Grader report area and into the assignment itself.
The Grader report area is the teacher's starting point for examining the grades in a course. It also enables the teacher to enter updated grades. From there, the teacher can click into individual activities and investigate or modify the grades.
Categorizing grades
Each of the graded activities can be put into a category. Note that you put activities into categories, not students. If you want to categorize students, put them into groups.
Viewing grade categories
Categorizing the graded activities in a course allows you to quickly see how your students are doing with various kinds of activities. If you do not assign an activity to a category, it will belong to the Uncategorized category by default.
In the Quizzes category, the grades are displayed for two quizzes. The page also displays the Category total value for Quizzes.
The Non-quizzes category only displays the Category total value. Grades for individual activities under Non-quizzes are not displayed. If the user clicks on the + sign located next to Non-quizzes, the individual grades in that category will be revealed.
In this example, the teacher can see that the scores of Student1 in the quizzes are consistent with their scores in the non-quiz activities. Categorizing the activities made it easy to see the comparison.
Now, let's learn how to create grade categories.
Creating grade categories
Categories are created and items are moved into categories in the same window.
How to create a grade category
Follow these steps:
- Select Administration | Grades | Gradebook setup | Add category:

Figure 13.15 – View of the Gradebook setup area
- At the bottom of the page, click on the Add category button. Then you can edit the category by clicking on the Edit category button. You can add the Category name and specify the method of calculating the grade (the kind of aggregation).
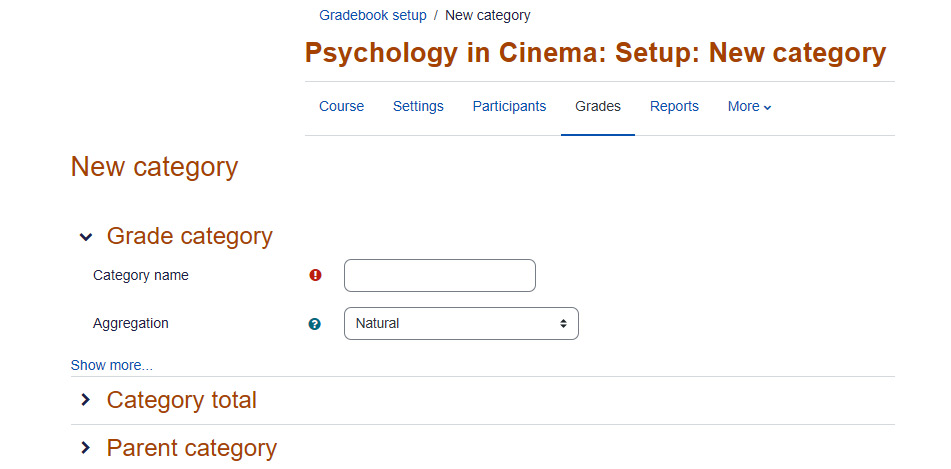
Figure 13.16 – View of the screen for setting up a new grade category
How to assign an item to a grade category
- Select Settings | Graded | Grade category | New category.
- Select the item(s) that you want to assign to the category.
- From the drop-down menu at the bottom of the page, select the category that you want to move the item(s) to:

Figure 13.17 – Moving to a new grade category
- Click the Save changes button.
The most important point here is to determine what kind of question you want to answer when you examine student grades and create categories that enable you to answer that question. You can categorize the grades around learning outcomes as well as topics or modules. For example, let's consider how students do on quizzes versus more interactive activities, such as workshops and forums. To answer that question, you can create a category just for quizzes, and then answer that question just by viewing the grades. Now, let's consider how students do on offline activities versus online activities. To answer that question, you can create online and offline grading categories.
Tip
Remember that these categories are not written in stone. If your needs change, you can always create and assign new grading categories as needed.
Summary
Moodle 4.0 has been updated with new functionalities to make it easier for students, teachers, and administrators to view performance and to see, at a glance, whether or not progress is being made, and where it might be necessary to intervene and motivate.
Whether in a classroom or online, managing a successful course requires two-way communication between the teacher and students. Constantly monitoring the course logs and grades gives you an early indication that a class may need a mid-course correction. You can use questions, surveys, and chats to discover specific problems and challenges that the students are facing. After bringing the course back on track, custom grading scales, extra credit, and curves can help you equalize the grades. When teaching online, make a habit of checking the logs and grades often.
You can use the reports and logs for administrative purposes as well, to comply with requirements to document when students first logged in and also their academic progress for student success. External accrediting institutions will often ask for course data. If you are a private training provider, you may wish to provide data to your students, who are paying customers.
Now that you have worked your way through this book, you have a basic toolkit for creating, delivering, and managing a successful online course in Moodle. However, you don't need to do it alone! When you need help with Moodle, there are many good resources.
Please keep in mind that this book is meant as a general introduction and focuses on instructional strategies that help you plan your course structure, resources, and activities to maximize your chances of success. Moodle is a robust learning management system with a complex structure, amazing flexibility and customizability, and reporting. It's easy to get overwhelmed. But, there's no need to worry. It is very easy to set up a basic shell or functional template, and you can add features as you go. The key is to keep your learning objectives and course goals in mind, and then to map out how you plan to teach by developing a template or storyboard.
First, the Moodle community at http://moodle.org is an excellent resource. The forums contain plenty of accumulated wisdom.
Second, you are welcome to visit my site at http://www.beyondutopia.com and click over to my blog at http://www.elearningcorgi.com for longer how-to articles about online learning. Leave comments and join the conversation. Also, feel free to contact me via LinkedIn at https://www.linkedin.com/in/susannash/.
Third, check out other Moodle books by Packt Publishing. They deal with specific topics in more detail, such as Moodle security, administration, and using Moodle in a corporate environment.
Thank you for taking a journey through Moodle with me. I look forward to seeing you online with the rest of the Moodle community.