
Chapter 11: Groups and Cohorts
People learn from each other. Moodle is designed for groups who work asynchronously as well as synchronously, in a blend of "on-demand" and "live" web conferencing. Being able to effectively coordinate activities so that groups and cohorts work well together will enable you to ensure that there are ideal conditions for learning, especially the collaborative learning that is so vital to online learning. Facilitating collaborative learning and communication between students is a straightforward process with groups and cohorts. Keep in mind that virtually all levels of learning can benefit from collaboration, from the lowest level of Bloom's taxonomy, Remember, which can include collaboratively defining terms, to the highest levels, Evaluate and Create, which can involve students working together to appraise, critique, design, and develop.
In this chapter, you will learn about the following topics:
- Using groups to build teams for collaboration and communication
- Differentiating between groups and cohorts
- How to mass-enroll students into courses
- How to manage students after they are enrolled
In the first section of this chapter, we will look at definitions of groups and cohorts in terms of how they relate to e-learners. We will then discuss when is the best time and way to organize students into groups and cohorts to achieve course learning objectives. By the end of the chapter, you will know how to create and manage groups and cohorts in Moodle.
Groups versus cohorts
Both groups and cohorts are collections of students. However, there are several differences between them. We can sum up these differences in one sentence, that is, cohorts are site-wide or course category-wide groups. Cohorts enable administrators to enroll and unenroll students en masse, whereas groups enable teachers to manage students during a class. So, you can think of a cohort as a collection of students who are staying together in order to complete an entire course or sequence of courses together. Groups are smaller sets of students within the course.
Here's another way to approach it: Think of a cohort as a group of students working together through the same academic curriculum; for example, a group of students all enrolled in the same degree program, and then they tend to have many courses together. For example, you may have a cohort (collection of students) who decide to pursue a Master's of Liberal Studies together. They will all be enrolled in the required sources together.
A group is different than a cohort. A group is at the course level rather than the degree program. Think of a group as a subset of students enrolled in a course. Groups are used to manage various activities within a course.
For example, members of a cohort may enter the degree program together, and they take the courses together in the same sequence. They have a lot in common because they have shared experiences, and over time, develop trust and long-term relationships.
The purpose of cohorts is to make it possible for all the members of a cohort to be enrolled in a course, with just a few clicks. We can do this with cohort sync, which synchronizes cohort membership with course enrollment.
There is a small amount of overlap between what you can do with a cohort and a group. However, the differences are large enough that you would not want to substitute one for the other.
We will start by looking closely at the primary characteristics of cohorts and examine how Moodle can be modified so that cohorts achieve the course and program learning objectives.
Cohorts
In this section, we'll look at how to create and use cohorts. You can perform many operations with cohorts in bulk, affecting many students at once. In general, cohorts consist of students who matriculate at the same time, and then take all their classes together, culminating in graduating together. For example, as in the case in the previous section, 20 students enter a master's degree program at the same time. They take three courses per term, and they do so at the same time. The students would interact with each other in each course, albeit in different ways. Over time, they would develop trust and they would learn from each other.
Creating a cohort
To create a cohort, perform the following steps:
- From the main menu, select Site administration | Users | Accounts | Cohorts.
- On the Cohorts page, click on the Add button. The Add new cohort page will be displayed:

Figure 11.1 – Adding a new cohort
- Enter a name for the cohort. This is the name that you will see when you work with the cohort. In this case, it is Writing About Nature.
- Enter an ID for the cohort.
If you upload students in bulk to this cohort, you will specify the cohort using this identifier. You can use any characters you want in the Cohort ID option; however, bear in mind that the file you upload to the cohort can come from a different computer system. To be safe, consider using only ASCII characters, such as letters, numbers, special characters, and no spaces in the Cohort ID option, for example, Nature-Writing.
- Enter a description that will help you and other administrators remember the purpose of the cohort.
- Click on Save changes:

Figure 11.2 – Describing the cohort within the category of Society and Environment
Now that the cohort has been created, you can begin adding users to this cohort.
Adding and removing students to and from a cohort
Students can be added or removed to a cohort manually by searching and selecting them. They can also be added in bulk by uploading a file to Moodle. Let's look at each of these methods in the next sections.
Manually adding and removing students from a cohort
We will look at how to manage cohorts and course enrollments in the Cohort sync section. For now, here are the steps on how to manually add and remove students:
- From the main menu, select Site administration | Users | Accounts | Cohorts.
- On the Cohorts page, for the cohort to which you want to add students, click on the People icon:

Figure 11.3 – The People icon
The Cohort Assign page will be displayed. The left-hand side panel displays users that are already in the cohort if any. The right-hand side panel displays users that can be added to the cohort:

Figure 11.4 – The Cohort Assign page
Adding by uploading a file
In addition to manually adding individuals to the cohort, you can also upload cohorts by uploading a file:

Figure 11.5 – Uploading a cohort file
- Use the Search field to search for users in each panel. You can search for text that is in the username and email address fields.
- Use the Add and Remove buttons to move users from one panel to another.
Now that we have seen how to add or remove the students manually, in the next section, let's see how to add them in bulk to a cohort.
Cohort sync
By using the cohort sync enrolment method, you can enroll and unenroll large collections of students at once. The enrollment is automatic. Using cohort sync involves the following steps:
- Creating a cohort
- Enrolling students in the cohort
- Enabling the cohort sync enrollment method
- Adding the cohort sync enrollment method to a course
In the previous section, you saw the first two steps: how to create a cohort and how to enroll students in the cohort. In this section, we will cover the last two steps: enabling the cohort sync method and adding the cohort sync to a course.
Now we will focus on enabling a different type of enrollment. This one uses the cohort sync enrollment methods.
Enabling the cohort sync enrollment method
To enable the cohort sync enrollment method, you will need to log in as an administrator. Note that this cannot be done by someone who only has teacher rights:
- Select Site administration | Plugins | Enrolments | Manage enrol plugins:

Figure 11.6 – Managing enrollments
While you are on the Plugins page, you can click on Manage enrol plugins to open the screen to enable or disable the course enrolment plugins:

Figure 11.7 – The types of course enrollment types that are available
- Click on the Enable icon located next to Cohort sync.
- Click on the Settings button located next to Cohort sync:
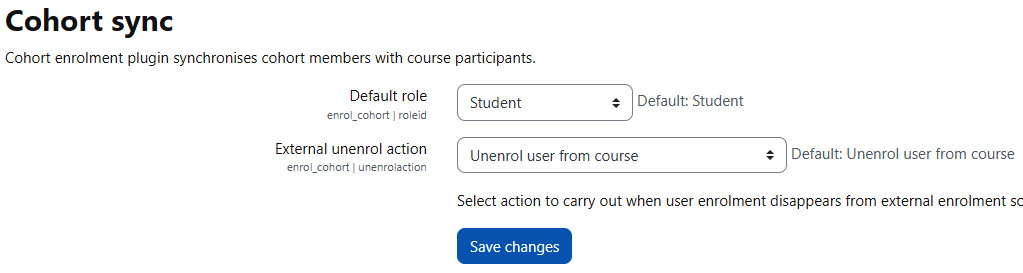
Figure 11.8 – The Cohort sync settings
- From the Settings page, choose the default role for people when you enroll them in a course using Cohort sync. You can change this setting for each course.
- You will also choose the External unenrol action option. This is what happens to a student when they are removed from the cohort.
- If you choose Unenrol user from course, the user and all their grades are removed from the course. The user's grades are purged from Moodle. If you were to read this user to the cohort, all the user's activity in this course will be blank, as though the user was never in the course.
- If you choose Disable course enrolment and remove the roles, the user and all their grades will be hidden. You will not see this user in the course's grade book. However, if you were to re-enroll this user to the cohort or the course, this user's course records will be restored.
After enabling the cohort sync method, it's time to actually add this method to a course.
Adding the cohort sync enrollment method to a course
To perform this, you will need to log in as an administrator or a teacher in the course. Perform the following steps:
- Log in and enter the course to which you want to add the enrolment method.
- Select Course administration | Participants | Enrolment methods:

Figure 11.9 – The enrollment methods from the drop-down menu

Figure 11.10 – The enrollment methods
- In Custom instance name, enter a name for this enrollment method. This will enable you to recognize this method within a list of cohort syncs.
- For Active, select Yes. This will enroll the users.
- Select the Cohort option:

Figure 11.11 – Cohort sync activation
- Select the role that the members of the cohort will be given.
- Click on the Save changes button.
All the users in the cohort will be given a selected role on the course. Next, we will learn how to unenroll from a course.
Adding students to a cohort in bulk – uploading
When you upload students to Moodle, you can add them to a cohort.
Once you have all the students inside a cohort, you can quickly enroll and unenroll them to and from courses just by synchronizing the cohort to the course. If you wish to upload students in bulk, consider putting them in a cohort. This makes it easier to manipulate them later.
Here's an example of cohorts. Note that there are students enrolled in the cohort:

Figure 11.12 – Available cohorts
These students were uploaded to the cohort under Site administration | Users | Accounts | Upload users:

Figure 11.13 – Uploading users
After clicking on Upload users, the following opens:

Figure 11.14 – Uploading students to the cohort under Site administration
The Excel file that was uploaded contained information about each student in the cohort. In a spreadsheet, this is what the file looks like. To make sure you keep track of the field names, you can place them in the first row to label each column. For more details on how to configure a file to upload to Moodle 4.0. Additionally, to test a file (such as the one displayed in the following screenshot), visit https://docs.moodle.org/400/en/Upload_cohorts#Valid_upload_file_for_testing:

Figure 11.15 – Uploading an Excel file that contains cohort information
In this example, we have the minimum required information to create new students. They are listed as follows:
Additionally, we have the cohort ID (the short name of the cohort) in which we want to place a student.
During the upload process, you can see a preview of the file that you will upload:
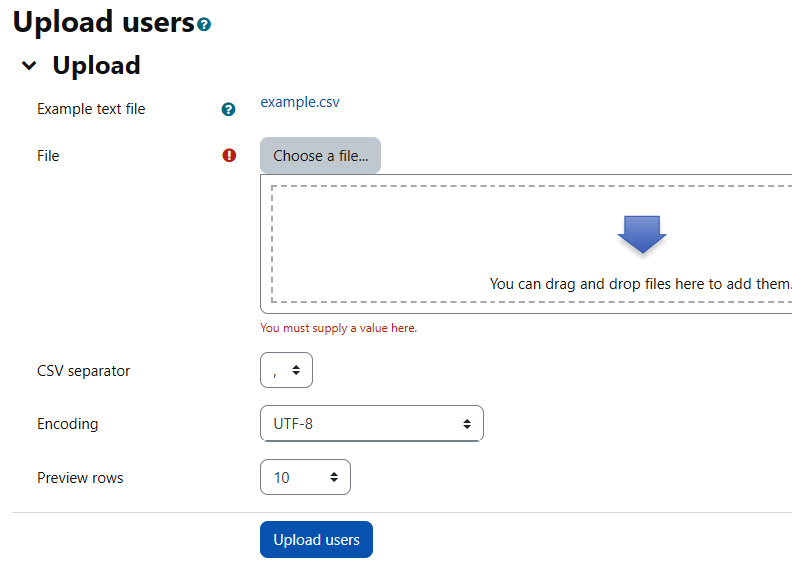
Figure 11.16 – A preview of the file that you will upload
Usually, when we upload users to Moodle, we create new users. However, we can also use the upload option to quickly enroll the existing users in the cohort.
Tip
In the Manually adding and removing students from a cohort section, you learned how to search for and then enroll users in a cohort.
However, when you want to enroll hundreds of users in the cohort, it's often faster to create a text file and upload it than to search your existing users. This is because when you create a text file, you can use powerful tools, such as spreadsheets and databases, to quickly create this file. If you want to perform this, you will find the option to Update existing users under the Upload type field.
When you upload a user to a system, you can specify the city and country in the upload file or omit them from the upload file and assign the city and country to the system while the file is being uploaded. In addition, you can upload user pictures. This is performed under Upload user pictures on the Users page:

Figure 11.17 – The Upload user pictures screen
Now that we have examined some of the capabilities and limitations of this process, let's list the steps to upload a cohort to Moodle.
Follow these steps to upload a cohort to Moodle:
- Under Administration | Site administration | Users | Upload users, select the text file that you wish to upload:

Figure 11.18 – Uploading a file to upload users
- On this page, choose Settings to describe the text file, such as delimiter (separator) and encoding.
- Click on the Upload users button.
You will see the first few rows of the text file displayed. Also, additional settings become available on this page.
- In the Settings section, there are settings that affect what happens when you upload information about the existing users. You can choose to have the system overwrite information for the existing users, ignore information that conflicts with the existing users, create passwords, and more.
- In the Default values section, you can enter values to be entered onto the user profiles. For example, you can select a city, country, and department for all the users.
- Click on the Upload users button to begin the upload.
Now that we have uploaded the cohort on Moodle, we will focus on how to use the cohort sync enrolment method in order to enroll and unenroll large numbers of students at the same time.
Unenrolling a cohort from a course
There are two ways to unenroll a cohort from a course. First, you can go to the course's enrollment methods page and delete the enrollment method. Just click on the X button located next to the cohort sync field that you added to the course. However, this will not just remove users from the course, but it will also delete all their course records.
The second method preserves the student records. Once again, go to the course's enrollment methods page located next to the Cohort sync method that you added and click on Settings. On the Settings page, select No for Active. This will remove the role that the cohort was given. However, the members of the cohort will still be listed as course participants. So, as the members of the cohort do not have a role in the course, they can no longer access this course. However, their grades and activity reports are preserved.
Tip – Cohort Sync Is Everyone or No One
When a person is added to or removed from the cohort, the person is added to or removed from all the courses that the cohort is synced to.
An alternative to cohort sync is to enroll a cohort, that is, you can select all the members of a cohort and enroll them in a course all at once. However, this is a one-way journey. You cannot unenroll them all at once; you will need to unenroll them one at a time.
If you enroll a cohort all at once, after enrollment, users are independent entities. You can unenroll them and change their role (for example, from a student to a teacher) whenever you wish.
To enroll a cohort in a course, perform the following steps:
- Enter the course as an administrator or teacher.
- Select Administration | Course administration | Users | Enrolled users.
- Click on the Enroll cohort button. A pop-up window appears. This window lists the cohorts on the site.
- Click on Enroll users next to the cohort that you want to enroll. The system will display a confirmation message.
- Now, click on the OK button. You will be taken back to the Enrolled users page.
Important Note
Although you can enroll all users in a cohort (all at once), there is no button to unenroll them all at once. You will need to remove them one at a time from your course.
Now that we have enrolled students, we can start managing groups. In the next section, we will learn how best to group them so that their interactions and collaborations are focused on common course goals.
Managing students within groups
In this section, we will learn how to manage students within groups. A group is a collection of students on a course. Outside of a course, a group has no meaning.
Groups are useful when you want to separate students who are studying the same course. For example, if your organization is using the same course for several different classes or groups, you can use the group feature to separate students so that each group can only see their peers on the course. For example, each month, you can create a new group for employees hired that month. Then, you can monitor and mentor them together.
Groups are excellent for course projects and for conducting peer reviews, too.
After you have run a group of people through a course, you might want to reuse this course for another group. You can use the group feature to separate groups so that the current group doesn't see the work that was done by the previous group. This will be like a new course for the current group.
Additionally, you might want an activity or resource to be open to just one group of people. In that case, you don't want others in the class to be able to use that activity or resource.
Courses versus activities
Additionally, you can apply the group setting to an entire course. If you do this, every activity and resource on the course will be segregated into groups.
You can also apply the group setting to an individual activity or resource. If you do this, it will override the group setting for the course.
The three group modes
For a course or activity, there are several ways to apply groups. Here is a list of the three group modes:
- No groups: There are no groups for a course or activity. If students have been placed into groups, ignore it. Also, give everyone the same access to the course or activity.
- Separate groups: If students have been placed in groups, allow them to see other students and only the work of other students from their own group. Students and work from other groups are invisible.
- Visible groups: If students have been placed into groups, allow them to see other students and the work of other students from all groups. However, the work from other groups is read-only.
You can use the No groups setting on any activity on your course. Here, you want every student who ever took the course to be able to interact with each other. For example, you might use the No groups setting in the news forum so that all students who have ever taken the course can see the latest news:

Figure 11.19 – Using the No groups setting to enable access
Also, you can use the Separate groups setting for a course. Here, you will be able to run different groups at different times. For each group that runs through the course, it will be like a brand-new course.
You can use the Visible groups setting for a course. Here, students are part of a large, in-person class, so you want them to collaborate in small groups online.
Also, be aware that some things will not be affected by the group setting. For example, no matter what the group setting is, students will never see each other's assignment submissions.
Creating a group
There are three ways to create groups for a particular course. You can do any of the following:
- Manually create and populate each group.
- Automatically create and populate groups based on the characteristics of students.
- Import groups using a text file.
We'll cover these methods in the following subsections.
Manually creating and populating a group
Don't be discouraged by the idea of manually populating a group with students. It only takes a few clicks to place a student into a group. To create and populate a group manually, perform the following steps:
- Select Course administration | Users | Groups. This will take you to the Groups page:

Figure 11.20 – Creating groups
- Click on the Create group button. The Create group page is displayed:

Figure 11.21 – Adding and removing users
- You must enter a name for the group. This will be the name that the teachers and administrators see when they manage a group:

Figure 11.22 – Naming the group
- The Group ID number is used to match up this group with a group identifier on another system. If your organization uses a system outside Moodle to manage students, and that system categorizes students in groups, you can enter the group ID from the other system into this field. It does not need to be a number. This field is optional.
- The Group description field is optional. It's good practice to use this to explain the purpose and criteria for belonging to a group.
- The Enrolment key setting is a code that you can give to students who self-enroll in a course. When the student enrolls, they are prompted to enter their enrollment key. On entering this key, the student is enrolled in the course and made a member of the group. Note that this is different from the master course enrolment key:

Figure 11.23 – Enrolment key
- If you add a picture to this group, when members are listed (such as in a forum), the member will have the group picture shown next to them. You can change the photo by editing the user profile, as follows:

Figure 11.24 – Adding a photo for the group
- Click on the Save changes button to save the group.
- On the Groups page, the group appears in the left-hand column. Select this group.
- In the right-hand column, search for and select the students that you want to add to this group:

Figure 11.25 – Adding students to specific groups
Note the Search fields. These enable you to search for students that meet specific criteria. You can search for a first name, last name, and email address. The other part of the user's profile information is not available in this search box.
Now that we have learned how to create a group manually, we will move on to the next method where we will learn how to automatically create and populate groups.
Automatically creating and populating a group
When you automatically create groups, Moodle creates a number of groups that you specify and then takes all the students enrolled in the course and allocates them to these groups. Moodle will put the currently enrolled students into these groups even if they already belong to another group on the course.
To automatically create a group, perform the following steps:
- Click on the Auto-create groups button. The Auto-create groups page will be displayed:

Figure 11.26 – Auto-creating groups
- In the Naming scheme field, enter a name for all the groups that will be created.
You can enter any character. If you enter @, it will be converted into sequential letters. If you enter #, it will be converted into sequential numbers. For example, if you enter Group @, Moodle will create Group A, Group B, Group C, and more.
- In the Auto-create based on field, you will tell the system to choose either of the following options:
- Create a specific number of groups and then fill each group with as many students as needed (Number of groups).
- Create as many groups as needed so that each group has a specific number of students (Members per group).
- In the Group/member count field, you will tell the system to choose either of the following options:
- How many groups to create (if you choose the preceding Number of groups option)
- How many members to put into each group (if you choose the preceding Members per group option):

Figure 11.27 – Adding students to specific groups
- Under Group members, select who will be put into these groups. You can select everyone with a specific role or everyone in a specific cohort.
The setting for Prevent last small group is available if you choose Members per group. This setting prevents Moodle from creating a group with fewer than the number of students that you specify. For example, if your class has 12 students and you choose to create groups with 5 members per group, Moodle will normally create 2 groups of 5. Then, it will create another group for the last two members. However, with Prevent last small group selected, it will distribute the remaining two members between the first two groups.

Figure 11.28 – The Prevent last small group setting
- Click on the Preview button to preview the results. The preview will not show you the names of the members in the groups, but it will show you how many groups and members will be in each group.
Summary
Cohorts and groups give you powerful tools to manage your students. Cohorts are a useful tool to quickly enroll and unenroll large numbers of students. Groups enable you to separate students who are on the same course and give teachers the ability to quickly see only the students they are responsible for. Additionally, you can divide students by whether or not they are participating "on-demand" (asynchronously) or "live" (synchronously).
In the previous chapters, you saw how to add content and activities to your course. In this chapter, you learned how to use some tools to manage the students in your course. In the next chapter, you will see how to extend your course using the functionality of blocks.