Chapter 12: Extending Your Course by Adding Blocks
Blocks add functionality to your site or course and they can be placed in many different locations on the page to help focus attention on content and provide useful information, such as assignment due dates on a calendar, course completion status, course overview, and more. Blocks are very flexible and have a wide array of uses. They are often used to build the student's self-confidence by helping them keep on track and manage their time effectively. This chapter will describe many of Moodle's blocks, help you decide which ones will meet your goals, and tell you how to implement them.
After completing this chapter, you will be able to do the following:
- Describe blocks.
- Explain their functionality.
- Configure blocks for your Moodle pages.
- Customize blocks for your courses in Moodle.
We will begin this chapter by describing what a block is and discussing how they are used. Afer that, we will look at some of the commonly used blocks and examples of them. Once we have seen these common blocks and examples, we will learn how to configure a block depending on where we want to place it. Finally, we will look at some of the most commonly used blocks that Moodle has to offer. Throughout this chapter, you will be asked to consider how best to align blocks with course objectives.
Defining a block
Blocks are great tools because they help you cluster content for easy use, and they can be organized around learning goals. Blocks are plugins that arrange chunks of text and links. They can be added to the side of a page in Moodle and can remind you of what a sidebar breakout looks like in a printed textbook. A block usually displays information in a small area in one of the side columns. For example, a block can display a calendar, the latest news, or the students enrolled in a course.
You can administer plugins from the Site administration site by going to Plugins:

Figure 12.1 – Where Plugins appears in the Site administration menu
Blocks help keep students on task. They can also include links to parts of the course and thus act as navigation bars. It is important to keep in mind that not all instructional designers or course designers like using blocks, and some even consider them a bit anchored in the past. Those who do not like blocks often point to the Dashboard as a better alternative.
That said, for people who like blocks, they can be useful for maintaining engagement. For example, blocks can help keep students engaged by being a place to put Check Your Knowledge or Did You Know? engagers:

Figure 12.2 – The Blocks menu on the Plugins page
Uses of blocks
When configuring the site, you can choose to display, hide, and position blocks on the site's front page. When configuring a course, you can also show/hide/position blocks on the course's home page. The procedure is the same as working on the site's front page or a course's home page. The site's front page is essentially a course. You can also permit students to add blocks to their Dashboard page and My profile page. Please keep in mind that some Moodle themes have pre-established blocks, so you may not be able to add blocks or reposition them.
Many blocks are available to you in a standard Moodle installation. The following screenshot shows the standard blocks in Moodle 4.0:

Figure 12.3 – Menu of standard blocks when adding a block
You can also install additional blocks, by going to http://moodle.org/plugins.
Examples of blocks in action
Many blocks are available in a standard Moodle installation. You can add the block by clicking Add a block in the top right-hand corner:

Figure 12.4 – The appearance of the Add a block option in the top right-hand corner
Be sure to select your blocks with care as you can easily create redundancy. For example, you can add an activity to the block, which would mean that it would appear in the right-hand column rather than in the center part of the page. Is that really what you want to do? Most of the time, the activities are best in the middle of the page. One notable exception could be Glossaries and Wikis, which can be conveniently placed "at one's fingertips" while in the course:

Figure 12.5 – Activities that can be added to a block
Perhaps the most popular option is the Calendar block, which you can position on either side so that it appears prominently on either side. The Calendar block is an excellent tool because it allows you to remind students of deadlines and key milestones.
The Comments block can help you organize comments and quickly allow you to communicate without having to go through several clicks or screens.
The Course completion status block is extremely useful as an engager and motivator because you can both remind students where they are in the course and reward them for progressing well through the course.
Blocks such as Course overview can help you create a nicely organized page. The Course description block has a similar function.
Other blocks are very useful as shortcuts to important pages within Moodle. These blocks include Activities, Main menu, Courses, Section links, and Upcoming Events.
Like any tool or app, blocks can be overused. They can be distracting and create clutter. To decide which blocks to use, think about your use of the blocks and prioritize what you'd like your students to do and see. Keep in mind that Moodle Mobile may display blocks at the bottom of the page instead of on the sides.
Now that you know what a block is, its uses, and the different types of blocks that Moodle has to offer, let's move on to the next section, where we will learn how to configure the blocks so that you can control where they appear.
Configuring where a block appears
You can configure a block to appear on the course's home page and all the resource and activity pages in the course. You can also configure a block to appear on all your courses. Additionally, you can create a block that contains categories of courses and lists the individual courses within those categories.
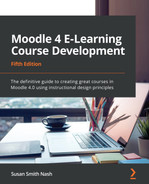
To configure where a block appears, click on the gear icon. In this case, we are configuring where to put the Calendar block:
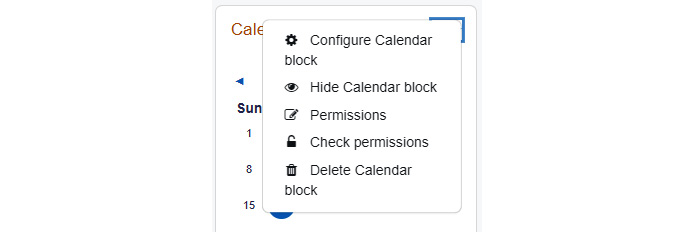
Figure 12.6 – Dropdown menu for managing a block
To move the blocks to the right-hand side of the screen and rearrange them, click on the crossed terminating arrows, hold down with your mouse, and move the selection around:
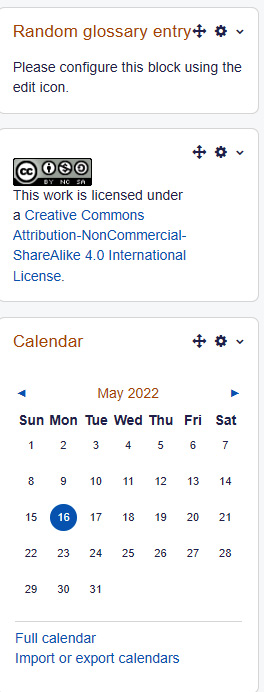
Figure 12.7 – To move the blocks, click on the cross, hold, and move
For example, in the following screenshot, the user is configuring the Upcoming events block in the The Impressionists course:

Figure 12.8 – How to configure an Upcoming events block
These settings work in combination to determine where a block appears. In some places, some of these settings have no effect. You can set the region on the page where the block will appear, and also which page types will feature the blocks. Notice that you must specify the block's weight. This is how you fine-tune where it appears on the page. 0 puts the block at the bottom, while 10 puts it at the top. Be sure to experiment with different settings to see how the block's position changes when you adjust the values.
When you add a block to a page, any display settings that you choose will affect the block from that page on, down through the hierarchy of pages. For example, suppose you add a block to the main page of a course, as the user is doing in the preceding screenshot. Any display settings will affect the block on that page and other pages inside that course.
As this block is being added to a course page, the block will not be displayed on any other pages outside of that course.
If you want a block to appear on every page of your site, or every occurrence of a specific page type, add the block to the front page of your site. From the Site administration screen, turn on Edit mode and click on Add a block in the right-hand corner:

Figure 12.9 – Adding a block to your site's home screen
Once you've done that, under Block settings, you will see choices for Display on page types. We will use the Recent activity block as an example:
Figure 12.10 – Configuring the block so it will appear on any site administration page
Further down the page, you will see a setting that determines whether the block is displayed on this page (that is, on the front page):
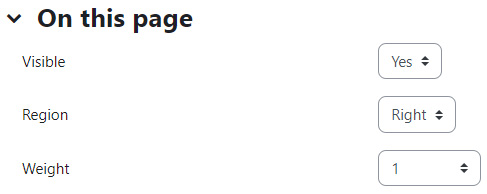
Figure 12.11 – Determining whether the block is displayed on the front page
These settings can work together to produce the result that you want. For example, if you are an administrator and want a block to appear on every page of your site except for the front page, choose Any site administration page, and then for just the front page, set Visible to No.
You can also add a block to all the courses in a category. From the Site administration menu, select Courses | Manage courses and categories. Then, select the category:

Figure 12.12 – Selecting the block to add from the pop-up menu
Add the block to the category page. Then, under the settings for Where this block appears, choose which pages in the category will display the block:

Figure 12.13 – Enabling the block on course category pages
Keep in mind that docked blocks will be displayed at the bottom of the page if you select a responsive theme for mobile devices such as phones and tablets. You now know how to configure where your blocks appear. In the next section, you will learn how to select and configure some of the blocks available to you.
Standard blocks
Moodle gives you many standard blocks that you can add to your courses. Some of the most useful ones will be discussed in this section. We will review Activities, Blogs, Calendar, Comments, Course completion, and many others, such as Users and Badges.
The Activities block
The Activities block lists all types of activities that are used in the course:
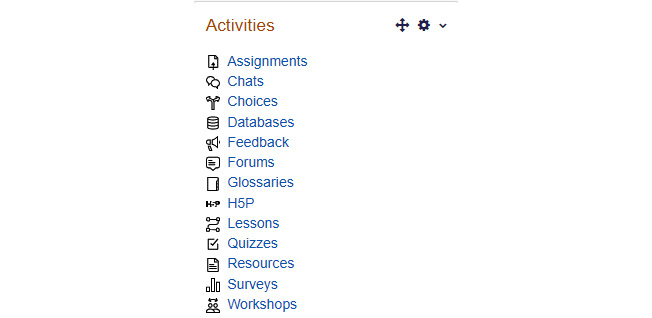
Figure 12.14 – Select the Activities block to list the activities used in the course
The activity type is only shown if your course contains at least one instance of that type. When a user clicks on the type of activity, all those kinds of activities for the course are listed.
In the following screenshot, the user clicked on Forums in the Activities block. By doing this, a list of the resources in the course is presented:

Figure 12.15 – You can use blocks to organize forums
Important Note
If this block is on the site's front page, clicking on a type of activity gives a list of the activities on the front page (not for the entire site).
The Text block
The Text block (formerly known as the HTML block before Moodle 4.0) creates a block in the sidebar that can hold any HTML (or any web content) that you can put on a web page. Most experienced web users are accustomed to the content in the sidebars being an addition to the main content of a page. For example, we can put menus and interesting links in the sidebars in most blogging software. I suggest that you keep with that standard. Use the Text block to hold content that is an interesting addition to the course, but not essential. For example, you can put an annotated link to another site of interest.
When you edit a Text block, Moodle provides the same full-featured web page editor that you get when adding a web page to a course.
Think of a Text block as a miniature web page that you can put into the sidebar of your course:
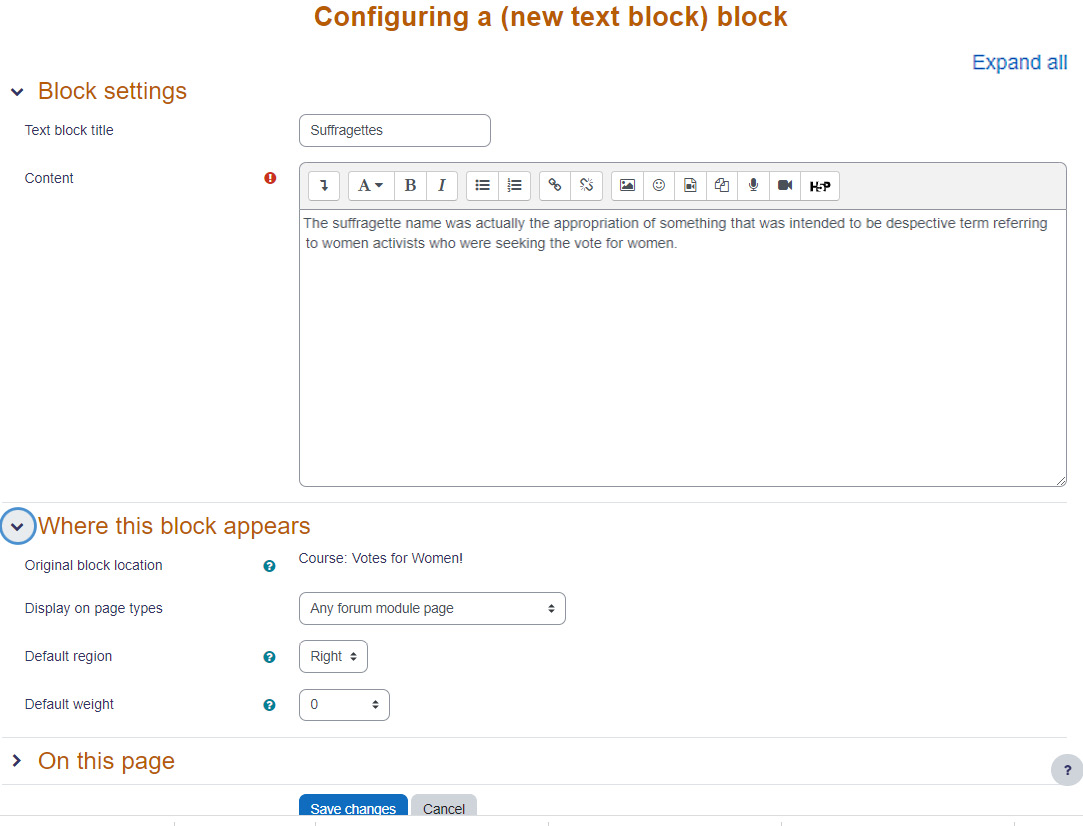
Figure 12.16 – Configuring a Text block (formerly an HTML block)
After configuring the Text block, it will appear in the right-hand column, with a consistent appearance:

Figure 12.17 – How a configured Text box appears
The Blog menu block
By default, every Moodle user has a personal blog on the site. For more information, check out Moodle docs (https://docs.moodle.org/400/en/Blogs). Selecting this block, as shown in the following screenshot, puts the menu into the sidebar of the course:

Figure 12.18 – The Blog menu block is positioned as a sidebar
The Blog menu block helps people have access to the blog posts that a student may have created. It allows you to incorporate blogs and develop custom content for the course that can be changed from term to term, which ensures it is up to date.
Note that this block provides shortcuts to blog entries about the course. If blogging will be a part of the course, include this block on the main page of the course.
The Blog tags block
This block displays a list of the blog tags used site-wide. The tags are listed in alphabetical order. The more blog entries that use a tag, the larger that tag is:

Figure 12.19 – The Blog tags block helps identify the topics
The Calendar block
The Calendar block is very useful because it helps students stay on track. Workshops, assignments, quizzes, and events appear on the Calendar block. Be sure to remind users that their timezone is correct. Otherwise, the times will not be adjusted to their timezone:
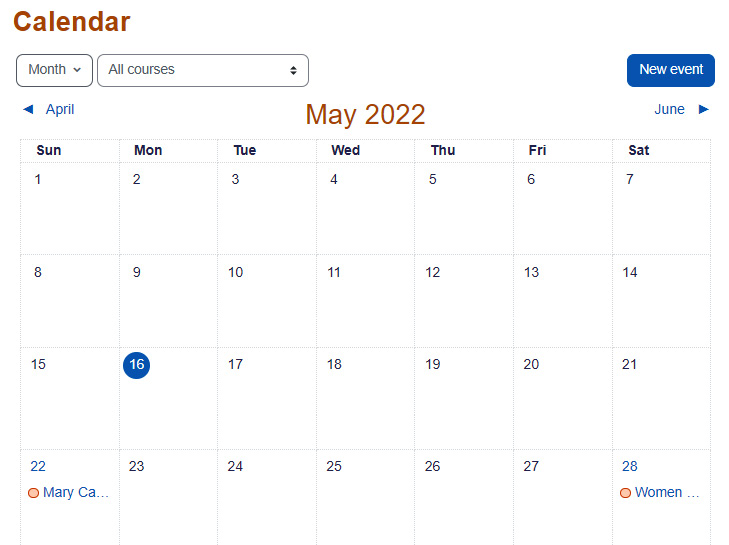
Figure 12.20 – The Calendar block displays the scheduled activities by month
A pop-up window will appear and show the name of the event. This event was added to this course, so it is a course-wide event.
When the user clicks on one of the four links at the bottom of the Calendar block, it disables the display of that type of event.
When a deadline is added to an activity in the course, it will automatically be added to the calendar.
The Comments block
The Comments block enables anyone with access to it to leave and read comments. The comments are all saved, so you can accumulate quite a long list of comments.
In the following screenshot, the Student1 user is logged in and has added a comment:

Figure 12.21 – The Comments block allows you to see comments in one place
Important Note
Student1 can delete their comment but not the comment left by the course administrator.
Of course, the teacher, manager, and site administrator can delete anyone's comments.
As all comments are saved, and the list can get long, you probably want to limit the Comment block to a single course – that is, you don't want to add a comment site-wide, or to all the courses in a category. If you do, the block can become crowded with comments (unless this is the effect that you want). The site administrator can decide how many comments are displayed in comments blocks by going to Site administration | Site home | Site home settings:

Figure 12.22 – Determining how many comments can appear on a page
Consider adding a Comments block to an activity or a resource and using the first comment to encourage students to leave feedback, as follows:
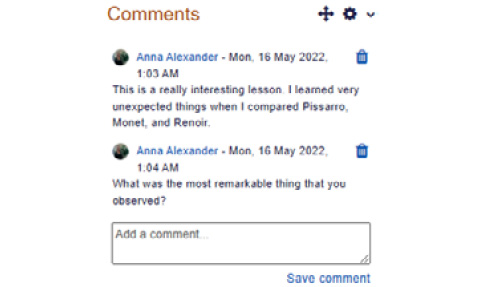
Figure 12.23 – Adding the first comment to encourage students to leave feedback
The Course completion status block
This block works with course completion tracking. For this block to function, you must first set the criteria for completing the course, and completion tracking must be enabled at the site level. This can be done by going to Settings | Completion tracking:
Figure 12.24 – The Course completion status block
When a student views this block, they see the conditions for course completion and the status of each condition. When a teacher views this block, they see a report of the completion status for each student in the course.
Course/site summary
If you add this block to the front page of your site, it will display the front page summary, which can be found by going to Site administration | Site home settings | Edit settings:

Figure 12.25 – The course description can appear in a block in the course
If you add it to a course page, it will display the course's description, which can be found by going to Settings | Edit course settings | Course summary.
The Learning plans block
The Learning plans block displays the competencies that the student needs to master. For useful references on learning plans, please visit Moodle docs (https://moodle.org/plugins/block_learning_plan):

Figure 12.26 – The appearance of the Learning plans block
The Online users block
The Online users block shows who is in the current course at present. If it is on the site's front page, it shows who is on the site. When it is added to a course, it can be a good way to lessen the isolation of e-learning. The block is updated every few minutes.
The Recent activity block
When the Recent activity block is added to the home page of a course, it lists all the student and teacher activity in that course since the user last logged in. The activity report filter and generator may be accessed via the Full report of recent activity link.
When added to the site's front page, it lists all the student and teacher activity on the front page, but not in the individual courses since the user last logged in. If someone is logged in as a guest user, this block displays any activity since the last time that guest logged in. If guest users are constantly coming to your site, this block may be of limited use to them. One strategy is to omit this block from the site's front page so that anonymous users don't see it and add it only to courses that require users to authenticate.
The Remote RSS feeds block
When the Remote RSS feeds block is added to a course, the course creator chooses or creates the RSS feeds to display in that block. When RSS feeds were first developed, they tended to be used in conjunction with subscribing to a person's blog. Now, they are in the backend and used for subscribing to podcasts, which have become more popular than ever. Podcast hosting services such as Podbean, Resonate, Captivate, and Buzzsprout automatically list their hosted podcasts on players and distribution platforms such as SoundCloud, Apple Podcasts, Google Podcasts, Spotify, TuneIn, and Overcast.
A feed can be added by the site administrator and then selected by the course creator for use in an RSS block. Alternatively, when the teacher adds the Remote RSS feeds block, they can add a feed at that time. If Share feed is set to Yes, the new feed becomes available to all other teachers, for use in all other courses.
The Search Forums block
The Search Forums block provides a search function for forums. It does not search for other types of activities or resources.
When it's added to the main page of a course, it only searches the forums in that course. It searches post titles and content.
This block is different than the Search courses field, which automatically appears on the site's front page. The Search courses field searches for course names and descriptions, not forums.
The Topics block
The Topics block displays links to the numbered topics or weeks in a course. Clicking on a link advances the page to that topic.
The Upcoming events block
The Upcoming events block is an extension of the Calendar block. It gets event information from your calendar. By default, the Upcoming events block displays 10 events; the maximum is 20. It looks ahead a default of 21 days; the maximum is 200. If there are more upcoming events than the maximum chosen for this block, the most distant events will not be shown. In the following screenshot, you can see how the events are listed, with short titles along with the date and time. The title is linked so that the learner can click and go to the site:

Figure 12.27 – The Upcoming events block
This block is helpful for reminding students of the tasks they need to complete in the course. Remember that if you want the upcoming events block to appear on all your pages, you'll need to add it to your site home page and select Any page:

Figure 12.28 – Configuring the Upcoming events block so that it appears on all pages
Summary
In this chapter, we looked at many of the blocks that are available in Moodle 4.0. Keep in mind that with 4.0, blocks appear on the Dashboard, and you can set them to appear on course pages to help remind your students of upcoming events, display important information, and keep them engaged. When deciding which blocks to use, resist the temptation to add too many. Blocks are helpful, but they can be a distraction and also confuse priorities. Use blocks strategically to make sure students stay on track, and also to flag important information. You can also use them as consistent motivators, where reminders of their positive achievements appear. Remember that you can turn blocks off and on as needed. The key is to use blocks to enable students to succeed. You can use blocks as signposts and guides. However, avoid overusing blocks since they can be distracting.
In the next chapter, you will learn how to optimize your course for teachers, including how to view course logs and activity reports to determine what students have done, how to view and categorize grades, and how to grade.