
By now, you have learned how to install Zen Cart and log into the administration area. In this chapter, you are going to learn about different configuration options for the store.
On completion of this chapter, you will know:
How to set global configuration options for a Zen Cart store
How to manage the product catalogue
How to install and configure payment, shipping, and order total modules for Zen Cart store
How to manage customers and orders
The configuration options introduced in this chapter are essential.
Before launching your shop online, you have to configure several aspects of your shop. First, you configure the store's name, address, store owner's name, login options, product listing, payment, and shipping options, and so on. Then, you add categories and products to your product catalog. Once the shop is live, customers will place orders and you will have to manage those orders.
Before launching your online shop, you need to specify your store's name and address. You can define these via Configuration | My Store. You should at least change the Store Name, Store Owner, Country, Zone, Store Address, and Phone. These are the essentials for starting your online shop.

There are some interesting settings on this screen. If your store is multilingual, then you can specify in what language the store will be shown—based on the store's default language or on the browser's language settings. Select Default or Browser in the Language Selector field, as required.
When showing the category lists, you may want to know how many products are there in each category. Select true in the Show Category Counts field to show the product counts. Similarly, you can show the products count in the admin area by selecting true in the Show Category Counts—Admin field.
Product prices can be shown with tax. Set Display Prices with Tax to display the prices inclusive of tax. You can also specify the basis on which the product and shipping taxes are computed. This may be based on the tax rules in the originating country (where store is located), billing address (from where the bill will be paid), or destination country (where the product is shipped to). You have to select the appropriate settings in these fields.
You can use a Zen Cart store as a showcase or as a normal store by setting the following values in the Store Status field:
0 (=Normal Store): Setting 0 in Store Status field will display the store in normal mode where customers can buy products from the store.
1 (=showcase no prices): Setting this value will display the shop as a showcase, where customers will not be able to place orders. This option will only show the product listing and descriptions, but not the prices.
2 (=Showcase with prices): setting this value in Store Status field will display the shop in showcase mode and also display the product prices.
Another important setting on the My Store screen is the Currency Conversion Ratio. You can automatically update currency exchange rates in Zen Cart. In this case, you may want to uplift the conversion by a certain ratio. This will be added to the conversion rate. As the bank rate is obtained from the currency-exchange servers, this conversion ratio will enable you to charge extra in order to make up the difference between the bank rate and the consumer rate.
You can define the extent to which you are going to collect information on customers. From the Configuration | Customer Details screen, you can define the fields that are going to be presented during account creation, and identify the absolute essentials for purchasing a product from your store.
You may want to know the customer's age to be sure that the person who is buying a product is an adult and legally authorized to transact online. For this, you require the birth date of each customer during account creation. Set the Date of Birth option to true. This will show the Date of Birth field during account creation. However, the customers could leave it blank. To make it a required field, set the value >0 in the Date of Birth field in the Configuration | Minimum Values screen.
You can show or hide the Company, Address Line 2, State, and Fax Number fields. If you want to show the states as a drop-down list, set the State - Always display as pulldown? field to true. Further, if you can set a default country from the Create Account Default Country ID field. If you want to promote your newsletter, set 1 or 2 in the Show Newsletter Checkbox field. Similarly, you can set Customer Default Email Preference to 1 =Text or 2 =HTML.
Some online shops require users to sign up before they can browse products and make purchases. If you want to do this, change the Customer Shop Status-View Shop and Prices field. You can set a value of 0 to 3:
If you want all visitors to be able to browse the products, but only require registration to place an order, then set its value to 0.
If you want only registered customers to be able to browse the products, then set its value to 1 =Must login to browse.
Setting it to 2 means everyone can browse the products but they cannot see the prices until they login to the shop.
If you want to make it a showroom, so that nobody can place an order, set this field to 3 =Showroom only.
Some of the other settings related to Customer Authorization are also on this screen. Default values will work for most of the shops.
You may want to track customer referrals, and provide a discount coupon up on signing up to your shop. In this case, you must define the necessary setting in the Customer Referral Status field. You may keep it off (0), use 1st Discount Coupon Code (1), or allow customer to type a coupon code during account creation (2). If you really want to give your customers a discount coupon on signing up, create a discount coupon via Gift Certificates/Coupon | Coupon Admin first. Then, select that coupon in the New Signup Discount Coupon ID# field from the Configuration | GV Coupons screen.
Note
Actual configuration of gift vouchers and discount coupons are discussed in detail in Chapter 6, Promotion and Public Relations. In that chapter you will learn how to configure and send discount coupons to customers on different occasions.
You can configure for how the product list and descriptions will be shown. From Configuration | Product Listing, you can define the fields that will be displayed on the product listing page. The first half of the options controls the fields that appear in the product listing, and their order. If you want an element to not appear on the page, give it a value of 0. A non-zero value means the element will be shown, and the number defines the sort order for the field.
The Display Product Listing Default Sort Order setting on the same page depends on these settings. Settings with a value (that is, sort order) of 0 will be ignored, while the rest will be assigned an incrementing ID based on the sort order. For example, if you set Display Product Name to 1, Display Product Price/Add to Cart to 3 and the rest to 0, then Display Product Name is assigned an ID of 1 and Display Product Price/Add to Cart is assigned an ID of 2 (not 3, which is the sort order).
You can also edit Display Product Listing Default Sort Order. This setting should contain two characters; the first character is the ID of the field which has already been discussed, and the second character should be the letter 'a' for ascending, or 'd' for descending. If you want to sort product field, in descending order, then use 2d.
From this screen, you can also enable or disable display of product images, the add to cart box, product name, module, manufacturer, price, weight, quantity box, category, and so on.
Several emails can be sent to your customers from your Zen Cart shop. Usually, customers who subscribe to newsletters and product notifications receive regular emails. However, whenever a customer registers or places an order, he or she receives an email. For some other reasons, you may also need to notify the customers from time to time. You can set various email configuration options via Configuration | Email Options. As a minimum, you have to configure the following options:
Email Transport method: You must specify whether the server will use a local connection to send mail or use an SMTP connection via TCP/IP. Servers running on Windows and MacOS should change this settings to SMTP. SMTPAUTH should be used only when your server requires SMTP authorization to send messages. You must also configure your SMTPAUTH settings in the appropriate fields in this admin section. Sendmail -f is only for servers which require the use of the
-fparameter to send email. This is a security setting often used to prevent spoofing. The default for this field is sendmail, and this will work fine with Linux servers.Use MIME HTML When Sending Emails: Set this to true if you want to send emails in HTML format. Otherwise keep the default value of false.
Send Copy of *: There are several options such as Send Copy of Order Confirmation Emails To. Type an appropriate email address to which the notifications will be sent. If your store is small, and only one person handles all these, then set only one email address for all of the fields. But for large stores, you may assign several people to order tracking, gift voucher management, review management, and so on. In this case, you must provide email addresses of those persons or departments.
SMTP Email Account Mailbox: If you have selected SMTPAUTH as the email transport mechanism, then type email account's SMTP mailbox name.
SMTP Email Account Password: Here, enter the password for your SMTP mailbox. This field is required only if you are using SMTPAUTH as the email transport.
SMTP Email Mail Host: Here, enter the DNS name of your SMTP mail server, for example,
mail.yourdomain.com. This is required only if you are using SMTPAUTH as the email transport mechanism.SMTP Email Mail Server Port: Here, enter the IP port number, generally 25, that our SMTP mail server operates on. This is required only if you are using SMTPAUTH as email transport mechanism.
Logging is important for your online shop, especially when you face problems with your shop. You can set the options for controlling how events are logged via Configuration | Logging. The following are some of the options:
Store Page Parse Time: Set this to true if you want to log the time it takes to parse a page. This information may be helpful to analyze your store's performance.
Log Destination: Here, set the directory and filename of the page parse time log in this field. The default is
/var/log/www/zen/page_parse_time.log. Change it to your required path.Log Date Format: Set the date format to be used in logging. The default format is %d/%m/%Y %H:%M:%S.
Display The Page Parse Time: You can display the page parse time at the bottom of each page by setting this field to true. Otherwise, storing parse time in the log file will be a good choice.
Store Database Queries: Storing database queries in the log file may help you troubleshoot query problems later. Set this value to true if you want to store the database queries in the page parse time log.
Log files are always helpful for troubleshooting. It is recommended that you enable logging for your online shop. This will give you the opportunity to analyze what happens in your shop. Also remember to manage the log file. You may need to clear the log file regularly to limit its growth.
Every online store has some rules and regulations that must be followed by the customers. You must always provide the terms and conditions of purchasing products from your online shop, and obtain the customers' acceptance of these. You can set the terms and conditions for the customers in Configuration | Regulations.
If you set Confirm Terms and Conditions During Checkout Procedure to true, the Terms and Conditions page will be shown during the checkout procedure, and the customer must agree to them before they can complete their purchase. This is a good way of reminding the customer of the terms and conditions of purchasing products from your shop.
Nowadays, most of the customers are aware of their privacy. As you collect some private information from the customers, it would be good to show a privacy notice during account creation. Set Confirm Privacy Notice During Account Creation Procedure to true to show the privacy notice during the account creation procedure, which the customer must agree to before they can create their account.
EZ-pages in Zen Cart give us opportunities to easily create static pages. From the Configuration | EZ Pages Settings page, you can set various options to configure the EZ-Pages. Creation and editing of EZ-Pages is controlled via Tools | EZ-Pages.
You can set the elements of an EZ Page that will be shown—header, footer, left sidebar, right sidebar, Prev/Next buttons, table of contents, and so on. The default settings for these fields are suitable for most of online shops. However, you have the option of changing them to suit your requirements.
A variety of images are shown in Zen Cart shop. You can configure the images and the way these images will be shown. Via Configuration | Images, you can set the options used to control the size of images on each page/for each type of content. Set these to the same size as the images you create. Otherwise, your images will appear distorted. There are some general options on how the images are handled, and a single option that controls the layout of additional product images on the Product Info page. You can set the options any way that you want them.
From the Configuration | GZip Compression page, you can control the GZip compression settings for your online shop. Enabling GZip Compression means that all content from your store is compressed before it is downloaded to the user. The contents are then decompressed by the user's web browser. This compression and decompression is transparent to the user and significantly speeds up their browsing. It is therefore recommended that you turn this on if your webserver supports it.
You can set options to control various options regarding stock control via Configuration | Stock. There are also two Shopping Cart page layout options here. To get an updated stock level, enable Check stock level and Subtract stock. Specify a mark that will be shown when a product is out of stock. In Show Sold Out Image in Place of Add to Cart field, set 1 to show an image when a product is out of stock. You may set a Stock Re-order Level to a convenient value, instead of the default of 5. If you want to show products that are out of stock, select 1 in the Products status in Catalog when out of stock should be set to field.
If you are selling physical products, then shipping and packaging options will be an important issue for your shop. You can set general shipping information including locations, and weight and size limits via Configuration | Shipping/Packaging. The following options needed to be configured:
Country of Origin: The country of origin from which the products will be shipped. This will be used for calculating the shipping cost.
Postal Code: Here, enter the postal code (ZIP code) of the store. This is to be used in the shipping quote.
Enter the Maximum Package Weight you will ship: The shipping methods you are using may prohibit you from shipping a heavy package. Generally, carriers have a maximum weight limit for a single package. Set the maximum weight limit that can be shipped through all carriers.
Package Tare Small to Medium—added percentage:weight: Here, you should define a percentage of the product weight as packaging. This is expressed as two numbers separated by a colon. The first number is a percentage of the weight of what will be our small package weight. The second is our small package weight maximum or upper limit.
Larger packages—added packaging percentage:weight: Here, you should define a percentage of product weight as packaging. This is expressed as two numbers separated by a colon. The first number is a percentage of the weight of what will be our large package weight. The second is our large package weight average or maximum or upper limit.
Display Number of Boxes and Weight Status: You must specify whether you want to show the number of boxes, the weight, or both the number of boxes and the weight during checkout. Set 0 to show none, 1 to show the number of boxes only, 2 to show the weight only, and 3 to show both the number of boxes and weight. The default is set to 3.
Order Free Shipping 0 Weight Status: For some products, the weight may be zero. In that case, calculating the shipping cost returns no value. You may consider such products as being eligible for free shipping. Set 1 to use free shipping for such products.
Shipping Estimator Display Settings for Shopping Cart: You can show a link to the shipping estimator on our shopping cart. Set 1 to show it as a button, and 2 to show it as a link.
Shipping Estimator Display Settings for Shopping Cart: You can show a link for the shipping estimator on your shopping cart. Set this filed to 1 to show it as a button, and 2 to show it as a link.
Display Order Comments on Admin Invoice: For this option, there are again three options, 0= OFF means that comments will not be displayed on the Admin Invoice. Option 1= First Comment by Customer only will show the comments by the customes only. Option 2= All Comments for the Order means that all of the comments for the order wll be displayed on the Admin Invoice.
Display Order Comments on Admin Packing Slip: This is very much similar to the above option.
Via Configuration | Attribute Settings, you can set options for controlling which product attributes are maintained, and whether downloadable products are allowed, and how they are handled. For downloadable products, there are eight options. First, you have to set Enable Downloads to true. Then, you have options to set the following:
Which method will be used for downloading—redirecting or streaming?
After how many days will a download product expire?
How many downloads are allowed per product?
How will the download controller status be updated?
Other attribute settings are for pricing. You can enable price factors, quantity price discounts, attribute images, and text pricing by word or by letter.
For online payments, you have the option to enable use of the credit cards. Via Configuration | Credit Cards, you can determine which credit cards can be accepted. However, this will not turn payment processing on. It will simply enable customers to use specific credit card, and display the credit card on the payment page. We can show the credit cards list as text or images. To show the image, set 2 in the Credit Card Enabled - Show on Payment field. You also need to upload the credit card images to the images directory and define these images in the language file. Editing the language file is discussed in Chapter 5, Localization of Zen Cart.
From Configuration | Product Info, you can set some basic options for controlling the elements that are included on the Product Info page. You can also set some page layout options for the Previous and Next buttons. These settings will be applied to all product types.
You may define the product image, height and weight, previous and next buttons, previous and next bar position, and so on. From here, you can set the contents of the product information page.
A wide range of options for controlling different layout options are available via Configuration | Layout Settings. These are global options that will appear on all pages, and there are also some options for individual sideboxes. From here, you can set column widths, breadcrumb positions and option, category display, banner display, and so on. Although you can change the width of the left and right columns, it would be wiser to look at your templates first. Changing these values may change your look and feel unexpectedly.
The countries of the world can be divided into zones. These zones are useful for applying taxes and calculating shipping costs. Zen Cart can use multiple currencies in your shop. You can also use taxes specific to a zone. Zones, Currencies, and Taxes are managed from the Locations/Taxes menu. These are discussed in detail, in Chapter 5, Localization of Zen Cart.
After configuring the shop, the shop owner's main task will be to manage the product catalog and orders. You can add and change products and categories from the Catalog Menu.
Product Types in Zen Cart allow us to present different information for types of products in the shop (and possibly in a different format). If you are selling books, for example, you should show some special information, such as author name, edition, ISBN, number of pages, cover type, and so on. A product type, say a book, can collect this custom information in addition to other generic product information for that book. Similarly, a product type, say music, will collect different information (artist name, download size, mp3 clip) and will be displayed differently. Catalog | Product Types allows us to view and edit product types.
On the Catalog | Product Types page, you will see a listing of product types. For each product type, you can select the default settings, such as default tax class for the new products of that type. You can also set layout options by clicking on the edit layout button. You will see the layout options for the product type you have chosen.
When you are creating products via Catalog | Categories/Products, beside the New Product button you will see a pull-down menu for choosing a product type. The product type that you select from this menu is the type of product that you will create. The product creation form will be different depending on the product type you have chosen.
Products should be cataloged according to manufacturer. This manufacturer information can also be displayed on the product details page. Catalog | Manufacturers allows us to view, add, edit, or delete manufacturer information.
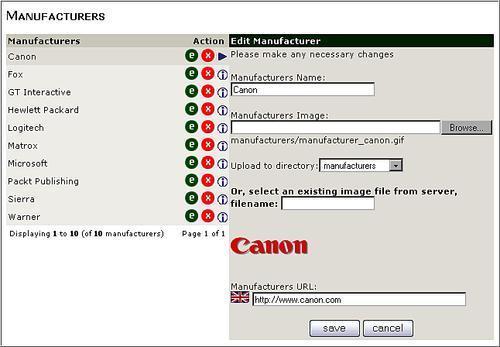
You can add a manufacturer by clicking on the insert button. This will display the new manufacturer screen (shown above). The following information should be provided on this screen:
Manufacturers name: Here, enter the manufacturer name, for example, Canon.
Manufacturers Image: Here, navigate to and select the product image on your computer. This image will be uploaded to your webserver.
Upload to directory: Select the directory on the webserver to which the manufacturer's image will be uploaded. Alternatively, you can keep all of the manufacturers' images in one directory. Then, if you have already uploaded the image to that directory, you can select a folder and enter the image name in the Or, select an existing image file from server, filename: field.
Manufacturers URL: Here, enter the URL for the manufacturer's website.
Once you have added the product types and manufacturers, you can create the product categories and products. Create and edit your products and categories via Catalog | Categories/Products.
In order to add products to your store, you need at least one category. Create a category by clicking the new category button. Products must be placed inside categories. Otherwise, Zen Cart may experience various problems. For example, it may not display the products, or searches may not work.
You can create multiple nested categories. For the new categories, you have to enter a name, description (in each active language), image to be uploaded for that category (or the filename of the image on the webserver), image upload directory, and sort order. To create a sub-category, click on the parent category and then click on the new category button.

To edit a category, click on the edit icon on the right of the row for that category. From the edit screen, you can restrict that category (including sub-categories) to only contain a certain product type. For example, if you have a category named books, you can restrict this category to the book product type only. Similarly, the music category can be restricted to the music product type only. Select the appropriate product type in the Restrict to Product Type drop-down list and click on Add include SubCategories or Add without SubCategories.

Each category may have multiple sub-categories, but it cannot contain both sub-categories and products. There is no restriction on the number of products or categories you can have in a category. Moreover, there is no restriction on the number of levels of subcategories. However, keep the nesting to a minimum for better management of the product catalog.
You can copy one category to another category and make it a sub-category. You can also delete a category, or a sub-category. Deleting a category does not automatically delete the products under it, but if the products lose their master category ID, they will no longer be shown in the catalog. Therefore, you must always move the products to another category before deleting their parent category.
Once you have created all of the categories and know which products to be included in each category, you can start adding products to these categories. For helping catalogers, you can prepare a guideline for choosing the appropriate categories. Restricting categories to specific product types will also help.
To add a product to a category, click on that category's icon. If that category has a sub-category, you will not see the new product button. So, click on the subcategories, until you see a new product button. Then, select the appropriate product type and click on the new product button. The following figure shows how a product is added:

Based on the product type you have chosen, you will have to provide specific information about that product. Typical information that you may need to provide includes: product name, manufacturer name, stock status, availability date, tax class, net and gross price, minimum and maximum order quantity, product description, quantity, model, product image, URL, shipping weight, and sort order. If you are adding a product of music product type, you need to provide music genre, recording company, recording artist, and so on. For book type products, you need to add author(s) name, edition, number of pages, publisher, sub-title, subject, format, publication date, and so on.
Before adding a product to the catalog, you must prepare images for that product. Images for product should be high-quality but, at the same time, small in size. Although Zen Cart displays images according to the configured size, do not use very large images as these will take more webserver space and more time to load.
You may sell products with options and attributes. For example, if you are selling T-shirts, you may offer four colors and four sizes S, M, L, and XL. For a change of color the price remains the same, but for a size change the price changes too. This type of product is appropriate for selling using attributes. We have to select Yes in the Product Priced by Attributes field while creating that product.
For using options and attributes with products, you have to create the options and values first, and then assign those option-value pairs to products through the attribute manager.
Before you can add attributes to your products in Catalog | Attributes Controller, you need to create option names and give them values wherever appropriate. Catalog | Option Name Manager allows us to view, edit, add, and delete option names.
Follow these steps to create an option:
In the first text box, en: type the name of your attribute option. This should be informative as it will appear in your shop.
In the second box, Order: type the sort order that you want the attribute to appear under the product.
In the drop-down box, select the type of attribute that you want.
Dropdown box: Requires option values that you can set in Catalog | Option Value Manager.
Text: A text area box that does not require option values.
Radio: A button that allows customers to select an option value. The customer can only select a single value from the available options. This requires option values.
Checkbox: A square box that allows customers to select an option value. The customer can select multiple values from the available options. This requires option values.
File: This type of attribute allows customers to upload files. File extensions can be set via Configuration | Maximum Values, in Allowed Filename Extensions. This attribute does not require option values.
Read only: These attributes are for display purposes only and are not part of a calculation. They also do not appear on the order page. It is an informational attribute that can be used with one or more products and then changed once to apply to all products to which the attribute has been assigned. However, this requires option values.
Click the insert button to save the option.
Once you have created an option, you can edit it by clicking edit next to the option name. Then, change the following settings:
Comments: Specify the text that your customers will see above your option name. Make this informative so that customers know what they need to enter. For example, if the option name is to upload a file, you can tell your customer the file extensions that are allowed.
Rows: The number of rows you want your input/text area box to have.
Display Size: This is the size of the input/text area box your customers will see on the screen.
Maximum length: This is the maximum number of characters including spaces, that your customer will be able to type into the input/text area box.
Attribute Images per Row: The number of images and option values that you would like on each row.
Attribute Style for Radio Buttons/Checkbox: If you choose your option as a radio box or checkbox, you can define how they will appear. The following number values can be used:
0 = Images Below Option Names
1 = Element, Image and Option Value
2 = Element, Image and Option Name Below
3 = Option Name Below Element (check box/radio button) and image
4 = Element (check box/radio button) Below Image and Option Name
5 = Element Above Image and Option Name
Once you have defined the option name, you can add values to it via Catalog | Option Value Manager. You will see the list of option names, values, and sort orders. At the bottom of the list, select the option name from the drop-down list, and then enter the value into the en: text box, and specify the sort order in order textbox. Now, click on insert to save it. Add all the other values for the same option name. Now, your option-value pairs are ready to be added in the attributes controller.

Once you have added option names and values using Catalog | Option Name Manager and Catalog | Option Value Manager, you can add these options to products via Catalog | Attributes Controller. You can also start attribute controller from product list by clicking on attribute controller icon (![]() )
)
To add an attribute to a product, you must follow these steps:
Go to the large gray box titled Adding New Attributes.
Select the option name that you want to add from the first scroll box .
Select a matching option value from the second scroll box, for example, select option name Size [dropdown] from the first box and Small [SIZE:] from the second box.
Click the insert button.
The price and weight of the product may vary depending on the product attributes. When adding attributes to a product, you can configure the price and weight changes. When selecting an option and a value, Price can be entered with a prefix of + (plus) or — (minus) or blank. '+' or blank means an increase, and '—' means a decrease. Generally, the price we enter here will be added to, or subtracted from, our base price based on the use of the + or — prefix. But when Price by Attribute is enabled, the price we enter here will be added to your base price regardless of the prefix.
Weight can optionally be entered if it affects the product weight. You can use a prefix of '+' or '—' or blank. Using '+' and blank will add the attribute weight, while '—' will subtract the attribute weight, from the product's base weight.
You can also define quantity discounts. Quantity discounts (Attributes Qty Price Discount) are useful when the entire group of products being ordered has a different price depending on the quantity purchased. You can also specify the quantity discounts as: 1:11, 5:10.00, 8:9.00,10:8.00,15:7.00,20:6.00, 50:5.00.
This can be best expressed as shown in the following table:

As you can see, definition consists of a number of quantity:price pairs. The first number in the pair is the minimum quantity that must be purchased, and the second number in the pair is the price that the customer will pay if they purchase (at least) that quantity. The quantity discount will be applied only to products with specific attributes (here, size XL).
One-time quantity discounts (Onetime Attributes Qty Price Discount) allow specific amounts to be applied to quantity discounts. For example, 400:5 will apply a one-time charge of $5 to an order with any number of items less than 400. Negative numbers work in these entries as well, creating a quantity discount. This is useful if you define a base price and would like to allow the user to have the discount off the base price.
You can use flags for attributes to make these attributes special. These are used to define other features of the attribute, such as:
Used For Display Purposes Only: Some attributes may be used for display purposes only, and cannot be selected and added to cart. For example, you may have a blue color t-shirt, and the color it has been expressed through an attribute. You don't want to give the option to the customers to choose a color. In this case, you can set this attribute to be display only.
Attribute is Free When product is Free: Select this to make the attribute free when the product is free. Otherwise, selecting the attribute will add the price to the free product.
Default Attribute to be Marked Selected: Selecting this will set a default value for attribute. A default value needs to be selected.
Apply Discounts Used by Product Special/Sale: This will apply the same type of discount that the product is getting from the products' price against the special or sale price.
Include in Base Price When Priced by Attributes: When products are priced by attributes, selecting this flag will add the lowest-priced attribute to the base price of the product.
Attribute Required for Text: This means that the customer must fill in this field before adding it to the cart.
Images can be attached to attributes. To add an image to each attribute, you can either type the filename of the image file into the Attributes Image Swatch text box, or click Browse and select the image from your computer. You also need to select the directory where the image will be uploaded. If you enter the filename, then you will need to upload it to your server yourself and select the No radio button under Overwrite Existing Image?. Click on the insert button to upload the image.
You can set a product as downloadable, so that customers can download. To add the downloadable attribute to a product, enter in the filename of the file that will be downloaded. Then, type the number of days after which the download will expire, and the maximum number of downloads that can be made. Click insert to save the attribute.
One easy way to use attributes on a group of products is to copy the attributes from one product to another, or to every product in a category. The attribute images and any other attribute options for price or weight also get copied and can be edited once copied.
At the top of the attributes controller are several self-explanatory buttons that link to other sections of the admin panel. The last two are both copy to—the first is to a product, the second to a category.

Click copy to (product or category depending on our preference), and in the large scroll box choose the category or product to which you want to copy the selected product attributes.

Then, you have three options:
Delete first, then copy new attributes: This will delete any existing attributes that are attached to the products to which you are copying the new attributes. New attributes are then added to the products.
Update with new attribute settings/prices, then add new ones: If the product you are copying to already has the same attributes, the values of those existing attributes will be updated. Then, the new attributes will be added to that product.
Ignore and add only new attributes: This will not alter any existing attributes, but will only add new ones.
You select one of the above options and click the copy button. You will then be notified about the success of copying the attributes. You can copy the attributes of the product to a category in similar way. In that case, the attributes will be applied to all of the products in that category.
Although, you can edit the sort order via Catalog | Option Name manager, it is easier to edit the sort order via Catalog | Option Name Sorter. You can then assign the sort order of each option and click on the Update Sort Order button to update the sort order. You need to do this for each language.
Similarly, you can manage option values easily via Catalog | Option Value Sorter. Select an option and click on edit to get the list of values for that option. Then enter the new sort orders and click on Update Sort Order button to update it.
Products for downloads can be managed via Catalog | Downloads Manager. You will see a list of all downloadable products, along with the associated product ID and name. You will also see the names of the files to be downloaded. A red icon in the Filename column indicates that the file is not on the webserver. A green icon means that the file is available on the webserver. For a red icon, upload the file to Zen Cart's download directory or, if the file is named differently, change the filename via the attribute controller. You can also do this by clicking on the edit button.

The Catalog | Products Price Manager menu allows us to edit product pricing by category. You can change the price, availability date, in stock / out of stock setting, quantity minimum (qty min), quantity units (qty units), quantity maximum (qty max), quantity minimum, and unit mix (qty min/unit mix), and whether the product is free, call for price, or priced by attributes, all from the products price manager. You can also edit special product and featured product information from this screen.
For building a catalogue, it will be useful if you could bulk import/export products from, the catalog. If you have an existing shop, then bulk import may help. Bulk export may help you when moving the catalog to another shop. It may also help if you want to build the catalog offline, and then upload it to the online shop. You may ask the manufacturers to send their catalog in a specified format and upload that to the webserver. By default, Zen Cart has no feature to bulk import/export products. However, some third party add-ons are available for this.
One of the easiest bulk import tools for Zen Cart is EasyPopulate by Langer (http://www.modhole.com). You can download it from the Zen Cart website's download section. Once downloaded, you just have to unzip it and upload the files, keeping the directory structure intact. EasyPopulate does not overwrite any core files. Apply the install_sql.sql file via Tools | Install SQL Patches. This will give you options for configuration.
To configure Easy Populate, select Configuration | Easy Populate. You will see only one option to configure—Uploads Directory. The default is temp/. You change it to be any path you choose. You may create a directory named ep in the Zen Cart directory and enter the path of that directory in this field. Then all Easy Populate files will be created in this directory. You must also remember to set the file permission on this directory to 777.

After uploading the files and configuring the Upload Directory, select Tools | Easy Populate. Here, you will see some links to download and create Easy Populate and Froogle files. Click on the Download Complete tab-delimited .txt file to edit (Attributes Not Included) link. This will download a tab-delimited text file, which can be opened using Microsoft Excel or the OpenOffice.org Calc spreadsheet program. If you want to build your own catalog based on this file, you must only keep the header row and delete/overwrite all other rows. You should type only the necessary information in these rows and save it. Once the file is ready, select Tools | Easy Populate and click on browse to select the file to upload in the Upload EP file field. Then, click on the Insert into db button. New product information will be added to catalog.
Similarly, you can download template for model/category, model/price/quantity, and prepare your file for uploading. In all of these cases, keep the header row intact. Otherwise, bulk import will not work.
Modules are functional add-ons for Zen Cart. You can have payment modules, shipping modules, or order total modules. Each type of module performs a different task for the shopping cart. For example, payment modules process payment through different payment gateways, while shipping modules are used to calculate shipping cost based on the destination and the carrier.
Modules in Zen Cart are automatically added to the shopping cart system when you put the module files in the appropriate directories. All of the modules in Zen Cart are located in the includes/modules directory. Under this directory, there are at least three subdirectories: payment, shipping and order_total. Once we put the files in these directories, we will find the module listed in the respective configuration screens, that is, Modules | Payment, Modules | Shipping, or Modules | Order Total screen. When you select that module for the first time you will see the install button on the right. You can install the module by clicking on this button.
Payment modules are for processing payment through a payment processing gateway. For example, you may use the Authorize.net payment module to receive payment through the Authorize.net gateway. By default, there are about nine payment modules installed. The functions and configuration of each payment module are described below:
If you have an Authorize.net merchant account, you can use this payment gateway. You can accept credit cards and electronic checks through Authorize.net. You can create an account at www.authorize.net.
There are two modules for Authorize.net: Authorize.net SIM and Authorize.net AIM. Authorize.net AIM is the preferred method for connecting a shop to the Authorize.net Payment Gateway. AIM allows merchants to customize their own payment forms (the web page that collects the customer's payment information) and receipt page, as well as submit transactions over an end-to-end Secure Sockets Layer (SSL) connection. On the other hand, Authorize.net SIM is a Payment Gateway connection method that allows merchants to post transactions directly to the payment gateway's secure server and requires transaction-unique encryption for transaction authentication. SIM provides merchants with a hosted payment form and a hosted receipt page.
Install either of the two modules. Both modules need some configuration values. Let's see how to configure the Authorize.net AIM module.
For the Authorize.net AIM module, you have to configure the following values:
Enable Authorize.net Transaction (AIM) Module: If you want to process transactions through Authorize.net using the AIM method, select True.
Login ID: Type the login username for you Authorize.net account.
Transaction Key: A transaction key is used for encrypting transaction processing data. You can get this code from your Authorizenet Account | Security Settings | API Login ID and Transaction Key.
MD5 Hash: This will be encryption key used for validating received transaction data (MAX 20 CHARACTERS). This hash value needs to be set in Authorize.net admin section.
Transaction mode: Transaction mode can be set to Test or Production. You can use Test mode only for testing your configuration, but always keep it in the Production mode when your shop is live.
Authorization Type: If you want to authorize only the submitted credit card number, select Authorize only. Selecting Authorize + Capture will also record the credit card number.
Enable Database Storage: To save the gateway data in your database, select True.
Customer Notifications: If you select True in this field, for every transaction, Authorize.net will send a receipt to the customer.
Merchant Notifications: If you select True in this field, for any transaction, Authorize.Net will send a receipt to the merchant.
Request CVV Number: If you want customers to provide card's CVV number, select True in this field.
Sort Order of Display: Enter a sort order for displaying the Authorize.Net payment method. The lowest sort order will be displayed first.
Payment Zone: Certain payment methods may be applicable only for certain zones. For example, you may use Check/Money Order payment only inside your country. For each payment method, you can specify a Payment Zone from this drop-down list.
Set Completed Order Status: Here, you can select the order status upon successful transaction using this payment method. As authorize.Net is an online payment processor, you may set the order status to Processing.
Set Refunded Order Status: Here you set the status of refunded orders to this value. You can select either of the following: default, Pending[1], Processing[2], Delivered[3], or Update[4].
Debug Mode: Enable the debug mode as this will help us know why a transaction has failed. In this case, select Log only, or Log and Email. If you select Log and Email for each failed transaction, the debug info will be written into the log, and an email will be sent to the administrator.
Configuration of the Authorize.net SIM module is almost similar, but has fewer options. It has a different configuration option, Transaction Method, where you can define what you want to accept Credit Card or eCheck.
The Credit Card module is not for instant online payment. Instead, credit card information is collected through this module, and we can charge it to that credit card using our credit card processing terminal.
To use the Credit Card module, you click on this, and install it. Then, you click on edit to change the following options. Set Enable Credit Card Module, Collect & Store the CVV Number to True, and select Store the Credit Card Number. Credit card numbers will be stored partially in the database. Then, you have to type an email address, usually the administrator's email address, to which part of the credit card number will be sent. You may keep Payment Zone blank. Set the Order Status field to Pending, as credit cards are not authorized instantly.
When customers use this module, they will provide their credit card information during check-out. You can see the order in Customers | Orders screen. If you click on that order, you will see the details. Their credit card numbers will be displayed, but with the middle eight digits masked with XXXXXXXX.
Check your email for a message related to the order number that you have on your screen. You will find the blacked out eight digits in the email. Now, you can assemble the credit card number and enter it into your merchant terminal to process the credit card transaction. If the credit card purchase is approved by your merchant, you can mark the order status as Processing. It is better to add the authorization number to the Comments field before you save the new order status. Select the notify customer box to let the customer know that the payment has been approved. Finally, when you ship the order, you will update the order status to Delivered and notify customer again.
Note
Customer credit card numbers are not allowed to be stored in a retrieval system. So, if you do store them, and your system is hacked and your customer's credit card info stolen and used fraudulently, you will be liable for all unauthorized purchases made using those credit cards. Hence, to protect yourself and your customers, the full numbers are not stored in Zen Cart, but are split up into two separate mechanisms for safety. However, if you have other payment methods, such as PayPal online payment, try to avoid using this simple credit card module.
For some products, or in some areas, your payment option may be pay by cash when the product is delivered. As for Bangladesh, we have no online transaction facility. So cash on delivery may be a suitable payment method.
If you want to use this module, then click on it to install it. Then, change its configuration. It has very few options: enable the module, set the Payment Zone, Order Status and Sort order of display.

You may be wondering whether this really involves payment. Actually, this module is used when you do not have to pay for a product. When checking out a free product, this payment module will be used. If you have free products in your shop, you can install and enable this module.
If you have a LinkPoint or YourPay account for online payment, you may use this module. If you have no account at LinkPoint or YouPay, simply click on the link provided on the right side box to Sign Up for an account.
Before installing this module, check that your system fulfills all of the requirements. You should have CURL enabled to be able to use this module. You also need to have Port 1129 to be configured for bidirectional communication, and a PEM RSA Key digital certificate. Instructions for getting this key are given in the box on the right most side of the screen:
First, install the module and enable it.
Then, type your LinkPoint/YouPay merchant ID.
Select LinkPoint Transaction Mode as LIVE:Production, TESTING:Successful or TESTING:Decline. This must be LIVE:Production for live shops.
In the Authorization Type field, select either Authorize only, or Immediate Charge/Capture.
Then, select Order Status, Payment Zone, Sort Order.
If you want to be notified of any fraudulent credit card activity by email, select Yes in the Fraud Alerts field.
Select True in Enable Database Storage field to store logs of all credit card activities. It is a good idea to log all credit card activities into the database, so that you can analyze this log in case of any fraudulent activity.
If you want to allow payment via Cheques and Money Order, install and enable this module. The configuration is simple. Set the Payment Zone, Order Status and Sort Order. Then, type the name of the person to whom the cheque or money order will be issued. The store address will automatically be shown as the address to which the money order or cheque will be sent to. As you do not receive the cheque or the money order instantly, set the order status to Pending. When you receive the cheque or money order, change the order status and notify the customer. It is better to record the cheque number in the comments field when you update the order status.
If you are starting an online shop, you may already know about PayPal. PayPal is a popular online transaction network through which you can pay to other PayPal account holders and others with your credit cards. It supports major credit cards and several types of accounts. For more information, you can visit www.paypal.com. If you don't have a PayPal account, you can create one to start accepting PayPal at your store.
By default, you will get three PayPal modules installed in Zen Cart: PayPal IPN-Websites Payments Standard, PayPal Website Payments Pro, and PayPal Express Checkout. Either can be used depending on your PayPal account type. The following sections describe the configuration of these two modules.
The PayPal IPN module is the easiest way to use PayPal for your site. Instant Payment Notification (IPN) is PayPal's interface for handling real-time purchase confirmation and server-to-server communications. Whenever a transaction occurs, IPN delivers immediate notification and confirmation of PayPal payments, and provides the status and additional data on pending, cancelled, or failed transactions.
Checkout using the PayPal IPN module consists of the following six steps:
Customers select the products they want to purchase and choose to pay with PayPal.
Customers are transferred to PayPal's secure site via an HTML redirect.
Customers log in to their account and review their shipping and billing information. Customers then click Pay to make their payment, which is processed instantly.
Customers review their payment confirmation at PayPal.
Customers are automatically redirected back to your site via an HTML redirect.
Customers arrive at the order confirmation screen on your website. Shop owners are notified of a successful payment via email, Instant Payment Notification, or Payment Data Transfer.
Note that payment information, PayPal account and credit card, are entered on PayPal's site, not on your shop's checkout page. PayPal just notifies you whether the transaction has been successful or not. The transaction amount automatically goes to your PayPal account.
To use the PayPal IPN module, install and enable it from the Modules | Payment screen. If you don't have a PayPal account, create one and configure your profile. In the profile settings, type http://www.yourdomain.com/shop/ipn_main_handler.php as Instant Payment Notification Preferences URL, and in the Automatic Return URL field under Website Payments Preferences, type http://www.yourdomain.com/shop/index.php?main_page=checkout_process. These URLs will be shown in the box on the rightmost side of the screen, when you click on the module.
You have to configure the following options for your PayPal IPN module:
Enable PayPal Module: Here, select True to enable and use this module.
Business ID: Here, type your PayPal account's primary email address. Check with your PayPal account if you have any doubts about the email addresses used for the account.
PDT Token (Payment Data Transfer): Enter your PDT Token value here to activate transactions immediately after processing (if they pass validation). You will get a token when you enable Payment Data Transfer under Website Transaction Preferences in your PayPal Profile.
Transaction Currency: Here, select the currency that you want to use with PayPal. If an unsupported currency format is sent to PayPal, it will automatically be converted into USD.
Payment Zone: Here, select the payment zone in which this module can be used. You can leave it blank to make it available in all zones.
Set Pending Notification Status: Here, select the order status for the pending transactions. The default is Pending.
Set Order Status: Here, select the order status of a successful PayPal transaction. The default is Processing, and it is fine to leave this as it is.
Set Refund Order Status: Here, select the order status for a refund request. The default is Pending, and it is fine to leave this as it is.
Sort Order of Display: Here, enter a number for the display order of the module in the checkout's payment options list. An option with a lower value will be placed first.
Page Style: If you have created a custom page style in your PayPal account profile, then type the name of that page style in this field. If you would like to always reference your Primary style, set it to primary. If you would like to reference the default PayPal page style, then set this to paypal.
Mode for PayPal web services: Here, specify the paypal processing URL. The default is www.paypal.com/cgi-bin/webscr. Alternatively, you can use www.paypal.com/us/cgi-bin/webscr for the US and www.paypal.com/uk/cgi-bin/webscr for the UK.
Debug Mode: Here, enable debug mode to collect information about failed transactions. You may choose Off, Log or Log and Email. Transaction logs are written in the
/includes/modules/payment/paypal/logsfile.
Once these options are configured, click on the update button to save the settings. Now, customers will see the PayPal IPN payment option during checkout. When they select this option, they are redirected to the PayPal page, where they can pay from their PayPal account or credit cards. When the transaction is successful, they will be redirected to the page specified in Automatic Return URL (that is, the checkout page of our shop).
We may use the PayPal Express module to enable the PayPal express checkout. Express Checkout allows customers to complete transactions in very few steps. It allows them to use shipping and billing information stored securely in PayPal to check out, so that they don't have to re-enter it on our site.
Express checkout works in the following way:
After selecting the products to purchase, customers click Checkout with PayPal on our website.
They are transferred to PayPal, where they select their payment method, as well as the correct shipping and billing address. Then, they are returned to your website to complete their purchases.
PayPal automatically gives you the shipping address, email, and other customer information needed to fulfill your order.
With Express Checkout, your buyers finish their orders on your website, and not on PayPal's. So, you can get real-time notification of successful payments.
To use PayPal Express Checkout, install and enable this module. This module requires PayPal API credentials and CURL enabled on your server. First, request an API key in your PayPal profile and keep the credentials at hand, and then check that CURL is enabled on your server. If your server uses a CURL proxy, get that proxy address. Also ensure that the IPN is enabled, and the IPN URL is provided in your PayPal profile.
In addition to the settings for the PayPal IPN module, the following are needed for PayPal Express module:
Express Checkout: Require Confirmed Address: If you want customers to provide a confirmed address for shipping, select Yes in this field.
Express Checkout: Select Cheapest Shipping Automatically: To make the checkout process faster, you may want to automatically select the cheapest shipping method when the customer returns from PayPal, and thus skip the shipping page. To do this, select Yes.
Express Checkout: Skip Payment Page: You may want to skip the checkout payment page when the customer is checking out with Express Checkout. Select Yes if you do not want to display the payment page. Note that enabling this will not give the customers options to use their coupons or gift certificates, as the Payment Page will be skipped.
Payment Action: Here, select the Final Payment in order to get the payment at the end of the transaction. Alternatively, you can select Auth only to receive payments upon authorization only. The default is Final Payment.
API Signature—Username: Enter the API Username from your PayPal API Signature settings under API Access. This value typically looks like an email address and is case-sensitive.
API Signature—Password: Here, enter the API Password from your PayPal API Signature settings under API Access. This value is a 16-character code, and is case-sensitive.
API Signature—Signature Code: Here, enter API Signature from your PayPal API Signature settings under API Access. This value is a 56-character code, and is case-sensitive.
Live or Sandbox: If you are using the module for testing purposes, select Sandbox. But for live shops, to receive payment through PayPal, you must select Live.
Once these configurations are saved by pressing the update button, you are ready to use PayPal Express checkout.
You can also use PayPal Website Payment Pro module for processing payment in Zen Cart. Website Payments Pro module gives some extra benefits than other two PayPal modules. However, for using this module you must have PayPal Express Checkout module installed and configured. Most of the configuration options are same as other two modules. Only new setting you have to configure in this module is PayPal Mode. This setting has the following options:
PayPal: If you have US Paypal account and want to use that for Website Payments Pro service, select this option. However, for using this you must have configured API Settings in PayPal Express Checkout module.
Payflow-UK: This option will allow you to use Payflow-UK payment processing gateway. You need a Payflow-UK account for using this option.
Payflow-US: For using Payflow-US payment processing gateway, select this option. You need a Payflow-US account for using this option.
Note
For more information on PayPal's merchant solutions like Express Checkout, Website Payments Pro, Payflow and other, please visit www.paypal.com and consult Business section.
There are a lot of payment modules that can be downloaded from the Zen Cart website and used for processing payments using other payment processor gateways. The configurations differ depending upon the gateways used. Here, you are going to learn about two popular payment modules that you may like to use for your shop.
WorldPay is a popular payment processor for online merchants. We can use WorldPay as payment processor by adding the third-party module, WorldPay for Zen Cart 1.3.x, available from the Zen Cart website's downloads section. After downloading the package, extract it and copy the files to your web server's Zen Cart directory, maintaining folder structure.
Once you have uploaded the files, you can see the new module Credit Card via WorldPay in the Modules | Payments screen in the Zen Cart administration area. Click on the module, and click the install button to install it. After installation, the configuration screen will be displayed. This module has the following configuration options:
Enable WorldPay Module: Select True to enable this module.
WorldPay Installation ID: When you sign up for the WorldPay services, you get the installation ID. Enter that ID in this field.
Transaction Mode: Set the transaction mode in this field. There are three options—100 = Test Mode Accept, 101 = Test Mode Decline, and 0 = Live. Select one of these.
Use MD5: Select True to enable MD5 encryption for transactions.
MD5 secret key: You must enter your MD5 secret key if you want to use MD5 encryption. This key also needs to be entered into the WorldPay installation configuration.
Use Pre-Authorization?: If pre-authorization in your WorldPay account is enabled, and you want to use that pre-authorization with Zen Cart payments, select True.
Set Order Status: Select the status of orders made with this payment module.
Pre-Auth: For pre-authorization, select a mode from the following available options: A= Pay Now, E= Pre Auth. Settings in this option is ignored if Use Pre-Authorization is False.
Payment Zone: Select the zone in which this payment method will be allowed.
WorldPay module for Zen Cart comes with a sidebox that shows the credit cards accepted by WorldPay. Enable this sidebox via Tools | Layout Boxes Controller.
Google Checkout is a new checkout method for online merchants. It provides sellers with checkout facilities similar to those provided by PayPal. As an owner/administrator of Zen Cart shop, you can use Google Checkout as a payment method. To use Google Checkout with Zen Cart, you need to install the Google Checkout module from Zen Cart's website , and then configure it. The module comes with detailed documentation on installation and configuration.
To use the Google Checkout module, you first need to sign-up for Google Checkout. Once you have an account, you can install and configure the Google Checkout module as follows:
Download Google Checkout from Zen Cart's website.
Extract the Zip file on your computer. Upload the files to your web server's Zen Cart directory, maintaining the folder structure. Uploading will not overwrite any file.
Log in to your shop's administration area and select Modules | Payment.
From the list of payment modules, click on Google Checkout and click the install button.
Once Google Checkout module is installed, you will see the configuration form for it. The following configuration options are used for this module:
Google Checkout module version: This option will display the Google module version you are using. If you have installed more than one version, you can select the version that is to be used.
Enable Google Checkout module: You can enable or disable this module by selecting True or False here.
Select mode of operation: You can select development mode or production mode. Before using this module in production, you should try first using the development mode. Select https://sandbox.google.com/checkout/ to use the development mode, and for live mode, select https://checkout.google.com/.
Production merchant ID: To use this module in the production environment, you need to enter a Production merchant ID. You can find this ID on the integration page under the settings tab on your Google Checkout account page.
Production Merchant Key: You must provide the merchant key, which is also available on the integration page under the settings tab on your Google Checkout account page.
Sandbox merchant ID: Enter the merchant ID, which can be found on the integration page under the settings tab of our Google Merchant account page.
Sandbox Merchant Key: Enter the merchant key, which can be found on the integration page under the settings tab of your Google Merchant account page.
.htaccess Basic Authentication Mode: When using PHP over CGI, PHP basic authentication is not compatible with Google Checkout responses. Therefore, you need to enable this option by selecting True and configuring the .htaccess file. After enabling this option, click on the link shown and configure your .htaccess file for Google Checkout module.
Select Merchant Calculation Mode of Operation: This option allows you to select an http or https URL for merchant calculation. This only applies for the sandbox environment. The production environment checkout always uses an https URL.
Disable Google Checkout for Virtual Products: For virtual products you may not need checkout. In that case, enable this option by selecting True. Once enabled, this Google Checkout button will be displayed disabled for virtual products.
Allow US PO Box Shipping: If you want to allow shipping to United States Post Box numbers, then select True here.
Default Values for Realtime Shipping Rates: Usually, shipping rates are taken from the shipping providers' web services. Sometimes, these web services may fail to provide shipping rates, so as a fallback you need to provide default shipping rates. You can click the
shipping generatorlink and add your default rates for each provider.
GoogleCheckout Carrier Calculated Shipping: For Google Checkout, you may also use calculated shipping. This calculated shipping can also be used for Flat Rate Shipping, but merchant calculation cannot be used. Once you enable it by selecting True in this option, you also need to configure calculated shipping in the next option.
Carrier Calculated Shipping Configuration: For each type of shipping, you need to specify the rates. For each shipping method, rates can either be fixed or variable.

Rounding Policy Mode: In this option, you have to specify the rounding policy for shipping charges. The options are similar to the rounding options in Google Checkout. Details of these options are available through the links to the Google Checkout website.
Rounding Policy Rule: This configuration option determines how rounding is to be applied—either per line of monetary values, or to the total order only.
Cart Expiration Time (Minutes): Here, specify the time in minutes after which the cart will expire (and everything in it is deleted). Type NONE if you don't want to apply expiration to the cart.
Also send notifications with Zen Cart: Usually, Google Checkout will send notifications to customers. If you want to send notifications to customers from Zen Cart too, select True here.
Google Analytics ID: If you want to integrate the Google Checkout module with Google Analytics, enter your Google analytic ID in this field. To disable the use of Google Analytics, enter NONE in this field. The use of Google analytics enables you to monitor how customers interact with our site.
3rd Party Tracking: Similar to Google Analytics, you can also integrate the Google Checkout module with aother, third-party tracking system. If so, enter the URL of the tracker or enter NONE to disable third-party tracking.
Google Checkout restricted product categories: Some of the products, such as bulk marketing, alcohol, weapons, and so on, are restricted on Google Checkout. A full list of these products and categories can be found on the Google Checkout help page. However, you can restrict these product categories by typing the product categories, in comma separated list, in this option box. Enter NONE to exclude no product or category.
Continue Shopping URL: In this option, you have to specify the name of the page to which the customers will be redirected when checkout is completed. The default is suitable for use with Zen Cart. Please type the exact name of the
checkout_successpage if you have modified it in Zen Cart.
Once these settings have been saved, your Google Checkout module is ready for use. For troubleshooting and other resources, please read the documentation that accompanied the module package.
2CO is a popular online payment processing service provider. You may obtain an account at 2co.com for a very low price. Please check www.2co.com for details of their services.
If you are a user of 2CO, you can use that for Zen Cart shop by using 2CO Payment Module, developed by Absolute Solutions and available from the Zen Cart website's download section. Upload the files in this package, and install the SQL patch file update_database.sql via Tools | Install SQL Patches.
The configuration options are almost the same as for PayPal and other modules. You have to enable it and provide the Login/Store Number, which is used for 2Checkout.com (2CO) login. Then, set the currency, order status, transaction mode, merchant notifications, payment zone, and the secret word. If you have more than one currency in your store, only one currency will be sent to 2Checkout. Select Yes in the Currency Converter option whenever you want to enable automatic currency conversion. Another important thing is that 2Checkout has a policy as to which products can be sold from your store. If you want to send your product information to 2Checkout, then select Enabled in Product Integration.
MoneyBooker (http://www.moneybooker.com) is an online wallet where registered users can upload their money and use it for purchases whenever needed. Online payments can be made using MoneyBooker. If you have an account with MoneyBooker, you can receive payments to that account.
Installation and configuration of the MoneyBooker payement module is straightforward. Download the module from the Zen Cart website's download section, unzip it, and upload all files. No file will be overwritten by this payment module.
Once the upload is complete, go to Modules | Payment. You will see the MoneyBooker listed as an available payment module. Install it and click edit to configure it. First, enable this payment method, provide the email address used for your MoneyBooker account, select Transaction Currency, Payment Zone, Set Order Status, and set Sort Order of Display. Your MoneyBooker payment module is now ready for use.
During checkout, the moneybooker.com payment option will be shown. On confirming the order, the customer will be redirected to the moneybooker.com site. The customer needs to log in to moneybooker.com using his or her account name and password, and make payment from his or her balance at moneybooker.com.
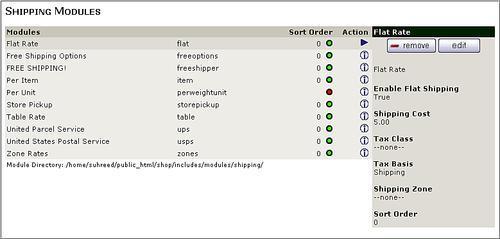
Shipping is one of the important features of your online shop. You have to give customers a choice of shipping options. Several modules are used to provide shipping options to the customers. Shipping modules are administered from the Modules | Shipping screen.
A flat rate shipping charge is simple to use and is the most straight-forward method. If you use flat rate shipping for all products, you charge the same shipping fee. To use a flat rate for shipping, enable this module and enter the shipping cost for all orders in the Shipping cost field. You may also define the Tax Class, Tax Basis, Shipping Zone, and Sort Order for this module.
Here, you can use the FREE SHIPPING! (freeshipper) and Free Shipping Options (freeoptions) modules if you want to offer free shipping for some or all products. In this case, you have to enable these modules and configure both the modules.
Free Options is used to display a Free Shipping option when other shipping modules are displayed. It can be based on: Always show, Order Total, Order Weight, or Order Item Count. For example, you may offer free shipping for an order of more than USD 200. However, the Free Options module will not be shown when Free Shipper is displayed.
Setting Total to >= 0.00 and <= nothing (leave blank) will activate this module to show with all shipping modules, except for Free Shipping. Leaving all settings for Total, Weight and Item Count blank will deactivate this module.
Free Shipping Options do not get displayed if Free Shipping is used, based on zero weight for Free Shipping. In Free Shipping Options configuration, you can define the total order, weight, and item count for which free shipping will be applicable, and the minimum cost and handling fee for free shipping.
The Free Shipping option is shown when a product is always shipped for free. But conditional free shipping, that is, for purchases above a total price or size, and so on, is handled by the Free Shipping Options module. If you have some products marked for free shipping, enable the Free Shipping module, and specify the minimum shipping and handling charges when free shipping is used.
Note
You may be wondering when to configure the Free Shipping Options and Free Shipping modules. Here, you have to specify the shipping charge and handling charges. If you charge for this, then it is not completely free shipping. So, remember that free shipping does not always mean absolutely FREE! You may need to pay something for Free Shipping!
Depending on your products, you may choose either per item, or per unit shipping costs. For example, for each shipping box you may charge USD 2.50, and for each book in your store, you may charge USD 1.00. These types of shipping are handled by the Per Item and Per Unit modules.
The main configuration for the Per Item shipping module is Shipping Cost per Item. Specify a cost here. When calculating the total shipping cost, this amount will be multiplied by the number of items in the order. In addition to per item costs, you may also specify a handling cost per shipping method. Then, the total cost of shipping will be:
Total Shipping Cost = (No. of Items × per item shipping cost) + Handling fee
If you ship your products in a box or other package, you may use the Per Unit shipping module. Similarly, you have to configure the per unit shipping cost and the handling fee. When using the per unit shipping method, you need to specify the shipping unit (box, packet) when adding a product to the catalog. Otherwise, this module cannot calculate the shipping cost.
Store Pickup is a shipping method wherein the store owner does not ship the products to the customer. Instead, the customer visits the physical store and picks up the products. This may sound good, and you may think that there is no cost involved, but, you may also charge a nominal fee for packaging the products. In fact, for the Store Pickup module you can configure this fee in the Shipping Cost field. Configuring Shipping Zone is important for this module as you cannot provide store pickup options for customers all over the world. For example, if your shop is in Bangladesh and you provide the store pickup option to customers in America, it would be weird!
You may calculate the shipping cost from a cost table where you can see the total price or the weight and determine the shipping cost. If you know the shipping cost for a region by weight, you can use the Table Rate module. In this module, you have to build a table for weight: cost or price:cost. In the Shipping Table field, you can provide shipping cost based on total cost, weight, or the number of items. This is denoted as 10:2.5, 20:4.5, and so on. In the Table Method, select the criteria on which you are calculating the cost—weight, price or items. If you select weight, then 10:2.5 means for 10 Kg you are charging USD 2.5; if you select price then 10:2.5 would mean that for every USD 10.00 spent, the shipping charge is USD 2.50; and when you select items, 10:2.5 means mean you will charge USD 2.5 per 10 purchased.
United Parcel Service (UPS) is a reputed worldwide parcel delivery service. You may like to use UPS as a shipping method. To use the UPS shipping method, install and enable the United Parcel Service shipping module and configure the following:
UPS Pickup Method: Specify how your packages will be handed over to UPS. You may take them to a UPS Customer Counter (CC), tell UPS to regularly pick the packages up from your store (RDP), ask for UPS to make a one-time pickup (OTP), send the packages to a letter centre (LC) or use On Call Air (OCA). You have to type the code, as indicated, for the different pickup methods.
UPS Packaging?: Specify the type of packaging that will be used for your parcel. You may use your own packaging (CP) or UPS packaging such as UPS Letter (ULE), UPS Tube (UTE), UPS Express Box (UBE). Enter the codes in this field.
Residential Delivery?: Indicate whether the delivery will be Residential (RES) or Commercial (COM). As you are normally shipping to individual customers, Residential delivery is recommended.
Shipping Methods: Choose the shipping methods to be used by UPS. A brief explanation of all methods are available on the page for this module in Zen Cart. For more information you may check the UPS website at www.ups.com.
You can also configure other generic options such as Shipping Zone, Handling Fee, Tax Class and Tax Basis.
You can use the United States Postal Service (USPS) for shipping your products. Zen Cart has a built-in USPS shipping module, which can be installed and configured for this purpose. Before using this module, you need to register at www.usps.com for a USPS web tools User ID. Install and enable this module and configure the following options:
Enable USPS Shipping: Do you want to offer USPS shipping? You have two options here: select True in order to enable it, or select False to disable it.
USPS Web Tools User ID: Enter the Web Tools user ID that you have received from USPS after registration.
Which server to use: Initially, you should use the testing server. Once you are satisfied that it is working, set it to production. It must be production for live shops. But before setting it to production, you have to mail to [email protected] to activate it for the Production server. Once you have received a confirmation email from USPS, you can set this option to the Production server.
All Packages are machinable: Here, specify whether all packages will be considered machinable (processable by a machine - for example with a barcoded ZIP code on the address label). Machinable packages have lower charges. But packages more than 35 lbs or less than 6 ounces will automatically be considered as non-machinable.
USPS Options: Select the information that will be shown in the USPS shipping option during checkout. It may show the weight and transit time, along with the shipping cost.
Domestic Shipping Methods: Select the domestic services that will be used. Options available are: Express, Priority, First Class, Parcel Media, BPM, and Library.
International Shipping Methods: Select the international shipping methods that will be used. Available options are: Global Express, Global Express Non-Doc Rect, Global Express Non-Doc Non-Rect, Express Mail Int, Express Mail Int Flat Rate Env, Priority Mail International, Priority Mail Int Flat Rate Env, Priority Mail Int Flat Rate Box, and First-Class Mail Int.
Debug Mode: Turn the debug mode on to have a complete detailed log of USPS quote results emailed to the store owner.
You can also configure other generic options, such as Shipping Zone, Handling Fee, Tax Class, and Tax Basis.
You may use one shipping rate for each zone. Although Table Rate allows us to apply a rate table for a specific zone, you can use multiple zones by using Zone Rates. First, you have to define which countries are in which zones. Then, define the shipping rates for each zone. The rates may be based on weight, price, or number of items.
As with the Table Rate shipping method, you have to indicate, in the Calculation Method field, the basis on which shipping cost will be calculated. Then, define Zone 1, Zone 2, and Zone 3 countries by entering the two-letter ISO codes for the countries that are to be assigned to each zone, separated by commas (,). Type the rates in Zone 1 Shipping Table, Zone 2 Shipping Table and Zone 3 Shipping Table field. The rates should be in the format: 10:2.5, 15:4.5, 20:6.5, and so on. If you select weight as a calculation method, then an entry of 10:2.5 in the Zone 1 Shipping Table means that for Zone 1 Countries, customers have to pay 2.5 USD per 10 Kg weight. For each zone, you can also specify a handling fee.
Order Total modules are used to calculate the total cost due during checkout. You can see the list of Order Total modules on the Modules | Order Total screen. These modules are located in the includes/modules/order_total/ directory. The following list shows the default Order Total modules:
COD Fee: If you want to enable Cash on Delivery as a payment option, then you may also charge a fee for using this payment method. The COD Fee (ot_cod_fee) module will add this COD fee to the subtotal of the product prices during checkout. You have to specify the COD fee for each shipping method used.
Discount Coupon: If a customer is using a discount coupon, this module's task is to deduct the discount coupon amount from the total amount due. In other words, this module actually provides the discounts to the customers. Here you have to configure how the discount will be granted. If you want to give a discount on total including shipping cost, select true in the Include Shipping field. If you want to give a discount on the total including tax, then select true in Include Tax field. Specify how to recalculate the tax. The three options available are None, Standard, and Credit Note.
Group Discount: This module deducts group discounts for eligible customers. Settings for this module are the same as for the Discount Coupon module.
Gift Certificates: This module is used to redeem gift certificates and allow gift certificates as a payment option. During checkout, payments made by gift certificates are deducted by this module. Settings for this module are the same as for the Discount Coupon module.
Low Order Fee: If the order amount is lower than a threshold value, then you may charge a low order fee. This module adds the low order fee to the order total. To charge a low order fee, enable low order fee through this module and specify the threshold value below which the low order will be charged. Also, specify the value of the low order fee in the Order Fee field. You can specify the fee as a percentage of the order total, or as an absolute amount. You may exempt the low order fee for the national orders, international orders, gift vouchers, or virtual products, individually.
Shipping: This module adds shipping cost to the order total. In the settings for this module, you can enable free shipping. Select true in the Allow Free Shipping field and specify the order amount over which an order will be eligible for free shipping. You can also enable free shipping for national, international, or both types of orders.
Sub-Total: This module shows the order sub-total, based on what discounts or other charges have to be applied. You need to simply enable this module; there is no option to configure.
Tax: This module adds taxes to order sub-total, to calculate the order total. You need to simply enable this module; there is no option to configure.
Total: This module calculates the total amount to be paid for the order. It must be enabled, and it has no configuration options.
These are the default Order Total modules. If you install other modules, you may find some other order total module in the Modules | Order Total screen. For example, installing Better Together module (which we will discuss in Chapter 6) will show the Better Together Discount moduel in this list.
Managing customers will be one of your tasks as a shop owner or administrator of Zen Cart. Customer Management includes customer registration, retrieval of forgotten passwords, informing customers about site update or maintenance, or any other important issues.
Generally, users need to register with the Zen Cart shop before shopping. An unregistered customer may add items to the shopping cart, but before checking out, he or she needs to register. A customer can always register by clicking on the Log In link on the home page. You may specify the required fields for user registration via Configuration | Customer Details.
Once registered, a confirmation email containing a verification code is sent to the customer. The customer clicks on the link provided to visit your shop and enter the verification code. This way, the customer is verified. Once a customer is verified, he or she can place orders in the shop.
Customers can retrieve their forgotten password by clicking on the Forgot your password? link on the Login page. Administrators can change customer information (but not the password) on the Customers | Customers screen.
All customer accounts are listed on the Customers | Customers screen. Select a customer name and you will see some command buttons in the right side box. Click on edit to change a customer's information. Although you can change any information in the customer's profile, it is not wise to change their address or other personal information. However, you may change the customer's authorization status, if you need to disable a customer for some reason.

We can see a customer's orders by clicking the orders button. A summary of the customer's activities will be shown in the right-side box.
You may need to communicate with the customers to clarify some order, items or any other reason. In this case, select that customer and click on the email button shown in the right-side box. E-mail screen will be shown, where you can type the email subject and message, and can send it by clicking on the send button. From this screen you can also send mails to a group of customers.
After opening the shop in production, your main task will be to manage orders and fulfill these in a timely manner. You can see the list of all orders on the Customers | Orders screen. From this screen, you can edit or delete an order, or print invoice and packing slip for that order.
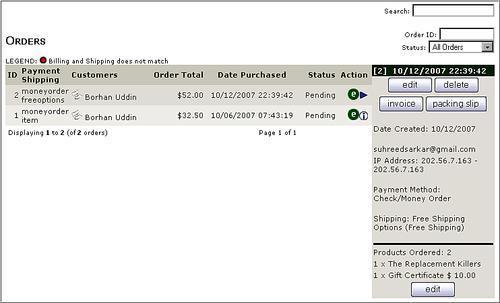
Order statistics can be seen from dashboard. In the orders section, you can see the order status, which shows the pending orders, orders being processed, orders delivered, and orders that have been updated. In the new orders section, you will find all new orders. The list of products sold can be seen on the Reports | Products Purchased screen.
Managing inventory includes knowing the stock levels of all products and adding products to the catalog as and when necessary. You can identify products with low stock from the Reports | Products Low Stock screen. The screen will show the products that need immediate repletion.
Group pricing can be used to provide a discount to a group of customers. You can manage group pricings from Customers | Group Pricing. To create a new group price, click on the insert button. Enter a group name and a discount percentage. Save the group. Now add customers to that group by editing the customer's profiles. From the Customers | Customers screen, select a customer and click on the edit button. In the options section, select the appropriate group in Discount Pricing Group field.
You need to update the order status manually. When an order is shipped or delivered, you need to change the order status. For managing an order, select that order from the list and click on the edit button. Now, change the Status field, for example, to Processing. You can also add a comment and select the Notify Customer and Append Comments checkboxes. You click on the update button to update the status. An email will be sent to the customer notifying them of the status of this order. When you have shipped the product, update the status to Shipped, and notify the customer. Again, you will need to update the status when the product is delivered.

When shipping products, you need to enclose an invoice. This invoice can be generated by clicking on the invoice button. You can also generate a packing slip by clicking on the packing slip button. The difference between an invoice and a packing slip is that the invoice includes the prices of the products, whereas a packing slip only lists the products.
In this chapter, we have discussed different configuration options for Zen Cart shop. First, we learned how to set global configuration options from the Configuration menu in the Administration area. Then we discussed the configuration of the available modules. We also learned how to enable and configure online payment methods using payment modules. Further, we discussed configuration of our shop for using several shipping methods, including Universal Parcel Service and the United States Postal Service. The use of Order Totals modules was also discussed. After examining how to configure these, we learned how to manage the product catalog by maintaining categories, products, and attributes. We are now also familiar with customer and order management. With all of this information, we now know how to configure a Zen Cart store.
Although we have learned how to configure the store, we have still not configured the look and feel of the store. In the next chapter, we are going to learn about customizing the look and feel of a Zen Cart store.